Secure your web traffic from prying eyes, and improve performance in the process.
squid
(http://www.squid-cache.org) is normally used as an HTTP accelerator. It is a large, well-managed, full-featured caching HTTP proxy that is finding its way into many commercial web platforms. Best of all, squid is open source and freely available. Since it performs all of its magic on a single TCP port, squid is an ideal candidate for use with an SSH tunnel. This will not only help to secure your web browser when using wireless networks, but may even make it run faster.
First, choose a server on which to host your squid cache. Typically, this will be a Linux or BSD machine on your local wired network, although squid also runs in Windows, under Cygwin (http://www.cygwin.com). You want to have a fast connection to your cache, so choosing a squid cache at the other end of a dial-up connection is probably a bad idea (unless you enjoy simulating what the Internet was like in 1995). On a home network, the server you use for your squid cache is typically the same machine you use as a firewall or DNS server. Fortunately, squid isn’t very demanding when it supports only a few simultaneous users, so it can happily share a box that runs other services.
Full squid installation instructions are beyond the scope of this hack, but configuration isn’t especially difficult. Just be sure to check your access rules and set a password for the management interface. If you have trouble getting it to run, check out Jennifer Vesperman’s “Installing and Configuring Squid” (http://linux.oreillynet.com/pub/a/linux/2001/07/26/squid.html).
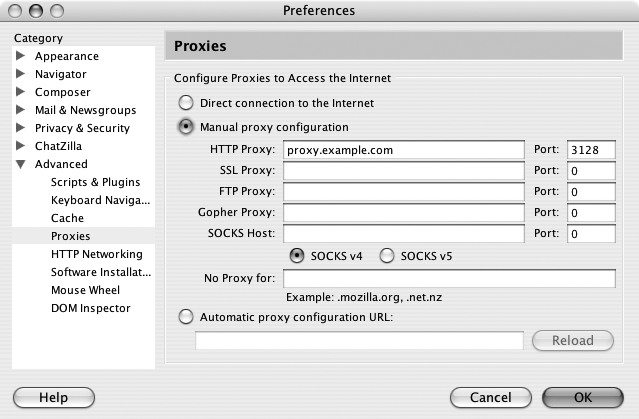
When squid is installed and running, it binds to TCP port 3128 by default. Once you have it running, you should test it manually by setting your HTTP proxy to the server. For example, suppose your server is running proxy.example.com. In Mozilla, go to Preferences→Advanced→Proxies, as shown in Figure 10-1.
Enter proxy.example.com as the HTTP proxy host and 3128 for the port. Click OK, and try to load any web page. You should immediately see the page you requested. If you see an Access Denied error, look over the http_access lines in your squid.conf, and restart squid if necessary.
Once you are satisfied that you have a happy squid, you need only forward your connection to it over SSH. Set up a local listener on port 3128, forwarding to proxy.example.com:3128 like this:
rob@caligula:~$ ssh -L 3128:localhost:3128 proxy.example.com -f -N
This sets up an SSH tunnel and forks it into the background automatically. Next, change the HTTP proxy host in your browser to localhost, and reload your page. As long as your SSH tunnel is running, your web traffic will be encrypted all the way to proxy.example.com, where it is decrypted and sent onto the Internet.
The biggest advantage of this technique (compared to using the SSH SOCKS 4 proxy [Hack #99]) is that virtually all browsers support the use of HTTP proxies, while not every browser supports SOCKS 4. Also, if you are using Mac OS X, support for HTTP proxies is built into the OS itself. This means that every properly written application will use your proxy settings transparently.
Note that HTTP proxies have the same difficulties with DNS as SOCKS 4 proxies, so keep those points in mind when using your proxy. Typically, your squid proxy will be used from a local network, so you shouldn’t run into the DNS schizophrenia issue. But your squid can theoretically run anywhere (even behind a remote firewall), so be sure to check out the notes on DNS in “Use SSH As a SOCKS Proxy” [Hack #99].
Running squid takes a little bit of preparation, but it can both secure and accelerate your web traffic when you’re going wireless. squid will support as many simultaneous wireless users as you care to throw at it, so be sure to set it up for all of your regular wireless users, and keep your web traffic private.
Rob Flickenger
