In the West, what most people think of when they hear the word massage is Swedish massage, a system directly applied to the skin that includes gliding, kneading, and percussive strokes; friction; compression; vibration; and range of motion. Lubricants such as creams, lotions, or oils are used to facilitate smooth movements of the hands over the skin of the receiver. Swedish massage is performed on a massage table, and most sessions are between thirty and ninety minutes long.
The room should be warm—72°F–74°F (22°C–23°C) is optimal—and with at least 3 feet (91.4 cm) of cleared area on each side of the massage table. The table height should be set where you can place the backs of your fingers from your knuckles on the table surface as you stand up straight and allow your arm to hang down loosely. If you find you are elevating your shoulders when you apply massage strokes, you should lower the height of the table; if you are bending over, bring the table height up. Have a chair or stool ready at the head of the massage table. Its height should allow you to place your forearms on the surface of the table with your shoulders in a neutral, not elevated, position.
It may be useful to perform some hand and arm stretches and do some lunges and squats to warm up your legs before you begin massage, as flexing your knees is the best way to adjust your own height relative to the table height as you are massaging.
Use mostly cotton or flannel twin sheets on the massage table; your partner will lie on the fitted sheet with the flat sheet covering her body. A blanket or bath towel measuring about 4’ x 6’ (1.2 x 1.8 m) may be used over the sheet if your partner becomes chilled as she relaxes, which often happens. A pillow for use under her knees should be close at hand. Some people enjoy having a rice or flaxseed-filled eye pillow or neck roll, which may be microwaved to provide soothing heat. The eye pillow may also be placed in the freezer for a refreshing, cool eye compress.
Have lubricant available, warmed to room temperature. Buy small portions of various types so that you can determine which lotion you prefer. Some manufacturers of professional massage lubricants will provide you with small sample sizes at an attractively low price. Adding two or three drops of fragrant lavender, tangerine, bergamot, grapefruit, or ylang-ylang high-quality essential oil from your local health food store can provide a relaxing and refreshing quality to the massage.
Lighting should be low, not overhead. Quiet, slow music is a nice addition to the experience.
The goal of all Swedish massage is relaxation, stress relief, and overall well-being. This face-up sequence addresses tension in the head, face, neck, and shoulders and relieves discomfort in overworked arms, hands, and legs. Many people think of massage as starting face down, but relaxing the head and neck has the effect of relaxing the whole person, which is a productive way to begin.
1. PREPARATION AND FEEDBACK
When your partner lies on the massage table, have her lift her knees and place a pillow beneath them and her lower thighs. This will reduce strain on her lower back. Make sure she is comfortable and warm enough. Ask her to give you constructive feedback on your massage, letting you know what feels especially good and what adjustments you could make in your strokes to improve her massage experience.
Begin seated at the head of the massage table. Place your hands lightly on your partner’s lateral shoulders or upper chest or cup her head without placing your hands on her ears. Your hands should be relaxed in this contact hold and stationary for about three to five breaths. This gives you an opportunity to bring your focus on her by following her breath and allows her to relax into your initial touch. Begin and end each section of her body with a contact hold.
Open the Chest and Lengthen the Neck
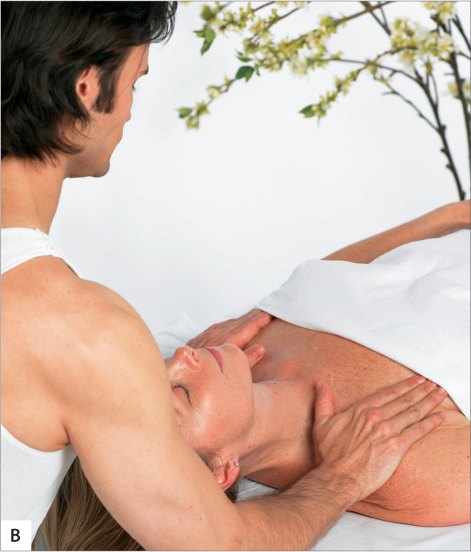
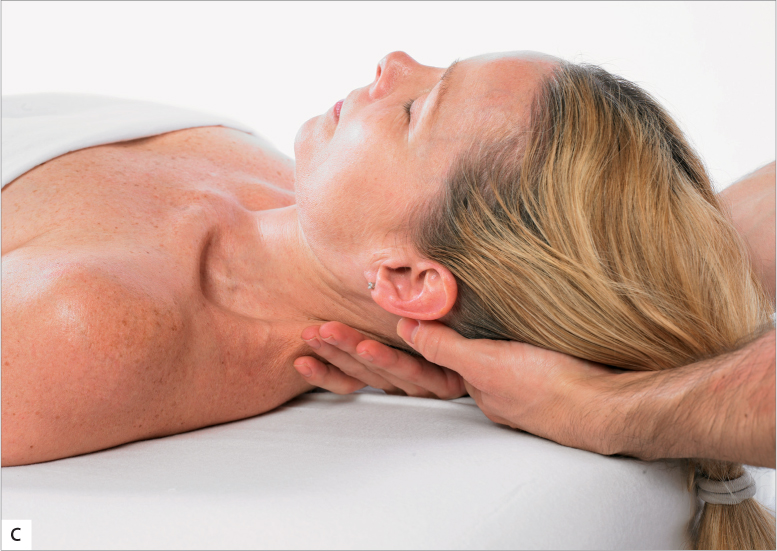
Bring your hands to the center of your partner’s upper chest and perform a spreading stroke all the way out and around her shoulders (photos A and B). Rotate your wrists laterally and come under her shoulders to her neck, with your palms up. When your hands arrive at the back of her neck, cup the palm and fingers of one hand around your partner’s neck and glide all the way up to the back of her head. As that hand comes past the base of her skull, use your other hand to cup her neck and follow your first hand, supporting her neck fully before you take the first hand off (photo C). Continue with alternating hand-pulling strokes up the back of her neck for two or three repetitions.

Warning! Avoid Touching the Ear Unintentionally
Avoid placing your hands over your partner’s ears, banging them, or dragging any part of your hands over her ears while you are massaging her head and neck. It is fine to specifically perform delicate and intentional massage on the ears, but it can be intensely irritating for your partner to receive unintentional ear contact. Also, you should try to avoid pushing your partner’s hair into her ears, and instead, try to sweep it away from them.
Your hands should graze the surface of the massage table, keeping your partner’s neck in a neutral position as you perform this profoundly relaxing, lengthening stroke. If your partner has difficulty relaxing her head and neck, ask her to allow her head to be heavy in your hands. Repeat this move from the center of the chest at least three times. Most of us are so accustomed to holding tension in our necks that receiving lengthening massage strokes can help the body remember how to relax and avoid chronically tight necks and resultant headaches.
2. MASSAGE THE FACE, HEAD, AND NECK
With your palms facing down, bring your thumbs together in the middle of your partner’s forehead. Linger there with light pressure for a breath; then perform a spreading stroke all the way out to where her cheek meets the front of her ear. Spreading the forehead two or three times can help alleviate the troublesome vertical lines between our eyebrows that result from squinting or frowning.
Perform a Face Lift
Bring your fingertips together under your partner’s chin and sweep your hands slowly up the side of her face to the top of her head a few times, which works like a little face lift. Bring your fingers to the side of her nose and trace below her cheekbones out to the front of her ear. You will feel a small indentation right in front of her ear. This is an acupressure point you can compress gently for about thirty seconds to help relieve head pain. Two other acupressure points lie along the same path you have traced: At the nose crease and midway between the nose crease and the headache point, right below the cheekbones, are sinus points. Compressing them lightly for thirty seconds frequently will relieve nasal congestion. Make a few tracings below your partner’s cheekbone laterally, pausing on the points if they feel good to her.
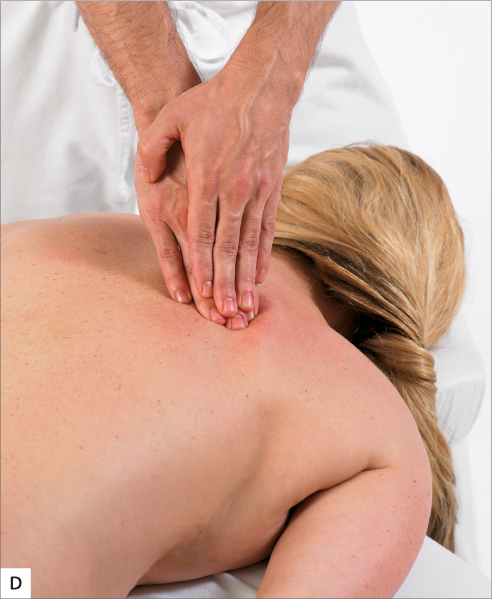
Soften the Jaw Muscle
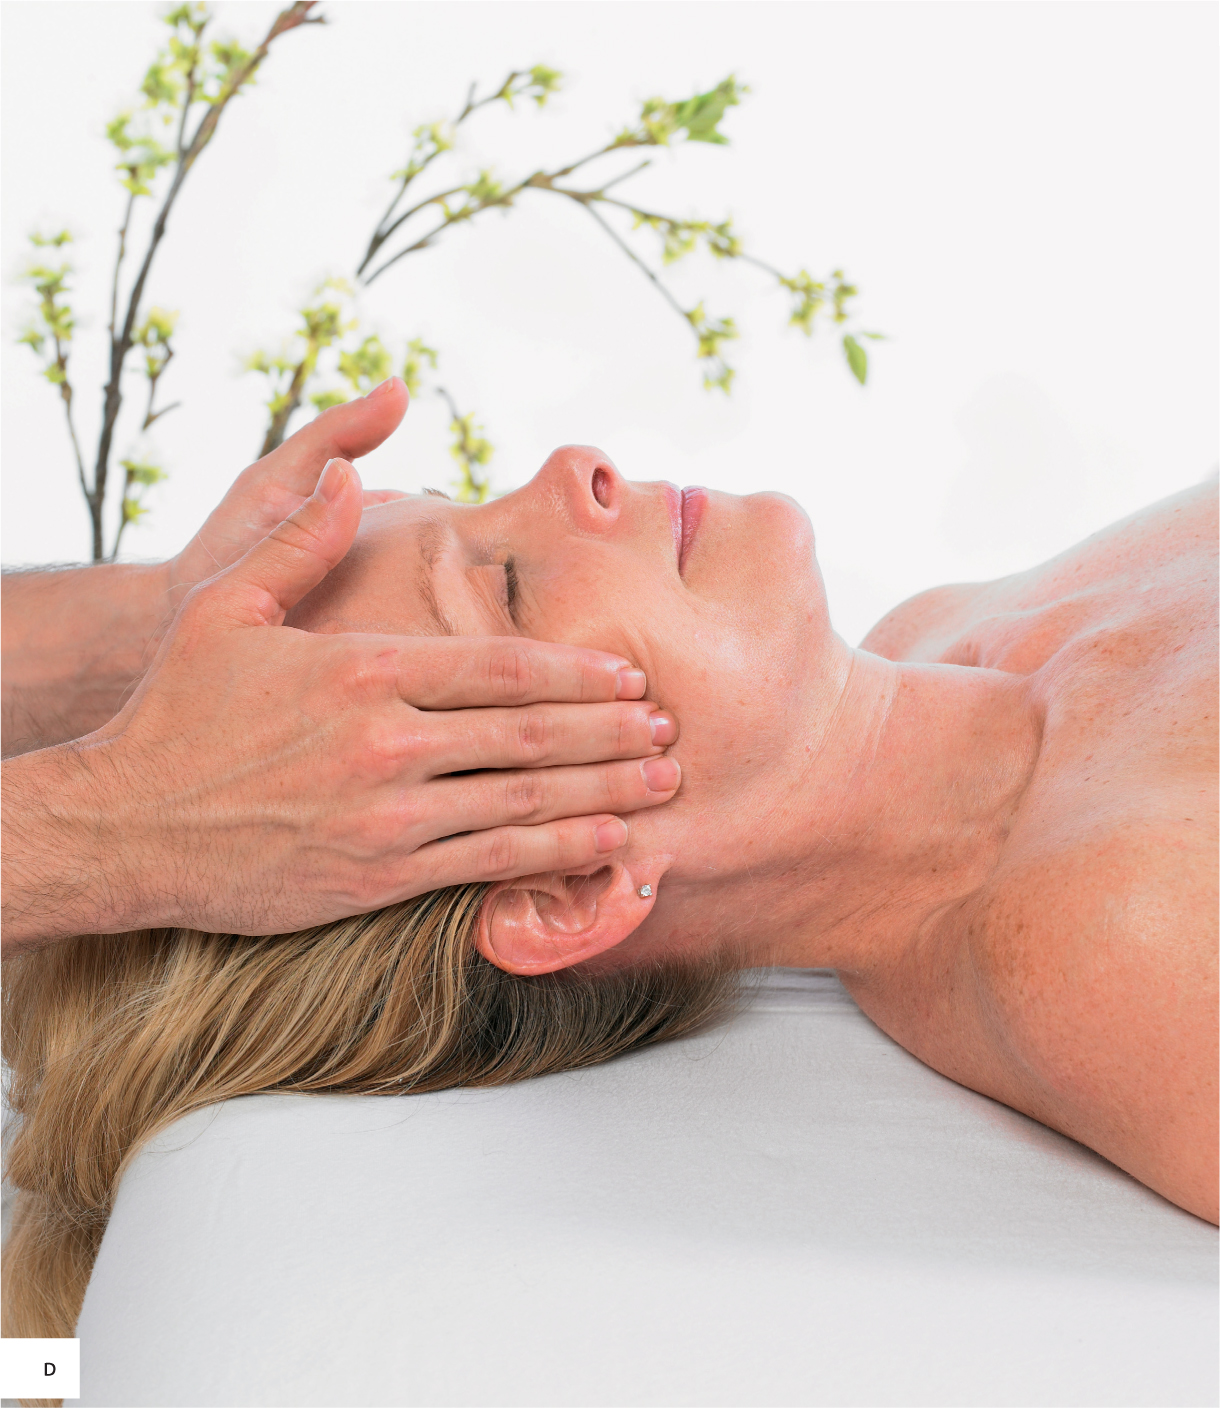
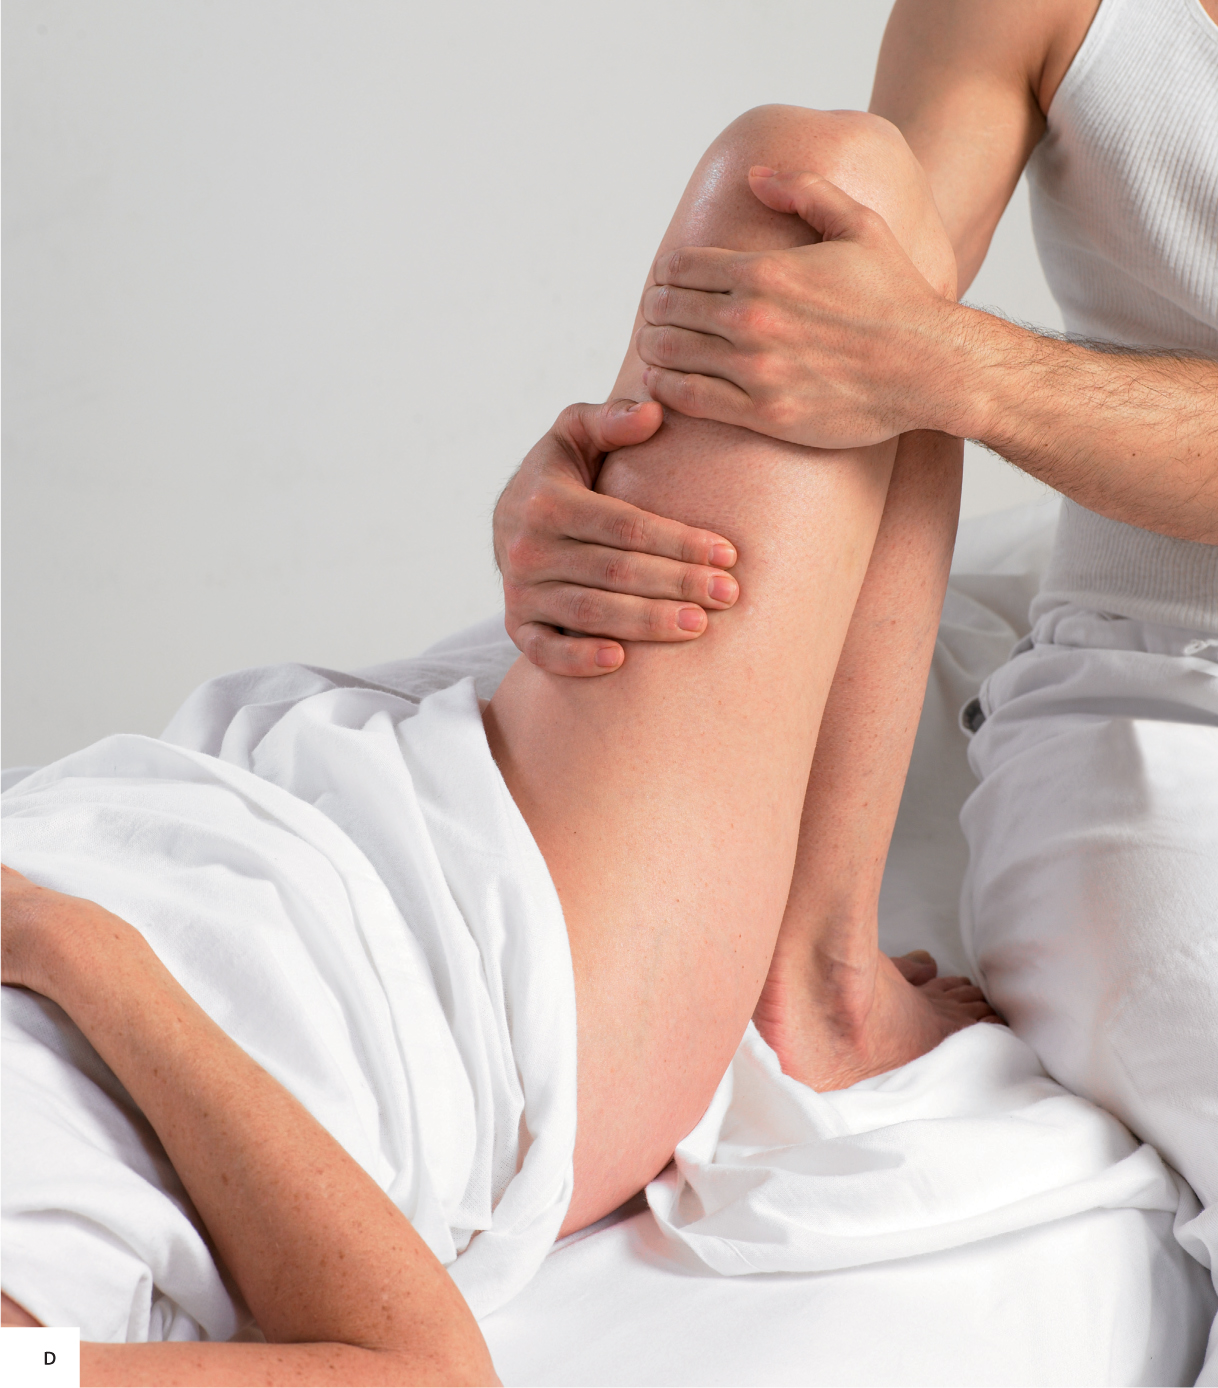
The only place on the face you should perform downward strokes is on the lateral face at the jaw (photo D). The masseter muscle is one of the strongest muscles in the body, and if you have your partner clench her teeth briefly it is easy to find. Make several short, downward stripping strokes on this muscle to help create length and ease in it, but don’t use so much pressure that you aggravate the muscle tension. Tension often lodges in this muscle, as does anger, and grinding the teeth or chewing gum can create jaw, neck, and head pain that may be relieved by massaging this muscle. Try some circular friction strokes on the masseter as well and end with a stationary compression for a breath or two.
Circles on the Base of the Skull
Bring the backs of your wrists to the table surface so that your fingertips curve upward at the base of your partner’s skull (the occipital ridge) and apply circular friction back and forth across the ridge with your hands mirroring each other. Close your eyes and really allow your fingertips to do all the “seeing” for you, feeling for taut bands and knots, and pausing to just compress them for a breath when you detect them. Continue the circular friction up and down your partner’s neck on each side of her spine, still palpating for areas that are tight or knotty.
Tension stored in the neck from emotional stress, working at a computer, driving, and many other work activities may be eased by compressing the tight areas you find while you instruct your partner to visualize directing breath into tight areas, or “breathe into the area,” loosening the knots and bands, which will seem to melt under your fingers. If you feel your partner tensing her neck at all, seek her feedback on how it feels and lighten your pressure while reducing the speed of your circles on her neck.
Coin Rubs around the Ear
Now for those intentional ear strokes: Take your partner’s ear lobes between your thumbs and forefingers and make circles with your fingertips, gradually moving up and around the whole external ear. Then position your hands so that your partner’s ears are between your index and middle fingers and make about a 1-inch (2.5 cm) stroke downward toward her jaw, easing the pressure as you slide your fingers back up; repeat this stroke several times. Your partner will enjoy this relaxing stroke as much as your dog does, but perhaps she will not drool.
Warning! Watch the Face for Grimaces
Throughout the massage, watch your partner’s face for any slight grimace or indication that your pressure is not comfortable. Never hesitate to ask for feedback about how the massage is feeling. Thank your partner for sharing what she is feeling and adjust your strokes to maximize her comfort and the benefits of the massage. Never give your partner the kind of massage you want; instead, provide her with what is comfortable and useful for her.
Pulling Strokes for the Neck
Perform several more alternating hand-pulling strokes on your partner’s neck; then take her head to the left, holding it at her occiput, while your right hand glides all the way down the side of her neck and around her shoulder from front to back, then back up to her ear a few times, lengthening the muscles of the lateral neck. Repeat on the other side. Bring your partner’s head back to the center and place your palms very lightly over her eyelids for a few breaths. This can be very relaxing for the eyes.
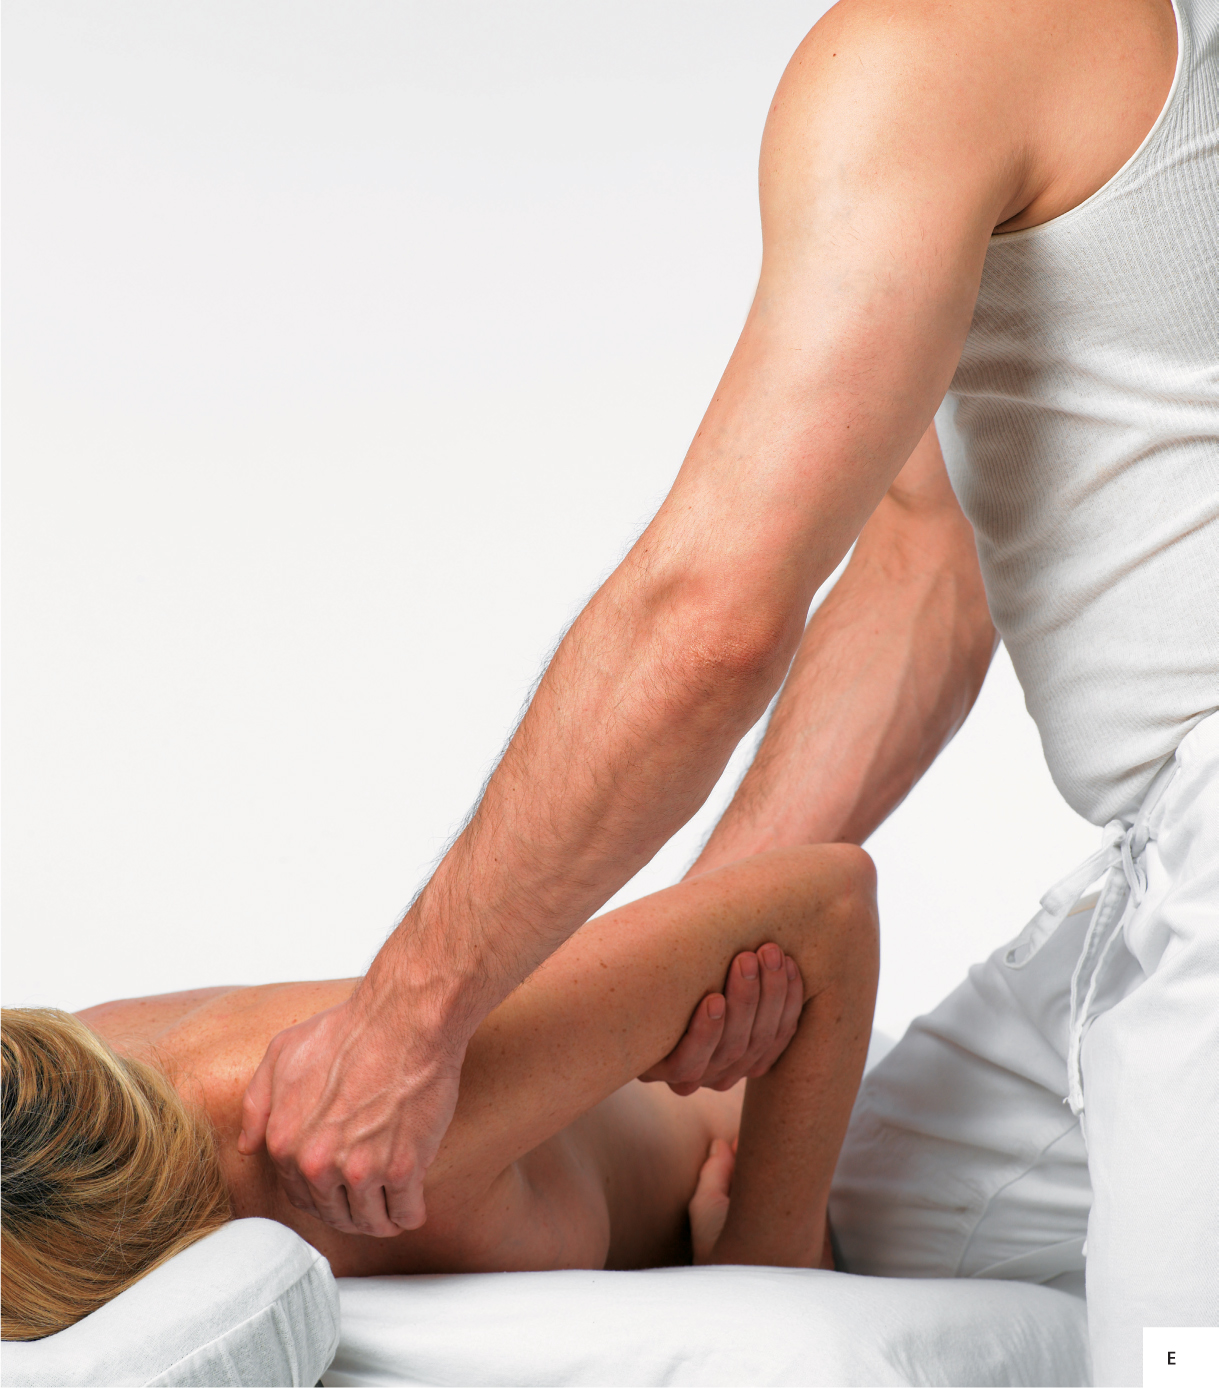
3. LUBRICATE AND LENGTHEN THE RIGHT ARM
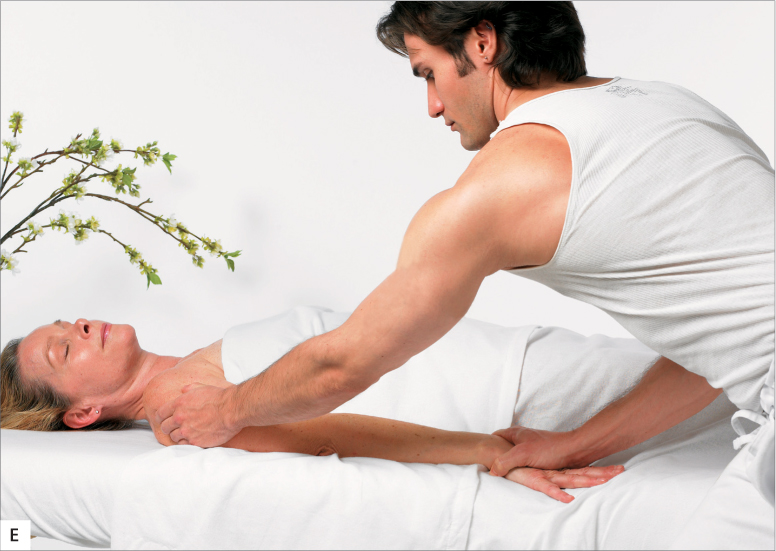
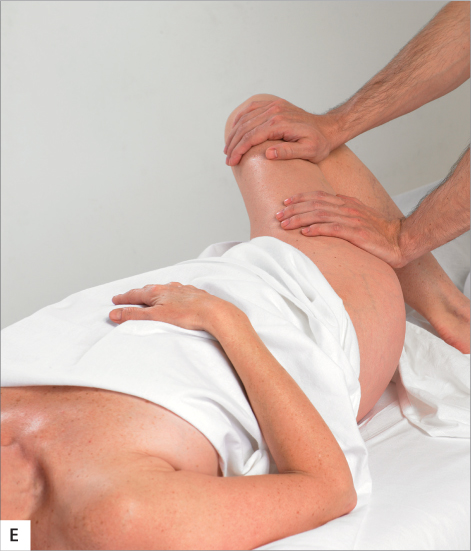
Move to your partner’s right side and spread lubricant from her fingertips up her arm and all the way around her shoulder with your left hand while you hold her right hand in your own (photo E). Keep enough downward tension on her arm with your right hand so that you do not force her shoulder up toward her ear with the application of several superficial effleurage strokes with your right hand. Glide your hands much more lightly as they return from her shoulder to her hand on each stroke, as you want to encourage circulation back toward her heart.
“Milk” the Hands and Fingers
Using both your left and right hands, perform a milking stroke on your partner’s hand, alternating squeezing pulls on the thumb and pinky sides of her hand for a few times each, allowing her wrist to rotate and move from side to side. This loosens the wrist and may improve flexibility and comfort in the joint, which we use constantly in almost all of our daily activities. Squeeze each finger, using a twisting motion as you move from her knuckles to her fingertips. Glide your thumbs from her knuckles to the dorsal wrist on both sides of each meta-carpal bone in her hand; these bones descend from each finger through the hand.
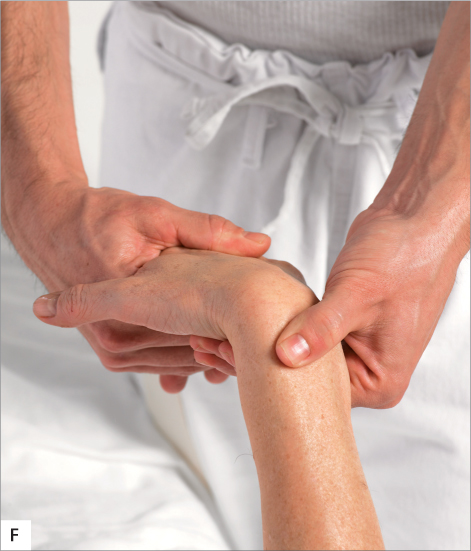
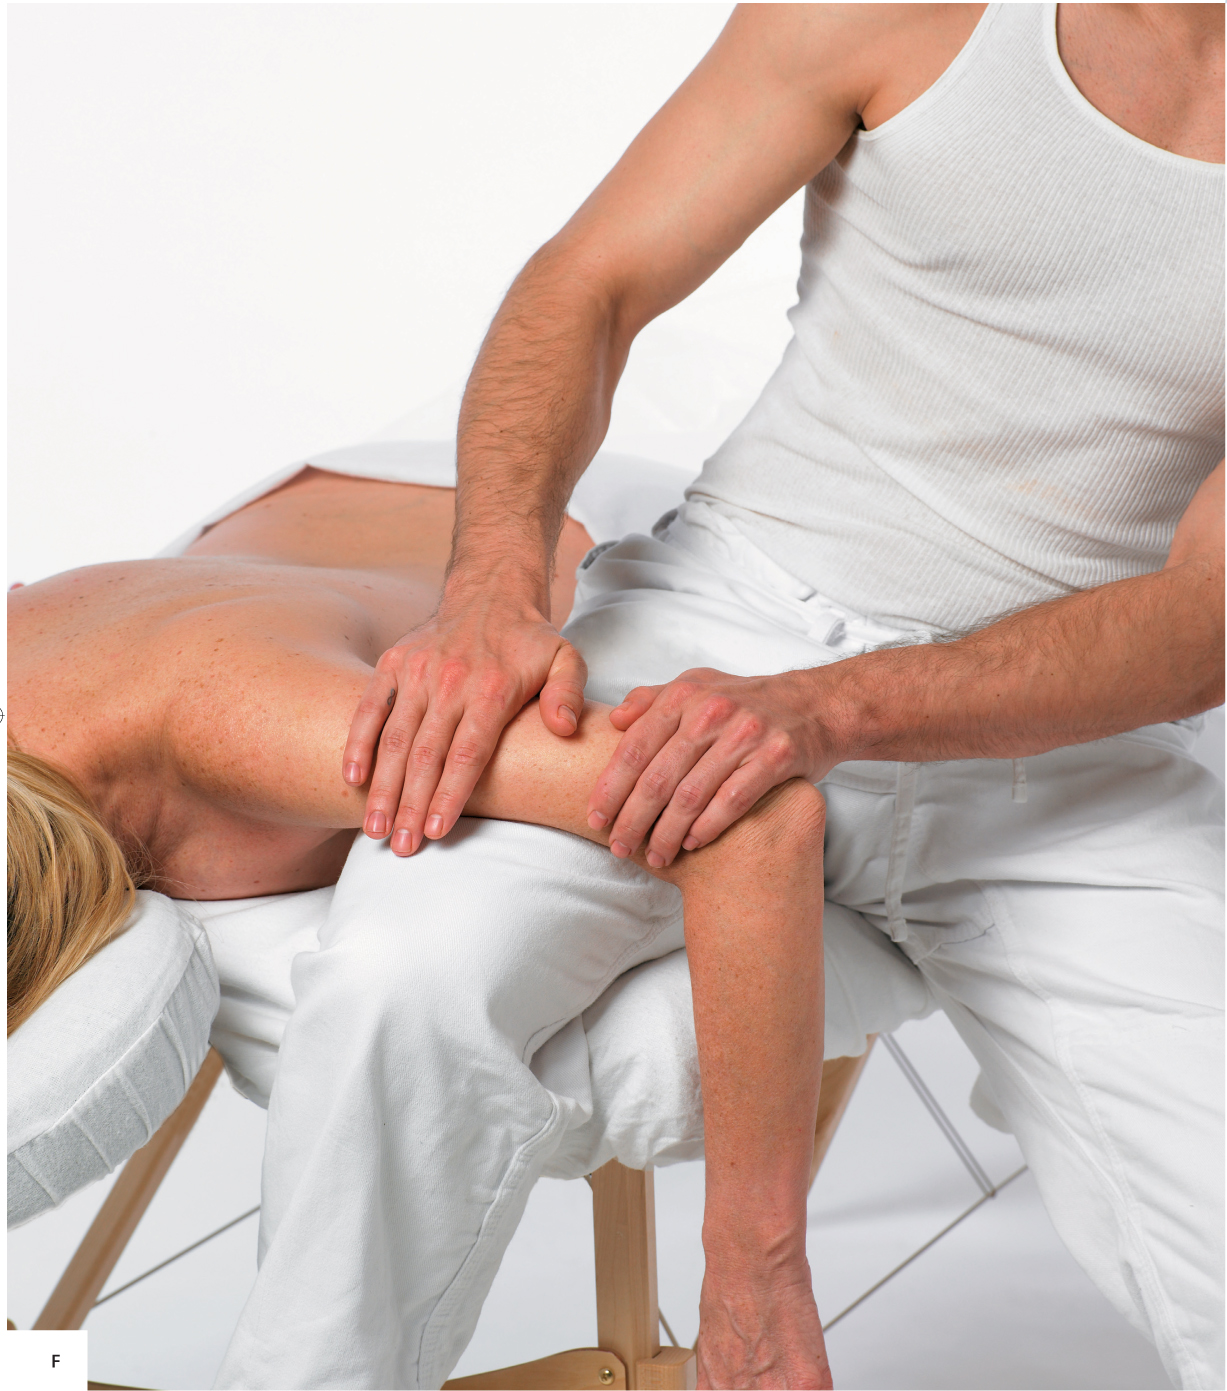
Circular Friction on the Wrist
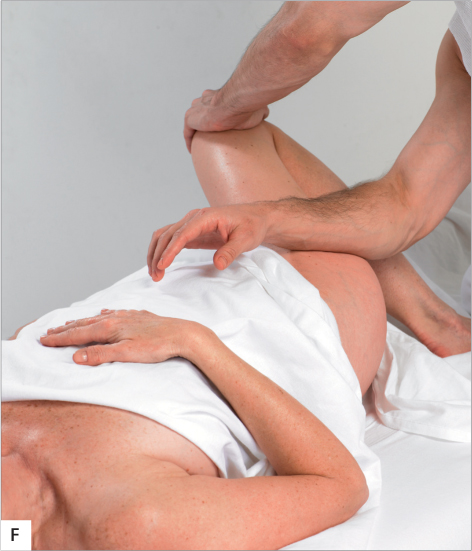
Apply circular friction on the back of your partner’s wrist, increasing the pliability of the retinaculum, which is the connective tissue that encircles the wrist like a bracelet. Firmly hold your partner’s wrist between your right thumb and fingers, with your thumb on the top of the joint. With your left hand, flex her wrist downward, allowing the skin and connective tissue to slide under the firm pressure of your thumb. Move your thumb medially and laterally along the back of your partner’s wrist as you repeatedly flex her wrist to pull the retinaculum through, loosening it (photo F).
Maintaining malleability in the wrist can be valuable in helping to prevent carpal tunnel syndrome. You may also wring your partner’s wrist; this move is like the Indian burns children give each other, but with lubricant the experience is much more pleasant.
Stretch the Palm
Allow your partner’s arm to move away from the side of the table as you rotate her palm to face upward; otherwise, keeping her arm straight at her side will bind her elbow, which is uncomfortable and not the way the elbow naturally seeks to move. Apply circular friction with both of your thumbs to her palm, as you spread her palm by placing the pinkies of both of your hands between her thumb and index finger on one side of her hand and between her ring finger and pinky on the other side. This may feel awkward at first, but you just need to have your fingers between hers enough to spread her palm open. Most people are unaware of how much the small muscles in the palm are used until you begin massaging them. All of our gripping and manipulative gestures with the hands close the palm; stretching it open as you massage it will create greater flexibility and will make the whole hand feel much more open.
Hold your partner’s left hand in yours so that her wrist is almost above her elbow and use your right hand to knead the muscles in her forearm. Just as with the neck, you are likely to find lots of ropey areas and knots in the forearms because most of the muscles that give us fine-motor dexterity in our hands are located there. Allow your fingers to linger and compress any tight areas you find. Switch hands and hold her left hand in your right hand while you petrissage (lift, wring, and squeeze) the forearm muscles on the other side of her forearm with your left hand.
Fold the Arm across the Chest
Lay your partner’s arm loosely across her torso and apply gentle pressure with your left hand on the back of her upper arm (photo H). Reach under her shoulder with your right hand and curl your fingers around the medial border of her scapula (shoulder blade), applying firm circular friction as you rock her upper arm away from you. You can find your partner’s rhythm by rocking her arm away and experiencing how quickly it moves back to you when you release pressure but keep your hand in contact with her arm for the rocking motion. As your right hand loosens the upper back muscles between the shoulder blades, your partner’s arm will gradually move closer to her chest, letting you know you have released the upper back muscles, which may be tight from general tension or from lifting activities.
Knead the Upper Arm
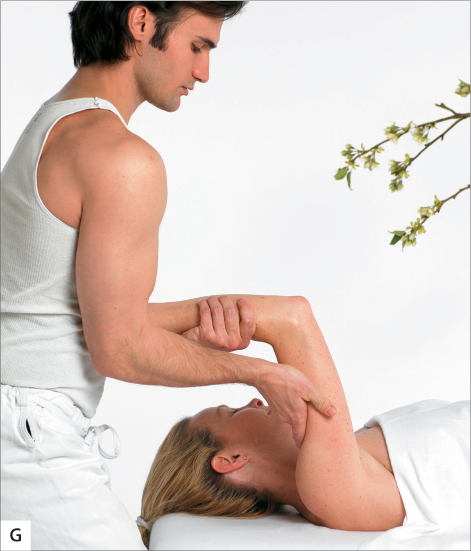
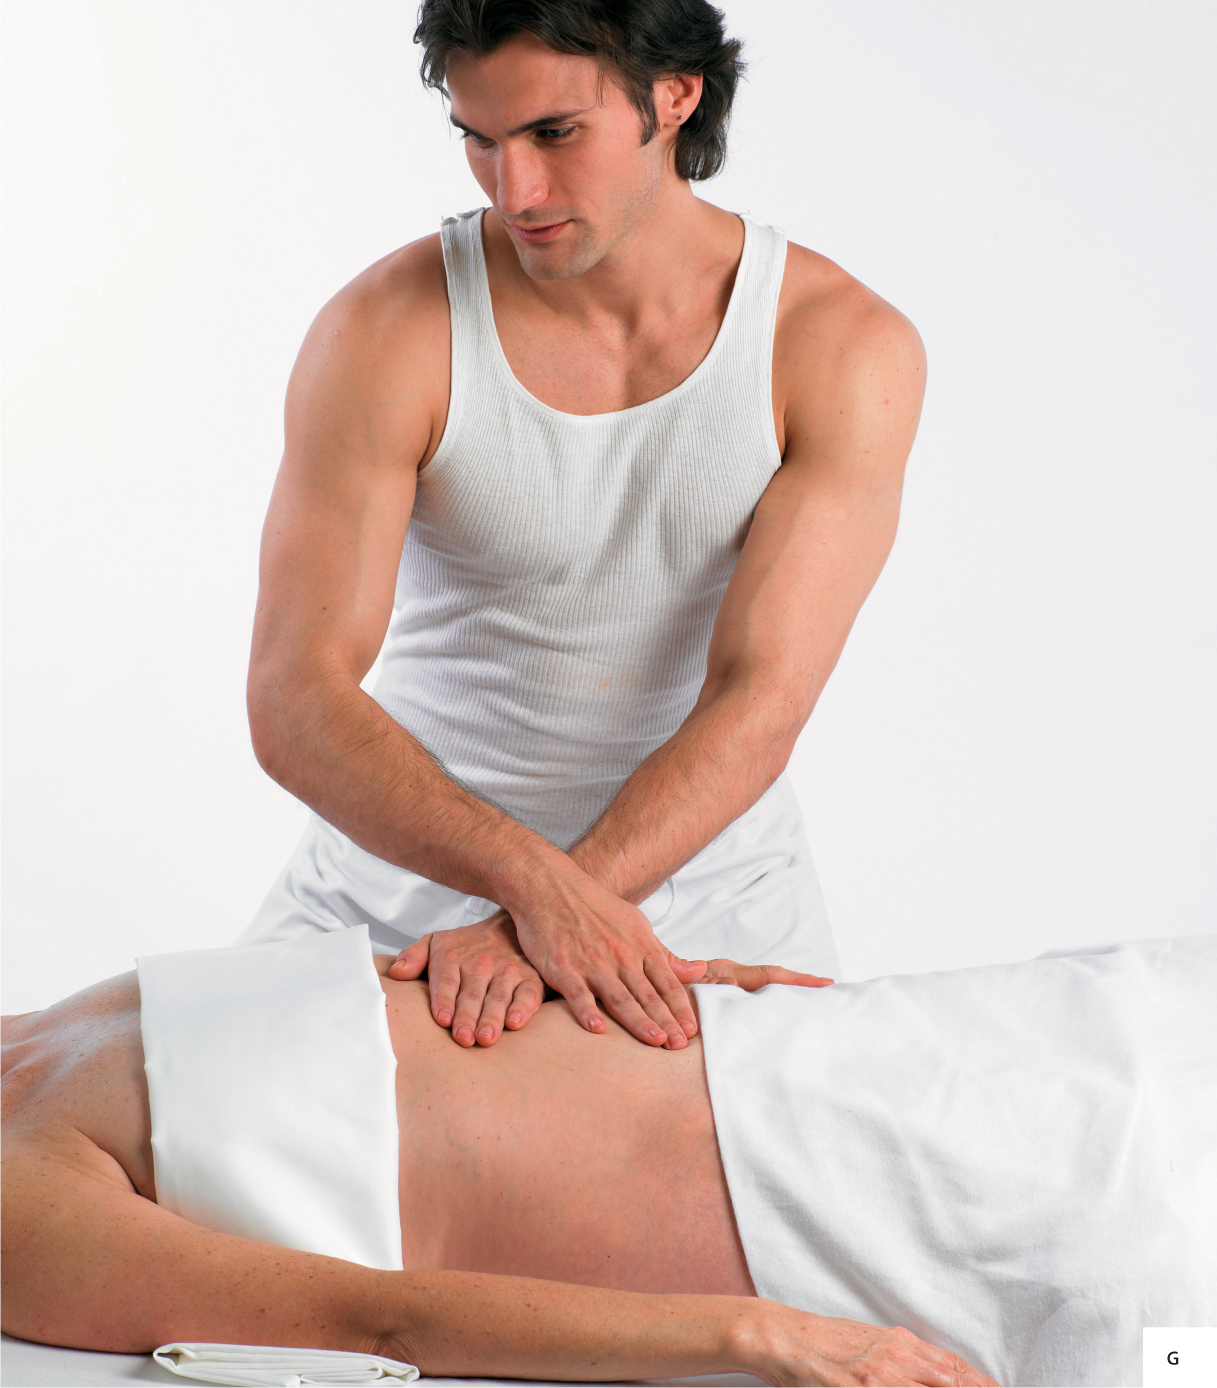
Lightly grasp immediately below your partner’s elbow with your right hand and come to the head of the table, holding her forearm while you petrissage the back of her upper arm (the triceps muscle) with your left hand (photo G). Her elbow should be directly over her shoulder because it will feel balanced there, and she will be less likely to try to hold it up for you.
Then switch the holding hand and knead your partner’s upper arm (biceps) with your right hand. Put a gentle traction on her arm overhead before you walk it back around to her side and apply some more effleurage strokes from her hand to her shoulder and back to give her arm a feeling of connectedness. Those who engage in yoga or work out at a gym frequently have tight, sore triceps, and kneading them will feel really delicious.
4. OPEN THE CHEST WITH LONG AND SHORT STROKES
Placing your left hand on your partner’s shoulder, apply effleurage across her upper chest and back for a few strokes. If her shoulders are lifted off the table because her pectoralis (upper chest) muscles are tight, spend extra time on that area with circular friction and lean into the effleurage strokes more to encourage length in the chest muscles.
5. REPEAT THE SEQUENCE ON THE RIGHT
Repeat the arm, shoulder, and chest massage on your partner’s right side.
When you massage your partner’s feet, legs, thighs, and hips, you will find that she frequently is unaware of tightness and discomfort residing there from the demands of work or recreation. Increasing circulation to the lower extremities often reduces swelling and makes the limbs feel more awake and alive.
Use the leg as a lever to address the back of the pelvis and create a welcome feeling of freeing the hips.
Lift Legs to Roll Them Inward
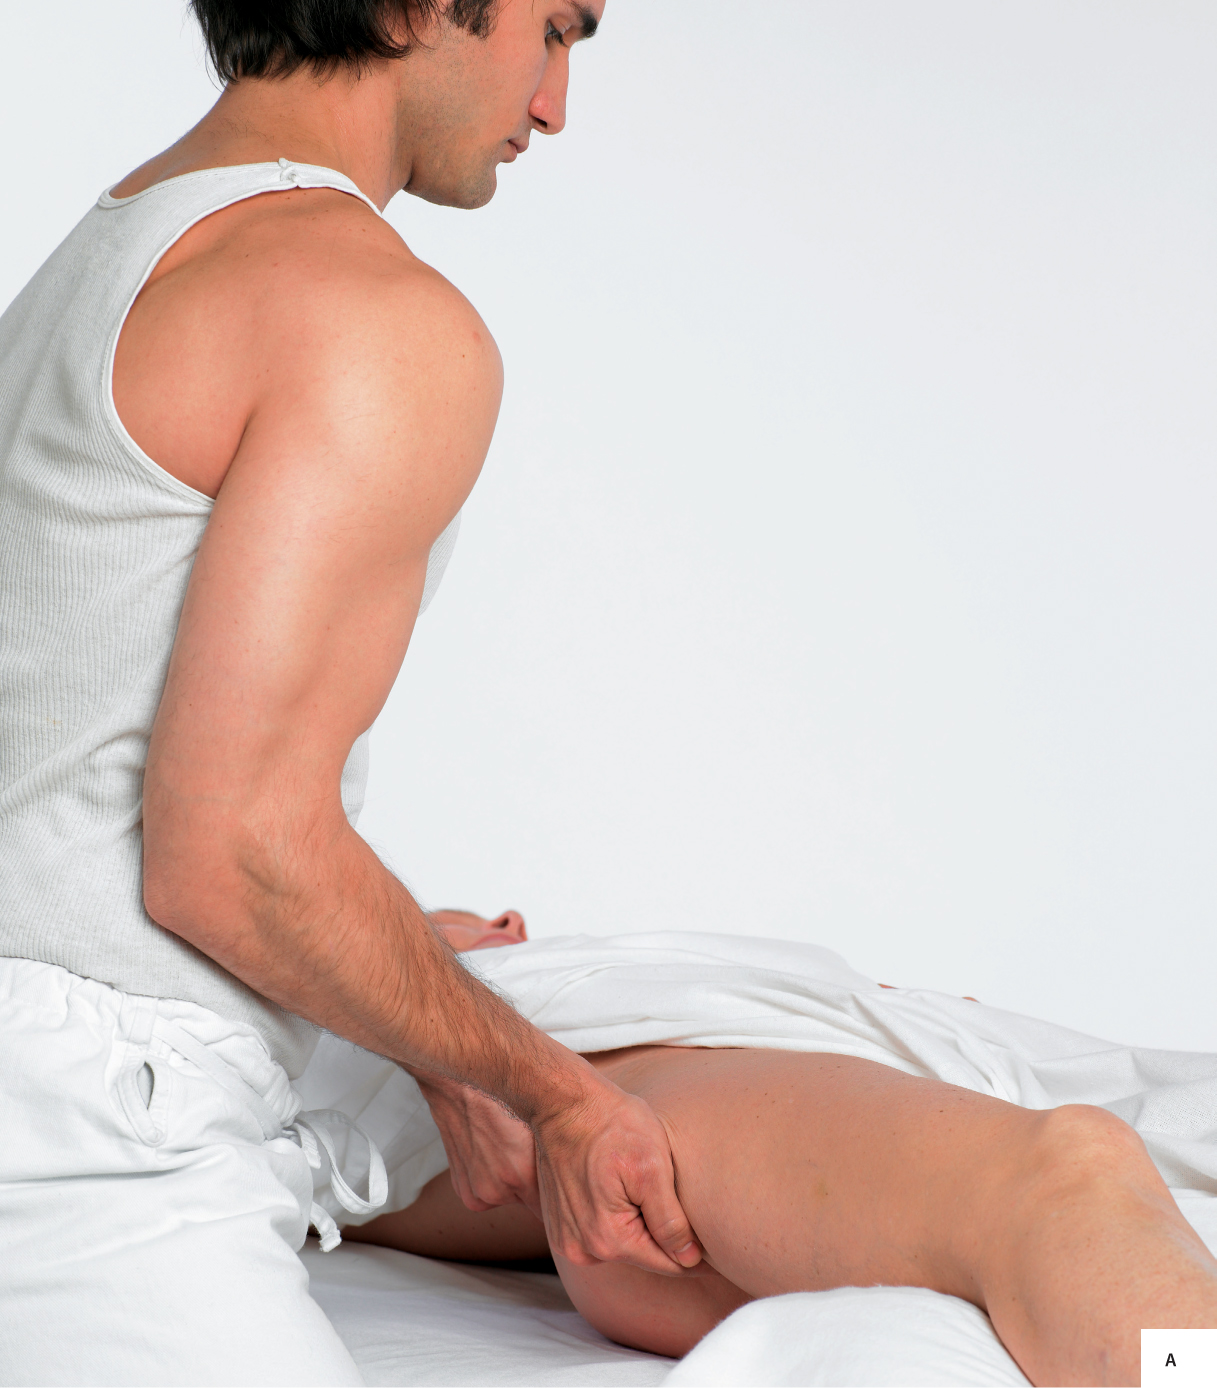
Move to your partner’s right leg and thigh. Notice whether her feet point roughly up at the ceiling or whether they are turned strongly out to the sides. If they turn significantly outward, reach under her waistline with your left hand, almost to the vertebral column, and under the broadest part of her hip with your right hand, palms up. Lift your fingers strongly upward and pull her pelvis toward you, which will roll her leg and thigh inward. Repeat at her hip and upper thigh, then at her thigh and leg, each time rotating her thigh and leg a little farther inward (photo A).
After you have completed these pulls, her foot should be less turned out and she will feel as though there is a pleasant openness in the posterior pelvis. Repeat the broadening action on her left side; then return to her right leg and thigh. This broadening helps to counteract the effects of sitting with legs crossed, which shortens the posterior hip muscles and can create tightness and discomfort in the hips and low back.
1. EFFLEURAGE AND PETRISSAGE FROM RIGHT TOES TO HIP
Perform several effleurage strokes with both hands from your partner’s toes to her hip to spread lubricant and begin to palpate for tight areas. Stand at the side of the table with your hips facing the direction of your strokes and remember that your strokes toward her heart should be considerably firmer than those toward her feet. Stand at the side of the table near her thigh and knead her thigh muscles (quadriceps) with the full, firm palms of both hands, feeding the tissue back and forth from one hand to the other, lifting and squeezing rhythmically until you feel a softening of the quadriceps muscles.
Lift, Shake, and Knead the Thigh
You may lift the muscles up and shake the tissue in place, which causes a vibration through the muscles. This is a movement the body can’t “push back” against, so it relaxes muscles that may have difficulty letting go. Place your knee on the table next to your partner’s lateral thigh to hold it in place as you apply pulling strokes on her medial thigh, up and down between her knee and groin. Remove your knee from the table and make vertical circles on her medial and lateral thigh, moving up and down between her knee and groin.
With each upward stroke that you use to lift the thigh muscles, you may pull your hands back toward you, making jostling motions with the thigh as you do so; like shaking the muscles, this movement relaxes muscles that may be holding tension from stair climbing or athletic activities.
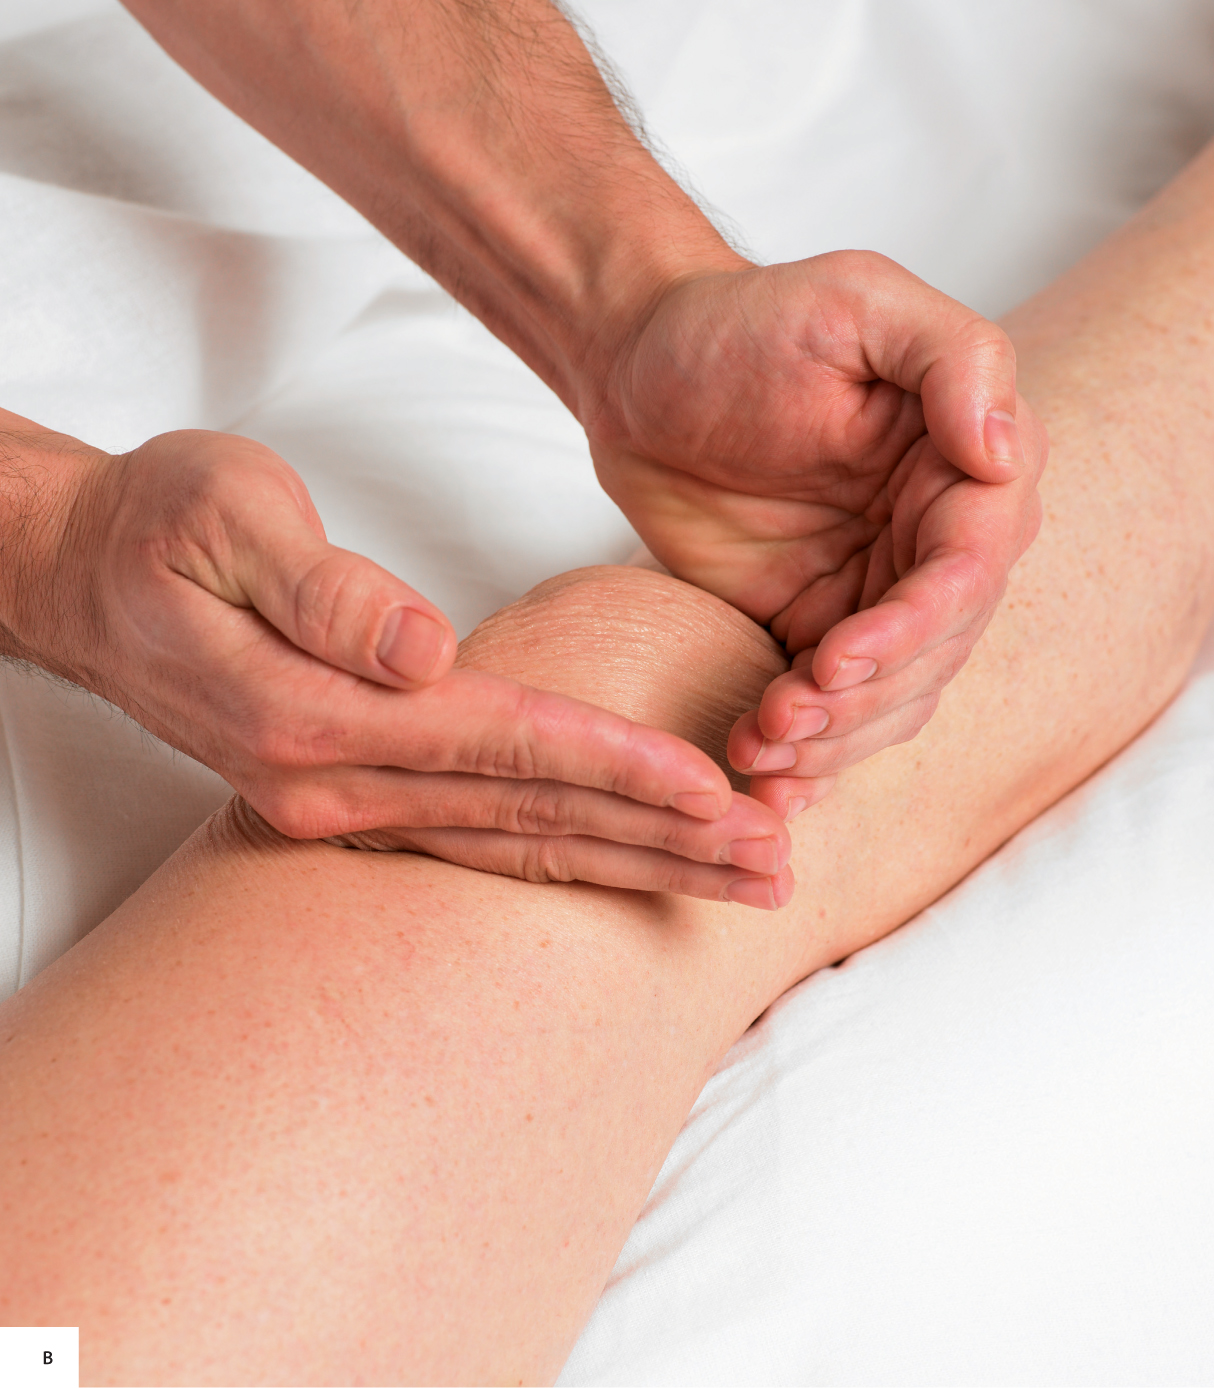
Use Circular and Cross-Fiber Friction around the Knee
When you arrive at your partner’s knee, use circular friction with your fingertips around her knee (photo B); then, facing the head of the table, perform cross-fiber friction with your thumbs just above her knee, with your thumbs crossing each other and forming circles just medial to her knee (photo C) using enough pressure to create some pinking of the skin around her knee. There are attachments of muscles at the medial knee that are often tight, and performing friction in the area can reduce knee discomfort.
2. STRETCH THE BACK
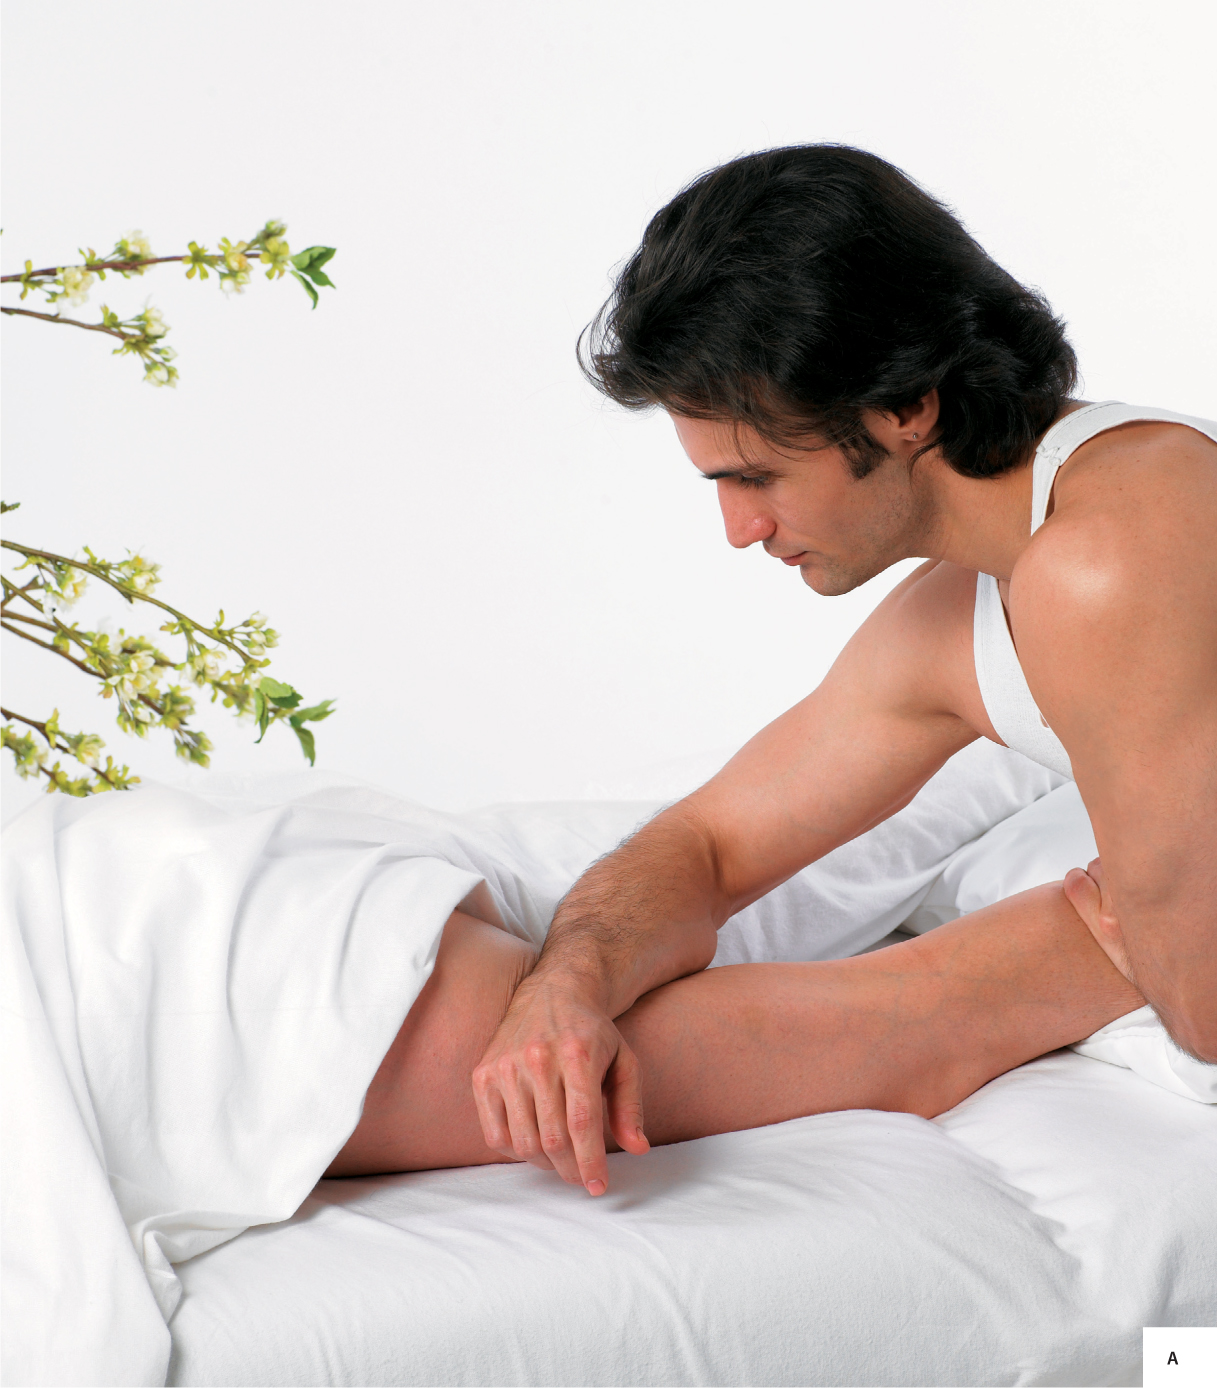
With your partner’s foot on the table, as close to her buttock as is comfortable for her, take a seat on the table just past her toes and wrap your arms around her thigh. Rock back with your whole torso, pulling her thigh torward you, to the natural stopping point of her stretch. Keep your hands in continuous contact with her thigh, allowing it to spring back torward her torso. Find her natural rhythm and flow with it, gradually gaining more movement, and allowing the knee to move medially and leterally with the pulls and rebounds (photo D).
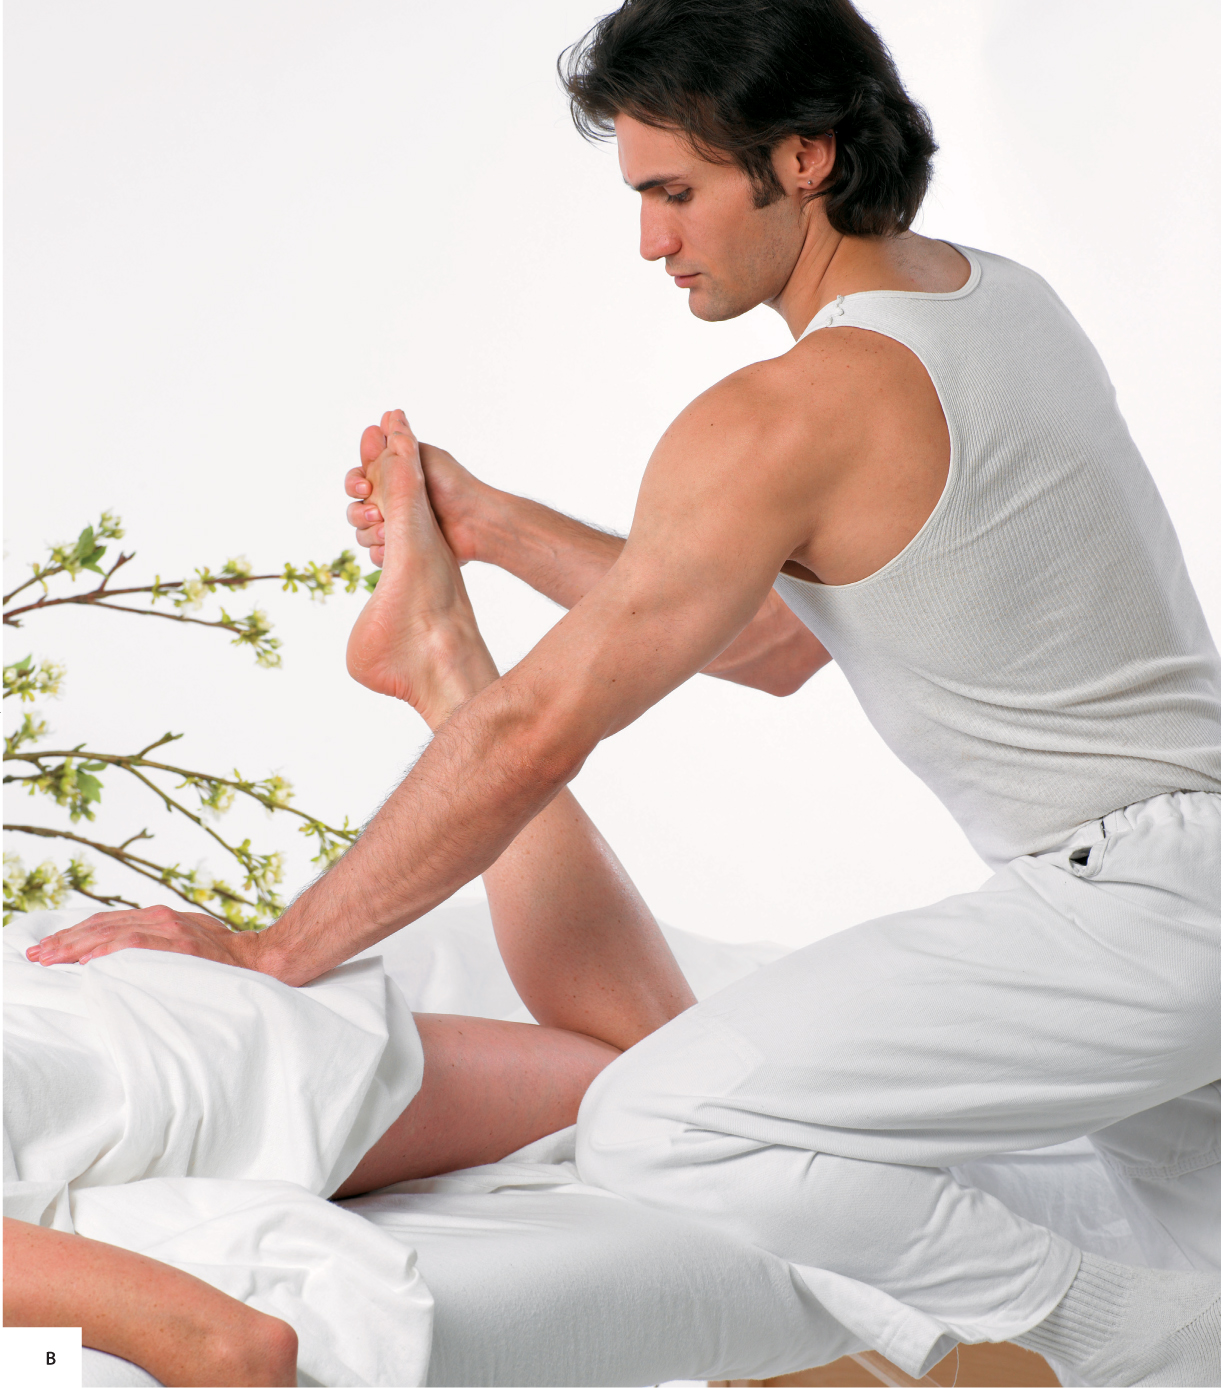
3. OPEN THE HIP BY ROCKING THE THIGH
Place your partner’s foot on the table, with her heel as close to her buttocks as is comfortable, and rock her thigh gently and rhythmically away from you, with your knee on the table just past her toes to keep her foot from sliding down the table (photo E). Just push her leg and thigh away; they will rebound back toward you at a rate that is her rhythmic pace. Try to keep the rocking fluid and don’t allow her leg to rebound all the way back, but encourage more opening in the posterior hip. When you feel some loosening in the hip joint, use your right forearm to glide deeply from her lateral knee to her hip two or three times, leaning your body weight gently into the stroke (photo F). Perform this broad stroke on the dense connective tissue on the lateral portion of the thigh to create a feeling of more space and length in the thigh.
Work Sensitively around the Hip
Still taking slack out of your partner’s lateral thigh and hip by maintaining pressure with your left hand to hold the stretch over her left leg, use the fingers on your right hand to apply circular friction around the hip joint. Because many people are tender in the hips, you should work sensitively in the area, applying circular friction all the way around the lateral hip bone (the trochanter). The muscle attachments around the bone radiate out like spokes, and you may feel taut bands in the area, which will benefit greatly from additional circular and cross-fiber friction, as well as some compression.
4. PAY ATTENTION TO THE CALF, ANKLE, AND FOOT
Return your partner’s leg and thigh to the table, performing a few superficial connecting effleurage (gliding) strokes on the entire length of her limb. Then with one hand on the medial side of her leg and the other on the lateral side, apply petrissage (lift, shake, and wring) strokes to the calf muscles followed by alternating hand-pushing strokes up her lower leg to her knee. Vigorously wring her ankle with both hands. From the end of the table, move into her foot with your thumbs on the medial arch. Milk her foot by squeezing one hand, then the other, on the medial and lateral sides, as you did with her hands. Then pull each toe with a little twist as you did with her fingers. All of these massage movements on the foot will help relieve foot pain from too much standing, fallen arches, or inadequate arch support in shoes.
5. REPEAT THE SEQUENCE ON THE LEFT LEG
Effleurage your partner’s foot, leg, and thigh two or three times to give the entire limb a feeling of connectedness and repeat the lower extremity massage on the left side.
6. USE A LONGER CONTACT HOLD FOR THE ABDOMEN
Stand on the left side of the table and face your partner’s abdomen. You may undrape her torso or give her a pillowcase to place over her breasts if she is either modest or chilly. Place your hands slowly and firmly, but without much weight, on her abdomen and offer a stationary contact hold.
Clockwise Circles and Pulls on the Abdomen
After you have held your hands immobile for two or three of your partner’s breaths, begin a few clockwise circles around her abdomen with both hands (photo G). It is important to remember to always use a clockwise direction as it is the direction in which the contents of the intestines flow through the digestive tract. By following the natural direction, you may reduce symptoms of constipation. Petrissage the entire abdominal area, paying special attention to kneading slowly and calmly so as not to elicit ticklishness. Perform some strokes across your partner’s belly, pushing toward the opposite side with one hand while the other hand pulls toward you, with your hands passing each other around the midline of her body. Be sure to start at the sides of her torso; you may use your forearms in addition to your hands for this stroke, and you may move up and down between your partner’s pubic bone and her rib cage.
Warning! Ease into These Places
Although massage on every part of the body should begin with a brief contact hold to accustom the receiver to touch in the particular area, it is especially important in sensitive areas such as the abdomen, the side of the torso, the buttocks, and the feet. If you feel an abdominal pulse under your hands, move them from that area of the belly or lighten the pressure until you do not detect the pulse.
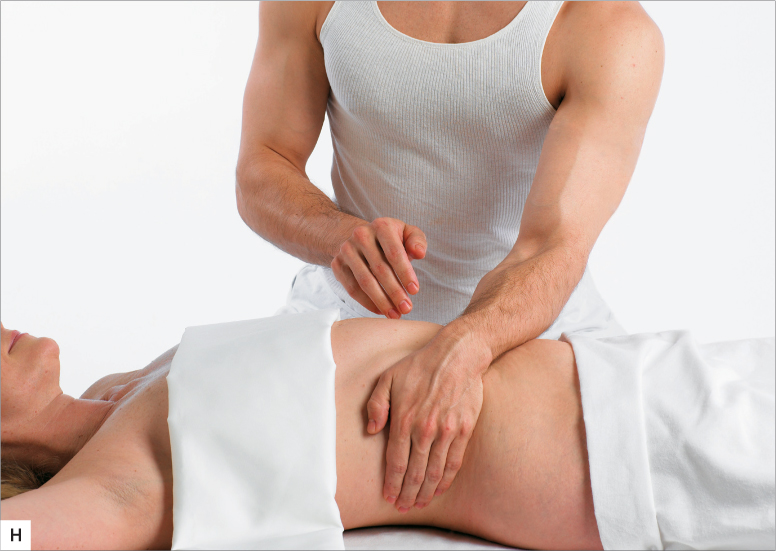
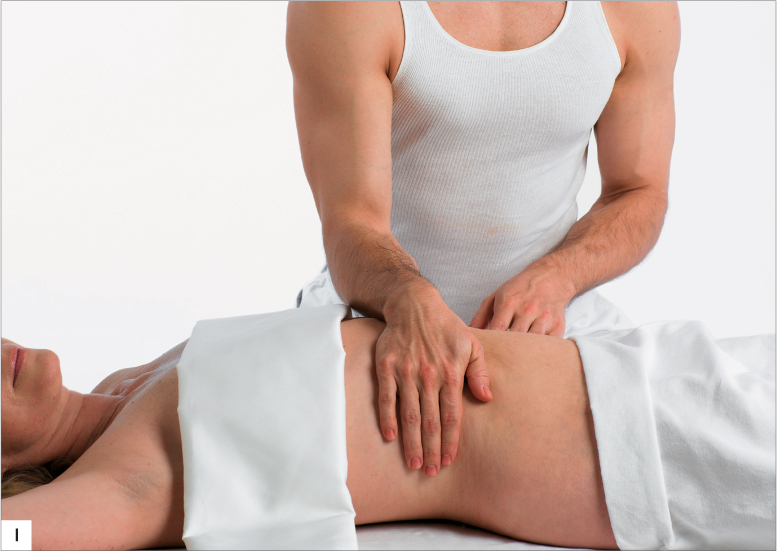
Alternate Hand-Pulling Strokes along the Torso
Reach across your partner’s torso and using both hands apply alternating hand-pulling strokes from her hip to her armpit; brace your thighs against the side of the table for stability, exerting firm pressure as you bring your hands toward you (photos H and I). This pulling stroke twists the torso and stretches a number of the back muscles in a way that can help relieve some low back pain. If she especially likes the twisting motion of the pulling stroke, place her arm across her chest and begin again to alternate pulling strokes from her hip, moving up her torso and continuing all the way up the back of her shoulder. Respect the amount of stretch in her back, recognizing where you meet any resistance to the stretch and make sure the stretch continues to be comfortable. When you have your left arm and hand behind her shoulder and your right arm and hand at her middle back, simply hold the stretch for a few breaths and release slowly as you reverse the twist and return her back to the table.
A Contact Hold before Transitioning to Prone (Face Down)
Place one hand on your partner’s upper chest and the other on her abdomen, over her navel. Hold for three or four of her breaths and then have her turn to a prone (face-down) position.
The hamstrings and calf muscles—chronically tight in many people, especially if they are athletic—are more accessible in the prone position. In addition, it is possible to reduce the appearance of cellulite on the hips and posterior thighs by massaging them.
FACE DOWN COMFORT MEASURES PAY ATTENTION TO COMFORT
The recipient will be more comfortable in the prone position if you set up the table carefully.
Position a Pillow beneath the Ankles
Place a pillow under your partner’s ankles as she lies face down on the table. This allows her feet to hang over the edge of the pillow rather than being strongly plantar-flexed on the surface of the table.
1. LENGTHEN AND KNEAD THE LEG
Undrape your partner’s left leg and thigh and effleurage the length of her leg from the sole of her foot to her buttock, spreading lubricant. As with all lubricant-spreading strokes, start with light pressure and gradually increase the pressure with repetitions of strokes. After a few full effleurage strokes, move to your partner’s thigh and begin petrissage strokes there, lifting and squeezing the tissue and feeding it back and forth from one hand to the other hand. As you feel her muscles begin to soften, you may use the backs of your fingers or all of your fingers together to perform deeper effleurage strokes from just above her knee to her sit bones; these strokes will follow the hamstrings, a group of muscles which tend to be tight and frequently contribute to low back pain by pulling the pelvis down. See if you can feel the fibers as they run from medial and lateral to her knee all the way up to her lower buttock crease. Applying deep effleurage slowly and leaning in will gradually encourage length in the hamstring muscles.
2. IRON THE HAMSTRINGS
You may also use your right forearm with your palm facing down and your elbow pointing toward your partner’s right leg to slowly iron out the hamstring muscles, moving slowly (photo A). If you want to reduce some of the tension in the hamstrings while you massage them, lift your partner’s foot at the ankle with your right hand so that it is above her knee and make several long strokes on her thigh with your left hand. Exercise caution with your pressure. Tight hamstrings are tender hamstrings. Be sure to ease into pressure very gradually.
3. FIND THE RANGE OF MOTION FOR THE LOWER LEG AND FOOT
Hold your partner’s left foot with your palm facing up under the top of her foot and your fingers curved around the ball of her foot. Place your left hand on her sacrum and press down firmly; this will reduce the likelihood of her hip lifting as you perform the stretch. With a quick rotation of your wrist away from yourself, flick your partner’s heel away (photo B). It will return to a neutral position at its own rate, establishing the rhythm for repeated heel flicks, during which you may rotate her foot and leg closer to and farther away from her buttocks, as well as closer to and farther away from yourself. These range-of-motion circles for the lower leg help create a lot of movement in the calf muscle. Because these muscles are often tight and tender, this indirect method of loosening them may be more comfortable for your partner than more direct pressure.
4. STIMULATE CIRCULATION IN THE CALF
Standing at the left side of the table near the lower leg, place your partner’s leg back onto the table and pillow and petrissage her calf muscles just as you did her thigh. You may also lift the tissue and shake it as you did with her hamstrings. Move closer to her foot and apply alternating hand-pushing strokes from above her ankle almost to her knee. This stimulates circulation in the lower leg. Then clasp your fingers together, as if in prayer, and squeeze the side of her calves with the heels of your hands, bringing your hands together off the back of her leg as you gradually move toward her knee with the strokes. Apply some light effleurage strokes to her entire leg and thigh, making figure eights, with half of the figure eight on her lower leg and half on her thigh, fluidly connecting the limb. Remember to concentrate the strokes so that circulation flows toward the heart!
5. CIRCLE THE HEELS, STROKE THE ARCH
When you return to your partner’s ankle after a few repetitions, circle the heels of your thumbs on the sides of her heels, from the ankle bones to the sole at the heel. Not only will this feel great on her heels, but it will also reinvigorate your hands. Hold the dorsal surface of her foot in your right hand, which can be resting on the pillow, and use the backs of your fingers (left hand) to make an arching stroke along the medial arch of her foot. With your thumbs side by side, apply some deep strokes from the ball of her foot to the front of her heel.
6. REPEAT THE SEQUENCE ON THE RIGHT
Hold your partner’s foot between your hands for a couple of breaths before repeating the foot, leg, and thigh massage on her right limb.
This sequence creates length in the postural muscles of the back, which continuously hold us upright, and increases flexibility in the back, shoulders, and hips. This is an area most of us cannot reach to rub for ourselves, so the back is especially appreciative of targeted attention. Almost everyone has areas of tension and discomfort in some region of the back.
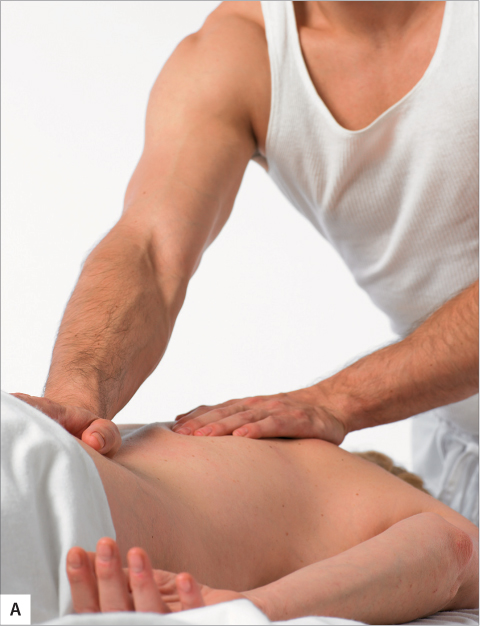
1. GLIDE OVER THE BACK, HIPS, AND SHOULDERS
Stand at the head of the table with your partner’s back undraped. Spread lubricant on her back with several effleurage strokes. Keep your weight evenly on your hands, from your fingertips to the heels of your hands, and lean in to glide to each side of the vertebral column from her shoulders to her hips, gradually increasing from light to moderate pressure as you repeat strokes. When you arrive at her hips, spread your hands apart and make a spreading stroke across her upper hips; then bring your hands in toward the center of her back before pulling them back toward you, broadening at her upper back and making a spreading stroke all the way around her shoulder joint before returning to her upper mid-back. Apply several of these long hourglass-shaped, integrated strokes, which will give your partner a sense of length through her entire back and shoulders.
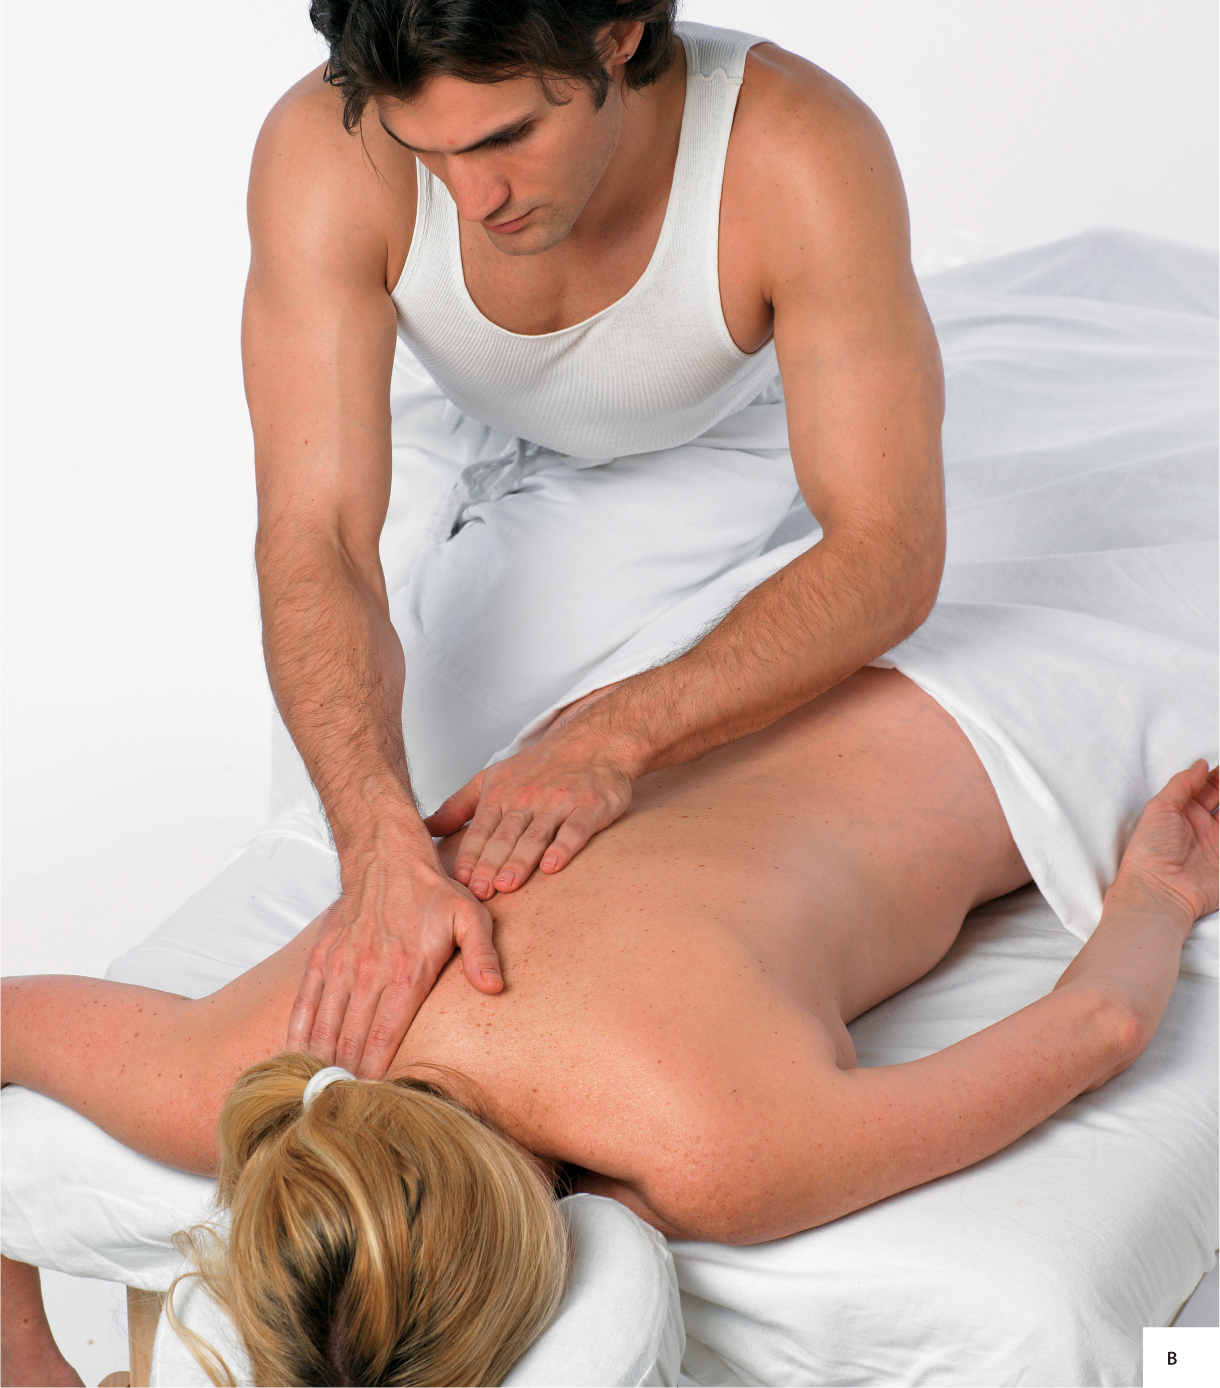
2. ALTERNATE HAND-PUSHING STROKES ALONG ONE SIDE OF THE SPINE
Scoop your partner’s upper trapezius muscle toward the ceiling with your right hand as you begin alternating hand-pushing strokes down the right side of her back (photo A), moving down along the side of the table as you apply the strokes. When both of your hands have arrived at her waist, turn and face her head and repeat the pushing strokes back up toward her shoulders (photo B).
Knead the Opposite Side of the Back
Reach across to the left side of your partner’s back and petrissage the muscles between her spine and her left side, lifting and squeezing the tissue and feeding it back and forth between your hands. The reason to petrissage on the opposite side of the back is to keep your wrists in a neutral position; it can be very hard on your hands to hyperextend your wrists to knead the side of the back closest to you. Keep your thumbs and forefingers of both hands spread wide apart and “aim” the tissue toward the C shape of your opposite hand, moving side to side as you petrissage.
3. ADD FRICTION AND VIBRATION FOR THE GLUTES AND SACRUM
You may also undrape your partner’s buttock on the side of her back you are petrissaging and continue kneading into the gluteal muscles sensitively (photo C); frequently, there are tight areas in the gluteal area, and kneading this area can help reduce discomfort and tightness in the hip and low back. (Everything is, after all, connected.) Place your fingertips on her sacrum, the bony area about the size of your hand just below the middle waistline, and apply circular friction on the bone, feeling for the bone’s indentations. Then, extending your arm at the shoulder, elbow, and wrist, create vibration that starts at your shoulder, moves down through your arm and hand, and vibrates deeply into her sacrum and the muscles that lie beneath it. Often, applying vibration on the sacrum will feel to the receiver like having a deep itch scratched.
4. PETRISSAGE THE UPPER SHOULDERS
Move toward your partner’s head and petrissage the upper trapezius muscles of both shoulders again, drawing your flattened fingers toward the heels of your hand, stabilized against the uppermost part of her back, or stabilizing your fingers in front and pushing the heels of your hands toward your fingers. Find out which movement your partner prefers or throw in a few repetitions of each. You may also perform both actions at once, squeezing with your fingers and the heels of your hands. Again, keep your entire palm on the tissue so that it doesn’t pinch. You may also apply the same kind of back-and-forth petrissage you performed on the left side of her back on her upper-right shoulder before you move to the left side of her head to repeat the back massage.
Create Space between the Shoulder Blades
Returning to the head of the table, place your left hand over your right hand and apply a few slow effleurage strokes on the left side of your partner’s upper back from the base of her neck to the medial border of her scapula (photo D). You are pushing the muscle fibers away from you and lengthening them from the spine. The direction of this short stroke is about forty-five degrees downward to follow the fiber direction of the rhomboid muscles, which are often sore. Repeat the stroke slowly a few times, moving a little downward at each stroke so that the last one ends at the lowest point of the scapula. Repeat on the right side.
Find the Range of Motion in the Shoulder
Standing on your partner’s left side, hold her left upper arm in your left palm loosely just above the elbow, with her forearm and hand hanging down toward the floor. Lean back and rock from foot to foot, swinging her arm from side to side and putting some traction on her upper arm and upper back muscles. Moving the limb as you stretch the muscles tends to confuse them into lengthening more than they would otherwise. Take your partner’s right wrist in your right hand, still holding above her elbow with your left hand, and lift her entire forearm up slightly; then rotate it medially and laterally. Perform this range of motion for her shoulder slowly so that you can feel when you are approaching the end point of the stretch in each direction and don’t exceed those natural limitations; just work the edge, which will gradually increase as you make several rotations. Check in with your partner about whether you are remaining within her comfortable range of motion.
Jostle the “Chicken Wings”
Place your partner’s arm on the table, with her elbow flexed and her hand near her waistline. Put your knee on the table just past her hand so that her arm will remain in place. Reach under her shoulder with your left hand and hold her upper arm in your right palm. With loose and floppy hands, lift her shoulder and arm alternately (photo E); this move is affectionately termed chicken wings to give you an idea of the action you are aiming for.
Try to keep the movement fluid rather than jerky and honor the natural limits in range of motion; you will feel a change when your partner allows full freedom of movement in her shoulder, elbow, and wrist. This movement actually helps free up the upper chest muscles as well.
Remove your knee from the table and lifting your partner’s upper arm with your left hand, sit on the front-left corner of the table with her upper arm over your thigh. Roll the muscles with both of your palms back and forth and as you press down on her upper arm, lean out to your left (photo F). This will stretch the “root” of the arm within the shoulder and will noticeably broaden the shoulder, releasing the muscles that become tight in the upper back, chest, and shoulder. When you feel you have loosened her shoulder as much as it seems inclined to let go, hold her left arm in your palm and return to a standing position, placing her arm on the table by her side.
6. BEAT, SLAP, AND TAP THE BACK
Effleurage your partner’s entire back, using long, hourglass-shaped strokes again to integrate the entire back, after working specific parts of her back, hips, and shoulders. With one hand on each side of her spine and avoiding areas where bones such as the scapulas are close to the surface, begin to apply tapotement, or tapping to her back, with alternating hands. Using the sides of your fists beat up and down her back. Follow with hacking strokes, the kind you always saw trainers in old movies performing on athletes, using the ulnar sides of your hands with your fingers extended. Next, apply tapotement with your cupped palms; this makes a very satisfying sound, similar to the clopping of horses’ hooves. Slapping tapotement is next, followed by tapping with your fingertips all over the back. Tapotement increases circulation and stimulates the nervous system. It confuses the muscles into releasing further, and if your partner has fallen asleep during the massage, tapotement is likely to wake her up.
7. SLOW TO A COMFORTABLE HALT WITH ROCKING
Always follow tapotement with effleurage to “make nice.” Gradually slow your strokes up and down your partner’s back and very lightly bring your alternating hand’s fingertips up her back, neck, and the back of her head to end the back massage. Come to her side and place one hand on her upper back and the other at the hip nearest to you. Gently ease into rocking her back and hips away from you and find her rhythm as her body comes back from the rocking, keeping the movement fluid and nurturing, like rocking a baby. Gradually rock more slowly and with smaller motions until your hands are resting on her still back. Maintain this contact hold for at least three of her breaths before removing your hands and thanking her for honoring you by trusting her body to your hands.