Now that you know how to peer into existing XHTML files and create your own, the next step is to understand what goes inside the average XHTML file. It all revolves around a single concept—tags.
XHTML tags are formatting instructions that tell a browser how to transform ordinary text into something that's visually appealing. If you were to take all the tags out of an XHTML document, the resulting Web page would consist of nothing more than plain, unformatted text.
You can recognize a tag by looking for angle brackets, two special characters that look like this: < >. To create a tag, you type XHTML code between the brackets. This code is for the browser's eyes only; Web visitors never see it (unless they use the View → Source trick to peek at the XHTML). Essentially, the code is an instruction that conveys information to the browser about how to format the text that follows.
For example, one simple tag is the <b> tag, which stands for "bold" (tag names are always lowercase). When a browser encounters this tag, it switches on boldface formatting, which affects all the text that follows. Here's an example:
This text isn't bold. <b>This text is bold.
This isn't quite good enough for XHTML, though. The <b> tag is known as a start tag, which means it switches on some effect (in this case, bold lettering). To satisfy the rules of XHTML, though, every start tag needs a matching end tag that switches off the effect later in the document.
End tags are easy to recognize. They look the same as the start tag, except that they begin with a forward slash. They look like this </ instead of like this <. So the end tag for bold formatting is </b>. Here's an example:
This isn't bold. <b>Pay attention!</b> Now we're back to normal.
Which the browser displays as:
| This isn't bold. Pay attention! Now we're back to normal. |
This example shows another important principle in how browsers work. They always process tags in order, based on where they show up in your text. To get the bold formatting in the right place, you need to make sure you position the <b> and </b> tags appropriately.
As you can see, the browser has a fairly simple job. It scans through an XHTML document, looking for tags and switching on and off various formatting settings. It takes everything else (everything that isn't a tag) and displays it in the Web browser window.
As you've seen, tags come in pairs. When you use a start tag (like <b> for bold), you have to also include an end tag (like </b>). This combination of start and end tags and the text in between them makes up an XHTML element.
Here's the basic idea: elements are containers (see Figure 2-5). You place some content (like text) inside that container. For example, when you use the <b> and </b> tags, you create a container that applies bold formatting to the text in between. You place text inside the container to make that text appear boldfaced. As you create your Web pages, you'll wrap different pieces of text in different containers that do different things. If you think about elements this way, you'll never forget to include the end tag.
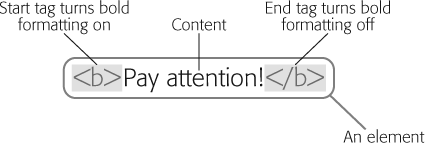
Figure 2-5. To get bold text, you need to start out with the correct container. It's the familiar <b> element.
Note
When someone refers to the <b> element, it means the whole shebang—start tag, end tag, and the content inside. When someone refers to a <b> tag, it simply means the instruction that starts the element.
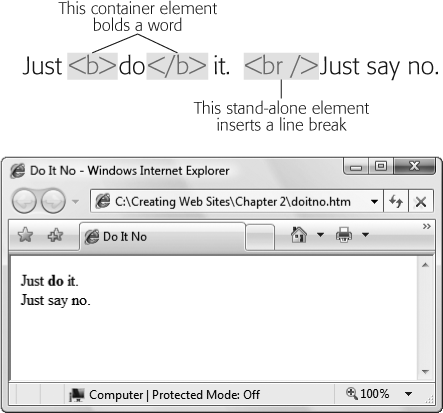
Of course, life wouldn't be much fun (and computer books wouldn't be nearly as thick) without exceptions. When you get right down to it, there are really two types of elements:
Container elements. The container element is, by far, the most common type. Container elements apply formatting to the content nestled between the start and end tags.
Standalone elements. Some tags don't come in pairs. These standalone elements don't turn formatting on or off. Instead, they insert something into a page, like an image. One example is the <br /> element, which inserts a line break in a page. Standalone elements include a slash character before the closing >, sort of like an opening and closing tag all rolled into one. This syntax is handy because it clearly indicates that you have a standalone element on your hands. Standalone elements are often called empty elements because there's no way to put any text inside them.
Figure 2-6 puts the two types of elements in perspective.
In the previous example, you saw how to apply a simple <b> element for bold formatting. Between the <b> and </b> tags, you put text that you wanted to make bold. However, text isn't the only thing you can put between a start and end tag. You can also nest one element inside another. In fact, nesting elements is one of the basic building-block techniques of Web pages. Nesting lets you apply more detailed formatting instructions to text (for example it lets you create bold, italicized text) by piling all the elements you need in the same place. Nesting is also required for more complicated structures (like bulleted lists).
To see nesting in action, you need another element to work with. For the next example, consider both the familiar <b> element and the <i> element, which italicizes text.
The question is, what happens if you want to make a piece of text bold and italicized? XHTML doesn't include a single element for this purpose, so you need to combine the two. Here's an example:
This <b><i>word</i></b> has italic and bold formatting.
When the browser chews through this scrap of XHTML, it produces text that looks like this:
| This word has italic and bold formatting. |
Incidentally, it doesn't matter if you reverse the order of the <i> and <b> tags. The following XHTML produces exactly the same result.
This <i><b>word</b></i> has italic and bold formatting.
However, you should always make sure that you close tags in the reverse order from which you opened them. In other words, if you apply italic formatting and then bold formatting, you should always switch off bold formatting first, and then italic formatting. Here's an example that breaks this rule:
This <i><b>word</i></b> has italic and bold formatting.
Finally, it's worth noting that XHTML gives you many more complex ways to nest elements. For example, you can nest one element inside another, and then nest another element inside that one, and so on, indefinitely.
Note
If you're a graphic-design type, you're probably itching to get your hands on more powerful formatting elements to change alignment, spacing, and fonts. Unfortunately, in the Web world you can't always control everything you want. Chapter 5 has the lowdown, and Chapter 6 introduces the best solution, style sheets.