Once you sign up for Web hosting, you're ready to transfer some files to your Web space. To perform this test, you can use Lee Park's résumé from the previous chapter (which you can download from the Missing CD page at www.missingmanuals.com). The final version has the filename resume5.htm.
Browser-based uploading is fairly easy, but it's not always convenient. The idea is that you go to a special Web page on your host's site where you specify the files on your hard drive that you want to transfer to the server. Many hosting companies provide both browser-based and FTP-based uploading. If you're using a budget plan or a free Web host, you may not have the FTP option at all. To perform browser-based uploading, follow these steps:
Go to your Web hosting company's site.
Log in to your account with the user name and password you created when you signed up.
Usually you'll find a login box somewhere on the first page.
Browse through the icons until you find the page for managing files.
Each Web hosting provider has its own slightly different site layout. Figure 3-13 shows what things look like at Brinkster.
Specify the files you want to upload. You need to specify each file individually, by clicking the Browse button next to the text box.
For the résumé example to work properly, make sure you upload both the resume5.htm file and the linked picture, leepark.jpg, to the same place on your Web site.
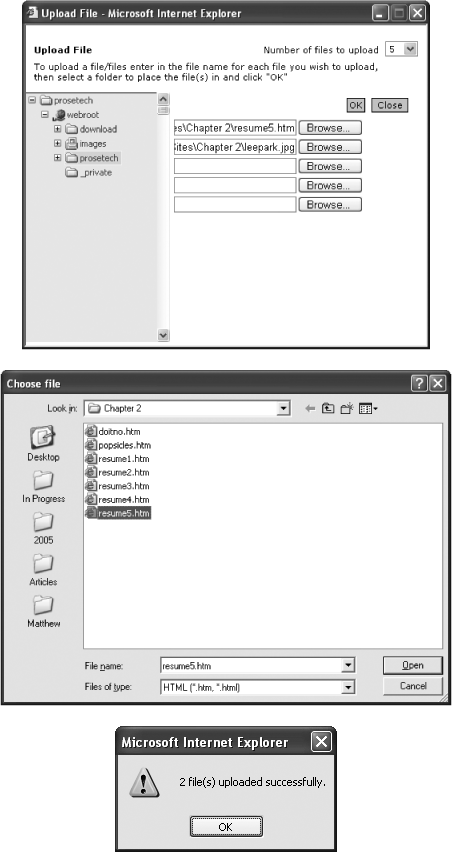
Figure 3-13. Every Web hosting provider's site looks a little different, but you'll eventually find a set of text boxes that let you upload pages. These text boxes always work the same way. First you click the Browse button (top image), which shows an Open File dialog box (middle). Then you browse to the file you want, select it, and click Open. If you have several files to upload at once, repeat this process using different text boxes. When you've chosen all the files you want (or just run out of text boxes), click OK, and then wait until the files are copied and you get a confirmation message (bottom).
Log out when you finish.
Now you can test your work by entering your domain name followed by the Web page name. For example, if you uploaded the résumé example to your Web site www.supersavvyworker.com, try requesting www.supersavvyworker.com/resume5.htm in your browser. You don't need to wait—once you upload the file to your Web server, it's available almost instantly to any browser that requests it.
Unfortunately, the possibilities for mistakes with browser-based uploading are endless. The most common error occurs when you have a large number of files to copy at once. Not only is it time-consuming to pick out each one, it's all too easy to forget something. Other headaches include trying to upload files to different folders, or needing to rename or delete files after you've uploaded them.
Ideally, your Web hosting company will provide FTP access. FTP access lets you transfer groups of files from your computer to the Web server (or vice versa) in much the same way that you copy files from one folder to another in Windows Explorer or the Mac's Finder.
Before you can upload files using FTP, you need the address for the FTP server, as well as a user name and password. These are usually the same as the user name and password of your Web hosting account, but not always.
To upload files using FTP, you can use a standalone FTP program. However, in these modern times you probably don't need to. Windows includes its own built-in FTP browser that handles the task comfortably. Here's how it works:
Open Windows Explorer.
There are many ways to open Windows Explorer, which lives in a slightly different part of the Start menu depending on your version of Windows. One approach that always works is to right-click the Start button, and then choose Explore.
Type the FTP address into the Windows Explorer address bar. Make sure the URL starts with ftp://.
In other words, if you're trying to visit ftp.myhost.com, enter the URL ftp://ftp.myhost.com, not http://ftp.myhost.com/", which incorrectly sends your computer off looking for Web pages.
The next step is to enter your login information (see Figure 3-14).
Once you log in, you'll see the folders and files on the Web server, which you can copy, delete, rename, and move in much the same way you work with your local folders and files. Seeing as you haven't uploaded anything yet, the folder may be empty, or it may contain a generic index.htm file that shows an "under construction" message if someone happens to browse to it.
The next step is to copy your files to the Web server. The easiest way to do this is to drag the files from another open window, and then drop them in the FTP window.
Figure 3-15 shows the steps you need to upload the résumé example.
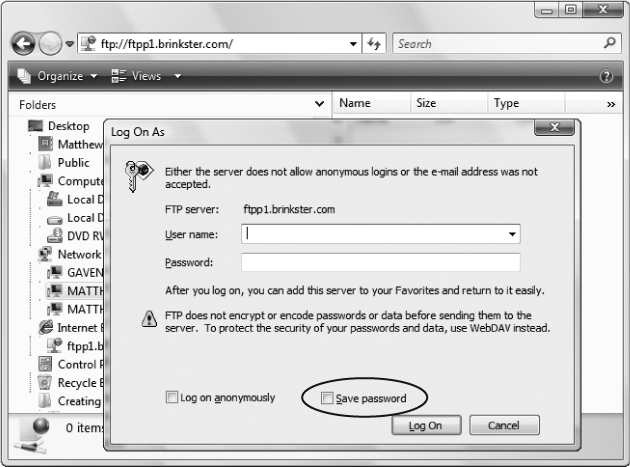
Figure 3-14. When you first enter the FTP site address, Windows Explorer will probably try to log you in anonymously and fail. It may then prompt you for your user ID and password (as shown here), or it may just show you an error message. If you get an error message, click OK, and then select File → Login As from the menu. If you turn on the "Save password" checkbox (circled), you don't need to repeat this process on subsequent visits.
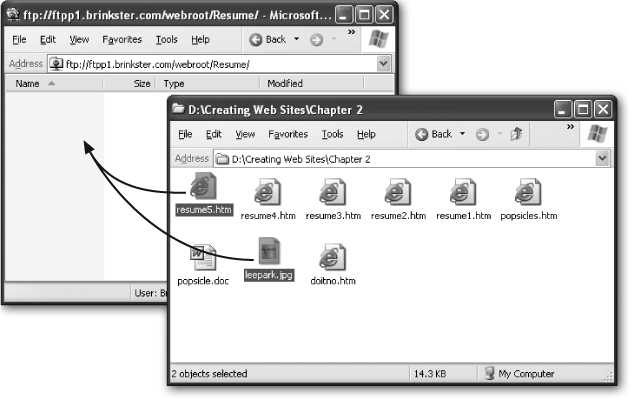
Figure 3-15. To get Lee Park onto the Web, start by opening a window in your file system using Windows Explorer. Then browse to the appropriate folder on your computer. When you find the resume5.htm and leepark.jpg files you downloaded earlier, select them, and then drag them into the FTP window to start the uploading process.
Tip
Drag-and-drop isn't the only way to transfer files. You can use all the familiar Windows shortcuts, including the Cut, Copy, and Paste commands in the Edit menu, and the Ctrl+C (copy) and Ctrl+V (paste) keyboard shortcuts.
If you're working on a Mac, you need to use a standalone FTP program. Fortunately, you've got loads of free options, including the super-easy-to-use Rbrowser (available at www.rbrowser.com). Things work pretty much the same way they do for your Windows brethren. First, fire up Rbrowser. You'll be asked to log in (Figure 3-16). Once that's out of the way, you can transfer your files by dragging them from a folder on your Mac to the Rbrowser window.
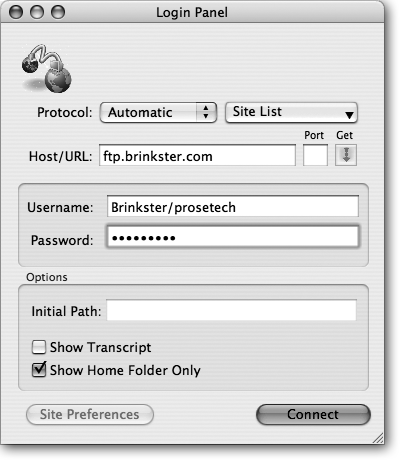
Figure 3-16. To log in to Rbrowser, you need to supply the name of the FTP server (in the Host/URL box), and your user name and password. Don't worry about setting an initial path—you can always browse to the right subfolder on your Web site once you make the connection. Finally, click Connect to seal the deal.