Deck Planning & Design
One of the benefits of building a deck is that you can create an impressive structure in a relatively short period of time, even with modest tools and skills. It’s an exciting project to undertake, but don’t let your energy and enthusiasm get the best of you. Without careful planning and design on the front end, your deck project could be frustrating to build, unnecessarily costly, or even dangerous to use when you’re through. So, in order to put your best foot forward, plan to spend those first hours of the project at a desk developing a thorough plan.
As you begin the planning process, keep in mind that your deck needs to satisfy four goals: it should meet the functional needs of your household, contribute to your home’s curb appeal and property value, fit your project budget, and satisfy local building codes for safety. This chapter will help you familiarize yourself with all four goals so you can build confidently and correctly, the first time. Be sure to spend some time reviewing the deck plans of this book, as well as other published deck plans. You may be able to find the perfect deck for your home without designing it from scratch or by making minor modifications to these plans.
In this chapter:
▪ Working with Building Inspectors
 Evaluating Your Site
That overused real estate adage about “location, location, location” definitely applies to decks. Once you build your deck, it’ll be there to stay, so choose your site carefully. A deck will be affected by sunlight and shade, prevailing winds and seasonal changes. Those natural factors will influence how and when you use your deck. There are other site-related issues to consider as well. An on-grade deck will reduce the size of your yard, which may or may not be an issue, depending on your desire for a garden, lawn, or play area. A raised deck could be perfect for entertaining friends, but it could also create unwanted shade in a flowerbed or darken a nearby living space.
The size and layout of your property will also impact your choice of deck sites. You may need to build a multi-level deck or a long run of steps to reach the ground of a sloping yard. Will your proposed deck site require you to remove a tree or two to accommodate it, or will you simply build around it? A tall deck could give you new vistas on the neighborhood, but will it encroach on your neighbor’s window privacy or put you dangerously close to power lines? These are all factors to keep in mind when settling on the final location of your deck. Make sure the benefits of your deck site outweigh any compromises you may need to make.
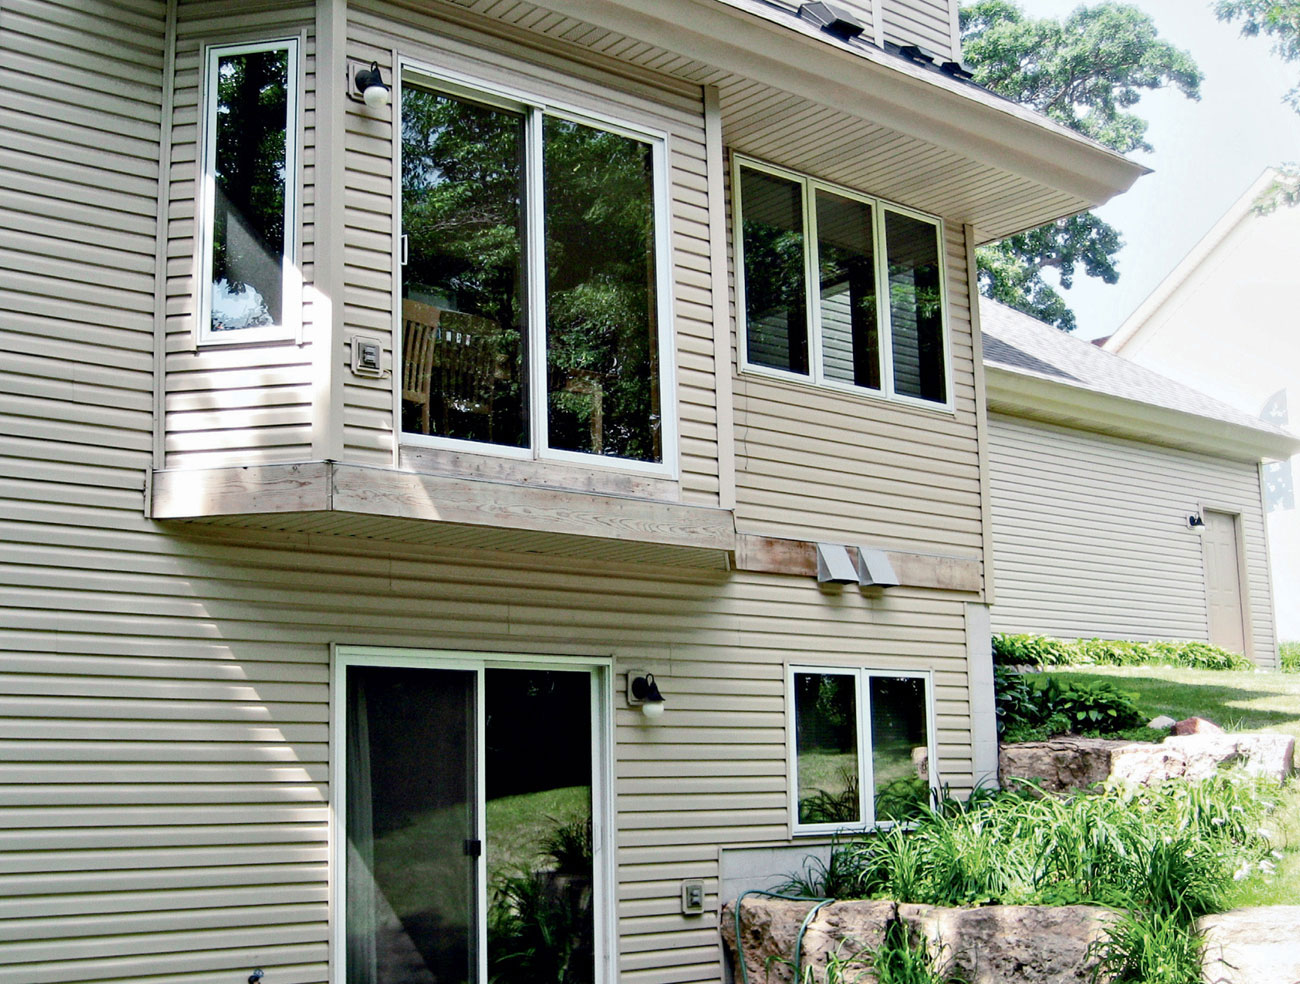
The location of your deck is often dictated by the design and pre-existing features of your house. This home was built with a second-story sliding glass door in anticipation of an upper-level deck. However, you’ll usually have more than one site to choose from, so consider all the options before you commit to a final location for your deck.
 Deck Siting Considerations
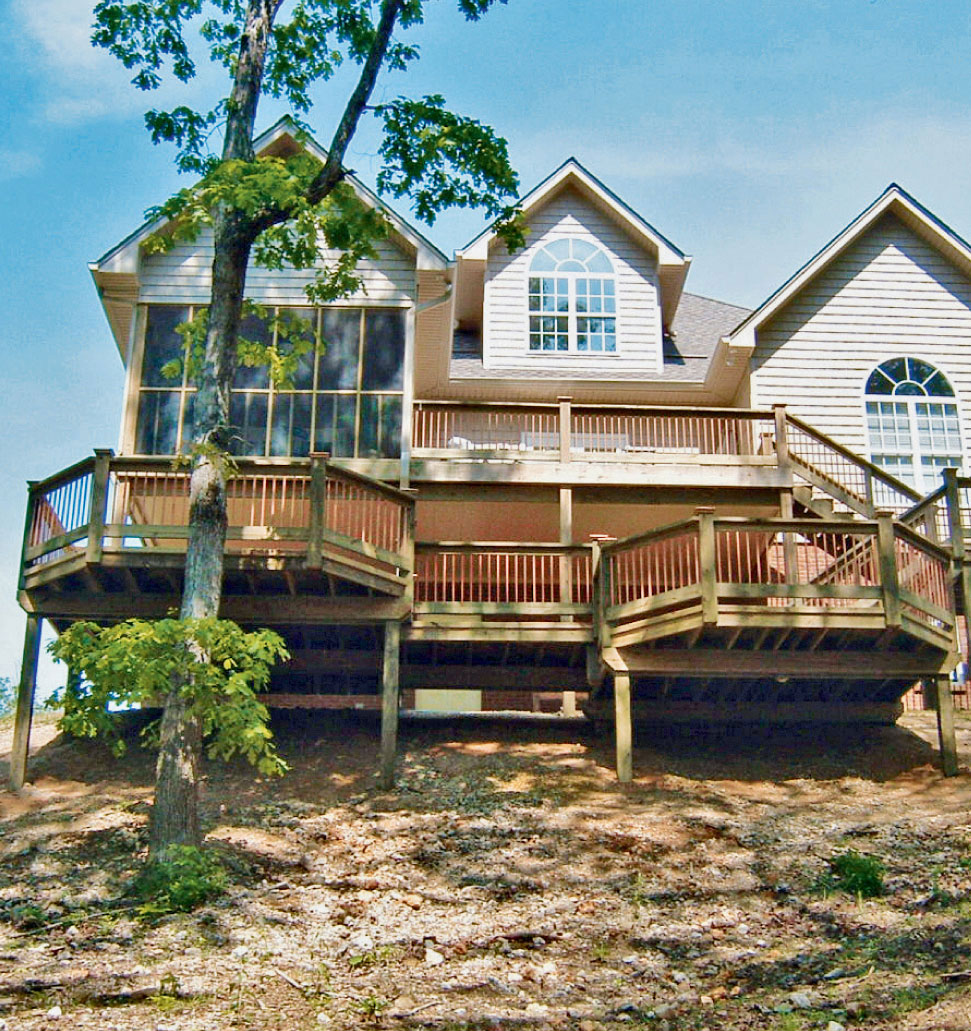
Natural yard features, such as a steep slope, will impact a deck’s layout and access. You may need to build a multi-level deck or a long staircase with a landing to accommodate the changing grade.
Before you build a second-floor deck, consider whether your site will compromise your neighbor’s privacy, place you too close to power lines, or shade areas of the yard or windows beneath.
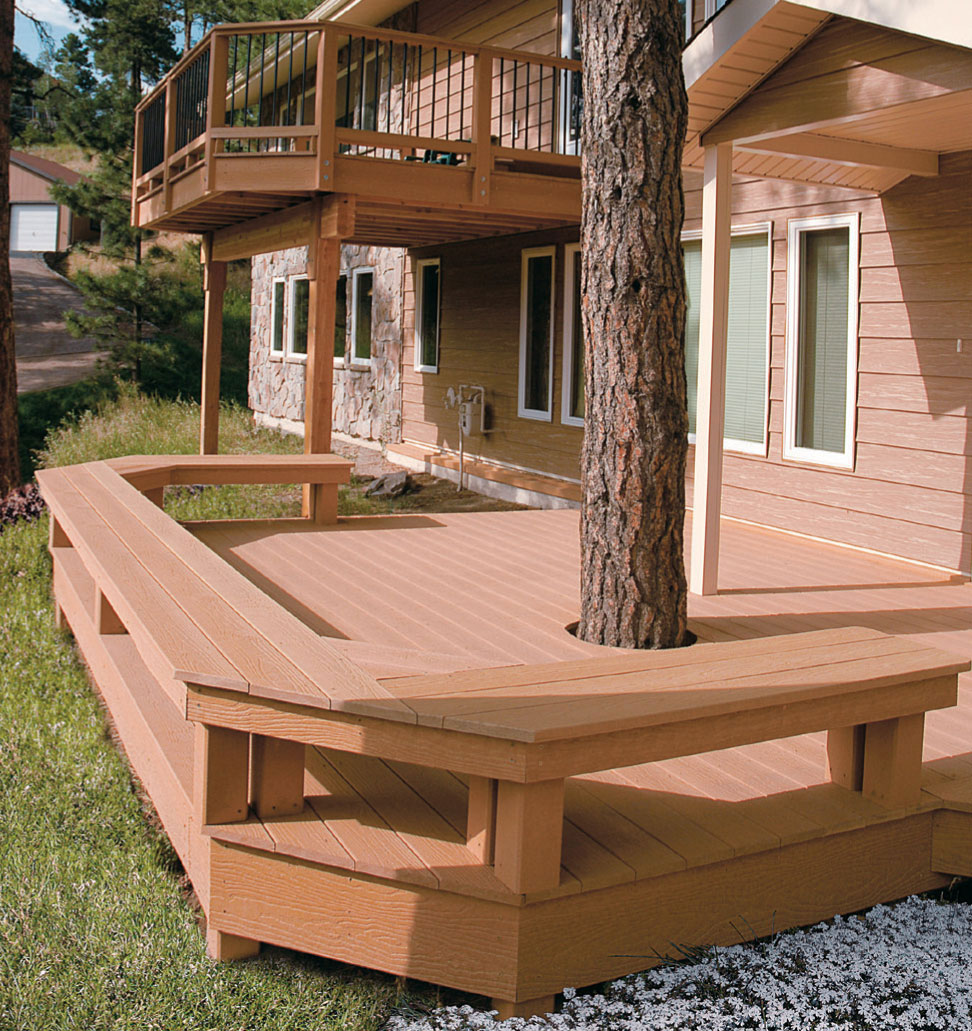
If you live in the midst of nature, you can go one of two ways with your deck design: blend in or stand out. Here, the homeowner has chosen the former, opting to build a modest lower deck around an existing evergreen using synthetic decking the exact color of the home’s siding.
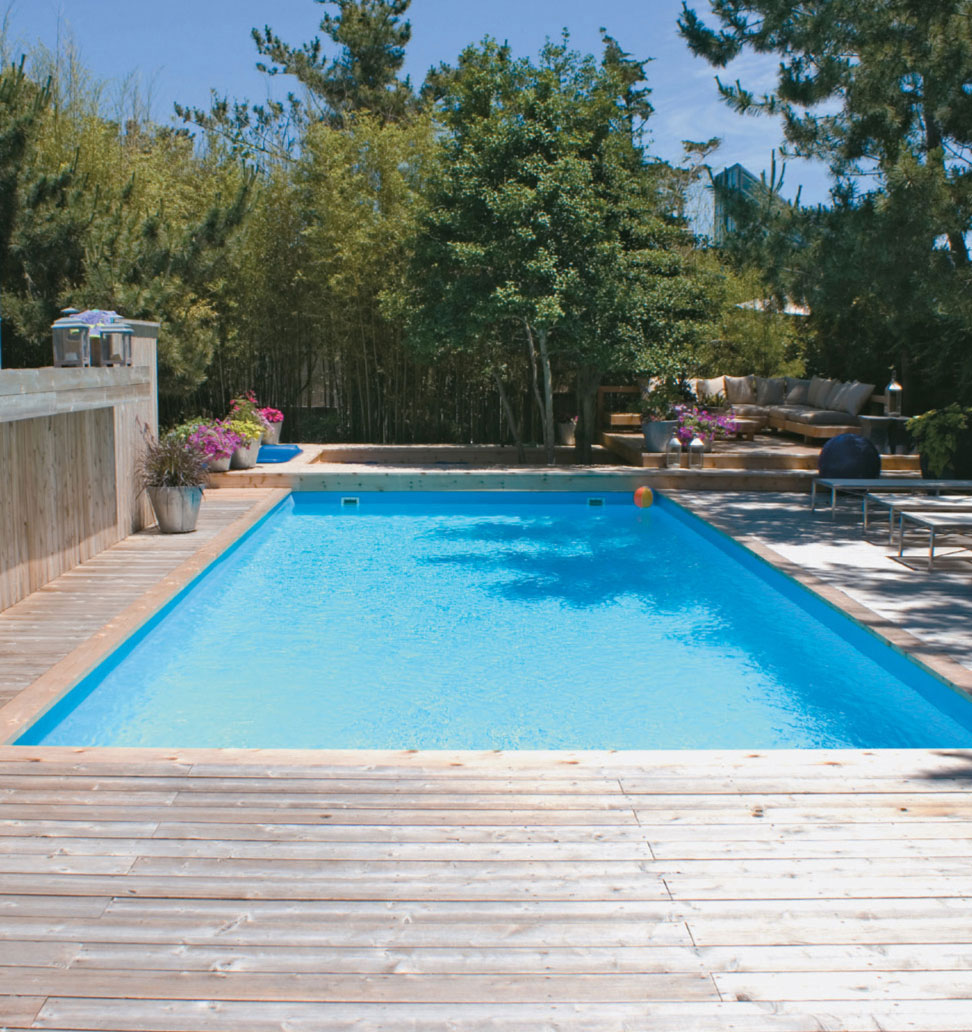
Built-ins and features you may want to use in conjunction with the deck, such as a swimming pool, will influence where and how you site the deck.
Deck Building CodesMost decks are relatively simple structures, but even a basic deck project must conform to the requirements of building codes in your area. In fact, virtually every aspect of your new deck—from its location on your property, to the design you choose and the materials you buy to build it—must meet stringent guidelines for safety. Codes vary to some degree from state to state, but they are based on general regulations established by the International Residential Code. Your local building inspector can provide you with a list of the relevant deck codes and help you interpret them so you can create code-compliant plans for your deck project. You may also want to download a free PDF copy of the “Prescriptive Residential Deck Construction Guide” (see Resources, page 347).
The next few pages will provide a survey of some of the more common code requirements for decks, although it is by no means comprehensive. Use this section as a way to familiarize yourself with the code requirements you will probably face as you plan and build your new deck.

Footing diameter and depth is determined by your local codes, based on the estimated load of the deck and on the composition of your soil. In regions with cold winters, footings must extend a prescribed depth below the frost line. Minimum diameter for concrete footings is 8".
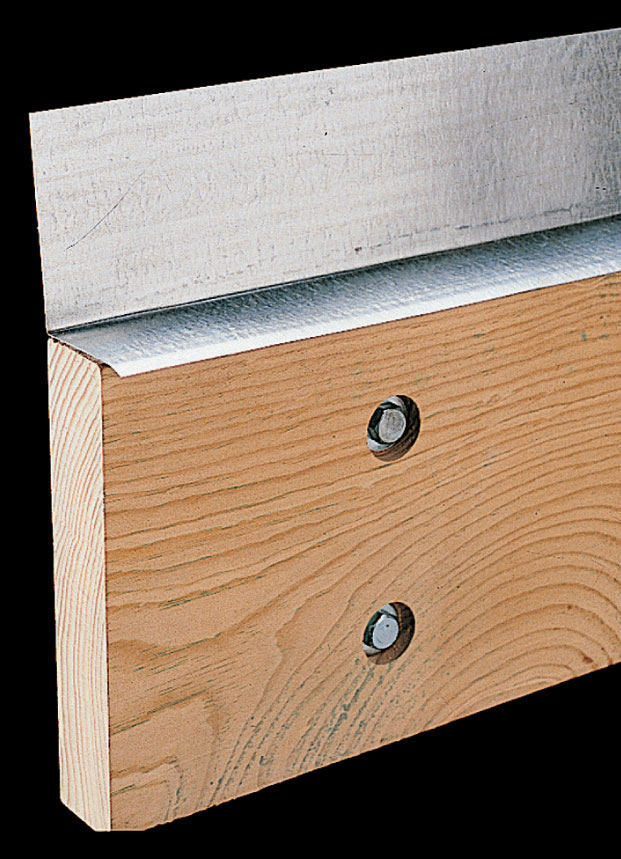
Metal flashings must be used to prevent moisture from penetrating between the ledger and the wall.
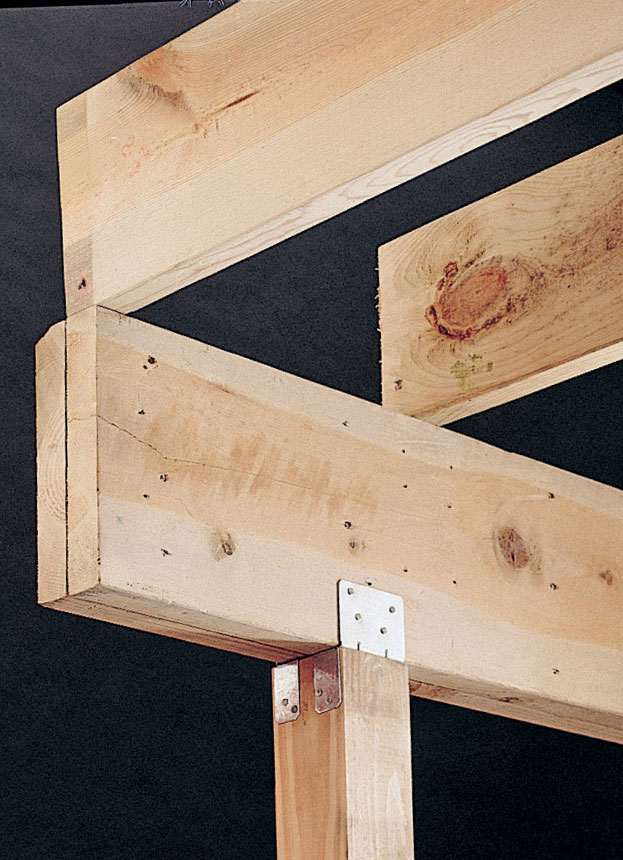
Beams may overhang posts by no more than 1 ft. Building regulations generally require that beams should rest on top of or be fully notched into posts, secured with metal post-beam caps or bolts.

Engineered beams, such as a laminated wood product or steel girder, should be used on decks with very long joist spans, where standard dimension lumber is not adequate for the load. Engineered beams for decks must be rated for exterior use.
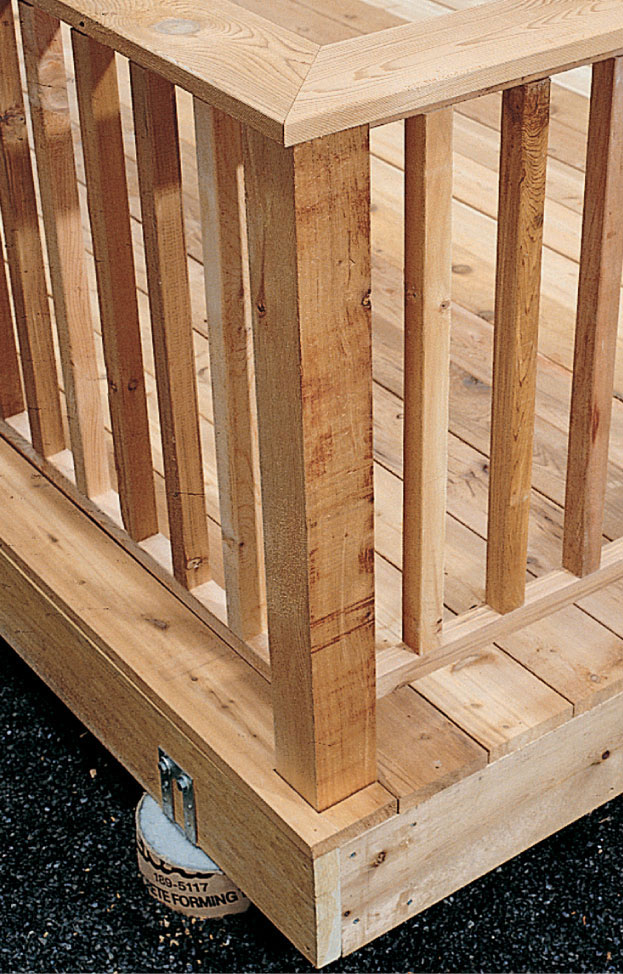
Railings are required by local codes for decks more than 30" above the ground and must usually be at least 36" in height. Bottom rails must be positioned with no more than 4" of open space below them. Balusters, whether vertical or horizontal, can be spaced no more than 4" apart.
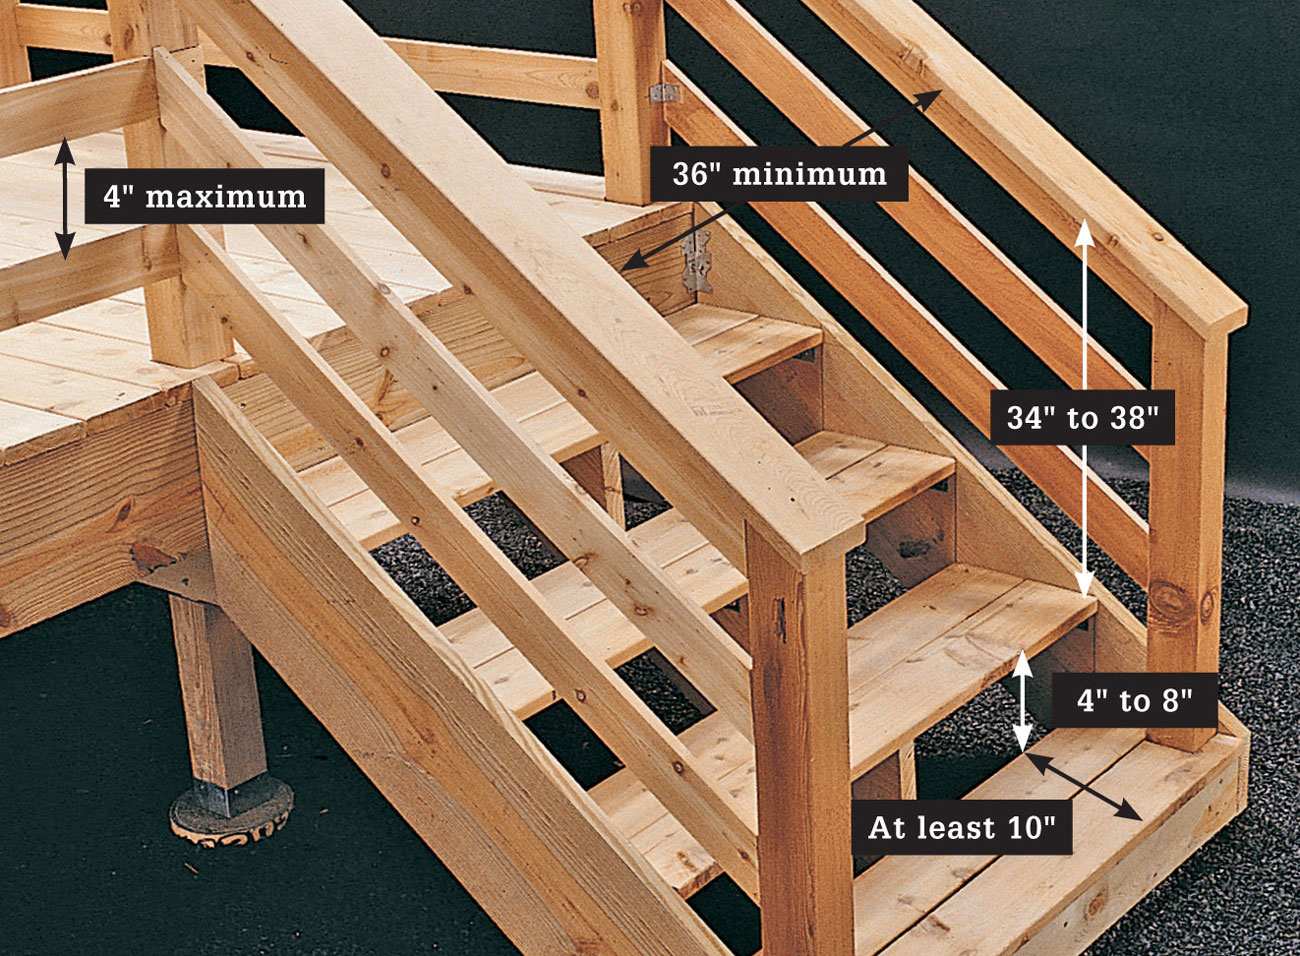
Stairs must be at least 36" wide. Vertical step risers must be between 4" and 7-3/4" and uniform in height within a staircase. Treads must have a horizontal run of at least 10" and be uniform in size within a staircase. Stair railings should be 34" to 38" above the noses of the step treads, and there should be no more than 6" of space between the bottom rail and the steps. The space between the rails or balusters should be no more than 4". Note: Grippable handrails may be required for decks with four or more risers. Consult your local building inspector.

Code violation. The International Building Code no longer allows joists to straddle the sides of a post fastened with through bolts, as shown here. It no longer endorses structural posts made of 4 × 4 lumber: 6 × 6 is the minimum size. Railing posts may be 4 × 4.

Beam assemblies. Deck beams made of 2 × lumber must be fastened together with staggered rows of 10d galvanized common nails or 3" deck screws. If the wood components that make up the beam are spliced together, stagger the splices and locate them over beams for added strength.
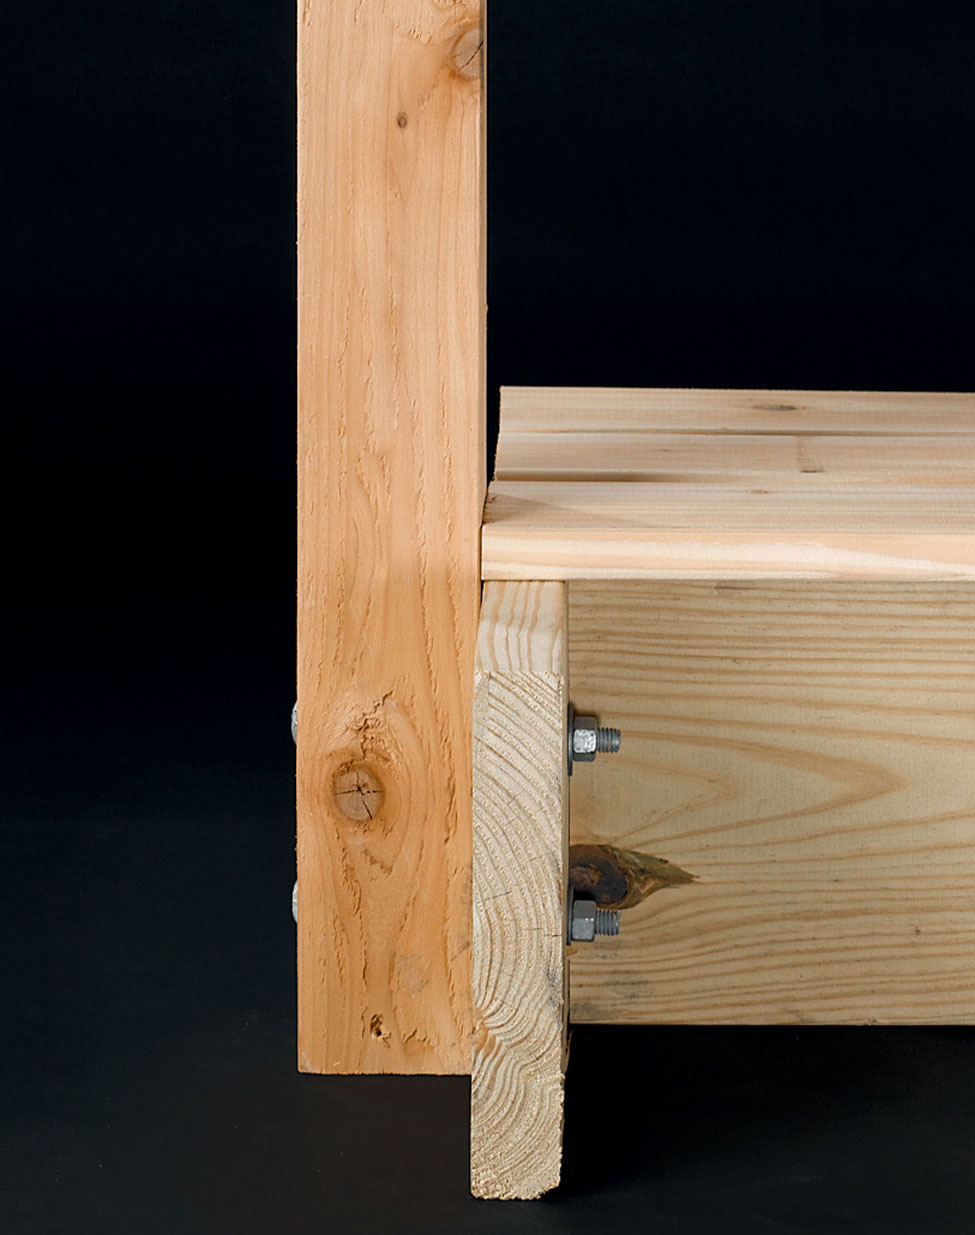
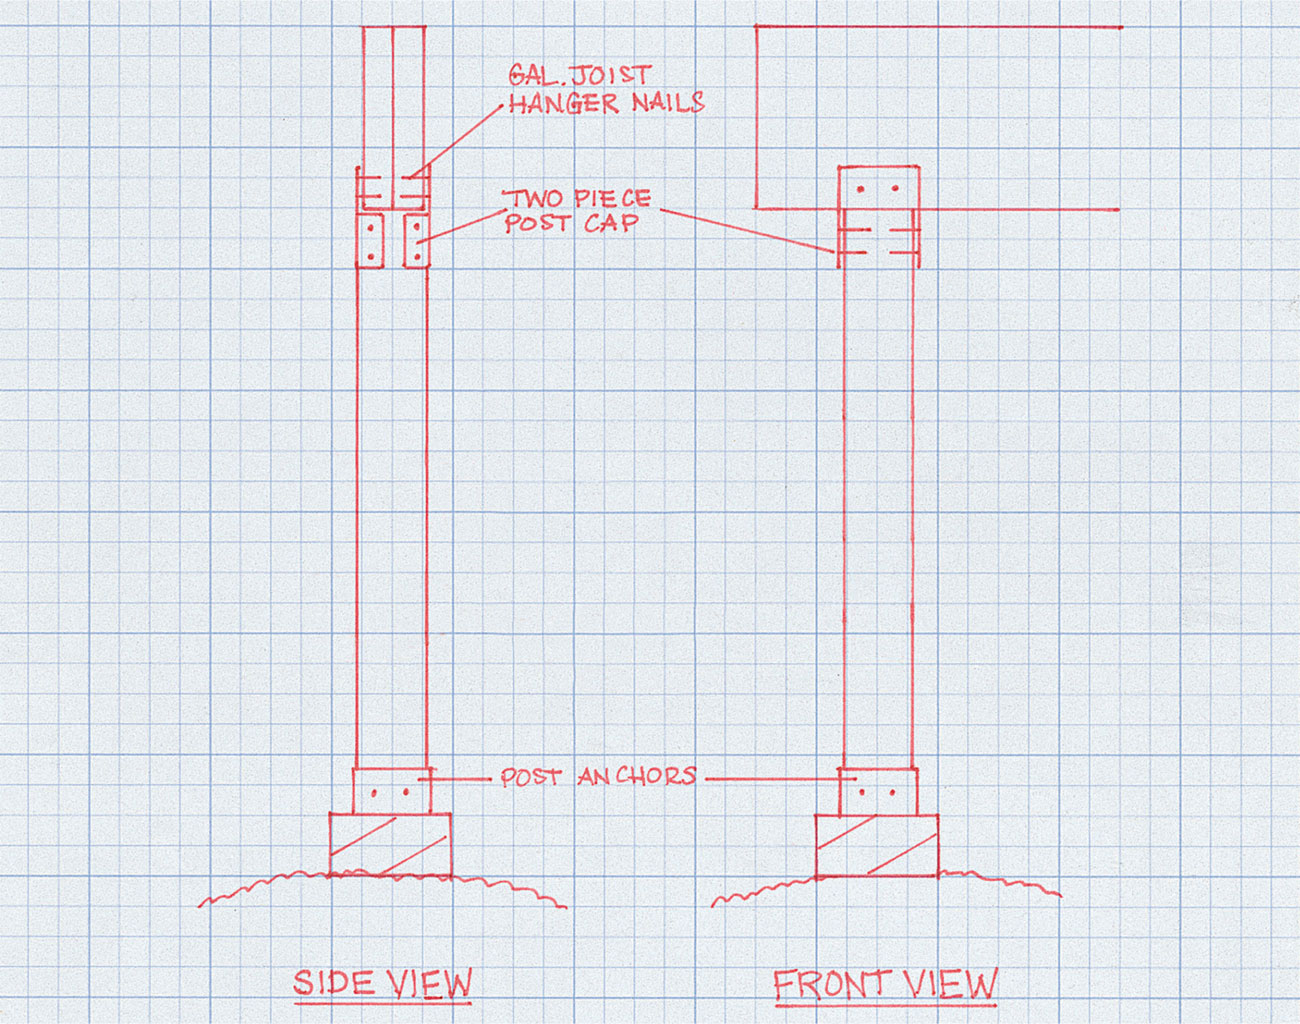
Post-to-beam attachment. Deck posts, regardless of length or size of deck, should be made of minimum 6 × 6 structural lumber. Notch the posts so that beams can bear fully in the notch, and attach them with pairs of 1/2-in.-diameter galvanized through bolts and washers. Or, you can mount beams on top of posts with galvanized post cap hardware. Some codes prohibit the use of notched posts. Check with your local building department.
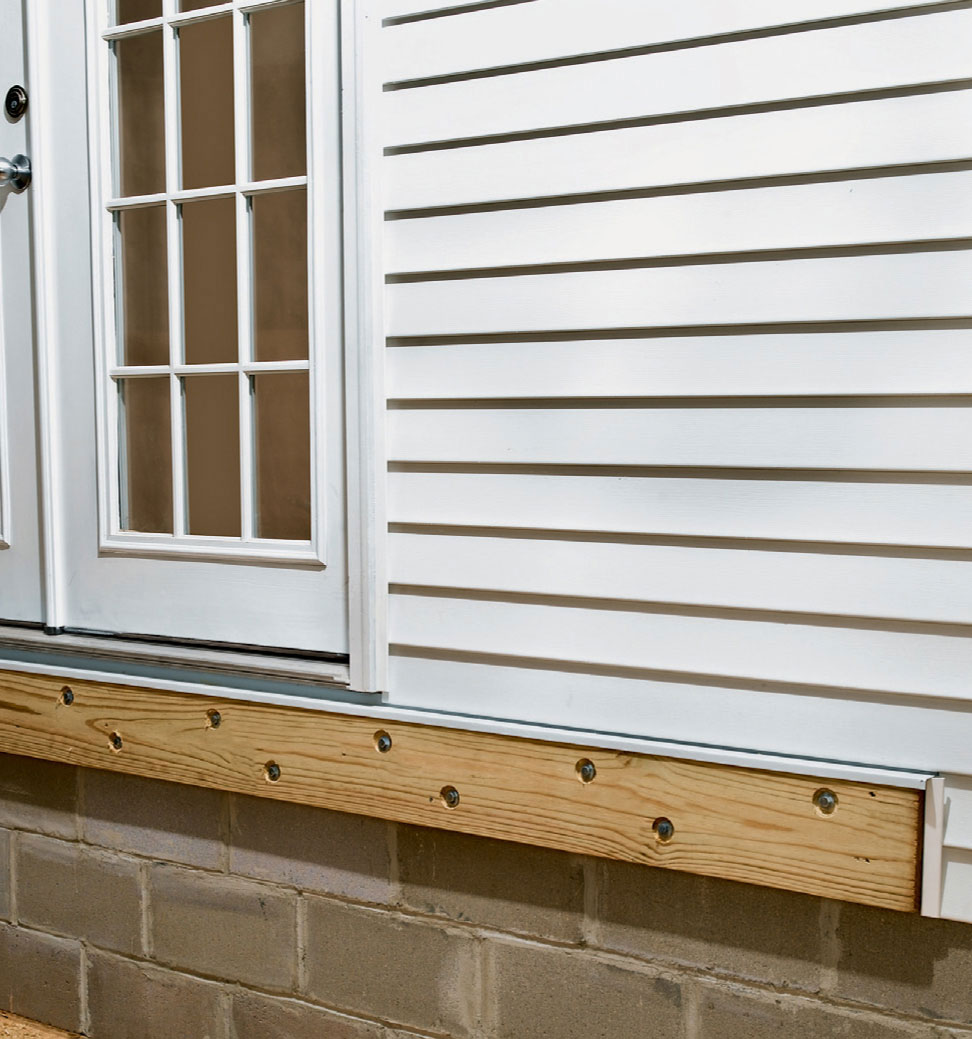
Ledgers and rim joists. When a ledger is fastened to a rim joist, the house siding must be removed prior to installation. Either 1/2-in.-diameter lag screws or through-bolts with washers can be used to make the connections.
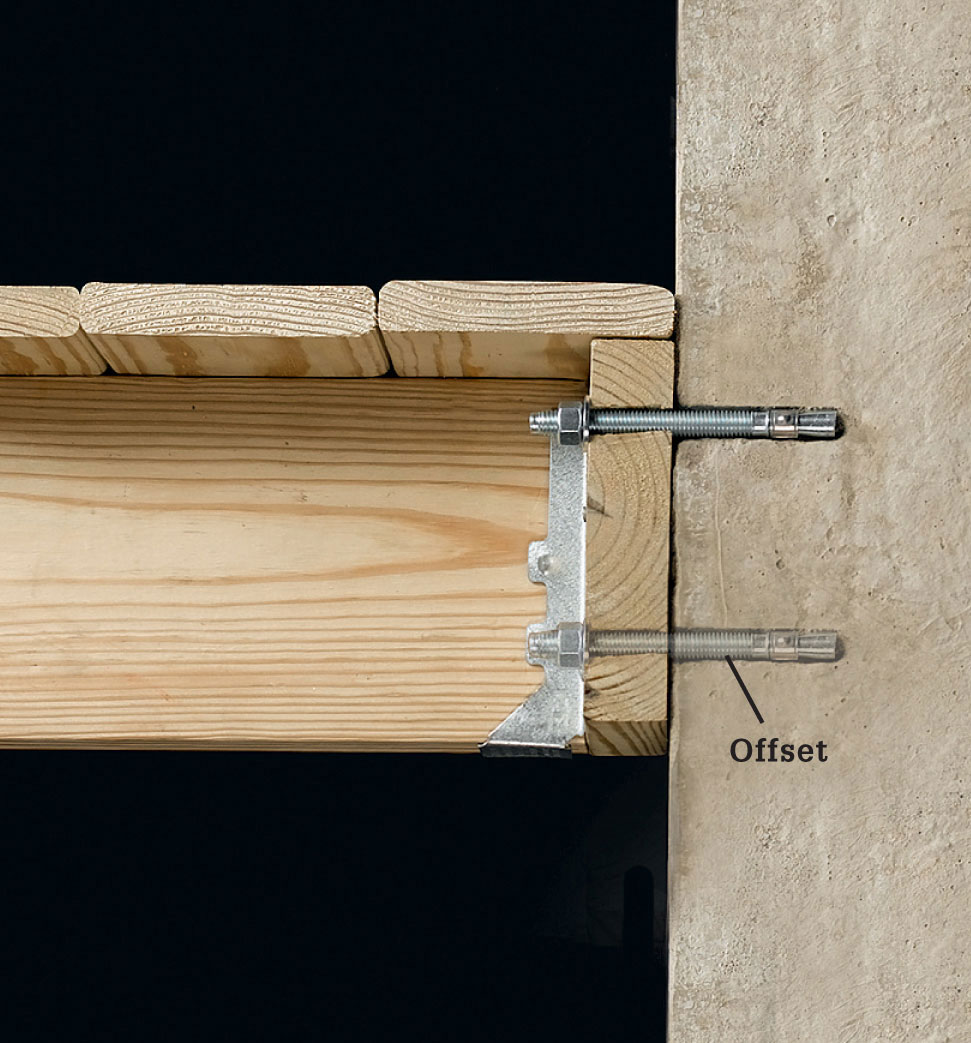
Ledgers and concrete walls. Ledgers fastened to solid concrete must be attached with bolts and washers driven into approved expansion, epoxy, or adhesive anchors.
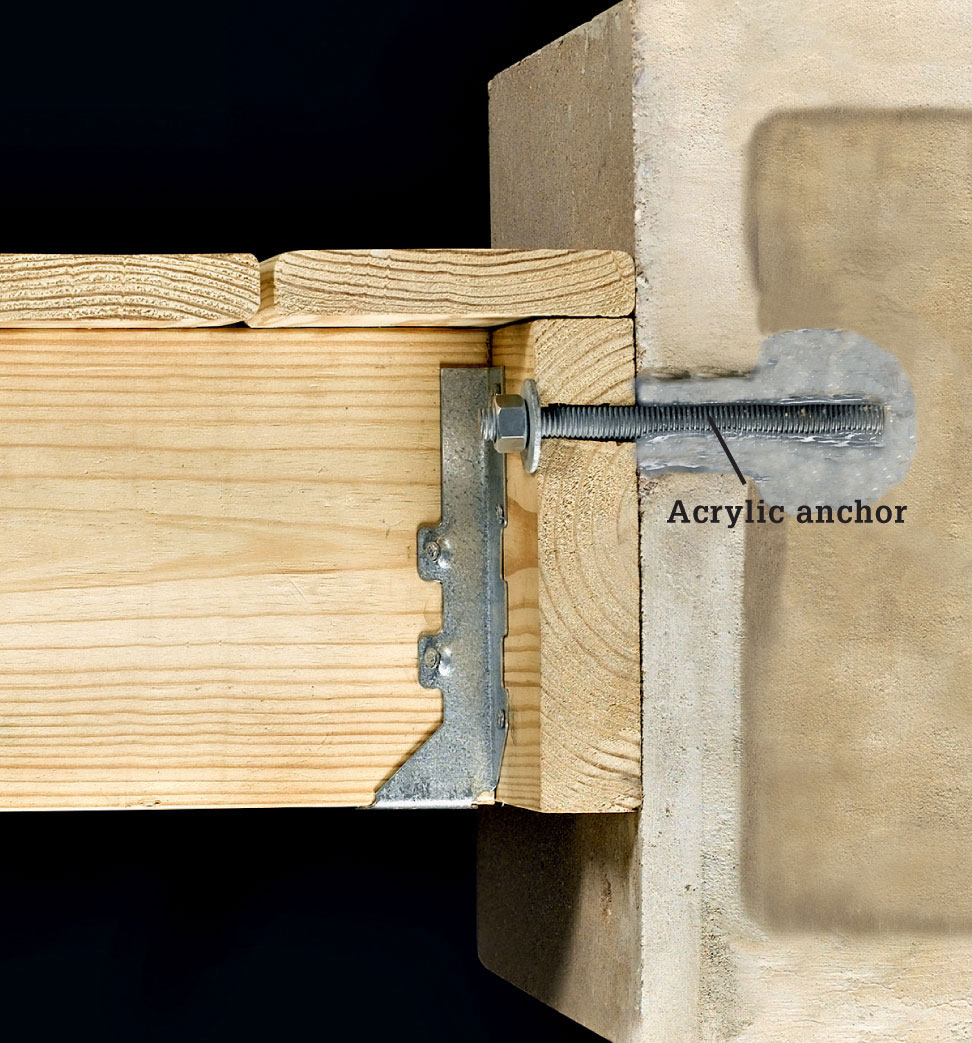
Ledgers and block walls. When fastening ledgers to hollow concrete block walls, secure the attachment bolts to the wall with approved epoxy anchors (also called acrylic anchors).
No notched railing posts. Code no longer allows deck railing posts to be notched where they attach to the deck rim joists. Railing posts should be fastened to rim joists with pairs of 1/2-in.-diameter through bolts and washers. In some cases, hold-down anchor hardware may also be required.

Stair lighting. Deck stairs must be illuminated at night from a light located at the top of the landing. The light can be switch-controlled from inside the house, motion-controlled, or used in conjunction with a timer switch.

Chimney chases and bays. When framing a deck around a chimney or bay window, a suitable double header must be added where the ledger is spliced to accommodate the obstruction. The type of header shown here can span a maximum of 6 ft.

Rim joist connections. Attach rim joists to the end of each joist with five #10 × 3-in. minimum wood screws. Secure decking to the top of rim joists with #10 × 3-in. minimum wood screws, two per board.
Determining Lumber SizeA deck has seven major structural parts: the ledger, decking, joists, one or more beams, posts, stairway stringers, and stairway treads. To create a working design plan and choose the correct lumber size, you must know the span limits of each part of the deck. The ledger is attached directly to the house and does not have a span limit.
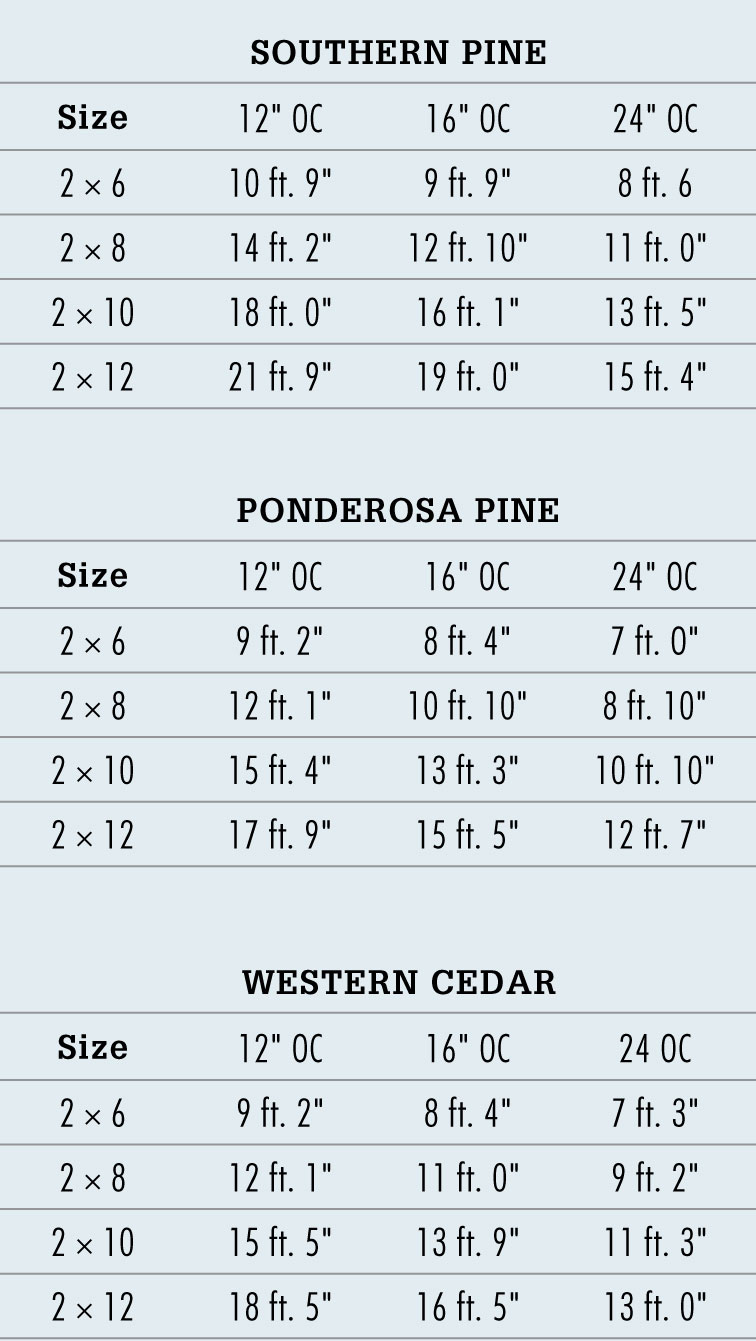
A span limit is the safe distance a board can cross without support from underneath. The maximum safe span depends on the size and wood species of the board. For example, 2 × 6 southern pine joists spaced 16" on-center can safely span 9'9", while 2 × 10 joists can span 16'1".
Composite, plastic, and aluminum decking all have their own span specifications, which are shorter than the standardized specifications for lumber. Always consult the manufacturer’s recommendations when using non-wood decking. None of these materials are suitable for use in structural support.
Begin planning your deck by first choosing the size and pattern for the decking. Determine the actual layout of joists and beams by using the tables on the opposite page and information in the “Prescriptive Residential Deck Construction Guide” (see Resources, page 347). In general, a deck designed with larger lumber, such as 2 × 12 joists and beams, requires fewer pieces because the boards have a longer span limit. Finally, choose the stair and railing lumber that fits your plan, using the same tables.
Use the design plans to make a complete list of the quantities of each lumber size your deck requires. Add 10% to compensate for lumber flaws and construction errors. Full-service lumberyards have extensive selections of lumber, but prices may be higher than those at home improvement centers. The quality of lumber at home centers can vary, so inspect the wood and hand-pick the pieces you want or add a larger percentage to compensate for lumber flaws. Both lumberyards and home centers will deliver lumber for a small fee, and you can usually return unused, uncut lumber if you keep your receipts.

Meet or exceed all lumber size codes. For example, use lumber that is at least 6 × 6" for all deck posts, regardless of the size of the deck or the length of the post.
Dimension & Span Limit Tables for Deck Lumber 

Nominal vs. actual Lumber Dimensions: When planning a deck, remember that the actual size of lumber is smaller than the nominal size by which lumber is sold. Use the actual dimensions when drawing a deck design plan.
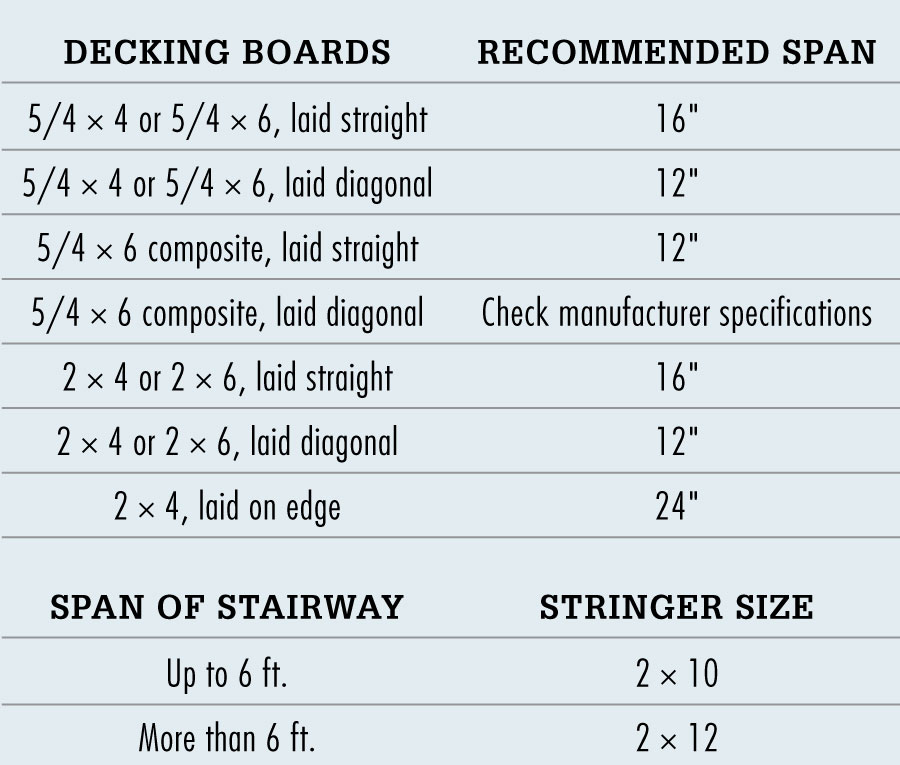
Recommended Decking Span Between Joists: Decking boards can be made from a variety of lumber sizes. For a basic deck use 2 × 4 or 2 × 6 lumber with joists spaced 16" apart.

Minimum Stair Stringer Sizes: Size of stair stringers depends on the span of the stairway. For example, if the bottom of the stairway lies 7 feet from the deck, build the stringers from 2 × 12s. Stringers should be spaced no more than 36" apart. Use of a center stringer is recommended for stairways with more than three steps.
Recommended Railing Sizes: Sizes of posts, rails, and caps depend on the spacing of the railing posts. For example, if railing posts are spaced 6 feet apart, use 4 × 4 posts and 2 × 6 rails and caps.
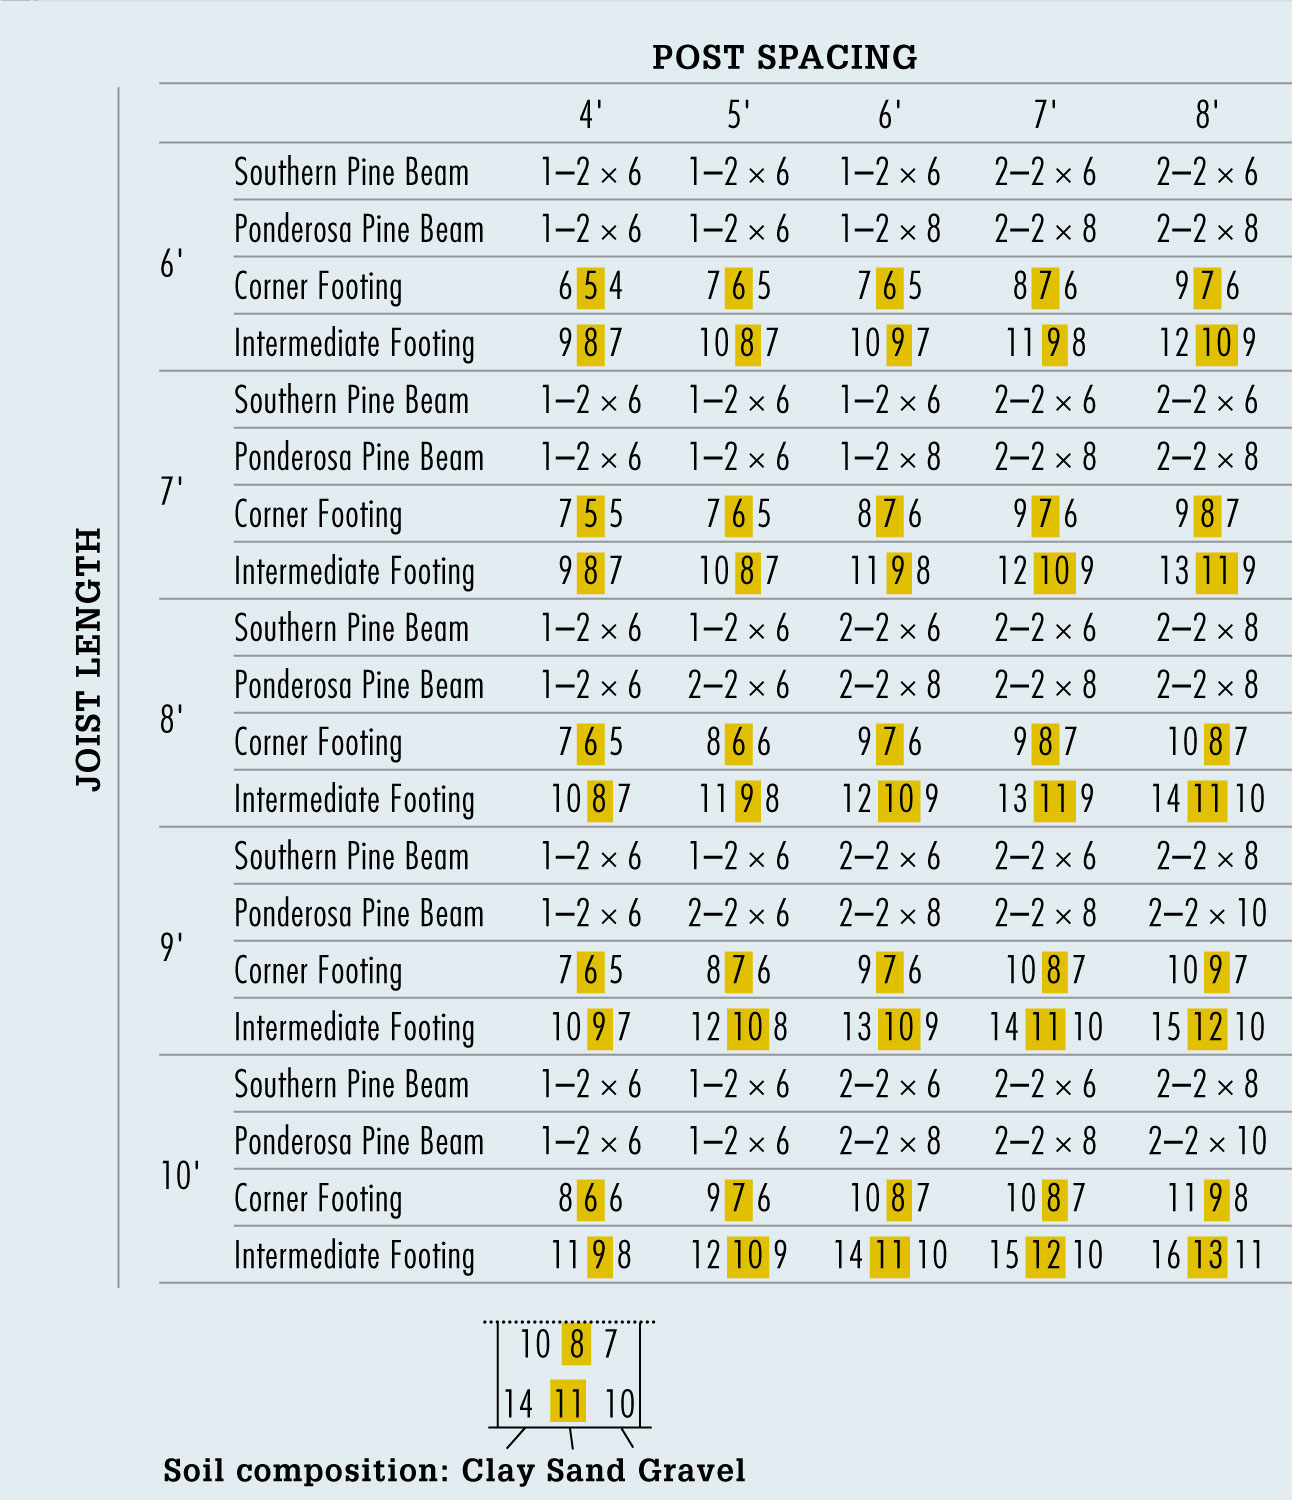
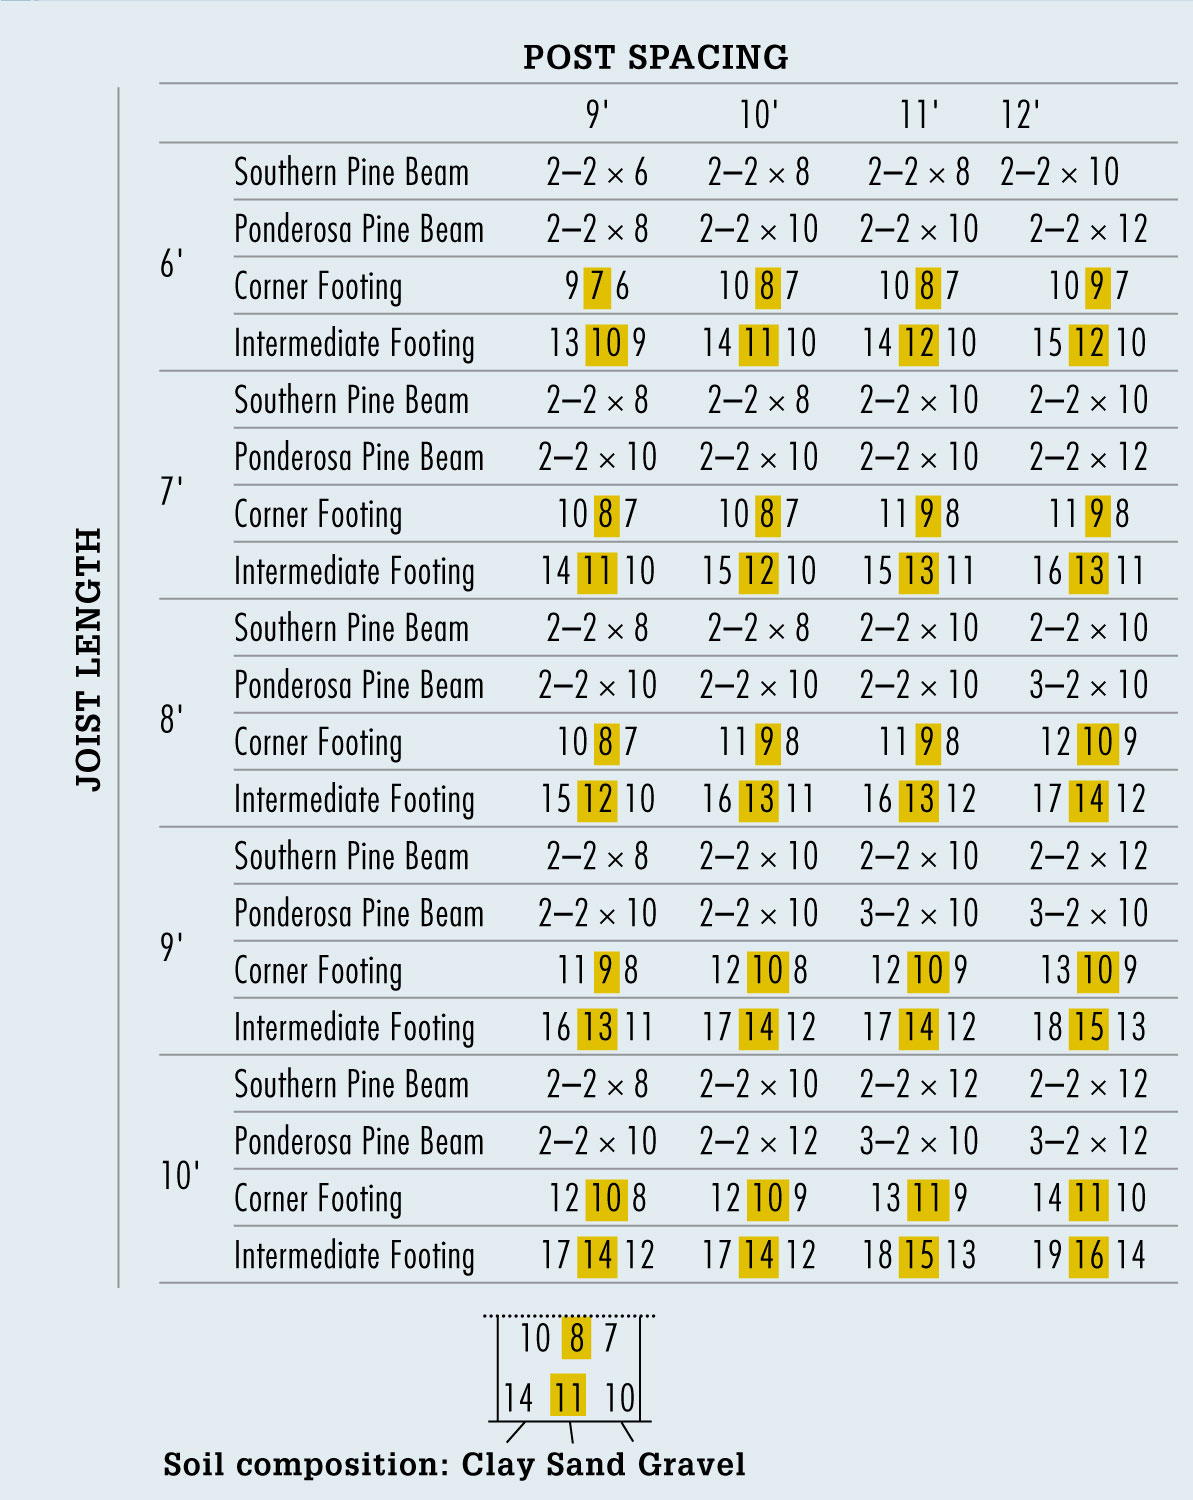
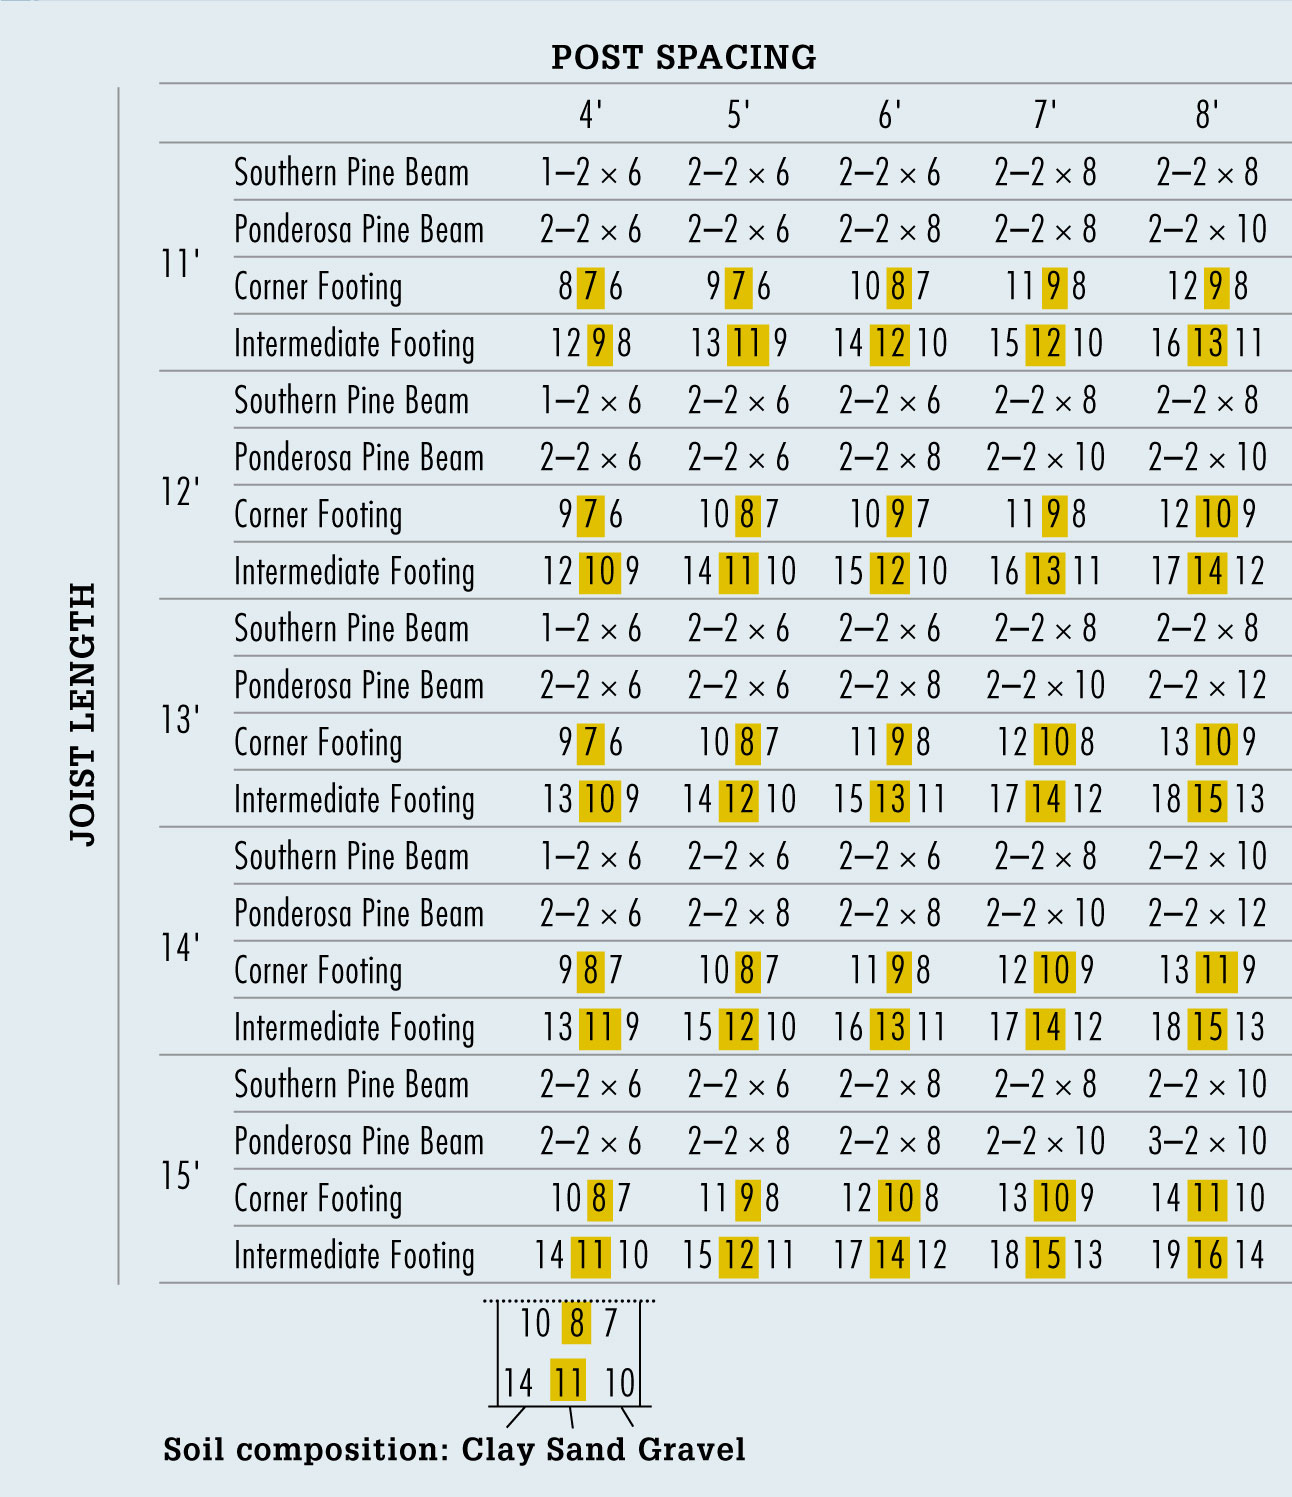
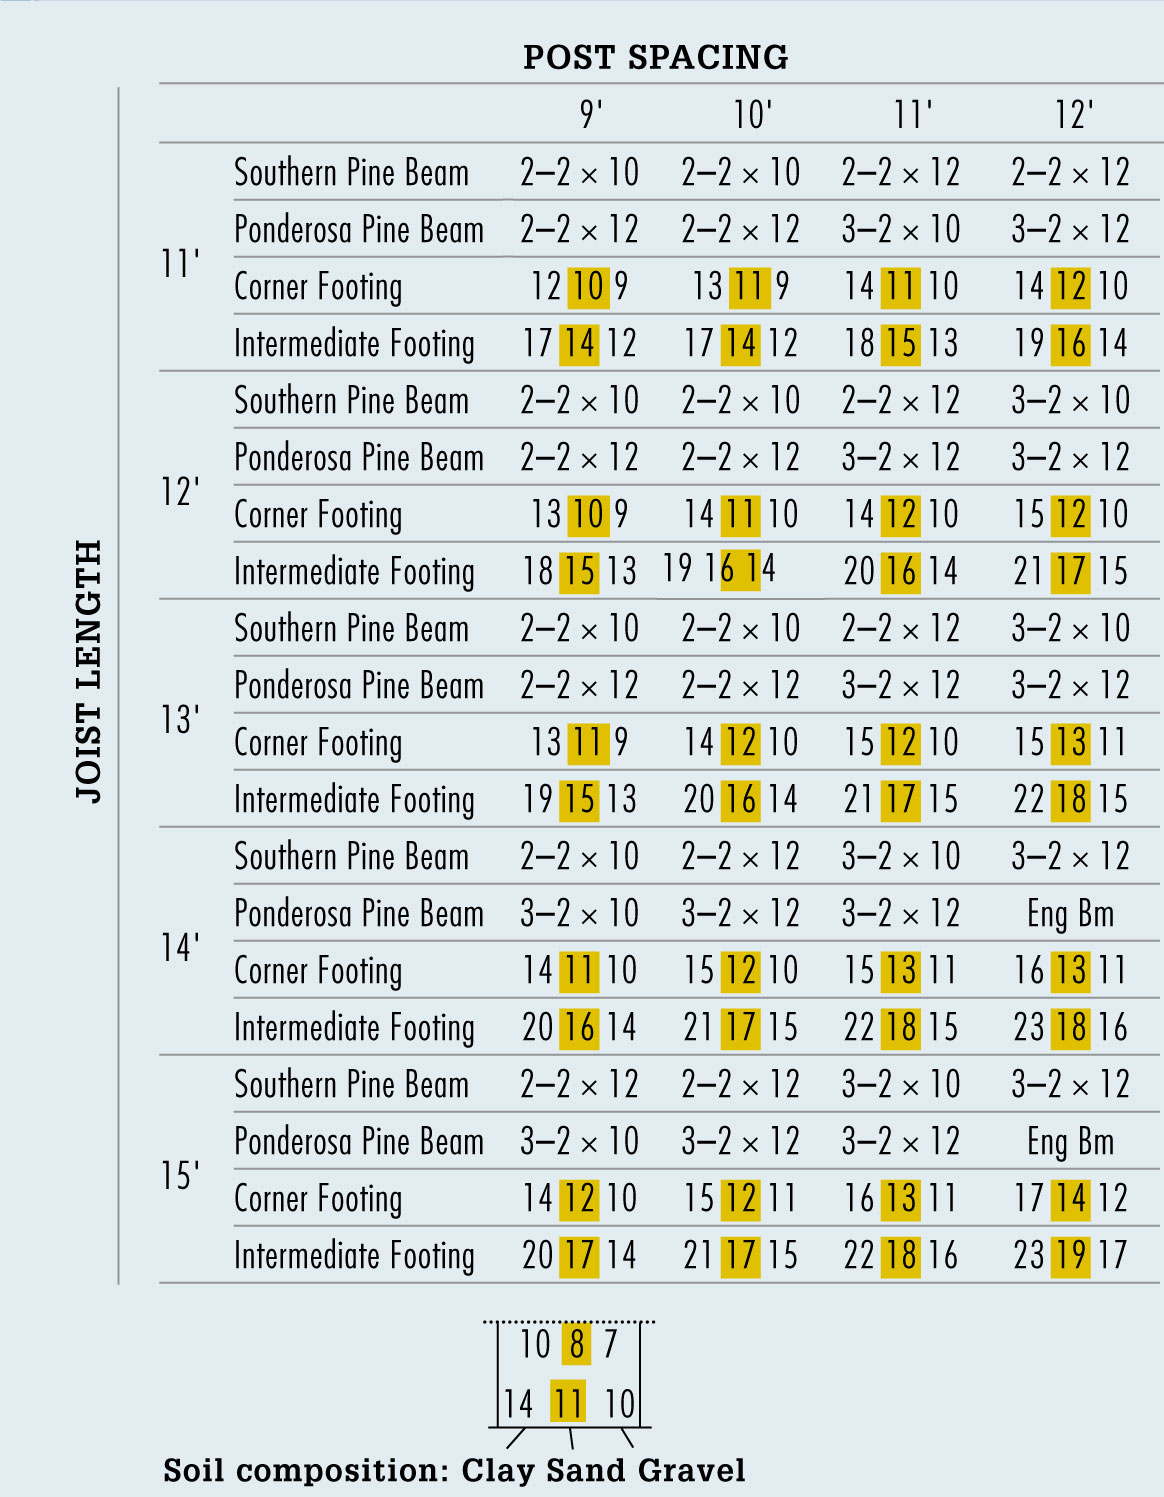
Chart 1: maximum Spans for Various Joist Sizes
 Understanding Loads
The supporting structural members of a deck—the posts, beams, and joists—must be sturdy enough to easily support the heaviest anticipated load on the deck. They must not only carry the substantial weight of the surface decking and railings, but also the weight of people, deck furnishings, and, in some climates, snow.
The charts and diagrams shown here will help you plan a deck so the size and spacing of the structural members are sufficient to support the load, assuming normal use. These recommendations are followed in most regions, but you should still check with your local building official for regulations that are unique to your area. In cases where the deck will support a hot tub or pool, you must consult your local building inspections office for load guidelines.
When choosing lumber for the structural members of your deck, select the diagram below that best matches your deck design, then follow the advice for applying the charts on the opposite page. Since different species of wood have different strengths, make sure to use the entries that match the type of lumber sold by your building center. When selecting the size for concrete footings, make sure to consider the composition of your soil; dense soils require footings with a larger diameter.
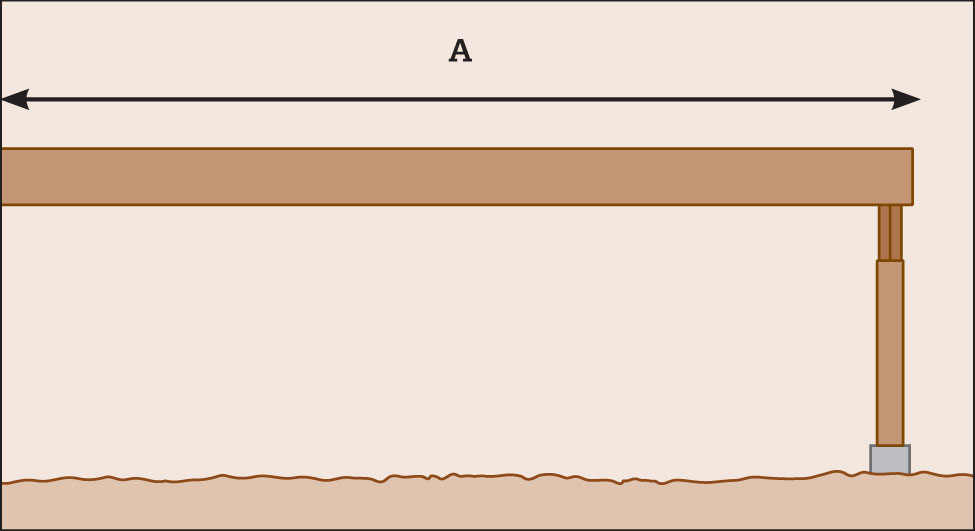
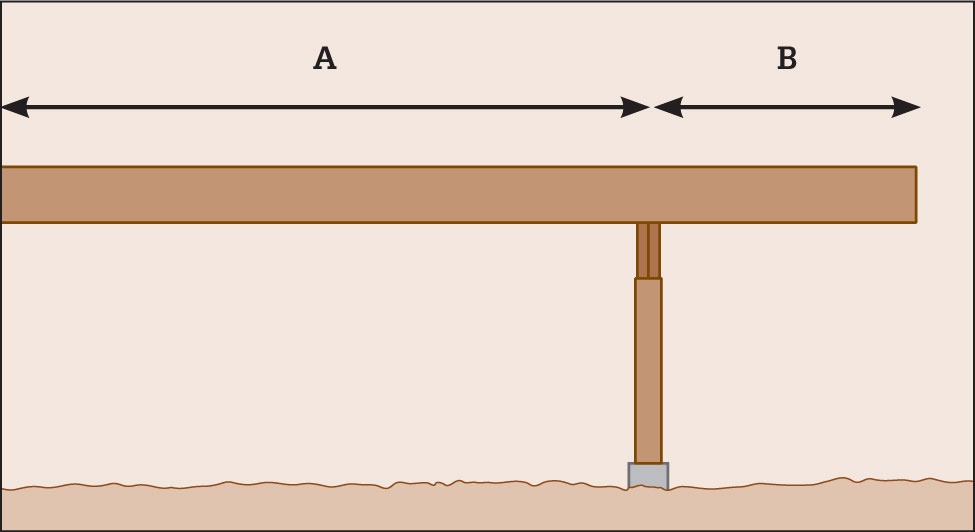
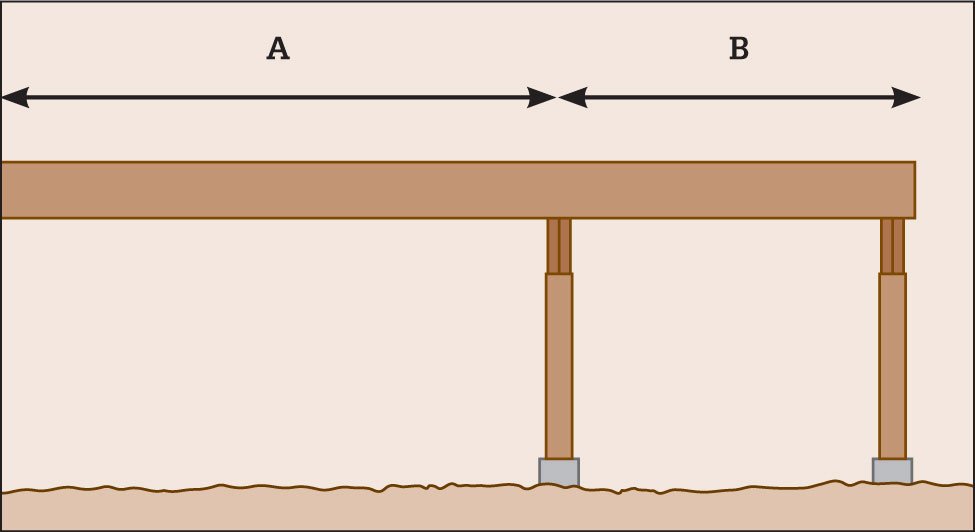
Post-and-beam deck: Using Chart 1, determine the proper size for your joists, based on the on-center (OC) spacing between joists and the overall length, or span, of the joists (A). For example, if you will be using southern pine joists to span a 12-ft. distance, you can use 2 × 8 lumber spaced no more than 16" apart, or 2 × 10 lumber spaced no more than 24" apart. Once you have determined allowable joist sizes, use Chart 2 to determine an appropriate beam size, post spacing, and footing size for your deck.
Cantilevered deck: Use the distance from the ledger to the beam (A) to determine minimum joist size, and use A + (2 × B) when choosing beam and footing sizes. For example, if your deck measures 9 ft. from ledger to beam, with an additional 3-ft. cantilevered overhang, use 9 ft. to choose a joist size from Chart 1 (2 × 6 southern pine joists spaced 16" apart, or 2 × 8 joists spaced 24" apart). Then, use A + (2 × B), or 15 ft., to find an appropriate beam size, post spacing, and footing size from Chart 2. Note: If your deck cantilevers more than 18" beyond the support beam, add 1" to the recommended diameter for footings.
Multiple-beam deck: Use distance A or B, whichever is larger, when determining joist size from Chart 1. For example, if your deck measures 8 ft. to beam #1 and another 4 ft. to beam #2, you can use 2 × 6 southern pine joists. Referring to Chart 2, use the total distance A + B to determine the size of beam #1, the spacing for the posts, and the size of the footings. Use joist length B to determine the size of beam #2, the post spacing, and footing size. For example, with an overall span of 12 ft. (8 ft. to the first beam, 4 ft. to the second), beam #1 could be made from two southern pine 2 × 8s; beam #2, from two 2 × 6s.
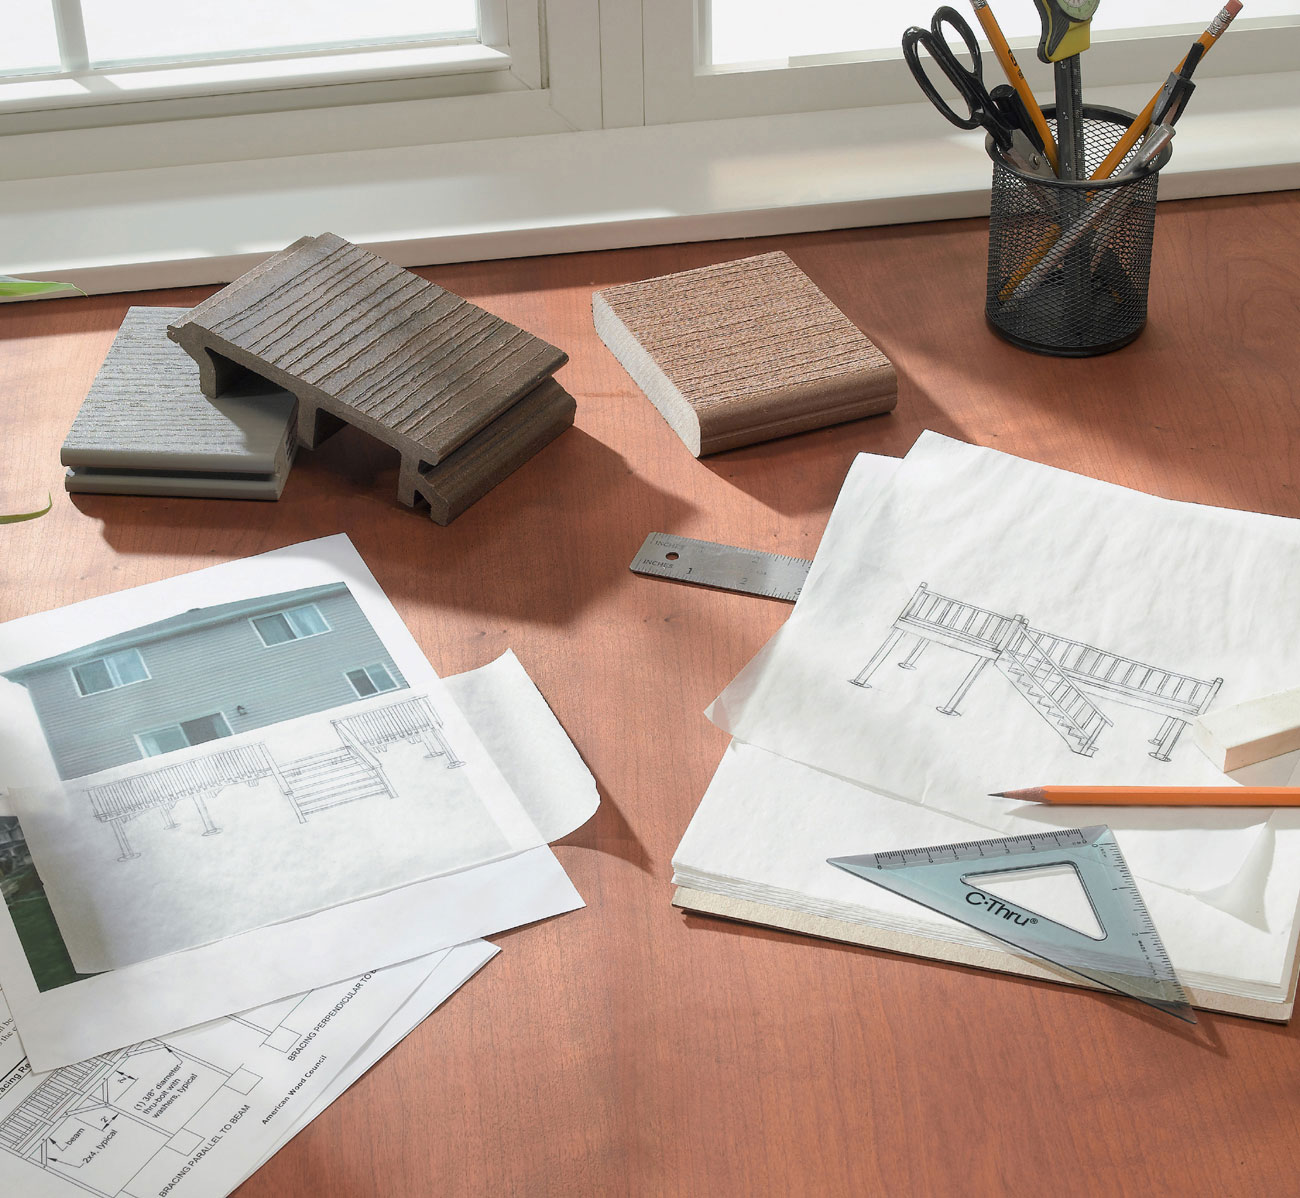
Developing Your Deck PlanA deck plan is more than just measured drawings. It needs to account for your deck’s functional purposes as well as its dimensional form. Before you begin drawing plans, determine everything you want your deck to include. Here’s where you’ll focus on functional concerns. The size, shape, and location of your deck can be affected by several questions: Will the deck be used for entertaining? Will you cook on it? Do you need privacy? Consider how the features of the house and yard influence the deck design. Weather, time of day, and seasonal changes affect deck usage. For example, if your deck will be used mainly for summertime evening meals, look at the sun, shade, and wind patterns on the planned site during this time of day.
Of course, building plans also help you estimate lumber and hardware needs, and provide the measurements needed to lay out the deck and cut the lumber. You will need two types of drawings for your deck plans and to obtain a building permit. A plan view shows the parts of the deck as they are viewed from directly overhead. An elevation shows the deck parts as viewed from the side or front.
Calculator Conversion Chart
8THS |
16THS |
DECIMAL |
|
1 |
.0625 |
1 |
2 |
.125 |
|
3 |
.1875 |
2 |
4 |
.25 |
|
5 |
.3125 |
3 |
6 |
.375 |
|
7 |
.4375 |
4 |
8 |
.5 |
|
9 |
.5625 |
5 |
10 |
.625 |
|
11 |
.6875 |
6 |
12 |
.75 |
|
13 |
.8125 |
7 |
14 |
.875 |
|
15 |
.9375 |
8 |
16 |
1.0 |
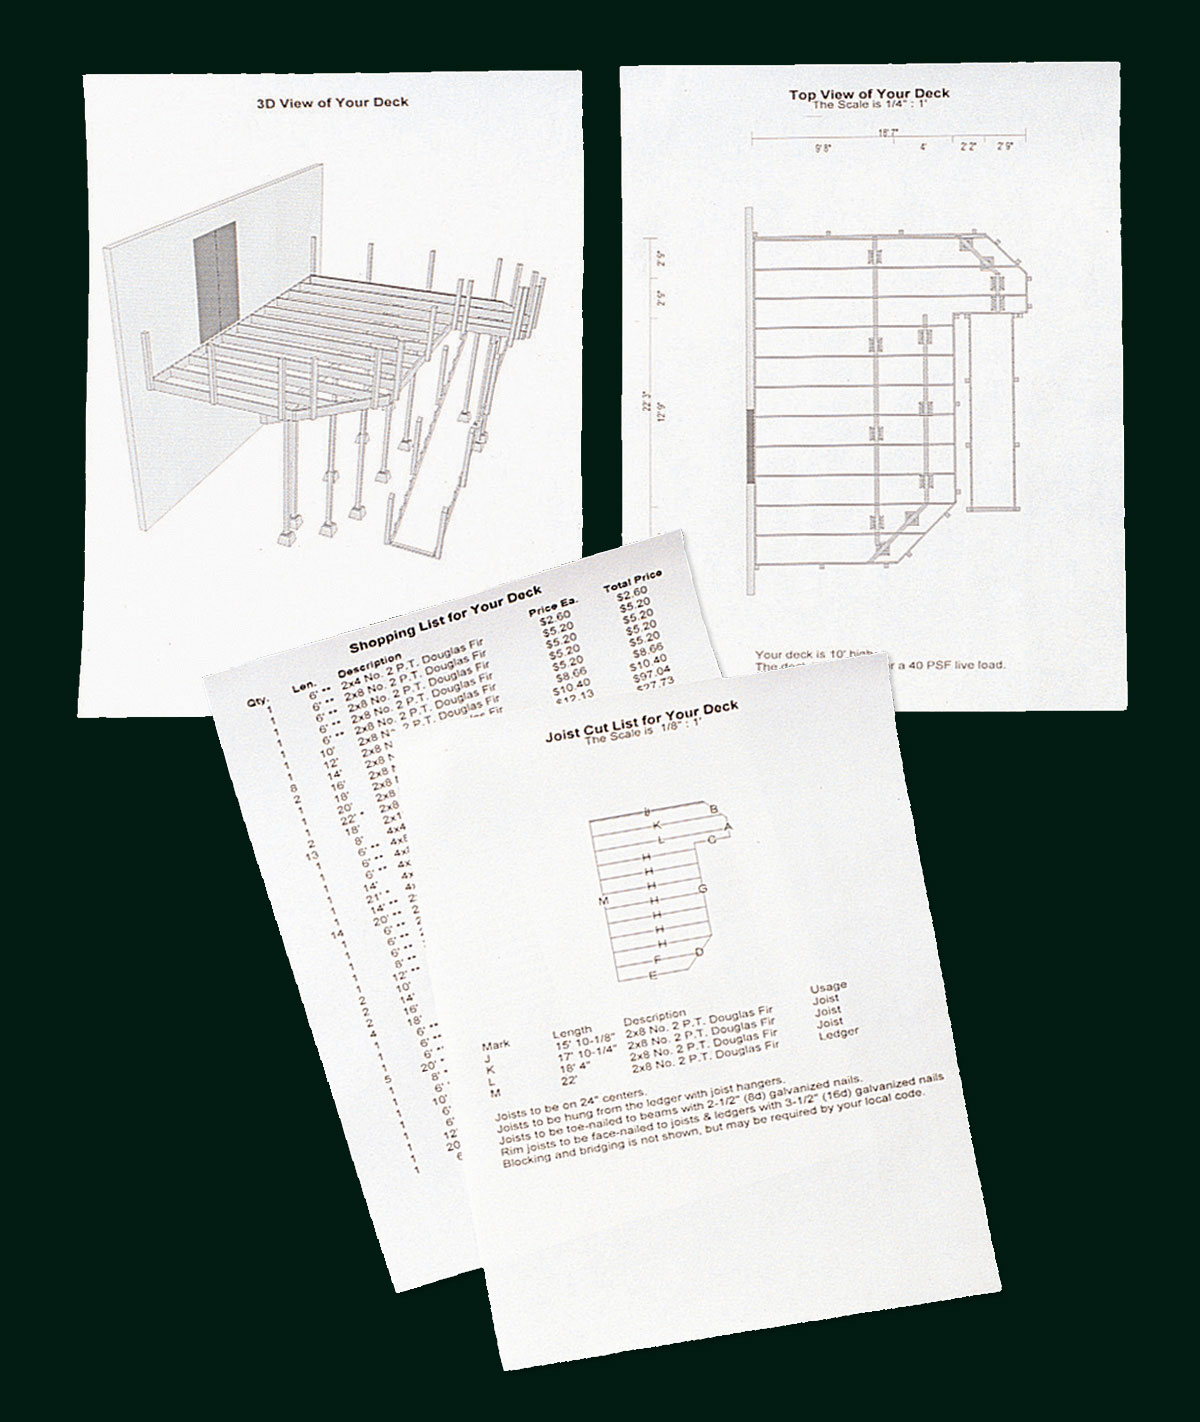
Many building centers will help you design and create deck plan drawings if you purchase your lumber and other deck materials from them. Their design capabilities include determining a detailed lumber and materials list based on the exact deck plan created.
 How to Create Design Drawings
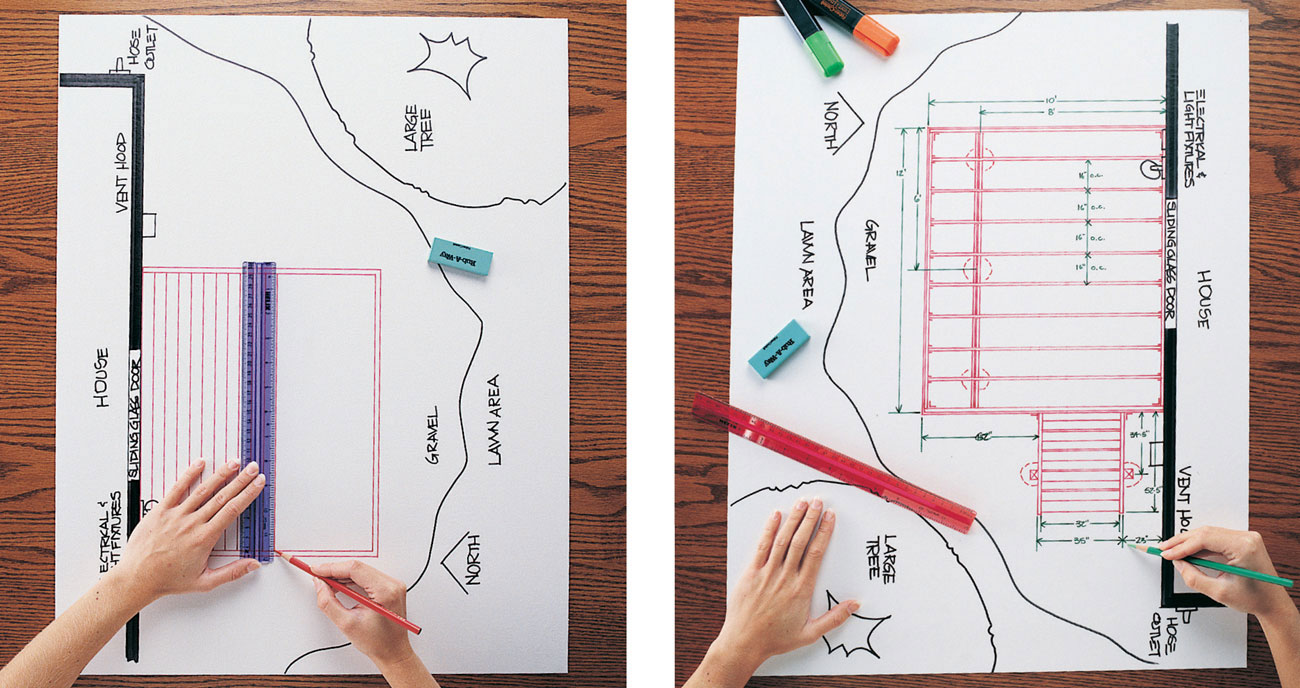
Use tracing paper to sketch different deck layouts. Then, test your ideas by overlaying the deck sketches onto a drawing of your building site. Make sure to consider sun patterns and the locations of existing landscape features when developing a deck plan.
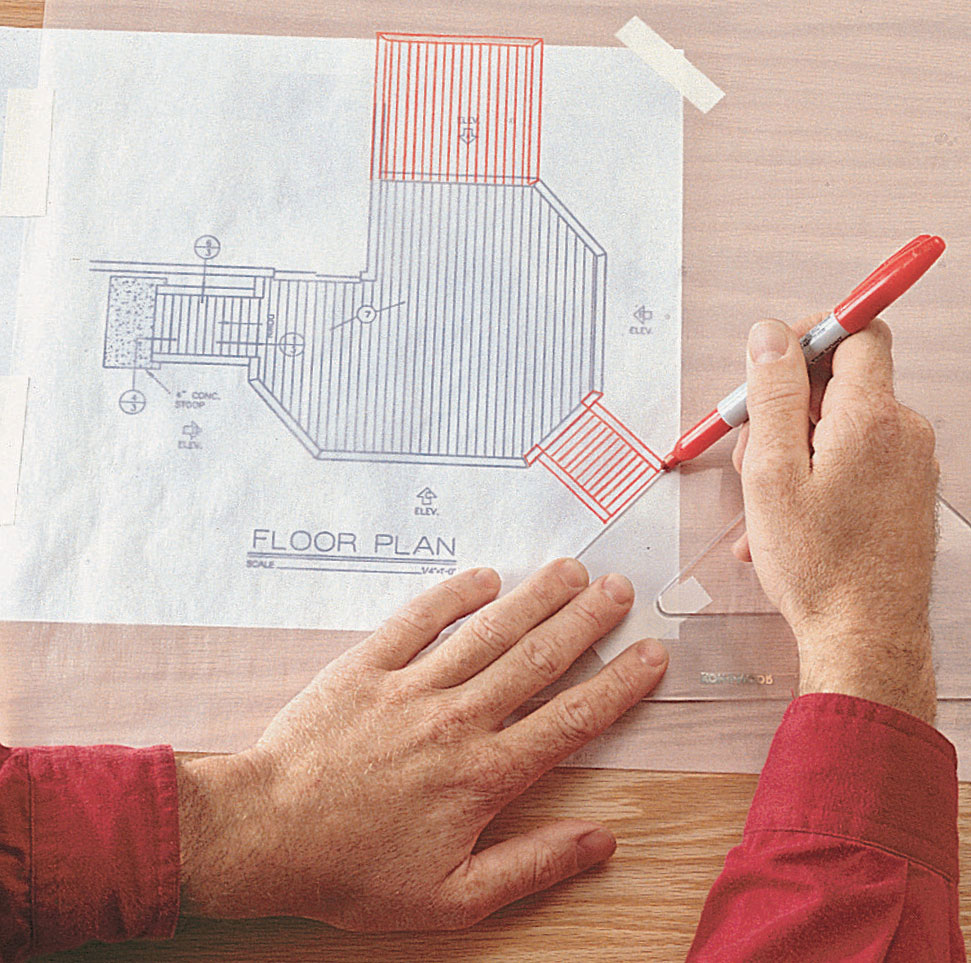
Adapt an existing deck plan, either borrowed from a book or magazine, or purchased in blueprint form. Tracing paper, pens, and measuring tools are all you need to revise an existing deck plan.

Use drafting tools and graph paper if you are creating a deck plan from scratch. Use a generous scale, such as 1" equals 1 ft., that allows you to illustrate the deck in fine detail. Remember to create both overhead plan drawings and side elevation drawings of your project.
Using Deck Design CAD Software
If you prefer working on computer to drafting by hand, you can choose from a number of different computer aided design (CAD) programs specifically developed to help the homeowner design his or her own deck and landscaping. Although most of these programs are sophisticated and powerful, they are generally easy to learn and use. Most include tutorials, and it generally only takes a few hours to become proficient with the software. These programs are loaded with features to help you envision and create a deck customized for your house. They include the ability to accurately re-create the exterior structure of your home and rough elements in the landscape. You can create and view both plan-view and elevation perspectives, and materials lists. The majority of these type of programs include the possibility of outputting drawings suitable for submission to building departments. But beyond the pragmatic uses, the best of these allow you to develop amazingly realistic renderings of material color and texturing, and give you the option of trying out different features such as cable railings or skirting. Some even offer 3-D perspectives that can be rotated on screen. Prices range from free to more than $200—buy the software that matches your needs and will work on your current computer.
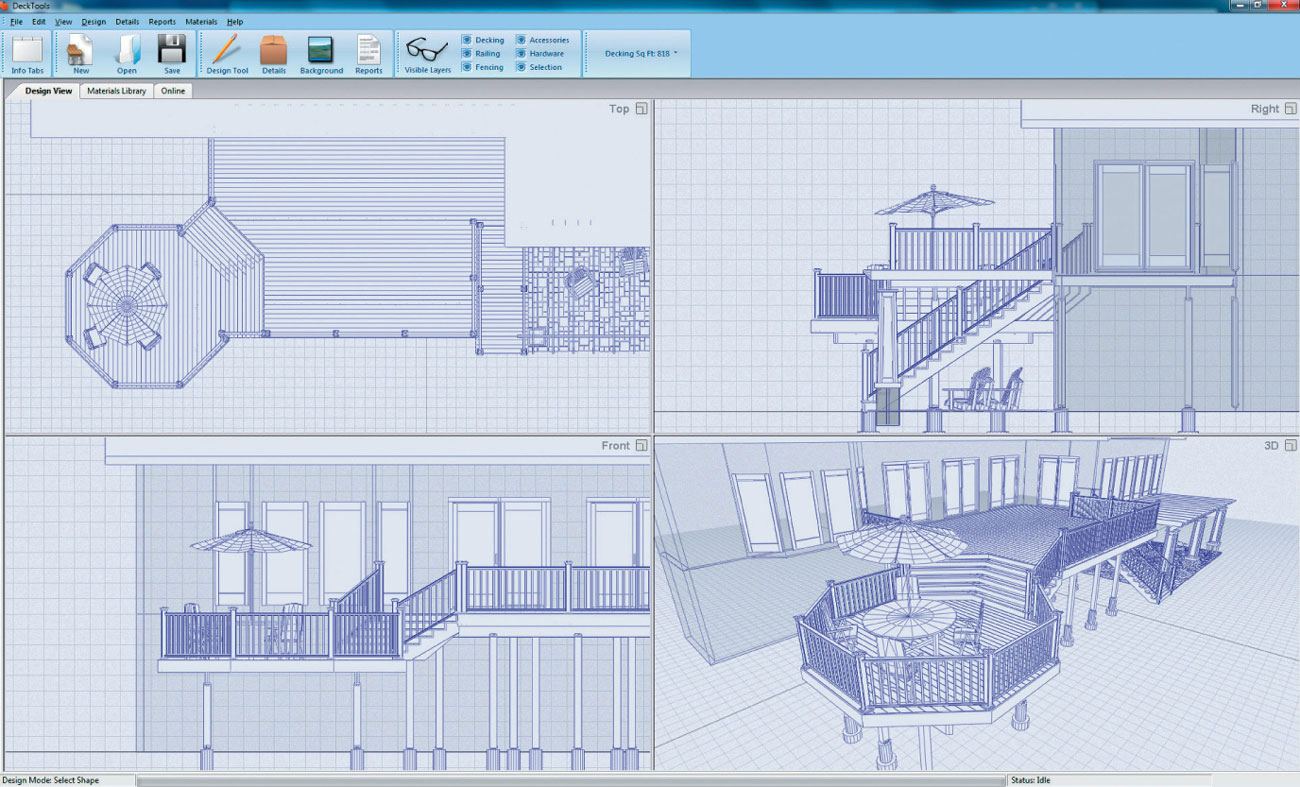
The plan drawings produced by some CAD programs are acceptable to many local building departments.
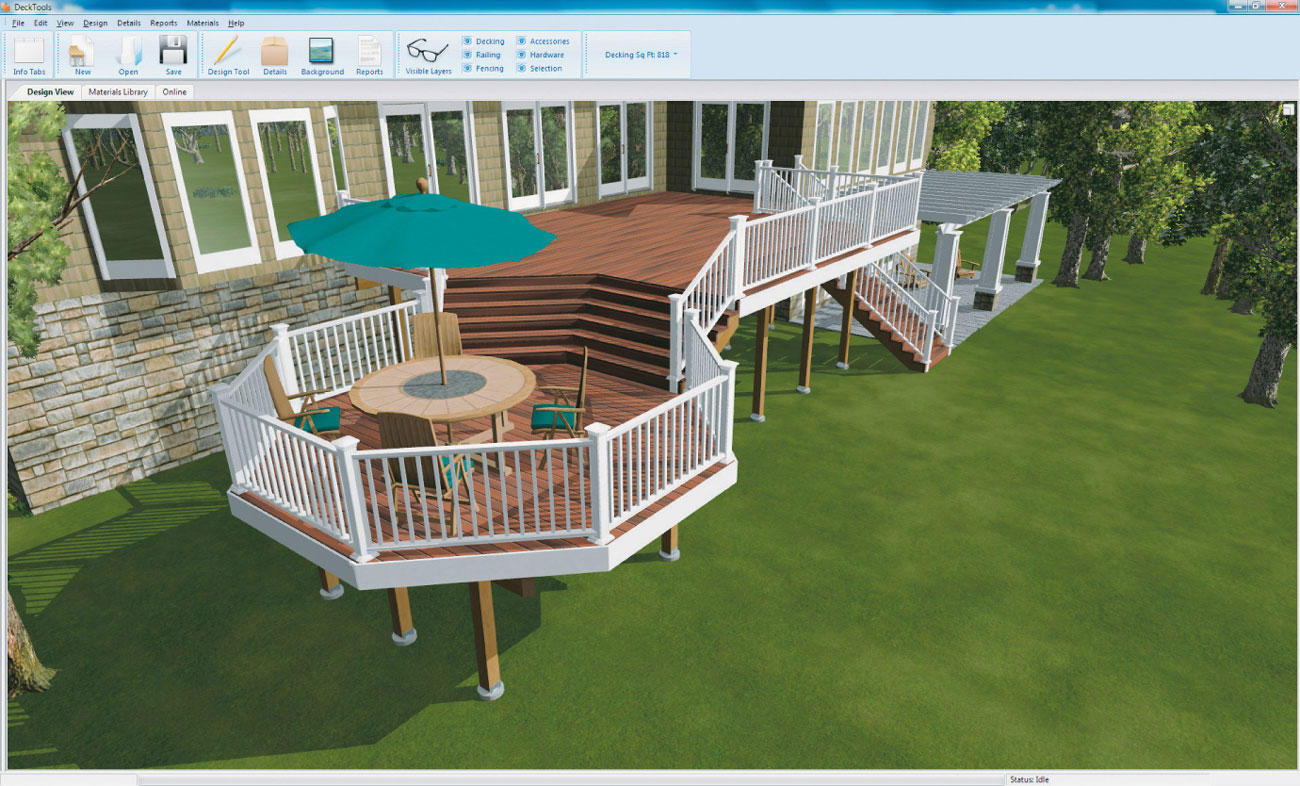
CAD programs have come a long way, and many can now show rotatable 3D versions of your deck design.
To avoid confusion, do not try to show all parts of the deck in a single plan view, especially for a complicated or multi-level deck. First, draw one plan view that shows the deck outline and the pattern of the decking boards. Then make another plan view (or more) that shows the underlying ledger, joists, beams, and posts.
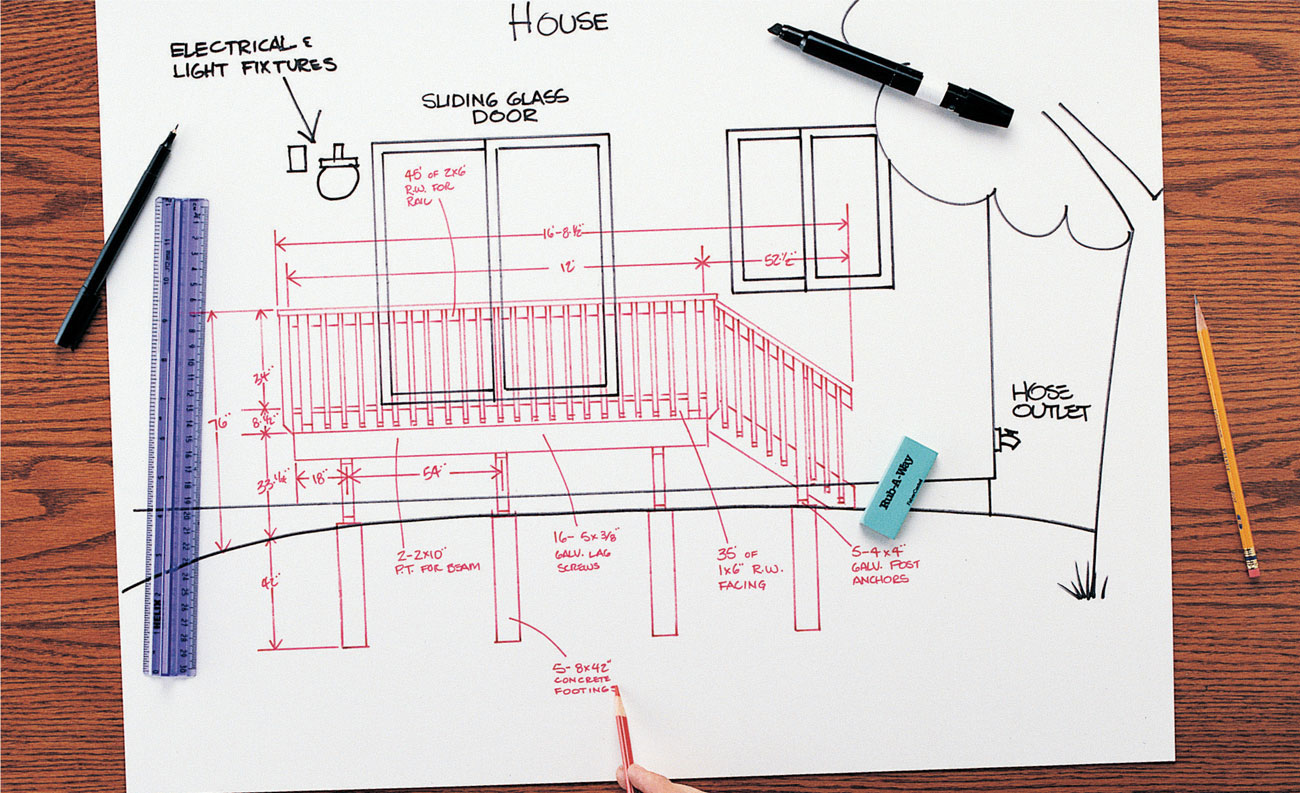
Elevation drawings must include deck dimensions, size and type of hardware to be used, beam sizes (if visible in drawing), and footing locations and their dimensions. Also indicate the grade of the ground in the deck area. Make multiple elevation drawings if necessary for complicated or multi-level decks.
Working with Building InspectorsIn most regions, you must have your plans reviewed and approved by a building official if your deck is attached to a permanent structure or if it is more than 30" high. The building official makes sure that your planned deck meets building code requirements for safe construction.
These pages show some of the most common code requirements for decks. But before you design your project, check with the building inspection division of your city office, since code regulations can vary from area to area. A valuable source of planning information, the building official may provide you with a free information sheet outlining the relevant requirements.
Once you have completed your deck plans, return to the building inspections office and have the official review them. Make certain you know how many copies of the plans they require before you go. If your plans meet code, you will be issued a building permit, usually for a small fee. This process often takes a few days. Regulations may require that a field inspector review the deck at specified stages in the building process. If so, make sure to allow for the review schedule in your project schedule.

While it might be tempting to forge ahead with your deck design and bypass the building inspector entirely, it’s a big mistake. Building a deck without the proper permits can lead to fines, and you may even be required to tear the deck down or significantly rebuild it to satisfy local codes. Do the right thing: consider permits and inspections to be a necessary part of the construction process.
Draw detailed illustrations of the joinery methods you plan to use for all structural members of your deck. Your building official will want to see details on post-footing connections, post-beam joints, beam-joist joints, and ledger connections. Be prepared to make adjustments.
Plan-approval Checklist
When the building official reviews your deck plans, he or she will look for the following details. Make sure your plan drawings include all this information.
• Overall size and shape of the deck.
• Position of the deck relative to buildings, property lines, and setbacks. Generally, a deck must be at least 5 ft. from the property line, although this varies locality to locality.
• Location of all beams and posts.
• Detailed drawings of joinery methods for all structural members of the deck.
• Size and on-center (OC) spacing of joists.
• Height of deck above grade.
• Thickness of deck boards—or profile of composite decking.
• Type of soil that will support the concrete post footings: sand, loam, or clay.
• Species of wood to be used, and/or type of composite material.
• Types of metal connectors and other hardware you plan to use in constructing the deck.
• Lighting and other electrical outlets or fixtures that will be wired into the deck.