Stairs
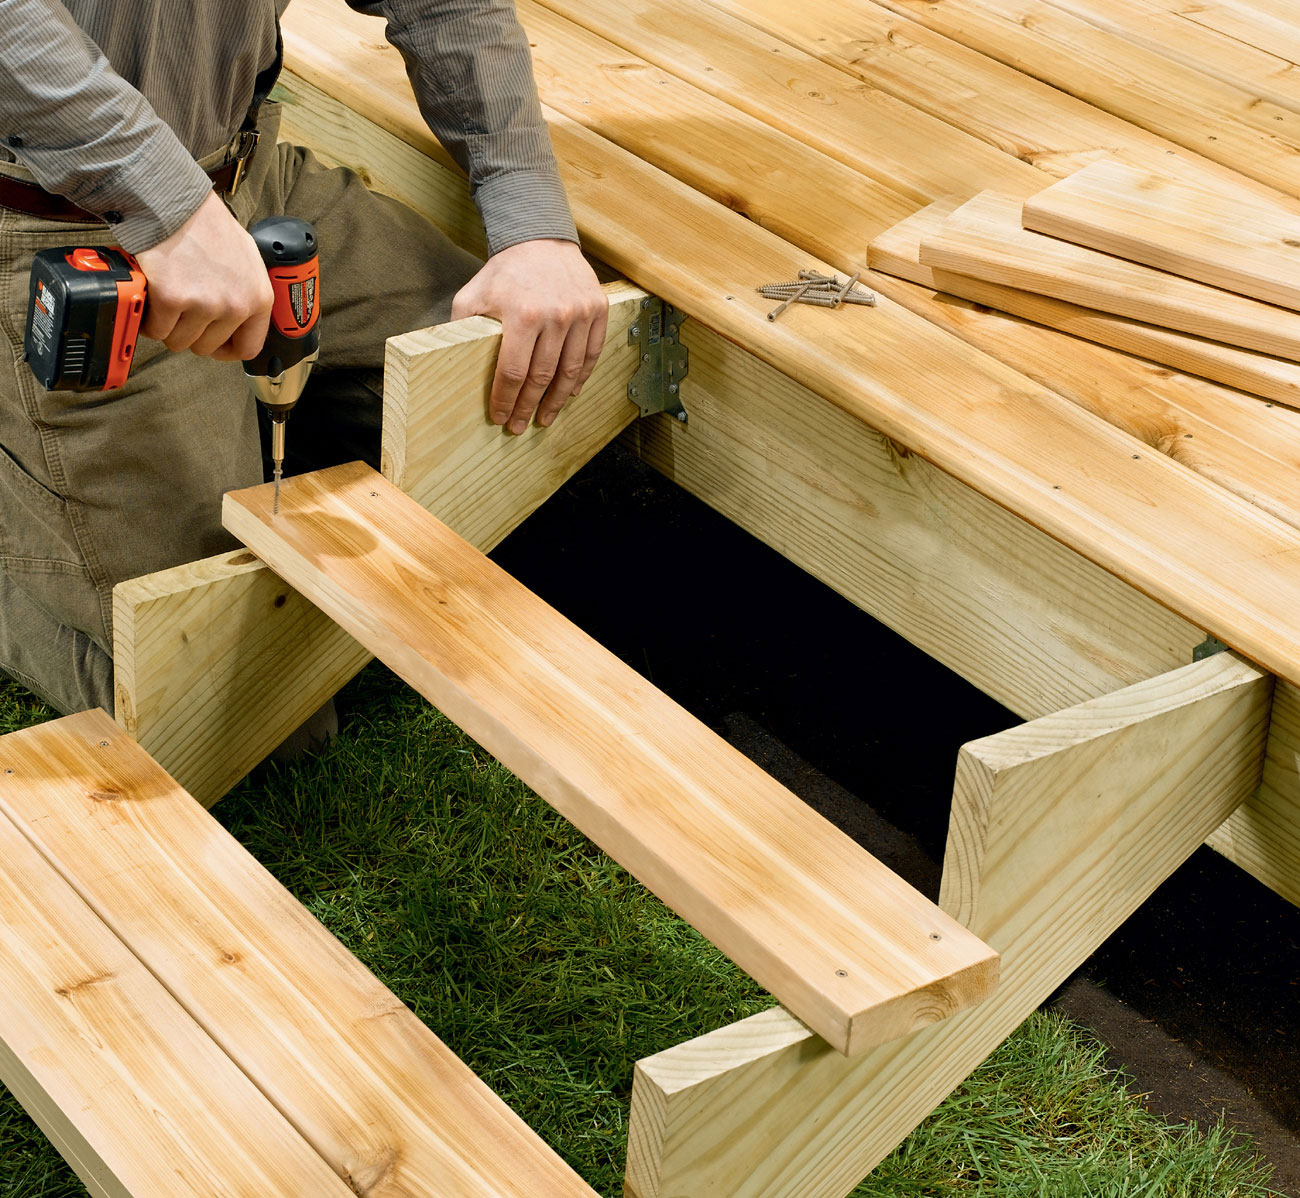
Nearly every deck, including most low-profile styles, requires at least one step to reach the deck platform. For complex, multi-level decks or decks built on steep slopes, you may need to build several runs of stairs and possibly a landing. Given the potential risks when using deck stairs, the International Building Code is very specific regarding the size and spacing of treads and risers, the minimum stair width, and the structural sizes for stringers. Here’s where your local building official can help you steer clear of potential code violations so you can build a safe stair system that will pass inspection.
Because the vertical drop of every deck varies, you’ll need to make several calculations to figure out exactly what the layout of your stairs will be. This chapter will show you how. You’ll also learn basic stair construction, how to build a longer flight of stairs with a landing, and even how to build a simple box-frame or suspended step when your deck is close to the ground.
In this chapter:
▪ Building Stairs with Landings
 Building Stairs
How you build stairs and railings for your deck is perhaps the most tightly regulated portion of the building code related to decks. Whenever you are in doubt about measurements for deck stairs—or wondering if you even need to install stairs in the first place—consult the local building codes or local building inspector. Basically, designing deck stairs involves four calculations:
The number of stairs depends on the vertical drop of the deck—the distance from the deck surface to the nearest ground level.
Rise is the vertical space between treads. The proper rise prevents stumbling on the stairs. Most codes call for a maximum rise of 7-3/4"; a lower rise generally makes it easier to ascend or descend the stairs. The thickness of one tread is added to the space between steps to determine actual rise.
Run is the depth of the treads, and is usually a minimum of 10", although the deeper the tread, the more comfortable the stairs will be. Stair step thickness is also dictated by code and is usually a minimum of 1", although most builders use 2 × lumber for stair steps. A convenient way to build step treads is by using two 2 × 6s.
Span is calculated by multiplying the run by the number of treads. The span helps you locate the end of the stairway so that you can properly position the posts.
Specifications for other elements such as the stringers and the method of attachment used to connect stairs to decking are also usually mandated in local codes. For instance, stringers normally have to be at least 1 1/2" thick.
Although there are different ways to construct stairs, the same basic code requirements apply to any staircase used with a deck.
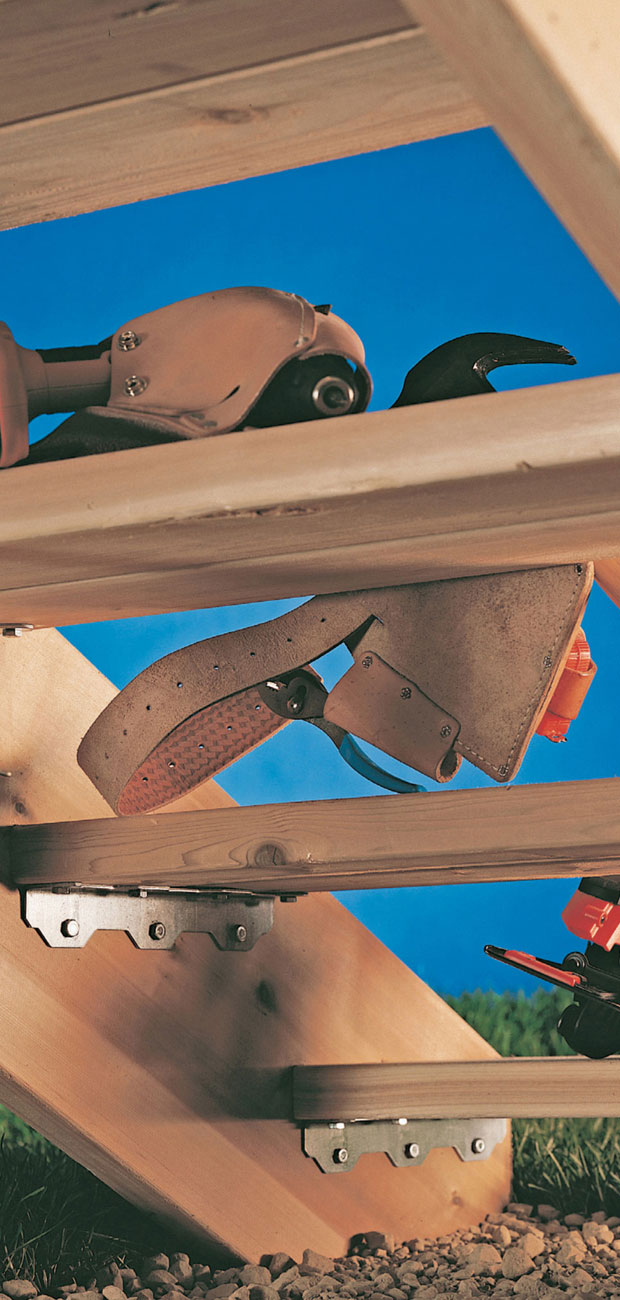
 Stairway Styles
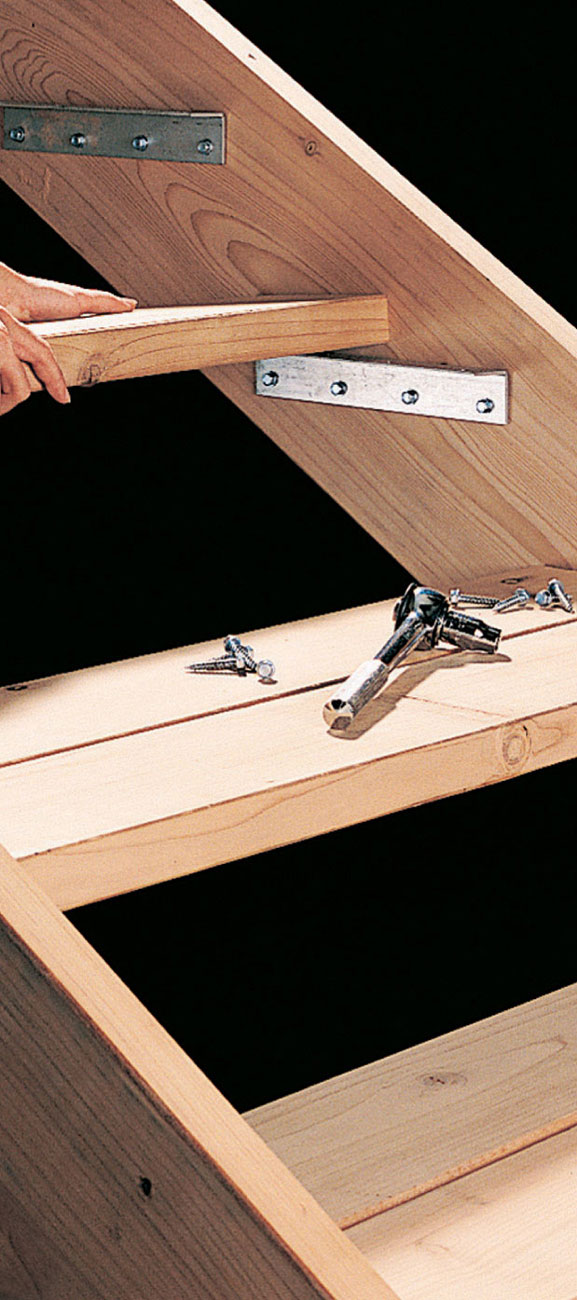
Open steps have metal cleats that hold the treads between the stringers. The treads on this stairway are built with 2 × 6s to match the surface decking.
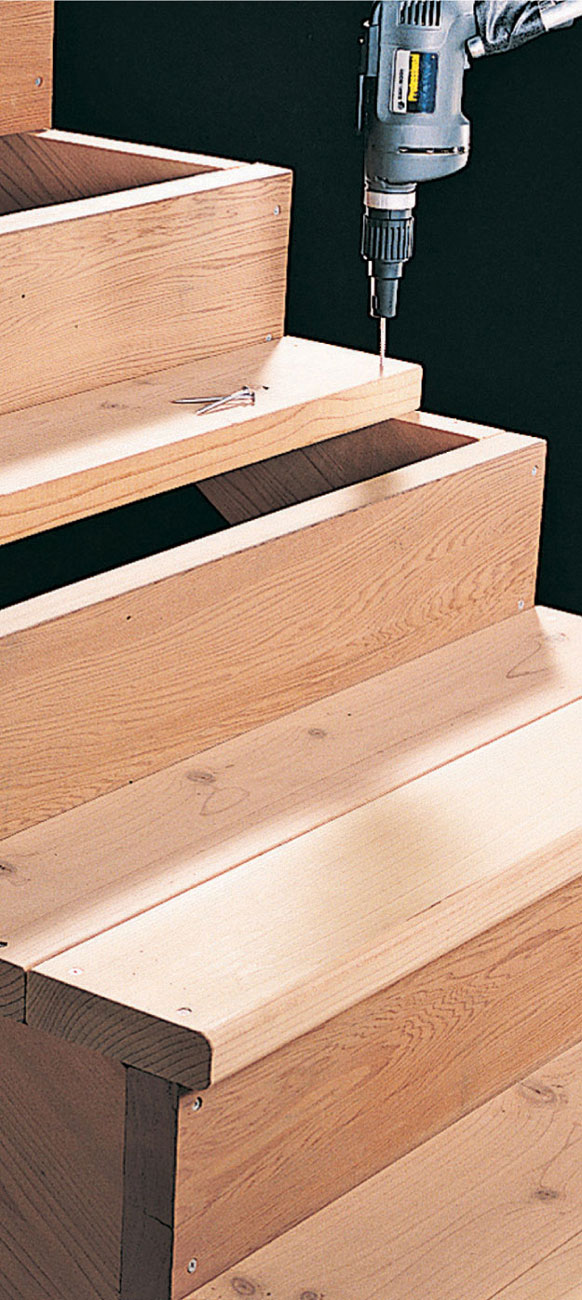
Boxed steps, built with notched stringers and solid risers, give a finished look to a deck stairway. Predrill the ends of treads to prevent splitting.
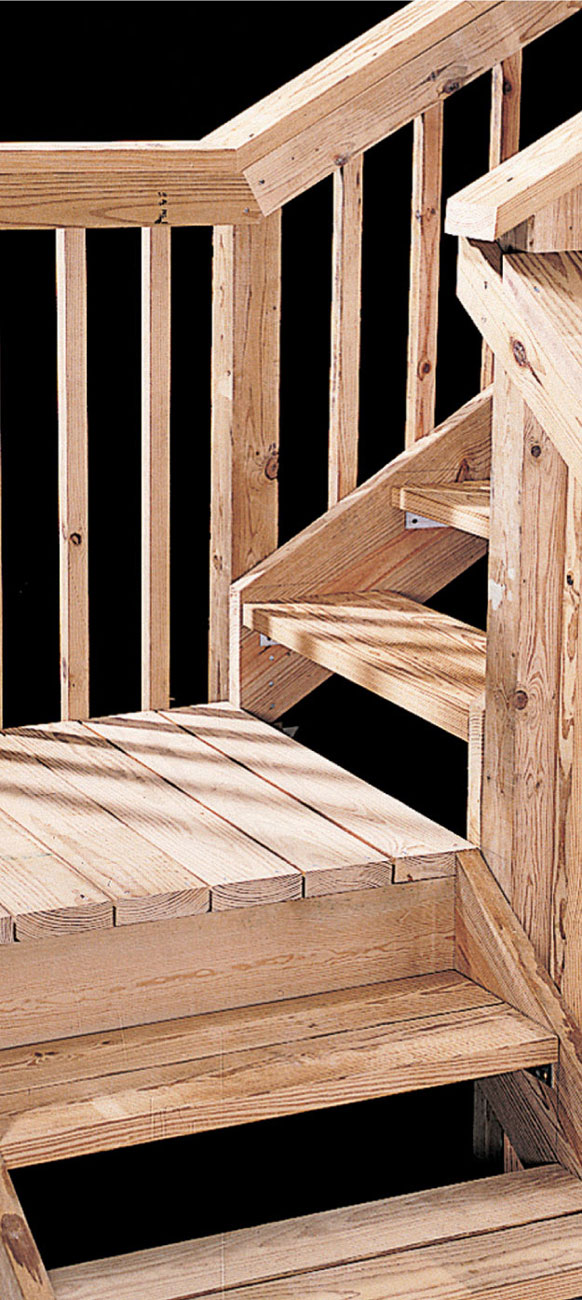
Long stairways sometimes require landings. A landing is a small platform to which both flights of stairs are attached (see pages 150 to 159).
A common deck stairway is made from two 2 × 12 stringers and pairs of 2 × 6 treads attached with metal cleats. Posts set 18" back from the end of the stairway help to anchor the stringers and the railings. Calculations needed to build stairs include the number of steps, the rise of each step, the run of each step, and the stairway span.
 Simple Stairs: How to Build a Box-frame Step
Construct a rectangular frame for the step using dimension lumber (2 × 6 lumber is standard). Join the pieces with deck screws. The step must be at least 36" wide and 10" deep. Cut cross blocks and install them inside the frame, spaced every 16".
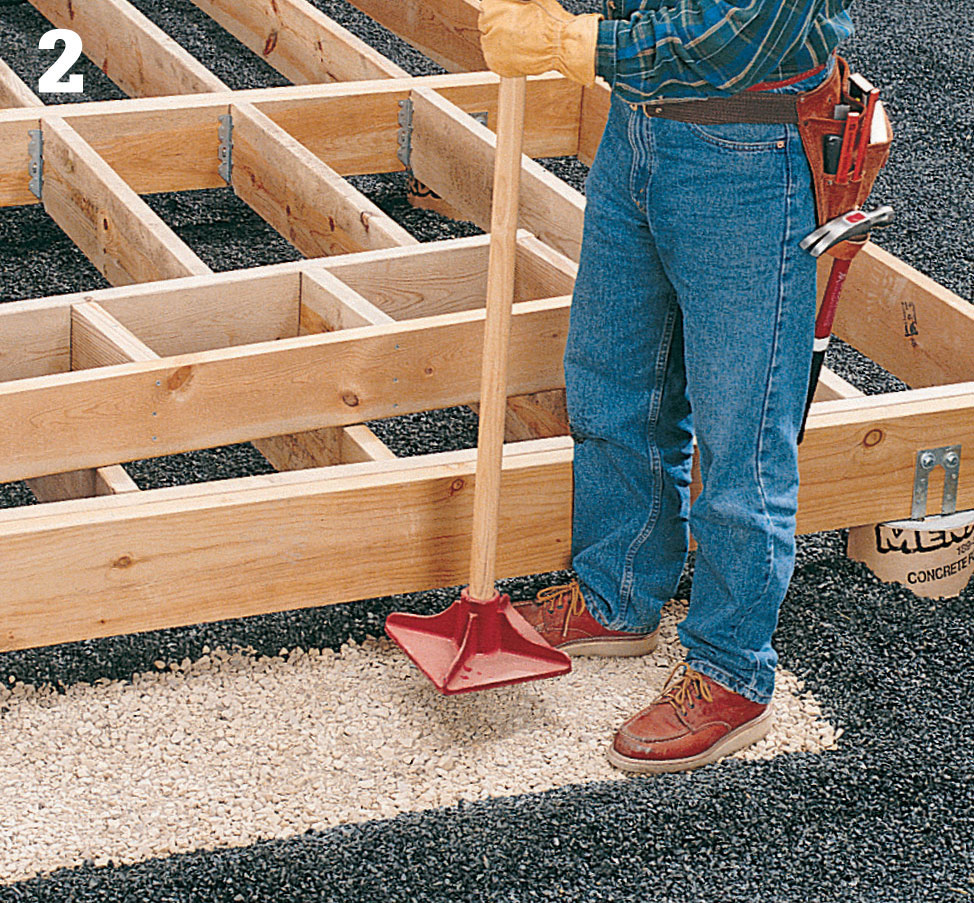
Dig a flat-bottomed trench, about 4" deep, where the step will rest. Fill the trench with compactible gravel, and pack with a tamper. Set the step in position, then measure and attach deck boards to form the tread of the step.
 Simple Stairs: How to Build a Suspended Step
Screw 2 × 4 furring strips against one side of the deck joists where the step joists will be installed. These strips provide an offset so the step joists will not conflict with the joist hangers attached to the beam. Use a reciprocating saw and chisel to make 1 1/2"-wide notches in the rim joist adjacent to the furring strips. Note: To maintain adequate structural strength, notches in the joists should be no more than 1 1/2" deep.
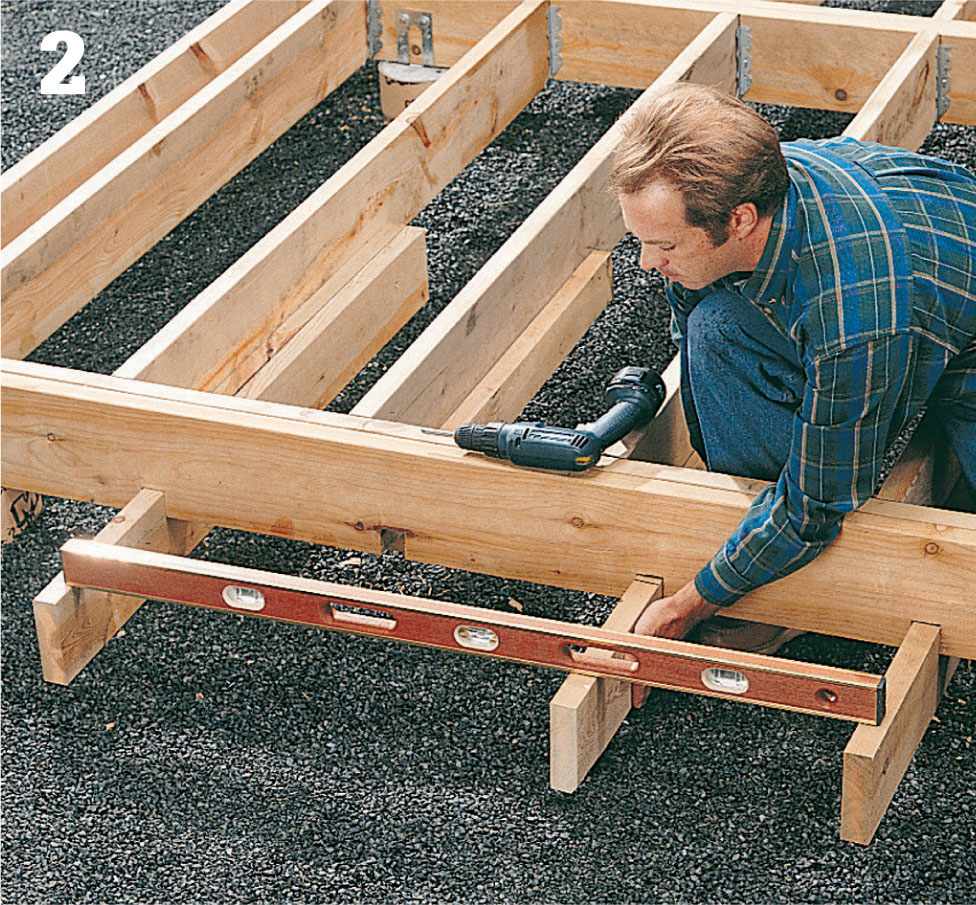
Measure and cut step joists, allowing about 3 ft. of nailing surface inside the deck frame, and 10" or more of exposed tread. Make sure the step joists are level with one another, then attach them to the deck joists, using deck screws. Cut and attach deck boards to the tread area of the step.
 How to Build Basic Deck Stairs
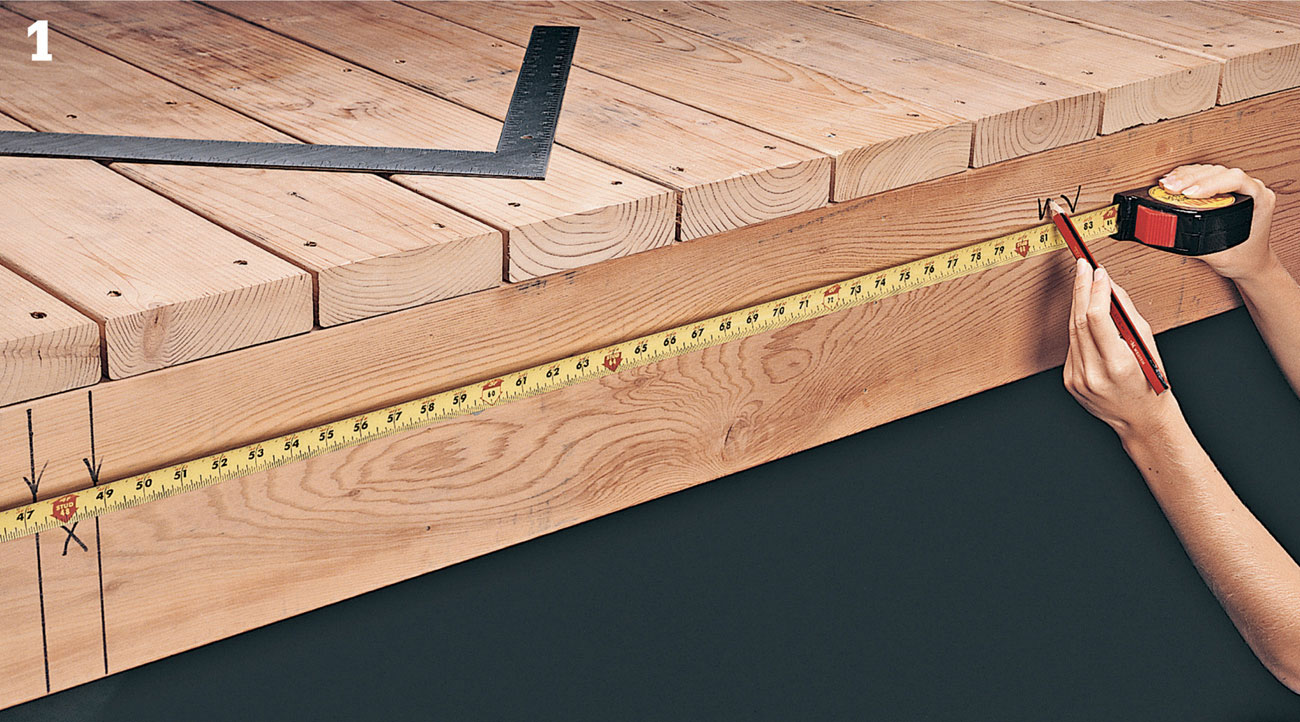
Use the stairway elevation drawings to find measurements for stair stringers and posts. Use a pencil and framing square to outline where stair stringers will be attached to the side of the deck.
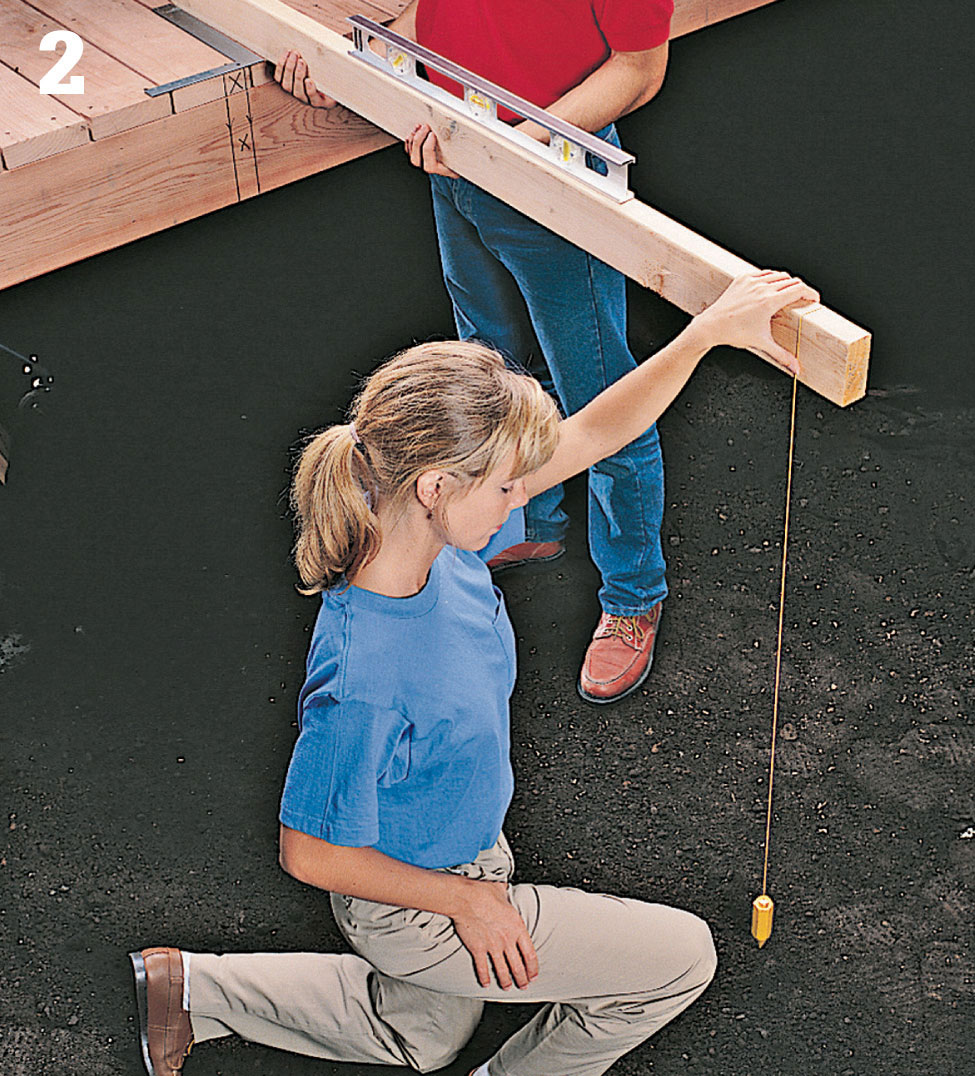
Locate the post footings so they are 18" back from the end of the stairway span. Lay a straight 2 × 4 on the deck so that it is level and square to the side of the deck. Use a plumb bob or level to mark the ground at footing centerpoints.
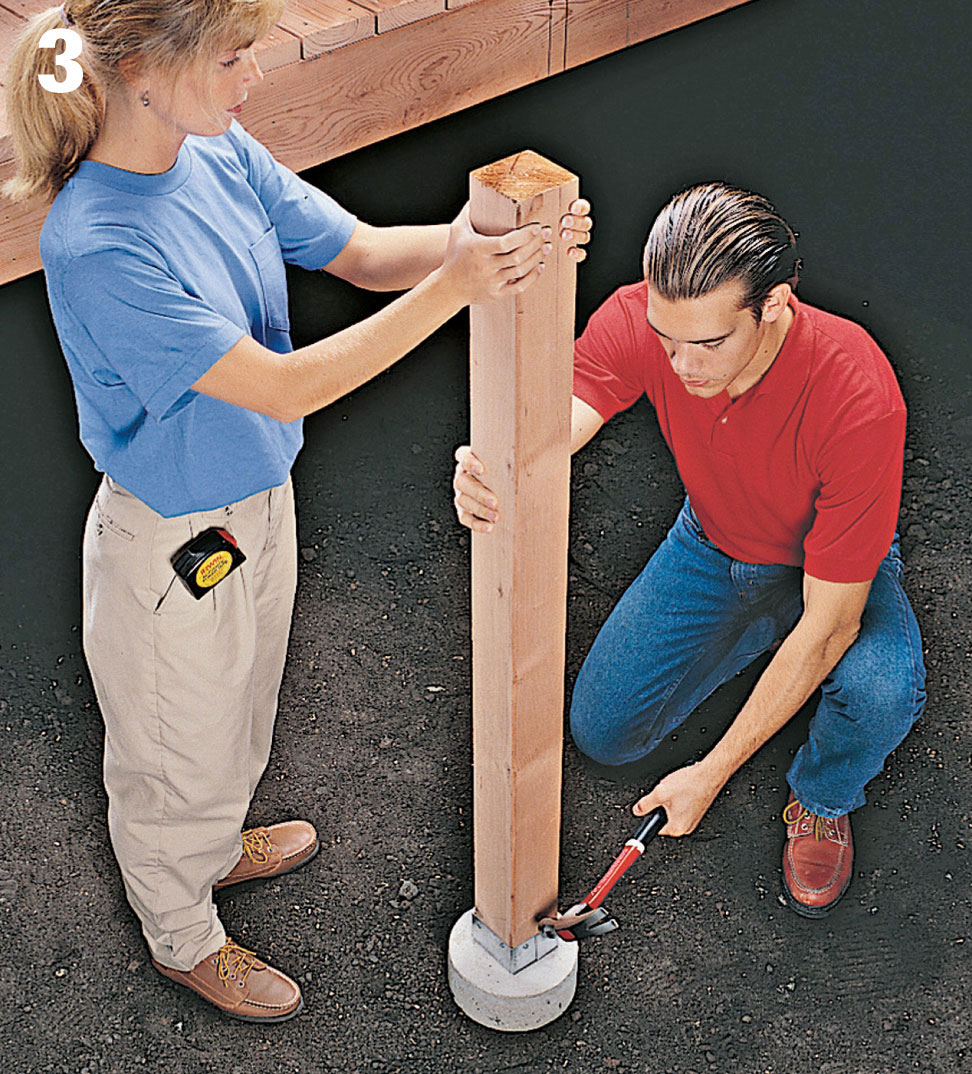
Dig holes and pour the footings for posts. Attach metal post anchors to the footings and install the posts. Check with your building department to find out if 6 × 6 posts are now required.
Lay out the stair stringers. Use tape to mark the rise measurement on one leg of a framing square, and the run measurement on the other leg. Beginning at one end of the stringer, position the square with tape marks flush to edge of the board, and outline the rise and run for each step. Then draw in the tread outline against the bottom of each run line. Use a circular saw to trim the ends of the stringers as shown. (When cutting the stringers for stairs without metal cleats, just cut on the solid lines.)
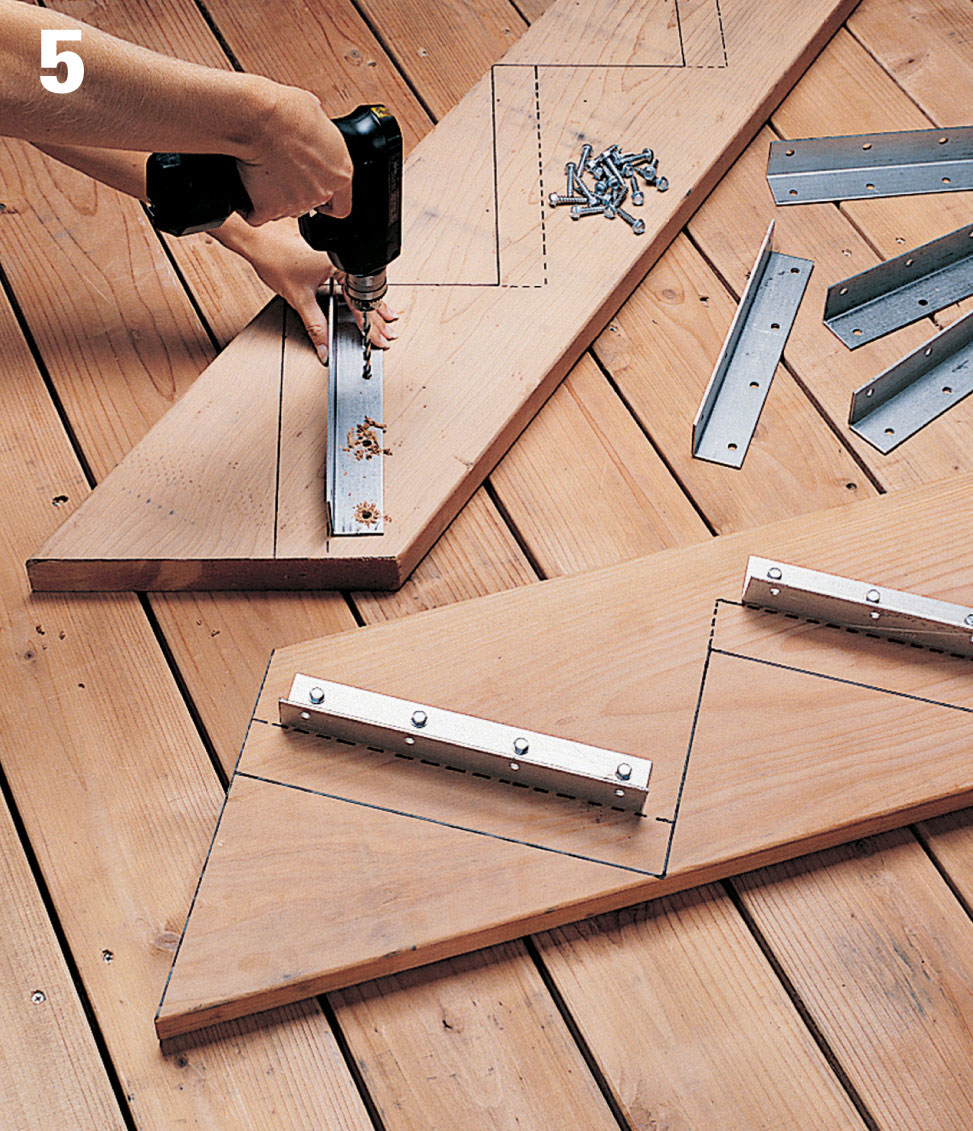
Attach metal tread cleats flush with the bottom of each tread outline, using 1/4" × 1 1/4" lag screws. Drill 1/8" pilot holes to prevent the screws from splitting the wood.
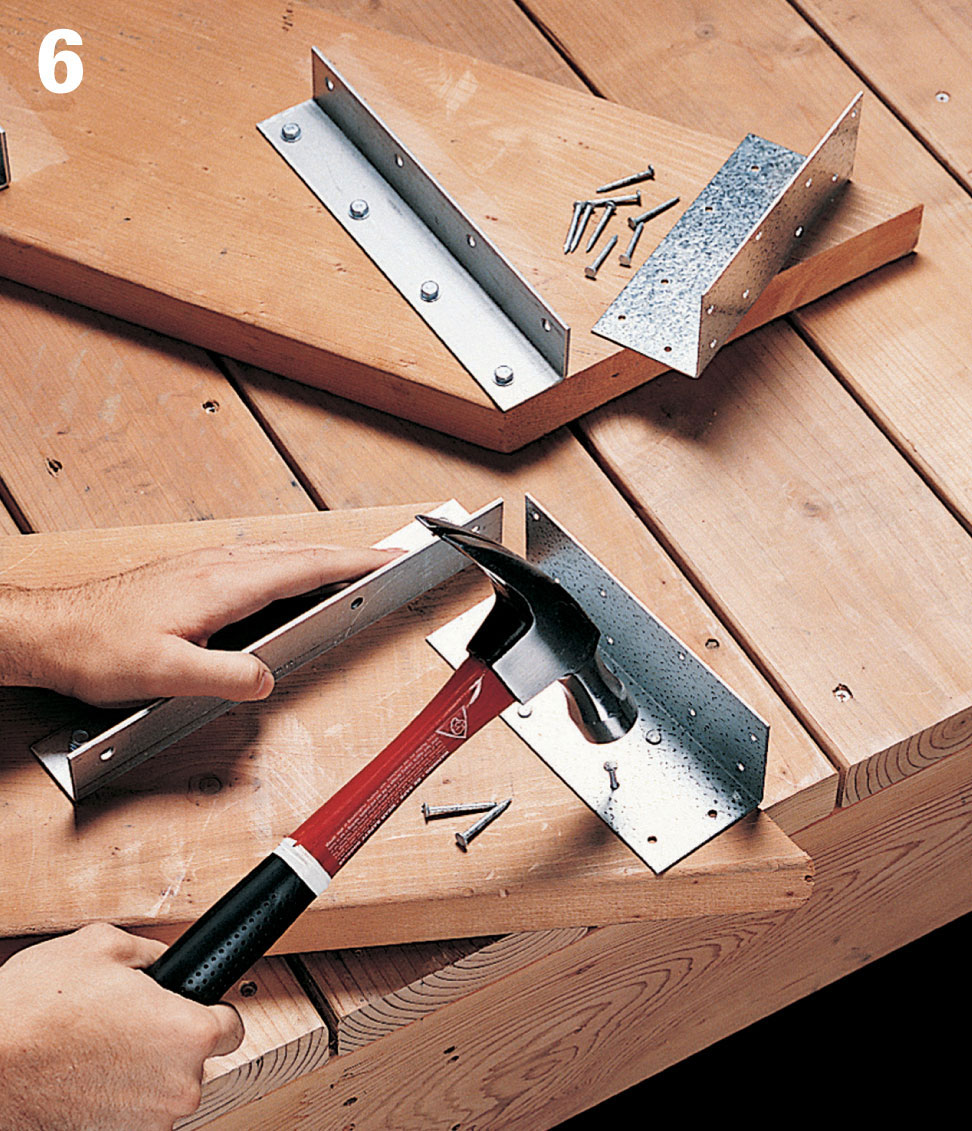
Attach angle brackets to the upper ends of the stringers, using 10d joist hanger nails. Brackets should be flush with the cut ends of the stringers.
Position the stair stringers against the side of the deck, over the stringer outlines. Align the top point of the stringer flush with the surface of the deck. Attach the stringers by nailing the angle brackets to the deck with joist hanger nails.
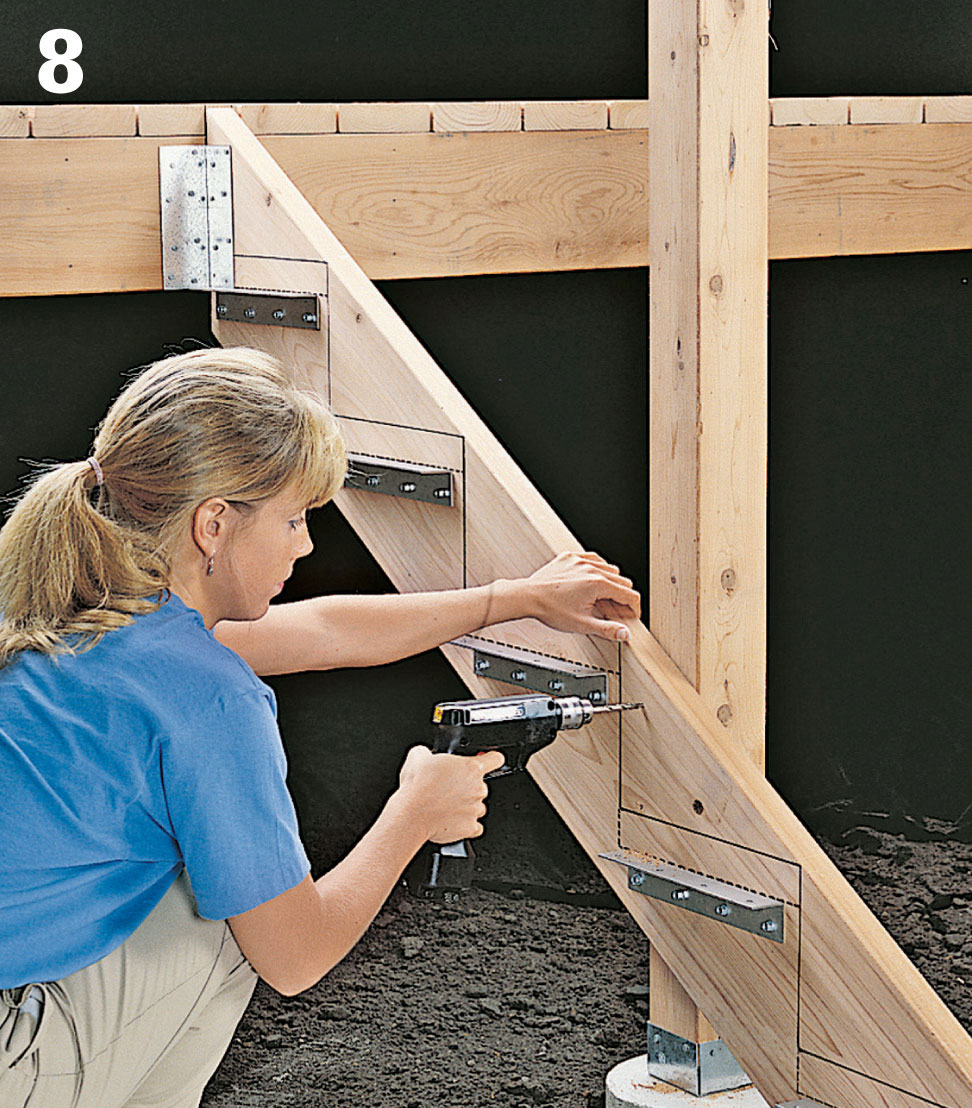
Drill two 1/4" pilot holes through each stringer and into each adjacent post. Counterbore each hole to a depth of 1/2", using a 1 3/8" spade bit. Attach the stringers to the posts with 1/2 × 4" lag screws and washers, using a ratchet wrench or impact driver. Seal screw heads with silicone caulk.
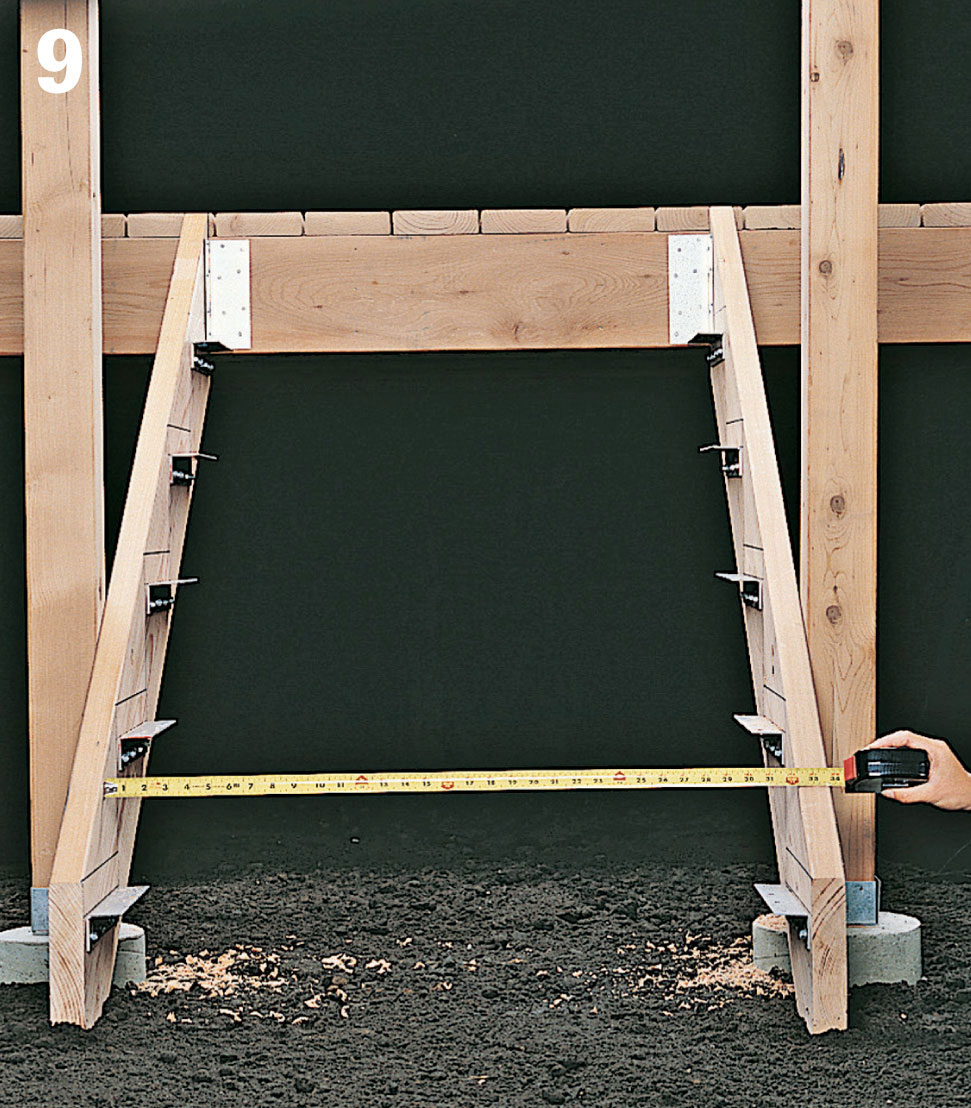
Measure the width of the stair treads. Cut two 2 × 6s for each tread, using a circular saw.
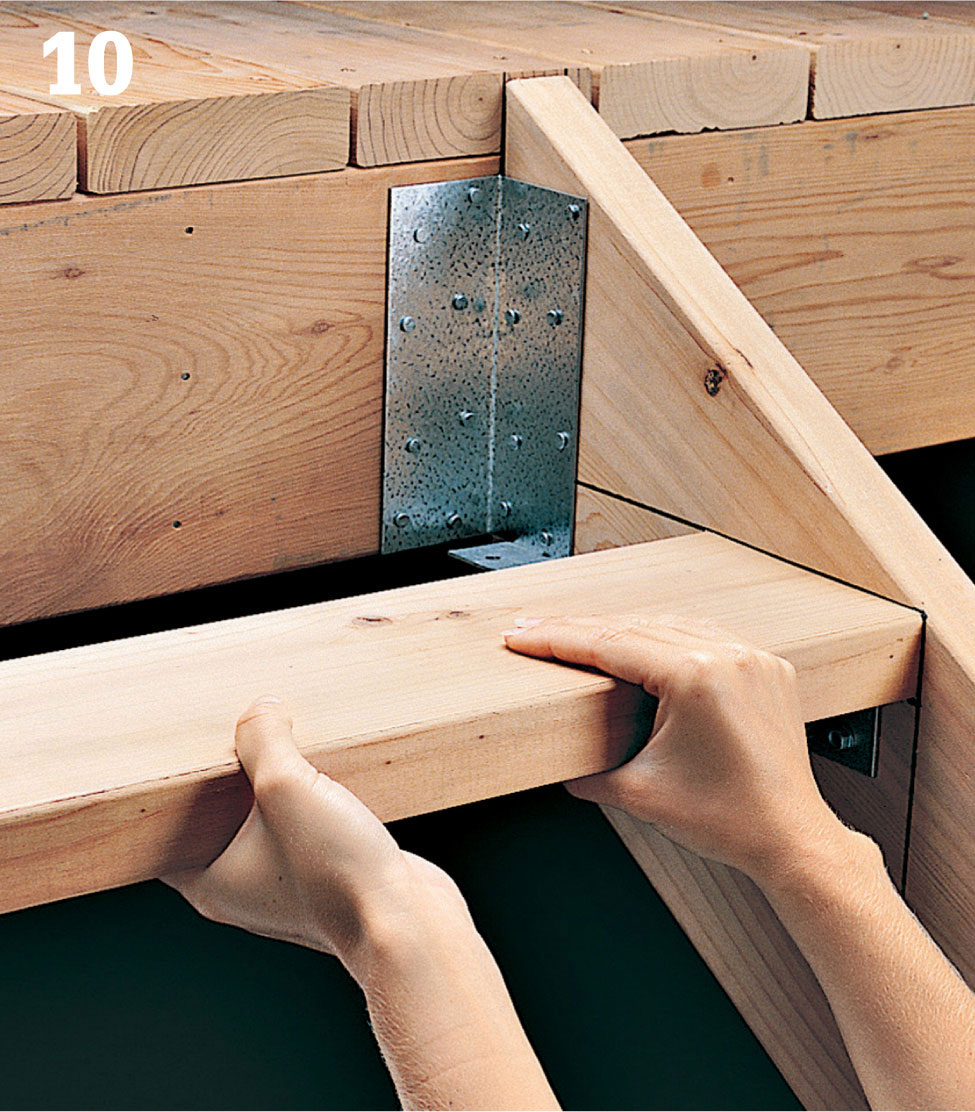
For each step, position the front 2 × 6 on the tread cleat, so that the front edge is flush with the tread outline on the stringers.
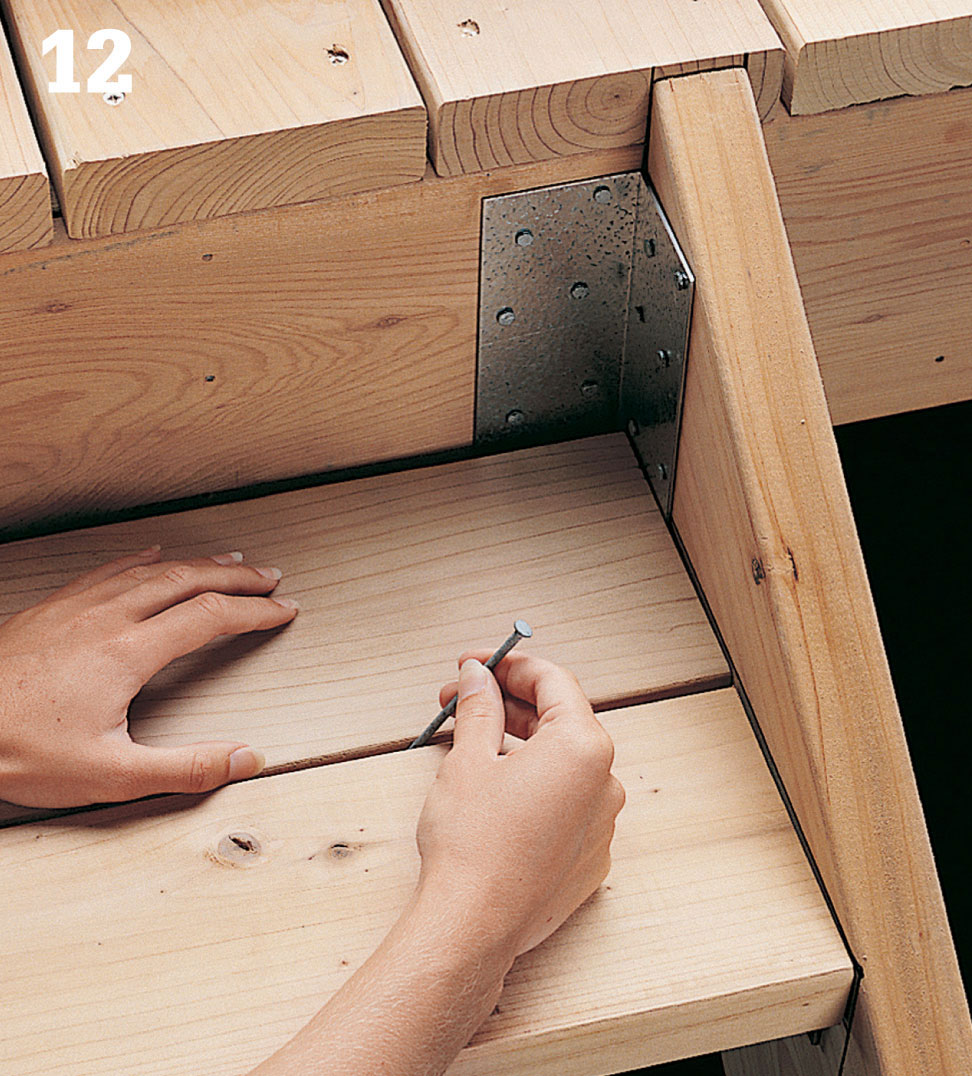
Position the rear 2 × 6 on the cleats, allowing a small space between boards. Use a 16d nail as a spacing guide. Drill 1/8" pilot holes, and attach the 2 × 6 to the cleats with 1/4 × 1 1/4" lag screws. Repeat for the remaining steps.
 Stairbuilding Option
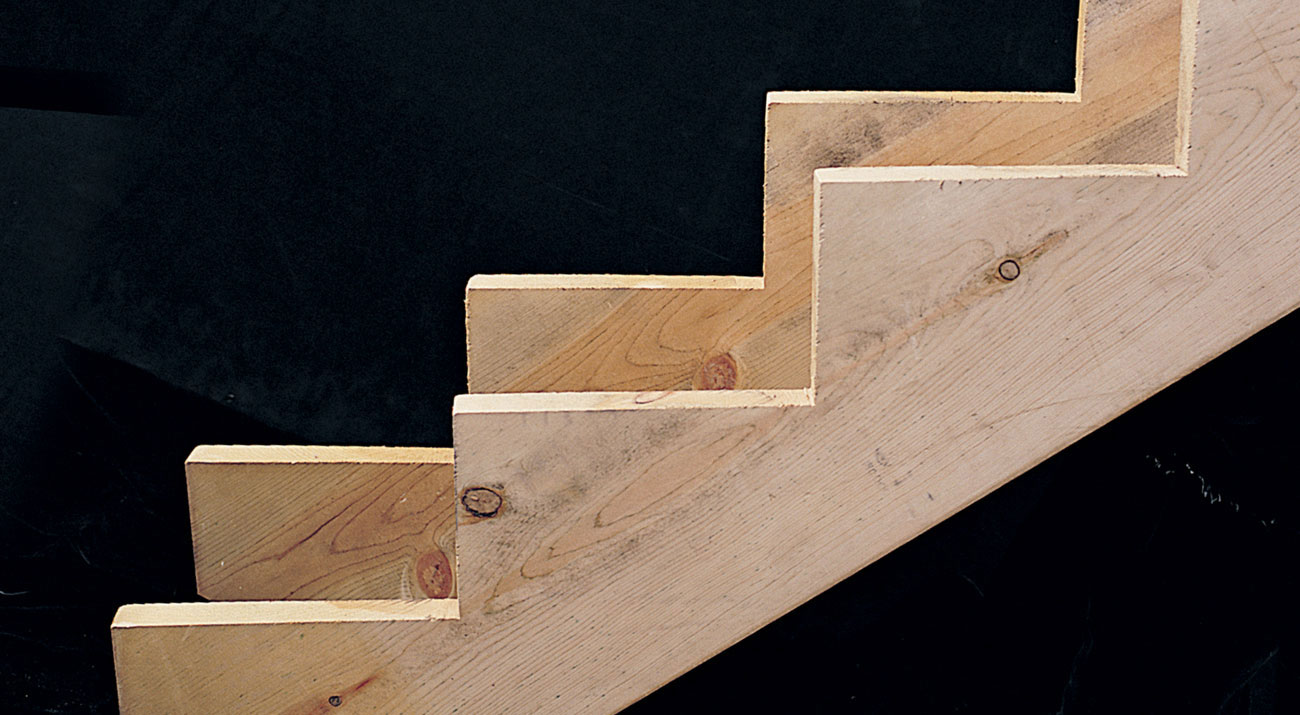
Notched stringers precut from pressure-treated wood are available at building centers. Edges of cutout areas should be coated with sealer-preservative to prevent rot.
 Building Stairs with Landings
Designing and building a stairway with a landing can be one of the most challenging elements of a deck project. Precision is crucial, since building codes have very exact standards for stairway construction. To ensure that the steps for both the top and bottom staircases have the same vertical rise and tread depth, the landing must be set at the right position and height.
Even for professional builders, designing a stairway layout is a process of trial and revision. Begin by creating a preliminary layout that fits your situation, but as you plan and diagram the project, be prepared to revise the layout to satisfy code requirements and the demands of your building site. Measure your site carefully, and work out all the details on paper before you begin any work. Accuracy and meticulous planning will help ensure that your steps are level and uniform in size.
Remember that local building codes may require handrails for any stairway with three or more risers.
 Stairway Basics
The goal of any stairway is to allow people to move easily and safely from one level to another. When designing a deck stairway, the builder must consider the vertical drop—the vertical distance from the surface of the deck to the ending point; and the span—the horizontal distance from the starting point to the end of the stairway.
During the planning stage, the vertical drop is divided into a series of equal-size steps, called rises. Similarly, the horizontal span is divided into a series of equal-size runs. On a stairway with a landing, there are two span measurements to consider: the distance from the deck to the edge of the landing, and from the landing to the end point on the ground. In general, the combined horizontal span of the staircases, not counting the landing, should be 40% to 60% more than the total vertical drop.
For safety and comfort, the components of a stairway must be built according to clearly prescribed guidelines, as listed on page 142.
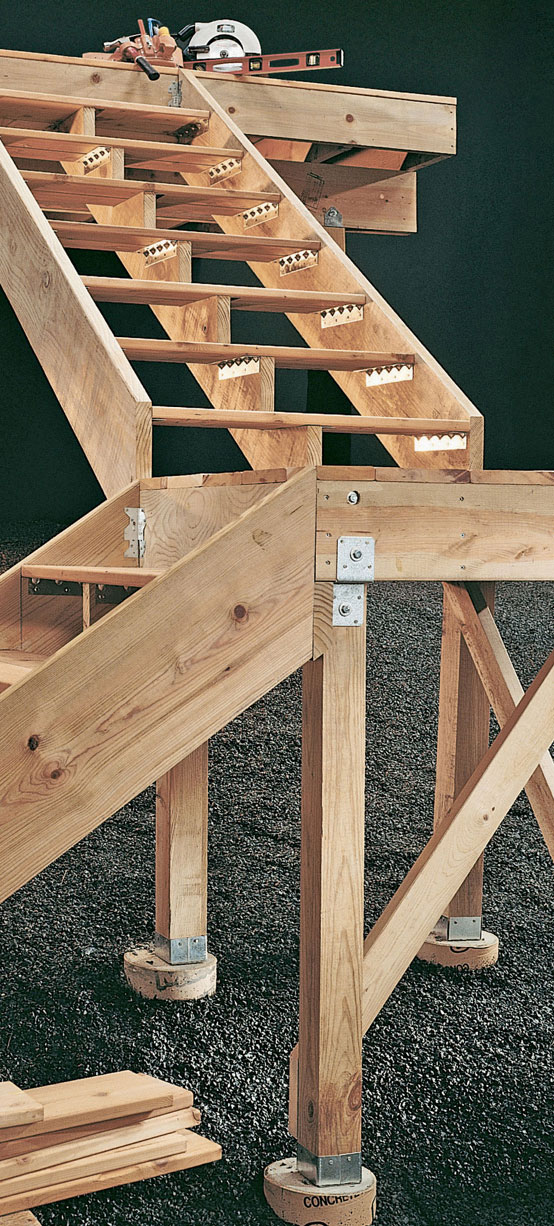
A landing functions essentially as a large step that interrupts a tall stairway. For the builder, the landing provides a convenient spot from which to change the direction of the stairway. For the homeowner, the landing provides a spot to catch your breath momentarily while climbing.
The challenge when planning a stairway is adjusting the preliminary layout and the step dimensions as needed to ensure that the stairway fits the building site and is comfortable to use.
Rises must be no less than 4" and no more than 7-3/4" high.
Runs, the horizontal depth of each step, must be at least 10". The number of runs in a staircase is always one less than the number of rises.
Combined sum of the step rise and run should be about 18" to 20". Steps built to this guideline are the most comfortable to use.
Variation between the largest and smallest rise or run measurement can be no more than 3/8".
Stair width must be at least 36", so two people can comfortably pass one another.
Stringers should be spaced no more than 36" apart. For added support, a center stringer is recommended for any staircase with more than three steps.
Landings serve as oversized steps; their height must be set as precisely as the risers for the other steps in the stairway. Landings should be at least 36" square, or as wide as the staircase itself. U-shaped stairways should have oversized landings, at least 1 ft. wider than the combined width of the two staircases. Landings very often require reinforcement with diagonal cross braces between the support posts.
Concrete footings should support all stringers resting on the ground.
 Construction Details
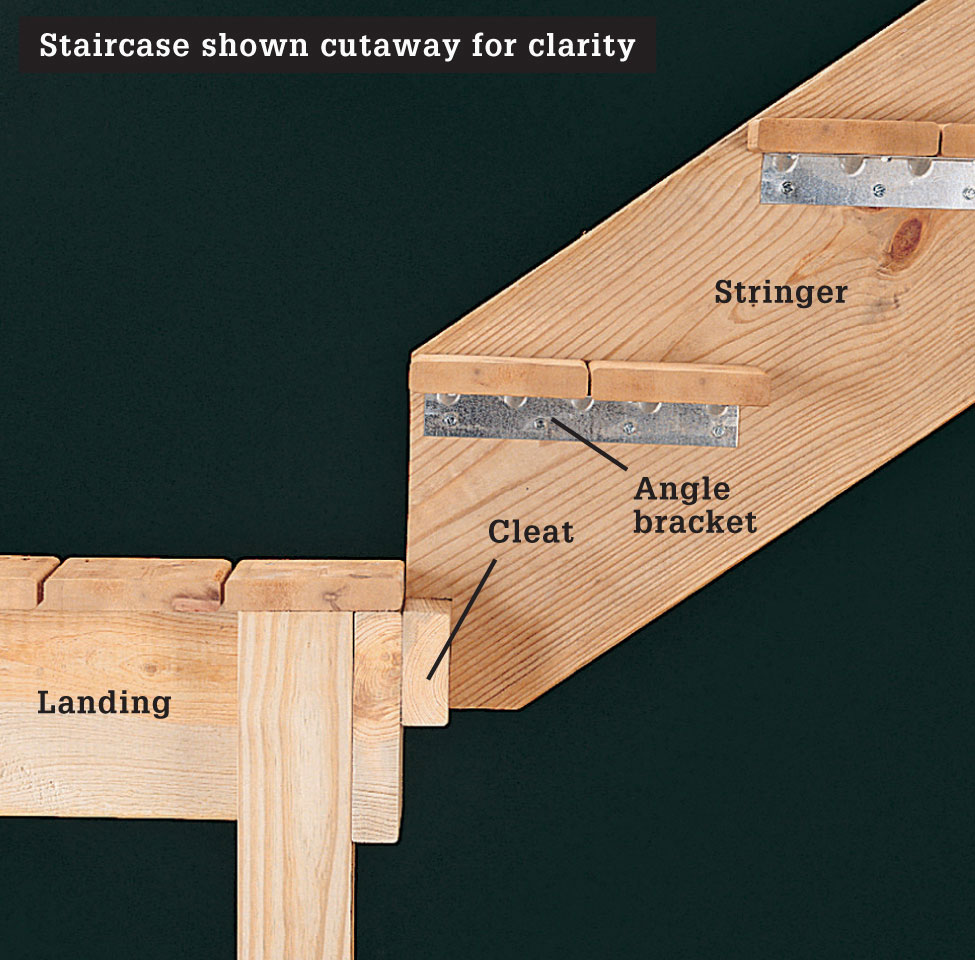
Stringers for the top staircase rest on a 2 × 4 cleat attached to the side of the landing. The stringers are notched to sit on top of the cleat. On the outside stringers, angle brackets support the treads.
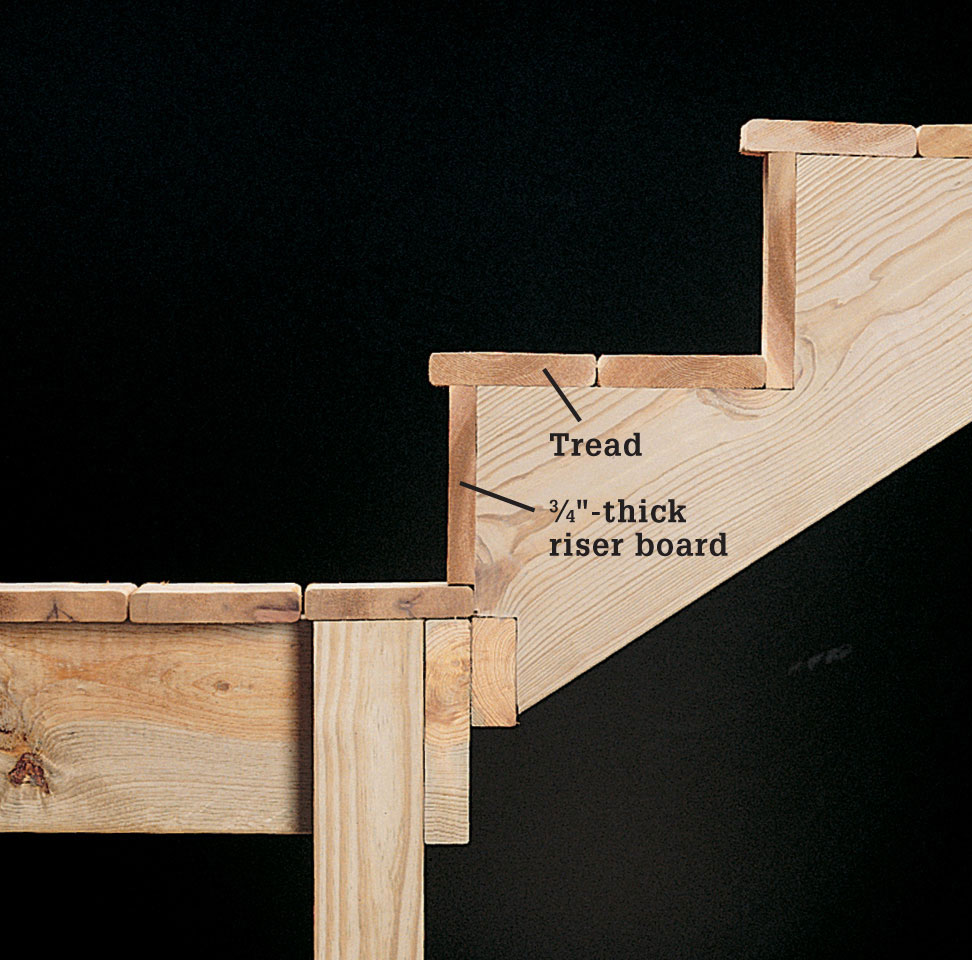
Steps may be boxed in the riser boards, and may have treads that overhang the front edge of the step for a more finished look. Treads should overhang the riser boards by no more than 1".
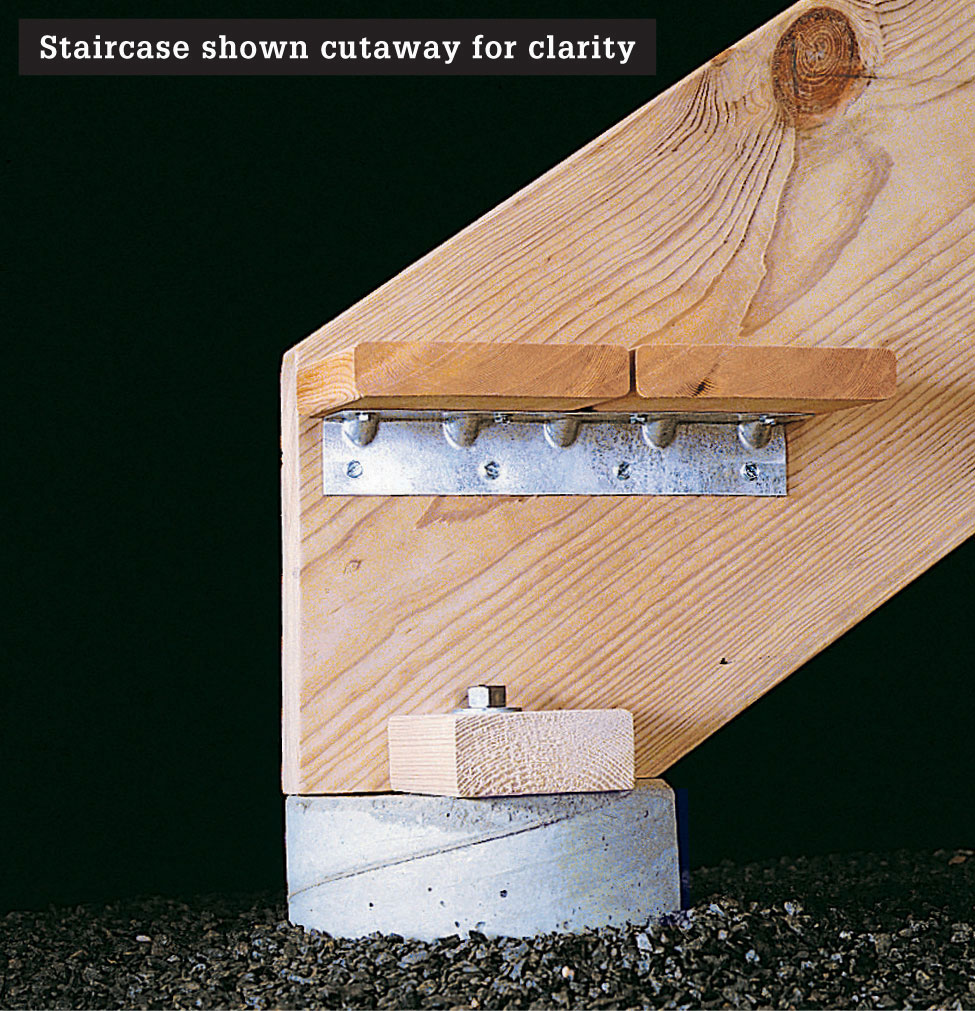
Concrete footings support the stringers for the lower staircase. J-bolts are inserted into the footings while the concrete is still wet. After the footings dry, wooden cleats are attached to the bolts to create surfaces for anchoring the stringers. After the staircase is positioned, the stringers are nailed or screwed to the cleats.
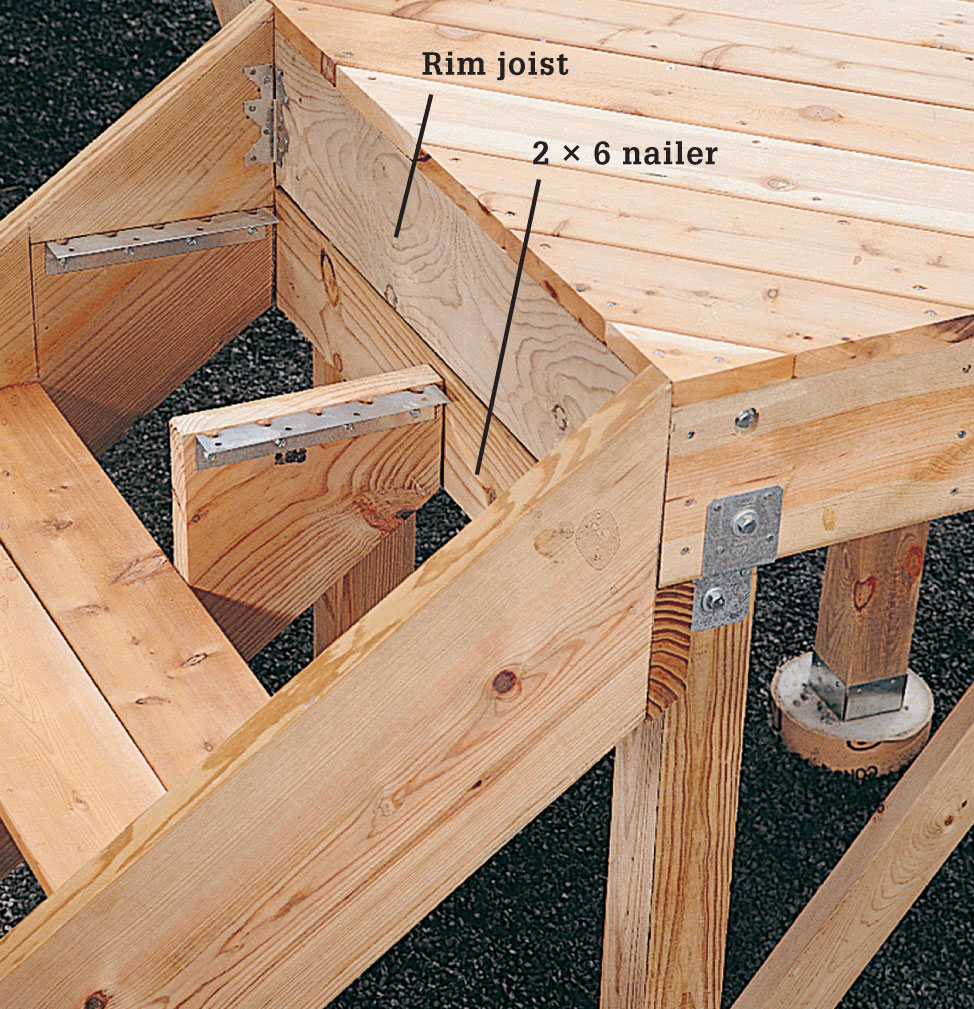
Center stringers are recommended for any staircase that has more than 3 steps or is more than 36" wide. Center stringers are supported by a 2 × 6 nailer attached with metal straps to the bottom of the rim joist. The bottom edge of the nailer can be beveled to match the angle of the stringers. The center stringer is attached by driving deck screws through the back of the nailer and into the stringer.
 How to Create a Preliminary Layout
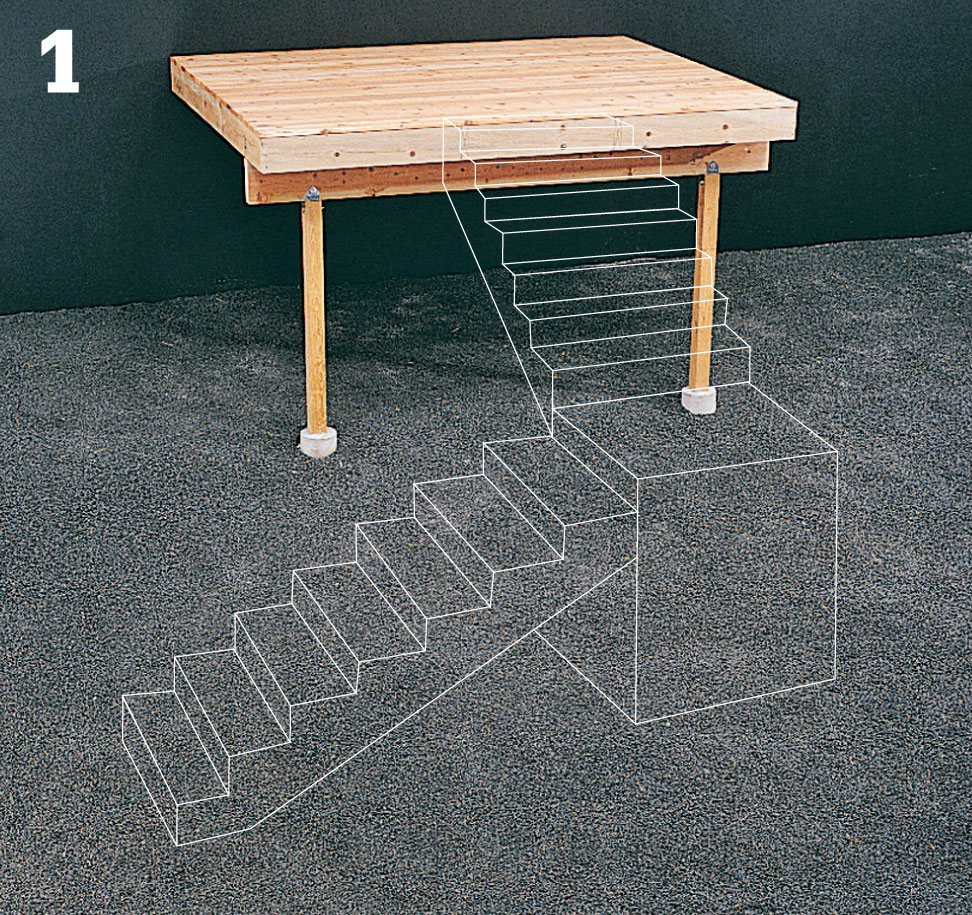
Evaluate your building site and try to visualize which stairway design best fits your needs. When creating a preliminary layout, it is generally best to position the landing so the upper and lower staircases will be of equal length. Select a general design idea.

Establish a rough starting point for the stairway on the deck, and an ending point on the ground that conforms with your design. Mark the starting point on the rim joist, and mark the ending point with two stakes, spaced to equal the planned width of your stairway. This is a rough layout only; later calculations will give you the precise measurements.
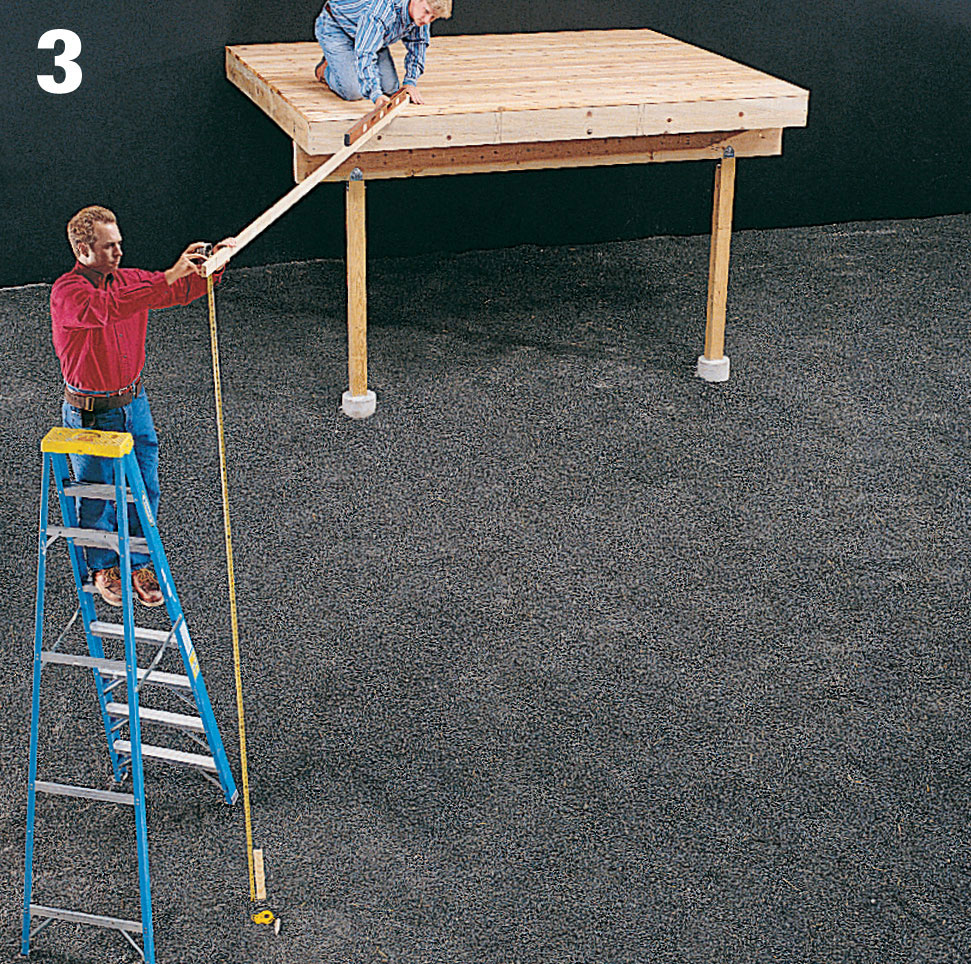
To determine the vertical drop of the stairway, extend a straight 2 × 4 from the starting point on the deck to a spot level with the deck directly over the ending point on the ground. Measure the distance to the ground; this measurement is the total vertical drop. Note: If the ending point is more than 10 ft. from the starting point, use a mason’s string and line level to establish a reference point from which to measure.
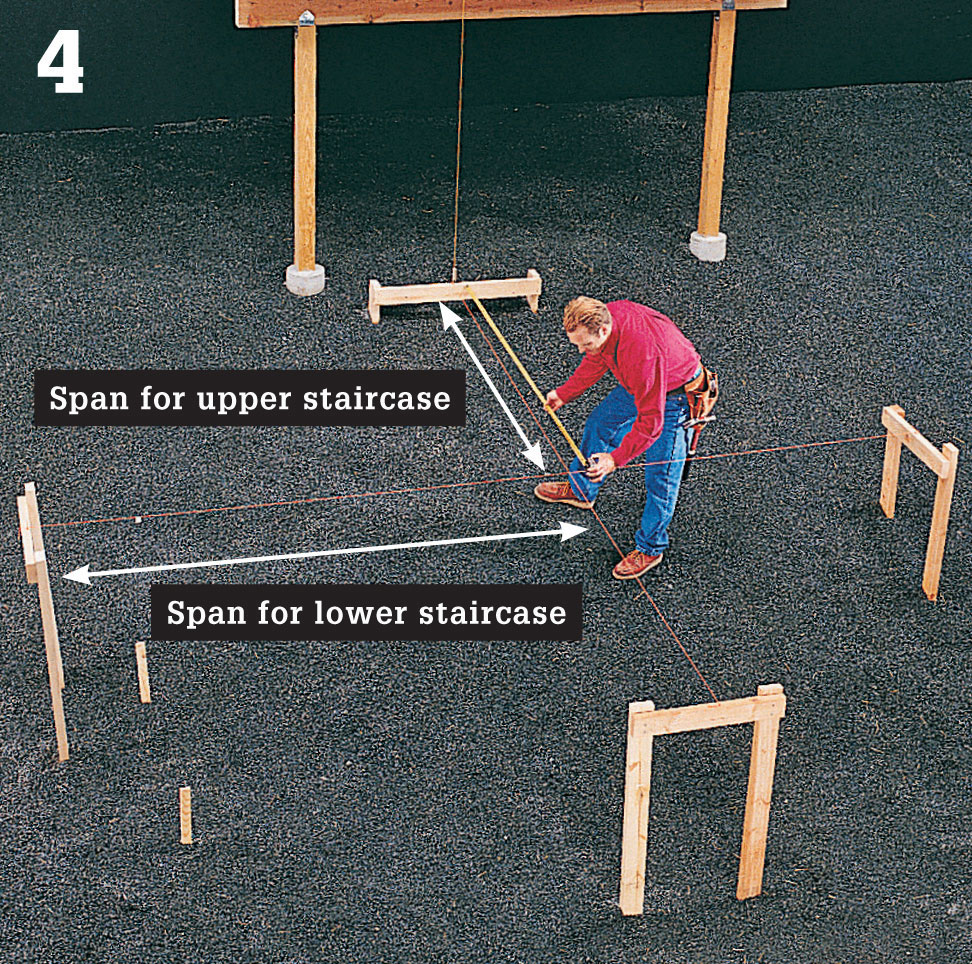
Measure the horizontal span for each staircase. First, use batterboards to establish level layout strings representing the edges of the staircases. Find the span for the upper staircase by measuring from a point directly below the edge of the deck out to the edge of the landing. Measure the span for the lower staircase from the landing to the endpoint.
 How to Build Stairs with a Landing
Begin construction by building the landing. On a flat surface, build the landing frame from 2 × 6 lumber. Join the corners with 3" deck screws, then check for square by measuring diagonals. Adjust the frame until the diagonals are equal, then tack braces across the corners to hold the frame square.

Using your plan drawing, find the exact position of the landing on the ground, then set the frame in position and adjust it for level. Drive stakes to mark locations for the landing posts, using a plumb bob as a guide. Install the footings and posts for the landing.
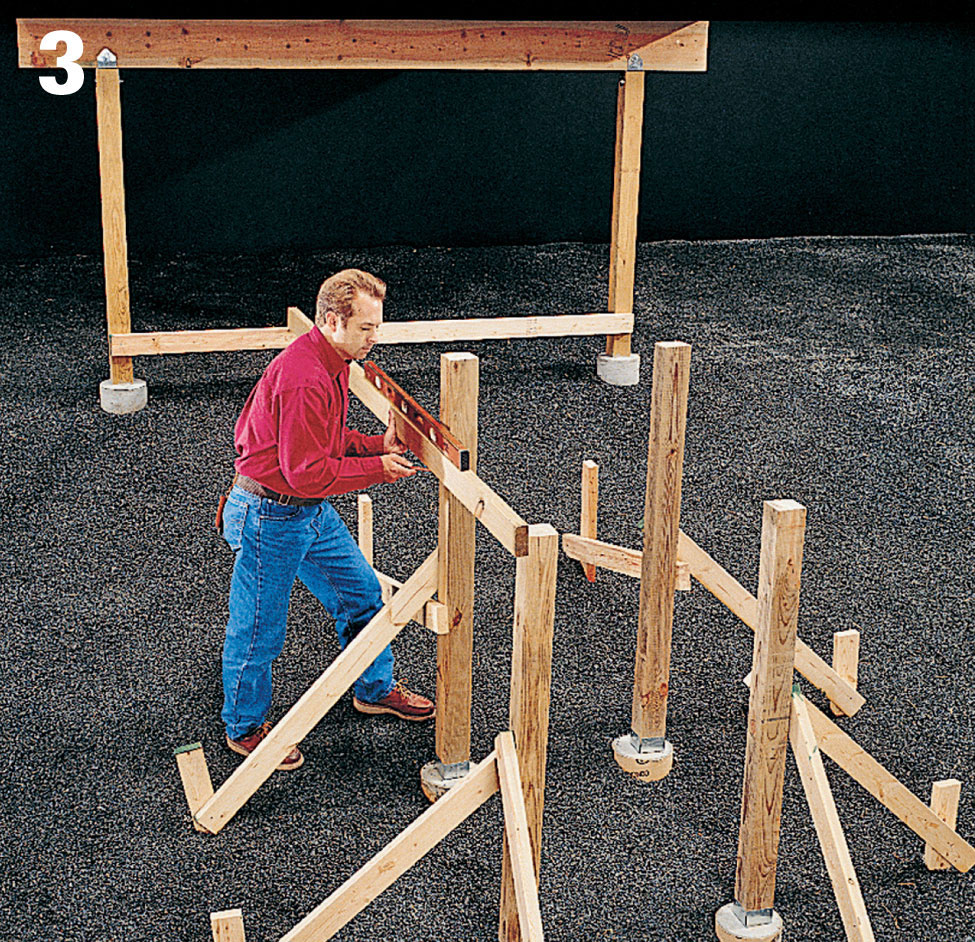
From the top of the deck, measure down a distance equal to the vertical drop for the upper staircase. Attach a 2 × 4 reference board across the deck posts at this height. Position a straightedge on the reference board and against the landing posts so it is level, and mark the posts at this height. Measure down a distance equal to the thickness of the decking boards, and mark reference lines to indicate where the top of the landing frame will rest.
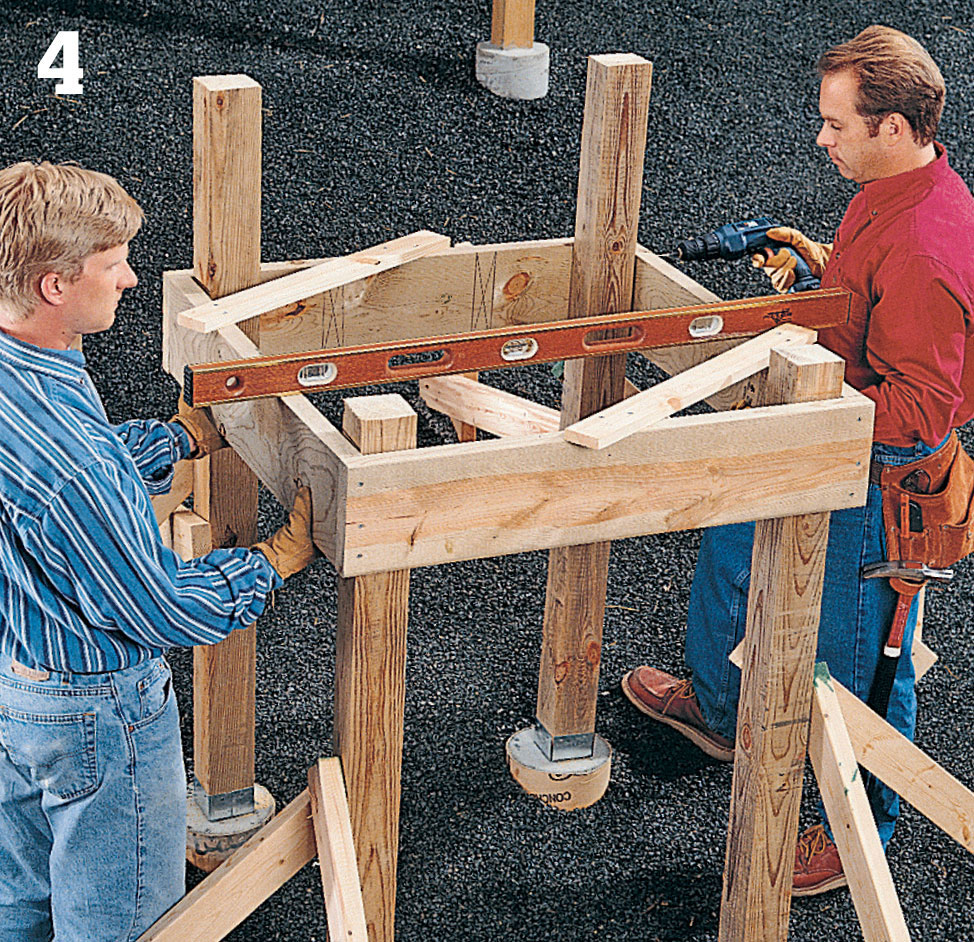
Attach the landing frame to the posts at the reference lines. Make sure the landing is level, then secure it with joist ties attached to the posts with 5/8 × 3" lag screws. Cut off the posts flush with the top of the landing frame using a reciprocating saw.
Remove the diagonal braces from the top of the landing frame, then cut and install joists. (For a diagonal decking pattern, space the joists every 12" on-center.) Attach the decking boards, and trim them to the edge of the frame.
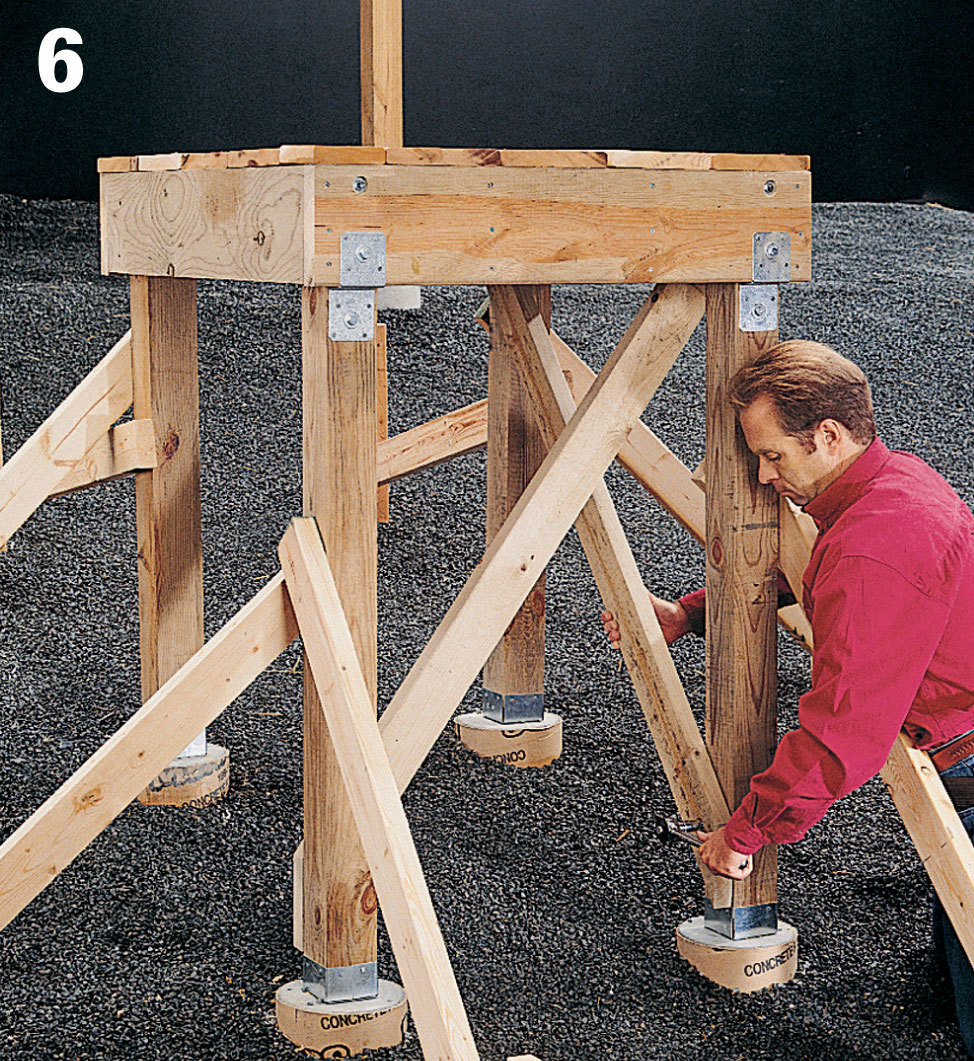
For extra support and to help prevent sway, create permanent cross braces by attaching 2 × 4 boards diagonally from the bottoms of the posts to the inside of the landing frame. Brace at least two sides of the landing. Remove the temporary braces and stakes holding the posts.
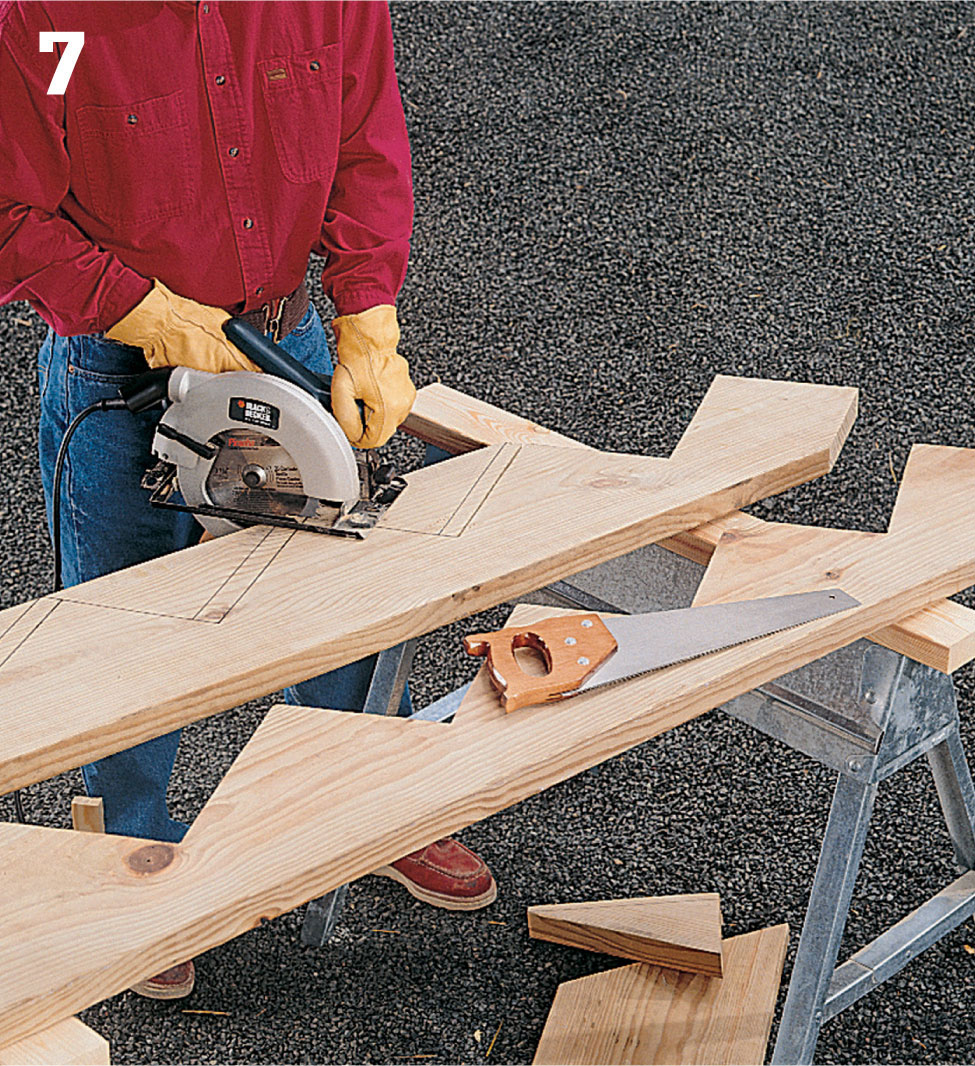
Lay out and cut all stringers for both the upper and lower staircases (page 155). For the center stringers only, cut notches where the treads will rest. Start the notches with a circular saw, then finish the cuts with a handsaw. Measure and cut all tread boards.
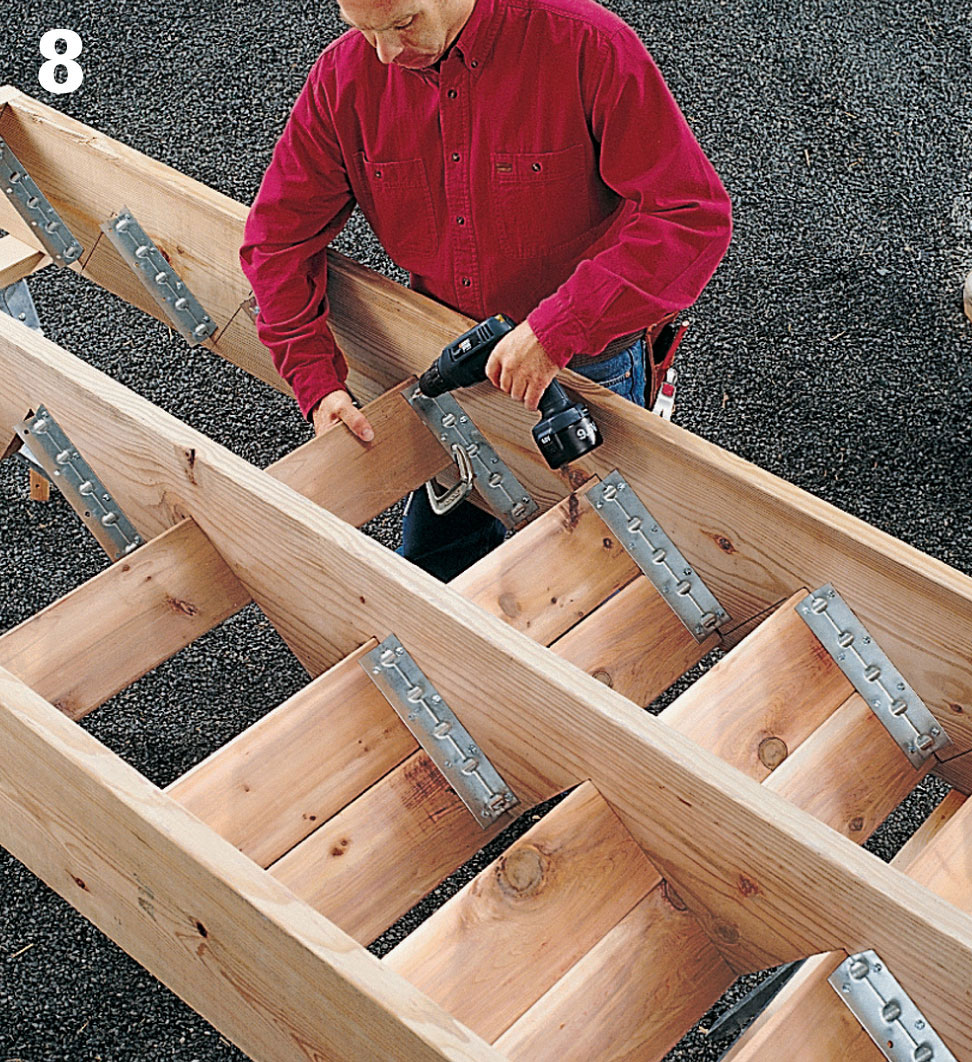
Use 3/4"-long lag screws to attach angle brackets to the stringers where the treads will rest, then turn the stringers upside down and attach the treads with lag screws. Gaps between tread boards should be no more than 3/8".
Dig and pour a concrete footing to support each stringer for the lower staircase. Make sure the footings are level and are the proper height in relation to the landing. Install a metal J-bolt in each footing while the concrete is wet, positioning the bolts so they will be offset about 2" from the stringers. After the concrete dries, cut 2 × 4 footing cleats, drill holes in them, and attach them to the J-bolts using nuts.
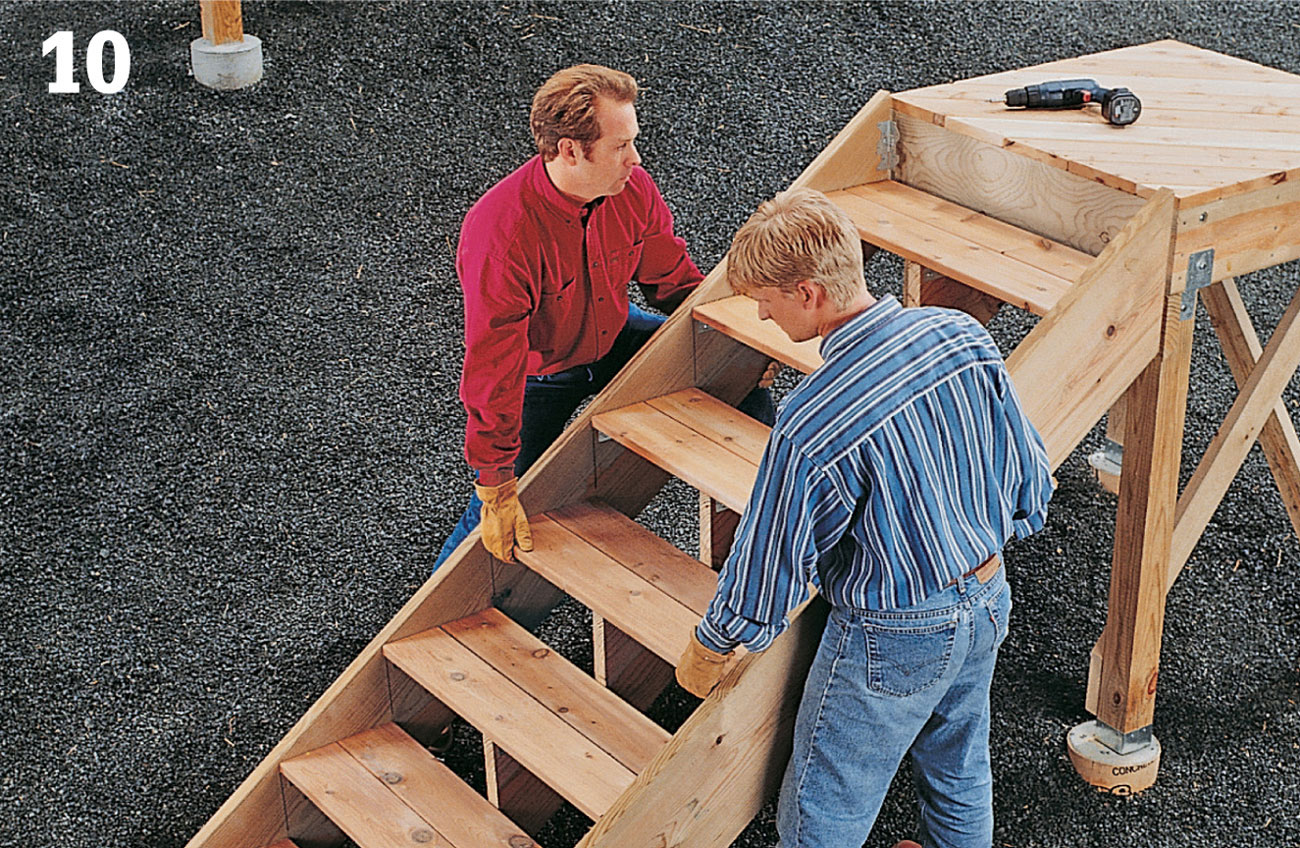
Attach a 2 × 6 nailer to the landing to support the center stringer (page 152), then set the staircase in place, making sure the outside stringers are flush with the top of the decking. Use corner brackets and joist-hanger nails to anchor the stringers to the rim joist and nailer. Attach the bottoms of the stringers by nailing them to the footing cleats.
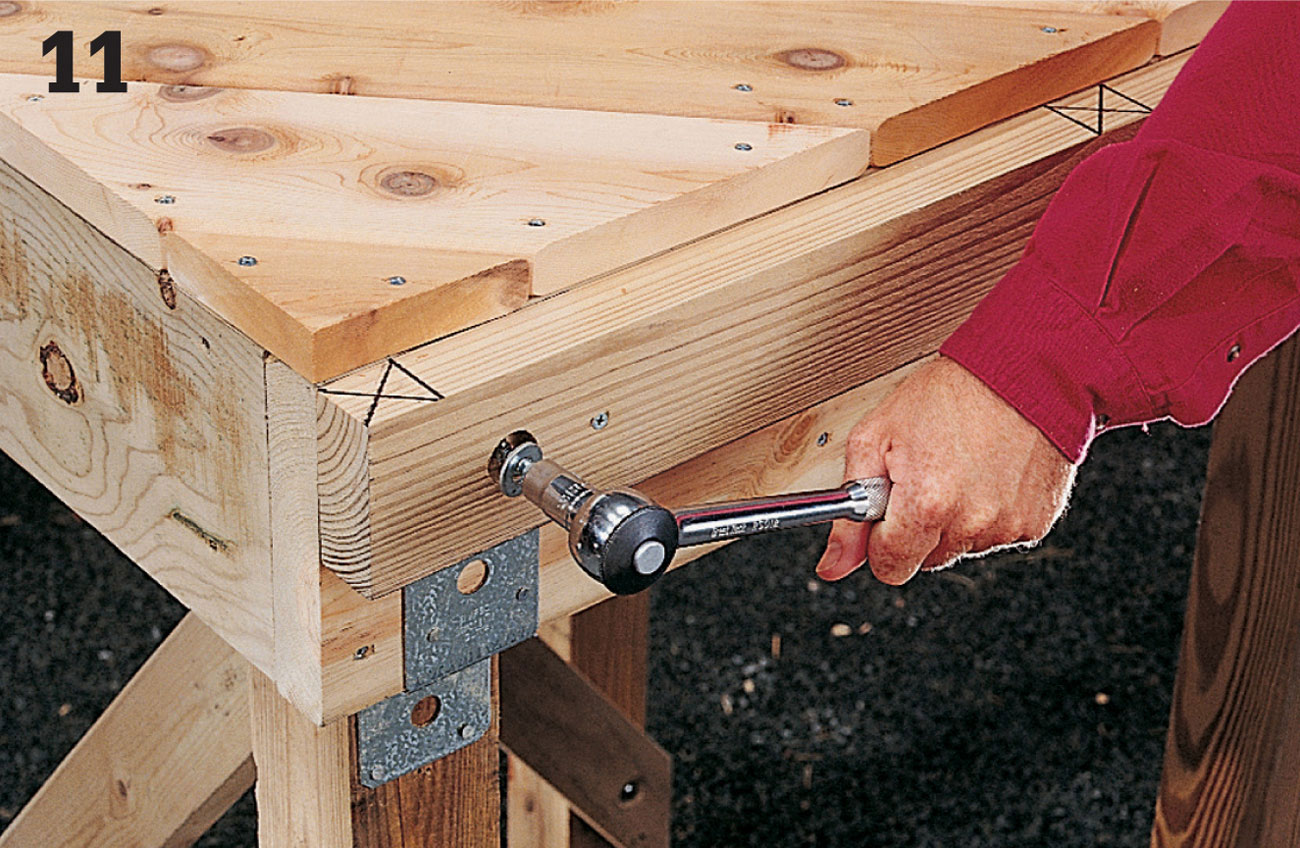
Measure and cut a 2 × 4 cleat to match the width of the upper staircase, including the stringers. Use lag screws to attach the cleat to the rim joist on the landing, flush with the tops of the joists. Notch the bottoms of all stringers to fit around the cleat (page 155), and attach angle brackets on the stringers to support the treads.
To support the center stringer at the top of the staircase, measure and cut a 2 × 6 nailer equal to the width of the staircase. Attach the nailer to the rim joist with metal straps and screws.
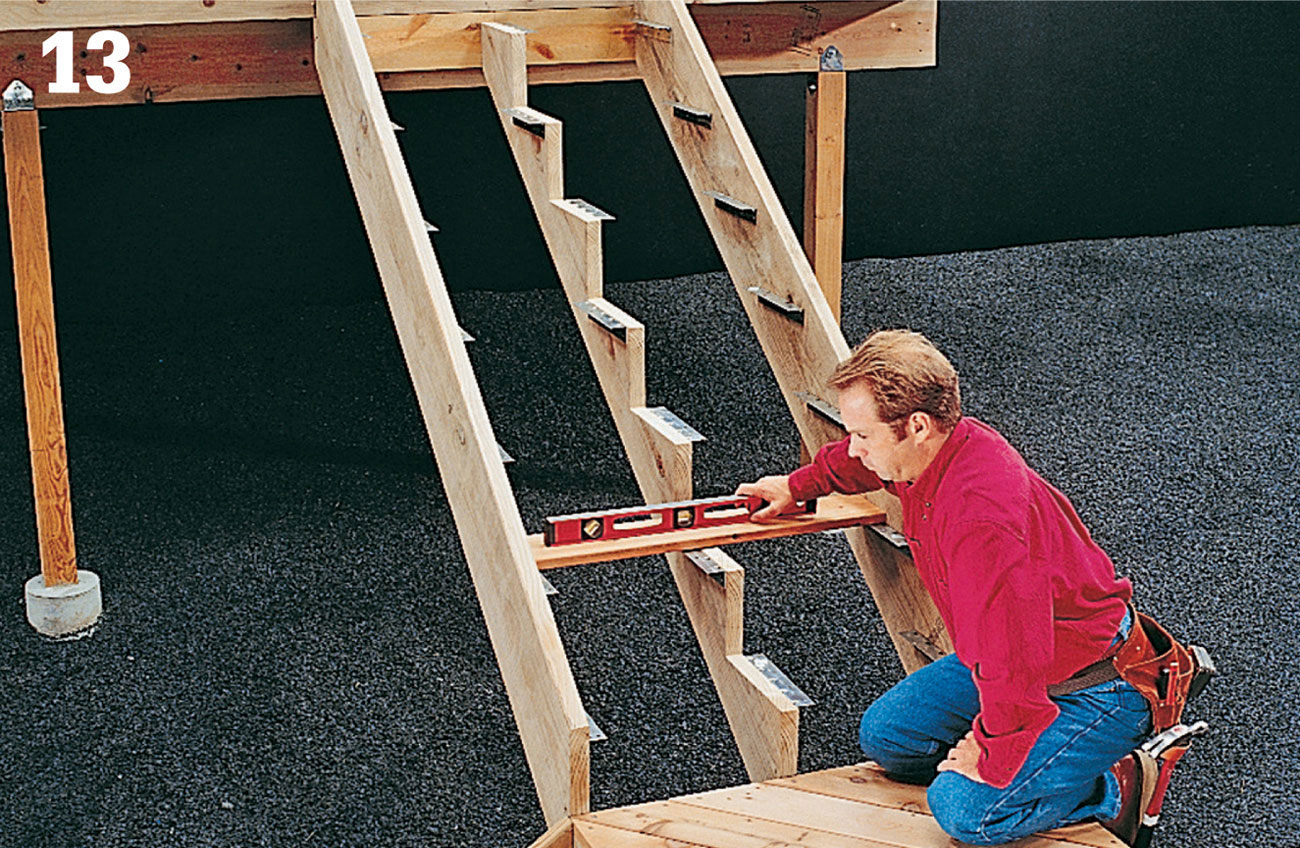
Position the stringers so they rest on the landing cleat. Make sure the stringers are level and properly spaced, then toenail the bottoms of the stringers into the cleat, using galvanized 16d nails. At the top of the staircase, use angle brackets to attach the outside stringers to the rim joist and the middle stringer to the nailer.
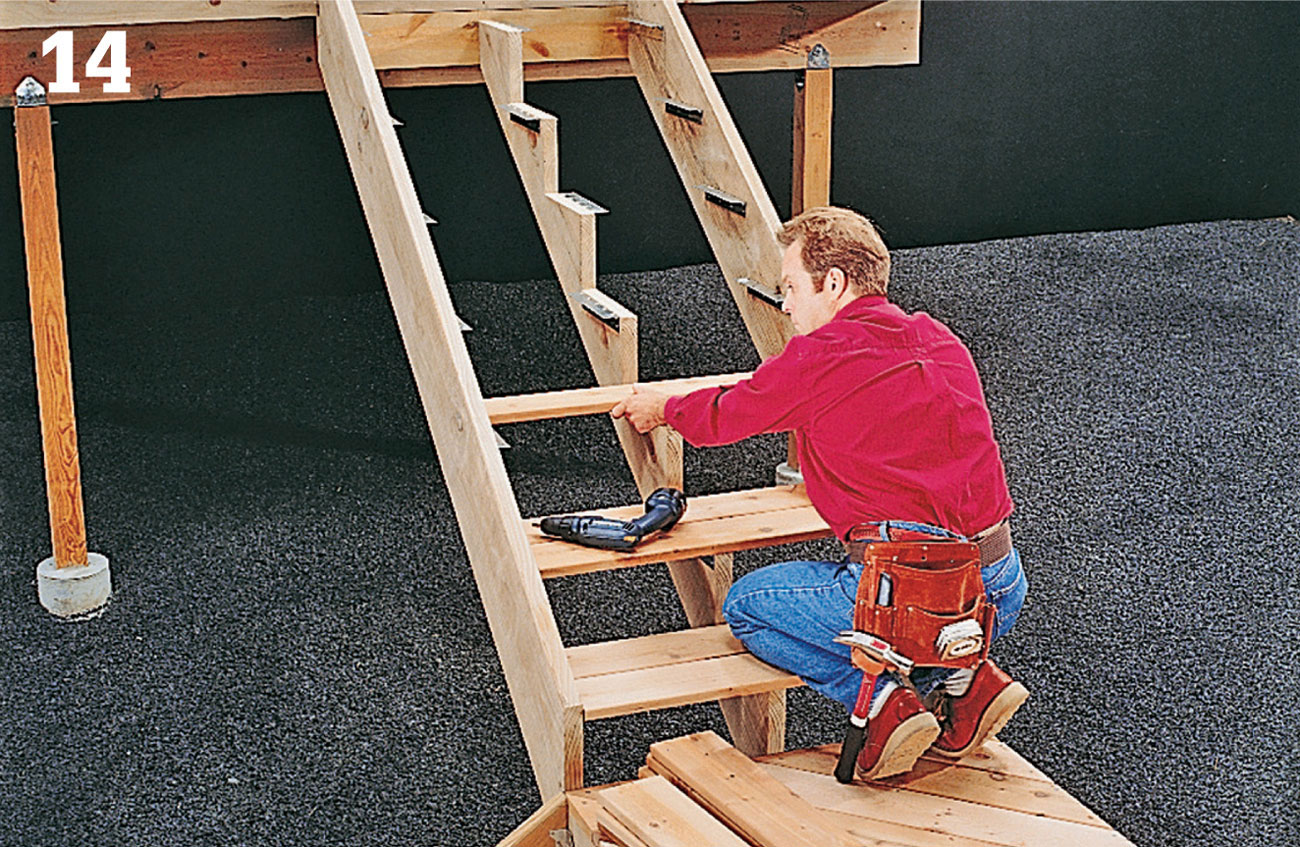
Measure, cut, and position tread boards over the angle brackets, then attach them from below, using 3/4"-long lag screws. The gap between tread boards should be no more than 3/8". After completing the stairway, install railings (pages 160 to 191).