CHAPTER 4
User Experience
The Hadoop MapReduce program is designed to process a large amount of data at a low cost. Hadoop has been in use for almost 10 years, and it was initially used to focus on massive parallel processing. As covered in Chapter 3, however, it's tiresome to use the MapReduce program every time you need to process and analyze data. A lot of code, builds, and deploy processes are required to perform just a simple word count program, and developers get tired of frequently occurring repetitive tasks. And non-developers, such as data analysts or general users, who don't have a strong development background, struggle to use this method in their environment.
General users don't need to know every detail about MapReduce operating principles or shuffle phases, such as having to know the operational principles of Oracle, in order to extract the desired value from a database. The framework of Hadoop MapReduce makes developers concentrate on logic by dividing the work into fault-tolerance and node management. Hadoop-related projects, on the other hand, can provide an interface that you can use on data flows, regardless of any complex events.
This chapter focuses on how the Hadoop ecosystem works to improve user experiences. The Hadoop ecosystem has been developed continuously, so it benefits from cluster provisioning, data collection, analysis, and visualization. It isn't necessary to build your architecture using the whole ecosystem that is shown in Figure 4.1. Most of the analysis can proceed smoothly with just a combination of a few ecosystems. And in the case of simple data analysis, DBMS or Excel can actually be more efficient. Therefore, you must choose the right ecosystem for the characteristics of your data. In this chapter we will cover Hive, Pig, Hue, and Oozie, since these are typically used with Hadoop. Let's start by first looking at Apache Hive.

APACHE HIVE
Apache Hive is similar to the SQL language. Hive doesn't always follow ANSI SQL grammar, but it can convert SQL grammar to MapReduce jobs to use a parallel processing mechanism for the Hadoop ecosystem. This is beneficial not only for a database administrator who runs an existing legacy system, but also for casual users who use SQL. Since Hadoop is basically an application for handling data, and most data warehouse applications have implemented the SQL language, Hive is the most famous and widely used project among Hadoop ecosystems.
A simple Hive architecture diagram is shown in Figure 4.2.

Before using Hive, consider the following:
- Hive is not a Relational Database Management System (RDBMS). Although it uses a SQL-like language, most jobs become converted into MapReduce jobs, following the nature of MapReduce. For example, unlike RDBMS where a simple
SELECT COUNT (*)instantly converts the result, Hive needs the startup because it can take a long time for map and reduce to launch. Also,COMMITandROLLBACKare not yet supported, which are crucial for online transactional purposes. - Hive works on files. Hive data exists in the form of HDFS or AWS S3 files, and a Hive table or partition exists in a physical form at the file location. Therefore, the dataset possessed by Hive can be converted by external factors, and it's also possible to load the external data.
- Using the built-in functions of Hive, it may be difficult to obtain the desired result. For this case, Hive supports User Defined Function (UDF) and Serializer/Deserializer (SerDe). This will be dealt with in more detail later in this chapter.
Hive Installation
This book provides a Hive 1.2.1 installation example. The latest version of Hive can be downloaded from the following URL: http://hive.apache.org/downloads.html.
- Download Hive and uncompress:
$ wget http://www.us.apache.org/dist/hive/hive-1.2.1/apache-hive-1.2.1-bin.tar.gz apache-hive-1.2.1-bin.tar.gz $ tar xvfz apache-hive-1.2.1-bin.tar.gz - Set the environment variable (or add it to your shell profile):
$ cd apache-hive-1.2.1-bin $ export HIVE_HOME=$PWD $ export PATH=$HIVE_HOME/bin:$PATH $ export HADOOP_HOME=<your_hadoop_home> to conf/hive-env.sh - Set the configuration variable:
Create
conf//hive-site.xmlaccording toconf/hive-default.xml, except for the<property>section.Add properties that you need to
hive-site.xml. The list for all of the properties is found here:https://cwiki.apache.org/confluence/display/Hive/Configuration+Properties
- Set the metastore configuration.
Hive uses the embedded Derby database with the default metastore, but in the production environment it is recommended that you use a different database. These configurations show how to use the Metastore with MySQL:
<property><name>javax.jdo.option.ConnectionDriverName</name><value>com.mysql.jdbc.Driver</value><description>Driver class name for a JDBC metastore</description></property><property><name>javax.jdo.option.ConnectionURL</name><value>jdbc:mysql://dbAddress/metastore</value><description>JDBC connect string for a JDBC metastore</description></property><property><name>javax.jdo.option.ConnectionUserName</name><value>hiveuser</value><description>Username to use against metastore database</description></property><property><name>javax.jdo.option.ConnectionPassword</name><value>password</value><description>password to use against metastore database</description></property>
HiveQL
As mentioned earlier, Hive defines a process with a SQL-like language. This is called the Hive Query Language (HiveQL). The Data Definition Language (DDL) and Data Manipulation Language (DML) exist similarly to SQL. We will cover DDL and DML later in this chapter. Click on this link if you are interested in seeing the complete description of HiveQL:
https://cwiki.apache.org/confluence/display/Hive/LanguageManualHive Command Line Options
HiveQL-executing methods are used most frequently through the use of the command line. In the Hive batch mode, one or more SQL queries from a file are distinguished by a semicolon, and can be executed directly by the user with the Query as a factor. The interactive shell mode is the conversation type that is usually used when running the ad hoc query. Table 4.1 lists the command line options most often used in batch mode.
Table 4.1 Batch mode command line options
| Option | Description | Examples |
-e <quoted-query-string> |
SQL from command line | hive -e 'SELECT a.col from tab1 a' |
-f <filename> |
SQL from files | hive -f /home/hive/hiveql.hql |
--hiveconf <property=value> |
Using Hive configuration variables | hive --hiveconf fs.default.name=localhost |
--hivevar <key=value> |
Using Hive variables | hive --hivevar tname="user" |
In the Hive interactive shell mode, the property can be defined by the set order as well as the execution of Hive QL or the JAR file used for UDF (see Table 4.2). It is also possible to execute an OS order by attaching “!” before the command, or to fulfill the HDFS-related command through DFS.
Table 4.2 Hive interactive shell mode properties
| Command | Description | Examples |
exit or quit |
Exiting the interactive shell | exit; |
set <key>=<value> |
Sets the value of a configuration variable | set hive.exec.parallel=true; |
add JAR <Jar file location> |
Adds jar file to distributed cache | add jar s3://mybucket/abc.jar |
list JAR |
Shows a list of JAR that already added to distributed cache | list jar; |
source <HQL file location> |
Executes a HQL script from file system | source /home/hadoop/ex.hql |
Data Definition Language
Data Definition Language (DDL) statements are used to define and modify data structures such as create, alter, or drop database/table schemas. It is useful to divide files based on the duty and schedule under the classified folders by projects when managing documents in the computer. It is also convenient to designate the bundle of relevant datasets by table, and to bind the relevant tables to manage by database when it comes to Hive. This method has been widely used in the past.
You can think of it as the database being a set of related tables. Hive uses the default database, until you assign a database to use as the USE <database_name> statement. You can use the SCHEMA keyword instead of the DATABASE keyword when running any database related commands. Here are some simple database command examples:
CREATE DATABASEstatement: This uses theIF NOT EXISTSclause, even though the database with the same name exists, and does not return an error. You can add a descriptive comment using theCOMMENTcommand. When creating a database, it creates adb_name.dbdirectory under the directory defined inhive.metastore.warehouse.dir(default value: /user/hive/warehouse). You can change the position to be stored using theLOCATIONcommand.CREATE DATABASE [IF NOT EXISTS] db_name [COMMENT database_comment] [LOCATION database_path] [WITH DBPROPERTIES (key1=value1, …)];ALTER DATABASEstatement: This is a command to modify key-value pairs inDBPROPERTIES, but you can't change its location or database name.ALTER DATABASE db_name SET DBPROPERTIES (key1=value1, …);DROP DATABASEstatement: Remember that you can't drop the database unless there are no existing tables in the database. If you want to drop the database and its entire table, append theCASCADEkeyword to the end of the command.DROP DATABASE [IF EXISTS] db_name [CASCADE];
Hive does not use the data of a completely formatted form like RDBMS. It just reads and writes the file. Therefore, it is important to define the table schema in accordance with the form of inserted data. Hive Table DDL can designate the terminate key of the row format to process the input file format of various forms, and prevents the full scan of the entire data by designating the partition. In addition, using the ORC (Optimized Row Columnar) and Parquet file format, should allow column-oriented data processing. The following example demonstrates how to use the table command.
CREATE TABLEstatement: It defines the table schema. Hive supports various types of column data types such as String, Int, Timestamp, etc. In addition, nested types like Arrays and Maps are also supported. These complex data types can pack a lot of data into a single column, but it can cause performance degradation when running repetitive operations.CREATE [EXTERNAL] TABLE [IF NOT EXISTS] [db_name.]table_name( column_name data_type, …) [COMMENT table_comment] [PARTITIONED BY (col_name data_type, …)] [STORED AS file_format] [LOCATION table_path]ALTER TABLEstatement: It enables you to change the table schema and includes table name, add/delete/modify columns, partition information, SerDe properties, etc.ALTER TABLE table_name SET property_name property_valueDROP TABLEStatement: It deletes table information from the metastore. Remember that in the case of Managed Table, it will delete the table location's data (file), but for the External Table it only deletes metadata.DROP TABLE [IF EXISTS] table_name
Hive keeps the partition information in metastore, but the new partition can be directly added to the file system. Because Hive can't know about this new partition information, HiveQL targets this partition and returns a null. In this case, the user can add the partition manually by ALTER TABLE table_name ADD PARTITION commands or check the whole partition using MSCK REPAIR TABLE table_name.
Data Manipulation Language
Data Manipulation Language (DML) statements are used to work with the data in tables. SELECT, INSERT, UPDATE, and DELETE are some well-known examples. It is difficult to describe all of the instructions here, so we will cover features assuming that you already have a basic knowledge of SQL.
-
Dynamic partition inserts: When using the
INSERTdata in a partitioned table, it can be used to manually specify the partition. But it is difficult to manage after the partition item has increased. In that case, you can use a dynamic partition insert statement by enabling thehive.exec.dynamic.partitionconfiguration to true. With HiveQL you can use dynamic partitions instead of using the multiple statement, and manually specifying the country code.Here is a static partition insert statement example:
FROM daily_Table
INSERT OVERWRITE TABLE to_table PARTITION(dt='2016-05-26', ctCode='USA')
  SELECT col1, col2, col3 WHERE countryCode = 'USA'
INSERT OVERWRITE TABLE to_table PARTITION(dt='2016-05-26', ctCode='FRA')
  SELECT col1, col2, col3 WHERE countryCode = 'FRA'
INSERT OVERWRITE TABLE to_table PARTITION(dt='2016-05-26', ctCode='BEL')
  SELECT col1, col2, col3 WHERE countryCode = 'BEL';
And here is a dynamic partition insert statement example:
FROM daily_Table
INSERT OVERWRITE TABLE to_table PARTITION(dt='2016-05-26', countryCode)
  SELECT col1, col2, col3, countryCode;
Pay attention to the following points when using the dynamic partition insert:
- A dynamic partition can't be the parent of a static partition.
- Problems will occur when there are broken words in values of dynamic partition.
- Performance degradation can occur when there are too many dynamic partitions.
- Multi Table/File inserts: Hive can send output into multiple tables or file systems with a single statement.
FROM daily_Table INSERT OVERWRITE TABLE to_table1 SELECT * WHERE ctCode = 'USA' INSERT OVERWRITE TABLE to_table2 SELECT * WHERE ctCode = 'FRA' INSERT OVERWRITE LOCAL DIRECTORY '/out/bel.out' SELECT * WHERE ctCode = 'BEL'; - Update and Delete operation: Update and Delete commands have been available since Hive 0.14, but your table has to support ACID.
UDF/SerDe
UDF and SerDe help you use Hive's function by expanding. Both have the embodied built-in function so you can use them to reach your goals.
User Defined Functions
In Hive, the built in function (see Table 4.3) and the user defined function are called UDF. You can inquire the list of functions currently loaded by means of SHOW FUNCTION, and you can confirm the description document on the relevant function_name by using DESCRIBE FUNCTION <function_name>.
Table 4.3 Built in functions
| Build-in Function | Description | Examples |
| Mathematical Functions | Used for the mathematical operation such as the square root, round off, or exponential function | round(DOUBLE a)sqrt(DOUBLE a)log2(DOUBLE a) |
| Collection Functions | Functions that operate in the nested data structure like Map or Array | size(MAP|ARRAY a)sort_array(Array a) |
| Type Conversion Functions | Use this to try to change the data type to another type | cast('1' as DOUBLE) |
| Date Functions | A function to extract time information from string and Unix time-related functions | unix_timestamp()date_add(string date, '1') |
| Conditional Functions | Control Statement such as IF or CASE-WHEN-THEN |
nvl(value, default_value)case a when b then c end |
| String Functions | String manipulation functions | concat(string a, string b…)length(string a) |
In addition, there are Built-in Aggregate Functions (UDAF) and Built-in Table-Generating Functions (UDTF). For example, sum0 of UDAF receives a column from several rows to fulfill the aggregation and the explode() of UDTF receives the array as input to return to individual rows.
When the user tries to write directly to UDF, the operation is processed in the following order:
- Create a new class that extends the
org.apache.hadoop.hive.ql.exec.UDFclass. - Implement the
evaluate()method. - Package the JAR file and add it to classpath (or upload to HDFS, S3).
- Add the JAR file to the distributed cache using the
ADD JAR <jar_file_name>command. - Register your function name using the
CREATE TEMPORARY FUNCTION AS <function_name> AS <class_name_including_package>command.
Serializer/Deserializer
Hive accesses the data of the table through SerDe, which is an input/output interface that allows it to handle files on HDFS. It shows the data read from HDFS in forms of rows and columns by means of SerDe's deserializer. Serializer is used when writing the file on HDFS. Like UDF, Hive provides the built-in SerDes and can handle the frequently used forms by using AvroSerDe, RegexSerDe, OpenCSVSerde, and JsonSerDe.
You can write SerDe directly using the following methods:
- Create a new class that extends the
org.apache.hadoop.hive.serde2.SerDeclass. - Implement
deserialize()andserialize()methods. - Package the JAR file and add it to classpath (or upload to HDFS, S3).
- Add the JAR file to the distributed cache using the
ADD JAR <jar_file_name>command. - Add the
ROW FORMAT SERDE 'serde_name_including_package'clause at table creation time or by altering the table property.
Hive Tuning
You can use Hive without a special setting, but if you understand the property of Hive, you can improve the job's performance through simple settings.
- Partitioning: HiveQL sets the condition with the Where clause to extract the desired data. Since Hive accesses the file, if you approach the table to extract the data of a certain date, you should refer to all files in the folder of the relevant table. Partitioning is used in this situation, and it makes a physical folder under the table by subdividing into certain conditions (date, time, national code) that are frequently used. It is created by using the Partitioned By sentence in the Create Table statement and the folder is created in a form of
<partition>=<value>and the multi-level partitioning is also possible. If the partition condition is included in the Where clause when fulfilling the Select query, Hive reads the entire folders belonging to Table while accessing only the folder applying to the given condition. Most data can be divided by time and code standard information, and users are likely to be interested only in the data belonging to a certain condition, so a well-designed partition policy is very helpful in reducing the job performance time. - Parallel execution: Complex HiveQL is commonly converted into a number of MapReduce jobs. It runs sequentially by default, but sometimes it may lead to resource waste. The
hive.exec.parallelproperty can execute independent jobs in parallel. Either add tohive-site.xml, or use theset hive.exec.parallel=truecommand to apply this option. - Use ORC files: Although you select only one column when performing HiveQL, the file is saved based on the row, and it accesses the entire row to read unnecessary data so the performance decline happens. The columnar input format, such as ORC, was developed to improve this. If you use ORC, you can obtain the advantage, such as the increase in read/write performance, and the storage space efficiency through compression can easily be used. Specify
STORED AS ORCwithCREATE TABLEsyntax, or addSET FILEFORMAT ORCin theALTER TABLEstatement. It also supports a compression such asSNAPPYorZLIB. - Small Files Problem: Hadoop is designed for high volume systems, but there are two problems when dealing with a number of split small files rather than large ones. These problems are the NameNode memory problem and performance problems that affect MapReduce. In the default input format, like TextInputFormat, each file should have at least one split. So, if there is a large number of mappers launching, it can cause a JVM startup overhead. To solve this problem, set the
hive.hadoop.supports.splittable.combineinputformatconfiguration to true. Enabling this property will increase performance, because mapper can handle more than one file.
APACHE PIG
Pig is a tool for analyzing the bulk dataset. It defines the job by the inherent language (Pig Latin). It is similar to Hive in that it converts into MapReduce internally, yet SQL used by Hive is declarative, while Pig Latin is the procedural language. Although Pig Latin is not familiar to users compared to SQL, it is advantageous when performing the different treatment to split the data stream, or by reading the anti-formal data.
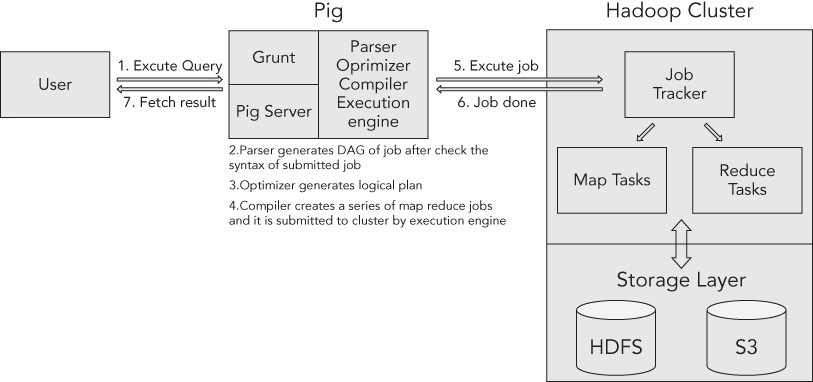
A simple Pig architecture diagram is shown in Figure 4.3.
Pig Installation
Next we will cover a Pig 0.15.0 installation example. The latest version of Pig can be downloaded from the following URL: http://pig.apache.org/releases.html.
- Download Pig and uncompress it:
$ wget http://apache.mirror.cdnetworks.com/pig/pig-0.15.0/pig-0.15.0.tar.gz $ tar xvfz pig-0.15.0.tar.gz - Set the environment variable (or add it your shell profile):
$ cd pig-0.15.0 $ export PIG_HOME=$PWD $ export PATH=$PIG_HOME/bin:$PATH $ export HADOOP_HOME=<your_hadoop_home> $ export PIG_CLASSPATH=<your_hadoop_conf_dir> - Make sure that the installation was successful:
$ pig –h
Apache Pig version 0.15.0 (r1682971)
compiled Jun 01 2015, 11:44:35
Pig Latin
Pig converts the script that describes the data stream into MapReduce. Pig Latin is the language used at this time. Pig Latin can process the data by a few codes, and can describe the job without caring about the MapReduce structure. Also, it can be expanded by using UDF, and can use Piggy Bank that gathers useful UDF or writes UDF directly. See the following link for a complete description of Pig Latin:
http://pig.apache.org/docs/r0.15.0/start.html.
Pig Command Line Options
A method of executing from the command line is most often used in Pig. By default, Pig runs in the MapReduce mode, and it can be specified via the -x option.
- Local mode: It runs through the
pig -x localcommand, carrying a single JVM with the local filesystem. It's useful when prototyping and debugging your program. - MapReduce mode: It runs through the
pix -x mapreducecommand or with no option. It uses cluster computing resources and HDFS. - Tez mode: Runs Pig on the Tez framework using the
pix -x tezcommand.
Pig also has the Interactive shell mode and batch mode. It is distinguished by the input type.
- Batch mode: It is the way to run a file that is pre-written by Pig Latin. Use as the
pig <pigLatin_file_name>command. When you perform a multiquery written to the file, Pig tries to run all of the jobs in the file, even if it fails in the middle of the job. It can be classified as return code: 0 is Success, 2 is failed all of the job, and 3 is a partial failure. Table 4.4 shows command-line options most often used in batch mode. - Interactive shell mode: Execute a shell that calls Grunt, and within this, type the Pig Latin phrase, “do the Job.” Table 4.5 shows the commands that are frequently used in the interactive shell mode.
Table 4.4 Batch mode on the command line
| Option | Description | Examples |
-e(or -execute) <quoted-command-string> |
Command to execute | pig -e 'sh ls' |
[-f] <filename> |
Execute from files | pig [-f] <pig_script_location> |
-p(or -param) <property=value> |
Use Pig variables | pig -p k: ey1=value1 pigLatin.pig |
-P(or -propertyFile) <property_file> |
Specify a property file | pig -P pig.properties |
-F(or -stop_on_failure) |
Stop Pig job immediately when one of multiple query failed | pig -F pig.properties |
Table 4.5 Interactive shell mode commands
| Command | Description | Examples |
fs |
Use the Hadoop file system shell | fs -ls |
sh |
Use the shell command |
sh ls |
exec |
Run a Pig script. All aliases in the script will not reference to Grunt. | exec <pig_script_location> |
run |
Run a Pig script. All aliases will be available to Grunt. | run <pig_script_location> |
kill |
Kill the MapReduce job with jobid |
kill <job_id> |
When writing Pig Latin, the processing logic is defined in the following order.
- 1. Specifying Input Data: Data can be read using the Load statement.
A = LOAD 'inputfile.txt' USING PigStorage('\t')statement, and readinputfile.txtclassified as a tab from the filesystem, storing it in the relationA. - 2. Define Data processing that you loaded: Find out in Table 4.6 how to use the frequently used operator.
- 3. Outputting the processed data: Use the
STOREcommand to save results to the filesystems or use aDUMPcommand to display to the screen.
Table 4.6 Frequently used operators
| Operator | Description | Examples |
FILTER |
Select tuples that meet the condition | X = FILTER A BY a1 >= 2016; |
FOREACH GENERATE |
Operation that works with specified columns | X = FOREACH A GENERATE a1, a2; |
GROUP |
Aggregate data to the specified field | X = GROUP A BY a1; |
DISTINCT |
Remove duplicate tuples | X = DISTINCT A; |
ORDER BY |
Sort the given data | X = ORDER A BY a1; |
UDF
Pig has several functions to help you with a job. In most cases, this can be solved with built-in functions, or provided by the Piggybank, but sometimes you may be able to solve the problem when you must create your own function. UDF is used in this case, and it can be developed using various languages such as Java, Python, Ruby, etc.
When the user tries to write UDF directly to use, operations can be done in the following order:
- Create a new class that extends the
org.apache.pig.EvalFunc(or FilterFunc)class. - Implement the
exec()method. - Package the JAR file and add it to the classpath (or upload to HDFS, S3).
- Register the JAR file to the distributed cache using
REGISTER <jar_file_name>command. If you use a language other than Java, paste theUSINGkeyword behind the register statement.
HUE
Hue provides an interface that allows you to easily approach the Hadoop ecosystem using a web-based application. It changes the way you work with HDFS or user management on CLI to the GUI. You can execute the Hive, Impala, and Spark job directly on the web. Also, the result is automatically expressed as a graph, and you can make a chart using a simple operation. If you are wondering what functions Hue has, refer to this website:
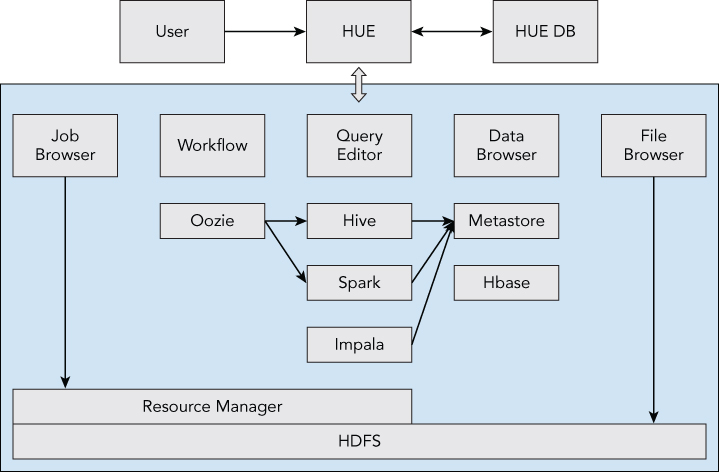
http://demo.gethue.com/#tourStep3A simple Hue architecture diagram is shown in Figure 4.4.
Features
Hue is intuitive to use, and most of the functions require no learning in order to use, because it runs a GUI environment. Given these characteristics, Hue is mainly responsible for providing the interface in contact with the end user. In Figure 4.5, you can see the chart using an executed Hive query in Hue.
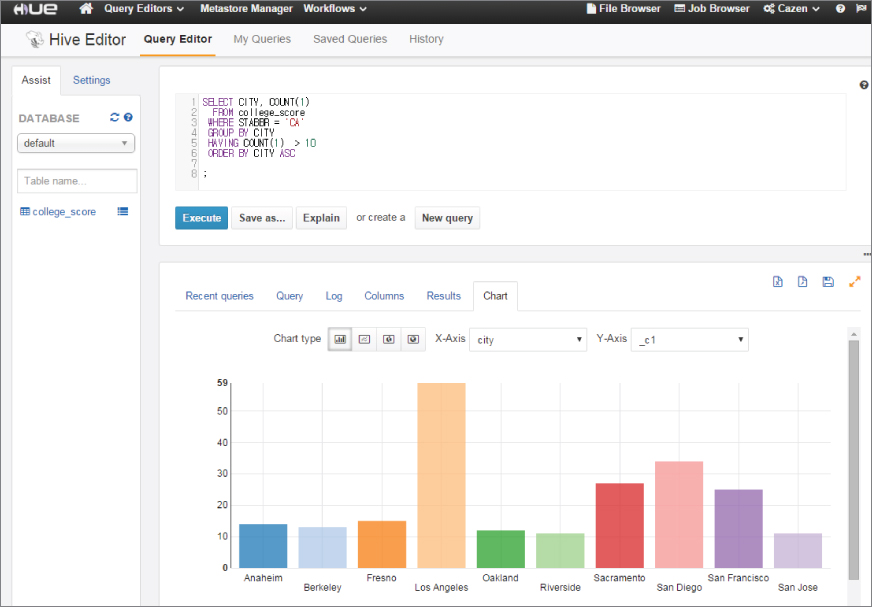
Let's examine the chart shown in Figure 4.5 where you can see an executed Hive query in Hue.
- Query Editor
- Hive and Pig scripts can be run directly, and Impala (MPP solution of Cloudera) is also possible to query in.
- In addition to this, traditional DB queries, such as MySQL and Oracle, are also possible.
- Save the written query to the filesystem and you can recall queries in the job history.
- Job Designer capabilities help simple Oozie workflow jobs to be defined in a graphic environment.
- Parameterize supported. This feature is useful when performing repetitive tasks given a variable. For example, if you obtain a count of a particular device model from a log, it is convenient and can be reused with specified variables.
- Data Browser
- The Hive metastore
CRUDis possible in the data browser. - You can visually see the structure of the database and table you manage, and you can also check the sample data.
- Browsing tables of Hbase is possible.
- It supports the import/export job managing of the Sqoop.
- The Hive metastore
- Workflow
- This is the Oozie job related menu. In the Dashboard you can check a list of the workflow, coordinator, and bundled jobs.
- Click on each job to see the detailed view, status, job logs and submitted XML file.
- The Workflow Editor can manage the Oozie job. Even users who are not familiar with the Oozie can easily create and apply their own logic, because unlike traditional XML methods, it defines a job with an interactive UI.
- File browser
- It provides a function of managing the file in HDFS via the web. Create, modify, delete, as well as a permission change, can be performed as well.
- Upload files with drag and drop. Uncompressing the uploaded file is also supported.
- Job browser
- Display the list of jobs based on information in the resource manager.
- You can click the job id to query the status of the task and the logs.
- Search by username, and containing text is also possible.
APACHE OOZIE
Oozie is a workflow scheduler for Hadoop. Although Hadoop jobs can be executed by connecting map and reduce, the use of scheduler is required because of the inconvenience of writing and management in realizing the complex business logic. Since Oozie supports most jobs of the Hadoop ecosystem (such as MapReduce, Spark, Pig, Hive, Shell, and Distcp), it is widely used.
Oozie workflow jobs are Direct Acyclic Graphs (DAGs) of actions and Oozie coordinator jobs can fulfill repeatedly by using the parameter of the start time, end time, and frequency that received the workflow jobs as a variable. It is possible to use the condition sentence, comparative sentence, and the Expression Language (EL). Thanks to this property, it is possible to easily embody generally used business logic, such as the input file check, hourly job, and various kinds of job chaining.
If you want to use Oozie, the considerations are as follows:
- Each workflow action creates control dependency DAG. It means that the second job is not executed until the end of the first job, and there is no circulation in the same workflow.
- The Oozie web console is a useful tool to get coordinator/workflow status information. The Oozie web console is disabled by default because the ExtJS library has different license agreements with Oozie. You can enable it in the following way:
$ mkdir libext
$ cd libext
$ wget http://extjs.com/deploy/ext-2.2.zip
$ cd ../bin
$ ./oozie-setup.sh prepare-war
The screenshot of the Oozie web console is shown in Figure 4.6.

Oozie Installation
Here is an installation example of Oozie 4.2.0. The latest version of Oozie can be downloaded from the following URL: http://http://oozie.apache.org/.
- Download Oozie and uncompress it:
wget http://apache.mirror.cdnetworks.com/oozie/4.2.0/oozie-4.2.0.tar.gz tar xvfz oozie-4.2.0.tar.gz - Build and set up Oozie from source. Remove the following codehaus repository from
pom.xmlbefore building:<repository> <id>Codehaus repository</id> http://repository.codehaus.org/ <snapshots> <enabled>false</enabled> </snapshots> </repository> bin/mkdistro.sh -P hadoop-2,uber -DskipTests --cp distro/target/oozie-4.2.0-distro.tar.gz ../ cp -R distro/target/oozie-4.2.0-distro/oozie-4.2.0/ ../oozie cd ../oozie - Set the environment variable (or add it your shell profile):
export OOZIE_HOME=$PWD export PATH=$OOZIE_HOME/bin:$PATH - Set the configuration variable. Add properties that you need to
conf/oozie-site.xml. - Set the metastore and shared lib configuration.
In general, Oozie uses an external metastore. The below configurations are examples of using the Metastore with MySQL. To use the external metastore, the proper driver has to exist in the libext folder.
<property> <name>oozie.service.JPAService.jdbc.driver</name> <value>com.mysql.jdbc.Driver</value> </property> <property> <name>oozie.service.JPAService.jdbc.url</name> <value>jdbc:mysql://dbAddress:port/database</value> </property> <property> <name>oozie.service.JPAService.jdbc.username</name> <value>oozieuser</value> </property> <property> <name>oozie.service.JPAService.jdbc.password</name> <value>password</value> </property> - Set the library path and the proxy user:
<property> <name>oozie.service.WorkflowAppService.system.libpath</name> <value>hdfs://<namenode>:<port>/user/hadoop/share/lib</value> </property> <property> <name>oozie.service.ProxyUserService.proxyuser.<oozieuser>.hosts</name> <value>*</value> </property> <property> <name>oozie.service.ProxyUserService.proxyuser.<oozieuser>.groups</name> <value>*</value> </property> - Add the following property to
conf/hadoopconf/core-site.xml:<property> <name>fs.default.name</name> <value>hdfs://namenode:port</value> </property> - After that, create the db schema and sharelib:
bin/oozie-setup.sh db create -run bin/oozie-setup.sh sharelib create -fs namenodeurl:port - Start Oozie and check the status.
bin/oozied.sh start
bin/oozie admin -oozie http://localhost:11000/oozie -sharelibupdate
After performing the command, it is successful if the shared library list is displayed as follows:
$ bin/oozie admin -oozie http://localhost:11000/oozie -shareliblist
[Available ShareLib]
oozie
hive
distcp
hcatalog
sqoop
mapreduce-streaming
spark
hive2
pig
How Oozie Works
Apache Oozie is a web application that supports the Rest API and runs on Tomcat (see Figure 4.7). It consists of the Oozie Server and Client and uses the metastore storage (RDBMS). You can perform a simple workflow job with Oozie as follows:

- The Oozie Client uses the
Job.propertiesto submit jobs to the Job Oozie Server. - The Oozie Server executes the job, calling a ResourceManager.
- ResourceManager executes the Oozie Launcher (Map-Only Job) using the received information.
- The Oozie Launcher runs the job defined in the workflow.
- A task invokes the callback URL to the Oozie server when it has either completed or failed.
- Be sure to finish the job.
Oozie has been prepared in accordance with a design principle that separates the scheduler and the job. Since a Job is run by the Oozie Launcher in the cluster, such as configuration files, workflow.xml, and coordinator.xml, it should be placed on HDFS. Also, if you want to use a JAR file, create a lib folder under the workflow.xml folder of HDFS, or specify oozie.libpath job.properties.
Performing a Job can be cumbersome, given how you need to add each workflow library, but Oozie manages a library of commonly used job types by using sharelib. The folder structure created on HDFS is produced similarly to the following (The latest version has been added for the version management lib_timestamp directory under lib).
 /user/oozie/share/lib/lib_20160126002346/hive
 /user/oozie/share/lib/lib_20160126002346/hive/ST4-4.0.4.jar
 /user/oozie/share/lib/lib_20160126002346/hive/activation-1.1.jar
 /user/oozie/share/lib/lib_20160126002346/hive/ant-1.9.1.jar
 /user/oozie/share/lib/lib_20160126002346/hive/ant-launcher-1.9.1.jar
Workflow/Coordinator
In order to accomplish your business goals, you have to fulfill one or more jobs. For example, a Pig script can bring the raw log saved in HDFS by grouping and designating it as an external table. You can also use the script to add the partition, and conduct a Hive job, making the report and informing the user of success and failure by email. Both of these items can be bound as one workflow. That is, the workflow is a gathering of the job, control, and the flow. Also, the above workflow is executed regularly during a certain time, or is dependent on other workflow or data. The coordinator is used to control this situation. In addition, the bundle and a set coordinator also exist, although we won't be discussing this here.
Workflow
The Oozie workflow is written in XML, based on xPDL (XML Process Definition Language), and it consisted of two types of nodes:
- Action node: Execute the actual job such as MR, Pig, Hive, SSH, etc.
- Control flow node: State control such as start, fork, join, kill, and end.
By combining these nodes, you can define the workflow. The following example is a simple Hive job with success at the end, which leaves a failed log.
workflow.xml
<workflow-app xmlns="uri:oozie:workflow:0.3" name="sampleOozieJob">
    <start to="hive_sample_job"/>
    <action name="hive_sample_job">
        <hive xmlns="uri:oozie:hive-action:0.2">
            <job-tracker>${jobTracker}:${jobTrackerPort}</job-tracker>
            <name-node>hdfs://${nameNode}:${nameNodePort}</name-node>
            <configuration>
      <property>
          <name>oozie.use.system.libpath</name>
          <value>true</value>
      </property>
      <property>
          <name>mapred.job.queue.name</name>
          <value>q2</value>
      </property>
      <property>
          <name>oozie.launcher.mapred.job.queue.name</name>
          <value>q1</value>
      </property>
            </configuration>
            <script>sample.hql</script>
            <param>targetDate=20160129</param>
        </hive>
        <ok to="end"/>
        <error to="fail"/>
    </action>
    <kill name="fail">
        <message>Job failed, [${wf:errorMessage(wf:lastErrorNode())}]</message>
    </kill>
    <end name="end"/>
</workflow-app>
job.properties
jobTracker=<jobtracker_address>
nameNode=<namenode_address>
jobTrackerPort=<jobtracker_port>
nameNodePort=<namenode_port>
oozie.wf.application.path=hdfs://${nameNode}:${nameNodePort}/{location_of_workflow}
oozie.use.system.libpath=true
You can run and check the Oozie workflow job using the following command:
$ oozie job -oozie http://localhost:11000/oozie -config job.properties -run
job: 160106012758058-oozie-bpse-W
$ oozie job -oozie http://localhost:11000/oozie -info 160106012758058-oozie-bpse-W
Job ID : 160106012758058-oozie-bpse-W
------------------------------------------------------------------------
Workflow Name : sampleOozieJob
App Path      : hdfs://10.3.50.73:8020/user/cazen/
Status        : RUNNING
Run           : 0
User          : hadoop
Group         : -
Created       : 2016-01-27 07:11 GMT
Started       : 2016-01-27 07:11 GMT
Last Modified : 2016-01-27 07:11 GMT
Ended         : -
CoordAction ID: -
Actions
------------------------------------------------------------------------
ID                          Status    Ext ID       Ext Status Err Code
------------------------------------------------------------------------
160106012758058-oozie-bpse-W@:start:                  OK
------------------------------------------------------------------------
160106012758058-oozie-bpse-W@hive_sample_job          RUNNING
------------------------------------------------------------------------
Coordinator
If you carefully examine the workflow sample above, you can see a targetDate variable that has passed to the job. The coordinator can perform workflow jobs at specified times via startTime, endTime, and also the frequency. A simple coordinator example that calls the Job at a certain time while passing a variable is shown next:
coordinator.xml
<coordinator-app name="sample_oozie_coord" frequency="${coord:days(1)}"
start="2016-01-01T00:20Z" end="2016-12-31T00:25Z"
 timezone="UTC" xmlns="uri:oozie:coordinator:0.4">
   <action>
      <workflow>
         <app-path>hdfs://${nameNode}:${nameNodePort}/user/cazen/</app-path>
         <configuration>
            <property>
    <name>targetDate</name>
<value>${coord:formatTime(coord:dateOffset(coord:nominalTime(), -1, 'DAY'),
 'yyyyMMdd')}
</value>
            </property>
         </configuration>
      </workflow>
   </action>
</coordinator-app>
coord.properties
jobTracker=<jobtracker_address>
nameNode=<namenode_address>
jobTrackerPort=<jobtracker_port>
nameNodePort=<namenode_port>
oozie.coord.application.path=hdfs://${nameNode}:${Port}/{location_of_workflow}
oozie.use.system.libpath=true
You can run and check the Oozie coordinator job by using the following command:
$ oozie job -oozie http://localhost:11000/oozie -config coord.properties -run
job: 160106012758058-oozie-bpse-C
$ oozie job -oozie http://localhost:11000/oozie -info 160106012758058-oozie-bpse-C
Job ID : 160106012758058-oozie-bpse-C
------------------------------------------------------------------------
Job Name    : sample_oozie_coord
App Path    : hdfs://10.3.50.73:8020/user/cazen
Status      : RUNNING
Start Time  : 2016-01-01 00:20 GMT
End Time    : 2016-12-31 00:25 GMT
Pause Time  : -
Concurrency : 1
------------------------------------------------------------------------
ID           Status    Ext ID           Err Code  Created    Nominal Time
160106012758058-oozie-bpse-C@1         RUNNING
------------------------------------------------------------------------
160106012758058-oozie-bpse-C@2         READY
------------------------------------------------------------------------
160106012758058-oozie-bpse-C@3         READY
------------------------------------------------------------------------
160106012758058-oozie-bpse-C@4         READY
------------------------------------------------------------------------
Oozie CLI
Oozie can be operated via the CLI, and the frequently used commands are listed next. Using an alias and export OOZIE_URL makes it more convenient.
Run a job            : oozie job -config job.properties -run
Check status         : oozie job -info <job_id>
Kill a job           : oozie job -kill <job_id>
Rerun a job          : oozie job -rerun <coord_id> -action=<job_num>
Check err log        : oozie job -errorlog <job_id>
List all coordinator : oozie jobs -jobtype coord
List all workflow    : oozie jobs -jobtype wf
Validate xml         : oozie validate workflow.xml
Update share library : oozie admin -sharelibupdate
Check share library  : oozie admin -shareliblist