
When a young child progresses from a baby’s cot to a small bed it is a milestone of development from infant to toddler. At two and a half our older twins became too big for their cots and we decided to make these beds for them, with foam mattresses cut to size, waterproofed and covered. After dismantling the cots and installing the beds in the children’s bedroom, it no longer seemed like a nursery and we realised our babies were quickly growing into young, independent children. The twins felt very grown up in their new beds and we put their cots into storage, not knowing that we would need them both again for our second set of twins. Luckily the first set of twins outgrew these beds before the younger ones needed them, otherwise I would have had to make another two beds!
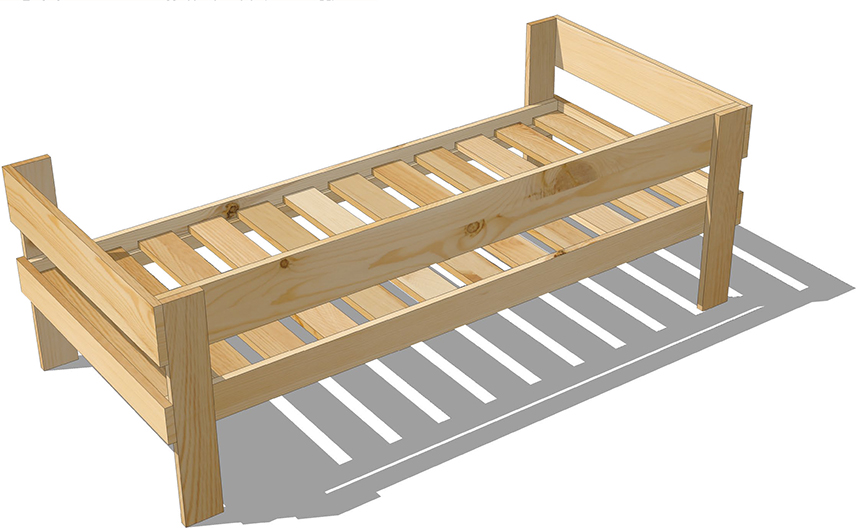
This three-quarter size child's bed is lightweight and space efficient, yet strong and sturdy. It is made from only two different widths of 19mm thick wood. The final assembly consists of three main parts: two end assemblies and the base. The latter consists of equally spaced slats mounted on supports with side and end rails. The two end assemblies feature two legs and an end guardrail, and these are joined by the side guardrail. Use a foam mattress that fits the inner dimensions of the base and has a thickness of 100mm, which is sufficient ergonomic support for sleeping toddlers. To allow for dismantling and storage, the bed could be constructed as three sub-assemblies that are made and painted separately, then bolted together when needed. The slats could also be left loose and connected along two parallel lengths of rope with the same spacing as in the design.
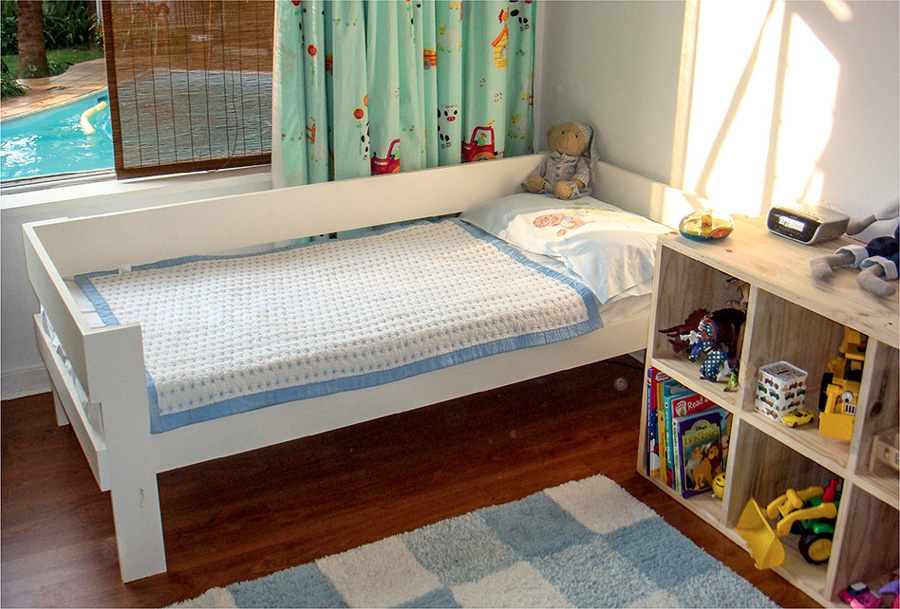
A very simple design for a lightweight bed that will look great in any child’s bedroom. The size is also perfect for young children who are too big for a cot but too small for a full-size bed.
WHAT I WOULD DO DIFFERENTLY NEXT TIME
Marking out the positions of the base slats (E) with a tape measure proved quite laborious, whereas a spacer would have been much quicker. Simply cut two pieces of wood the same size as the required gap between the slats and use these to position each successive slat as it is clamped in place (see Wendy house, step 20, page 150). It would also be more efficient to fasten each slat in place while it is positioned using the spacers, which avoids the clamping process entirely. As the base is hidden by the mattress, accurate positioning of the slats is not critical, as long as you can build it efficiently and they provide enough support for the sleeping child.
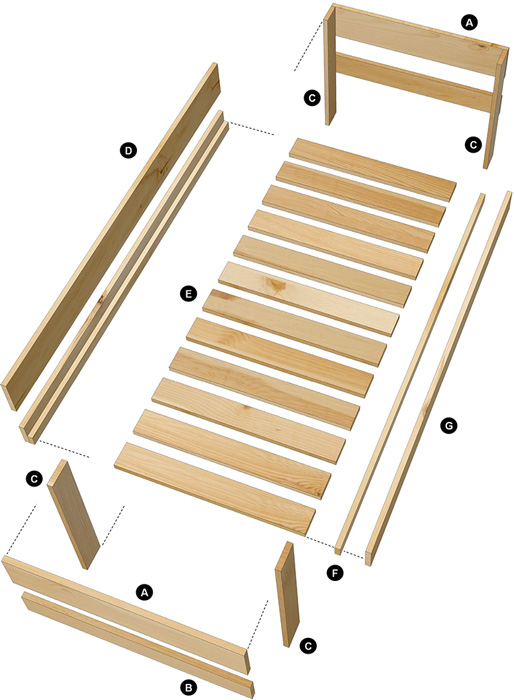
| PART | QUANTITY | THICKNESS | WIDTH | LENGTH | |
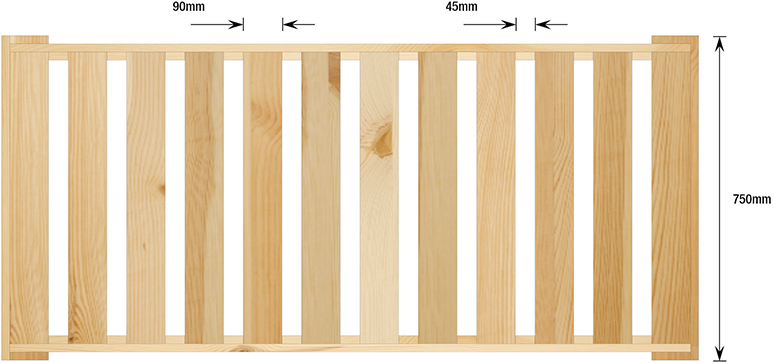
| A | End guardrail | 2 | 19mm | 140mm | 750mm |
| B | End rail | 2 | 19mm | 90mm | 750mm |
| C | Leg | 4 | 19mm | 90mm | 550mm |
| D | Side guardrail | 1 | 19mm | 140mm | 1575mm |
| E | Bed slat | 12 | 19mm | 90mm | 675mm |
| F | Bed slat support | 2 | 19mm | 40mm | 1575mm |
| G | Side rail | 2 | 19mm | 90mm | 1575mm |
Project information
| Overall dimensions | 1613mm long x 750mm wide x 550mm high |
| Number of parts | 25 |
| Special equipment | None |
| Techniques | Marking template (see page 22) |
| Difficulty | Medium |
| Duration | 8 hours |
Family fun factor

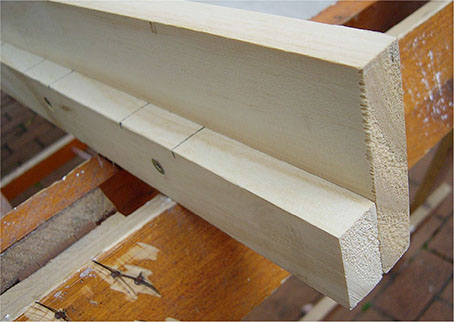
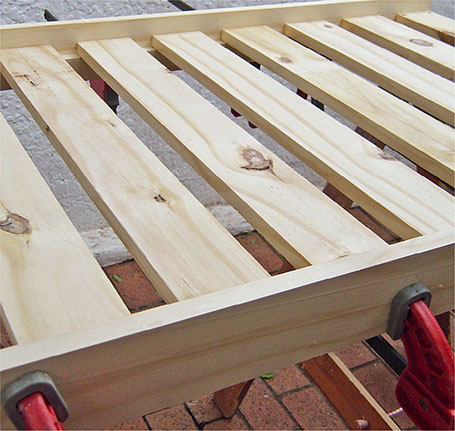
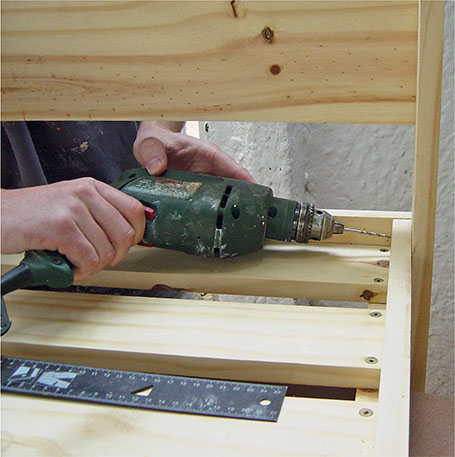
1 On the top edge of one of the slat supports (F), mark the positions of the bed slats (E) by spacing them evenly along the length. Place this slat support (F) on top of a side rail (G) as shown, place over two trestles and clamp the two pieces together with quick grip clamps. Use a power drill to make pilot holes in the spaces between the slats, as shown in the photograph.

2 Fasten the slat support (F) to the length of the side rail (G), using a power drill to drive in cut screws at each pilot hole. Turn the assembly so it is standing on its edge, as can be seen in the photograph. Repeat these two steps with the other slat support (F) and side rail (G) and place it opposite the other side assembly, with both slat supports (F x 2) facing inwards.
TIP: The spacing of the cut screws between the slats (E) will ensure they do not obstruct the wood screws that fasten the slats (E x 12) downwards onto the slat supports (F).
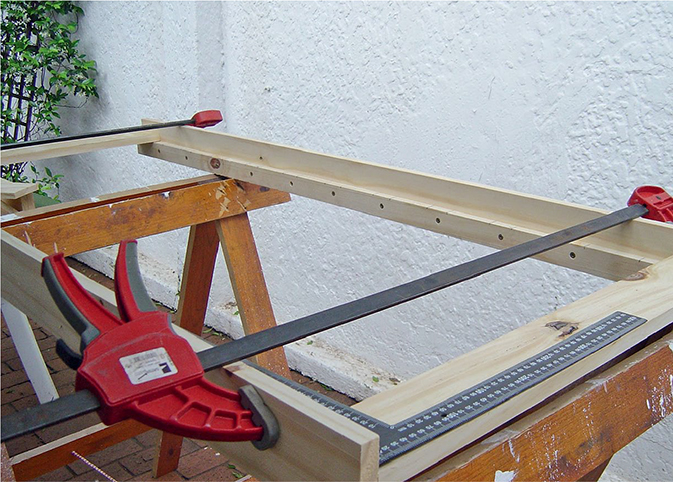
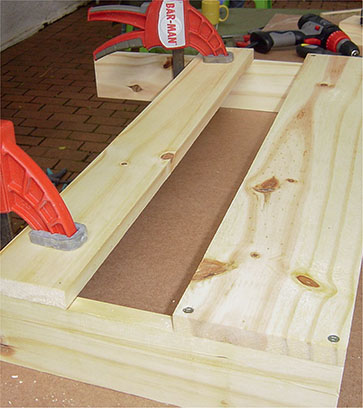
3Use long quick grip clamps or sash clamps to clamp the end slats (E) onto the slat supports (F) at either end of the side rail (G) and slat support (F) assemblies, as shown. Ensure this is done at right angles by checking with a try square. Don’t clamp too near the middle of the length of the side assemblies as this will cause the side rail (G) and slat support (F) assembly to bend inwards. Mounting the base frame on two trestles, as shown in the photograph, will make the following steps much easier.
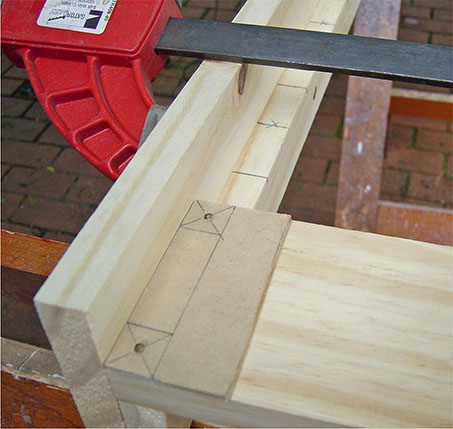
4 Make a marking template for the positions of the screws on the ends of all the slats, as shown in the photograph. This will speed up assembly of the 12 slats (E x 12), which require 48 screw positions in total.
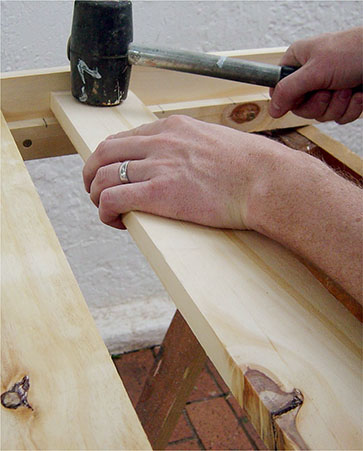
5 Remove the clamps, position the rest of the slats (E x 10) in line with the markings and tap into position with a rubber mallet. Mark the positions of the cut screws at both ends of all the slats, using the marking template.
6 Once all the slats are in place and the screw positions have been marked, re-clamp at regular intervals along the side rails (G) to hold the whole base assembly in place. Use a power drill to make pilot holes at all the marked screw positions and then fasten all the slats (E) to the slat supports (F) with cut screws.
TIP: You might need to countersink as well as drill pilot holes, otherwise the wood may split when the screws are tightened, because they are fastened so near the end of the slat.
Top view
7 Assemble the four components of one of the bed ends – end guardrail (A), end rail (B) and two legs (C x 2) – and use quick grip clamps to clamp in place. Re-use the marking template and a power drill to make pilot holes, then fasten with cut screws. Do not clamp too far from the ends of the rails or they will bend inwards and lead to inaccurate construction. Repeat for the other bed end.
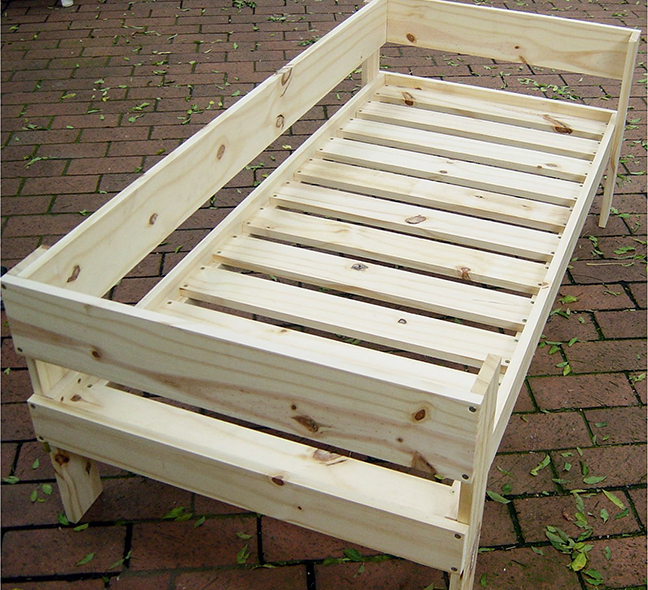
8The three sub-assemblies that comprise the bed are now complete and ready for final assembly together with the side guardrail (D). Check all right angles, measurements, spacing and screws.

Side view

9 Position the bed ends at both ends of the base, as shown in the photograph, ensuring that the long edges of the side rails (G x 2) align with the width of the end rails (B x 2). Use a try square to make sure the bed ends are positioned at right angles to the base assembly.
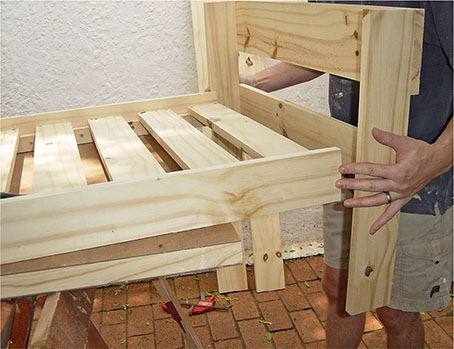
10 Once the bed ends are clamped in place with quick grip clamps, drill pilot holes and fasten with cut screws using a power drill.
11Choose which side is the front of the bed, based on the quality of assembly and avoiding any knots on the front edges. Use two quick grip clamps as shown to clamp the side guardrail (D) onto the inside of the top corners of the legs (C x 2). Fasten with cut screws in opposite corners of the rectangular overlap between the side guardrail and leg, as shown.
12Use wood filler on any gaps in the joints, defects or knots before giving the bed a final sanding, priming and painting as needed. You can make two of these beds and combine them into bunk beds as explained on page 97.
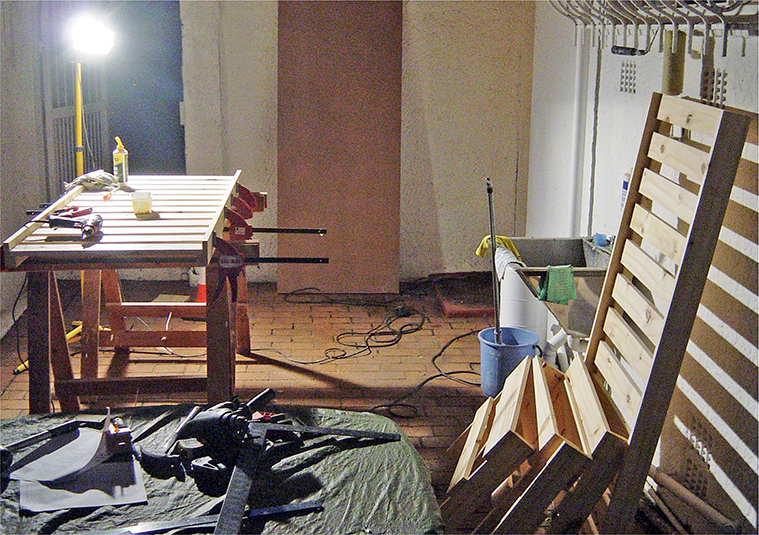
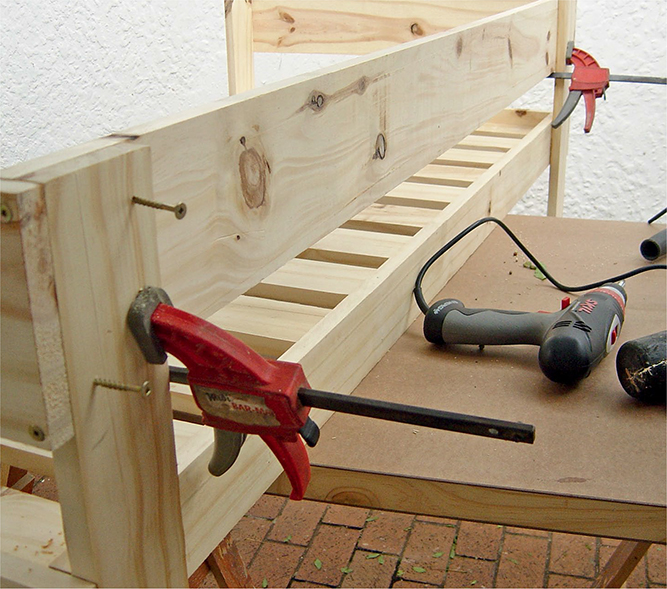
Limited time and a small workshop meant that for many projects I had to work at night and outside. In the photograph you can see two beds in progress, which I needed for our first set of twins. You will also need to make two beds for step 7 of the bunk beds project in the next chapter.