Chinese Painting Techniques
Like other types of painting, Chinese painting emphasizes concept and composition. Concept is the idea, and composition is the position, proportion and color arrangement within the painting. This chapter will further discuss how to use brush, ink, color, water and framing to help you understand the fundamentals and prepare for Chinese painting.
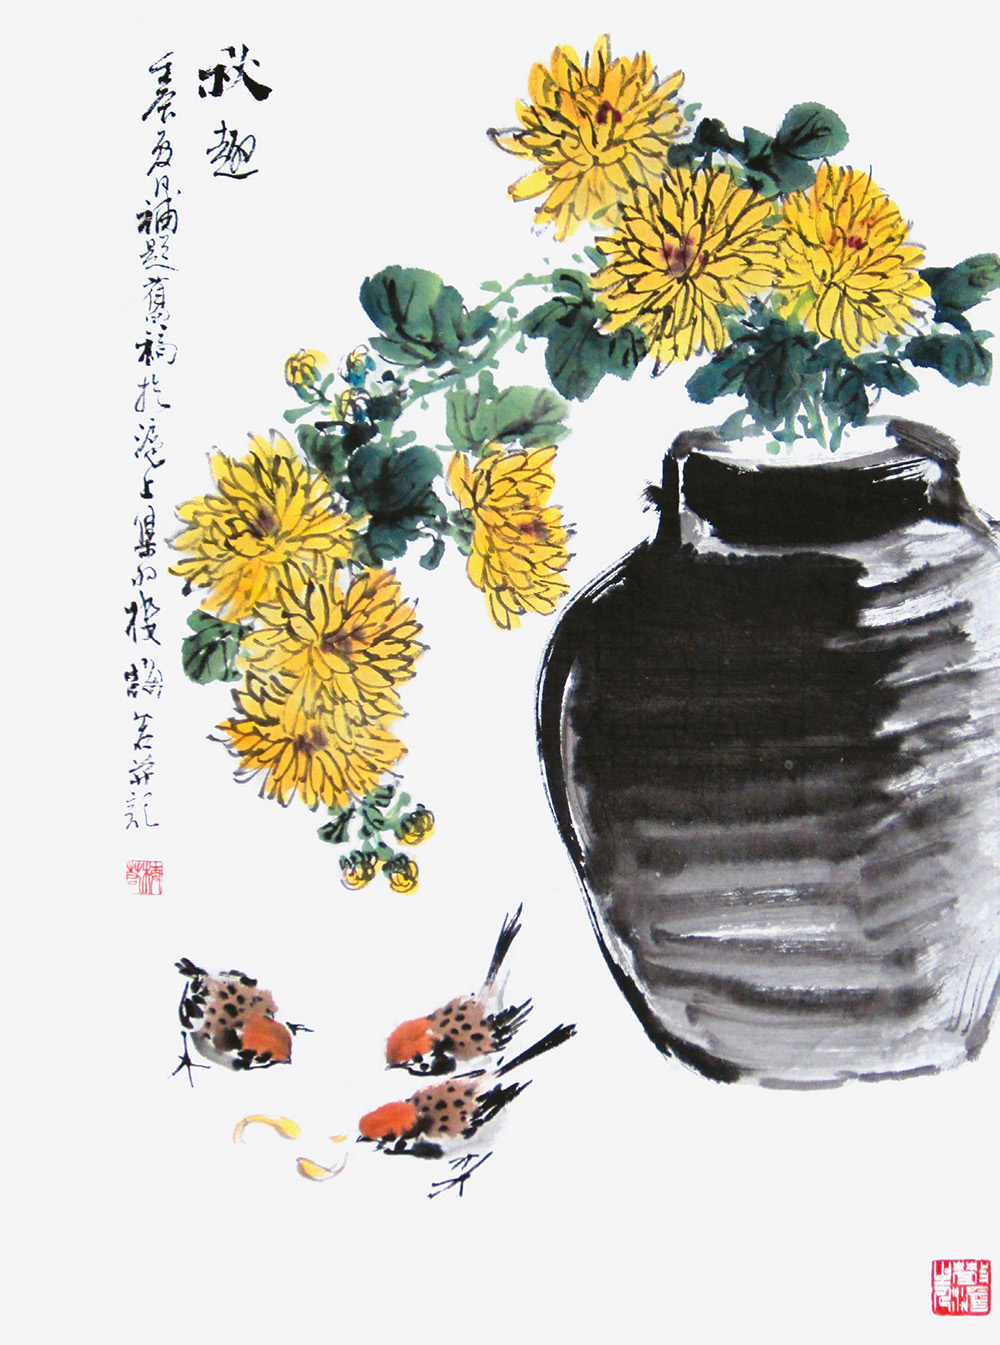
Fig. 19 The Fall
Height 67 by width 45 centimeters
The chrysanthemums bloom when the fall comes. This painting illustrates a few little birds pecking the fallen petals.
1. How to Hold the Brush
The first thing to learn before practicing Chinese painting is how to hold the brush. Having the correct grip can help you paint smoothly. When working on a large-scale painting, keep your elbow and waist above the table. When working on a small-scale painting, your arm can rest gently on the table.
Use your thumb, index finger and middle finger to hold the lower part of the brush handle about 3 centimeters from the tip. Place your index finger on the front and your thumb on the back. Have your middle finger press against the handle and let your ring finger and little finger rest naturally below the middle finger, folding toward your palm (fig. 20).
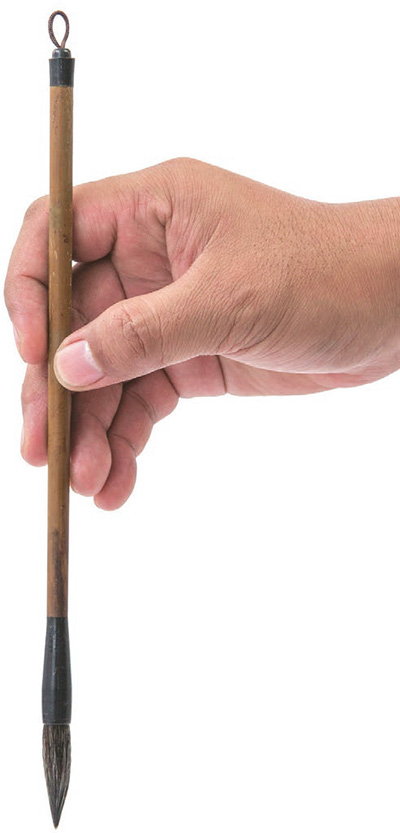
Fig. 20 The correct way to hold the brush.
2. How to Paint with the Brush
The brush is used to produce dots, lines and surfaces. In Chinese painting, a complete brushstroke should have three steps: entering the stroke, moving the brush along and exiting from the stroke. Different start and finish techniques, as well as intensity and flow of strokes, produce different results.
There are four basic brush strokes. Zhongfeng (centered-tip stroke) (see fig. 21 on page 19) is to use the brush tip to paint along the center of the ink line; cefeng (side-brush stroke) (see fig. 22 on page 19) is to tilt the brush at an angle, with the tip against one side of the line, point or surface and with the belly of the brush pressed against the paper; shunfeng (downstream stroke) (fig. 24) is to paint from the top downward or from left to right; and nifeng (upstream stroke) (fig. 25) is to paint from the bottom upward or from right to left.
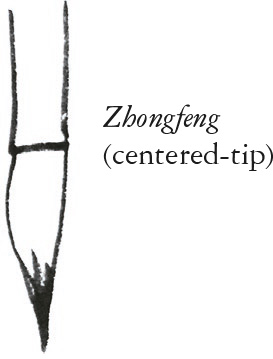
Fig. 21 Centered-tip stroke.
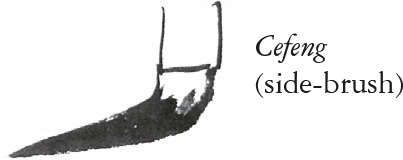
Fig. 22 Side-brush stroke.

Fig. 23 Dotting and dyeing are usually done by using the centered-tip stroke. Dyeing is commonly used on landscape painting to present a misty scene in the mountains.
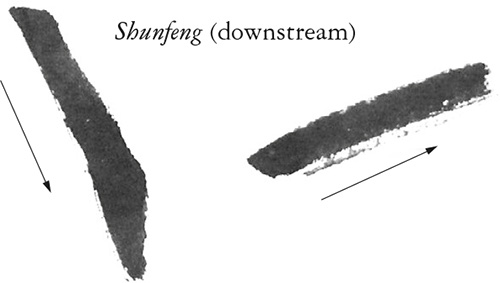
Fig. 24 Downstream stroke.
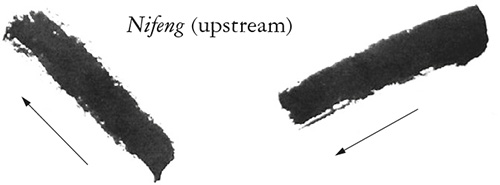
Fig. 25 Upstream stroke.
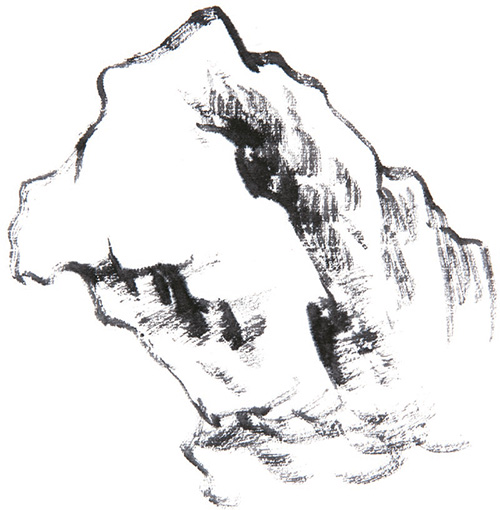
Fig. 26 This is a typical example of ca and cun techniques: Outline the rock with the centered-tip stroke first. Then use the centered-tip or side-brush stroke to touch up the texture of the rock from different directions according to the surface’s light and shade and its texture.
To paint a thin line, lift the brush up to form a lighter line. To paint a thicker line, press down on the brush. Lifting and pressing along with different speed can create different forms of dots, lines and surfaces. Pressing the brush into the paper or rotating the brush is called dun (pause).
Combining the above-mentioned techniques, Chinese painting brushwork can be divided into three main strokes: outlining stroke, cun stroke (texture stroke or touch up) and dotting and dying stroke. Outlining is to depict the shape of the object using the centered-tip stroke to create smooth lines. Cun stroke is to portray the texture and create 3-D effect of the object. It can be done with the centered-tip or side-brush stroke with dark or light ink. Ca is similar to cun, which means gently using the side-brush stroke to create broken and blurred texture, leaving a very light brush trace (fig. 26). Dotting and dyeing is to use the centered-tip stroke to paint a small area. If the dotting stroke or painted area is larger, it is called dyeing. It is very common in xieyi-style painting (fig. 23).
3. How to Use Water
Water plays an important role in mixing ink and color, and helps produce the unusual appeal of Chinese painting. The blending, thickness and five shades (dark, light, dry, wet and charred) of the color are totally related to water. Analyzing the appearance of water use is one way of evaluating the level of an artist and the value of an art piece.
In Chinese painting, black ink can be categorized into five shades: dark, light, dry, wet and charred (fig. 27). It’s very important to master how to use these shades.
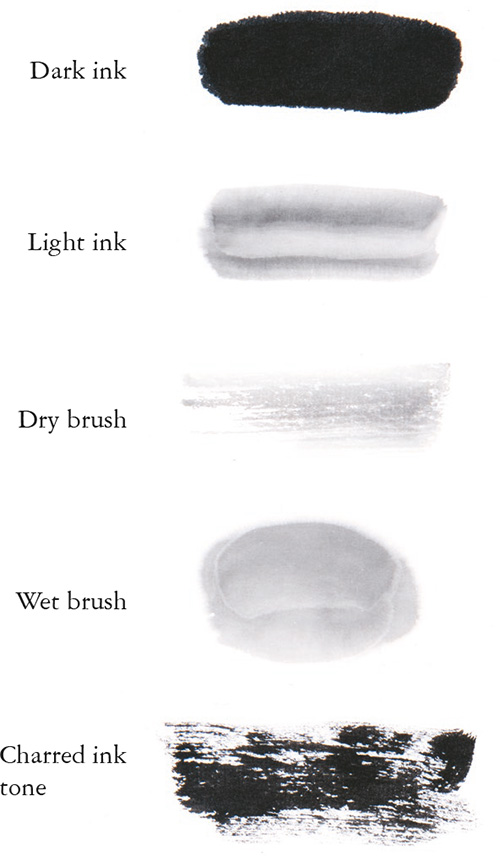
Fig. 27 Five shades of ink (from top to bottom): dark, light, dry, wet and charred.
Dark: It has a small amount of water in the ink.
Light: It has more water in the ink turning it to gray.
Dry: It can either be dark or light but with less water in the brush.
Wet: It can either be dark or light but with more water in the brush.
Charred: It is very black with a shiny effect. The wetness or dryness of the ink translates into the wetness or dryness of the brush. They are closely interdependent.
When practicing the brush strokes, remember these six words: light (lifting the pressure on the brush), fast (shortening the time of the stroke), side (using side-brush stroke), heavy (pressing down on the brush), slow (increasing the time of the brush) and center (using centered-tip stroke). When you dip the brush into water, it drips faster if the brush is held upright and slower if it is held at a slant. The ink can be easily absorbed by the paper when using the centered-tip stroke going heavily and slowly. This is called wet stroke. On the other hand, the ink cannot be thoroughly absorbed when the brush is slanted and moved lightly and quickly. This is called dry stroke or “flying white” (broken ink wash effect). Thus, we must learn how to manipulate brush and ink.
Referring to the picture, we can see the light and fast strokes are dry on the paper, whereas those heavy and slow strokes are wet on the paper. After practicing a few times, you should be able to control the level of wetness and shades on the paper (fig. 28).
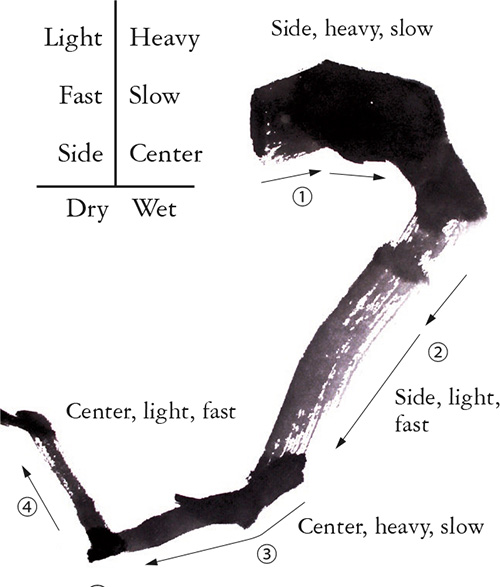
Fig. 28 ① Side-brush stroke: Start by pressing down and move slowly. ② Side-brush stroke: Start by lifting the pressure and move quickly. ③ Centered-tip stroke: Start by pressing down and move slowly. ④ Centered-tip stroke: Start by lifting the pressure and move quickly. Keep practicing to master the dry, wet, dark and light brush techniques.
5. How to Apply Color
Coloring in western and Chinese painting is significantly different. Western painting focuses on light. Besides painting the various colors of the objects, it also focuses on the light reflected on them. For example, the light reflected on a white shirt can be yellow or green. It has to be painted accordingly to make it more realistic. This means that western painting does not emphasize the object’s color but rather the light reflection.
Chinese painting emphasizes the categorization of the objects, using one color for each category. For instance, the face and hands in figure painting are grouped into one category and applied with one color; the plants and trees in landscape painting are grouped into categories and each category can be painted in the same tone. The object color can be applied according to the artist’s subjective impression. For example, flowers can be black and yet still deliver the necessary vividness.
We all know that the primary colors are red, yellow and blue. Looking at the color wheel, we see there are colors between the primary ones. Those are secondary colors, such as orange, which is a mixture of red and yellow; green, a mixture of yellow and blue; and purple, a mixture of blue and red. The higher the proportion of one primary color added to the mixture, the closer the mixed color will lean toward that primary color (fig. 29).
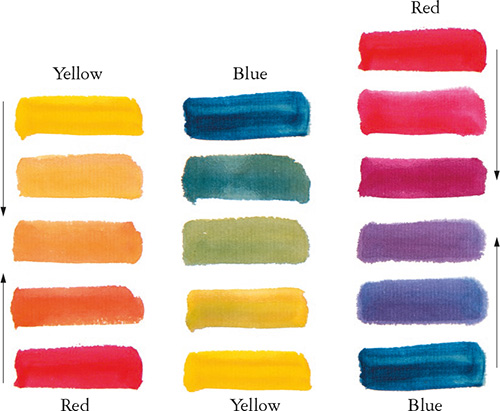
Fig. 29 Mix the primary colors of red, yellow and blue to form different colors.
The popular colors for Chinese painting are different from western painting. They are indigo, gamboge, vermilion, eosin, cinnabar, rouge, ocher, azurite, malachite and cyanine. Both azurite and malachite can be further classified into three shades, from dark to light (fig. 30).
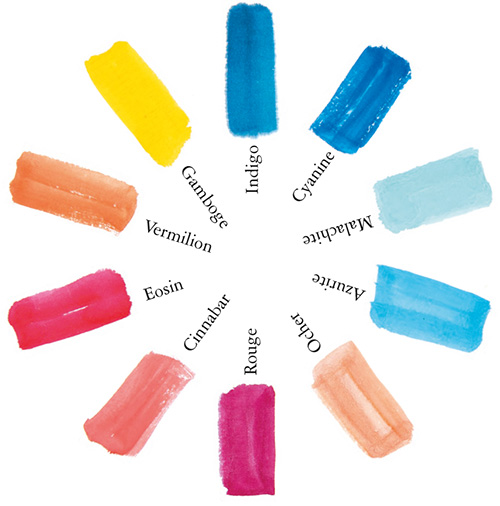
Fig. 30 The common Chinese painting colors.
We can use the basic color wheel as a reference to learn color mixing for Chinese painting. Gamboge is similar to yellow; indigo and cyanine are similar to blue; eosin and cinnabar are different shades of red; vermilion is similar to orange; rouge is similar to rosiness; ocher is similar to burnt umber. Azurite and malachite are usually used alone, not mixed with other colors. Mixing different colors develops a new color. When dipping a brush into one color and dipping the brush tip into another, we can see the gradient effect when the two colors blend on the xuan paper. On the next page is the list of the common color mixing we use in this book. It does not have a set color ratio. The higher the ratio of one color added, the more dominant that color will be. Keep practicing to help yourself find and analyze different chromaticity.
Gamboge + titanium white = light yellow
Azurite + titanium white = light blue
Ocher + black = burnt umber
Gamboge + indigo = dark green
Vermilion + eosin = orange red
Gamboge + vermilion = golden yellow
Eosin + indigo/cyanine = purple
Ocher + rouge = brown
6. Framing
The life and the value of a Chinese painting rely heavily on the framing technique. A well-done frame can support and elevate a painting. If a piece of art is hung without proper framing, not only can the characteristics not be exhibited but the overall aesthetics will also be destroyed. The same principle applies when framing an oil painting.
The simplest method of preserving the painting is: First, spray some water onto the painting to soften the paper tissue. Then, set an iron to its lowest temperature and flatten the paper with heat while it is still wet. You can frame the flattened paper after that.
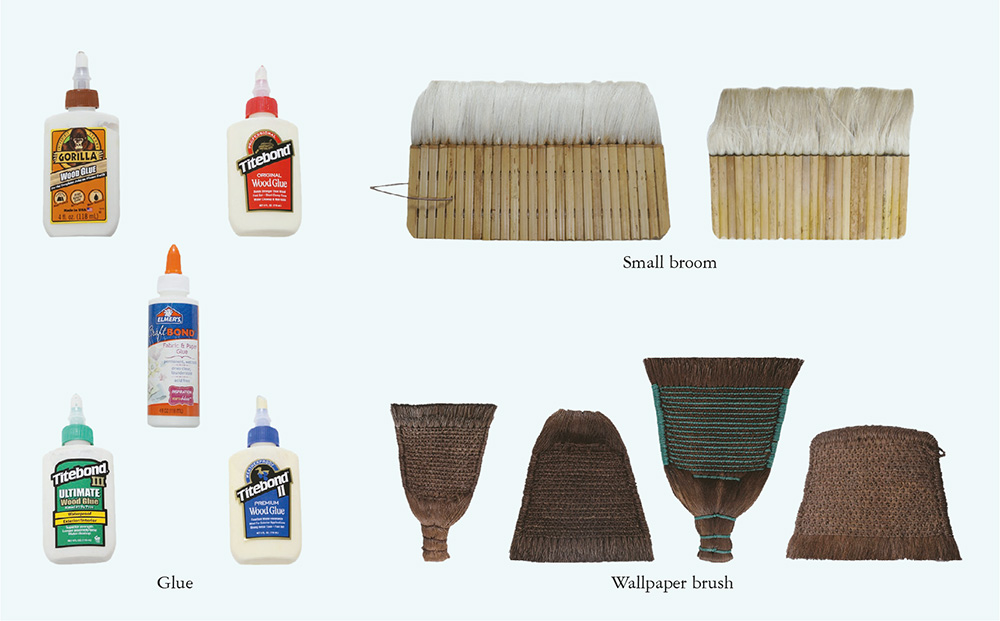
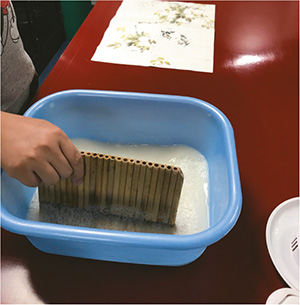
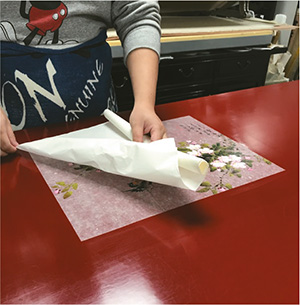
Chinese painting, however, is presented on xuan paper, which is thin and fragile. Framing correctly can strengthen the paper, extend the life of the art and encourage appreciation. To do an uncomplicated framing at home, only a wallpaper brush, small broom, paper knife, xuan paper, glue and ruler are needed.
1 Clean up a large piece of glass, tile floor or flat surface and place the painting upside down. Mix glue with water to make a diluted glue solution.
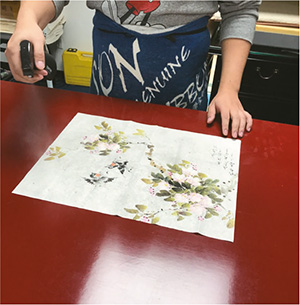
2 Spray some water on the back of the painting to soften the xuan paper fibers.
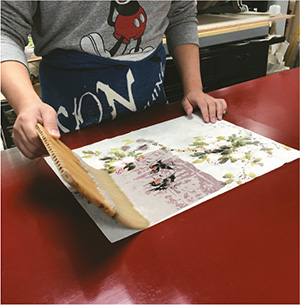
3 Use the wallpaper brush to apply the diluted glue solution from step 1 onto the back of the painting, starting from the center and brushing outward toward all sides. Be sure to brush gently to avoid tearing the xuan paper.
4 After applying the diluted glue solution to the entire painting, use a towel to clean up the glue outside of the painting’s edge.
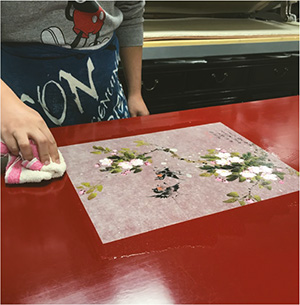
5 Use a piece of xuan paper that is larger than the painting as the supporting paper.
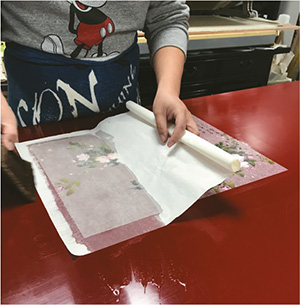
6 Roll the supporting paper from one side of the painting to the other side while using a small broom to flatten it.
7 There should be no bubbles between the painting and the supporting paper.

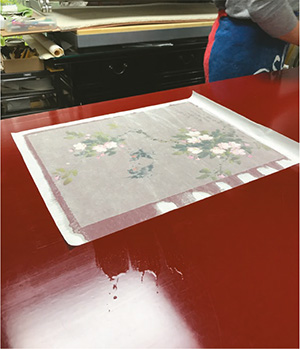
8 Apply a thick layer of glue at the border of the supporting paper. Place a piece of plastic or other smooth, hard surface such as ruler at the edge of the painting to stop the glue from spreading onto the painting.

9 Place the painting with the supporting paper on a clean and smooth surface or wall. Be sure to leave a gap for air to pass through for easy removal. When it is dry, trim the border 1 to 2 centimeters from the edge of the painting with the ruler and paper knife, being careful not to damage the art. Prepare a picture frame with proper size and put in the painting.