In this section, we’ll explore how two systems use public key cryptography to authenticate identity: PGP, an offline system that uses public keys to prove authorship of electronic documents; and SSH, an online system that uses public keys to authenticate the identity of interactive users and remote systems.
If you get an email message, how do you know who it is really from? Today’s email programs allow users to enter any “From:” address that they wish, so how do you know that a message is really from the person listed in the message header? Email messages can travel through many different computers and be repeatedly forwarded, so how do you know that the message you are reading hasn’t been altered since it was originally sent?
The underlying infrastructure of the Internet doesn’t provide any mechanism for verifying the authorship of email messages. It’s all too easy to claim you are somebody—or something—you aren’t. It’s this reality that was behind Peter Steiner’s cartoon in the July 5, 1993 issue of The New Yorker, which portrayed two dogs in front of a computer; one says to the other, “On the Internet, nobody knows you’re a dog.”
But while it is possible to anonymously post messages and claim to be something that you aren’t in the online world, it is also possible to establish your identity, and authenticate your authorship of documents and email messages that you create. One of the best ways to do this is using PGP.
Although PGP was originally written and released for the purpose of securing the contents of electronic communications from prying eyes, as we described earlier, one of the most popular current uses of the program is for digitally signing security advisories and security-related source code.
One of the best examples of an organization that uses PGP to sign its documents is the CERT/CC ( Computer Emergency Response Team Coordination Center) at Carnegie Mellon University. The CERT/CC sends out many advisories by email of current computer security problems. Many of these advisories recommend specific actions, such as services that need to be reconfigured or patches that need to be downloaded. Because these documents are direct calls to action, it’s important for system administrators to be able to verify the authenticity and integrity of the CERT messages before they act upon them—otherwise, a malicious attacker could issue a phony message that might recommend actions that would end up decreasing security.
To prevent this sort of abuse, CERT/CC sends its email advisories with a digital signature at the bottom. At the top of each advisory is a line that says “——BEGIN PGP SIGNED MESSAGE—-”. Here is an example:
-----BEGIN PGP SIGNED MESSAGE-----
Hash: SHA1 ==========================================================================
CERT* Vendor-Initiated Bulletin VB-98.02
Jan. 20, 1998

Topic: Apache Security Advisory
Source: Marc Slemko, Apache Team Member
At the bottom each message is the PGP signature itself:
* Registered U.S. Patent and Trademark Office.

The CERT Coordination Center is part of the Software Engineering
Institute (SEI). The SEI is sponsored by the U. S. Department of Defense.


This file: ftp://ftp.cert.org/pub/cert_bulletins/VB-98.02.apache


-----BEGIN PGP SIGNATURE-----
Version: PGP for Personal Privacy 5.0
Charset: noconv

iQA/AwUBOBTEF1r9kb5qlZHQEQJDFgCgojyMi4lZX+O4n0M3Q2nZAuVDU5YAnjjm
CW9TXRG1uvYOeHFidVKSAsLL
=AEl/
-----END PGP SIGNATURE-----
The PGP signature at the bottom of the email message looks quite complicated and somewhat official. But unlike signatures that are written with a pen and ink, you can’t verify a PGP signature by looking at it or by comparing it to another PGP signature that you might have on file. Instead, the signature can only be verified by using the PGP encryption program, as described in the following sections.
To verify the signature, the entire signed email message and the digital signature at the bottom need to be saved in a file. You then process this file with a copy of PGP.
To verify the signature, PGP needs to have a copy of the public key that CERT/CC used to sign this message. If you do not have the CERT/CC key on file, PGP will complain that it cannot check the signature:
% pgp advisory.pgp
Pretty Good Privacy(tm) Version 6.5.1i
(c) 1999 Network Associates Inc.

Export of this software may be restricted by the U.S. government.

File is signed.  signature not checked.
Signature made 1999/10/25 20:57 GMT
key does not meet validity threshold.

WARNING:  Because this public key is not certified with a trusted
signature, it is not known with high confidence that this public key
actually belongs to: "(KeyID: 0x6A9591D0)".

Plaintext filename: advisory
%
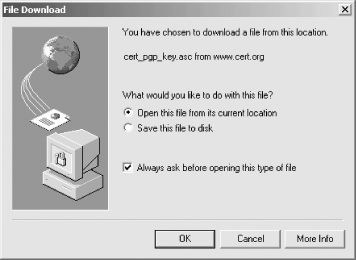
There are two ways to get a copy of the CERT/CC PGP key. The easiest is to download the key directly from CERT/CC’s web server. The advantage of this approach is that you can be reasonably sure that the key is coming from CERT/CC. A copy of CERT/CC’s PGP key is at the address https://www.cert.org/pgp/cert_pgp_key.asc. If you type this URL into Internet Explorer, for example, IE will attempt to download the file and give you the option of opening the file (with PGP) or saving the file on your disk, as shown in Figure 6-14.
Figure 6-14. When you download the file, Internet Explorer allows you to open the file directly or save it to your disk. Choose “Open” to view the file with the PGPkeys application.
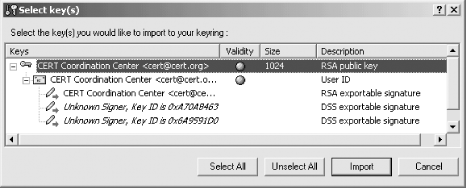
If you choose to open the file with PGP, the PGP program will then display information about the key and allow you to import it to your PGP key ring (Figure 6-15).
Figure 6-15. The PGPkeys application allows you to view the contents of any key on your hard disk. Once you view the key, you can decide whether or not to “import” the key—that is, to add it to your key chain.
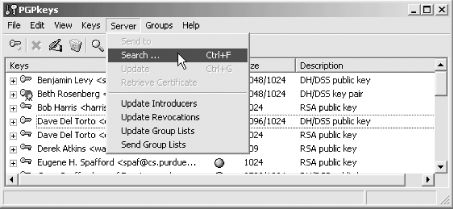
The second way to download a copy of the CERT/CC’s key is to use one of the PGP key servers. Current versions of the PGP from Network Associates have the ability to search the key server automatically. To conduct a search, choose the “Search” option from the “Server” menu, as shown in Figure 6-16.
Figure 6-16. To search for a key on the PGP public key server, choose “Search...” from the “Server” menu
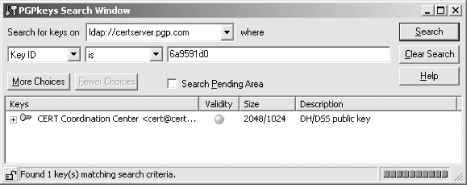
Then search for the key with the key that you wish to download. In this case, we search for KeyID OX6A9591D0 because that is the one that signed the message we wish to verify (see Figure 6-17).
Figure 6-17. Searching for Key0x6A9591D0 on the PGP public key server finds the PGP key for the CERT Coordination Center
You can then import this key to your local key ring by right-clicking on the key and selecting “Import to local keyring” (Figure 6-18).
Once you have a copy of a PGP key, you can use PGP to verify a signature. You can do so using either one of the command-line versions of PGP or the graphical version. The command-line version would give you a result that looks like this:
% pgp advisory.pgp
Pretty Good Privacy(tm) Version 6.5.1i
(c) 1999 Network Associates Inc.

Export of this software may be restricted by the U.S. government.

File is signed.  Good signature from user "CERT Coordination Center <cert@cert.org>".
Signature made 1999/10/25 20:57 GMT

Plaintext filename: advisory.pgp
%
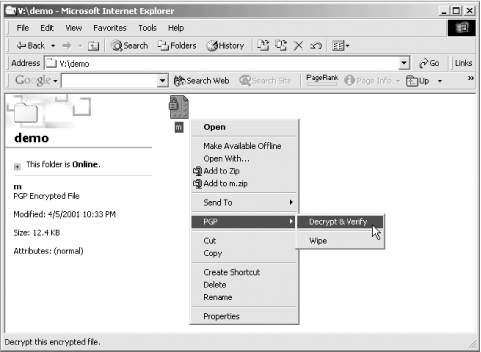
Many people found PGP’s original user interface somewhat difficult to use, so PGP, Inc. created an easier-to-use graphical user interface for Windows and Macintosh systems. With the Windows version, you can select the file that you wish to verify by right-clicking on the file’s icon, as shown in Figure 6-19. With the Macintosh version you can use contextual menus, or the PGP menu to verify the file.
Figure 6-19. You can decrypt a PGP-encrypted file directly from Explorer by right-clicking on the file and choosing “Decrypt & Verify” from the PGP menu.
PGP will then verify the signature on the file (Figure 6-20).
Figure 6-20. PGP displays the “Decrypting File(s)...” pop-up while it is decrypting a file. You can cancel this operation by clicking on the Cancel button.
And finally, the program will display a window indicating if the signature is valid or not (Figure 6-21).
Unfortunately, there is a security problem with the basic PGP signature scheme that we’ve presented here. The public key cryptography built into PGP allows you to be reasonably certain that the person who digitally signed the document is the same person who created the original PGP public key. But, there is no way to be sure that the person or organization whose name is on the PGP key is really who they claim to be. That is, there is no obvious way to certify the validity of the keys themselves.
CERT/CC sidesteps this problem by putting its PGP key on its web server. Many other people take this same approach. For instance, Gene Spafford puts links to his PGP public keys together with his contact information on his home page, at http://www.cerias.purdue.edu/homes/spaf/.
Another approach to certifying keys is to digitally sign them with other keys. This approach is discussed in detail in Chapter 7.
A good example of a program that can use public keys for identification and authorization is the Secure Shell (SSH), a virtual terminal program that uses encryption to protect information sent over the Internet from eavesdropping.[82]
Most people who use SSH simply use it as a secure “telnet” program. You can use SSH to log on to a remote system by typing ssh hostname from the Unix command line. The SSH program will contact the remote system; it will then ask for your password, and send the encrypted password over the network to the remote system. If the password matches the password for the account, the remote system allows you to log in. In this example, the SSH program is used to log into the computer called queen:
joker% ssh queen
simsong@queen's password: apas334
Last login: Sat Feb 24 22:55:08 2001 from king
Copyright (c) 1980, 1983, 1986, 1988, 1990, 1991, 1993, 1994
        The Regents of the University of California.  All rights reserved.
FreeBSD 4.1-RELEASE (GENERIC) #0: Fri Jul 28 14:30:31 GMT 2000

Welcome to FreeBSD!

queen%
As an alternative to passwords, SSH has an authentication system that is based on public key cryptography. SSH uses RSA authentication.
To use RSA authentication with SSH, you must first register a RSA public key with the SSH server as an “authorized key.” Once a public key is registered, any user who possesses the matching private key can log into the SSH-enabled system without having to present a password.
You create a pair of SSH RSA keys with a program that is called ssh-keygen . This program creates two files:
- $HOME/.ssh/identity.pub
A public key.
- $HOME/.ssh/identity
The private key. The private key may optionally be encrypted with a passphrase.
In the next example, the ssh-keygen program is used to create a public key and the corresponding private key. Because no passphrase is provided, the private key is not encrypted:
joker% ssh-keygen
Generating RSA keys:  Key generation complete.
Enter file in which to save the key (/home/simsong/.ssh/identity):
Enter passphrase (empty for no passphrase):
Enter same passphrase again:
Your identification has been saved in /home/simsong/.ssh/identity.
Your public key has been saved in /home/simsong/.ssh/identity.pub.
The key fingerprint is:
84:eb:d7:fa:65:8d:96:92:1f:bf:d3:42:98:78:ed:6f simsong@joker
joker%
The file identity.pub contains the public key in an easy-to-read ASCII format. The format is ASCII so that it is easy to move the key to other systems using the Copy and Paste commands of most windowing systems:
1024 35
1153658856334728053800732002995091802768030672920855101567696799593546217442339589189
5696787703409046566143648578658507491069283044996527617870937935932744778012158701502
9036534589217371615742904736898660434209966667011326203219393036710140322082107451925
975857100476657321081074068664124438800483005581427153 simsong@joker
The file identity, meanwhile, contains the private key. Because this file is not designed to be readily moved, it is in a more compact binary representation:
In order to use this public key, we will need to manually place it in the .ssh directory on the remote system in a file called authorized_keys. As its name implies, the ssh/authorized_keys file contains a list of keys that are authorized to log into the system without providing a password. The file can be created with the Unix cat command:
queen%cat >> .ssh/authorized_keys1024 35115365885633472805380073200299509180276803067292085510156769679959354621744233958918956967877034090465661436485786585074910692830449965276178709379359327447780121587015029036534589217371615742904736898660434209966667011326203219393036710140322082107451925975857100476657321081074068664124438800483005581427153 simsong@jokerqueen%
Once the public key is present on the remote machine, the user (Simson) can log from joker into queen without providing a password:
joker% ssh queen
Last login: Sat Feb 24 22:55:08 2001 from king
Copyright (c) 1980, 1983, 1986, 1988, 1990, 1991, 1993, 1994
        The Regents of the University of California.  All rights reserved.
FreeBSD 4.1-RELEASE (GENERIC) #0: Fri Jul 28 14:30:31 GMT 2000

Welcome to FreeBSD!

queen%
An interesting feature of the ssh command is the “-v” (verbose) option, which causes the ssh program to print a log of each cryptographic step as the ssh client logs into the remote system:
joker% ssh -v queen
SSH Version OpenSSH_2.2.0, protocol versions 1.5/2.0.
Compiled with SSL (0x0090581f).
debug: Reading configuration data /etc/ssh/ssh_config
debug: ssh_connect: getuid 0 geteuid 0 anon 0
debug: Connecting to queen [199.174.100.189] port 22.
debug: Allocated local port 1017.
debug: Connection established.
debug: Remote protocol version 1.99, remote software version OpenSSH-2.1
debug: Local version string SSH-1.5-OpenSSH_2.2.0
debug: Waiting for server public key.
debug: Received server public key (768 bits) and host key (1024 bits).
debug: Host 'queen' is known and matches the RSA host key.
debug: Encryption type: 3des
debug: Sent encrypted session key.
debug: Installing crc compensation attack detector.
debug: Received encrypted confirmation.
debug: Trying RSA authentication with key 'simsong@joker'
                  debug: Received RSA challenge from server.
                  debug: Sending response to host key RSA challenge.
                  debug: Remote: RSA authentication accepted.
                  debug: RSA authentication accepted by server.
debug: Requesting pty.
debug: Requesting shell.
debug: Entering interactive session.
Last login: Sun Feb 25 17:20:40 2001 from sdsl-64-7-15-234
Copyright (c) 1980, 1983, 1986, 1988, 1990, 1991, 1993, 1994
        The Regents of the University of California.  All rights reserved.
FreeBSD 4.1-RELEASE (GENERIC) #0: Fri Jul 28 14:30:31 GMT 2000

Welcome to FreeBSD!

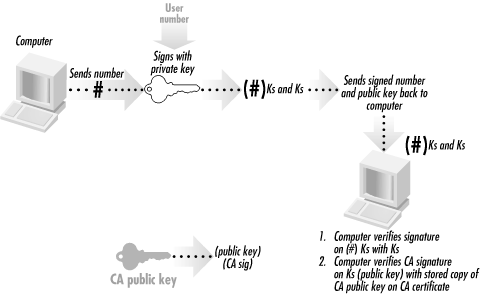
queen%Look at the lines that are underlined. The authentication with the public key takes place on these lines. First, the SSH client running on joker tells the remote SSH server that the client wishes to try RSA authentication with the key “simsong@joker”. The remote machine sends an “RSA challenge.” The RSA challenge is simply a number that the remote machine has randomly chosen; this random value is sometimes referred to as a nonce . Next, the SSH client on joker signs the RSA challenge and sends it back to the remote SSH server on queen. The server on queen verifies the signature[83] using the public key that it has on file. Finally, the remote machine allows the login. This process is shown schematically in Figure 6-22.
Figure 6-22. In a public key challenge-response process, a computer can provide a person with a number (the challenge) which must be signed. If the person can sign the number and return it to the computer, and if the digital signature can then be verified by the computer using the public key on file for the individual, the person must possess the private key that matches the given public key.
This process of exchanging a number, having the number signed, and then returning the signature is commonly called a public key challenge-response . It is the basis of many cryptographic protocols.
Notice that this technique cannot be readily compromised by an attacker who is eavesdropping on the communications link. Even if the attacker could see the number that is passed from the computer and see the signature that is sent back from the person to the computer, the attacker could not see the private key; the attacker thus will be unable to forge the person’s signature in the future. The attacker could see that a valid signature was provided, and that’s all.
The system can be compromised, however, if the attacker has access to the computer on which the private key resides. All the attacker has to do is copy the key, and the attacker can impersonate Simson. For this reason, the SSH system allows the user to further protect the private key by encrypting it. In practice, however, many people do not encrypt their SSH private keys.[84]
Another attack is possible if an eavesdropper listens in on many, many logins, capturing the random challenges and responses for each one. If enough are collected, it is possible that an attempt to masquerade will succeed if the nonce generated by the server as a challenge is identical to one of saved exchanges. For this reason, many cryptographic systems include a timestamp in the nonce.
[82] SSH can actually use a variety of schemes for authentication, including passwords and Kerberos.
[83] Because the example uses RSA encryption, the remote system verifies the signature by decrypting the signature with the public key that is on file. If the decrypted signature is the same number as the original challenge, then the client must have possession of the matching RSA private key.
[84] Most SSH users do not encrypt their private keys because encrypting private keys on a Unix computer actually adds little security. If an attacker has the ability to overcome Unix permissions and read your private key file, the attacker can capture your keystrokes as you type your password to decrypt your private key.
