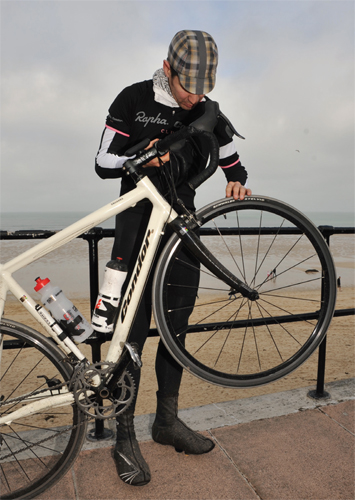
Bike maintenance is a big subject, and one that’s been covered by a number of very good books. If you don’t know how to do basic adjustments to your bike then it’s well worth buying such a book. It’s also worth cultivating a working relationship with a good bike shop, and that means buying stuff off them from time to time. If you keep them happy they’ll be there for you when last-minute mechanical disasters strike, and that’s a resource well worth having.
In this chapter we show you some basics: how to clean your bike; how to carry out pre-ride safety checks; how to repair a puncture; and how to adjust your gears. It finishes off with a section that addresses some common bike-care questions.
Keeping your bike clean
Not only does a clean bike look better but it works better and lasts longer too. Road dirt and old lubricant act as a grinding paste, wearing out components fast. Also dirt hides stuff that might become a problem, such as cuts in tyres and chips in paint that might lead to corrosion.
You should clean your bike once a week, and after every wet ride. If you haven’t time to do the whole thing, just clean the drive train, which is the chain, chainset and sprockets. You need some bits of kit to clean your bike:
+ Bucket of hot soapy water
+ Clean sponge
+ Degreaser spray
+ Dirty sponge
+ Dry cloths
+ Hose-pipe or other clean water for rinsing
+ Lubricant
+ Selection of different-sized, stiff-bristled brushes

|
Step |
|
|
Remove the wheels and spray degreaser over the chain, and over the front and rear mechs. Allow the degreaser to soak in.
|
Step |
|
|
Wash off the degreaser with hot soapy water, using the dirty sponge you should keep just for this job.

|
Step |
|
|
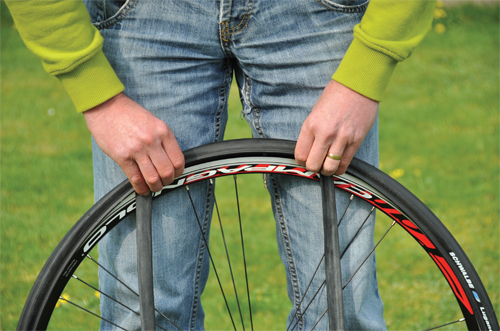
Clean both wheels with hot soapy water, using a stiff brush. Work the water in between the spokes and around the hubs. Scrub the tyres, and check for cuts.
|
Step |
|
|
Wash the rest of the frame with hot soapy water, using sponges, cloths and different-sized brushes to get into hard-to-reach places. Start at the top of the frame and work down.

|
Step |
|
|
Rinse the wheels and frame with clean water and dry them with a clean cloth. Reassemble the bike and check the frame for blemishes and wear.
|
Step |
|
|
Lubricate all moving parts with a bike-specific lubricant.
Pre-ride checks
These don’t take long, but doing a few pre-ride checks are essential for safety. Get into the habit of doing them before each ride. Also have a close look at the frame once a week, or whenever you clean your bike, which should be at least weekly. Use touch-up paint to cover up any chips in the frame. If you discover a crack, take the bike to a reputable bike shop for them to look at and advise.

|
Step |
|
|
Fully apply your front and rear brakes while trying to push your bike forwards. Neither wheel should turn. Adjust the brake travel if they do. A bike shop will do this if you don’t know how to. Inspect the cables inside brake levers for fraying. Replace if you see any. All the cables on your bike should be replaced once or twice a year.
|
Step |
|
|
Hold the front wheel between your legs and try to turn the handlebars. They shouldn’t move.
|
Step |
|
|
Lift the front of the bike and slowly turn the front wheel, inspecting the tyres for bulges, cuts or excessive wear. Repeat for the back wheel and replace the tyre if you see any defects. If either wheel touches the brake blocks then it isn’t running true or the brakes need attention. A good bike shop will advise.

|
Step |
|
|
Check that the quick-release levers on your wheels are in the locked position. Most have the words ‘lock’ and ‘unlock’ on them – ‘lock’ should be outermost. If yours don’t have those words on them, get familiar with how they work and how they look when locked.

|
Step |
|
|
Check the gear shifts because if these aren’t perfect they can distract you when riding, and having your chain slip out of gear can cause injury. So, with the rear wheel raised, run through all the gear shifts. If shifts aren’t instant and smooth, or there is chain noise when running on a particular sprocket or chainring, the rear or front mech needs adjusting. If you bought your bike from new, instructions for this should come with it. We’ve also included some steps on how to adjust your gears in the following section.
You need:
+ Puncture repair kit containing glue, patches, a crayon marker, French chalk and some kind of abrasive surface
+ Three tyre levers
+ Tweezers

|
Step |
|
|
Remove the wheel then insert the blunt end of a tyre lever between the tyre and wheel rim. Lever the edge of the tyre over the rim. With the lever still under the tyre, hook its other end around a spoke. Insert the second lever and push this around the tyre to lift it off, then remove the inner tube. If the tyre is tight you might need to hook the second tyre lever to a spoke and use a third one to remove the tyre.

|
Step |
|
|
Lift the tyre completely off the wheel and inspect it inside and out for cuts and anything sticking through it. A deeply cut tyre needs replacing. Remove any objects sticking in the tyre by pulling them out from the outside. Tweezers are useful for this.
|
Step |
|
|
Inflate the inner tube and listen for escaping air to locate the puncture. Mark where it is, then work around the whole tube listening in case of more holes. Deflate the tube and roughen its surface around each hole with abrasive. Select a repair patch and spread a thin layer of glue over the roughened area of the tube, making the glued area slightly larger than the repair patch.
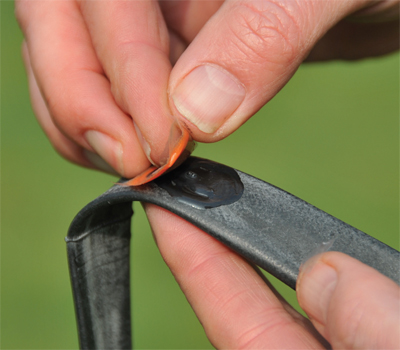
|
Step |
|
|
Allow the glue to go tacky then peel the backing from the repair patch and firmly press the patch, backside down, on to the glue. Ensure that the patch edges are flat and keep pressure on it for about a minute. Use the abrasive to dust some French chalk on to the repair and allow the glue to dry fully.
|
Step |
|
|
Put one side of the tyre on the rim. Inflate the tube slightly and push its valve down through the rim hole. Work the whole of the tube on to the rim and under the tyre. Push the valve upwards slightly and lift the other side of the tyre over the rim. Work the rest of the tyre back on the rim. If it proves difficult, use a tyre lever to help fit the last part.
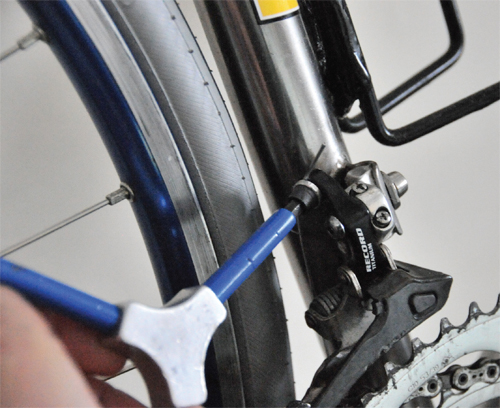
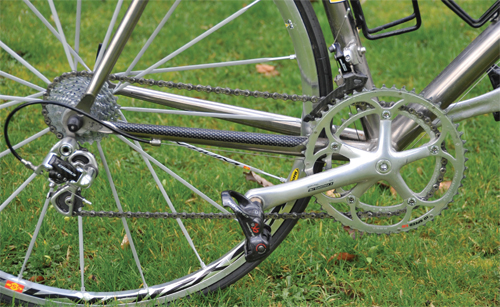
Front mech
If your gear shifts between chainrings are slow, or if the chain gets derailed when you shift or rubs against it, the front mech needs adjusting. You do this by setting it to its optimal working position.
|
Step |
|
|
Shift the chain on to the largest sprocket and smallest chainring. Undo the cable clamp bolt on the front mech.

|
Step |
|
|
Screw the low (marked L) adjuster until the chain is 2mm away from the inside plate of the front-mech cage.
|
Step |
|
|
Pull the cable taut and tighten the clamp bolt.

|
Step |
|
|
Shift the chain on to the smallest sprocket and biggest chainring. Screw the high (H) adjuster until the outside plate is 2mm clear of the chain.
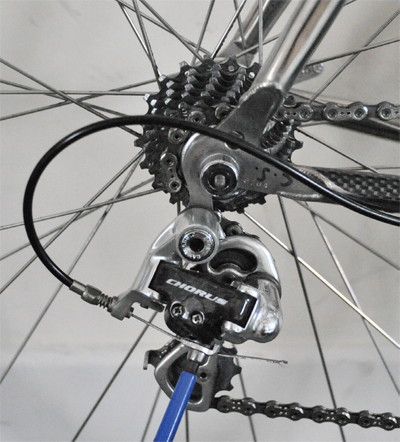
If rear mech shifts are slow, or the chain jumps sprockets or becomes derailed during shifts, you need to set the rear mech up to its optimal working position.
|
Step |
|
|
Shift to the big chainring and small sprocket. Undo the cable clamp.

|
Step |
|
|
Adjust the high screw (H) until the chain runs quietly when you turn the pedals. Tighten the cable clamp.
|
Step |
|
|
Shift gears upwards, turning the barrel adjuster to speed up slow shifts or reduce over-shifts.

|
Step |
|
|
Adjust low (L) screw if the inside of the rear mech cage rubs on the spokes.
Here are some troubleshooting answers to common questions concerning bike maintenance.
Q: How often should I get my bike serviced?
A: Get it fully serviced twice a year, once before the winter and again before the summer. You should also do a weekly degrease, clean and lubrication of the drive train.
Q: How can I increase the life of my tyres?
A: Always inflate them to a pressure in accordance with the manufacturer’s instructions, which are usually printed on the tyre wall. Brush off anything that might be stuck to them after each ride before it gets embedded in the tyre.
Q: What if my brakes become hard to apply, or won’t release when I let go of the brake levers?
A: The cables are dry and worn and need replacing. Either do it yourself, as there are many good books on DIY cycle repair, or take it to a bike shop. You should replace brake and gear cables at least once a year anyway.
Q: How do I prolong the life of the bearings on my bike?
A: Check cranks, pedals, hubs and headset for play or over-tightness. If you find any, either adjust it yourself using the instructions in a good bike-maintenance book, or take the bike to a good bike shop for some attention.
Q: Is there anything I can do to prevent punctures?
A: Use tyres with a Kevlar layer, or other brands of puncture prevention in them. Avoid riding on gravel, especially wet gravel. Look out for glass and thorns on the road. Replace worn tyres.
Q: The wheel rim catches on my brakes in the same place on each revolution.
A: Check for broken spokes, if you can’t find any, the wheel has just gone out of true. Both require the attention of a bike shop.
Q: How do I cut down wear to the drive train?
A: Replace any worn single part before it wears out the rest: for example, a worn chain will quickly wear out sprockets and chainrings. Chains should be replaced at least every six months. If your chain jumps on a single sprocket, that sprocket could be worn and should be replaced.
Q: What do I need in a home tool kit?
A: A multi-tool, crosshead screwdriver, tyre levers, puncture repair kit, long-nosed pliers, a cable cutter, a chain breaker tool and various brushes, sponges and cloths for cleaning.
Q: What should I do if the chain jumps when I pedal?
A: Degrease, clean and lubricate it. Back pedal to see if the chain runs smoothly through the rear gear mech. If there is a kink in it take hold of the chain where the kink is with both hands and gently flex it sideways. Apply more oil and let it soak in. If the jumping persists you might need a new chain and/or cassette sprockets.
Q: My gear shifts aren’t smooth, or I can’t get all my gears when I shift.
A: Follow the steps for setting up your front and rear mechs under Adjusting your gears.
Q: How do I prevent my brakes screeching or juddering when I apply them?
A: Inspect the brake blocks and remove any foreign bodies that might become embedded in them with tweezers. This cuts down on rim wear too. Clean wheel rims with solvent to remove residue that can affect brake performance. Do not get solvent on the tyre.
Q: How can I protect my frame from scratches?
A: If it hasn’t got one, fit a chain-stay protector on the side where the chain runs to stop it chipping the paintwork when riding over rough surfaces. Protect places where the various cables rub against the frame with special patches that fit between the cables and frame.
Q: My pedals creak when I press hard on them.
A: Check that all bolts on your cranks and chainset are tight. If the noise persists, clean and degrease your pedals, then lubricate the retention device that retains the cleat attached to your shoes in the pedals.