Chapter

Techniques
In this chapter, you will find a wealth of expert information to help you start cross stitching, choose fabric and threads, and look after your work. There are also helpful hints on how to use and combine the motifs from the Pattern Library to create your own cross stitch designs.
Starting and finishing
The following basic techniques show you how to begin and end cross stitch work, from using an embroidery hoop or frame and preparing the fabric to starting and finishing stitching. The various methods of working cross stitch and other useful embroidery stitches are covered on pages 20–22.
Mounting fabric in a hoop
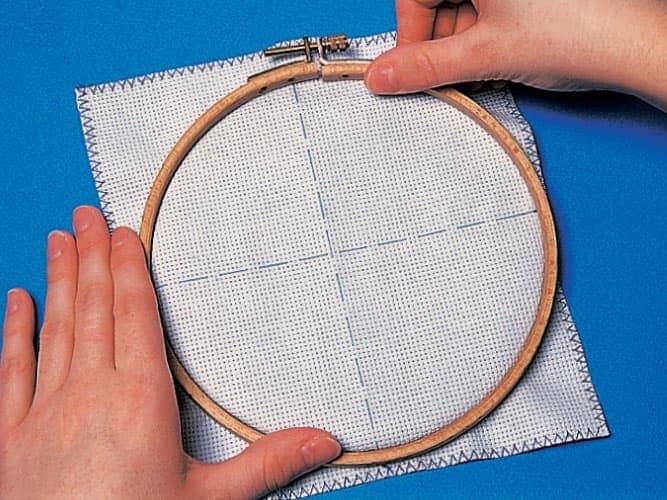
1 Loosen the screw on the larger hoop then spread the fabric, right side up, over the smaller hoop. Now press the larger hoop over the top. Tighten the screw slightly then manipulate the fabric with your fingers until it is evenly stretched, keeping the larger hoop pressed well down over the smaller one. Tighten the screw fully.
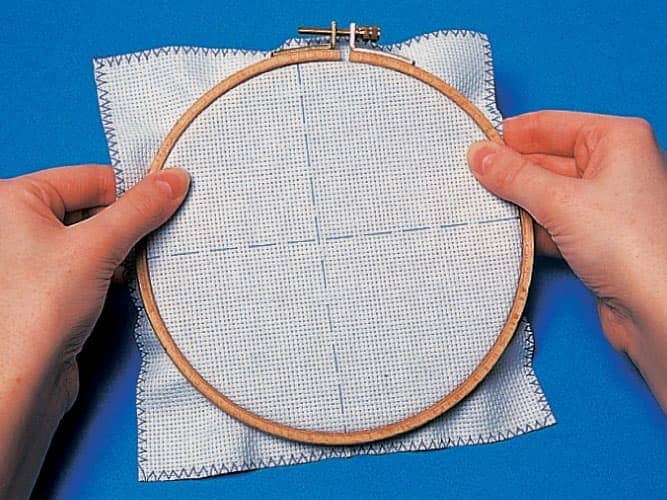
2 Always release the fabric from the hoop after each stitching session to avoid marking the fabric permanently. To do this, loosen the screw and push out the smaller hoop with your thumbs.
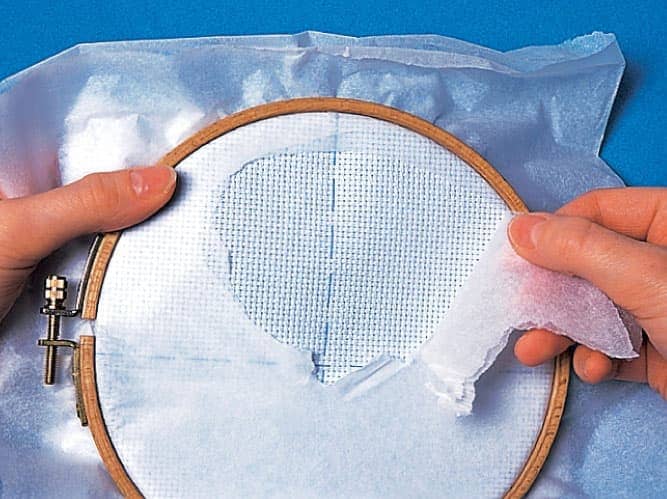
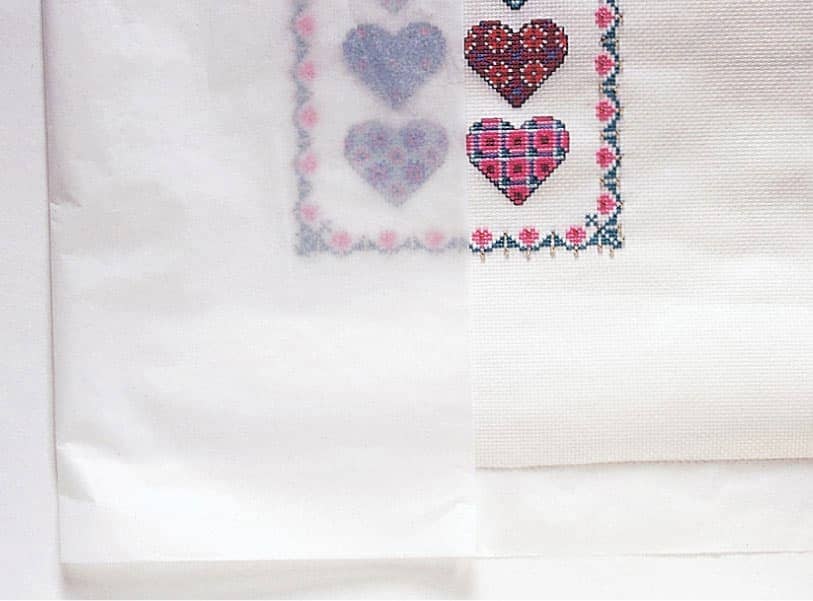
3 When working on a large design, move the hoop along the fabric once each portion is completed. Protect the area already worked by spreading a piece of white tissue paper over the right side of the embroidery before it is remounted in the hoop. Cut or tear away the paper to expose the next area to be worked.
Mounting fabric in a frame
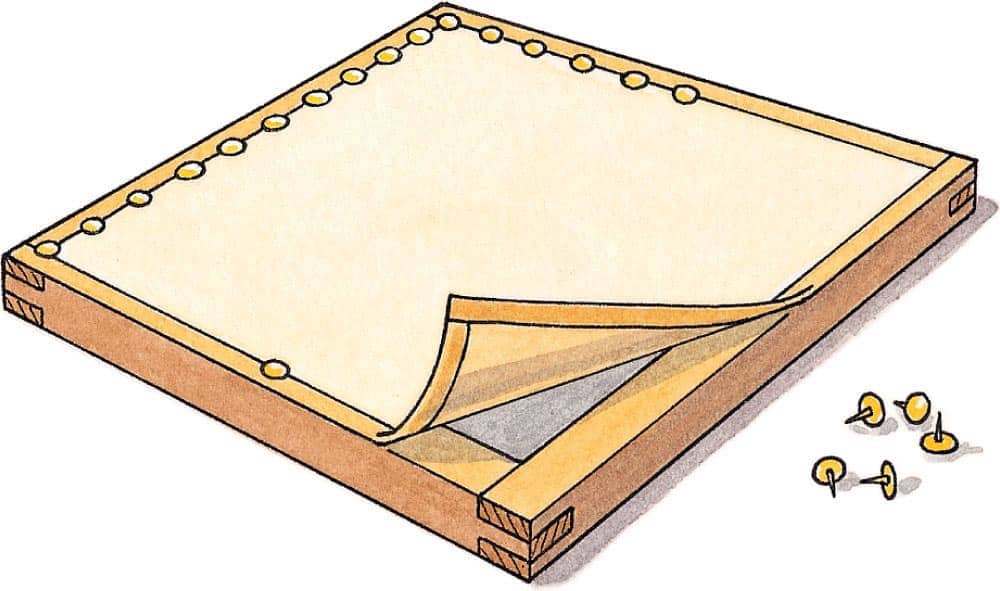
To use a non-adjustable rectangular frame, first bind the edges of the fabric with strips of 1-in. (2.5-cm) wide masking tape. Slot the frame sides together, then pin the fabric to the frame using thumb tacks, taking care to keep the fabric grain straight.
Preparing the fabric
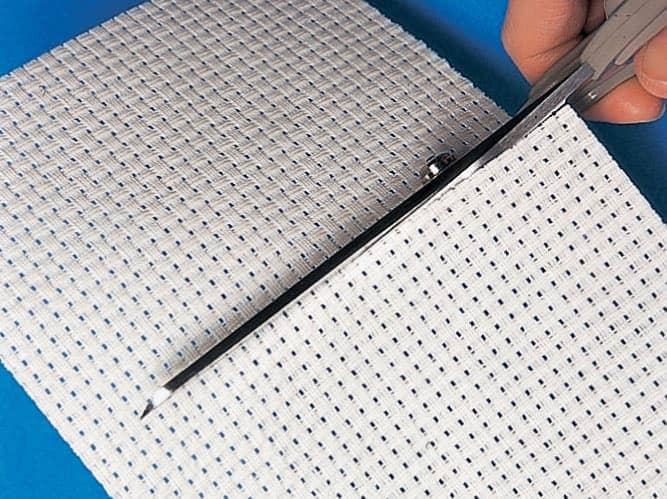
1 Cut out the fabric to the correct size using sharp scissors, cutting in a straight line between the fabric blocks or threads and allowing at least a 3–4-in. (8–10-cm) margin of unworked fabric all around the planned design. Remember to always “measure twice, cut once.”
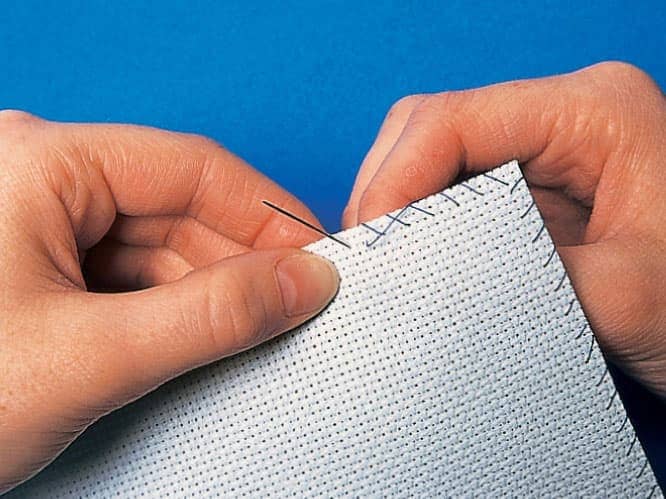
2 To prevent the raw edges of large pieces of fabric from fraying while you are stitching, oversew the raw edge by hand or use a row of machine zigzag stitching all around the edge. This is not necessary for small designs on small pieces of fabric that will be completed in a few hours.
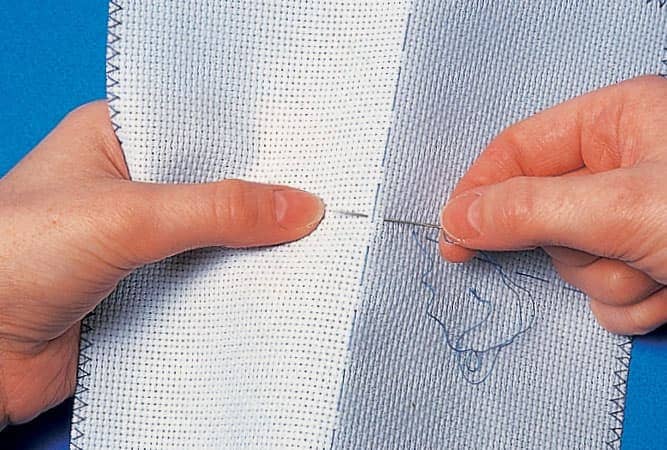
3 Cross stitch is always worked outward from the center of the design, to ensure there is an even margin of fabric all around the finished piece. To find the center, fold the fabric into quarters and mark the point where the folds join with a pin. Unfold the fabric and work two rows of basting stitches along the folds so the rows cross at this point. Use a contrasting color of sewing thread for the basting so that the stitches are easy to see. Starting at the center of the fabric, work the group of stitches nearest to the center of the chart. Work the remainder of the design outward from these stitches by counting the squares on the chart to determine the placing of the stitches.
Starting to stitch
There are several ways to anchor the thread end when you begin stitching, so choose the method that feels most comfortable to you.
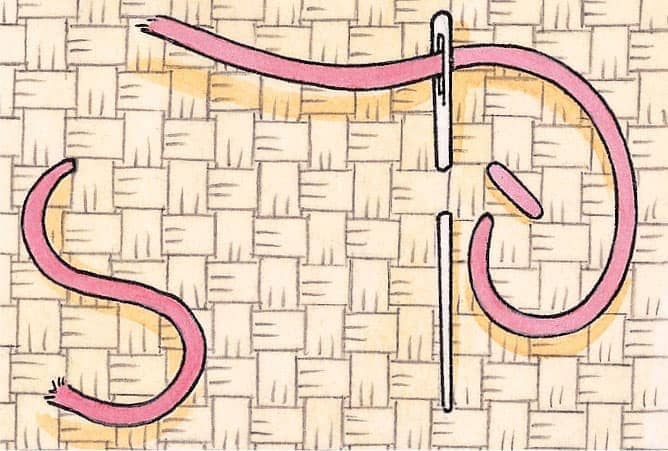
Loose-end start Take the needle through to the wrong side of the fabric close to where you intend to start stitching and leave a 2-in. (5-cm) length of thread hanging loose on the surface. Continue stitching until you finish the length of thread (see Finishing off the thread, right), then return to the loose end, take it through to the wrong side and darn it in under a group of stitches.
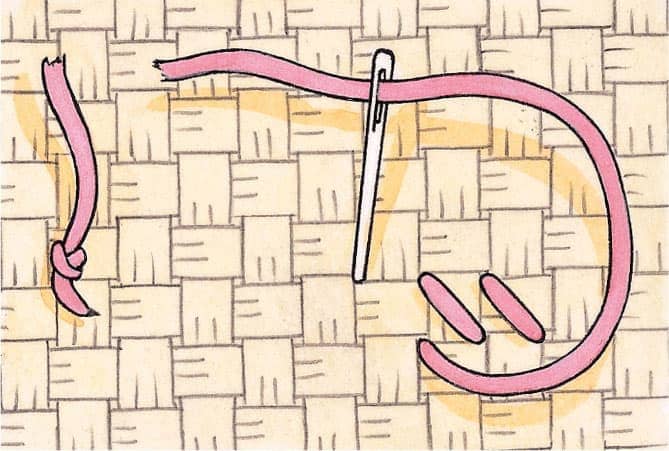
Waste-knot start Tie a knot at the end of the thread. Take the needle through to the wrong side of the fabric a short distance away from where you will be stitching, so the thread on the back lies along the position of the first few stitches. Work the stitches up to the knot, securing the thread on the back, then carefully snip off the knot.
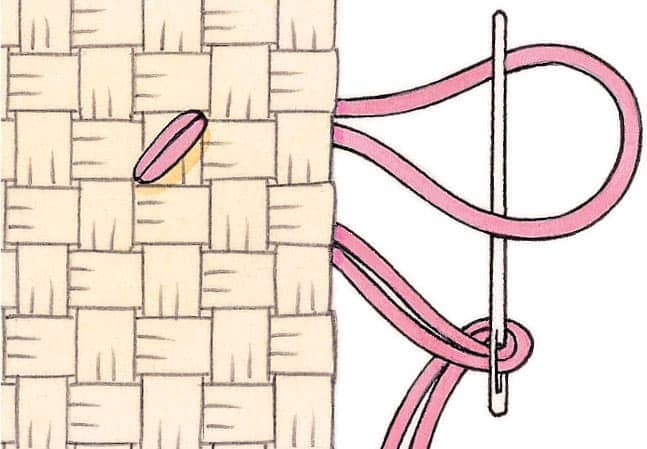
Loop start When stitching with an even number of strands of thread you can use the loop start. Cut the thread twice as long as usual. To loop start when using two strands, simply fold the thread in half and thread the cut ends through the eye of the needle, making a loop at the other end. Bring the needle through the fabric at the beginning of the first stitch and pull the thread through to leave the loop on the wrong side. Make the first stitch, take the needle to the wrong side, slip it through the loop and pull gently to anchor the end.
Finishing off the thread
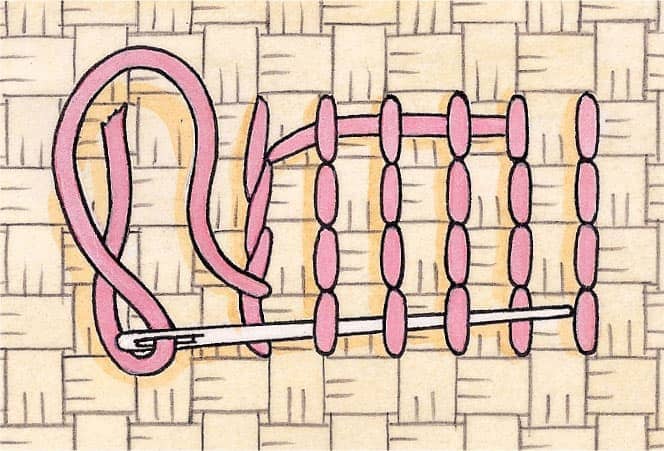
Close to the end of a length of thread, or at the end of a design element, take the needle through to the wrong side of the fabric. Slide the needle through the last few stitches you have worked, pull gently and cut off the thread end. Don’t be tempted to carry a length of thread across the wrong side between two stitched areas because this may show through on the right side and spoil the stitching. Instead, fasten off the thread after each area is completed.
Joining in a new length
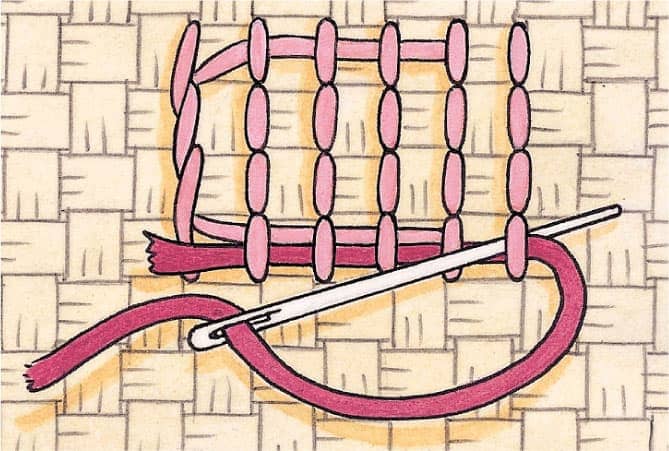
On the wrong side of the fabric, take the new length of thread under the back of several stitches close to where you are stitching. Take a small stitch over the last stitch already worked and bring the needle through the fabric ready to begin stitching.
The stitches
Cross stitches can be worked individually or in rows. Individual stitches should be used for small areas of color, while rows of stitches are suitable for filling in solid blocks of color. Backstitch and French knots are the other stitches used with cross stitch, to make straight lines or solid dots for eyes, and the stitch for applying beads can also be useful to learn.
Individual cross stitch
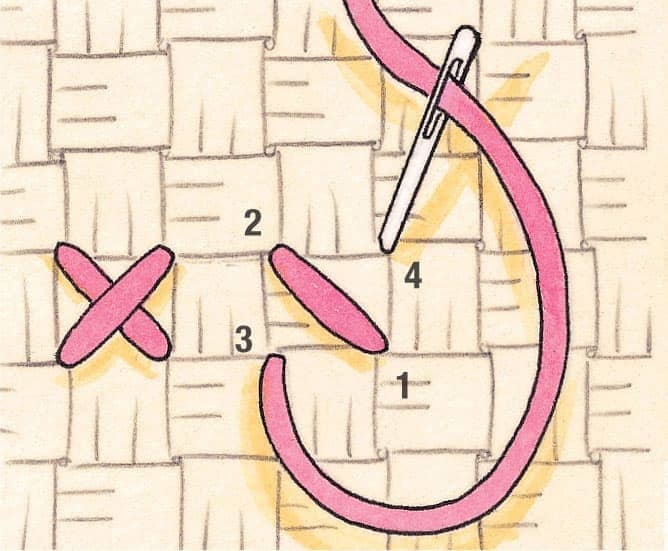
The first diagonal stitch of the cross slants from bottom right to top left. Bring the needle through at 1 and insert it at 2 to make a half-cross stitch. Complete the cross by stitching the second diagonal from bottom left (3) to top right (4). Repeat as required.
Cross stitch in horizontal rows
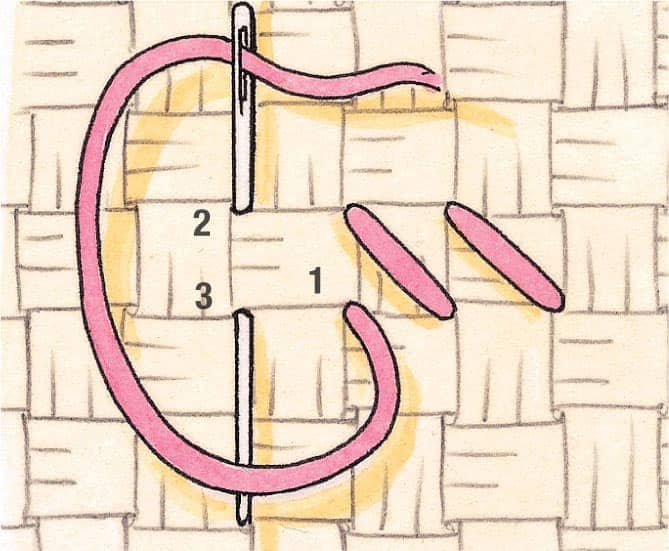
1 Each row of crosses is worked over two horizontal journeys. On the first journey, work from right to left making a row of evenly spaced diagonal stitches. Bring the needle through at 1 and insert it at 2. Bring the needle through at 3, ready to make the next stitch at the left. Repeat as required along the row.
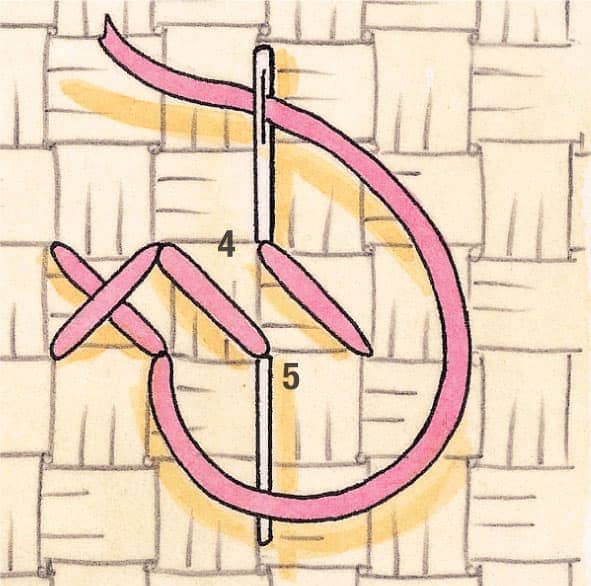
2 At the end of the row, turn and work back in the opposite direction making diagonal stitches to complete the crosses. Insert the needle at 4 and bring it through at 5. Work the next and subsequent rows below the first and repeat until the block of color is completed.
Cross stitch in vertical rows
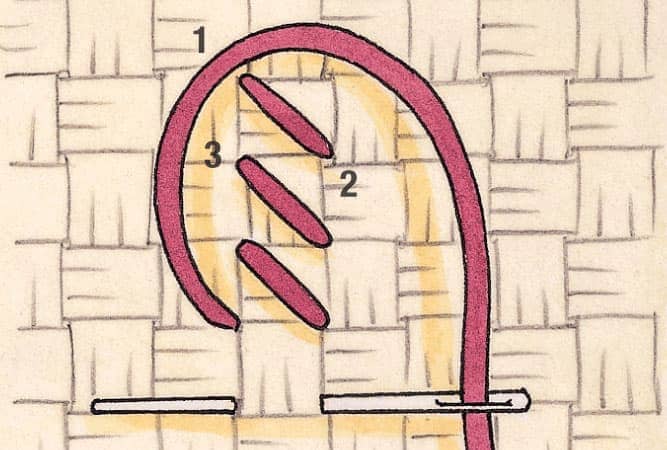
1 Each row of crosses is worked over two vertical journeys. On the first journey, work from top to bottom making a row of evenly spaced diagonal stitches. Bring the needle through at 1 and insert it at 2. Bring the needle through at 3, ready to make the next stitch below. Repeat as required along the row.
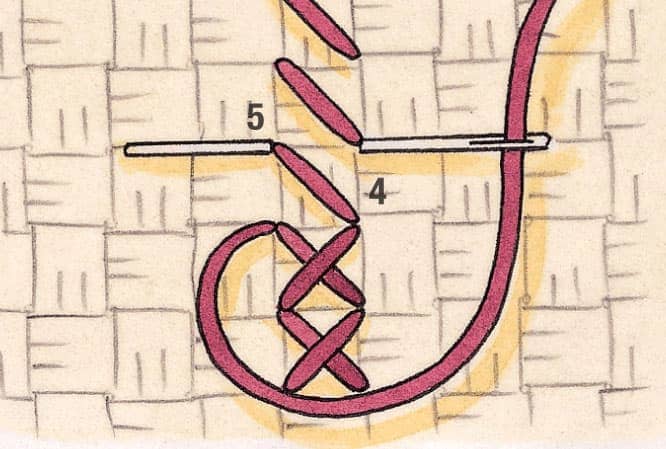
2 At the end of the row, work back in the opposite direction making diagonal stitches to complete the crosses. Insert the needle at 4 and bring it through at 5. Work the next and subsequent rows at the left of the first and repeat until the block of color is completed.
Backstitch
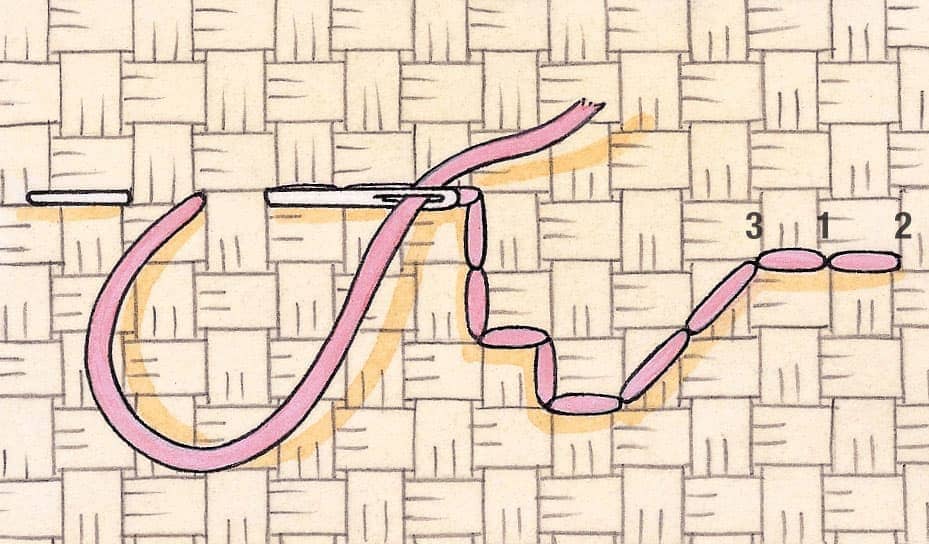
Work backstitch from right to left, making straight stitches forward and backward along the row. Bring the needle through at 1 and insert it to the right at 2, then bring it through again at 3. To make the next stitch, insert the needle at the left-hand end of the previous stitch. Backstitches may be vertical, horizontal, or diagonal and cover one or more fabric blocks.
French knots
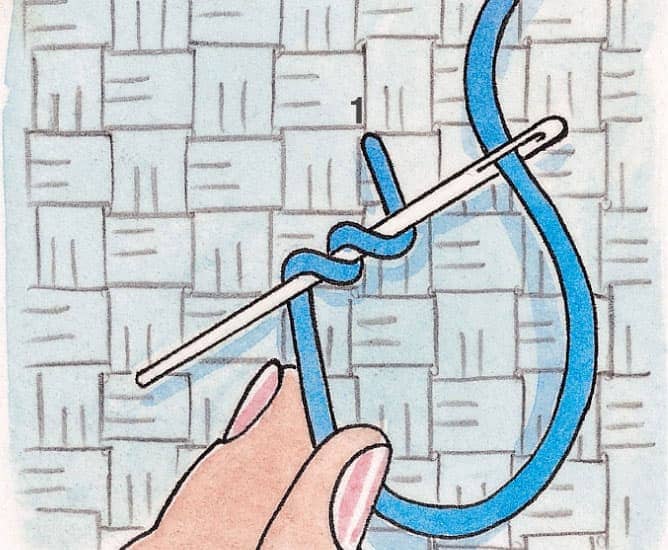
1 Bring the needle through at 1. Holding the thread taut with your left hand, twist the needle around the thread several times and gently tighten the twists.
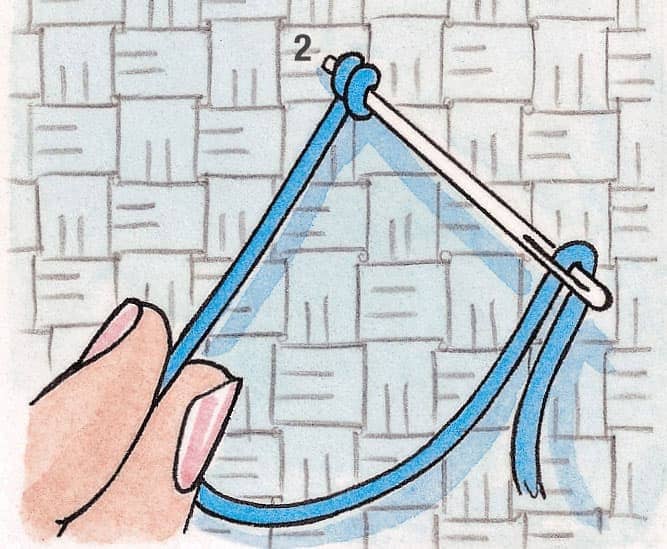
2 Holding the thread taut, turn the needle and insert it a short distance away at 2. Keeping the thread taut, take the needle through to the back, forming a knot at 2.
Applying beads
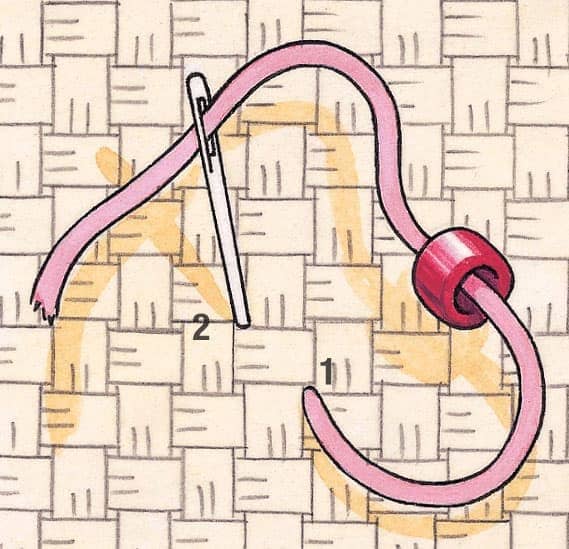
Attach each bead with a half-cross stitch. Bring the needle through at 1, thread the bead, and insert the needle at 2. For a more secure fixing, make a second diagonal stitch through the bead in the same way.
Design tips
Here are some useful guidelines for combining multiple motifs, alphabets, and borders to design samplers and pictures.
Adding corners to a border
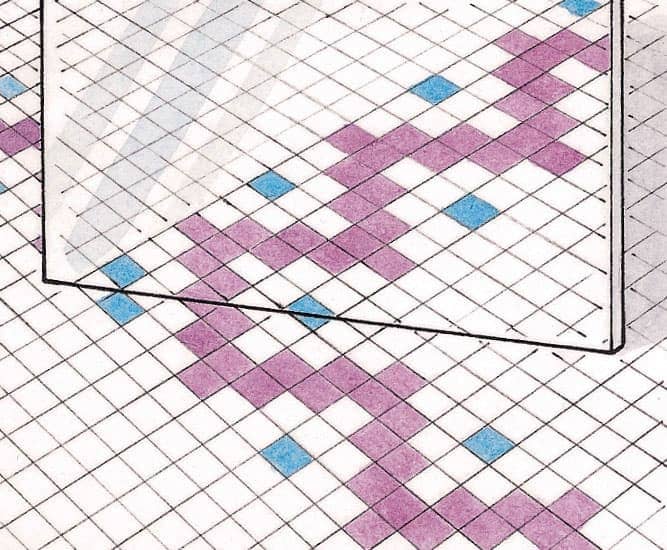
There are plenty of borders in the book that can be used just as they are, but you will probably also want to use a border pattern to make a continuous frame around a sampler, or to edge a tablecloth or decorative runner. To help you work out a good corner design from your chosen border, first draw a length of the border on graph paper and color it in. Angle a small mirror at 45 degrees to the drawn border then move the mirror until you achieve a satisfactory corner arrangement—made by the drawn border and the reflected image. Now draw the arrangement in on the graph paper.
Combining motifs to make a sampler
To build up the design for a sampler using several motifs from the book, start by drawing your chosen motifs on graph paper. If you plan to repeat the same motif draw it out as many times as required. Cut out each graph-paper motif leaving a margin of one or two squares all around each one. Now spread the motifs out on a large sheet of graph paper and begin moving them around until you are happy with the arrangement, adding lettering if you wish. When using lots of small motifs try arranging them in neat rows, as if you were placing them on a chessboard. When you are happy with the arrangement stick each motif in position using double-sided tape.
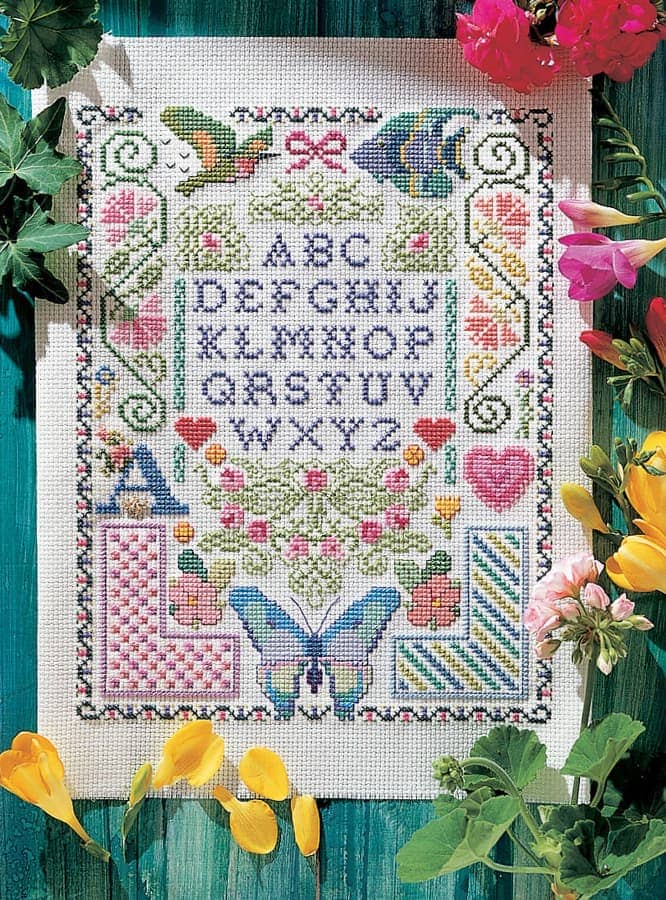
MY FAVORITE SAMPLER
TOM PUDDING DESIGNS This large, elaborate sampler combines many pictorial and geometric motifs arranged round a central alphabet. A wide range of thread colors have been used, together with tiny seed beads and a gilt charm.
Spacing letters and numbers
As well as personalizing your own stitching by adding your name and the date of completion, you may also want to add lettering to special gifts, such as a wedding or other commemorative sampler. Write out the words you would like to use and choose one of the alphabets from the book. The height of each alphabet is given on , page 253. For example, 7h means that each letter is seven crosses high when stitched. Use the same technique of drawing each letter or number on graph paper as if you were making a sampler (see above). Cut out the letters, leaving a one-square margin all around, then arrange them to form words. As a general guideline, space all the letters or numbers out evenly, remembering that you will need to leave a larger gap between words than you do between individual letters. For a small alphabet, try leaving a space of a single square between letters and two squares between words. When you are happy with the spacing, double check the spelling before sticking each letter in place with double-sided tape.
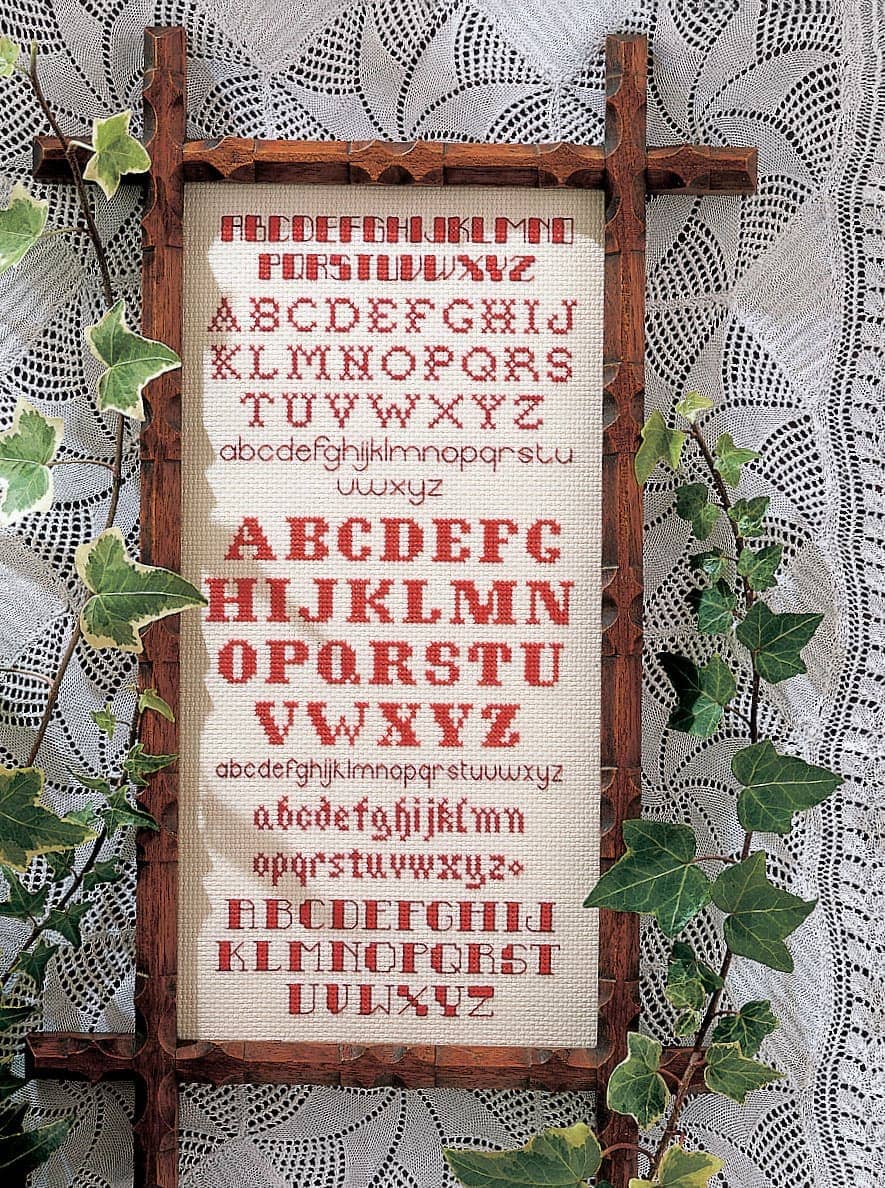
RED ALPHABETS TOM PUDDING DESIGNS A simple arrangement of alphabets stitched in shades of red thread on white fabric works well surrounded by an antique wooden cross frame.
Making a key
Choose a selection of threads to stitch your design with and then color in the different motifs using fiber-tip pens or colored pencils in similar colors to the threads. For every color you use, draw and fill in a small square along the side of the chart to make a key. Write the code number of each thread by the relevant colored-in square.
Looking after your completed work
When your stitching is complete, give some thought to how best to look after it, so that you and your family can enjoy the fruits of your labor for many years to come.
Washing guidelines
Make it a cast-iron rule to treat spills and stains as soon as they occur and mend tears or holes before laundering. If you are worried that the threads used in a piece may not be colorfast, have the item dry cleaned.
Embroidered items such as table linen and pillowcases that are intended to be used rather than displayed will need to be laundered. The best way to do this is to wash the items carefully by hand in hand-hot water with a mild, detergent-free cleaning agent. Most specialist fabric shampoos are ideal, but check that the one you choose does not contain optical brighteners, which will cause colors to fade.

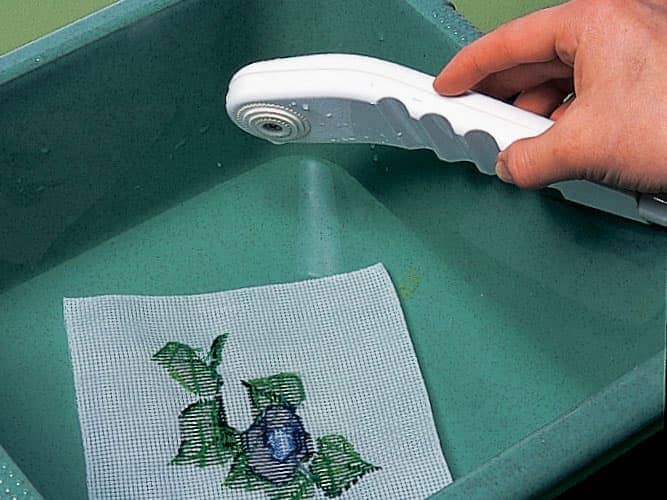
Rinse the piece thoroughly in several changes of water, then roll it in a towel and press gently to remove surplus water. Gently ease the embroidery into shape and leave to dry out of direct sunlight.
Pressing guidelines
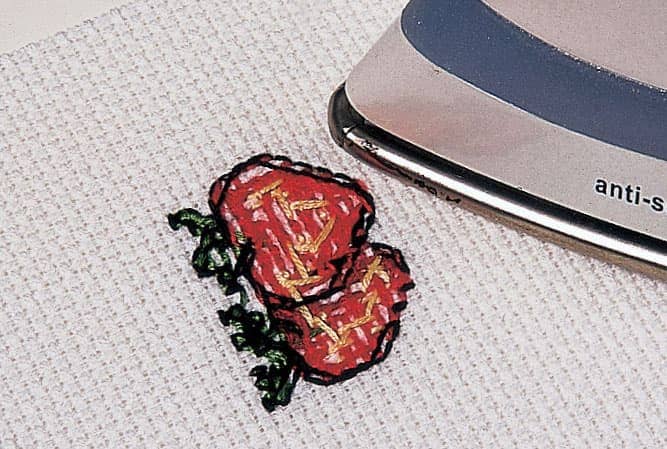
Press embroidered pieces while they are still slightly damp. Pad the ironing surface with a couple of old, clean towels then lay the embroidery over them with the wrong side uppermost. Cover with a piece of clean white fabric—an old cotton sheet is perfect. Set the iron to a temperature that matches the composition of the fabric: linen setting for evenweave linen; slightly cooler for Aida and cotton fabrics; and a lower synthetic setting for fabric made from a cotton/synthetic blend. Press lightly, taking care not to flatten the stitches.
Storage
Frame pictures to eliminate dust and dirt and store items such as table and bed linen carefully when not in use.
The main enemies that can attack embroideries, apart from dust and dirt, are direct sunlight and strong artificial lighting, which cause colors to fade and fibers to weaken. Heat makes both the threads and fabric brittle, while damp rots the fibers, so display framed pieces carefully, avoiding positions close to fireplaces and radiators and rooms with humid atmospheres, such as bathrooms.
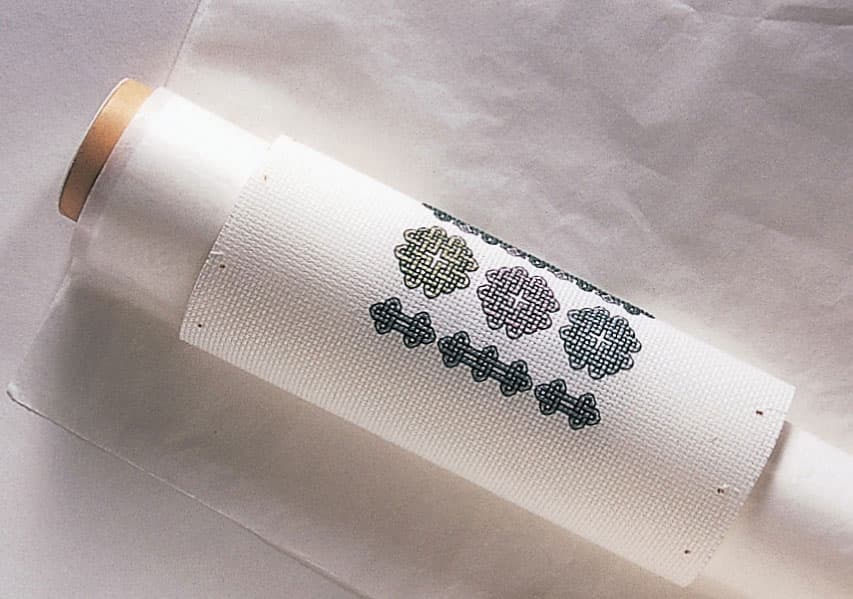
Try not to store fabric items for any length of time in polythene bags because the polythene attracts dirt and dust that will transfer readily to the fabric. Polythene also prevents natural fibers such as cotton and linen from breathing, causing them to weaken and eventually rot, and can result in mildew attacks. Instead, store small items flat and larger ones rolled around an acid-free card tube protected by layers of white acid-free tissue paper. Items that are too large to roll should be loosely folded between layers of white acid-free tissue paper, making sure each fold is padded with more tissue paper. Store all the items in their own, clean, fabric bag in a drawer, cupboard, or other dark, dry, and moth-free place.
