CHAPTER 10
VEGETARIAN MAINS
Summer Squash “Spaghetti” with Roasted Cherry Tomato Sauce
Mexican-Style Spaghetti Squash Casserole
Farro Bowl with Tofu, Mushrooms, and Spinach
Southwestern Brown Rice and Pinto Bean Bowl
Cauliflower Steaks with Chimichurri Sauce
Sautéed Spinach with Chickpeas and Garlicky Yogurt
Tunisian-Style Grilled Vegetables with Couscous and Eggs
Stir-Fried Tofu with Shiitakes and Green Beans
Curried Tempeh with Cauliflower and Peas
Thai-Style Red Curry with Cauliflower
Stewed Chickpeas with Eggplant and Tomatoes
Chickpea Cakes with Cucumber-Yogurt Sauce
Sweet Potato, Poblano, and Black Bean Tacos

There is no need to salt or fry the eggplant to make these delicious ricotta-filled eggplant rolls.
Eggplant Involtini
SERVES 4
WHY THIS RECIPE WORKS Eggplant involtini is like a lighter and more summery version of eggplant Parmesan, with the flavorful and fiber-rich eggplant planks rolled around a creamy ricotta filling. Traditional recipes require a two-step process of salting the eggplant, and then breading and frying it; we found a way to avoid the work of both the breading and the frying. This method allowed the eggplant’s flavor and meaty texture to take center stage in the dish: We could simply bake the eggplant until its excess moisture evaporated. Adding some Pecorino Romano to the ricotta meant we could use less filling without sacrificing flavor. Lastly, we threw together a simple but bright tomato sauce in a skillet, added the eggplant bundles to it, and finished the dish under the broiler so we could skip dirtying a casserole dish. Select shorter, wider eggplants for this recipe.
2 large eggplants (1½ pounds each), peeled and sliced lengthwise into ½-inch-thick planks (about 12 planks), end pieces trimmed to lie flat
6 tablespoons canola oil
Salt and pepper
2 garlic cloves, minced
¼ teaspoon dried oregano
Pinch red pepper flakes
1 (28-ounce) can no-salt-added whole peeled tomatoes, drained, juice reserved, and tomatoes chopped coarse
8 ounces (1 cup) whole-milk ricotta cheese
1 ounce Pecorino Romano cheese, grated (½ cup)
¼ cup plus 1 tablespoon chopped fresh basil
1 tablespoon lemon juice
1. Adjust 1 oven rack to lower-middle position and second rack 8 inches from broiler element. Heat oven to 375 degrees. Line 2 rimmed baking sheets with parchment paper and spray generously with vegetable oil spray. Brush 1 side of eggplant slices with 2½ tablespoons oil, then season with ⅛ teaspoon salt and ¼ teaspoon pepper. Flip slices over and repeat on second side with another 2½ tablespoons oil, ⅛ teaspoon salt, and ¼ teaspoon pepper. Arrange eggplant slices in single layer on prepared sheets. Bake until tender and lightly browned, 30 to 35 minutes, switching and rotating sheets halfway through baking. Let eggplant cool for 5 minutes, then flip each slice over using thin spatula.
2. Heat remaining 1 tablespoon oil in 12-inch broiler-safe skillet over medium-low heat until shimmering. Add garlic, ⅛ teaspoon salt, oregano, and pepper flakes and cook, stirring occasionally, until fragrant, about 30 seconds. Stir in tomatoes and their juice, bring to simmer, and cook until thickened, about 15 minutes. Cover to keep warm.
3. Combine ricotta, ¼ cup Pecorino, ¼ cup basil, and lemon juice in bowl. With widest short side facing you, spoon about 1 tablespoon ricotta mixture over bottom third of each eggplant slice (use slightly more filling for larger slices and slightly less for smaller slices). Gently roll up each eggplant slice and place seam side down in tomato sauce in skillet.
4. Heat broiler. Place skillet over medium heat, bring sauce to simmer, and cook for 5 minutes. Transfer skillet to oven and broil until eggplant is well browned and cheese is heated through, 5 to 10 minutes. Sprinkle with remaining ¼ cup Pecorino and let rest for 5 minutes. Sprinkle with remaining 1 tablespoon basil and serve.
PER SERVING
Cal 430 • Total Fat 31g • Sat Fat 7g • Chol 30mg
Sodium 430mg • Total Carbs 28g • Fiber 12g • Total Sugar 15g
Added Sugar 0g • Protein 14g • Total Carbohydrate Choices 2
Summer Squash “Spaghetti” with Roasted Cherry Tomato Sauce
SERVES 4
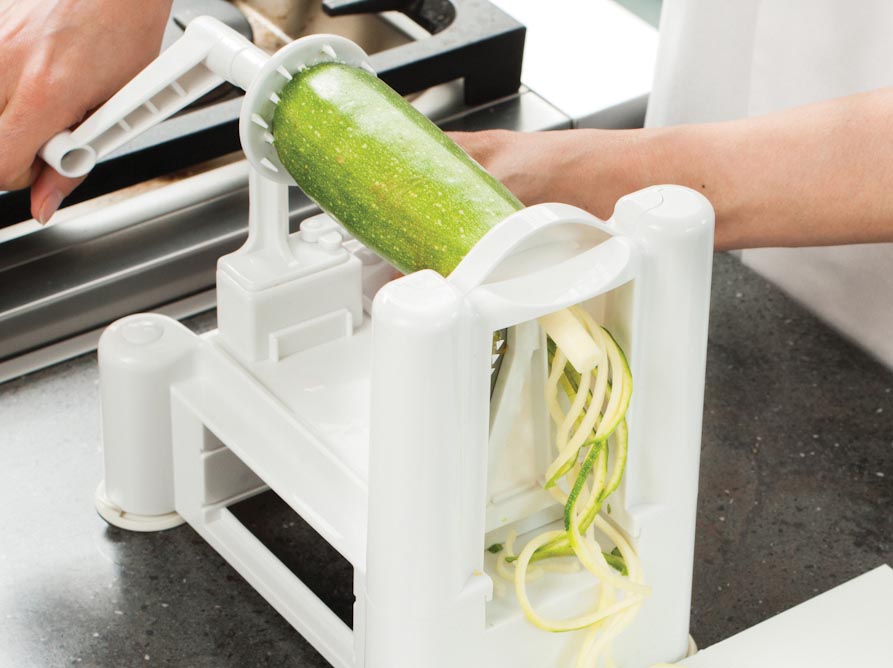
WHY THIS RECIPE WORKS Spiralizing vegetables is all the rage and for good reason: It offers lots of new ways to incorporate vitamin- and fiber-rich vegetables into your diet. Here we paired spiralized yellow squash with an aromatic, deeply flavorful tomato sauce. We halved and roasted cherry tomatoes, which drove off extra moisture and intensified their natural sweetness. Tossing the tomatoes with a bit of tomato paste and olive oil before roasting encouraged caramelization and gave the sauce a rounded flavor. Roasting the spiralized squash and then transferring it to a colander allowed us to get rid of any excess moisture. Seasoned ricotta brought much needed creaminess—and protein—to our dish. You can substitute zucchini for the summer squash, if desired. Our favorite spiralizer model is the Paderno World Cuisine Tri-Blade Plastic Spiral Vegetable Slicer.
6 ounces (¾ cup) whole-milk ricotta cheese
6 tablespoons chopped fresh basil
Salt and pepper
3 pounds yellow summer squash, trimmed
2 pounds cherry tomatoes, halved
1 shallot, sliced thin
3 tablespoons extra-virgin olive oil
5 garlic cloves, minced
1 tablespoon minced fresh oregano or 1 teaspoon dried
1 tablespoon no-salt-added tomato paste
¼ teaspoon red pepper flakes
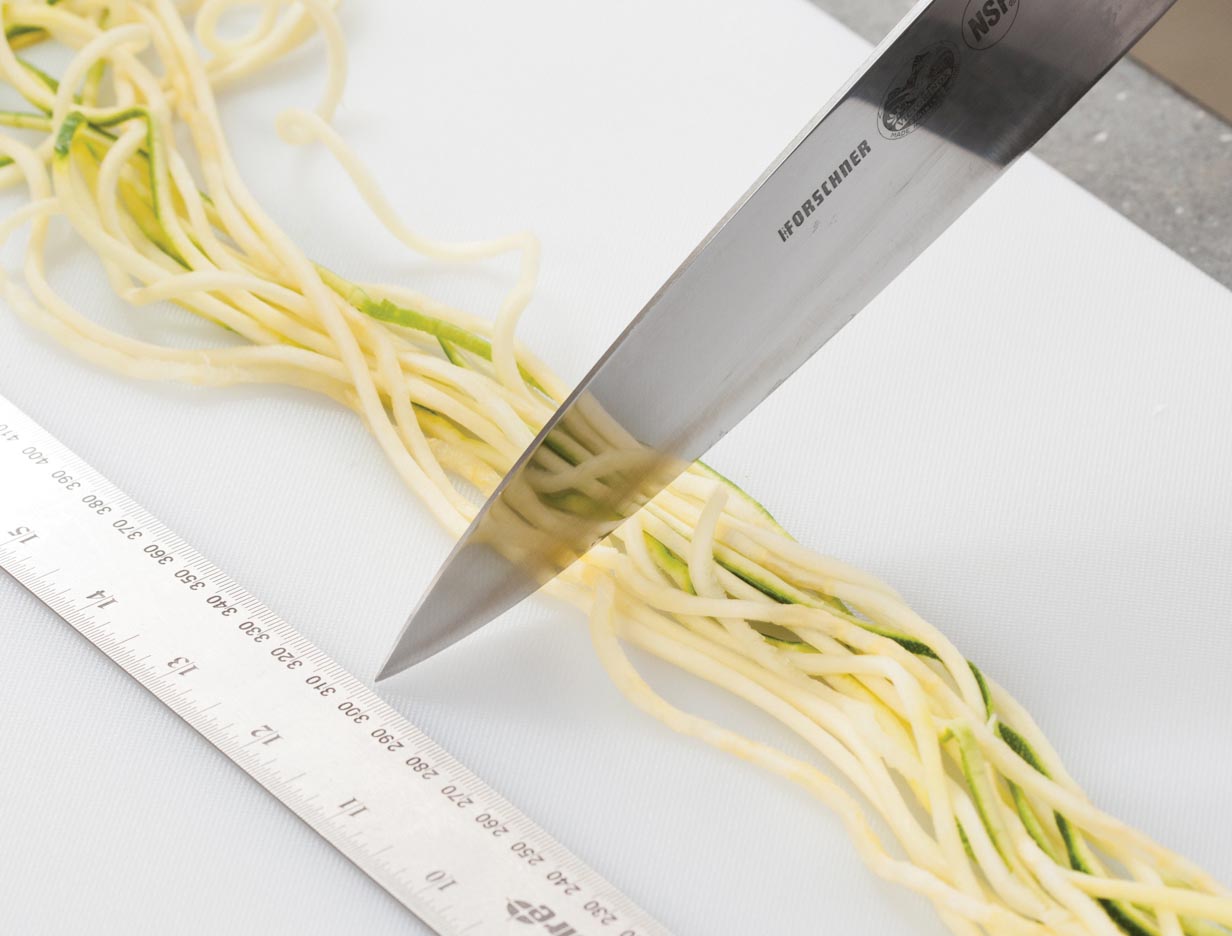
1. Adjust oven racks to upper-middle and lower-middle positions and heat oven to 375 degrees. Line rimmed baking sheet with aluminum foil. Combine ricotta, 2 tablespoons basil, ⅛ teaspoon salt, and ¼ teaspoon pepper in bowl; set aside for serving. Using spiralizer, cut squash into ⅛-inch-thick noodles, then cut noodles into 12-inch lengths.
2. Toss tomatoes, shallot, 2 tablespoons oil, garlic, oregano, tomato paste, pepper flakes, ⅛ teaspoon salt, and ¼ teaspoon pepper together in bowl. Spread tomato mixture in lined baking sheet and roast, without stirring, on lower rack until tomatoes are softened and skins begin to shrivel, about 30 minutes.
3. Meanwhile, toss squash with ⅛ teaspoon salt and remaining 1 tablespoon oil on second rimmed baking sheet and roast on upper rack until tender, 20 to 25 minutes. Transfer squash to colander and shake to remove any excess liquid; transfer to large serving bowl. (If tomatoes are not finished cooking, cover bowl with aluminum foil to keep warm.)
4. Add roasted tomato mixture and any accumulated juices to bowl with squash and gently toss to combine. Season with ⅛ teaspoon salt and pepper to taste. Dollop individual portions with 3 tablespoons ricotta mixture and sprinkle with remaining ¼ cup basil before serving.
PER SERVING
Cal 280 • Total Fat 17g • Sat Fat 5g • Chol 20mg
Sodium 390mg • Total Carbs 24g • Fiber 7g • Total Sugar 15g
Added Sugar 0g • Protein 13g • Total Carbohydrate Choices 1.5
Depending on your spiralizer, the amount of trimming required will vary. You can also make noodles using a mandoline or V-slicer fitted with an ⅛-inch julienne attachment. Make sure to position the zucchini or summer squash vertically so the noodles are as long as possible.


Mexican-Style Spaghetti Squash Casserole
Shredded spaghetti squash makes a great base for a vegetable and bean-packed casserole.
Mexican-Style Spaghetti Squash Casserole
SERVES 4
WHY THIS RECIPE WORKS Spaghetti squash makes a great pasta replacement or a fun side dish, but we wanted to showcase this versatile vegetable’s ability to work as a casserole by jazzing it up with bright Mexican flavors. We roasted the oblong yellow squash in the traditional method, simply halving it and roasting until the sweet strands could be easily shredded from the skins with a fork. While the squash roasted, we built a flavorful base for our casserole by blooming minced garlic, smoked paprika, and cumin in the microwave. Incorporating black beans, corn, and tomatoes added protein and heft while reinforcing the Mexican flavors. Scallions lent a subtle oniony flavor without overpowering the sweet squash, as well as a nice pop of color. Minced jalapeño gave just the right amount of gentle heat. We sampled a variety of toppings, but creamy, heart-healthy avocado and mellow, slightly briny queso fresco won us over. We also enjoyed serving our squash with a squeeze of lime juice. For more spice, include the seeds from the jalapeño chile.
1 (2½- to 3-pound) spaghetti squash, halved lengthwise and seeded
3 tablespoons extra-virgin olive oil
Salt and pepper
2 garlic cloves, minced
½ teaspoon smoked paprika
½ teaspoon ground cumin
1 (15-ounce) can no-salt-added black beans, rinsed
1 cup frozen corn
6 ounces cherry tomatoes, quartered
6 scallions (4 minced, 2 sliced thin)
1 jalapeño chile, stemmed, seeded, and minced
1 avocado, halved, pitted, and cut into ½-inch pieces
2 ounces queso fresco, crumbled (½ cup)
Lime wedges
1. Adjust oven rack to middle position and heat oven to 375 degrees. Lightly spray 8-inch square baking dish with vegetable oil spray. Brush cut sides of squash with 1 tablespoon oil and sprinkle with ⅛ teaspoon salt and ¼ teaspoon pepper. Place squash cut side down in prepared dish (squash will not sit flat in dish) and roast until just tender, 40 to 45 minutes. Flip squash cut side up and let sit until cool enough to handle, about 20 minutes. Do not turn off oven.
2. Combine remaining 2 tablespoons oil, garlic, paprika, cumin, and ½ teaspoon salt in large bowl and microwave until fragrant, about 30 seconds. Stir in beans, corn, tomatoes, minced scallions, and jalapeño.
3. Using fork, scrape squash into strands in bowl with bean mixture. Stir to combine, then spread mixture evenly in now-empty dish and cover tightly with aluminum foil. Bake until heated through, 20 to 25 minutes. Sprinkle with avocado, queso fresco, and sliced scallions. Serve with lime wedges.
PER SERVING
Cal 400 • Total Fat 24g • Sat Fat 4.5g • Chol 10mg
Sodium 520mg • Total Carbs 41g • Fiber 11g • Total Sugar 9g
Added Sugar 0g • Protein 11g • Total Carbohydrate Choices 3

There is no need to precook the bulgur for our stuffed eggplants which also contain fresh tomatoes, pine nuts, and seasonings.
Stuffed Eggplant with Bulgur
SERVES 4
WHY THIS RECIPE WORKS Italian eggplants are the perfect size for stuffing, and they take on a rich, creamy texture when baked. Roasting the eggplants prior to stuffing was the key to preventing them from turning watery and tasteless. The slight caramelizing effect of roasting them on a preheated baking sheet added depth of flavor, too. We then drained the eggplants briefly on paper towels (which got rid of excess liquid) before adding the stuffing. Hearty, nutty bulgur, which requires only soaking before it’s ready to eat, made a perfect filling base. Pecorino Romano cheese added richness while tomatoes lent bright flavor and a bit of moisture. When shopping, do not confuse bulgur with cracked wheat, which has a much longer cooking time and will not work in this recipe.
4 (10-ounce) Italian eggplants, halved lengthwise
¼ cup extra-virgin olive oil
Salt and pepper
½ cup medium-grind bulgur, rinsed
¼ cup water
1 onion, chopped fine
3 garlic cloves, minced
2 teaspoons minced fresh oregano or ½ teaspoon dried
¼ teaspoon ground cinnamon
⅛ teaspoon cayenne pepper
1 pound plum tomatoes, cored, seeded, and chopped
2 ounces Pecorino Romano cheese, grated (1 cup)
2 tablespoons pine nuts, toasted
¼ teaspoon grated lemon zest plus 1 tablespoon juice
2 tablespoons minced fresh parsley
Lemon wedges
1. Adjust oven racks to upper-middle and lowest positions, place parchment paper–lined rimmed baking sheet on lowest rack, and heat oven to 400 degrees.
2. Score flesh of each eggplant half in 1-inch crosshatch pattern, about 1 inch deep. Brush scored sides of eggplant with 1 tablespoon oil and sprinkle with ⅛ teaspoon salt and ¼ teaspoon pepper. Lay eggplant cut side down on hot sheet and roast until flesh is tender, 40 to 50 minutes. Transfer eggplant cut side down to paper towel–lined baking sheet and let drain. Do not wash rimmed baking sheet.
3. Meanwhile, toss bulgur with water in bowl and let sit until grains are softened and liquid is fully absorbed, 20 to 40 minutes.
4. Heat 1 tablespoon oil in 12-inch skillet over medium heat until shimmering. Add onion and cook until softened, 5 minutes. Stir in garlic, oregano, cinnamon, cayenne, and ¼ teaspoon salt and cook until fragrant, about 30 seconds. Stir in bulgur, tomatoes, ¾ cup Pecorino, pine nuts, and lemon zest and juice and cook until heated through, about 1 minute. Season with pepper to taste.
5. Return eggplant cut side up to rimmed baking sheet. Using 2 forks, gently push eggplant flesh to sides to make room for filling. Mound bulgur mixture into eggplant halves and pack lightly with back of spoon. Sprinkle with remaining ¼ cup Pecorino. Bake on upper-middle rack until cheese is melted, 5 to 10 minutes. Drizzle with remaining 2 tablespoons oil, sprinkle with parsley, and serve with lemon wedges.
PER SERVING
Cal 370 • Total Fat 22g • Sat Fat 5g • Chol 15mg
Sodium 320mg • Total Carbs 39g • Fiber 12g • Total Sugar 14g
Added Sugar 0g • Protein 11g • Total Carbohydrate Choices 2.5


Farro Bowl with Tofu, Mushrooms, and Spinach
We swapped out rice for farro in this protein-packed bowl featuring tofu, earthy spinach, and cremini mushrooms.
Farro Bowl with Tofu, Mushrooms, and Spinach
SERVES 4
WHY THIS RECIPE WORKS Hearty, nutty farro is traditionally associated with Italy, but it also adapts well to bold Asian ingredients, as in this bowl featuring crispy seared tofu and a simple miso-ginger sauce. We found through testing that farro is best prepared using a pasta cooking method—boiled until tender and drained. Neutral-tasting tofu seemed like an easy way to incorporate a great source of plant-based protein into the bowl. Next came vegetables. Mushrooms were a must—we chopped some cremini and tossed them into the skillet after cooking the crispy tofu. They tasted meaty and rich, and a hit of sherry brought in some nutty flavor. To incorporate some greenery, we looked to baby spinach. After cooking the mushrooms, we cleared out the skillet, heated up some oil, and began wilting the quick-cooking spinach in batches. These tender leaves cooked down in no time and brought some colorful nutrients to the dish. To assemble the bowls, we piled the farro high with crisp tofu, earthy cremini, and spinach. A sprinkling of scallions made for a fresh finish, but the winning touch came with the sauce flavored with red miso, sesame oil, sherry vinegar, and ginger. With that, we had a soul-satisfying bowl worth craving. We prefer the flavor and texture of whole farro; pearled farro can be used, but the texture may be softer. Do not use quick-cooking or presteamed farro (read the ingredient list on the package to determine this) in this recipe. The cooking time for farro can vary greatly among different brands, so we recommend beginning to check for doneness after 10 minutes.
2 tablespoons mayonnaise
5 teaspoons toasted sesame oil
1 tablespoon red miso
2 teaspoons sherry vinegar
1 teaspoon grated fresh ginger
1 cup whole farro
Salt
14 ounces firm tofu
3 tablespoons cornstarch
¼ cup canola oil
10 ounces cremini mushrooms, trimmed and chopped coarse
2 tablespoons dry sherry
10 ounces (10 cups) baby spinach
2 scallions, sliced thin
1. Whisk mayonnaise, 1 tablespoon sesame oil, miso, 1 tablespoon water, 1 teaspoon vinegar, and ginger together in small bowl; set sauce aside for serving.
2. Bring 4 quarts water to boil in large pot. Add farro and 1 teaspoon salt and cook until grains are tender with slight chew, 15 to 30 minutes. Drain farro well and return to now-empty pot. Stir in remaining 2 teaspoons sesame oil and remaining 1 teaspoon vinegar and cover to keep warm.
3. Meanwhile, cut tofu crosswise into 8 equal slabs, arrange over paper towel–lined baking sheet, and let drain for 20 minutes. Gently press dry with paper towels.
4. Spread cornstarch in shallow dish. Coat tofu thoroughly in cornstarch, pressing gently to adhere; transfer to plate. Heat 2 tablespoons canola oil in 12-inch nonstick skillet over medium-high heat until just smoking. Add tofu and cook until crisp and browned, about 4 minutes per side. Transfer to paper towel–lined plate and tent with aluminum foil. Wipe skillet clean with paper towels.
5. Heat 1 tablespoon canola oil in now-empty skillet over medium-high heat until shimmering. Add mushrooms and ⅛ teaspoon salt and cook until beginning to brown, 5 to 8 minutes. Stir in sherry and cook, scraping up any browned bits, until skillet is nearly dry, about 1 minute; transfer to bowl.
6. Heat remaining 1 tablespoon canola oil in again-empty skillet over medium-high heat until shimmering. Add spinach, 1 handful at a time, and cook until just wilted, about 1 minute. Divide farro among individual serving bowls, then top with tofu, mushrooms, and spinach. Drizzle with miso-ginger sauce, sprinkle with scallions, and serve.
PER SERVING
Cal 530 • Total Fat 31g • Sat Fat 3g • Chol 5mg
Sodium 420mg • Total Carbs 48g • Fiber 7g • Total Sugar 5g
Added Sugar 0g • Protein 18g • Total Carbohydrate Choices 3
NOTES FROM THE TEST KITCHEN
All About Tofu
Tofu is high in protein as well as iron and calcium. We love it in the test kitchen because it is an ideal canvas for bold or aromatic sauces. It also takes to a wide variety of preparations from stir-frying and sautéing to roasting, braising, grilling, and scrambling. There are many recipes that include tofu throughout this book.
So what is tofu, exactly? Tofu is the result of a process that is similar to cheese making: curds, the result of coagulating soy milk, are set in a mold and pressed to extract as much, or as little, of the liquid whey as desired. Depending on how long the tofu is pressed, and how much coagulant is used, the amount of whey released will vary, creating a range of textures from soft to firm.
Choosing the Right Tofu
Tofu is available in a variety of textures: extra-firm, firm, medium-firm, soft, and silken. We use all these varieties throughout this book, and reaching for the right variety will be key to the success of any given recipe. In general, firmer varieties hold their shape when cooking, while softer varieties do not, so it follows that each type of tofu is best when used in specific ways.
Extra-Firm and Firm Tofu
We prefer extra-firm or firm tofu for stir-fries and noodle dishes as they hold their shape in high heat cooking applications or when tossed with pasta. These two varieties of tofu are also great marinated (they absorb marinade better than softer varieties) or tossed raw into salads.
Medium and soft tofu boast a creamy texture; we love to pan-fry these kinds of tofu, often coated with cornstarch, to achieve a crisp outside, which makes a nice textural contrast to the silky interior. Soft tofu is great scrambled like eggs.
Silken Tofu
Silken tofu has a soft, ultracreamy texture and is often used as a base for smoothies and dips, in desserts such as puddings, or as an egg replacement in vegan baked goods.
Tofu is highly perishable, so look for a package with the latest expiration date possible. To store an opened package, cover the tofu with water and store, refrigerated, in a covered container, changing the water daily.

Southwestern Brown Rice and Pinto Bean Bowl
The key to this Southwestern bowl is a spice- and aromatic-infused brown rice base plus salsa, crema, and vegetables.
Southwestern Brown Rice and Pinto Bean Bowl
SERVES 6
WHY THIS RECIPE WORKS The sustaining combination of rice and beans is a staple in many cuisines. We wanted to make a simple hearty and nutritious dish with a bold Latin American profile. We preferred the texture and robust flavor of brown rice, not to mention that it is higher in fiber than white rice. After sautéing onion and poblano pepper, we added zesty aromatics and cooked them until fragrant. We then stirred in the rice and broth and simmered until the rice was tender. Canned pinto beans instead of dried beans simplified the dish; and to keep them from getting mushy we stirred them in partway through cooking the rice. A fresh and flavorful tomatillo salsa and a spicy crema added a welcomed fresh counterpart to this rich rice-and-beans dish.
TOMATILLO SALSA
1 pound tomatillos, husks and stems removed, rinsed, dried, and halved
1 jalapeño chile, stemmed, seeded, and chopped
¼ cup fresh cilantro leaves
1 garlic clove, peeled
1 tablespoon extra-virgin olive oil
¼ teaspoon salt
CHIPOTLE CREMA
¼ cup mayonnaise
¼ cup plain low-fat yogurt
1 tablespoon lime juice, plus lime wedges for serving
2 teaspoons minced canned chipotle chile in adobo sauce
1 garlic clove, minced
RICE
1 tablespoon extra-virgin olive oil
3 poblano chiles, stemmed, seeded, and cut into ½-inch pieces
1 onion, chopped fine
4 garlic cloves, minced
2½ teaspoons ground cumin
1½ teaspoons ground coriander
⅛ teaspoon cayenne pepper
1 cup long-grain brown rice, rinsed
3¼ cups low-sodium vegetable broth
½ teaspoon salt
2 (15-ounce) cans no-salt-added pinto beans, rinsed
10 radishes, trimmed and cut into matchsticks
1 avocado, halved, pitted, and sliced ½-inch-thick
1. FOR THE TOMATILLO SALSA Pulse tomatillos, jalapeño, cilantro, and garlic in food processor until chopped, about 8 pulses. Transfer to fine-mesh strainer set over bowl and let drain for 10 minutes, discard liquid. Stir in oil and salt and set aside for serving.
2. FOR THE CHIPOTLE CREMA Combine mayonnaise, yogurt, lime juice, chipotle, and garlic in small bowl; set aside for serving.
3. FOR THE RICE Heat oil in 12-inch nonstick skillet over medium-high heat until shimmering. Add poblanos and onion and cook until softened and lightly browned, 5 to 7 minutes. Stir in minced garlic, cumin, coriander, and cayenne and cook until fragrant, about 30 seconds.
4. Stir in rice, broth, and ½ teaspoon salt and bring to simmer. Cover, reduce heat to medium-low, and cook, stirring occasionally, for 25 minutes. Stir in beans and cook, covered, until liquid is absorbed and rice is tender, 20 to 25 minutes.
5. Divide rice mixture among individual serving bowls, then top with salsa, crema, radishes, and avocado. Serve with lime wedges.
PER SERVING
Cal 410 • Total Fat 20g • Sat Fat 2.5g • Chol 5mg
Sodium 460mg • Total Carbs 53g • Fiber 13g • Total Sugar 8g
Added Sugar 0g • Protein 12g • Total Carbohydrate Choices 3.5
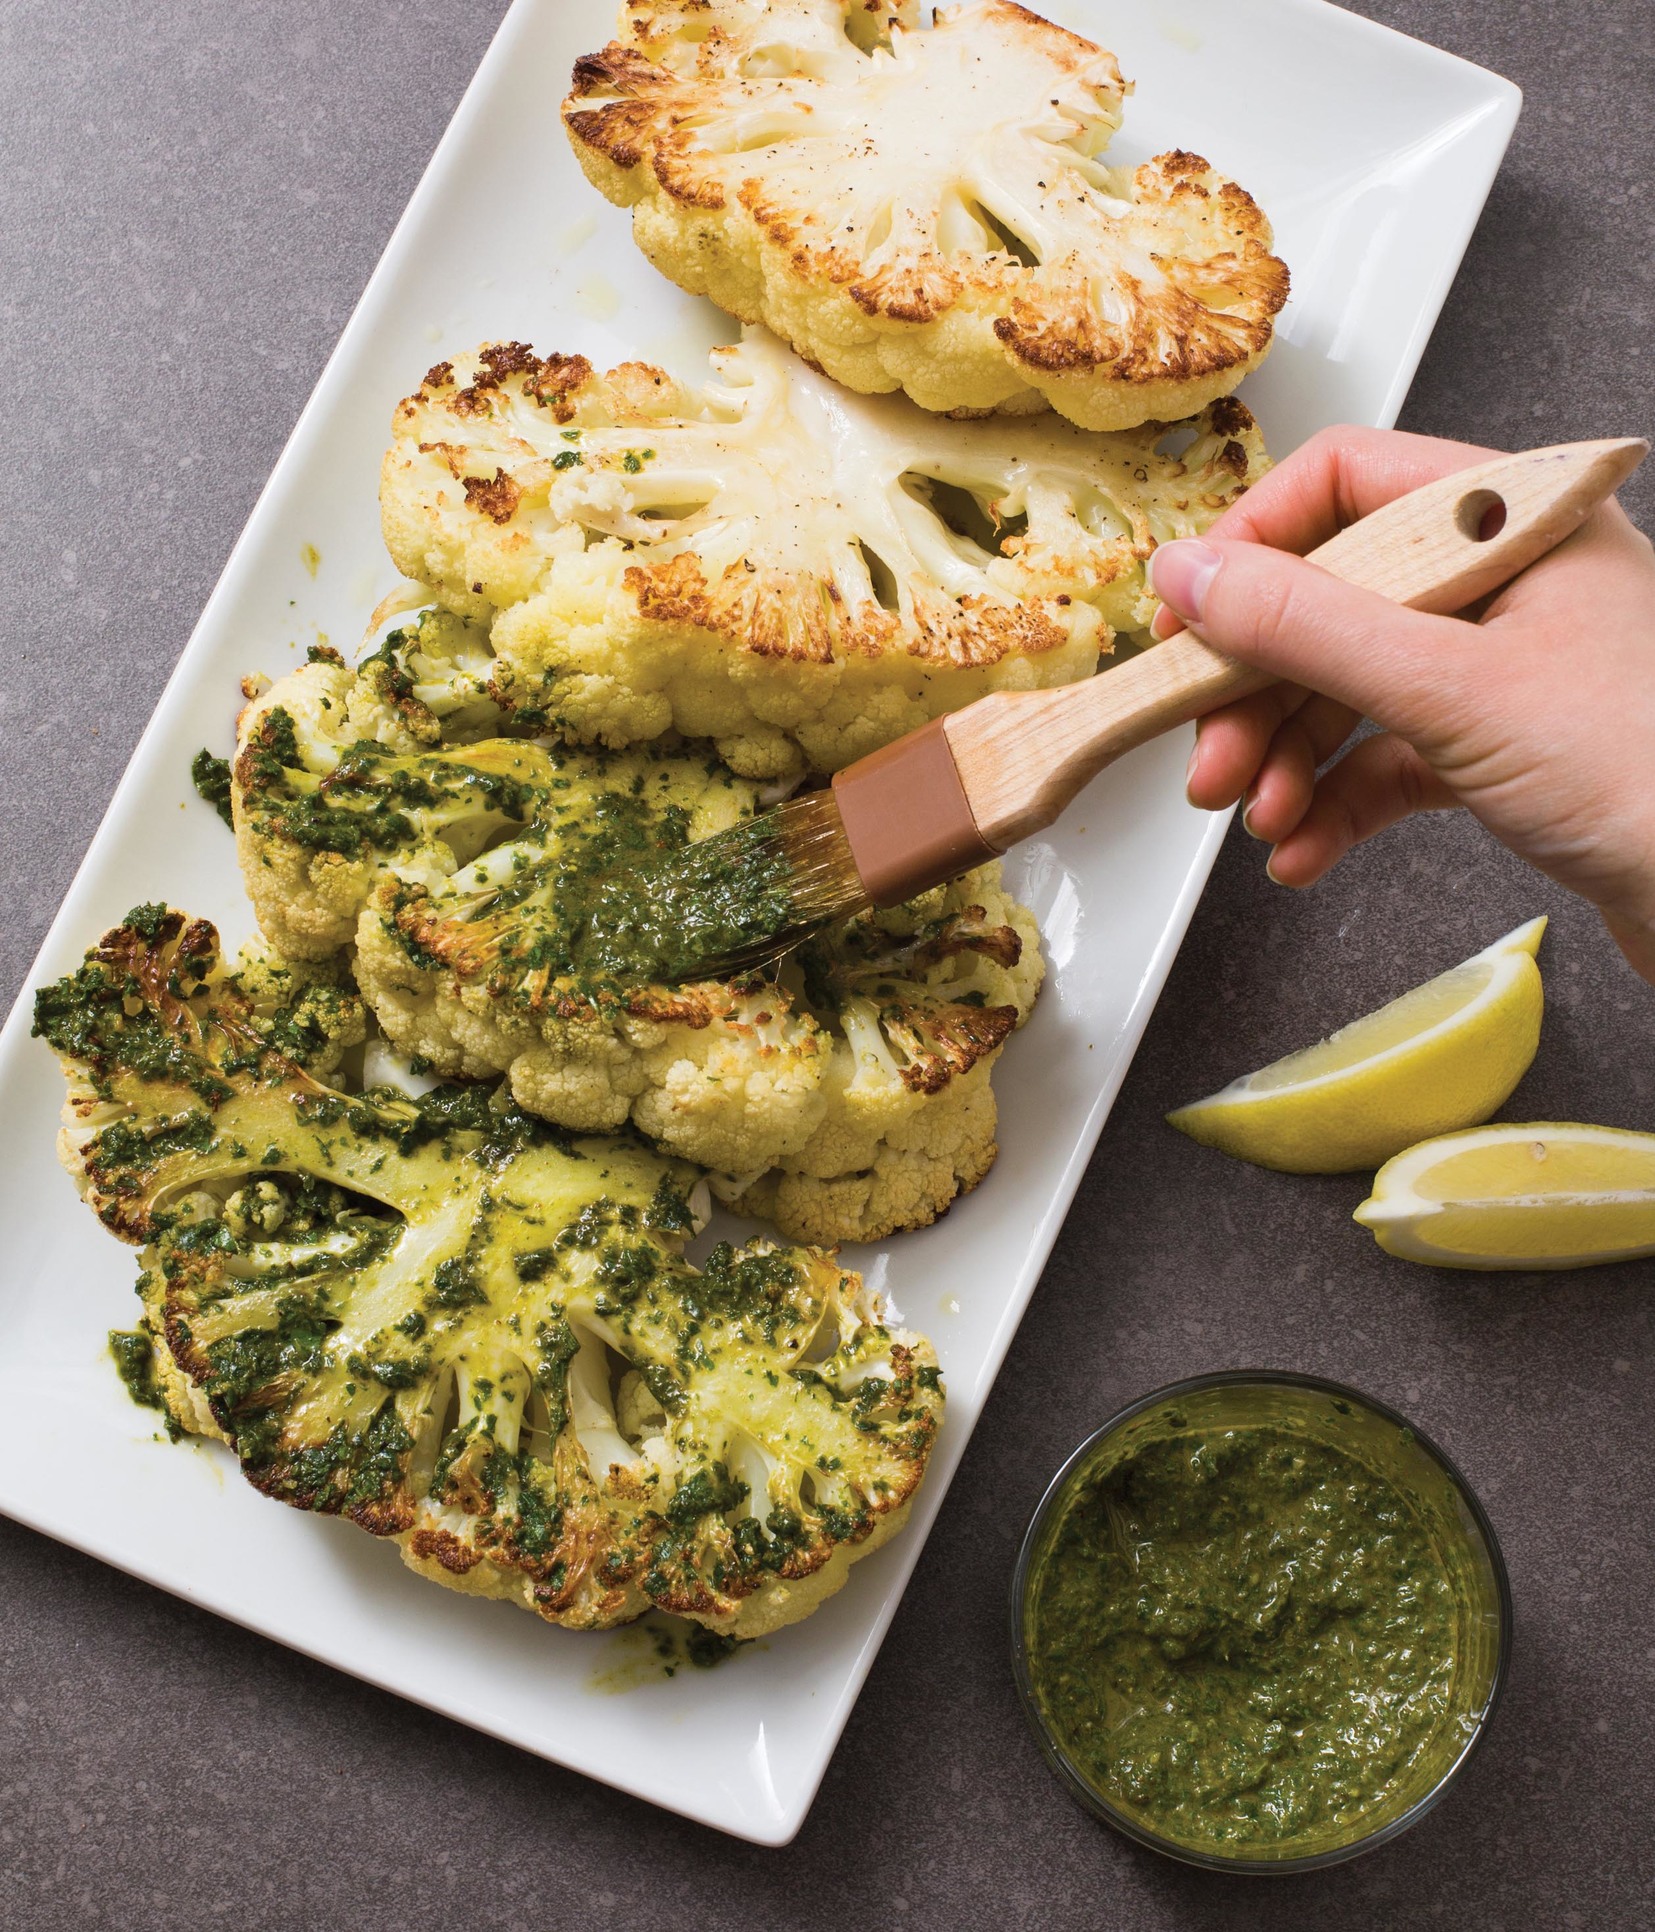
Cauliflower Steaks with Chimichurri Sauce
For cauliflower steaks that are tender and caramelized, we roast them first covered and then uncovered.
Cauliflower Steaks with Chimichurri Sauce
SERVES 4
WHY THIS RECIPE WORKS Cauliflower is a nutritional hero: It’s full of fiber and a rich source of vitamins B6 and C and potassium. So making the most of this vegetable is a good thing for everyone. Enter cauliflower steaks. When you roast thick planks of cauliflower, they develop a meaty texture and become nutty, sweet, and caramelized. Many recipes, however, are fussy, involving transitions between stovetop and oven. We wanted a simpler method that produced four perfectly cooked cauliflower steaks simultaneously, so we opted for a rimmed baking sheet and a scorching oven. Steaming the cauliflower briefly under foil followed by high-heat uncovered roasting produced well-caramelized steaks with tender interiors. To elevate the cauliflower to centerpiece status, we paired it with a vibrant Chimichurri Sauce. We brushed the hot steaks with the bright sauce so they’d soak up its robust flavor. Look for fresh, firm, bright white heads of cauliflower that feel heavy for their size and are free of blemishes or soft spots; florets are more likely to separate from older heads of cauliflower.
2 heads cauliflower (2 pounds each)
¼ cup extra-virgin olive oil
Salt and pepper
1 recipe Chimichurri (this page)
Lemon wedges
1. Adjust oven rack to lowest position and heat oven to 500 degrees. Working with 1 head cauliflower at a time, discard outer leaves and trim stem flush with bottom florets. Halve cauliflower lengthwise through core. Cut one 1½-inch-thick slab lengthwise from each half, trimming any florets not connected to core. Repeat with remaining cauliflower. (You should have 4 steaks; reserve remaining cauliflower for another use.)
2. Place steaks on rimmed baking sheet and drizzle with 2 tablespoons oil. Sprinkle with pinch salt and ⅛ teaspoon pepper and rub to distribute. Flip steaks and repeat.
3. Cover sheet tightly with foil and roast for 5 minutes. Remove foil and continue to roast until bottoms of steaks are well browned, 8 to 10 minutes. Gently flip and continue to roast until cauliflower is tender and second sides are well browned, 6 to 8 minutes.
4. Transfer steaks to serving platter and brush tops evenly with ¼ cup chimichurri. Serve with lemon wedges and remaining chimichurri.
PER SERVING
Cal 370 • Total Fat 29g • Sat Fat 4.5g • Chol 0mg
Sodium 300mg • Total Carbs 24g • Fiber 10g • Total Sugar 9g
Added Sugar 0g • Protein 9g • Total Carbohydrate Choices 1.5


Sautéed Spinach with Chickpeas and Garlicky Yogurt
This dish puts spinach front and center and builds layers of flavor that will have your family reaching for seconds.
Sautéed Spinach with Chickpeas and Garlicky Yogurt
SERVES 4
WHY THIS RECIPE WORKS It is good to have a hearty spinach-based main course in your repertoire given that this leafy green is so nutrient dense. Here we turned to convenient and tender baby spinach and added hearty protein-rich chickpeas and an aromatic yogurt sauce. The trickiest part of cooking spinach is getting it tender but not mushy, so we knew we’d need a strategy for ridding the spinach of excess liquid. Parcooking it in the microwave and then draining it turned out to be the best solution. We pressed the microwaved spinach in a colander to eliminate water, coarsely chopped it, and pressed it again. Then all we had to do was quickly sauté it. As for seasonings, we started by toasting a good amount of sliced garlic in oil, then added coriander and turmeric to the skillet to bloom. Canned chickpeas bulked up this dish without adding any more work, and thinly sliced sun-dried tomatoes contributed another layer of bright flavor. For the final touch to this dish, we put together a quick garlicky yogurt sauce with a dash of fresh mint for brightness.
1 cup plain low-fat yogurt
2 tablespoons chopped fresh mint
5 garlic cloves (4 sliced thin, 1 minced)
18 ounces (18 cups) baby spinach
2 tablespoons extra-virgin olive oil
1 teaspoon ground coriander
1 teaspoon ground turmeric
¼ teaspoon grated lemon zest
⅛ teaspoon red pepper flakes
2 (15-ounce) cans no-salt-added chickpeas, rinsed
½ cup oil-packed sun-dried tomatoes, sliced thin
Salt and pepper
1. Combine yogurt, mint, and minced garlic in bowl; cover and refrigerate sauce until ready to serve.
2. Microwave spinach and ¼ cup water in covered bowl until spinach is wilted and has reduced in volume by half, 3 to 4 minutes. Remove bowl from microwave and keep covered for 1 minute. Carefully transfer spinach to colander and, using back of rubber spatula, gently press spinach to release excess liquid. Transfer spinach to cutting board and chop coarsely. Return spinach to colander and press again.
3. Cook 1 tablespoon oil and sliced garlic in 12-inch skillet over medium heat, stirring constantly, until garlic is light golden brown and beginning to sizzle, 3 to 6 minutes. Stir in coriander, turmeric, lemon zest, and pepper flakes and cook until fragrant, about 30 seconds. Stir in chickpeas, tomatoes, and 2 tablespoons water. Cook, stirring occasionally, until water evaporates and tomatoes are softened, 1 to 2 minutes.
4. Stir in spinach and ¼ teaspoon salt and cook until uniformly wilted and glossy green, about 2 minutes. Transfer spinach mixture to serving platter, drizzle with remaining 1 tablespoon oil, and season with pepper to taste. Serve with yogurt sauce.
PER SERVING
Cal 310 • Total Fat 11g • Sat Fat 2g • Chol 5mg
Sodium 360mg • Total Carbs 37g • Fiber 10g • Total Sugar 5g
Added Sugar 0g • Protein 15g • Total Carbohydrate Choices 2.5

Tunisian-Style Grilled Vegetables with Couscous and Eggs
Our Tunisian salad relies on multiple spices for its flavorful dressing that enhances a variety of grilled vegetables.
Tunisian-Style Grilled Vegetables with Couscous and Eggs
SERVES 6
WHY THIS RECIPE WORKS For our take on the robustly flavored grilled vegetable salad known as mechouia, we started by prepping the vegetables for the grill. To maximize surface area for flavorful charring, we halved eggplant, zucchini, and plum tomatoes lengthwise and stemmed and flattened bell peppers. We also scored the eggplant and zucchini so they would release their excess moisture as they cooked.
DRESSING
2 teaspoons coriander seeds
1½ teaspoons caraway seeds
1 teaspoon cumin seeds
5 tablespoons extra-virgin olive oil
½ teaspoon paprika
⅛ teaspoon cayenne pepper
3 garlic cloves, minced
¼ cup chopped fresh parsley
¼ cup chopped fresh cilantro
2 tablespoons chopped fresh mint
1 teaspoon grated lemon zest plus 2 tablespoons juice
Salt
COUSCOUS AND VEGETABLES
1 tablespoon extra-virgin olive oil
1 cup whole-wheat couscous
¾ cup water
¾ cup low-sodium vegetable broth
Salt and pepper
2 red or green bell peppers, tops and bottoms trimmed, stemmed and seeded, and peppers flattened
1 small eggplant, halved lengthwise and scored on cut sides
1 zucchini (8 to 10 ounces), halved lengthwise and scored on cut sides
4 plum tomatoes, cored and halved lengthwise
2 shallots, unpeeled
6 hard-cooked eggs, peeled and halved
1. FOR THE DRESSING Grind coriander seeds, caraway seeds, and cumin seeds in spice grinder until finely ground. Whisk ground spices, oil, paprika, and cayenne together in bowl. Reserve 3 tablespoons spiced oil mixture for brushing vegetables before grilling. Heat remaining spiced oil and garlic in 8-inch skillet over low heat, stirring occasionally, until fragrant and small bubbles appear, 8 to 10 minutes. Transfer to large bowl, let cool for 10 minutes, then whisk in parsley, cilantro, mint, lemon zest and juice, and ¼ teaspoon salt; set aside for serving.
2. FOR THE COUSCOUS AND VEGETABLES Heat oil in saucepan over medium heat until shimmering. Add couscous and toast, stirring often, until a few grains begin to brown, about 3 minutes. Transfer couscous to large bowl. Add water, broth, and pinch salt to saucepan and bring to boil. Once boiling, immediately pour broth mixture over couscous, cover tightly with plastic wrap, and let sit until grains are tender, about 12 minutes. Fluff gently with fork to combine. Season with pepper to taste.
3. Meanwhile, brush interior of bell peppers and cut sides of eggplant, zucchini, and tomatoes with reserved oil mixture and sprinkle with ¼ teaspoon salt.
4a. FOR A CHARCOAL GRILL Open bottom vent completely. Light large chimney starter three-quarters filled with charcoal briquettes (4½ quarts). When top coals are partially covered with ash, pour evenly over grill. Set cooking grate in place, cover, and open lid vent completely. Heat grill until hot, about 5 minutes.
4b. FOR A GAS GRILL Turn all burners to high, cover, and heat grill until hot, about 15 minutes. Turn all burners to medium-high.
5. Clean and oil cooking grate. Place bell peppers, eggplant, zucchini, tomatoes, and shallots cut side down on grill. Cook (covered if using gas), turning as needed, until tender and slightly charred, 8 to 16 minutes. Transfer eggplant, zucchini, tomatoes, and shallots to baking sheet as they finish cooking; place bell peppers in bowl, cover with plastic wrap, and let steam to loosen skins.
6. Let vegetables cool slightly. Peel bell peppers, tomatoes, and shallots. Chop all vegetables into ½-inch pieces, then toss gently with dressing in bowl. Season with pepper to taste. Serve vegetables and hard-cooked eggs over couscous.
PER SERVING
Cal 380 • Total Fat 20g • Sat Fat 3.5g • Chol 185mg
Sodium 300mg • Total Carbs 37g • Fiber 9g • Total Sugar 10g
Added Sugar 0g • Protein 13g • Total Carbohydrate Choices 2.5
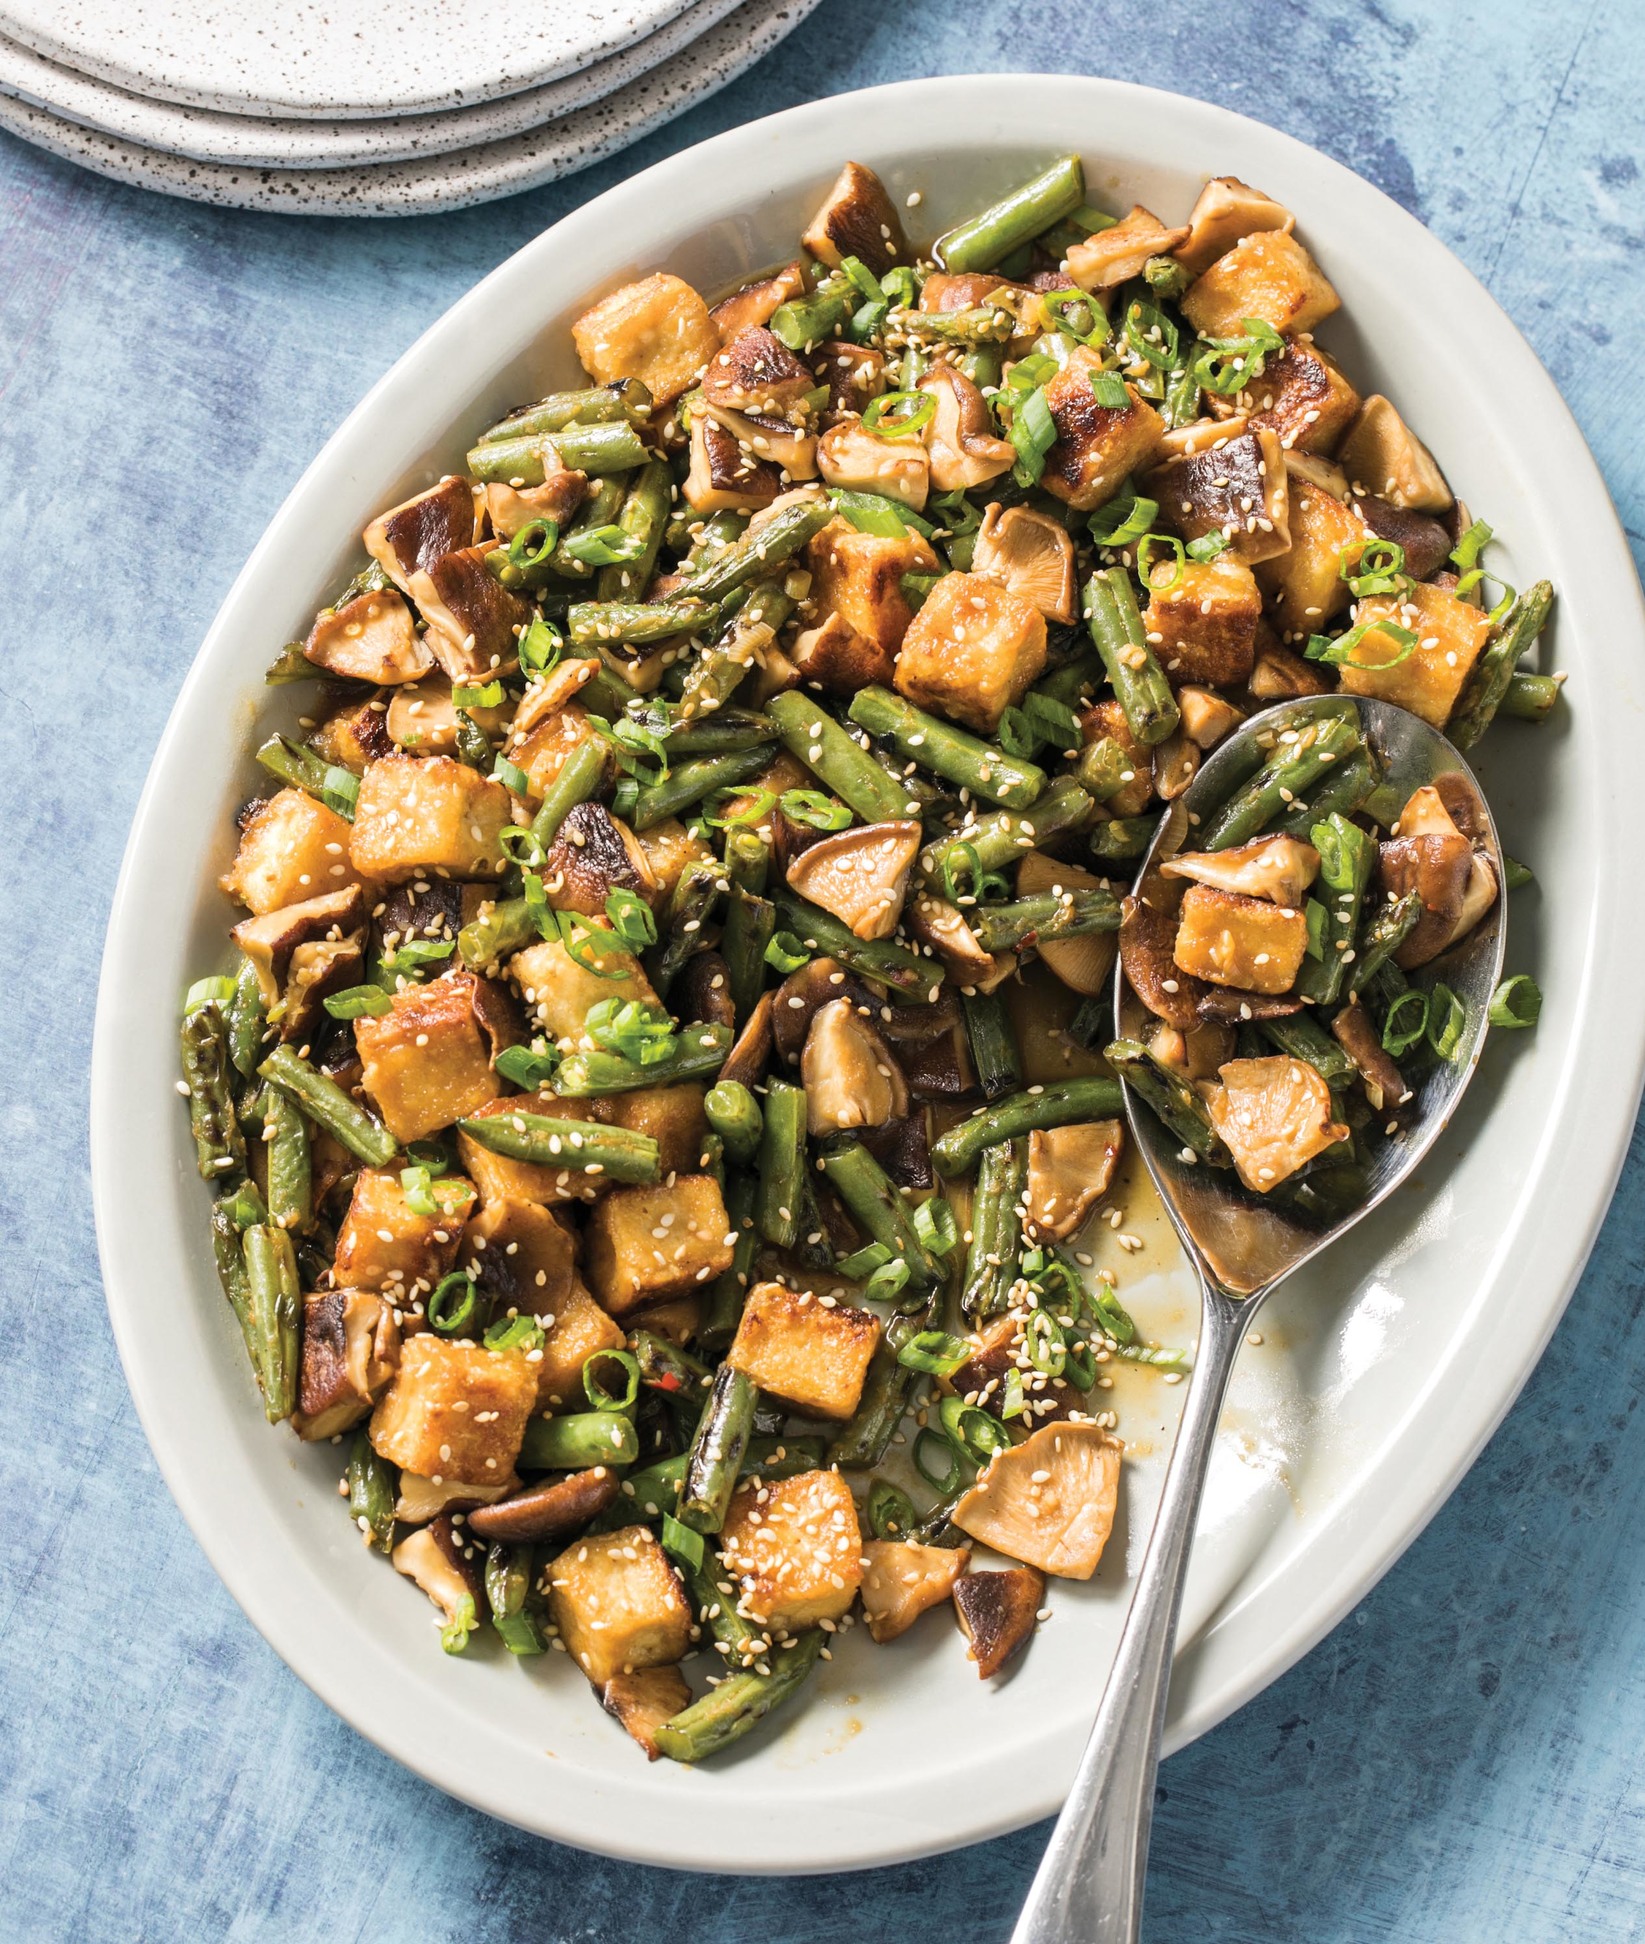
Stir-Fried Tofu with Shiitakes and Green Beans
Draining the tofu and coating it with cornstarch are the keys to a stir-fry where the tofu is crispy on the outside and creamy inside.
Stir-Fried Tofu with Shiitakes and Green Beans
SERVES 4
WHY THIS RECIPE WORKS There are many reasons to love stir-fries: They’re quick, healthful, and open to endless variations. We wanted to develop a classic stir-fry that captured our infatuation with the dish, so we refreshed ourselves on the wisdom we’ve collected over the years. For a cooking vessel, we use a nonstick skillet (a wok is designed for a pit-style stove). Patience is on our ingredient list; despite the name, if you overstir your stir-fry, you’ll lose that coveted sear. And the process is fast; you must have your ingredients ready before you start cooking. We paired sturdy green beans and meaty, mineral-rich shiitake mushrooms with cornstarch-coated tofu, which developed a slightly crunchy sheath. Although we often cook the vegetables in batches, here we were able to stir-fry them at the same time; the moisture released from the mushrooms nicely steamed the green beans. For a balanced brown sauce, we combined soy sauce, sesame oil, rice vinegar, and pepper flakes, and we thickened it with cornstarch.
SAUCE
¾ cup low-sodium vegetable broth
3 tablespoons low-sodium soy sauce
2 tablespoons rice vinegar
2 teaspoons cornstarch
1 tablespoon toasted sesame oil
⅛ teaspoon red pepper flakes
STIR-FRY
14 ounces extra-firm tofu, cut into ¾-inch pieces
3 tablespoons cornstarch
3 tablespoons canola oil
2 scallions, white and green parts separated and sliced thin on bias
3 garlic cloves, minced
1 tablespoon grated fresh ginger
12 ounces green beans, trimmed and cut on bias into 1-inch lengths
12 ounces shiitake mushrooms, stemmed and quartered
1 tablespoon toasted sesame seeds (optional)
1. FOR THE SAUCE Whisk all ingredients together in bowl.
2. FOR THE STIR-FRY Spread tofu on paper towel–lined baking sheet and let drain for 20 minutes. Gently pat dry with paper towels. Toss drained tofu with cornstarch in bowl.
3. Combine 1 teaspoon oil, scallion whites, garlic, and ginger in bowl. Heat 2 tablespoons oil in 12-inch nonstick skillet over high heat until shimmering. Add tofu and cook, turning as needed, until crisp and well browned on all sides, 12 to 15 minutes; transfer to paper towel–lined plate.
4. Add remaining 2 teaspoons oil to now-empty skillet and heat over medium-high heat until shimmering. Add green beans and mushrooms, cover, and cook until mushrooms release their liquid and green beans are bright green and beginning to soften, 4 to 5 minutes. Uncover and continue to cook until vegetables are spotty brown, about 3 minutes.
5. Push vegetables to sides of skillet. Add garlic mixture to center and cook, mashing mixture into skillet, until fragrant, about 30 seconds. Stir garlic mixture into vegetables, then stir in tofu. Whisk sauce to recombine, then add to skillet and cook, stirring constantly, until sauce is thickened, about 30 seconds. Transfer to serving platter and sprinkle with scallion greens and sesame seeds, if using. Serve.
PER SERVING
Cal 310 • Total Fat 21g • Sat Fat 2g • Chol 0mg
Sodium 470mg • Total Carbs 19g • Fiber 4g • Total Sugar 5g
Added Sugar 0g • Protein 14g • Total Carbohydrate Choices 1.5

This curry is a satisfying combination of vitamin-rich sweet potatoes, meaty eggplant, earthy green beans, and chickpeas.
Indian-Style Vegetable Curry
SERVES 6
WHY THIS RECIPE WORKS Vegetable curries are a great hearty choice for a vegetarian meal. Filled with bold flavors and a good variety of vegetables, they can be healthy, satisfying, and delicious—as long as the vegetables are well cooked and the flavors are balanced. To nail the bold flavor we turned to a few pantry-friendly items like curry powder, garam masala, garlic, and tomato paste while fresh ginger and a serrano chile pumped up the flavor even more. A combination of sweet potatoes, canned diced tomatoes, eggplant, green beans, and chickpeas guaranteed everyone would walk away from the table satiated. We started by cooking the sweet potatoes since they would take the longest to become tender, followed by the eggplant and green beans. We also found that 20 minutes of simmering eliminated any tinny taste in the tomatoes and allowed the chickpeas to turn from crumbly to creamy. Finishing the dish with a generous handful of cilantro and a dollop of Greek yogurt helped to add brightness and brought our flavors into balance. You can adjust the spice level of this dish by either including less of the serrano chile or adding its seeds.
1 (14.5-ounce) can no-salt-added diced tomatoes
3 tablespoons canola oil
4 teaspoons curry powder
1½ teaspoons garam masala
2 onions, chopped fine
12 ounces sweet potatoes, peeled and cut into 1-inch pieces
Salt and pepper
3 garlic cloves, minced
1 serrano chile, stemmed, seeded, and minced
1 tablespoon grated fresh ginger
1 tablespoon no-salt-added tomato paste
1 pound eggplant, cut into ½-inch pieces
8 ounces green beans, trimmed and cut into 1-inch lengths
2 cups water
1 (15-ounce) can no-salt-added chickpeas, rinsed
¼ cup minced fresh cilantro
⅔ cup 2 percent Greek yogurt
1. Pulse tomatoes with their juice in food processor until nearly smooth, with some ¼-inch pieces visible, about 3 pulses.
2. Heat oil in Dutch oven over medium heat until shimmering. Add curry powder and garam masala and cook until fragrant, about 10 seconds. Add onions, sweet potatoes, and ¼ teaspoon salt and cook, stirring occasionally, until onions are browned and sweet potatoes are golden brown at edges, about 10 minutes.
3. Stir in garlic, chile, ginger, and tomato paste and cook until fragrant, about 30 seconds. Add eggplant and green beans and cook, stirring constantly, until vegetables are coated with spices, about 2 minutes.
4. Gradually stir in water, scraping up any browned bits. Stir in tomatoes and chickpeas and bring to simmer. Cover, reduce heat to low, and cook until vegetables are tender, 20 to 25 minutes. Off heat, stir in cilantro and ½ teaspoon salt and season with pepper to taste. Serve with yogurt.
PER SERVING
Cal 240 • Total Fat 8g • Sat Fat 1g • Chol 0mg
Sodium 380mg • Total Carbs 34g • Fiber 9g • Total Sugar 12g
Added Sugar 0g • Protein 8g • Total Carbohydrate Choices 2
Curried Tempeh with Cauliflower and Peas
SERVES 6
WHY THIS RECIPE WORKS With its deep, intense flavors, curry makes a perfect pairing for strong-tasting tempeh. To create truly complex curry flavor, we started by toasting curry powder and garam masala in oil. A serrano chile delivered the right combination of flavor and spice. Blooming glutamate-rich tomato paste with our seasonings added a meaty, savory element to the curry. Canned diced tomatoes pulsed in a food processor formed the base of the sauce. Simmering the tempeh in the curry for 15 minutes helped to infuse it with the curry’s flavor. To round out our curry, we added cauliflower, simmering it in the sauce until tender, and convenient frozen peas. Finishing our tempeh curry with a dash of light coconut milk imparted a little extra richness while still staying healthy. You can adjust the spice level of this dish by either including less of the serrano chile or adding its seeds.
1 (14.5-ounce) no-salt-added can diced tomatoes
¼ cup canola oil
2 tablespoons curry powder
1½ teaspoons garam masala
2 onions, chopped fine
Salt and pepper
3 garlic cloves, minced
1 tablespoon grated fresh ginger
1 serrano chile, stemmed, seeded, and minced
1 tablespoon no-salt-added tomato paste
½ head cauliflower (1 pound), cored and cut into 1-inch florets
8 ounces tempeh, cut into 1-inch pieces
1¼ cups water
1 cup frozen peas
¼ cup light coconut milk
2 tablespoons minced fresh cilantro
Lime wedges
1. Pulse diced tomatoes with their juice in food processor until nearly smooth, with some ¼-inch pieces visible, about 3 pulses.
2. Heat oil in Dutch oven over medium-high heat until shimmering. Add curry powder and garam masala and cook until fragrant, about 10 seconds. Add onions and ¼ teaspoon salt and cook, stirring occasionally, until softened and browned, about 10 minutes.
3. Reduce heat to medium. Stir in garlic, ginger, serrano, and tomato paste and cook until fragrant, about 30 seconds. Add cauliflower and tempeh and cook, stirring constantly, until florets are coated with spices, about 2 minutes.
4. Gradually stir in water, scraping up any browned bits. Stir in tomatoes and bring to simmer. Cover, reduce heat to low, and cook until vegetables are tender, 10 to 15 minutes.
5. Stir in peas, coconut milk, and ¾ teaspoon salt and cook until heated through, 1 to 2 minutes. Off heat, stir in cilantro and season with pepper to taste. Serve with lime wedges.
PER SERVING
Cal 240 • Total Fat 15g • Sat Fat 2.5g • Chol 0mg
Sodium 430mg • Total Carbs 19g • Fiber 6g • Total Sugar 6g
Added Sugar 0g • Protein 12g • Total Carbohydrate Choices 1.5
NOTES FROM THE TEST KITCHEN
Getting to Know Tempeh
While tofu has hit the mainstream, tempeh might not be as familiar. Tempeh is made by fermenting cooked soybeans, then forming the mixture into a firm, dense cake. Some versions also contain beans, grains, and flavorings. It serves as a good meat substitute and is a mainstay of many vegetarian diets–it’s particularly popular in Southeast Asia. It has a strong nutty flavor, but it also will absorb flavors easily. And because it’s better than tofu at holding its shape when cooked, it’s a versatile choice for many dishes, from sandwiches and tacos to curry. It’s also a healthy choice, since it’s high in protein, cholesterol-free, and contains many essential vitamins and minerals. Tempeh is sold refrigerated in most supermarkets and can be found with different grain and flavoring combinations. We use five-grain tempeh in our recipes, but any plain variety will work. If you are gluten-free, be sure to look for a gluten-free brand of tempeh.

Thai-Style Red Curry with Cauliflower
A sauce that combines coconut milk and store-bought red curry paste makes it easy to whip up this nutritious cauliflower curry.
Thai-Style Red Curry with Cauliflower
SERVES 4
WHY THIS RECIPE WORKS Thai cooking is all about balance, so when we set out to make a red curry with cauliflower, we knew that developing the deep, nutty flavor of the cauliflower was important. Typically, we turn to the oven to achieve this, but for a curry dish that could otherwise be on the table in about 15 minutes, this felt like an unnecessary step. Instead, we confined ourselves to the skillet. Achieving tender, golden-brown cauliflower without scorching turned out to be a two-step process that took just about 10 minutes. First, we cooked the cauliflower along with water in a covered skillet for about 5 minutes, steaming it until it was just tender, then we uncovered the skillet to finish the cooking in canola oil. This final uncovered cooking time drove off any remaining water left in the skillet, tenderized the cauliflower further, and allowed it to develop deep golden browning without any charring. A few minutes in the skillet at the very end of cooking was all the red curry sauce needed to bloom its flavors and thicken enough to coat the cauliflower nicely.
1 (13.5-ounce) can light coconut milk
1 tablespoon fish sauce
1 teaspoon grated lime zest plus 1 tablespoon juice
2 teaspoons Thai red curry paste
⅛ teaspoon red pepper flakes
2 tablespoons plus 1 teaspoon canola oil
2 garlic cloves, minced
1 teaspoon grated fresh ginger
1 large head cauliflower (3 pounds), cored and cut into ¾-inch florets
¼ cup fresh basil leaves, torn into rough ½-inch pieces
1. Whisk coconut milk, fish sauce, lime zest and juice, curry paste, and pepper flakes together in bowl. In separate bowl, combine 1 teaspoon oil, garlic, and ginger.
2. Heat remaining 2 tablespoons oil in 12-inch nonstick skillet over high heat until shimmering. Add cauliflower and ¼ cup water, cover, and cook until cauliflower is just tender and translucent, about 5 minutes. Uncover and continue to cook, stirring occasionally, until liquid is evaporated and cauliflower is tender and well browned, 8 to 10 minutes.
3. Push cauliflower to sides of skillet. Add garlic mixture and cook, mashing mixture into skillet, until fragrant, about 30 seconds. Stir garlic mixture into cauliflower and reduce heat to medium-high. Whisk coconut milk mixture to recombine, add to skillet, and simmer until slightly thickened, about 4 minutes. Off heat, stir in basil. Serve.
PER SERVING
Cal 200 • Total Fat 13g • Sat Fat 4g • Chol 0mg
Sodium 380mg • Total Carbs 20g • Fiber 7g • Total Sugar 7g
Added Sugar 0g • Protein 7g • Total Carbohydrate Choices 1
VARIATION
Thai-Style Red Curry with Bell Peppers and Tofu
Omit cauliflower, water, and salt. Toss 14 ounces extra-firm tofu, pressed dry with paper towels and cut into ¾-inch cubes, with ⅓ cup cornstarch; transfer tofu to strainer and shake gently to remove excess cornstarch. Add coated tofu to heated oil in step 2 and cook until crisp and browned on all sides, 10 to 15 minutes; transfer tofu to clean bowl. Add 2 red bell peppers, cut into 2-inch-long matchsticks, to oil left in skillet and cook until crisp-tender, about 2 minutes, before adding garlic mixture. Return tofu to skillet with sauce.
PER SERVING
Cal 260 • Total Fat 17g • Sat Fat 4.5g • Chol 0mg
Sodium 280mg • Total Carbs 14g • Fiber 3g • Total Sugar 3g
Added Sugar 0g • Protein 11g • Total Carbohydrate Choices 1

Stewed Chickpeas with Eggplant and Tomatoes
After building a flavor base on the stovetop, we add the eggplant, tomatoes, and chickpeas and braise them in the oven.
Stewed Chickpeas with Eggplant and Tomatoes
SERVES 6
WHY THIS RECIPE WORKS There is a reason so many vegetarian dishes feature eggplant: It takes well to many cooking mediums and pairs well with beans, grains, and tomatoes. Here fresh eggplant and canned chickpeas create a hearty stew with deep savory flavor. The soft and creamy texture of the eggplant is complemented by the firm-tender chickpeas, and chopped canned tomatoes give the dish a rustic texture and tomatoey backbone. We tested cooking methods and times and landed on a combination stovetop-oven method that worked to create the texture we were after. To jump-start the cooking process, we sautéed onions, bell pepper, garlic, oregano, and bay leaves to create an aromatic base. We added our chickpeas, tomatoes, and eggplant (cutting it into 1-inch pieces ensured that it softened but didn’t completely break down) and transferred the pot to the oven. Baking the mixture uncovered concentrated the flavors and allowed any unwanted liquid to evaporate, eliminating the need to pretreat the eggplant. Stirring a couple of times during cooking ensured that the top layer didn’t dry out. Some fresh oregano, added at the end, gave this dish a welcome burst of herbaceous flavor. We were happy to find that this versatile dish tasted equally good when served warm or at room temperature.
¼ cup extra-virgin olive oil
2 onions, chopped
1 green bell pepper, stemmed, seeded, and chopped fine
Salt and pepper
3 garlic cloves, minced
1 tablespoon minced fresh oregano or 1 teaspoon dried
2 bay leaves
1 pound eggplant, cut into 1-inch pieces
1 (28-ounce) can no-salt-added whole peeled tomatoes, drained with juice reserved, chopped coarse
2 (15-ounce) cans no-salt-added chickpeas, drained with 1 cup liquid reserved
1. Adjust oven rack to lower-middle position and heat oven to 400 degrees. Heat oil in Dutch oven over medium heat until shimmering. Add onions, bell pepper, ½ teaspoon salt, and ¼ teaspoon pepper and cook until softened, about 5 minutes. Stir in garlic, 1 teaspoon oregano, and bay leaves and cook until fragrant, about 30 seconds.
2. Stir in eggplant, tomatoes and reserved juice, and chickpeas and reserved liquid and bring to boil. Transfer pot to oven and cook, uncovered, until eggplant is very tender, 45 to 60 minutes, stirring twice during cooking.
3. Discard bay leaves. Stir in remaining 2 teaspoons oregano and season with pepper to taste. Serve.
PER SERVING
Cal 270 • Total Fat 10g • Sat Fat 1.5g • Chol 0mg
Sodium 470mg • Total Carbs 34g • Fiber 9g • Total Sugar 9g
Added Sugar 0g • Protein 9g • Total Carbohydrate Choices 2
NOTES FROM THE TEST KITCHEN
Using Bay Leaves
Bay leaves are a key seasoning in many soups and stews. In the test kitchen, we use fresh herbs more often than dried—bay leaves being an exception. We prefer dried bay leaves to fresh; they work just as well in long-cooked recipes, are cheaper, and will keep for 3 months in the freezer in an airtight container. We prefer Turkish bay leaves to those from California. The California bay leaf has a medicinal and potent, eucalyptus-like flavor, but the Turkish bay leaf has a mild, green, and slightly clovelike flavor.

Ground corn tortilla chips and the liquid from the canned beans ensure cohesive and tasty black bean burgers that are also vegan.
Vegan Black Bean Burgers
SERVES 6
WHY THIS RECIPE WORKS Satisfying black beans seem like a natural base for a hearty burger, but most black bean burgers are mushy or fall apart when flipped. We managed to harness the sticking power of the beans’ natural starches and, with just a few additions, create a great vegan burger. For a dry binder, we used tortilla chips that we ground in the food processor; their corn flavor added a pleasing Southwestern flair to our burgers, which we enhanced with scallions, fresh cilantro, garlic, ground cumin and coriander, and hot sauce. As for a moist binder, instead of an egg we found that the liquid from the black bean can provided the necessary cohesion, and the beans were sticky enough to hold together without an additional binder. The black bean liquid also boosted the overall flavor of the burgers. We dried the rinsed beans well to ensure we had control over the moisture content of our burgers. When forming the patties, it’s important to pack them together firmly.
2 (15-ounce) cans no-salt-added black beans, drained, with 6 tablespoons bean liquid reserved, and rinsed
2 tablespoons all-purpose flour
4 scallions, minced
3 tablespoons minced fresh cilantro
2 garlic cloves, minced
1 teaspoon ground cumin
1 teaspoon hot sauce (optional)
½ teaspoon ground coriander
½ teaspoon salt
¼ teaspoon pepper
1 ounce corn tortilla chips, crushed (½ cup)
¼ cup canola oil
6 100 percent whole-wheat burger buns, lightly toasted (optional)
2 avocados, halved, pitted, and sliced ¼ inch thick
1 head Bibb lettuce (8 ounces), leaves separated
2 tomatoes, cored and sliced ¼ inch thick
1. Line rimmed baking sheet with triple layer of paper towels, spread beans over towels, and let sit for 15 minutes.
2. Whisk reserved bean liquid and flour in large bowl until well combined and smooth. Stir in scallions, cilantro, garlic, cumin, hot sauce, if using, coriander, salt, and pepper until well combined. Process tortilla chips in food processor until finely ground, about 30 seconds. Add black beans and pulse until beans are coarsely ground, about 5 pulses. Transfer bean mixture to bowl with flour mixture and mix until well combined.
3. Adjust oven rack to middle position and heat oven to 200 degrees. Divide mixture into 6 equal portions and pack firmly into 3½-inch-wide patties.
4. Heat 1 tablespoon oil in 10-inch nonstick skillet over medium heat until shimmering. Gently lay 3 patties in skillet and cook until crisp and well browned on first side, about 5 minutes. Gently flip patties, add 1 tablespoon oil, and cook until crisp and well browned on second side, 3 to 5 minutes.
5. Transfer burgers to wire rack set in rimmed baking sheet and place in oven to keep warm. Wipe out skillet with paper towels and repeat with remaining 2 tablespoons oil and remaining patties. Serve burgers on buns, if using, and top with avocado, lettuce, and tomatoes.
PER SERVING WITH BUN
Cal 450 • Total Fat 24g • Sat Fat 2.5g • Chol 0mg
Sodium 460mg • Total Carbs 52g • Fiber 15g • Total Sugar 6g
Added Sugar 0g • Protein 13g • Total Carbohydrate Choices 3.5
PER SERVING WITHOUT BUN
Cal 340 • Total Fat 21g • Sat Fat 2.5g • Chol 0mg
Sodium 240mg • Total Carbs 30g • Fiber 11g • Total Sugar 2g
Added Sugar 0g • Protein 9g • Total Carbohydrate Choices 2

Chickpea Cakes with Cucumber-Yogurt Sauce
We use extra-virgin olive oil and Greek yogurt to make both the chickpea cakes and the flavorful sauce that goes with them.
Chickpea Cakes with Cucumber-Yogurt Sauce
SERVES 4
WHY THIS RECIPE WORKS Buttery, nutty chickpeas make a great foundation for a light yet filling vegetarian patty. They are protein-rich and just as satisfying as a beef burger, and they can be mixed and formed ahead of time and stored overnight for a quick dinner. To keep our recipe easy, we decided to use canned beans rather than dried, which would require an overnight soak before we could prep and form the patties. Pulsing the chickpeas in the food processor was quick and gave us just the right coarse texture for cohesive cakes. For the flavors, we started with the fragrant Indian spice mix garam masala. Tasters liked the aromatic flavor of onion, but it released moisture as it sat, making the cakes gummy. Swapping the onion for scallions fixed the problem, lending a nice onion flavor without excess moisture. Fresh cilantro added a bright complexity. For a cool, creamy counterpoint, we made a simple cucumber-yogurt sauce to top the cakes. Be careful to avoid overprocessing the bean mixture, as it will cause the cakes to become mealy in texture.
CUCUMBER-YOGURT SAUCE
1 cucumber, peeled, halved lengthwise, seeded, and shredded
Salt and pepper
1 cup 2 percent Greek yogurt
2 tablespoons extra-virgin olive oil
2 tablespoons minced fresh cilantro
1 garlic clove, minced
CHICKPEA CAKES
2 (15-ounce) cans no-salt-added chickpeas, rinsed
½ cup 2 percent Greek yogurt
2 large eggs
5 tablespoons extra-virgin olive oil
1 teaspoon garam masala
¼ teaspoon salt
⅛ teaspoon cayenne pepper
1 cup 100 percent whole-wheat panko bread crumbs
5 scallions, sliced thin
3 tablespoons minced fresh cilantro
1 shallot, minced
1. FOR THE CUCUMBER-YOGURT SAUCE Toss cucumber with ½ teaspoon salt in fine-mesh strainer and let drain for 15 minutes. Combine drained cucumber with yogurt, oil, cilantro, and garlic and season with pepper to taste. (Sauce can be refrigerated for up to 1 day.)
2. FOR THE CHICKPEA CAKES Line rimmed baking sheet with parchment paper. Pulse chickpeas in food processor to coarse puree with few large pieces remaining, about 8 pulses.
3. In medium bowl, whisk yogurt, eggs, 2 tablespoons oil, garam masala, salt, and cayenne together. Stir in chickpeas, panko, scallions, cilantro, and shallot until combined. Divide mixture into 8 equal portions, pack firmly into 1-inch-thick patties, and place on prepared sheet. Cover and refrigerate patties for at least 1 hour and up to 24 hours.
4. Heat 1½ tablespoons oil in 12-inch nonstick skillet over medium heat until shimmering. Gently lay 4 patties in skillet and cook until well browned on first side, 6 to 8 minutes. Gently flip patties and cook until golden brown on second side, 6 to 8 minutes. Transfer patties to serving platter and tent with aluminum foil. Return now-empty skillet to medium heat and repeat with remaining 1½ tablespoons oil and remaining patties. Serve with cucumber-yogurt sauce.
PER SERVING
Cal 540 • Total Fat 30g • Sat Fat 5g • Chol 95mg
Sodium 410mg • Total Carbs 44g • Fiber 9g • Total Sugar 7g
Added Sugar 0g • Protein 22g • Total Carbohydrate Choices 3
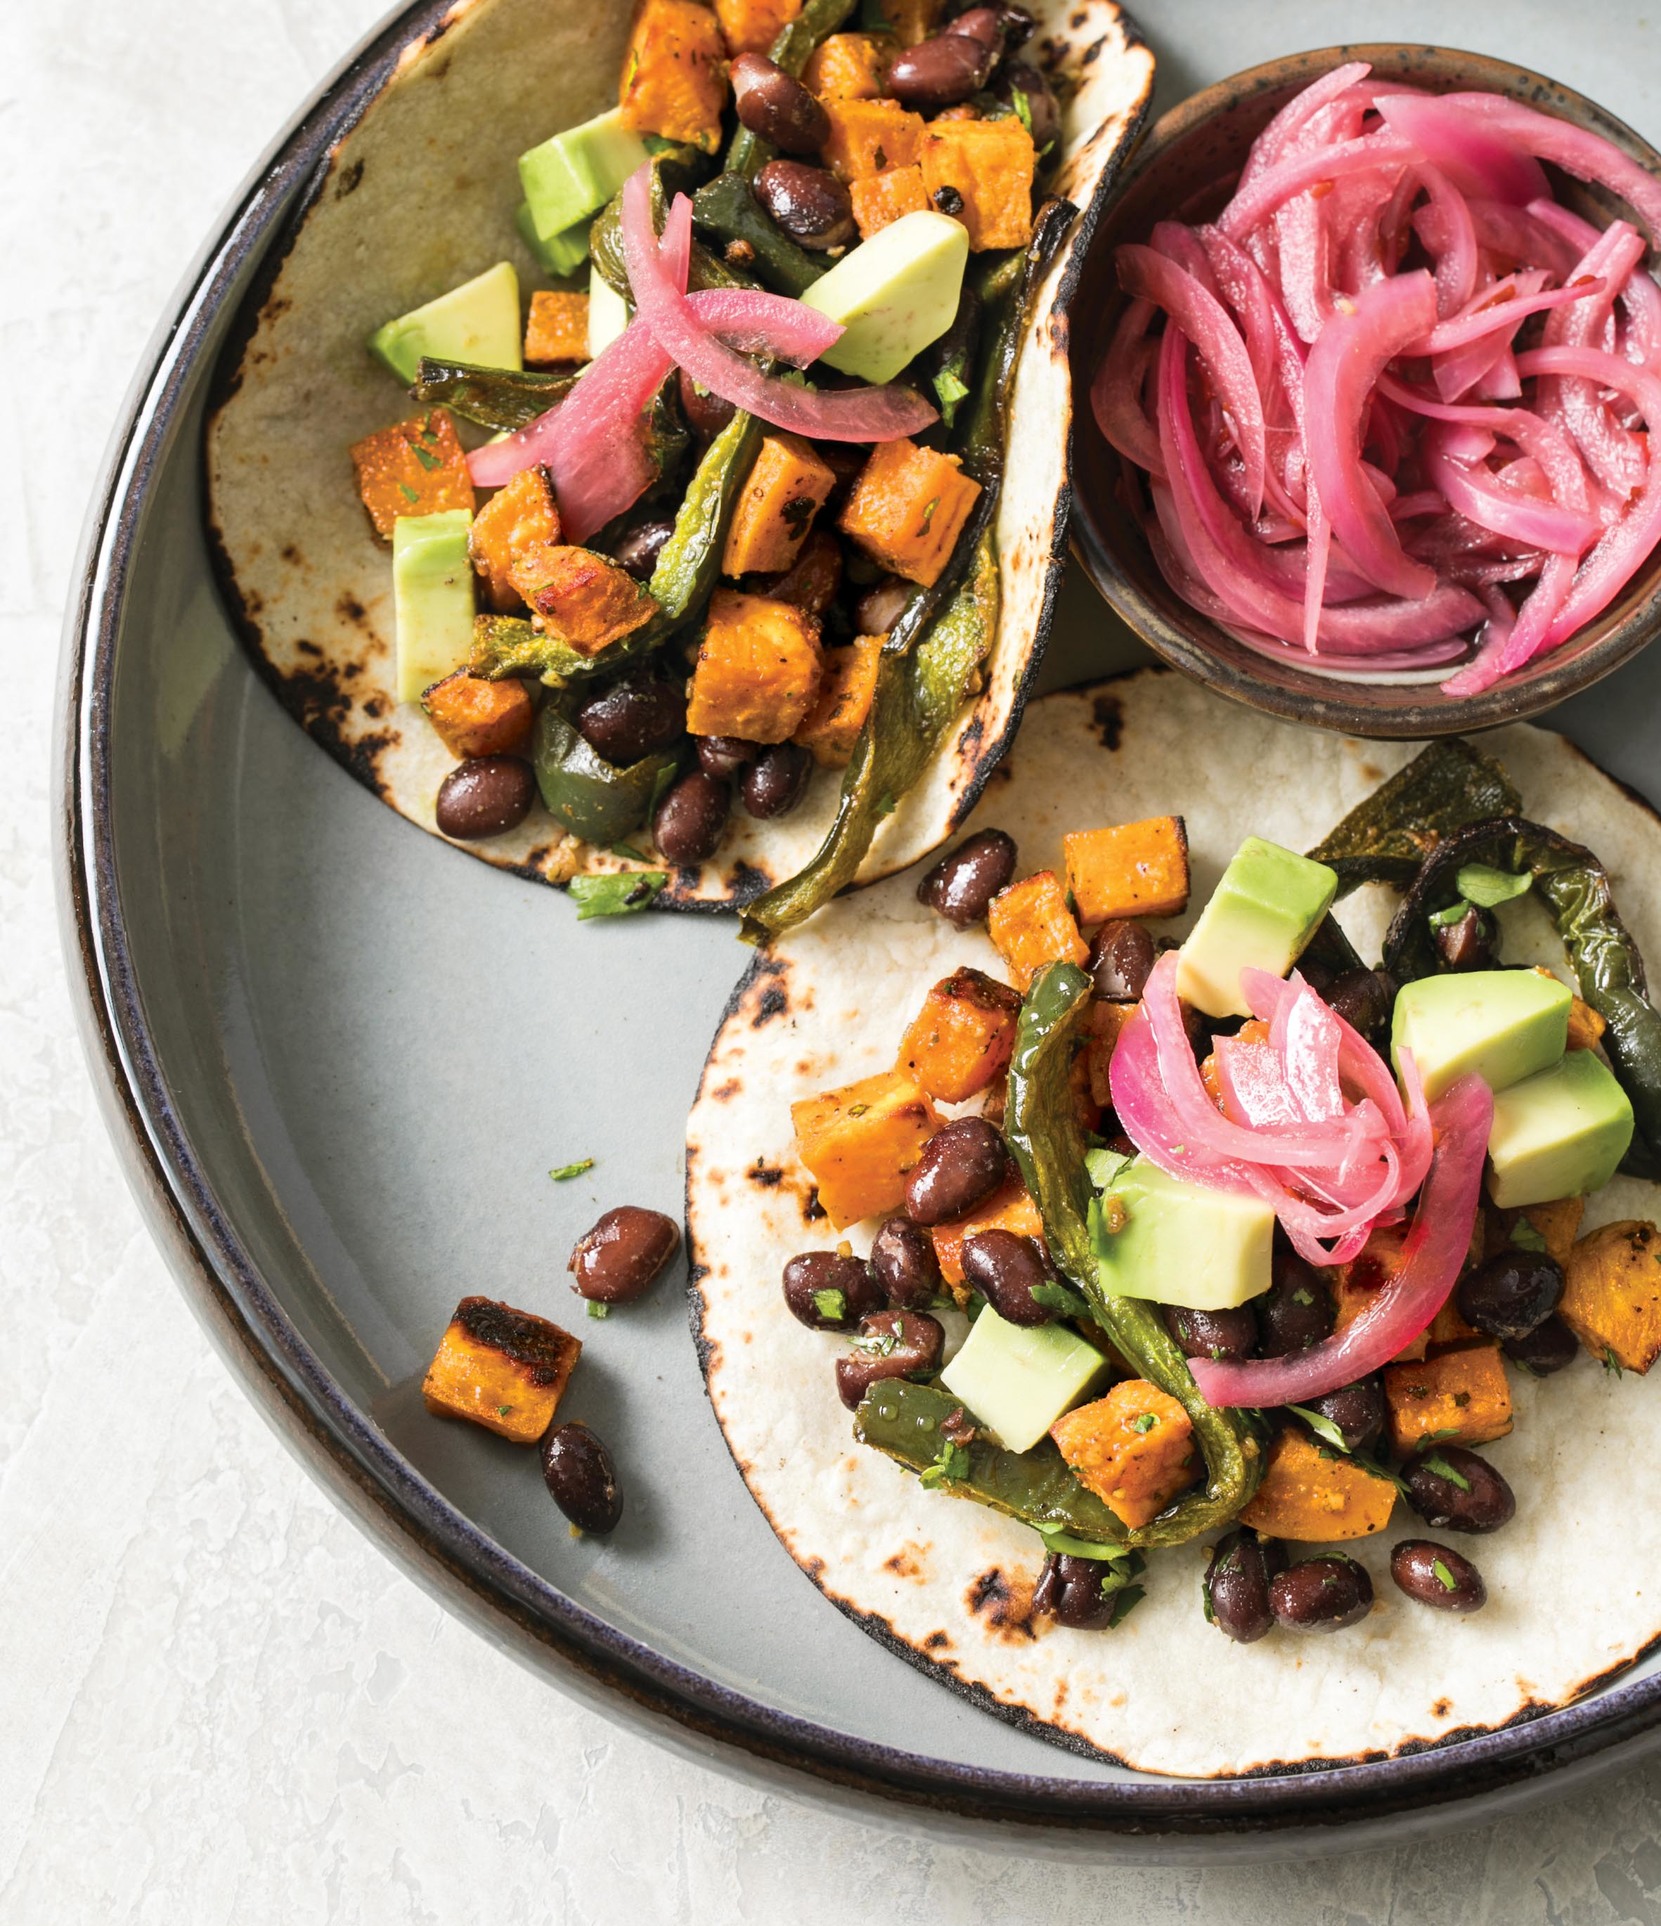
Sweet Potato, Poblano, and Black Bean Tacos
These vegetarian tacos feature sweet potatoes, which provide a wealth of vitamin A, and very little saturated fat.
Sweet Potato, Poblano, and Black Bean Tacos
SERVES 6
WHY THIS RECIPE WORKS Tacos are often focused on rich meats, but we wanted a delicious version that was all about vegetables. Our favorite combination turned out to be sweet potatoes and poblano chiles, which we seasoned with fragrant garlic, cumin, coriander, and oregano. Roasting produced caramelized exteriors and tender interiors. Adding black beans turned the tacos into a satiating meal packed with vitamins and fiber.
½ cup red wine vinegar
½ teaspoon red pepper flakes
1 red onion, halved and sliced thin
3 tablespoons extra-virgin olive oil
3 garlic cloves, minced
1½ teaspoons ground cumin
1½ teaspoons ground coriander
1 teaspoon minced fresh oregano or ¼ teaspoon dried
Salt and pepper
1 pound sweet potatoes, peeled and cut into ½-inch pieces
4 poblano chiles, stemmed, seeded, and cut into ½-inch-wide strips
1 (15-ounce) can no-salt added black beans, rinsed
¼ cup chopped fresh cilantro
12 (6-inch) corn tortillas, warmed
1 avocado, halved, pitted, and cut into ½-inch pieces
1. Adjust oven racks to upper-middle and lower-middle positions and heat oven to 450 degrees. Line 2 rimmed baking sheets with aluminum foil. Microwave vinegar and pepper flakes in medium bowl until steaming, about 2 minutes. Stir in onion and let sit until ready to serve.
2. Whisk oil, garlic, cumin, coriander, oregano, ½ teaspoon salt, and ½ teaspoon pepper together in large bowl. Add potatoes and poblanos to oil mixture and toss to coat.
3. Spread vegetable mixture in even layer in lined baking sheets. Roast vegetables until tender and golden brown, about 30 minutes, stirring vegetables and switching and rotating sheets halfway through baking.
4. Return vegetables to now-empty bowl, add black beans and cilantro, and gently toss to combine. Divide vegetables evenly among warm tortillas and top with avocado and pickled onions. Serve.
PER SERVING
Cal 350 • Total Fat 14g • Sat Fat 2g • Chol 0mg
Sodium 250mg • Total Carbs 51g • Fiber 11g • Total Sugar 7g
Added Sugar 0g • Protein 8g • Total Carbohydrate Choices 3.5
NOTES FROM THE TEST KITCHEN
Sweet Potato or Yam?
You often hear “yam” and “sweet potato” used interchangeably, but they actually belong to completely different botanical families. Yams, generally sold in Latin and Asian markets, are often sold in chunks (they can grow to be several feet long) and can be found in dozens of varieties, with flesh ranging from white to light yellow to pink, and skin from off-white to brown. They all have very starchy flesh. Sweet potatoes are also found in several varieties and can have firm or soft flesh, but it’s the soft varieties that have in the past been mislabeled as “yams,” and the confusion continues to this day. The U.S. Department of Agriculture now requires labels with the term “yam” to be accompanied by the term “sweet potato” when appropriate. We typically buy the conventional sweet potato, a longish, knobby tuber with dark orange-brown skin and vivid flesh. Beauregard is our favorite variety.
