~ 4 ~
Recycling Water for Irrigation
FRESHWATER IS NOT A NECESSITY for irrigation. You might consider recycling water for irrigation purposes. Depending upon where you live, there may be many ways to obtain water for irrigating your lawn and garden without drilling a well or paying exorbitant water bills.
People in past centuries often settled near a natural water source, such as a lake or stream. This was fine when there was ample unsettled land with water and fewer people looking for a place to live. Today, however, while there are still private homes situated near natural water sources, most people don’t have a waterfront view.
Obviously, having a pond, lake, or stream in your backyard is an easy way to get irrigation water. You run a pipe into the water source, connect it to a pump, and you’re in business. Even if you don’t have this option, there are a number of creative ways to collect water for irrigation purposes.
My sixty-four-acre farm has a good pond, a dug well for livestock, and a drilled well for the house. Water is not much of a problem. I’m also in the process of building a new house on much less acreage, but the land has 800 feet of river frontage, a good pond, and some springs and streams. Again, water shouldn’t be a problem. I am lucky to have such abundant, free, water sources. However, I realize not all people are so fortunate.
Some methods explored in this chapter won’t be practical for people living in the city. Other methods will cater to the needs of people with limited space. Even if your garden is in a window box, you’ll find some nuggets of information worth remembering.
Ponds and Lakes
Ponds and lakes are ideal sources of irrigation water. Whether created by nature or by humans, ponds and lakes can provide more than enough water for even large-scale irrigation. If one of these water sources is in the vicinity of your lawn or garden, you’ve got it made.
Getting water from the pond or lake to the irrigation area is usually pretty simple. Since you won’t be irrigating during freezing weather, the piping can be above the frost line and installed temporarily. Very little is required in the way of materials.

Pump Installation in a Pond or Lake
1. The pump and pressure tank must be located near the irrigation site.
2. You will need only 110 volts of electricity.
3. To begin, attach the well pipe to the pump and run the pipe to the water source — it is okay for the pipe to lay on top of the ground.
4. Install a foot valve on the pipe end to be submerged in the water. This valve acts as a strainer and a check valve, to keep your pump from losing its prime. Allow enough length on the pipe so that it will remain submerged under the water. Do not let the end of the pipe and the foot valve rest on a sandy or muddy bottom. You will need to install gauges, relief valves, cut-off valves, and various fittings as described in Chapter 5.
5. Once the pipe is under the water, you are ready to prime the pump. To do this, remove the priming plug and pour water into the priming hole until the well pipe and pump body are full.
6. Replace the priming plug and you are ready to turn on the pump and energize your pressure tank. A pipe connects your irrigation system to the pressure tank and provides a constant flow of water on demand.
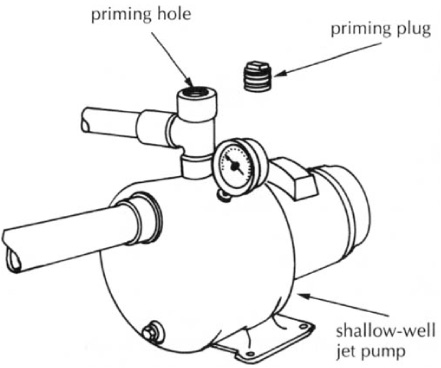
Pumping water is discussed extensively in Chapter 5, but in this chapter I cover the basic requirements of getting water from various sources to the irrigation site.
Pump System
Setting up a pump system for a pond or lake requires a shallow-well pump, also called a jet pump. If you want to increase water pressure and reduce wear and tear on the pump, you will need a pressure tank and the necessary fittings. You will also need a coil of plastic well pipe. The last major component is a foot valve.
Installing this type of system is quite simple and relatively inexpensive; one person can accomplish it in only a few hours. No exotic tools or equipment is needed. There are, however, a few pointers I’d like to pass on to you. While the next chapter will educate you about pumps, it will not warn you of the difficulties you may encounter when pumping water from a pond or lake, so I’d like to do that now.
Protecting the Foot Valve
The bottoms of many ponds and lakes consist of mud, silt, sand, or a combination of the three. These elements can plug up a foot valve very quickly. If this happens, the pump will run, but no water (or very little water) will be supplied to the pressure tank. This situation normally doesn’t occur when the foot valve is suspended in the water and not near contaminants. In a lake or pond, however, the foot valve often sinks to the bottom. Unless the body of water has a steep bank that drops off suddenly, there is no way to avoid this.
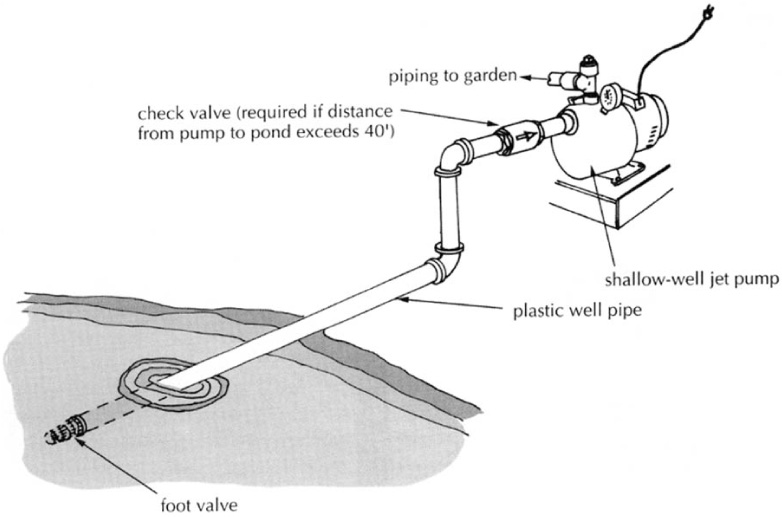
A simple seasonal pumping system can be set up from a pond or lake near your garden with a shallow-well jet pump and some plastic well pipe. Once the season’s over, the system can be easily disassembled, so you don’t need to worry about frozen pipes.
One simple, inexpensive method to keep a foot valve from coming into contact with the bottom of a pond or lake, however, is to build a box frame covered with screen wire to enclose the foot valve. The frame of the box can be made with scrap lumber and covered with any type of fine-mesh screen. With the foot valve protected by the screen box, you won’t have to worry about it plugging up. There may be occasions when you will need to pull the pipe out of the water and clean debris, such as leaves and weeds, from the sides of the box, but you will avoid the aggravation and expense of having your foot valve plugged up every time you put it in the water.
If your lake or pond has a dock extending out into it, you can suspend the well pipe and foot valve from the side of the dock. This will position the foot valve vertically in the water so that it functions just as it would in a well. Keep the foot valve several feet off of the bottom of the lake or pond to prevent it from sucking in particles that could restrict its function. Either method will make your system work better, and neither will add much cost to your job.
Moving Water
Moving water, such as streams and rivers, is a good source of irrigation, but requires a few compensating techniques to overcome the water’s movement. If you’ve ever gone fishing in moving water while using a fishing float, you know how the current often carries it downstream — frequently right into one of the tributary’s banks if you let it go long enough. This same thing can happen to your well pipe and foot valve. Depending on the strength of the river current, you will need to anchor your foot valve in place.
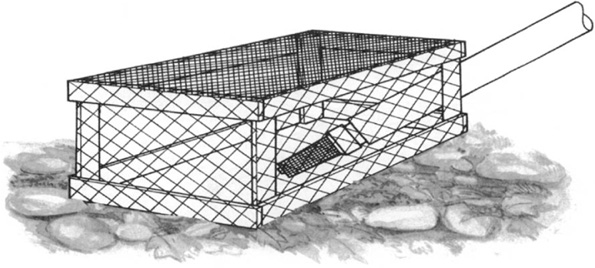
You can build a simple, inexpensive screened box from scrap lumber and wire mesh to protect the foot valve from becoming clogged with debris from the lake or pond bottom. The box also serves as an anchor.
Protecting the Foot Valve
River and stream water is a conduit for floating debris. Just as I advised you to protect your foot valve from the bottoms of ponds and lakes, you should also protect it in moving water. The screened box described on the previous page can serve two purposes in moving water: preventing the foot valve from picking up foreign particles; and, with added weight, acting as an anchor. The added weight can be a brick, a cinderblock, or even an old piece of chain wrapped around the frame. Of course, you could invest in a small mushroom anchor (like the ones used for canoes and small boats) if you want a first-class job. If your source of moving water is clogged with tree branches, roots, and other tangles, a mushroom anchor is a good investment. Chains, cinderblocks, and similar homemade weights may get tangled in underwater obstacles and prevent you from being able to retrieve your foot valve.
Springs
Springs are another natural source of irrigation water. Not all springs produce large quantities of water, but some do. My pond is spring fed, and its water level rarely drops, even in extremely dry periods. I know of a spring where people drive from miles around to fill their plastic jugs. This spring runs all the time, and it is not unusual to see a line of people waiting to fill dozens of milk jugs. The flow from this particular spring is similar to the flow from a ½-inch pipe with its faucet turned about halfway on. The flow certainly wouldn’t fill out a fire hose, but with a pressure tank and pump, it would do a dandy job of watering a garden.
Many springs dry up during the hot summer months, which is a problem if you rely on the spring for your irrigation needs. However, most any spring will produce water in the early part of the summer and in the fall. Any water you can get from a spring is free water, not to mention that you could build a water storage system and take full benefit of the spring’s output before it dries up in the late summer.
Digging Out a Spring
One way to increase the reserve capability of a spring is to dig it out. Your excavation can be as much or as little as you like. If you’re so inclined and have the space and the money, you can build a spring-fed pond. This is probably overkill for most folks, but it’s worth mentioning.
If you dig a spring hole, line the sides of the hole to prevent erosion and settling that will fill the spring with dirt and debris. How you line the hole depends on how big it is. Well casing, like that used with dug wells, makes a great (but heavy) lining for your spring hole. A 55-gallon drum can be used if you cut out the ends. The metal drum will have to be replaced periodically, but it doesn’t weigh much, and one person can install it easily. Plywood also can be used and it, too, will have to be replaced from time to time. As long as the liner protects the hole from cave-ins, it’s doing its job.

Selecting a Pond Site and Estimating Its Potential
When you think about it, it’s not surprising that natural ponds almost never form in coarse soils that drain well. Yet thousands of attempts at man-made ponds in just such places have proven to be dismal failures. A good pond takes careful research.
Clay is thought to be ideal for a pond bottom. But it’s not without its disadvantages. Very waterproof and stable when dry, overly steep clay banks can slide toward flatness when wet. A clay bottom is slippery and soggy, not particularly fun to walk in. When disturbed, it turns water murky.
At the opposite extreme, bedrock — or ledge — is next to impossible to excavate without blasting. Besides, it’s pierced with cracks and fissures that can leak forever. Ponds can be expensively lined with plastic membranes, high-density concrete, or clay. But the ideal soil condition is somewhere between clay and rock: good digging in predictable earth that may leak a trifle at first, but will eventually seal itself with silt and sediment.
Topographical depressions, swampy valleys, and wet spots are often good pond sites, just as long as the soil base will hold water. In many parts of the country, the U.S. Soil Conservation Service will help you design and lay out a pond at little or no cost, and be able to tell you if you have enough water and enough of the right kind of soil for a particular type of pond construction.
Estimating pond capacity. If a pond holds enough to supply a farm or homestead with a year’s worth of water — beyond what evaporates and leaks out — a pond is thought to be big enough. Its potential is best figured during the driest part of the year — in August or early September in most places. Calculating the pond’s acre footage, with the help of rectangular measurements at the pond site and sketches on graph paper, is a help in estimating the pond’s storage capacity. An acre foot is the water needed to cover one acre (43,560 square feet), one foot deep. There are about 325,851 gallons per acre foot. Unless the water table nearby is exceptionally high, each acre foot of pond may receive water from 1½ to 2 acres of watershed. Obviously if the watershed falls short of the pond’s needs, the pond never fills.
Excerpted from The Home Water Supply by Stu Campbell (Garden Way Publishing, 1983).
A natural spring is a good source of water for a small lawn or garden, but don’t expect an average spring to meet the demands of heavy irrigation, which only can be done when the spring has been enlarged to create a sizable reservoir, or when the water is stored in some other location.
Cisterns
People used to divert rainwater from their roofs into a holding pool or cistern. There are still numerous homes in Maine with cisterns under them. While it is unlikely you will put a cistern in your basement or cellar, you might want to consider building one near your irrigation site.
The term cistern encompasses a broad range of possibilities. Depending on your interpretation, a cistern could be a 55-gallon drum, a water tank set up on legs, or the equivalent of a swimming pool. Technically, I suppose a coffee can set under the corner of your roof could pass for a cistern. Depending upon your age, you might well remember the rain barrels of old. It was not uncommon to see these barrels set in strategic locations to capture rainwater. These too could be considered a type of cistern.
Probably the best-known cistern is a container with a round shape, walls that rise a couple of feet above the bottom, and no top. It looks something like a wading pool for children. This type of cistern can hold a lot of water, and was often used in older homes for reserve water.
Building a cistern near your garden provides many benefits: You can catch and store free water; you will not have far to pump the water; and, depending upon how you build the container, you can use it to cool off on hot days. The main advantage is having a ready source of water close to your point of need.
Building a Garden Pond Cistern
Building a cistern today is easier in some ways and more complicated in others than it was years ago. Most building codes today treat any holding vessel with a depth for water exceeding 18 inches as a swimming pool. This definition may open a number of regulatory issues involving special fencing and other local requirements. Before building a cistern, check with your local code enforcement office for area rules and regulations.
Old cisterns usually were made from rock or concrete. With today’s new membrane linings and materials, it is possible to build one without all those heavy materials. In fact, you can build the cistern either above or below ground level. It can even double as a decorative fish pond or a place for the kids to splash around. If you want to keep your construction time to a minimum, you can purchase a used, aboveground swimming pool to use as your holding vessel.
When I built my last house in Virginia, I installed a cistern of sorts. It was a contemporary-style home on five acres, affording us a great deal of privacy and a lot of lawn. We also created a garden spot on part of the land. Virginia can have some really hot, humid, dry summers, and we were concerned about our watering needs. We had a shallow well, which was standard practice in our part of the state. Having just moved from a house with a shallow well, we knew about the limitations of irrigating.
Rather than spend a lot of money drilling a well or installing a separate shallow well, we decided to create a garden pond. This decorative pond made a beautiful addition to the grounds while serving as our source of irrigation.
As a building contractor, I was lucky to have friends with muscle willing to help us. I threw a little work party for our construction crew, and we had the pond dug in one day, by hand.
Most of the pond was no more than 2 feet deep. We dug the hole by hand and lined it with inexpensive tarp, the kind that costs about twenty dollars. After fitting the tarp into the hole and securing the top edge with tent stakes, we filled the pond with enough well water to hold the tarp in place.
We put fish in the water, and my wife created a water garden with various types of plants. The garden pond was only a few feet deep at its deepest end, but it gave the fish a place of retreat in freezing weather.
Basically the pond was a cistern, a holding vessel for stored water. As the rains came, the pond filled up. Then it was just a matter of occasional maintenance to keep it full.
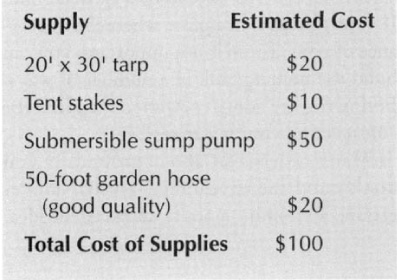
Whenever the lawn or the garden needed watering, I put a submersible sump pump into the pond and pumped water through a garden hose. The pump plugged into an outside electrical outlet on the side of the house. By using a sump pump and garden hose, my irrigation costs were negligible. To demonstrate how little this type of irrigation system can cost, let me give you a basic rundown of the materials needed. The estimated costs of these supplies are detailed in the box.
You will need a tarp large enough to cover the bottom, sides, and ends of your pool. If the pool is 2 feet deep, a 20-foot by 30-foot tarp will accommodate a pool 26 feet by 16 feet, which is a pretty good-sized garden pool. You’ll also need tent stakes to secure the top of the tarp.
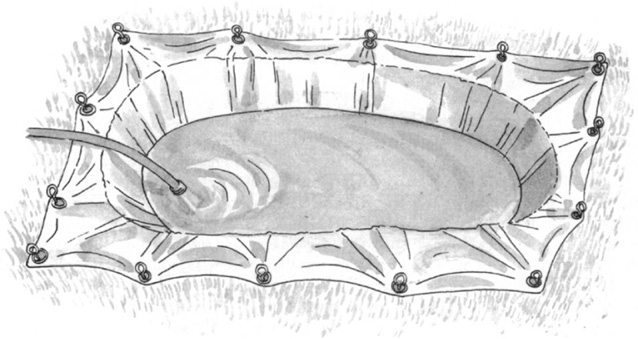
You can create a good water source by digging a 2-foot deep garden pond and lining it with an inexpensive tarp. Secure the tarp with stakes before filling the cistern with water. Once full, the pond can be landscaped with plantings and other decorative features.
The digging is done with a shovel, so there is no monetary outlay needed for this phase of the job. The next cost is for a sump pump. I recommend a submersible one that discharges through a garden hose and runs on 110-volt electricity. This little pump produces 1,200 gallons of water per hour when it is pumping a head of water 5 feet high. Since you will not be pumping more than 2 or 3 feet if your pool is only 2 feet deep, you will get a little more output. You’ll also need a good quality 50-foot garden hose.
This type of cistern fits into most settings. Whether you have a home in the suburbs or the country, a garden pond adds appeal to your grounds and provides a good source of irrigation water. You can make the watering hole as decorative as you like and still have an adequate irrigation system.

The Cost of Building a Garden Pond
Assuming the pond is dug by hand, the cost of supplies is very reasonable. Following are 1996 estimated costs:
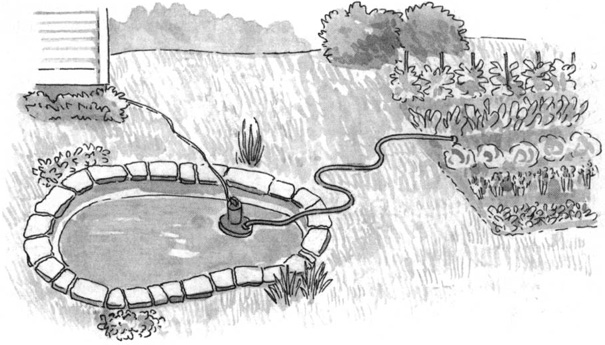
When you’re ready to water your lawn or garden from your garden pond, simply put a submersible sump pump into the pond and pump water through a garden hose. Once you’re done, remove the pump and hose to restore the pristine look of your pond.
Other Options
Not all cisterns have to be a garden pond. If your garden is in a place where the appearance of your cistern is not important, you can build the holding tank in a number of ways. Following are some cost-effective ideas for constructing your water reserve.
Many cisterns sit above ground. If you don’t mind the appearance, a used, above-ground swimming pool is an excellent idea. Even if the filters and other pool accessories are in bad condition, you can have a fantastic cistern, and you should be able to drive a hard bargain on the price of the unit.
Recently I was looking for a wading pool for my daughter and came across an above-ground pool, 3-feet deep, with a large circumference, about 12 feet in diameter. This particular pool came complete with filtering equipment and was priced less than $200. When considering the volume of water that can be stored in such a pool, there is no question it would be quite effective.
Depending on how primitive you are willing to get, you could line up a bunch of 55-gallon drums to store water, which is not as convenient as having all the water in one container, but serves the purpose.
If cost is not a consideration, you could hire a concrete company to build a cistern. The concrete would have to be sealed to avoid leakage, and the job would be expensive, but there would be no limitations on size and shape.
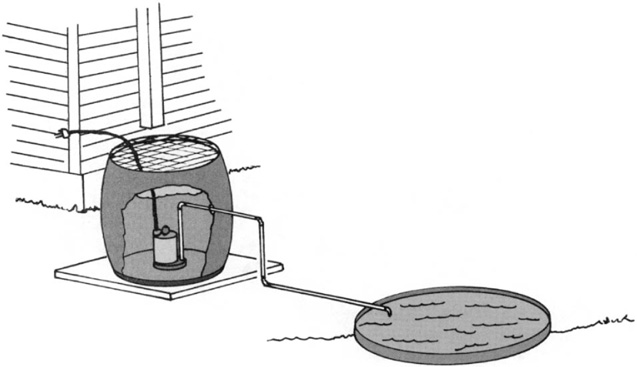
This set-up is useful for filling a cistern that is a distance from your house. Rainwater from your house’s downspouts can be collected in a barrel and pumped via a sump pump to your cistern.
In my opinion, the two best methods of building a cistern storage system are to use an aboveground swimming pool or to install an in-ground garden pond. If your home is in a subdivision with covenants and restrictions, the garden pond may be the only option.
Filling Your Cistern
Filling your cistern with water can be done in scores of ways. You could hire a company that trucks water for swimming pools. This, of course, is costly. The cistern can be filled with well water or city water. In the case of city water, you still are facing a water bill. With well water, your only cost is the electricity used to run the pump.
Provided that you build your cistern early in the growing season, nature will contribute greatly to filling the container, which you can help in a number of ways. If your house is equipped with gutters and downspouts, you have an excellent source of water if it is possible to make a direct connection between your downspouts and the holding tank.
If your downspout is not close to your cistern, you still can make adaptations. Assuming your house is equipped with gutters and downspouts, but your cistern is too far away and too high to allow rainwater to run directly into the holding tank, you could pipe your downspouts to a miniature cistern (a 5-gallon bucket or a 55-gallon drum, for instance). Then the collected water could be pumped to the cistern with an inexpensive effluent (sump) pump, as illustrated.
While catching rainwater from your roof may seem like a slow method to get irrigation water, you will be surprised how fast it accumulates. I left a large contractor’s wheelbarrow under the corner of my roof one night, and a small thunderstorm filled it to overflowing — that’s several gallons of water. If there were a rain barrel under each gutter outlet, it’s hard to predict how much water would accumulate.
Rain plays a significant role in filling a cistern, but you cannot count solely on the rain to be sufficient for your watering purposes. Run-off water from the roof of your home is only one way of meeting this demand. Supplementing water in the cistern with well water or city water is another way to maintain your high-water mark. A driven well point can also produce enough water to keep your cistern at a high level.
However you keep the cistern full of water, you can enjoy the low cost of using an effluent pump with this type of system. The vertical rise of water being pumped is so low that a jet pump is not needed. This fact alone will save you hundreds of dollars in start-up costs.


