The Domino Effect

Think high contrasts …
yin yang …
domino games …
North Pole and the Black Sea …
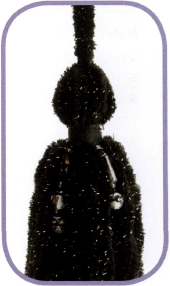
Midnight Duster
DESIGNED BY LISA GONZALES
INTERMEDIATE
This easy-to-crochet duster is a modern take on a granny square theme. The center of each square is highlighted with a bead, making the duster simple but elegant. Dress it down for work or wear it over a frilly top for the evening.
SIZES
Small/Medium (Medium/Large, 1X/2X)
To Fit Bust 32–36 (38–42, 44–48)"⁄80–90 (95–105,
110–120) cm
FINISHED MEASUREMENTS
Bust 40 (50, 55)"⁄100 (125, 138) cm
Length 40"/101.5 cm, all sizes
YARN
Caron International’s Simply Soft
(100% acrylic; 6 oz/170 g, 315 yds/288 m skein):
- #9727 Black, 9 (10, 12) skeins
CROCHET HOOK
One size US H-8 (5 mm), or size to obtain gauge
ADDITIONAL MATERIALS
- #16 tapestry needle
- 70 (86, 94) beads of choice (with a hole large for tapestry needle to fit through)
- Yarn needle
GAUGE
One Motif = 5"/12.5 cm square
In Mesh pattern (on sleeves), 5 sts and 5 rows = 4"/10 cm
CROCHET STITCHES USED
beginning cluster—ch 2 [ yarn over, insert hook in same space, yarn over and pull up a loop, yarn over and draw through 2 loops on hook] twice, yarn over and pull through all 3 loops on hook.
ch: chain
cluster—[ yarn over, insert hook in space indicated, yarn over and pull up a loop, yarn over and draw through 2 loops on hook] 3 times, yarn over and pull through all 4 loops on hook.
dc: double crochet
sc: single crochet
slip st: slip stitch
NOTES
- Duster is designed to be loose fitting; fabric is very flexible, sizes are approximate.
- Wear Duster overlapped in front, or open as shown in photo.
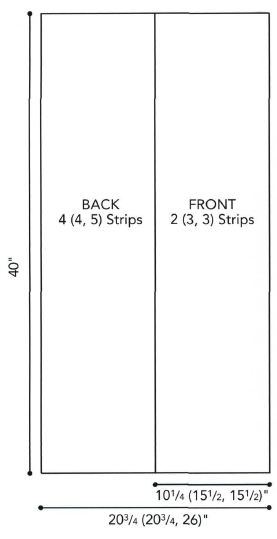
- Motifs are worked, then joined into Strips and assembled for Back and Fronts.
- Instructions given are for one length for all sizes; to shorten, work 1 or 2 fewer Motifs for each Strip.
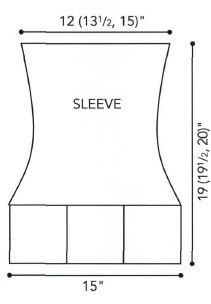
- Sleeves are worked upward from a 3-Motif strip, in Mesh pattern.
Using larger hook, leaving a 6"/15 cm tail for attaching bead, chain 6; join with a slip st to form a ring, being careful not to twist chain.
Round 1: Ch 4 (counts as dc and ch 1), in the ring work [dc, ch 1] eleven times, join with a slip st in third ch of beginning ch-4—12 ch-1 spaces.
Round 2: Work a slip st and beginning cluster in next ch-1 space, ch 3 (counts as dc), work * cluster in next ch-1 space, ch 3; repeat from *around, join with a slip st in second ch of beginning cluster—12 clusters, 12 ch-3 spaces.
Round 3: Sc in next ch-3 space, ch 5, * sc in next ch-3 space, ch 5; repeat from * around, join with a slip st in first sc.
Round 4: Slip st in next ch-5 space, ch 3 (counts as dc), in same ch-5 space, work [dc, ch 1, 2 dc, ch 3, (2 dc, ch 1) twice] for first corner, sc in next ch-5 space, ch 5 (center space), sc in next ch-5 space, * in next ch-5 space, work [(ch 1, 2 dc) twice, ch 3, (2 dc, ch 1) twice] for corner, sc in next ch-5 space, ch 5 (center space), sc in next ch-5 space; repeat from * twice, ch 1, join with a slip st to top of beginning ch-3. Fasten off.
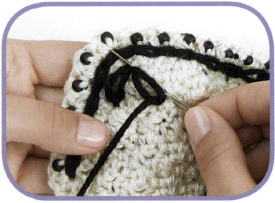
EMBELLISHING
Note that photos do not show Round 4.
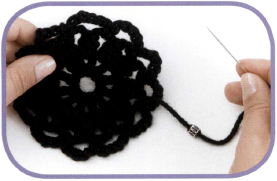
ATTACH BEADS
- After completing the motif, thread the tapestry needle with the 6"/15 cm tail.
- Thread bead onto yarn.
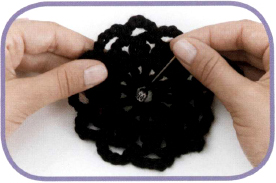
- Push the bead so it is close to the center ring of the Motif.
- Use the yarn needle to attach the yarn end to the WS of the center ring. Knot securely and weave in end.
Tip: Put a very small drop of fabric glue on the knot to secure.
STRIPS [USING 8 MOTIFS PER STRIP, MAKE 8 (10, 11) STRIPS]
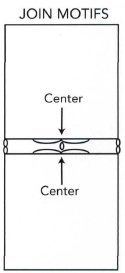
JOIN MOTIFS
Note: Edging is worked along one side of first Motif, then edging is worked along one side of second Motif, and AT THE SAME TIME, the 2 Motifs are joined together at each corner and in the center of the Motifs.
FIRST MOTIF
With RS facing, join yarn with a slip st in ch-3 corner space, * [ (ch 2, slip st in next ch-1 space) twice, ch 5, slip st in center ch-5 space ], ch 5; (slip st in ch-1 space, ch 2) twice, slip st in corner ch-3 space, ch 2, turn (WS of first Motif is now facing). Do NOT fasten off.
SECOND MOTIF
Place second Motif in front of first Motif, with WSs of the Motifs facing each other; slip st in the ch-3 corner space of second Motif, repeat from first bracket ([) under “First Motif” above through second bracket (]). Ch 1, slip st in the slip st worked in the center ch-5 space of First Motif, joining Motifs at center, ch 5; work to end as for First Motif, join last ch-2 worked with a slip st in ch-3 corner space of First Motif. Fasten off—2 Motifs joined.
Work 3 more sets of 2 Motifs—4 sets of 2 Motifs.
Join 2 sets together to make two 4-Motif strips; join 4-Motif strips to make 8-Motif Strip.
Continue in this manner until all 8-Motif Strips are completed.
JOIN 8-MOTIF STRIPS
Join 4 (4, 5) Strips for Back and 2 (3, 3) Strips for each Front as follows:
Hold 2 Strips together, with WS facing each other; join yarn with a sc in corner ch-3 space, working through both Strips; working along long edge through both Strips, * ch 3, slip st in next ch-space; repeat from * to end. Fasten off.
Continue in this manner until all Strips are joined for Back and Fronts.
Join side seams in the same manner, leaving 6 (6 3⁄4, 7 1⁄2)"⁄15 (17, 19.5) cm open at upper edge for armhole.
Join shoulders, leaving 6 (6, 6 1⁄2)"⁄15 (15, 16.5) cm free for Back neck; remainder of Fronts will fold forward.
SLEEVES (MAKE 2)
Join 3 Motifs to make a Strip.
With RS facing, join yarn with a slip st to corner ch-3 space of right-hand Motif.
Row 1: * Ch 3, sc in next ch-space; repeat from * twenty-two times evenly across, end by working last sc in corner ch-3 space, turn—23 ch-3 spaces (Mesh pattern).
Row 2: Decrease Row — Ch 3, skip first ch-3 space, sc in next ch-3 space, * ch 3, sc in next ch-3 space; repeat from * across, end sc in last ch-3 space, turn—22 ch-3 spaces remain.
Repeat Row 2 until 13 (15, 17) ch-3 spaces remain.

Next Row: * Ch 3, sc in next ch-3 space; repeat from * across; turn—13 (15, 17) ch-3 spaces.
Work 3 rows even.
Next Row: Increase Row — Ch 3, sc in first ch-3 space, ch 3, sc in same ch-3 space, * ch 3, sc in next ch-3 space; repeat from * across, turn—14 (16, 18) ch-3 spaces.
Work 4 rows even.
Repeat Increase Row—15 (17, 19) ch-3 spaces.
Work even until piece measures 19 (19 1⁄2, 20)"⁄49 (50, 51) cm from beginning. Fasten off.
FINISHING
Join sleeves to armholes in the same manner as side seams, working evenly around armhole. Join Sleeve seams. Using yarn needle, weave in all ends.
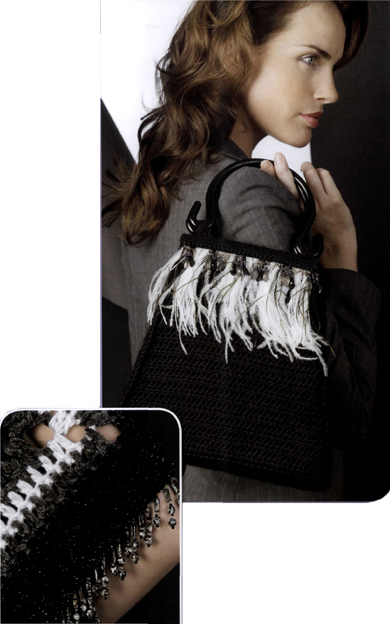
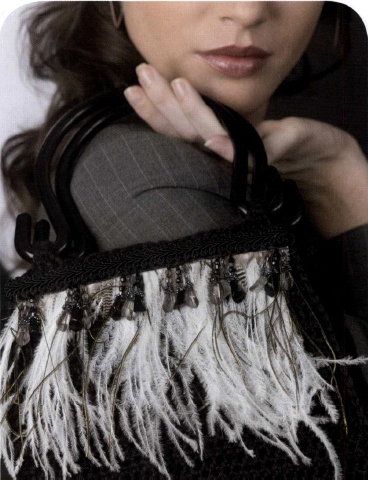
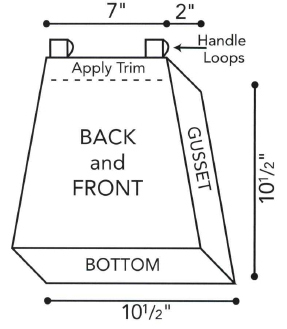
Fly Away Purse
DESIGNED BY CARI CLEMENT
EASY
This chic purse is the perfect accessory for a night on the town. The feather fringe is a beautiful embellishment that makes the piece stand out.
ONE SIZE
FINISHED MEASUREMENTS
Width (lower edge) 10 1⁄2"/26.5 cm; (upper edge) 7"/18 cm
Height 10 1⁄2"/26.5 cm, excluding handles
Depth 2"/5 cm
YARN
Caron International’s Simply Soft (100% acrylic; 6 oz/170 g, 315 yds/288 m skein):
- #9727 Black, 1 skein
CROCHET HOOK
One size US G-6 (4 mm), or size to obtain gauge
ADDITIONAL MATERIALS
Handles: One pair black plastic purse handles, with hooks at lower ends
Lining: Two sheets black plastic canvas, 10" × 12"/25 × 30.5 cm
Trim: 1⁄2 yard/45.5 cm each of the following:
- 4" – 5"/10 – 12.5 cm -wide feather trim;
- black and gray beaded trim;
- ½"/1.3 cm -wide black braid
Yarn needle
Chalk marker
Fabric glue
Scissors
GAUGE
Gauge is not critical for this project.
In half double crochet (hdc), 15 sts and 8 rows = 4"/10 cm
CROCHET STITCHES USED
ch: chain
hdc: half double crochet
sc: single crochet
slip st: slip stitch
NOTE
Purse is worked in 5 pieces; Back, Front, Bottom, and 2 Gussets. Back and Front of Purse are lined with plastic canvas to maintain its shape. Trim is applied after Purse is assembled.

Chain 45.
Row 1: Hdc in third ch from hook and in each ch across, turn—43 hdc.
Row 2: Ch 2, hdc in each hdc across, turn—43 hdc.
SHAPE SIDES
Row 3: Ch 2, skip first hdc, hdc in each st across—42 hdc remain.
Repeat Row 3, decreasing 1 stitch every row until 25 hdc remain.
Work even, if necessary, until piece measures 10 1⁄2"/26.5 cm from beginning. Fasten off.
GUSSETS (MAKE 2)
Chain 11.
Row 1: Hdc in third ch from hook and in each ch across, turn—9 hdc.
Row 2: Ch 2, hdc in each hdc across, turn.
Work even, repeating Row 2, until piece measures 3 1⁄2"/9 cm from beginning.
SHAPE GUSSET
Increase Row: Ch 2, work 2 hdc in first st, hdc in each st across to last st, work 2 hdc in last st, turn—11 hdc.
Work even, repeating Row 2 until piece measures 7"/18 cm from beginning.
Repeat Increase Row—13 hdc.
Work even, repeating Row 2, until piece mea-sures 10 1⁄2"/26.5 cm from beginning. Fasten off.
BOTTOM
Chain 11.
Row 1: Hdc in third ch from hook and in each ch across, turn—9 hdc.
Row 2: Ch 2, hdc in each hdc across, turn.
Work even, repeating Row 2, until piece mea-sures 10 1⁄2"/26.5 cm from beginning. Fasten off.
FINISHING
Using yarn needle, weave in all ends.
LINING
Using Front, Back, and Bottom pieces as patterns, trace shapes onto plastic canvas, using a marker. Using scissors, cut out plastic canvas lining pieces. Using yarn needle threaded with a strand of yarn, whipstitch the lower edges of Front and Back lining pieces to the Bottom lining piece.
ASSEMBLE PURSE
With WS held together, join Front and Back pieces to Gussets by working 1 row of sc evenly along side edges through both pieces; join Bottom to Front, Back, and Gussets in the same manner.
HANDLE LOOPS
(MAKE 2 EACH ON BACK AND FRONT)
Right-hand side: With RS facing, join yarn with a slip st, one st in from right-hand seam on upper edge.
Row 1: Ch 1, * sc in next 3 sts, turn—3 sc.
Continuing on these 3 sts, repeat Row 1 until piece measures 1 1⁄2"/3.5 cm from beginning, end with a WS row, turn.
Fold loop to WS; working through last row of Handle Loop and upper edge of Purse, slip st across, joining loop to WS of piece in the same sts worked on Row 1.
Left-hand side: With RS facing, join yarn with a slip st, 4 sts in from left-hand seam on upper edge. Work as for right-hand side.
Insert Lining into Purse: Whipstitch in place along upper edges of Back and Front. Insert the hook ends of the Purse Handles into the Handle Loops.

EMBELLISHING

Attach trims: Note above photo shows each layer of trim in the order it is applied.
- Cut feather trim to width of top edge of Purse.
- Apply thin line of glue to back side of trim; adhere along top edge.
- Cut beaded trim to width of top edge of Purse plus 1"/2.5 cm. Turn in 1⁄2"/1.3 cm on each end; glue wrong sides of each trim end together to secure.
- Apply glue along top edge of feather trim; press beaded trim in place.
- Cut braid trim to width of top edge of Purse plus 1"/2.5 cm. Turn in 1⁄2"/1.3 cm on each end; glue ends as for beaded trim.
- Apply glue along top of beaded trim; press braid trim in place.
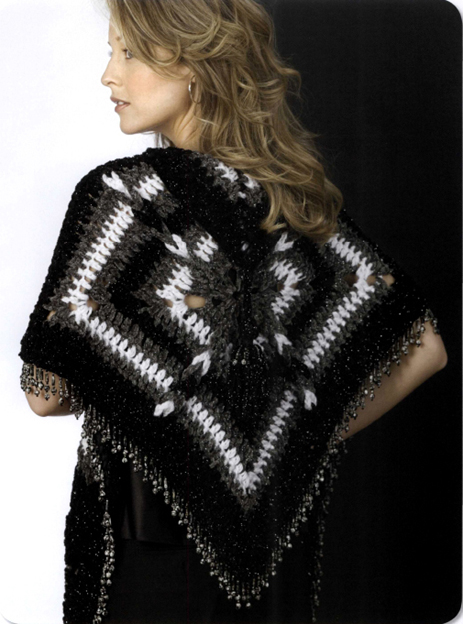
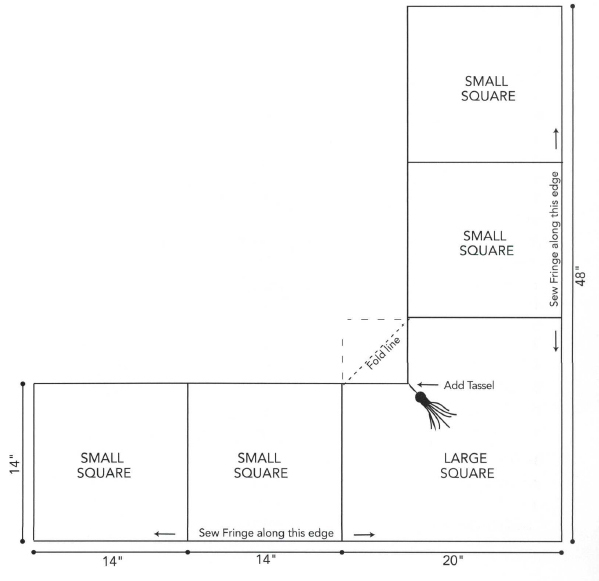
Elegant Squares Wrap
DESIGNED BY MARILYN LOSEE
INTERMEDIATE
This comfortable wrap is another take on granny squares, but this version is completely updated. It’s sophisticated, sparkly, and so easy to make!
ONE SIZE
FINISHED MEASUREMENTS
Small Squares measures 14"/35.5 cm; Large Square measures 20"/51 cm
Wrap measures 48"/122 cm along one side, after assembly, excluding fringe
YARN
Caron International’s Glimmer (85% acrylic, 15% polyester; 1.76 oz/50 g, 49 yds/45 m ball):
- #0019 Charcoal (A), 4 balls
- #0020 Black (B), 5 balls
Caron International’s Simply Soft (100% acrylic; 6 oz/170 g, 315 yds/288 m skein):
- #9701 White (C), 1 skein, use double strand throughout
CROCHET HOOKS
One each size US K-10 1⁄2 (6.5 mm) and L-11 (8 mm), or size to obtain gauge
ADDITIONAL MATERIALS
Yarn needle
3 yards/2.75 m beaded fringe
1 skein black embroidery floss
Sewing needle and black thread
6"/15 cm -wide piece of cardboard
Safety pin
GAUGE
Gauge is not critical for this project.
NOTE
Wrap is worked in 5 Squares, then joined (see Diagram); purchased beaded fringe is sewn to 2 long sides, Tassel is added to the neck edge of large Square and end folded down.
CROCHET STITCHES USED
ch: chain
ch-loop: chain loop—ch 10, slip st in top of dc just made.
dc: double crochet
joining-dc: joining double crochet—yarn over, insert hook in next dc, yarn over and pull up a loop, yarn over and draw through 2 loops on hook, insert hook in ch-loop, yarn over and draw through ch-loop and both loops on hook.
sc: single crochet
slip st: slip stitch

Note: RS is facing for all rounds.
Using larger hook and A, chain 4; join with a slip st to form a ring.
Round 1: Using A, ch 5 (counts as dc, ch 2), in the ring work 2 dc, work ch-loop, * dc, ch 2, 2 dc, work ch-loop; repeat from * twice, join with a slip st to third ch of beginning ch-5—4 ch-loops.
Round 2: Slip st in first ch-2 space, ch 7 (counts as first dc plus ch 4, now and throughout), work 2 dc in same space, dc in next 2 dc, work ch-loop, dc in next dc, * work [2 dc, ch 4, 2 dc] in next ch-2 space, dc in next 2 dc, work ch-loop, dc in next dc; repeat from * twice, dc in same space as first dc (beginning ch-7), join with a slip st to first dc (third ch of beginning ch-7)—28 dc, 4 ch-4 spaces.
Fasten off A; join double strand of C with a slip st in first ch-4 space.
Round 3: Using 2 strands of C held together, ch 7, work 2 dc in same space, dc in next 4 dc, work ch-loop, dc in next 3 dc, * work [2 dc, ch 4, 2 dc in next ch-4 space] for corner, dc in next 4 dc, work ch-loop, dc in next 3 dc; repeat from * twice, dc in same space as first dc, join with a slip st in first dc—44 dc.
Fasten off C; join A with a slip st in first ch-4 space.
Round 4: Using A, ch 7, work 2 dc in same space, dc in next 6 dc, work ch-loop, dc in each dc to corner, * work corner in next ch-4 space, dc in next 6 dc, work ch-loop, dc in each dc to corner; repeat from * twice, dc in same space as first dc, join with a slip st to first dc—60 dc.
Fasten off A; join B with a slip st in first ch-4 space.
Round 5: Using B, ch 7, work 2 dc in same space, dc in next 15 dc, * work [2 dc, ch 4, 2 dc] in next ch-4 space (corner), dc in next 15 dc; repeat from * twice, dc in same space as first dc, join with a slip st to first dc—76 dc.
Do NOT fasten off.
Transfer loop from hook to safety pin, to keep piece from unraveling while braiding ch-loops.
BRAID CHAIN-LOOPS
Working from center to outside edge, insert hook from front to back in first ch-loop (Round 1), * pull ch-loop on next round through ch-loop on hook; repeat from * twice, leaving last ch-loop free (to be joined on next round). Repeat braiding on remaining 3 sides.
Round 6: Continuing with B, return loop on safety pin to hook; slip st in first ch-4 space, ch 7, work 2 dc in same space, dc in next 9 dc, work joining-dc, dc in next 9 dc, * work [2 dc, ch 4, 2 dc] in next ch-4 space (corner), dc in |next 9 dc, work joining-dc, dc in next 9 dc; repeat from * twice, dc in same space as first dc, join with a slip st to first dc. Fasten off.
Using yarn needle, weave in ends.
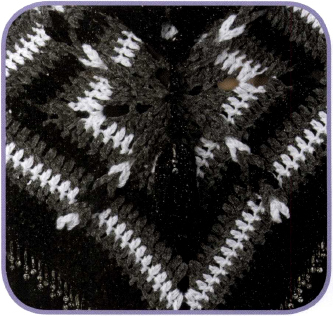
LARGE SQUARE (MAKE 1)
Work Rounds 1–4 of Small Square—60 dc.
Round 5: Using B, work as for Round 4 of Small Square, working ch-loop above ch-loop of previous round—76 dc.
Round 6: Using A, repeat Round 5 of Large Square—92 dc.
Round 7: Using C, repeat Round 5 of Large Square—108 dc.
Round 8: Using A, work as Round 5 of Small Square, working dc in each dc between corners, work corners as established—124 dc.
Place last loop on safety pin. Braid ch-loops.
Round 9: Using B, work as Round 6 of Small Square, joining ch-loops with joining-dc.
Round 10: Using B, work as Round 5 of Small Square, working dc in each dc between corners, work corners as established. Fasten off. Weave in ends.
ASSEMBLY (SEE SCHEMATIC)
Using yarn needle and B, [join 2 Small Squares together] twice—2 strips of 2 Squares each.
Join one strip to each side of Large Square, as shown.
EDGING
Using smaller hook and B, join yarn with a slip st in any corner ch-space on outer edge; ch 1, work 2 sc in same space, work sc in each dc around, working 2 sc in corner loops where squares are joined and 4 sc in next 3 corners; in last corner (at beginning of round), work 2 sc in same space as beginning sc, join with a slip st to first st. Fasten off. Weave in end.
EMBELLISHING
ATTACH BEADED FRINGE
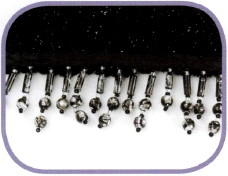
- Pin beaded fringe to WS of lower edge of Wrap, turning in ends.
- Sew to lower edge of Wrap using sewing thread.
MAKE TASSEL:
- Wrap B around 6"⁄15 cm piece of cardboard to desired thickness.
- Tie top of Tassel with length of embroidery floss.
- Cut a 1-yard/92 cm length of B and thread through top of Tassel.
- Trim bottom of Tassel evenly.
- Wrap neck of Tassel with embroidery floss, leaving a 10"⁄25.5 cm length at one end, and secure. Pull long end of floss through top of Tassel. Tie securely at top of Tassel.
- Thread short end through neck to skirt of Tassel.
- With smaller hook and using floss end at top of Tassel, make a 2"⁄ 5 cm -long ch.
- Fasten off, but do not cut yarn end.
- Cut enough beaded fringe to encircle neck of Tassel and sew in place.
- Using end of floss, sew Tassel securely to the point of large square, using Schematic as guide.
Cropped Vest
DESIGNED BY CARI CLEMENT
EASY
Tie an outfit together with this simple cropped vest. The beading and detail around the trim is sure to spice up any look.
SIZES
X-Small (Small, Medium, Large, 1X, 2X)
FINISHED MEASUREMENTS
Bust 32 (36, 40, 44, 48, 52)"⁄81 (91.5, 101.5, 112, 122, 132) cm
Back Length (from shoulder) 13 (13, 13, 13 1⁄2, 13 1⁄2, 14)"⁄33 (33, 33, 34, 34, 35.5) cm
YARN
Caron International’s Simply Soft Tweed (98% Acrylic, 2% Rayon; 3 oz/85 g, 150 yds, 137 m ball):
- #0002 Off White (MC), 2 (3, 3, 4) balls
Caron International’s Simply Soft (100% acrylic; 6 oz/170 g, 315 yds/288 m skein):
- #9727 Black (CC), 1 skein
CROCHET HOOK
One size US H-8 (5 mm), or size to obtain gauge
GAUGE
In Pebble st, 16 sts and 15 rows = 4"⁄10 cm
ADDITIONAL MATERIALS
Yarn Needle
#16 tapestry needle
294 (312, 330, 362, 384, 406) large-hole 5/0 E seed beads, Matte Black (Miyuki)
CROCHET STITCHES USED
ch: chain
dc: double crochet
sc: single crochet
slip st: slip stitch
Bead Pebble Stitch (Edging)
Work as for Pebble st (below), sliding a bead down after dc and before sc; to turn corners, in corner work [3 sts in pattern in same st, adding 2 beads].
Decrease (dec)
Work 2 sts together in pattern to decrease 1 st, as follows:
- In pattern: [begin the next st in pattern, but to not complete it (leave 1 loop from the stitch on hook)] twice, yarn over, draw through all 3 loops on hook.
- For sc: insert hook into next st, yarn over and pull up a loop, leaving loop on hook.
- For dc: yarn over, insert hook in next st, yarn over and pull up a loop, yarn over and draw through 2 loops, leaving remaining loop on hook.
Pebble Stitch (multiple of 2 sts)
- ROW 1: Dc in third ch from hook, * sc in next st, dc in next st; repeat from * across, end dc in last ch, turn.
- ROW 2: Ch 2, * dc in next sc, sc in next dc, repeat from * across, end dc in top of beginning ch.
- Repeat Row 2 for Pebble st.
NOTES
- Vest is worked in one piece to underarms, then Back and Fronts are worked separately to shoulders.
- Beaded trim is worked after garment is assembled.
HELPFUL
Place a marker at the beginning of first row to indicate RS. Pebble stitch looks the same on both sides, therefore indications of RS and WS in instructions are to clarify instructions only.

Using MC, chain 130 (146, 162, 178, 194, 210).
Begin Pebble st, Row 1—128 (144, 160, 176, 192, 208) sts, counting beginning ch.
Work even in pattern, repeating Row 2, until piece measures 4 1⁄2"/ 11.5 cm from beginning (all sizes), end with a WS row; count in 33 (37, 41, 45, 49, 53) sts from each side, place a marker (pm) on these sts (center of underarm)—32 (36, 40, 44, 48, 52) sts each side for Fronts; 64 (72, 80, 88, 96, 104) sts for Back, including marked sts.
DIVIDING ROW
(RS) Work across 26 (30, 32, 34, 36, 38) sts in pattern for right Front, turn, leaving remaining sts unworked.
RIGHT FRONT
SHAPE ARMHOLE
WS) Beginning this row, at armhole edge (beginning of WS rows, end of RS rows), dec 1 st every row 12 (12, 12, 14, 14, 14) times—14 (18, 20, 20, 22, 24) sts remain.
SHAPE NECK AND SHOULDER
WS) Work across to last 3 (5, 7, 5, 7, 7) sts, dec across next 2 sts, turn, leaving remaining sts unworked—12 (14, 14, 16, 16, 18) sts remain.
RS) Beginning this row, at neck edge (end of WS rows, beginning of RS rows), dec 1 st every row 10 times—2 (4, 4, 6, 6, 8) sts remain for shoulder.
Work even until armhole measures 8 1⁄2 (8 1⁄2, 8 1⁄2, 9, 9, 9 1⁄2)"⁄21.5 (21.5, 21.5, 23, 23, 24) cm (from dividing row. Fasten off.
With RS facing, beginning with marked st, skip 6 (6, 8, 8, 10, 12) sts to the left, counting underarm marked st; join yarn with a slip st in next st.
Ch 2, work in pattern across to 5 (5, 7, 7, 9, 11) sts before second marked st, turn, leaving remaining sts unworked—52 (60, 64, 72, 76, 80) sts for Back.
SHAPE ARMHOLES
WS) Beginning this row, dec 1 st each side every row 12 (12, 12, 14, 14, 14) times—28 (36, 40, 44, 48, 52) sts remain.
Work even until armhole measures 6 (6, 6, 6 1⁄2, 6 1⁄2, 7)"⁄ 15 (15, 15, 16.5, 16.5, 18) cm from dividing row, end with a WS row.
SHAPE RIGHT SHOULDER
RS) Continuing in pattern, work across 8 (10, 10, 12, 12, 14) sts, turn, leaving remaining sts unworked for neck and left shoulder.
WS) Beginning this row, at neck edge dec 1 st every row 6 times—2 (4, 4, 6, 6, 8) sts remain for shoulder.
Work even until armhole measures 8 1⁄2 (8 1⁄2, 8 1⁄2, 9, 9, 9 1⁄2)"⁄21.5 (21.5, 21.5, 23, 23, 24) cm from dividing row. Fasten off.
With RS facing, skip center 12 (16, 20, 20, 24, 24) sts; join yarn with a slip st 8 (10, 10, 12, 12, 14) sts from left armhole edge, work to end.
WS) Beginning this row, at neck edge dec 1 st every row 6 times—2 (4, 4, 6, 6, 8) sts remain for shoulder.
Work even until armhole measures 8 1⁄2 (8 1⁄2, 8 1⁄2, 9, 9, 9 1⁄2)"⁄21.5 (21.5, 21.5, 23, 23, 24) cm from dividing row. Fasten off.
LEFT FRONT
With RS facing, skip 6 sts after marked st, join yarn with a slip st in next st; ch 2, work in pattern to end.
SHAPE ARMHOLE
(WS) Beginning this row, at armhole edge (end of WS rows, beginning of RS rows), dec 1 st every row 12 (12, 12, 14, 14, 14) times—14 (18, 20, 20, 22, 24) sts remain.
SHAPE NECK AND SHOULDER
(RS) Work across to last 3 (5, 7, 5, 7, 7) sts, dec across next 2 sts, turn, leaving remaining sts unworked—12 (14, 14, 16, 16, 18) sts remain.
(WS) Beginning this row, at neck edge (end of RS rows, beginning of WS rows), dec 1 st every row ten times—2 (4, 4, 6, 6, 8) sts remain for shoulder.
Work even until armhole measures 8 1⁄2 (8 1⁄2, 8 1⁄2, 9, 9, 9 1⁄2)"⁄ 21.5 (21.5, 21.5, 23, 23, 24) cm from dividing row. Fasten off.
FINISHING
Sew shoulders seams.
Bead counts are what were used on sample garment, plus 10 to 12 extra; it’s easier to have a few beads left on the yarn after finishing than to have to string additional beads to complete the edging; sample garment used approximately 14 beads per 6"⁄15 cm.
BEADED EDGING
- Vest: Using tapestry needle, thread 164 (182, 196, 220, 238, 252) beads onto MC.
- With WS facing, join yarn with a slip st to right Back neck edge at left shoulder seam.
- Begin Bead Pebble st; work 1 row evenly across Back neck, along right Front neck shaping, down Front edge, across lower edge, up left Front and neck shaping (be sure to work the same number of beads on left Front as on right Front) to shoulder.
- Armholes: Thread 70 (70, 72, 76, 78, 82) beads onto MC.
- With WS facing, join yarn with a slip st to underarm at marker.
- Begin Bead Pebble st; work 1 row evenly around armhole. Fasten off.
- Count the number of beads used for armhole and thread an equal number for remaining armhole. Repeat Step 6 for remaining armhole.
CROCHETED LOOP STITCH TRIM
- Join CC to the WS of the center Back neck edge on the last row of the vest.
- Insert the hook between the last row of the Vest and the beaded trim row from RS to WS; yarn over and pull loop through to RS and through loop on hook.
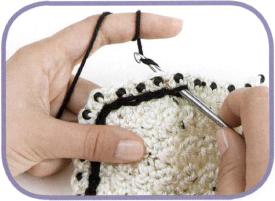
- Skip 2 sts (1 bead); repeat Step 2.
- Continue in this manner around Vest, taking care not to pull the loops too tightly.
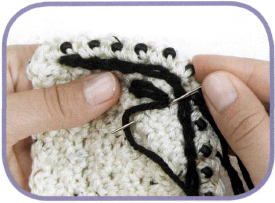
- Make three Lazy Daisy stitches on each corner of the lower Front and upper Front (see illustration here), using photos as a guide.
