Focus on Color
Think deep, saturated colors …
bright, sparkling colors …
intense, eye-popping colors …
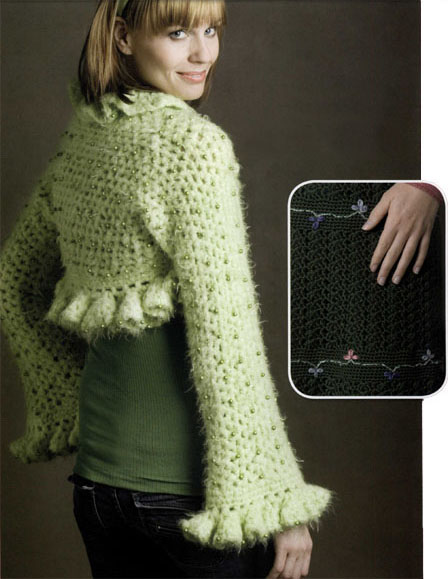
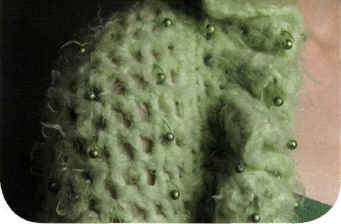
Beaded Ruffled Shrug
DESIGNED BY KIM RUTLEDGE
INTERMEDIATE
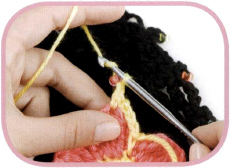
Bliss is the perfect yarn for this embellishing technique using beads. The super-soft, slightly fuzzy nature of Bliss totally disguises the thread and the dangle-bead technique easily shows off the beads. The technique is easy, takes little time, and results in a young, unique look.
SIZES
Small (Medium/Large)
FINISHED MEASUREMENTS
To fit Bust 32 – 35 (36 – 39)"⁄81 – 89 (91.5 – 99) cm
Back Length 17 (18)"⁄43 (45.5) cm, including ruffle
YARN
Caron International’s Bliss (60% acrylic, 40% nylon; 1.76 oz/50 g, 82 yds/75 m ball):
• #0008 Sour Apple, 10 (11) balls
CROCHET HOOK
One size US K-10.5 (6.5 mm), or size to obtain gauge
ADDITIONAL MATERIALS
502 (570) – 6 mm Lime Glass Miracle Beads
Beading needle (thin enough to fit through bead)
Beading nylon or beading thread to match Yarn needle
Row counter (optional)
GAUGE
In stitch pattern, 12 sts and 8 rows = 4"⁄10 cm
CROCHET STITCHES USED
ch: chain
hdc: half double crochet
sc: single crochet
slip st: slip stitch
NOTE
Shrug is worked in one piece; beads are added before assembly, allowing the option of adding as many or as few beads as preferred.
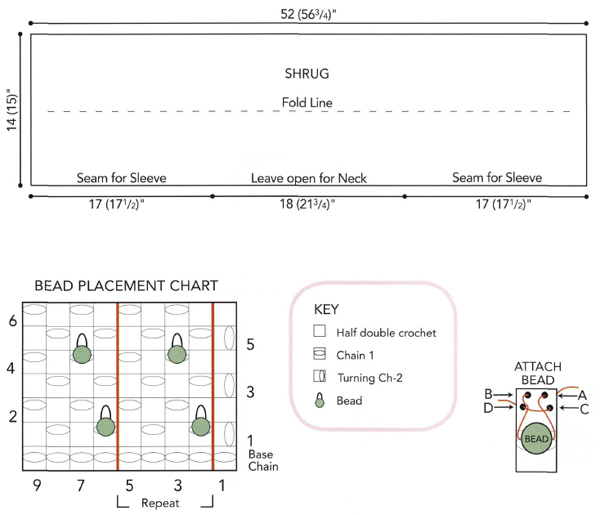
SHRUG
Chain 155 (171).
Row 1 (RS): Hdc in third ch from hook, hdc in next ch, * ch 1, skip 1 ch, hdc in next ch; repeat from * across to last 3 ch, ch 1, skip 1 ch, hdc in each of last 2 ch, turn—78 (86) hdc.
Row 2: Ch 3 (counts as hdc, ch-1), skip first 2 hdc, * hdc in next ch-1 space, ch 1, skip next hdc; repeat from * to last hdc, hdc in last hdc, turn.
Row 3: Ch 2 (counts as hdc), * hdc in next ch-1 space, ch 1, skip next hdc; repeat from * across, end hdc in last ch-1 space and in last hdc, turn.
Rows 4 – 27: Repeat Rows 2 and 3.
Size Small: Fasten off.
Size Medium/Large, work 3 more rows, ending with Row 2. Fasten off. Using yarn needle, weave in ends.

EMBELLISHING
Note: Add beads to body of Shrug before assembling.
Thread the tapestry needle with the beading thread.
- With RS facing, beginning Row 2 (see Bead Placement Chart, here), secure beading yarn to WS of piece.
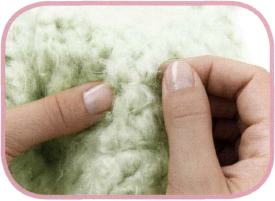
- Thread needle through the first hdc on the WS of piece.
- Bring needle to RS at Point A (see Attach Bead Illustration).
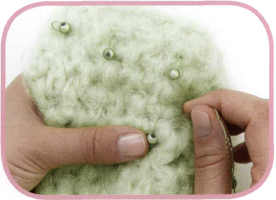
- Thread one bead onto thread.
- Holding bead down, insert needle through Point B to the WS of the piece, leaving the bead on a loop of beading thread long enough so that the bead hangs down to the ch-1 space on the row below.
- Bring needle to the RS at Point C, then to WS at Point D, which secures the loop in place.
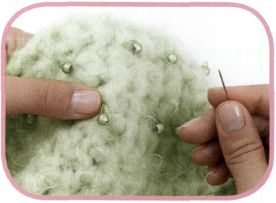
- Thread needle through the next hdc, to hide the thread.
- Repeat Steps 4–8, referring to Row 2 of Bead Placement Chart.
Tip: Give a lengthwise tug on the shrug to be sure you’re not pulling the beading nylon or thread too tightly and gathering the stitches.
- Thread needle through the backs of two rows, using the same method as for Step 8.
- Repeat Steps 3–8 for the next and every third row.
ASSEMBLY
SLEEVE SEAMS
Fold shrug in half lengthwise with WS tog.
Measure and mark 17 (17 ½)" / 43(44) cm from each end (see diagram here).
Sew seams, leaving 18 (21 ¾)" / 46(55) cm open in center.
RUFFLE – CUFFS
Work around each Cuff.
Round 1: With RS facing, join yarn with slip st at seam; ch 1, sc an odd number of sts evenly around, join with slip st in first sc.
Round 2: Ch 1, sc in each sc around, join with slip st in first sc.
Round 3: Ch 3 (counts as hdc, ch 1), * skip 1 sc, hdc in next sc, ch 1; repeat from * around, end skip last sc, join with slip st in first hdc.
Round 4: Slip st in first ch-1 space, ch 3, hdc in same ch-1 space, * ch 1, skip next hdc, [hdc, ch 1, hdc] in next ch-1 space; repeat from * around, end ch 1, skip next hdc, join with slip st in first st.
Round 5: Repeat Round 4.
Round 6: Slip st in first ch-1 space, ch 3, hdc in same ch-1 space, * ch 1, skip next hdc, hdc in next ch-1 space, ch 1, skip next hdc, [hdc, ch 1, hdc] in next ch-1 space; repeat from * around, end ch 1, join with slip st to first hdc. Fasten off Cuffs.
RUFFLE — COLLAR
Work around center opening for Collar.
Rounds 1–6: As above. Repeat Round 3 once. Fasten off Collar. Weave in all ends.
BEADING — CUFFS AND COLLAR
Work bead loops as for Shrug, working on every third hdc (skipping two hdc between each bead loop), across the last round only of the Cuffs and Collar.

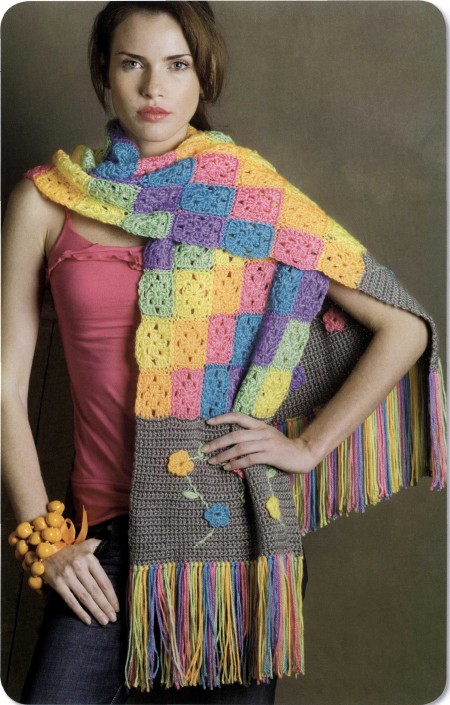
Mini-Squares Wrap
DESIGNED BY KIM BIDDEX WITH MARILYN LOSEE
EASY
This colorful wrap is the perfect way to top off a summer dress or liven up a winter coat. The beautiful embroidery embellishing is easy to do and makes this Simply Soft wrap a real eye-catcher!
ONE SIZE
FINISHED MEASUREMENTS
Width 15"⁄38 cm
Length 61"⁄155 cm, excluding fringe
YARN
Caron International’s Simply Soft (100% acrylic; 6 oz/170 g, 315 yds/288 m skein):
- #9742 Grey Heather (MC), 1 skein
Caron International’s Simply Soft Brites (100% acrylic; 6 oz/170 g, 315 yds/288 m skein):
- #9604 Watermelon (A), 1 skein
- #9608 Blue Mint (B), 1 skein
- #9610 Grape (C), 1 skein
- #9607 Limelight (D), 1 skein
- #9606 Lemonade (E), 1 skein
- #9605 Mango (F), 1 skein
CROCHET HOOK
One size US H-8 (5 mm), or size to obtain gauge
ADDITIONAL MATERIALS
Yarn/tapestry needle size 13 or 16
GAUGE
In single crochet, 16 rows = 4"⁄10 cm; each square = 2 ½"⁄6.25 cm
CROCHET STITCHES USED
ch: chain
dc: double crochet
sc: single crochet
slip st: slip stitch
NOTE
Make 108 squares, 18 each using colors A, B, C, D, E, and F.
SQUARES
Using appropriate color, chain 3.
Round 1: Work 2 dc in third ch from hook (counts as first cluster), ch 1; in same ch, work [3 dc, ch 1] 3 times, join with slip st to top of beginning ch-3—4 dc clusters.
Round 2: Ch 3, * work [3 dc, ch 1, 3 dc] in next ch-1 space, ch 1; repeat from * 2 times, end by working [3 dc, ch 1, 2 dc] in last ch-1 space, join with slip st to second ch of beginning ch-3. Fasten off.
ASSEMBLY
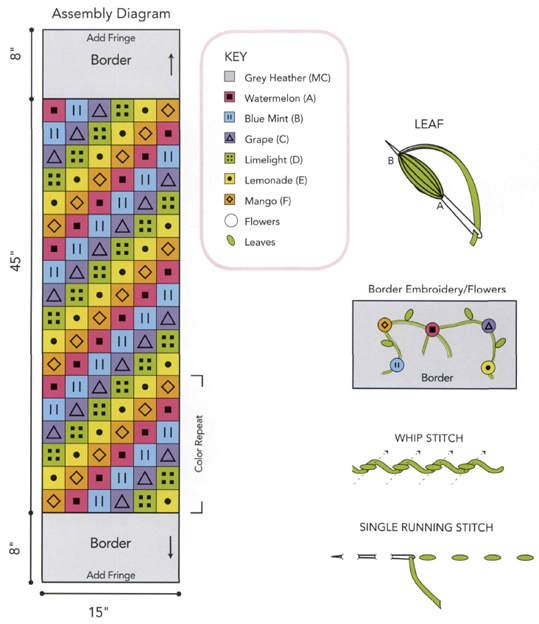
Using yarn needle and appropriate color(s), join Squares in rows of 6, then join rows to form a rectangle as shown (see Assembly Diagram).
(work on both ends of rectangle)
With RS facing, using MC, join yarn with a slip st to corner on one short end of piece.
Row 1: Ch 1, sc evenly across, working 9 sc across each Square; turn—54 sc.
Row 2: Ch 1, sc in each sc across; turn.
Repeat Row 2 until Border measures 8"⁄20.5 cm from beginning. Fasten off.
FINISHING
Using yarn/tapestry needle, weave in all ends.
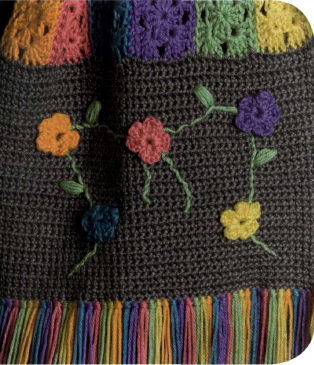
EMBELLISHING
Note: Embellishing is worked on both sides, making the Borders reversible. References to WS and RS are for clarity of instructions only. Use photo and illustrations as guides for placement of Vine, Flowers, and Leaves.
FLOWERS
(make 20: 4 each using A, B, C, E, and F)
- Leaving a 6"⁄15 cm tail for attaching Flower to Wrap, chain 3.
- Work 2 dc in third ch from hook, ch 2, slip st in third ch (first petal made); in the same ch, work [ch 2, 2 dc, ch 2, slip st] four times—5 petals. Fasten off.
- Sew 10 Flowers randomly to each border, 5 on RS, 5 on WS opposite those on RS.
VINE
Work on both borders of Wrap.
- Thread tapestry needle with one strand of D.

- Referring to Border Embroidery/Flowers illustration for stitch placement, work 1⁄4"⁄.6 cm Running stitches between the flowers (stitches show alternately on both sides of the work).
- Work Whip stitch through the Running stitches on both sides of the Border. (Note: The arrows in the Assembly Diagram show the path of the Whip stitch through the Running stitches.)
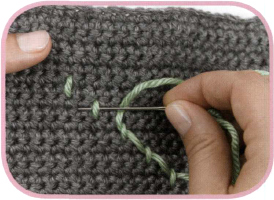
LEAVES
- Thread tapestry needle with a double strand of D.
- * Insert needle at Point A (see Leaf Illustration) through the border to the WS, then bring needle to the RS at Point B, 1" to 1 ½"⁄ 2.5 to 3.5 cm from the entry point. Work loosely to allow leaf shape to form on both RS and WS of piece.
- Repeat from * 3 or 4 times, until the leaf is the desired shape and thickness. Fasten off securely and weave ends into Leaf.
- Cut 16"⁄41 cm -long strands of A, B, C, D, E, and F.
- Holding 2 strands of one color together, fold the strands in half lengthwise.
- Using crochet hook, * insert hook from WS to RS into corner st of Border, pull through fold of strands (loop), insert ends into loop, and pull tight against edge of Border.
- Repeat from * in color sequence of A, B, C, D, E, F, or as desired, working into every sc along last row of Border.
- Trim Fringe ends even.
Tulips Shawl
DESIGNED BY TREVA G. MCCAIN
INTERMEDIATE
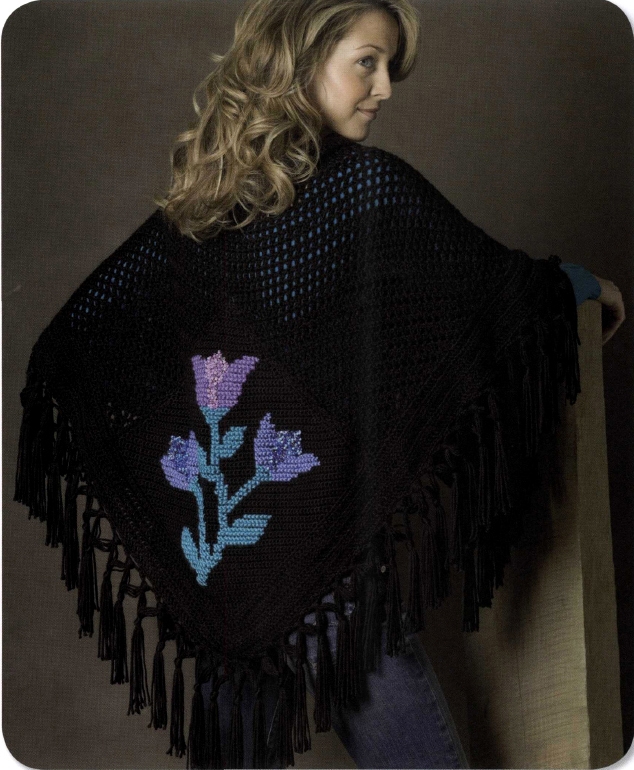
Crochet provides the perfect background for embellishments of all kinds. Cross stitch with beads makes a bold statement on this truly elegant shawl. Simply Soft provides the drape and intense color that creates an impressive piece.
ONE SIZE
FINISHED MEASUREMENTS
Width 68"⁄ 172.5 cm
Length 44"⁄112 cm
YARN
Caron International’s Simply Soft Brites (100% acrylic; 6 oz/170 g, 315 yds/288 m skein):
- #9727 Black (MC), 4 skeins
- #9610 Grape (A), 1 skein
- #9608 Blue Mint (B), 1 skein
- #9609 Berry Blue (C), 1 skein
CROCHET HOOK
One size US I-9 (5.5 mm), or size to obtain gauge
ADDITIONAL MATERIALS
Yarn needle
30 g tube #3 seed rocaille beads in mixed shades of blue and purple, 2 tubes
Beading needle thin enough to fit through beads
GAUGE
Gauge is not critical in this project.
CROCHET STITCHES USED
ch: chain
dc: double crochet
sc: single crochet
sc2tog: single crochet 2 together—insert hook in next stitch, yarn over and pull up loop (two loops on hook), insert hook in next stitch, yarn over and pull up a loop, yarn over and draw through all three loops on hook.
slip st: slip stitch
Mesh Stitch (multiple of 2 sts + 1)
- NOTE: Each mesh (st) is made up of one dc and a ch-1; the last dc completes the final mesh (st).
- ROW 1: Ch 4 (counts as dc, ch 1), dc in next st (first mesh) [ch1, dc], repeat from [to] across, working final dc in last st, turn.
- Repeat Row 1 for Mesh st.
NOTES
- Tulip Square is worked first, then embroidered in beaded Cross stitch, using the Chart; mesh side panels are worked separately and attached to upper two sides of the Square. An additional mesh panel is worked at the upper edge to complete Shawl.
- Each square on the Chart represents one beaded Cross stitch on the Tulip Square.
HELPFUL
Using a strand of contrast-color thread or yarn, work a Basting st from corner to corner in both directions on the Tulip Square; these lines correspond to the red lines on the Chart, and indicate where to center the Tulip Motif.
TULIP SQUARE
Using MC, chain 2.
Row 1: Work 3 sc in second ch from hook, turn—3 sc.
Row 2: Ch 1, work 2 sc in first sc (increase), sc in next sc, work 2 sc in last sc (increase), turn—5 sc.
Row 3: Ch 1, work 2 sc in first sc, sc in each sc across to last sc, work 2 sc in last sc, turn—7 sc.
Rows 4 – 40: Repeat Row 3—81 sc.
Row 41: Sc2tog, sc in each space across to last 2 sc, sc2tog, turn—79 sc remain.
Rows 42 – 79: Repeat Row 41—3 sc remain.
Row 80: Sc3tog—1 sc remains; do NOT fasten off.
BORDER
With RS facing, working into last sc worked (corner), ch 1, * work 3 sc in corner sc, sc in each row end to next corner; repeat from * around, join with a slip st to beginning sc. Fasten off. Using yarn needle, weave in all ends.
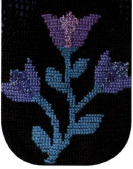
TULIP MOTIF
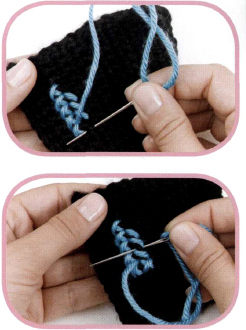
- Working in Cross st from Chart and photos above, cross-stitch the Tulip Motif.
- For the cross-stitched areas with beads, separate a length of desired yarn into a 2-ply strand (see here), thread beading needle, and secure yarn to WS, bringing up needle to begin the first stitch.
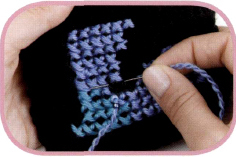
- Slide 2 beads onto needle and slide down next to square when making the first leg of your Cross stitch ( / ).


- Slide 3 beads onto needle and slide down next to square when finishing second leg of Cross stitch ( \ ).
MESH PANELS (MAKE 2)
Using MC, chain 5.
Row 1: Dc in the fifth ch from hook — this is the first ch worked (counts as dc, ch 1, dc)—1 mesh.
Row 2: Ch 4 (counts as dc, ch 1), dc in first dc (second ch of beginning ch-5), ch 1, skip next ch, [dc, ch 1, dc] in 4th ch of beginning ch-5, turn—3 meshes.
Row 3: Ch 4 (counts as dc, ch 1), dc in first dc (increase), ch 1, skip ch-1 space, work [dc, ch 1] in each dc across to last dc (third ch of beginning ch-4), [dc, ch 1, dc] in last dc (increase), turn—5 meshes.
Rows 4 – 20: Repeat Row 3, increasing 1 mesh st each side every row—39 meshes.
Fasten off, leaving a 20"⁄51 cm tail. Using yarn needle and tail, sew one Mesh Panel to each upper side edge of Tulip Square. Weave in ends.
UPPER EDGE
With RS facing, attach yarn to first dc (corner) of right-hand side Mesh Panel, ready to work across the upper edge.
Row 1: Ch 4 (counts as dc, ch-1), dc in same space as joining (increase), ch 1, skip ch-1 space, work [dc, ch 1] in each dc across to last st, work [dc, ch 1, dc] in last st (increase), turn—80 meshes.
Rows 2 – 18: Repeat Row 3 of Mesh Panels, increasing 1 mesh st each side every row—114 meshes.
BORDER
Round 1 (RS): Working across the upper edge, ch 3 (counts as first dc), work 2 dc in first dc (upper right-hand corner); dc in each dc and ch-1 space across to last dc; work 5 dc in last dc (upper left-hand corner); work 3 dc in each row end along side of Mesh Panel; dc in each sc along side of Tulip Square to lower edge (point of Tulip Square); work 3 dc in center st at point; dc in each sc along side of Tulip Square; work 3 dc in each row end along side of Mesh Panel to upper right-hand corner; work 2 dc in same st as first st, join with a slip st in beginning ch-3, turn.
Round 2: Ch 3 (counts as dc), work 2 dc in same space as joining (upper right-hand corner), dc in each dc around, working 3 dc in the center dc at lower edge point, and 5 dc in center st at upper left-hand corner; end by working 2 dc in same st as first st, join with a slip st in beginning ch-3, turn.
Rounds 3 – 5: Repeat Round 2.
Round 6: Ch 1, work 3 sc in same space as joining, sc in each dc around, working 3 sc in the center dc at lower point, and 5 sc in center dc at upper corner; end by working 2 sc in same st as first st, join with a slip st in beginning ch-1, turn.
Round 7: Ch 1, sc in same space as joining, ch 1, [sc, ch 1] in each sc across upper edge to center st of sc-5 (corner); * ch 5, skip 4 sc, work 2 sc in next st; repeat from * around, working [sc, ch 5, sc] in center st at lower edge point, join with a slip st to beginning sc at upper edge corner. Fasten off.
FINISHING
FRINGE
Using yarn needle, weave in ends.
Cut strands 16"⁄41 cm long; holding 6 strands together, fold Fringe in half. Using crochet hook, * insert hook from WS to RS into first ch-5 space, pull through fold of stands (loop), insert ends into loop and pull tight against edge, repeat from *, working into each ch-5 space around.
* Separate each 12-strand Fringe into two 6-strand groups; combine one 6-strand group with the adjacent group from the next Fringe (see illustration). Tie an overhand knot in new 12-strand group, approximately 2"⁄5 cm down from the edge of Shawl; repeat from * across, leaving one 6-strand group free at each side.

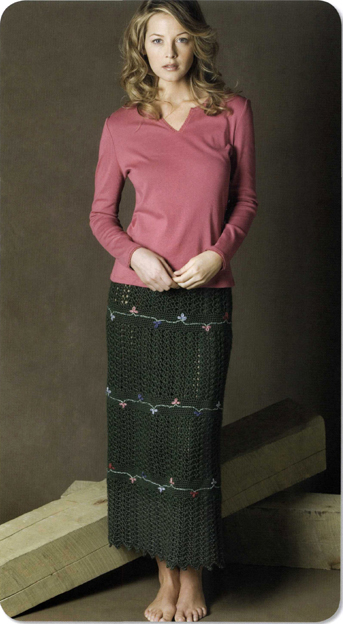
Gypsy Skirt
DESIGNED BY TREVA G. MCCAIN
INTERMEDIATE
This versatile skirt can be worn year-round and is the ideal design for experimenting with color. The bands separating the tiers make great “canvases” for different types of embroidery and embellishing. Simply Soft gives the skirt the perfect drape.
SIZES
Small (Medium, Large)
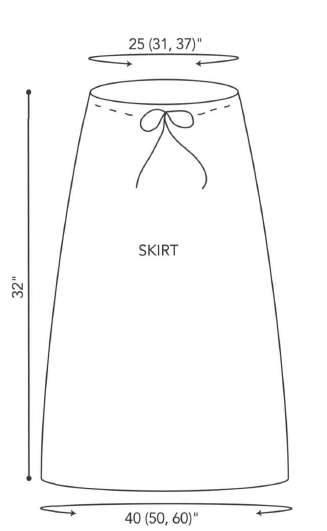
FINISHED MEASUREMENTS
Waist 25 (31, 37)"⁄63.5 (78.5, 94) cm
Length 32"⁄81 cm, all sizes
YARN
Caron International’s Simply Soft (100% acrylic; 6 oz/170 g, 315 yds/288 m skein):
- #9707 Dark Sage (MC), 3 (3, 4) skeins
- #9705 Sage (A), 1 skein
- #9723 Raspberry (B), 1 skein
- #9721 Victorian Rose (C), 1 skein
- #9710 Country Blue (D), 1 skein
- #9709 Lt. Country Blue (E), 1 skein
CROCHET HOOK
One size US I-9 (5.5 mm), or size to obtain gauge
ADDITIONAL MATERIALS
Yarn needle
30 g tube frosted green #3 seed beads, 1 tube
Beading needle (thin enough to fit through beads)
GAUGE
In Shell pattern, 4 shell-and-dc groups = 5"⁄12.5 cm; 10 rows = 5"⁄12.5 cm
SPECIAL TERMS
Shell: Work (2 dc, ch 1, 2 dc) in stitch indicated.
Picot: Ch 5, sc in fifth ch from hook.
CROCHET STITCHES USED
ch: chain
dc: double crochet
picot—ch 5, sc in fifth ch from hook.
sc: single crochet
shell—work (2 dc, ch 1, 2 dc) in stitch indicated.
slip st: slip stitch
SKIRT
Using MC, beginning at waist, chain 120 (150, 180); join with a slip st to form a ring, being careful not to twist chain.
Round 1: Ch 1, sc in same space as joining and in each ch around; join with a slip st to beginning sc—120 (150, 180) sc.
Round 2: Ch 4 (counts as first dc, ch 1), * skip 1 st, dc in next st, ch 1; repeat from * around, join with a slip st in third ch of beginning ch-4—60 (75, 90) dc.
Round 3: Ch 1, sc in same space and in each dc and ch-1 space around, join with a slip st to beginning sc—120 (150, 180) sc.
Round 4: Begin Shell pattern—Ch 3 (counts as first dc here and throughout), skip 2 st, shell in next st, skip 2 sts, * dc in next st, skip 2 sts, shell in next st, skip 2 sts; repeat from * around, join with a slip st in third ch of beginning ch-3—20 (25, 30) shells, 20 (25, 30) dc.
Round 5: Ch 3; skip 2 dc, shell in ch-1 space, skip 2 dc, * dc in next dc, skip 2 dc, shell in ch-1 space, skip 2 dc; repeat from * around, join with a slip st in third ch of beginning ch-3.
Rounds 6 – 13: Repeat Round 5.
Round 14: Ch 1, sc in same space and in each dc and ch-1 space around, join with a slip st to beginning sc—120 (150, 180) sc.
Round 15: Ch 1, sc in same space and in each sc around, join with a slip st to beginning sc.
Rounds 16 – 21: Repeat Round 15.
Round 22: Increase Round — Ch 1, sc in same space and in each of the next 3 sc, * work 2 sc in next sc, sc in each of the next 4 sc; repeat from * to around, end work 2 sc in last sc, join with a slip st to beginning sc—144 (180, 216) sc.
Round 23: Repeat Round 4—24 (30, 36) shells, 24 (30, 36) dc.
Rounds 24 – 34: Repeat Round 5.
Round 35: Repeat Round 14—144 (180, 216) sc.
Rounds 36 – 42: Repeat Round 15.
Round 43: Increase Round — Ch 1, sc in same space and in each of the next 4 sc, * work 2 sc in next sc, sc in each of the next 5 sc; repeat from * around, end work 2 sc in last sc, join with a slip st to beginning sc—168 (210, 252) sc.
Round 44: Repeat Round 4—28 (35, 42) shells; 28 (35, 42) dc.
Rounds 45 – 55: Repeat Round 5.
Round 56: Repeat Round 14—168 (210, 252) sc.
Rounds 57 – 63: Repeat Round 15.
Round 64: Increase Round — Ch 1, sc in same space and in each of the next 5 sc, * work 2 sc in next sc; sc in each of the next 6 sc; repeat from * around, end work 2 sc in last sc, join with a slip st to beginning sc—192 (240, 288) sc.
Round 65: Repeat Round 4—32 (40, 48) shells, 32 (40, 48) dc.
Rounds 66 – 76: Repeat Round 5.
EDGING
Ch 1, sc in same space, skip 2 dc, work [3 dc, picot, 3 dc] in ch-1 space, skip 2 dc, * sc in next dc, skip 2 dc, work [3 dc, picot, 3 dc] in next ch-1 space, skip 2 dc; repeat from * around, join with a slip st to beginning sc. Fasten off.

EMBELLISHING

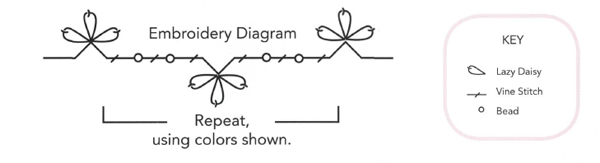
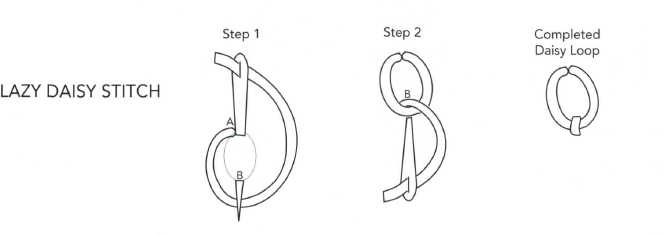
EMBROIDERY
- Flowers: Using B, C, D, and E, referring to photo as a guide for color placement, embroider 12 to 14 evenly spaced 3-petal flowers on each sc band of Skirt, using Lazy Daisy stitch (see Illustration and photo).
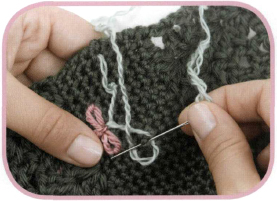
- Vine: Separate a 36" to 42"⁄92 to 107 cm length of A into 2-ply strands (see here). Using a 2-ply strand of A, embroider vine (see Embroidery Diagram and photo), adding beads as shown.
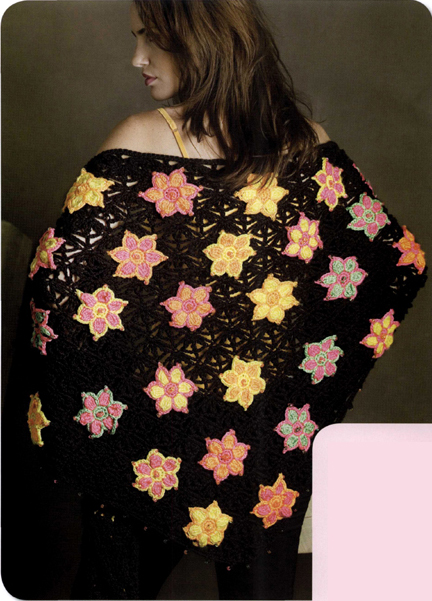
Flower Wrap
DESIGNED BY KIM RUTLEDGE
EXPERIENCED
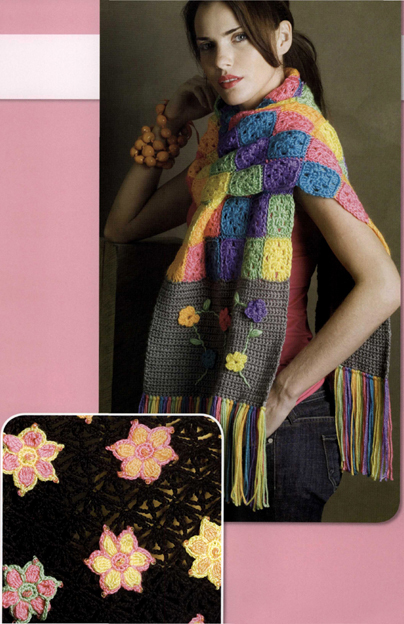
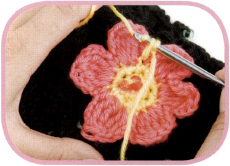
The flowers really “pop” against the black base of this spectacular design. The base is crocheted first, then the flowers and beads are attached to create this dramatic but playful look.
ONE SIZE
FINISHED MEASUREMENTS
Width 84"⁄213 cm
Length 32"⁄81 cm (upper edge to point)
YARN
Caron International’s Simply Soft (100% acrylic; 6 oz/ 170 g, 315 yds/288 m skein):
- #9727 Black (MC), 3 skeins
Caron International’s Simply Soft Brites (100% acrylic; 6 oz/170 g, 315 yds/288 m skein):
- #9604 Watermelon (A), 1 skein
- #9605 Mango (B), 1 skein
- #9606 Lemonade (C), 1 skein
- #9607 Limelight (D), 1 skein
CROCHET HOOKS
One each size US I-9 (5.5 mm) and US G-6 (4 mm), or size to obtain gauge
ADDITIONAL MATERIALS
Yarn needle
Pony beads 4 × 7 mm: 53 green, 152 pink, 105 yellow, 116 orange
GAUGE
One triple-picot cluster (tp-cluster) = 3"⁄7.5 cm; 6 rows = 3 ½"⁄8.75 cm
CROCHET STITCHES USED
bead-picot (Wrap edging) — chain 1, pull up a bead, yarn over, pull up a loop, chi 1, slip st in back loop of first ch.
ch: chain
dc: double crochet
sc: single crochet
slip st: slip stitch
tp-cluster: triple picot cluster—work [sc, ch 7] 3 times, sc all in same stitch.
tr: treble crochet
tr4tog: treble crochet 4 together—leaving last loop of each tr on hook, work 2 tr in next sc and 2 tr in the following sc, yarn over, draw through all 5 loops on hook.
WRAP
Using larger hook and MC, chain 288.
Row 1 (RS): Work tp-cluster in twelfth ch from hook, * ch 4, skip 4 ch, dc into next ch +, ch 4, skip 4 ch, work tp-cluster in next ch; repeat from * across, ending last repeat at +, working final dc in last ch, turn—28 tp-clusters.
Row 2: Ch 1, sc in first st, * ch 1, sc into first arch of next tp-cluster, [ch 3, sc in next arch of same tp-cluster] twice, ch 1, skip 4 ch +, sc in next dc; repeat from * across, ending last repeat at +, sc in next ch (top of turning-ch), turn.
Row 3: Slip st (in each of next sc, ch-1, sc, ch-3, sc) to middle of first tp-cluster; ch 7 (counts as dc, ch 4), * skip [ch-3, sc, ch-1], work tp-cluster in next sc, ch 4, skip [ch-1, sc, ch-3], dc in next sc +, ch 4; repeat from * across, ending last repeat at +; leave remaining [ch-3, sc, ch-1, sc] unworked, turn—27 tp-clusters remain.
NOTE
Wrap is worked from upper edge to point at lower edge. Bead-picot stitch is worked along edges of Wrap, then Flowers are attached while working Picot Bead edging around each Flower.
HELPFUL
When threading a large number of beads onto a length of yarn, wax the tip of the yarn with a little candle wax; shape to a point before wax has fully cooled.
Rows 4 – 56: Repeat Rows 2 and 3, ending with Row 2—1 tp-cluster remains; do NOT turn after Row 56.
EDGING
Row 1: Working along row edges, ch 5, sc in final sc at end of last repeat of Row 2 (below); * ch 5,sc in final sc of next repeat of Row 2; repeat from * to corner; working across upper edge (in remaining loops of beginning chain), sc in each of next 2 ch, work 3 sc in next ch (upper corner), ** sc in each of next 4 ch, sc in ch beneath next tp-cluster, sc in next 4 ch, sc in chain beneath next dc; repeat from ** to ch beneath last dc of row, work 2 more sc in same dc (opposite upper corner); working along row edges, work 3 sc over post of same dc, sc in beginning sc of first repeat of Row 2 (above), *** ch 5, sc in beginning sc of next repeat of Row 2; repeat from *** to beginning of Row 56 (lower point). Fasten off. Using MC, thread 57 beads onto yarn, alternating colors (yellow, orange, green, and pink), ending with yellow; join yarn with a slip st to upper left-hand corner.
Row 2: Ch 1, sc in same st, sc in each of the next 4 sc, * work bead-picot, sc in next ch-5 space, ch 4, sc in next sc *; repeat between *s along side edge to lower corner, work bead-picot, ch 4, skip [ch-1, sc, ch-3], sc in next sc, work bead-picot, sc in same sc, ch 4, skip [ch-3, sc, ch-1], sc in next sc; repeat between *s across to last 6 sts before next corner, work bead-picot, sc in each of next 5 sc, slip st in next sc. Fasten off.
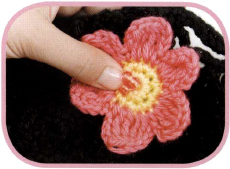
FLOWERS
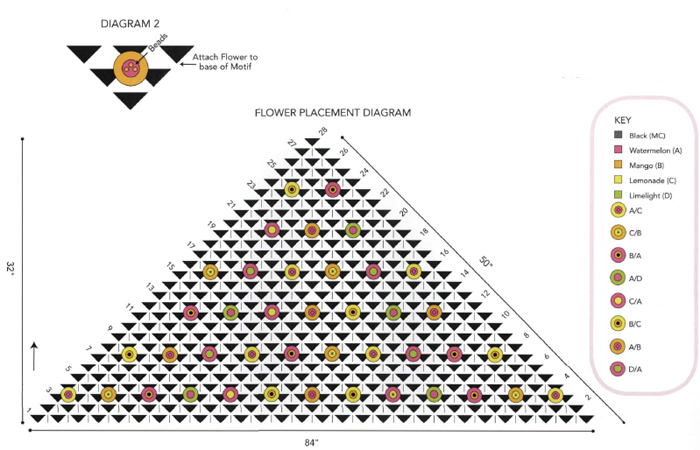
Make 41 in the following colorways: 6 using A as Color 1, C as Color 2 (A/C), 5 C/B, 6 B/A, 5 A/D, 4 C/A, 6 B/C, 5 A/B, and 4 D/A.
Using smaller hook and Color 1, leaving a 6"⁄15 cm tail for sewing, chain 4; join with a slip st to form a ring.
Round 1: Ch 1, work 9 sc in ring, join with a slip st in first sc—9 sc.
Round 2: Ch 1, work 2 sc in each sc around, join with a slip st in first sc—18 sc. Fasten off Color 1; join Color 2 with a sc in any sc.
Round 3: Ch 4, work [tr4tog (petal made), ch 4, sc in next sc, ch 4] 6 times, join with a slip st in first sc—6 petals. Fasten off.
Using Flower Placement Diagram as a guide, pin Flowers in place on Wrap.
EMBELLISHING
ATTACH FLOWERS
- Pull 6"⁄15 cm tail from center of flower to right side. Thread 3 beads, matching petal color of Flower.
- Thread yarn back through center hole of Flower to WS, being careful not to pull the beads through to the hole to the WS.
- Sew Flower to the base of tp-cluster (see Diagram 2). Hint: Use a French knot to secure the yarn; pass the needle under the loop attaching the Flower to Wrap, pass needle through the loop just made, pull tight. Weave in end. Add beads to centers of remaining Flowers, attaching Flowers to Wrap as you go.
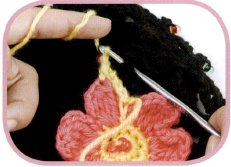
PICOT BEAD EDGING
This round adds a beaded edging to the Flowers and attaches the petals to the Wrap.
- Thread Color 1 (center of Flower) with 6 beads, matching petal color of Flower.
- Using smaller hook and Color 1 of Flower, working from the RS of Round 2, join yarn with a sc in the same sc of Round 2 as any sc on Round 3.
- Working in front of Round 3, * ch 4, sc into top of petal, ch 1, slide down bead, yarn over, draw through loop on hook.
- Remove loop from hook and pick up a stitch on the Wrap (below the bead), by inserting hook under the stitch.
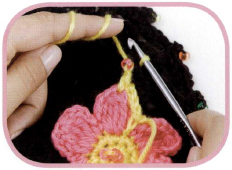
- Return the dropped loop to hook and pull the loop through the stitch on the Wrap.

- Ch 1, insert hook in last sc made, yarn over, pull up a loop; push bead through the stitch to the RS; yarn over and draw through both loops on hook. Note: Working the sc in this manner will place the bead on the RS of the piece.
- Ch 4, sc in same sc on Round 2 as next sc of Round 3 of flower; repeat from * of Step 3 around, end ch 4, join with a slip st to joining sc. Fasten off and weave in ends.
Repeat Picot Bead Edging on each Flower.