Got the Blues
Think denims …
basics blues accented with intense hues …
applied embellishments …
embroidered and trimmed jeans …
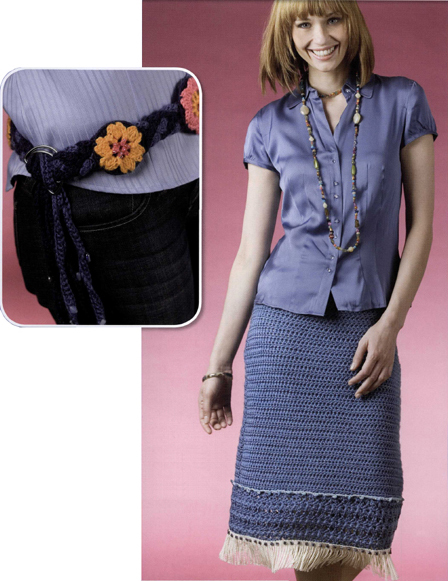
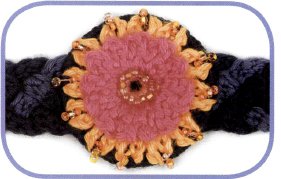
Medallions Belt
DESIGNED BY TREVA G. MCCAIN
EASY
Denim is a wonderful color to which you can add bright shades and sparkly trimmings, and the premade discs of plastic canvas act as a great armature or base to use in your embellishing projects. Play with the yarn, tassels, and beads to create your own signature belt.
SIZES
Small (Medium, Large)
FINISHED MEASUREMENTS
Length 33 (38, 43)", excluding Tassels
YARN
Caron International’s Simply Soft (100% acrylic; 6 oz/170 g, 315 yds/288 m skein):
- #9711 Dk. Country Blue (A), 1 skein
- #9710 Country Blue (B), 1 skein
Caron International’s Simply Soft Brites (100% acrylic; 6 oz/170 g, 315 yds/288 m skein):
- #9605 Mango (C), 1 skein
- #9604 Watermelon (D), 1 skein
CROCHET HOOK
One size US H-8 (5 mm), or size to obtain gauge
ADDITIONAL MATERIALS
Yarn needle
6—3" plastic canvas circles
30 g tube #3 seed rocaille glass beads, colors of mixed orange and hot pink, 1 tube
Larger blue beads for Tassels
Beading needle
2—2" D-rings
Large safety pin or sewing needle and thread (optional)
T-pins or straight pins (optional)
Cork board (optional)
GAUGE
Gauge is not critical for this project.
CROCHET STITCHES USED
ch: chain
dc: double crochet
dc3tog (cluster): double crochet 3 together—[ yarn over, insert hook in next ch-2 space and pull up a loop, yarn over and draw through 2 loops] 3 times, yarn over and draw through 4 loops on hook.
fpsc: front-post single crochet—(RS) insert hook from left-hand side of stitch to WS of piece, return to RS at right-hand side of next dc from previous round (Note: This is the opposite direction from the normal working method for fpsc), yarn over and pull up loop, complete as sc.
sc: single crochet
slip st: slip stitch

SPECIAL TECHNIQUE
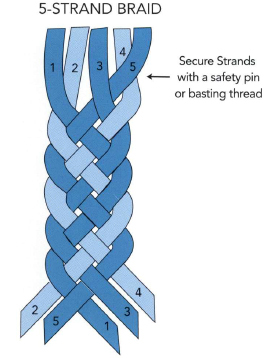
FIVE-STRAND BRAID
Note: The illustration here shows the path of each strand as it is braided; when repeating Steps 2 and 3, for each repeat the strand at the far left will be worked as for Strand 1 (Step 2), the strand at the far right will be worked as Strand 5 (Step 3).
- Stitch or pin the ends of five strands together to secure, then pin strands to ironing board or cork board with T-pins.
- Referring to the diagram, bring the left-hand strand (1) over the strand to its immediate right (2).
- Weave the right-hand strand (5) over the strand to its immediate left (4), under the next strand (3) and over the next strand (1). Strand 2 is now at the far left, and Strand 4 at the far right.
- Repeat Steps 2 and 3, always using the outer left-hand and right-hand strands.
NOTES
- Depending on the hole size of the beads, it may be necessary to separate the yarn into 2-ply strands to be able to string on the beads. ( See here.)
- Make Belt longer or shorter by adjusting the number of beginning chains.
- Flower Motifs are worked separately, applied to medallion bases, then attached to Braided Belt as desired.
Make 3 strands using A and 2 strands using B as follows:
Chain 276 (301, 326).
Row 1: Sc in the second ch from the hook and in each ch across, turn—275 (300, 325) sc.
Row 2: Ch 1, sc in each sc across. Fasten off.
Alternating colors (A, B, A, B, A), pin or baste strands together, then secure them to ironing board or a piece of cork board. Following instructions for 5-strand Braid technique, beginning at pinned end, braid cords until 18"⁄46 cm of cord remains at opposite end. Wrap a strand of A or B securely around strands to form a Tassel.
ATTACH D-RINGS
Using yarn needle and A, join the strands together close to the beginning of the Braid. Fold the ends through both D-rings; sew ends securely to WS. Using yarn needle, weave in ends.
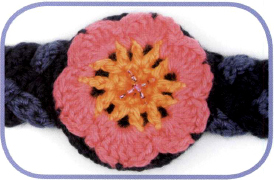
FLOWERS
FLOWER MOTIF 1 (MAKE 2)

Using D, chain 4; join with a slip st to form a ring.
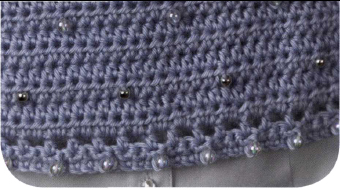
Round 1: Ch 5 (counts as dc, ch 2), working in the center of the ring, [dc, ch 2] 5 times; changing to C, join with a slip st in third ch of beginning ch-5—6 dc; 6 ch-2 spaces.
Round 2: Continuing with C, ch 4, * work cluster in ch-2 space of beginning ch of previous round, ch 4, work fpsc around next dc, ch 4; repeat from * 4 times, end cluster in next ch-2 space, ch 4, sc around first ch 2 of Round 1, join with a slip st in first ch of Rnd 2. Fasten off.
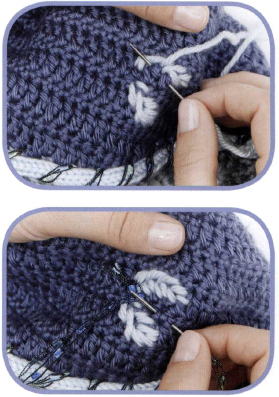
Using yarn needle, weave in ends. Using beading needle and yarn, attach 2 beads to each dc post of Round 1 (see photo above).
Using C, chain 4, join with a slip st to form a ring.
Round 1: Ch 1, work 12 sc into ring; do NOT cut C, changing to D, join with a slip st in first sc—12 sc.
Round 2: Using D, ch 1, [sc, ch 4, sc] in the front loop only of each sc of Round 1, join with a slip st in first sc of Round 2—12 small petals; cut D.
Round 3: Using C, working in back loops only of each sc of Round 1, ch 1, [sc, ch 7, sc] in back loop of each sc around, join with slip st in first sc of Round 3—12 large petals. Fasten off.
Using yarn needle, weave in ends. Using beading needle and yarn, attach 12 to 14 beads to the sc sts of Round 1 (see photo above).
FLOWER MOTIF 3 (MAKE 2)
Using C, chain 4, join with a slip st to form a ring.
Round 1: Ch 1, work 12 sc into ring; join with slip st to beginning sc—12 sc.
Round 2: Ch 5 (counts as dc, ch 2), dc in same space, skip 1 sc, [(dc, ch 2, dc) in next sc, skip 1 sc] 5 times; changing to D, join with a slip st in third ch of beginning ch-5—12 dc; 6 ch-2 spaces.
Round 3: Slip st in ch-2 space of beginning ch of Round 2, ch 3 (counts as dc), work 6 dc in same space, skip 1 dc, sc in space between skipped dc and next dc, skip 1 dc, * work 7 dc in next ch-2 space, skip 1 dc, sc in space between skipped dc and next dc, skip 1 dc; repeat from * around, join with a slip st to top of beg ch-3. Fasten off.
Using yarn needle, weave in ends. Using beading needle and yarn, attach beads in an × shape over the sc on Round 1; use 4 beads crossing from upper right to lower left, 5 beads crossing from upper left to lower right (see photo above).
MEDALLION BASES
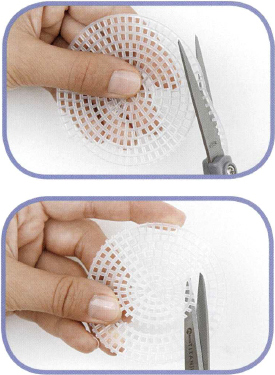
- Using plastic canvas circles and sharp, pointed scissors, remove 1 outer section and 3 inner sections from 4 circles.
- Remove 2 outer sections and 3 inner sections from 2 circles.

- Using yarn needle and a double strand of A, cover circles with yarn, leaving last row at outer edge free (see photo above).
ATTACH FLOWERS TO MEDALLION BASES
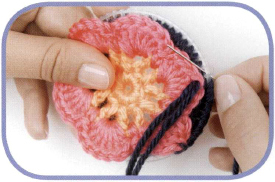
- Place Flower Motif on Medallion. Using yarn needle and a double strand of A, cover last row of canvas circle while attaching Flower to Medallion.
- Attach Flower Motifs 2 and 3 to larger Medallions, Flower Motif 1 to smaller Medallions; when attaching Flower Motif 2, use 3 beads when securing outer petals to Medallion.
FINISHING
ASSEMBLY
Using yarn needle and A, attach assembled Medallions securely to the Braided Belt, evenly spaced. Note: Photo shows the smaller Medallions at each end.
TASSEL
Using beading needle and A or B, attach 3 larger beads to the end of each strand of Tassel (at opposite end from D-rings). If desired, attach 3 smaller beads, randomly spaced, up the length of each Tassel. Be creative!
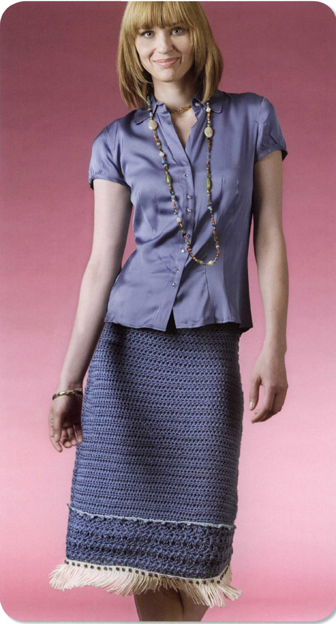
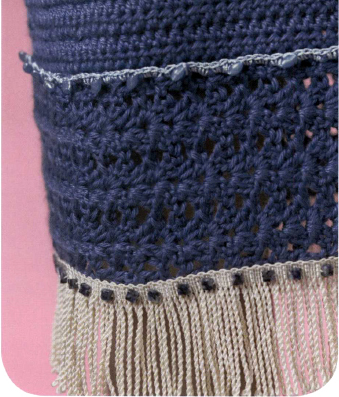
Denim Skirt
DESIGNED BY GAYLE BUNN
EASY
The classic, straight denim skirt was the inspiration for this more embellished version. Using different types of fringes and beads or, by changing the colors, you can create a whole wardrobe of Simply Soft skirts!
SIZES
Small (Medium, Large, Extra-Large)
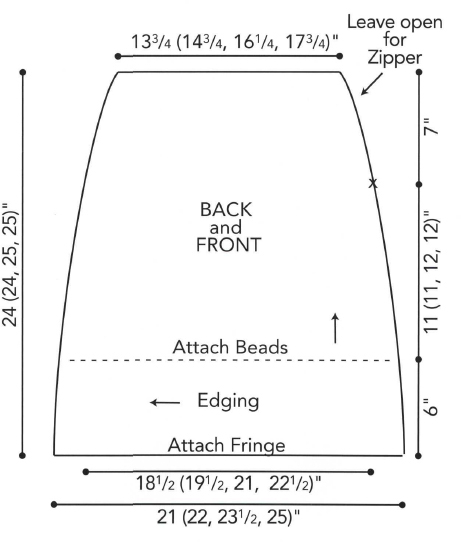
FINISHED MEASUREMENTS
Hips 37 (39, 42, 45)"⁄ 94 (99, 106.5, 114) cm
Length 24 (24, 25, 25)"⁄ 61 (61, 63.5, 63.5) cm (including edging)
YARN
Caron International’s Simply Soft (100% acrylic; 6 oz/170 g, 315 yds/288 m skein):
- #9710 Country Blue, 3 (3, 4, 4) skeins
CROCHET HOOKS
Sizes US B-1 (2.25 mm) and US I-9 (5.5 mm), or size to obtain gauge
GAUGE
In half double crochet, using larger hook, 12 sts and 8 rows = 4"⁄10 cm
ADDITIONAL MATERIALS
Stitch markers
Yarn needle
2 (2, 3, 4) spools metallic thread (5 yards/meters each)
Bead threader
33 (35, 38, 42) barrel beads
1 1⁄4 (1 3⁄8, 1 3⁄8, 1 1⁄2) yards fringe, 2 1⁄2" wide
Sewing needle and thread to match fringe trim and to match skirt
70 (74, 79, 84) square beads, 6 mm
Zipper, 7"⁄18 cm long
CROCHET STITCHES USED
bsc: bead single crochet (see here)
ch: chain
cl: cluster—work [2 dc, ch 1, 2 dc] in next stitch (or chain).
dc: double crochet
hdc: half double crochet
hdc2tog: half double crochet 2 together—yarn over, insert hook in next st, pull up a loop] twice, yarn over and pull through 5 loops on hook (1 st decreased).
sc: single crochet
slip st: slip stitch
NOTE
Turning chain (ch-2) does not count as a stitch.
Beginning at lower edge, using larger hook, chain 65 (68, 73, 77).
Row 1 (RS): Hdc in third ch from hook and in each ch across, turn—63 (66, 71, 75) hdc.
Row 2: Ch 2, hdc in each hdc across, turn.
Repeat Row 2 until piece measures 3"⁄7.5 cm from beginning.
Decrease Row: Ch 2, hdc2tog, hdc in each hdc across to last 2 hdc, hdc2tog, turn—61, (64, 69, 73) hdc remain.
Work even for 3 rows.
Repeat last 4 rows 3 more times—55 (58, 63, 67) hdc remain.
Work even until piece measures 11 (11, 12, 12)"⁄27.5 (27.5, 30.5, 30.5) cm from beginning; place a marker (pm) each end of last row.
Next Row: Repeat Decrease Row, every other row until 41 (44, 49, 53) hdc remain for waist.
Work even until piece measures 7"⁄18 cm from markers. Fasten off.
BOTTOM EDGING
Using larger hook, chain 21.
Row 1 (RS): Dc in fourth ch from hook (counts as 2 dc), * skip next 3 ch, work cluster in next ch; repeat from * twice, skip next 3 ch, dc in each of last 2 ch, turn—2 dc at each end, 3 clusters.
Row 2: Ch 3 (counts as dc), dc in next dc, work [cluster in ch-1 space of next cluster] 3 times, dc in each of last 2 dc, turn.
Repeat Row 2 until piece, slightly stretched, measures 42 (44, 47, 50)"⁄107 (112, 118, 126) cm from beginning. Fasten off.
EMBELLISHING
BEADED ACCENT
- Thread 17 (18, 19, 21) barrel beads onto 1 spool of metallic thread; thread 16 (17, 19, 20) barrel beads onto next spool(s) of metallic thread.
- Using smaller hook, join metallic thread with a slip st in top corner of Bottom Edging.
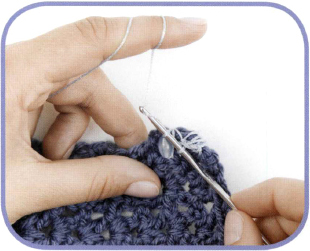
- Ch 1, sc in same space, work 3 sc across side of next row, * bsc in corner of next dc, work 6 sc across side of next 2 rows; repeat from * across, joining new spool(s) of thread as needed. Fasten off.
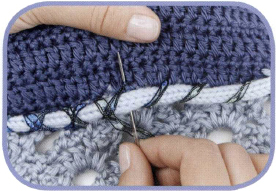
FRINGE
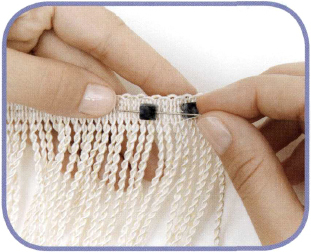
- Using sewing needle and matching thread, sew square beads to top edge of fringe trim at 5⁄8"/1.6 cm intervals (see photo above).
- Sew fringe trim across lower edge of Bottom Edging.
FINISHING
With RS facing, sew side seams of Back and Front, leave opening above markers on left side for zipper.
Using sewing needle and matching thread, sew zipper in place.
Sew seam of Bottom Edging; sew Bottom Edging to lower edge of Skirt, with seam at left side seam.
WAIST EDGING
With RS facing, using larger hook, join yarn with a slip st at upper edge beside zipper opening; slip st in each sc around waistline. Fasten off.
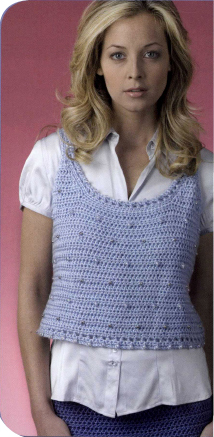
Easy Beaded Camisole
DESIGNED BY GAYLE BUNN
EASY
This elegant camisole is a great design for your first embellishing project. It’s versatile enough to wear by itself in the evening or over a shirt for a sophisticated look for day.
SIZES
Small (Medium, Large, Extra-Large)
FINISHED MEASUREMENTS
Bust 34 1⁄2 (36 3⁄4, 40, 45 1⁄4)"⁄87.5 (93.5, 101.5, 115) cm
Length 18 1⁄2 (18 1⁄2, 19 1⁄2, 20 1⁄4)"⁄46.5 (46.5, 49, 51) cm, including Straps
YARN
Caron International’s Simply Soft (100% acrylic; 6 oz/170 g, 315 yds/288 m skein):
- # 9709 Lt. Country Blue, 2 (2, 2, 2) balls
CROCHET HOOK
One size US I-9 (5.5 mm), or size to obtain gauge
GAUGE
In half double crochet, 15 sts and 9 rows = 4"⁄10 cm
ADDITIONAL MATERIALS
Beading needle (thin enough to fit through beads)
90 (92, 104, 110) beads, 8 mm, crystal
26 (26, 32, 34) beads, 8 mm, silver
Yarn needle
CROCHET STITCHES USED
bhdc: bead half double crochet—work as bsc, working hdc instead of sc.
bsc: bead single crochet (see here)
ch: chain
dc: double crochet
hdc: half double crochet
hdc2tog: half double crochet 2 together—yarn over, insert hook in next st, pull up a loop] twice, yarn over and pull through 5 loops on hook (1 st decreased).
sc: single crochet
slip st: slip stitch
NOTES
- Chain-2 does not count as a hdc.
- The beads are added in bead single crochet as the piece worked.
BACK
Thread 16 (16, 18, 20) crystal beads onto yarn. Chain 64 (68, 74, 84).
LOWER EDGING
Row 1 (RS): Sc in second ch from hook and in each ch across, turn—63 (67, 73, 83) sc.
Row 2: Ch 1, sc in first 1 (3, 2, 3) sc, * bsc in next st, sc in each of the next 3 sc; repeat from * until last 2 (0, 3, 0) sc, bsc 1 (0, 1, 0) time, sc in each of last 1 (0, 2, 0) sc, turn.
Row 3: Ch 2, hdc in each of the first 2 (2, 1, 2) sts, * ch 1, skip next sc, hdc in next st; repeat from * to last 1 (1, 0, 1) st, hdc in last 1 (1, 0, 1) st, turn.
Row 4: Ch 2, hdc in each of the first 2 (2, 1, 2) sts, * hdc in next ch-1 space, hdc in next hdc; repeat from * to last 1 (1, 0, 1) st, hdc in last 1 (1, 0, 1) st, turn.

(Note: Side shaping is written out below; it is also shown on Front Bead Placement Chart; work armhole and neck shaping as given for Back.)
Rows 1–4: Ch 2, hdc in each st across, turn.
Row 5: Decrease Row — Ch 2, hdc2tog (decrease), hdc in each hdc across to last 2 sts, hdc2tog over last 2 sts, turn—61 (65, 71, 81) sts remain.
Rows 6–8: Work even in hdc, (ch 2, hdc in each st across, turn).
Row 9: Repeat Decrease Row—59 (63, 69, 79) sts remain.
Rows 10–12: Work even in hdc.
Row 13: Increase Row — Ch 2, work 2 hdc in first st (increase), hdc in each hdc across to last st, work 2 hdc in last st, turn—61 (65, 71, 81) sts.
Rows 14–21: Repeat Rows 10 – 13 twice—65 (69, 75, 85) sts.
Rows 22–24: Work even in hdc.
SHAPE ARMHOLES
Row 25: Slip st in each of the first 7 (8, 9, 11) sts; ch 2, hdc in same space as last slip st, hdc in each hdc across to last 6 (7, 8, 10) sts, turn, leaving remaining sts unworked—53 (55, 59, 65) sts remain.
Row 26: Ch 2, hdc2tog, hdc in each st across to last 2 sts, hdc2tog over last 2 sts, turn—51 (53, 57, 63) sts remain.
Repeat last row 3 (3, 4, 6) times more—45 (47, 49, 51) sts remain.
SHAPE NECK
Next Row: Ch 2 [hdc2tog] twice, turn, leaving remaining sts unworked—2 sts remain.
Next Row: Ch 2, hdc2tog. Fasten off. With RS facing, skip center 37 (39, 41, 43) sts, join yarn with a slip st to next st; ch 2, hdc2tog over this st and next st, hdc2tog over last 2 sts, turn.
Next Row: Ch 2, hdc2tog. Fasten off.
FRONT
Thread beads onto yarn in the following sequence: 1 (1, 1, 2) silver beads, 7 (9, 9, 9) crystal beads, 8 (8, 8, 10) silver beads, [7 (7, 9, 9) crystal beads, 8 (8, 8, 10) silver beads] twice, and 16 (16, 18, 20) crystal beads.
EDGING
Work Rows 1–4 as for Back. Begin working from Front Bead Placement Chart, placing beads as indicated and working side shaping as for Back. Work Rows 1–24 of Chart.
SHAPE LEFT ARMHOLE AND NECK
Next Row: Slip st in each of the first 6 (7, 8, 10) sts; ch 2, hdc in same space as last slip st, hdc in each of the next 13 (13, 15, 19) hdc, turn, leaving remaining sts unworked—14 (14, 16, 20) sts.
SIZES SMALL, MEDIUM, AND LARGE ONLY
Next Row: Ch 2, hdc2tog, hdc in each of the next 4 (3, 3) hdc, bhdc, hdc in each st across to last 2 sts, hdc2tog over last 2 sts, turn—12 (12, 14) sts remain.
SIZE EXTRA-LARGE ONLY
Next Row: Ch 2, hdc2tog, hdc in each of the next 3 hdc, bhdc, hdc in each of the next 7 hdc, bead hdc, hdc in each hdc across to last 2 hdc, hdc2tog over last 2 hdc, turn—18 sts.
ALL SIZES
Next Row: Ch 2, hdc2tog, hdc in each st across to last 2 sts, hdc2tog over last 2 sts, turn—10 (10, 12, 16) sts remain. Repeat last row until 2 sts remain.
Next Row: Ch 2, hdc2tog. Fasten off.
SHAPE RIGHT ARMHOLE AND NECK
Thread 1 (1, 1, 2) silver beads onto yarn. With RS facing, skip center 25 (27, 27, 25) sts, join yarn with a slip st to next st; ch 2, hdc in same space as the slip st, hdc in each hdc across until last 6 (7, 8, 10) sts, turn, leaving remaining sts unworked—14 (14, 16, 20) sts.
Work as for left Armhole and Neck, reversing shaping.
NECK EDGING AND STRAPS
Thread 35 (36, 38, 40) crystal beads onto yarn. With RS facing, join yarn with a slip st at top corner of right Back neck edge. Ch 1, work 40 (42, 44, 48) sc evenly across Back neck edge to left side; ch 25 (25, 27, 27) for Strap, join with a slip st at top of left Front side; work 50 (52, 54, 58) sc evenly across Front neck edge to right side; ch 25 (25, 27, 27) for Strap, join with a slip st to first sc—140 sts, counting Strap chains.
Round 1: Ch 1, sc in each sc and ch around, join with a slip st to first sc.
Round 2: Ch 2, hdc in same space as joining; * ch 1, skip next sc, hdc in next sc; repeat from * around to last st, ch 1, skip last st, join with a slip st to first hdc, turn.
Round 3: Ch 1, sc in first hdc, sc in next ch-1 space, * bsc in next hdc, sc in next ch-1 space, sc in next hdc, sc in next ch-1 space; repeat from * around to last 2 sts, bsc in next hdc, sc in last ch-1 space, join with a slip st to first sc. Fasten off. Sew side seams.
ARMHOLE EDGING
With RS facing, join yarn with a slip st at side seam; work 1 round of sc evenly around armhole edge and sc in each remaining loop of chain along Strap, join with a slip st to first sc. Fasten off. Using yarn needle, weave in ends.

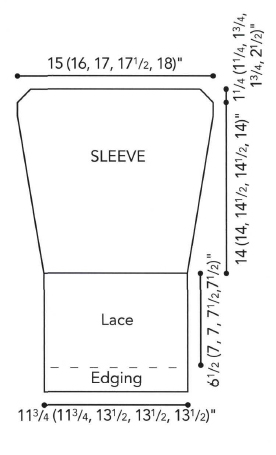
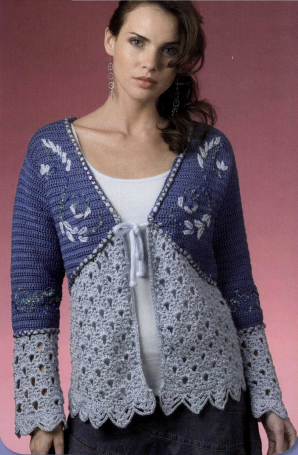
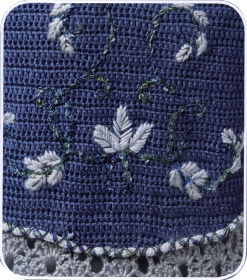
Color-Me-Blue Jacket
DESIGNED BY SUSAN SHILDMYER
EXPERIENCED
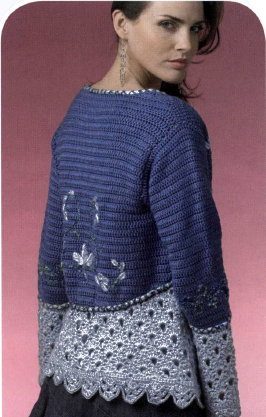
Crochet this lacy and delicate jacket to make a beautifully feminine garment. The floral embellishments and detailed trims make this jacket truly one of a kind.
SIZES
Small (Medium, Large, 1X, 2X)
FINISHED MEASUREMENTS
Bust 36 (40, 44, 48, 52)"⁄ 91.5 (101.5, 112, 122, 132) cm
Length 24 (25, 25 1⁄2, 26 1⁄4, 27)"⁄ 61 (63.5, 64.5, 66.5, 68.5) cm, including edging
YARN
Caron International’s Simply Soft (100% acrylic; 6 oz/170 g, 315 yds/288 m skein):
- #9710 Country Blue (MC), 3 (3, 4, 4, 4) skeins
- #9709 Lt. Country Blue (A), 2 (3, 3, 3, 4) skeins
- #9712 Soft Blue (B) 1 (1, 1, 1, 1) skeins
Caron International’s Fabulous (100% nylon; 1.76 oz/50 g, 160 yds/146 m ball):
- #0010 Blue Lagoon (C), 1 (1, 1, 1, 1) ball, for embroidery
CROCHET HOOKS
One each size US 7 (4.5 mm) and US H-8 (5 mm), or size to obtain gauge
ADDITIONAL MATERIALS
Yarn needle
Two stitch markers
Embroidery needle and floss
Embellish Knit® Automatic Spool Knitter, (optional) OR 2 double-pointed knitting needles, for cording
GAUGE
In Stitch pattern, 17 sts and 13 rows = 4"⁄10 cm, using smaller hook and MC
CROCHET STITCHES USED
ch: chain
dc: double crochet
dc2tog: double crochet 2 together—[yarn over, insert hook in next st and pull up a loop, yarn over and draw through 2 loops] twice, yarn over and draw through 3 loops on hook.
hdc: half double crochet
sc: single crochet
slip st: slip stitch
Stitch Pattern (any number of sts) using MC
- ROW 1 (RS): Dc across all sts.
- ROW 2 (WS): Sc across all sts.
- Repeat Rows 1 and 2 for St pattern.

Lace Pattern (multiple of 8 + 1)
NOTE: Count sts on WS rows only; stitch count varies on RS rows.
- ROW 1 (RS): Ch 1, sc in first sc, * ch 1, skip 3 sts, work [dc (ch 2, dc) 4 times] in next st, skip 3 sts, ch 1, sc in next sc; repeat from * across, turn.
- ROW 2: Ch 4 (counts as dc, ch 1), skip [ch-1 space and dc], dc in next 2-ch space, ch 2, skip [dc, ch-2], sc in next dc, * ch 2, skip [ch-2, dc], dc in next ch-2 space, ch 1, skip next [dc, sc, dc], dc in next ch-2 space, ch 2, skip [dc, ch-2], sc in next dc; repeat from * across, end, ch 2, skip [ch-2, dc], dc in ch-2 space, ch 1, dc in beginning sc, turn.
- ROW 3: Ch 5 (count as dc, ch 2), skip first dc, work [dc, ch 2, dc] in ch-1 space, ch 1, skip [dc, ch-2], sc in next sc, * ch 1, skip [ch-2, dc], work [dc (ch 2, dc) 4 times] in ch-1 space, ch 1, skip [dc, ch-2], sc in sc; repeat from * across, end ch 1, skip [ch-2, dc], work [dc, ch 2] twice in turning-ch, dc in third ch of turning-ch, turn.
DESIGNER’S NOTE: [dc, ch 2] twice in turning ch, dc in third ch of turning ch at end of this and subsequent rows means: Work the sts from [ to ] into the loop of the turning-ch, then work the dc in the actual third ch of the turning-ch; this maintains a consistently straight edge to work from when finishing the Jacket.
- ROW 4: Ch 1, sc in first st, * ch 2, skip [ch-2, dc], dc in next ch-space, ch 1, skip [dc, sc, dc], dc in next ch-2 space, ch 2, skip [dc, ch-2], sc in next dc; repeat from * across, working final sc in third ch of turning-ch, turn.
- ROW 5: Ch 1, * sc in first sc, ch 1, skip [ch-2, dc], work [dc (ch 2, dc) 4 times] in ch-1 space, ch 1, skip [dc, ch-2]; repeat from * across, end sc in last sc, turn.
- Repeat Rows 2 – 5 for Lace pattern.
- Garment is worked in one piece from lower edge to armhole; then Fronts and Back are worked separately to shoulders.
- While working Intarsia section, use larger hook for Lace pattern with A; smaller hook for Stitch pattern with MC.
JACKET
Using larger hook and A, chain 155 (171,187, 202, 219).
Setup Row: Sc in third ch from hook and in each ch across, turn—153 (169, 185, 201, 217) sts. Begin Lace pattern; work Rows 1 – 5 once, Rows 2 – 5 once, then Row 2 once—155 (171, 187, 202, 219) sts after Row 2; 153 (169, 185, 201, 217) sts after Row 4.
BEGIN INTARSIA
Row 11: Work in Lace pattern, repeating from * 8 (9, 10, 11, 12) times, dc in next sc; change to smaller hook and MC; work [2 dc in ch-2 space, dc in next dc, dc in ch-1 space, dc in next dc, 2 dc in ch-2 space, dc in next sc] twice, dc in next sc; change to larger hook and join a second ball of A; ch 2, skip [ch-2, dc], work [dc (ch 2, dc) 4 times] in ch-1 space, ch 1, skip [dc, ch-2], sc in next sc; continuing in Lace pattern, work to end.
Row 12: Work in Lace pattern, repeating from * 8 (9, 10, 11, 12) times, ch 2, skip [ch-2, dc], dc in ch-2 space, ch 1; with MC; sc in each of next 17 dc; with A; ch 1, dc in next ch-2 space, ch 2, skip [dc, ch-2], sc in next dc; continuing in Lace pattern, repeat from * of Row 5 across, end as Row 5—155 (171, 187, 203, 219) sts.
Rows 13–22: Continue working Lace pattern as est, each side of MC section; work for your size as follows:
Small: Work Rows 13–16 twice, then Rows 19–22 twice.
Medium: Work Row 13–16 once, Rows 15–18 three times, then Rows 19–22 once.
Large: Work Rows 13–16 once, Rows 15–18 three times, then Rows 19–22 once.
1X: Work Rows 13–16 twice, Rows 15–18 twice, then Rows 19–22 once.
2X: Work Rows 13–16 three times, Rows 15–18 once, then Rows 19–22 once.
Row 13: Work in Lace pattern across to 20 sts before previous color change, end sc in next sc, ch 1, skip [ch-2, dc], work [(dc, ch 2) twice, dc] in ch-1 space; with MC, work [dc in next dc, 2 dc in ch-2 space, dc in next sc, 2 dc in ch-2 space, dc in next dc, dc in ch-1 space] twice, dc in each of the next 17 sc, work [dc in ch-1 space, dc in next dc, 2 dc in ch-2 space, dc in next sc, 2 dc in ch-2 space, dc in next dc] twice; with A, work [(dc, ch 2) twice, dc] in ch-1 space, ch 1; continue in Lace pattern to end.
Rows 14, 16, 18, and 20: Work in Lace pattern across to color change; with MC, sc in each dc across MC section; with A, work in Lace pattern to end—155 (171, 189, 203, 219) sts.
Row 15: Work in Lace pattern across to 8 sts before color change, end dc in next sc; with MC, work 2 dc in ch-2 space, dc in next dc, dc in ch-1 space, dc in next dc, 2 dc in ch-2 space, dc in next sc, dc in each sc across MC section, dc in ch-1 space, dc in next dc, work 2 dc in ch-2 space, dc in next dc, dc in ch-1 space, dc in next dc, 2 dc in ch-2 space; with A, dc in next sc, work in Lace pattern to end.
Row 17: Work in Lace pattern work across to 13 sts before color change, end sc in next sc, ch 1, skip [ch-2, dc], work [(dc, ch2) twice, dc] in ch-1 space; with MC, dc in next dc, work 2 dc in ch-2 space, dc in next sc, 2 dc in ch-2 space, dc in next dc, dc in ch-1 space, dc in each st across MC section, dc in ch-1 space, dc in next dc, work 2 dc in ch-2 space, dc in next sc, 2 dc in ch-2 space, dc in next dc; with A work [(dc, ch 2) twice, dc] in ch-1 space, ch 1, work in Lace pattern to end.
Row 19: Work in Lace pattern across to 4 sts before color change, end ch 1, skip [ch-2, dc], work [(dc, ch 2) twice, dc] in ch-1 space; with MC, dc in next dc, work 2 dc in ch-2 space, dc in next sc, dc in each st across MC section, dc in next sc, work 2 dc in ch-2 space, dc in next dc; with A, work [(dc, ch 2) twice, dc] in ch-1 space, work in Lace pattern to end.
Row 21: Ch 1, sc in first sc, skip [ch-2, dc], work [dc (ch 2, 2 dc) twice] in ch-1 space; with MC, dc in next dc, work 2 dc in ch-2 space, dc in next sc, dc in each st across MC section, dc in next sc, work 2 dc in ch-2 space, dc in next dc; with A, work [dc (ch 2, dc) twice] in ch-1 space, ch 1, skip [dc, ch-2], sc in last sc, turn.
Row 22: Repeat Row 14.
Row 23: Change to MC on all sts; ch 2, skip next dc, dc in ch-1 space, dc in next dc, work 2 dc in ch-2 space, dc in each st across MC section, dc in next sc, work 2 dc in ch-2 space, dc in next dc, dc in turning-ch, turn.
Row 24: Ch 1, work even in St pattern (sc in each st across), turn—155 (171, 189, 203, 219) sts.
SHAPE FRONT NECK
Row 1 (RS): Ch 2 (count as dc), at right Front neck edge, skip first sc, dc2tog across next 2 sts (decrease), dc in each sc across to last 3 sts, dc2tog across next 2 sts, dc in turning ch, turn—153 (169, 185, 201, 217) sts remain.
Row 2 (WS): Ch 1 (count as first st), skip first dc, sc in each dc across, turn.
Repeat Rows 1 and 2 once, then work even, if necessary, until piece measures 13 1⁄2 (14, 14, 14 1⁄2, 14 1⁄2)"⁄34.5 (36.5, 36.5, 37, 37) cm from beginning, end with a WS row—151 (167, 183, 199, 215) sts remain.
DIVIDING ROW
Row 1 (RS): At right Front neck edge, ch 2, skip first sc, dc2tog, dc across next 26 (30, 35, 37, 39) sts; at armhole edge, dc2tog, place marker (pm), turn, leave remaining sts unworked—29 (33, 38, 40, 42) sts for right Front.
Row 2 (WS): Ch 1, skip first dc, work even in sc, turn.
Rows 3–4 (4, 6, 6, 6): Repeat Rows 1 and 2—27 (31, 34, 36, 38) sts remain.
Next Row (RS): Ch 2, skip first sc, dc2tog, dc to end—26 (30, 33, 35, 37) sts remain.
Continue in pattern; at neck edge, dec 1 st every other row 10 (11, 11, 10, 10) times—16 (19, 22, 25, 27) sts remain for shoulder.
Work even until armhole measures 7 1⁄2 (8, 8 1⁄2, 8 3⁄4, 9)"⁄19.5 (20.5, 21.5, 22, 23) cm from marker, end with a WS row.
SHAPE SHOULDER
Row 1 (RS): Ch 2, skip first sc, dc in next 7 (10, 12, 14, 16) sc, hdc in next st, sc in next st, turn, leaving remaining sts unworked—10 (13, 15, 17, 19) sts.
Row 2 (WS): Slip st in first st, sc in each st across to last st, slip st in last st, turn—9 (12, 14, 16, 18) sts remain.
Row 3: Ch 2 (counts as dc), skip first sc, dc in next 2 (4, 5, 5, 6) sts, hdc in next st, sc in next st, leave remaining sts unworked. Fasten off.
BACK
With RS facing, beginning at underarm marker, skip 14 (16, 16, 18, 20) sts; join MC with a slip st in next st.
Row 1 (RS): Ch 2, dc2tog (1 st decrease), dc in each of the next 51 (57, 63, 71, 79) sts, dc2tog, dc in next st; pm, turn, leaving remaining sts unworked—55 (61, 67, 75, 83) sts.
Row 2 (WS): Ch 1, skip first dc, work even in sc, turn.
Rows 3–4 (4, 6, 6, 6): Repeat Rows 1 and 2–53 (59, 63, 71, 77) sts.
Work even in established pattern until Back measures the same as right Front to shoulder shaping, end with a WS row.
SHAPE SHOULDERS AND NECK
(RS): Slip st in next 5 (6, 6, 8, 8) sts, [sc, hdc] across next 2 sts, dc in each sc across to last 7 (8, 8, 10, 10) sts, hdc, sc, turn, leaving remaining sts unworked—43 (47, 51, 55, 61) sts remain.
(WS): Slip st in first st, sc in each st across to last st, slip st in last st, turn — 41(45, 49, 53, 59) sts remain.
(RS): Slip st in next 5 (5, 6, 8, 9) sts, [sc, hdc] across next 2 sts, dc in next 2 (5, 6, 6, 7) sts. Fasten off. Skip center 27 (28, 29, 29, 32) sts for Back neck. Join MC with a slip st in next st; ch 2, dc in the next 2 (4, 5, 5, 6) sts, [hdc, sc] across next 2 sts, leave remaining sts unworked. Fasten off.
LEFT FRONT
With RS facing, beginning at marker, skip 14 (16, 16, 18, 20) sts; join MC with a slip st in next st. Work as for right Front, reversing all shaping
SLEEVES
Using A and larger hook, ch 50 (50, 58, 58, 58), turn.
Row 1: Sc in second ch from hook and in each sc across, turn—49 (49, 57, 57, 57) sts.
(RS): Begin Lace pattern; work even until piece measures 6 1⁄2 (7, 7, 7 1⁄2, 7 1⁄2)"⁄16.5 (18, 18, 19.5, 19.5) cm from beginning, end with a WS row. Change to MC and smaller hook.
Note: Work next row as Row 1a or Row 1b, depending on last Row of Lace pattern worked, then continue as indicated.
IF LAST ROW WAS ROW 2 OF LACE PATTERN:
Row 1a (RS): Ch 2, dc in ch-1 space,* dc in next dc, work 2 dc in ch-2 space, dc in next st, work 2 dc in ch-2 space, dc in next 2 sts; repeat from * to end, working last dc in the fourth ch of the turning ch, turn—49 (49, 57, 57, 57) sts.
IF LAST ROW WAS ROW 4 OF LACE PATTERN:
Row 1b (RS): Ch 2, * work 2 dc in ch-2 space, dc in next dc, dc in ch-1 space, dc in next dc, work 2 dc in ch-2 space, dc in next st; repeat from * to end, turn—49 (49, 57, 57, 57) sts.
Row 2 (WS): Ch 1, work even in sc, turn.
SHAPE SLEEVE
Row 3 (RS): Work 2 dc in first sc (increase), dc in each sc across to last sc, work 2 dc in last sc (increase), turn. Continuing in pattern, work 1 row even.
Repeat last 2 rows 7 (9, 7, 8, 9) times, increasing 1 st each side every other row—65 (69, 73, 75, 77) sts.
Work even in pattern until MC section of piece measures 14 (14, 14 1⁄2, 14 1⁄2)"⁄36.5 (36.5, 37, 37, 38) cm from beginning, end with a WS row.
SHAPE CAP
(RS): Dec 1 st each side every other row 2 (2, 3, 3, 4) times—61 (65, 67, 69, 69) sts remain. Fasten off.
FINISHING
Sew shoulder seams.
LOWER EDGING
Note: Row 1 is worked in the remaining loops of beginning-ch.
Row 1 (RS): Join A with a slip st in first ch; ch 1, sc in next 3 ch, * ch 2, skip next ch, work [2 dc, ch 2] twice in next ch, skip 1 ch, sc in next 5 ch; repeat from * across, turn.
Row 2: Ch 1, sc in next 4 sc, skip next st, * ch 3, skip ch-2 space, work [2 dc, ch 2, 2 dc] in next ch-2 space, ch 3, skip [next ch-2 space and sc], sc in next 3 sc, skip 1; repeat from * across, end last repeat skip [next ch-2 space and sc], sc in next 2 sc, sc in turning ch, turn.
Row 3: Ch 1, first 2 sc, skip next sc, * ch 5, skip ch-3 space, work [2 dc, ch 2, 2 dc] in next ch-2 space, ch 5, skip [next ch-3 space and sc], sc in next sc; repeat from * across to last 2 sts, sc in last 2 sc.
Sizes Small, Medium, Large, and 1X — Fasten off.
SIZE 2X ONLY:
Row 4: Ch 1, sc in first st, skip next sc * ch 7, skip ch-5 space, work [2 dc, ch 2, 2 dc] in next ch-2 space, ch 7, skip ch-5 space, sc in next sc; repeat from * across to last 2 sts, skip next sc, sc in last sc. Fasten off.
NECK EDGING
With RS facing, beginning at right Front at beginning of neck shaping, using smaller hook and MC, join yarn with a slip to first st; ch 1, work 1 row sc evenly around neck shaping, ending at left Front.
LOWER FRONT EDGING
With RS facing, working along lace sections of each Front, using larger hook and A, join yarn and work as for neck edging, working 1 row sc evenly along Front edges. Fasten off.
SLEEVE EDGING
Work same as for Lower Edging along each Sleeve.
EMBELLISHING
MAKE CORDING
Note: Make each length of cord slightly longer than actual garment measurement, bind off loosely; do not weave in ends. Length will be adjusted after couching. Ends will be used to secure Cording.
Using method of choice listed below, work two cords, each 12"⁄30.5 cm long for Sleeves; one cord 33"⁄84 cm long for neck, one cord 66"⁄167 cm long for lower edge between MC and Lace sections and ties.
- Using Embellish Knit Automatic Spool Knitter, work cord, following instructions included with Knitter.
- Using crochet hook, ch 5, join with a slip st to form a ring. Working around in a spiral, slip st in each st until cord is desired length. Fasten off.
- Using 2 double pointed needles, work I-cord to desired lengths.
COUCH (ATTACH) CORDING
Neck Edge
- Beginning with the cast on end of cording at right center Front, lay cording along neckline just inside sc edging.
- Using yarn needle and C, work Cross stitch over cording, stretching cording slightly.

- Slowly unravel cording at bind-off end to meet garment exactly, bind off.
- Use ends of cording to secure cord to Jacket edge.
Lower Edge of MC Section
- Beginning at right center Front, leaving approximately 12" to 14"⁄30.5 to 36 cm for tie, couch cording to lower edge between MC and lace sections as for neckline.
- Leave 12" to 14"⁄30.5 to 36 cm for tie at left Front.
- Unravel as for neckline. Secure loose ends inside ties and tie knot at end.
Sleeves
Attach cording to each Sleeve between MC and CC sections.
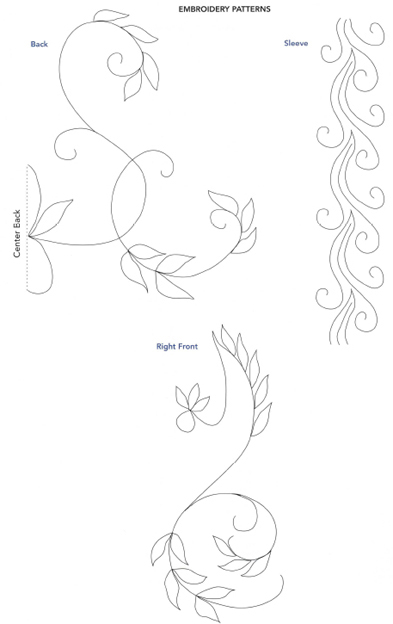
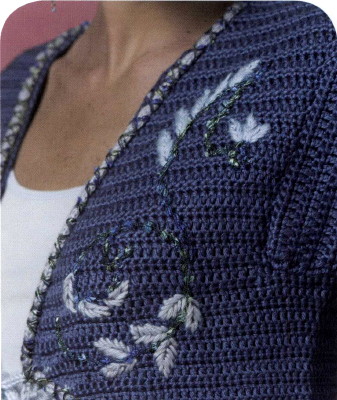
EMBROIDERY
- Trace embroidery pattern onto tracing paper, reversing patterns for left side and left sleeve. Pin paper to Jacket and Sleeves.
- Using embroidery needle and any color embroidery floss, work Running stitch along all pattern lines to mark. Carefully tear away tracing paper.
Helpful: Use different color of floss for leaves. Embroider patterns as shown using Stem st and C for all line work and Satin st and B for leaves.
ASSEMBLY
Sew in Sleeves; sew sleeve seams. Using yarn needle, weave in all ends.