HOW TO…
• Connect computers and other devices to the Internet through the Galaxy Tab
• Connect the Galaxy Tab to a work network via virtual private networking
• Install a digital certificate on the Galaxy Tab
• Control your PC or Mac from the Galaxy Tab anywhere
In this chapter, I’ll show you how to perform three advanced maneuvers to take your use of the Galaxy Tab to the next level.
First, you’ll learn how to connect other computers and devices to the Internet through the Galaxy Tab’s cellular connection. This capability can be a real timesaver when you’re on the road. You can either connect a single PC via tethering—lassoing the Galaxy Tab’s Internet connection with the USB cable—or connect up to five computers or devices via Wi-Fi. As you’d imagine, this capability works only with Galaxy Tab models that have cellular connectivity.
Second, you’ll learn how to connect the Galaxy Tab to your work network via virtual private networking. By doing this, you can connect to network resources even when you’re halfway around the world. You may need to install a digital certificate for authentication; I’ll walk you through the installation process.
Last, I’ll show you how to take control of your PC or Mac from the Galaxy Tab—no matter where you happen to be. This remote control enables you to get work done on your computer when you’re elsewhere, so it can save you time and effort.
When the Galaxy Tab has an Internet connection but your computer doesn’t, you can share the Galaxy Tab’s connection to get your computer online. The easy way to do this is by using USB tethering, making the Galaxy Tab share its Internet connection via a USB connection to your computer.
Other times, you may need to use the Galaxy Tab to put several computers or other devices online. You can do this by turning the Galaxy Tab into a portable Wi-Fi hotspot (in other words, a mobile wireless access point) that can share its Internet connection with up to five other computers or devices.
Both these capabilities are great when you’re on the road, either alone or with colleagues or family. But you can also use them at home if necessary—for example, when your landline fails.
When you need to connect a Windows PC to the Internet via the Galaxy Tab’s Internet connection, use USB tethering. Tethering sounds like what you’d do to your pet goat to stop it wandering off, but in this context it means connecting your computer via a cable to the Galaxy Tab so that the computer can share the Galaxy Tab’s Internet connection.
At this writing, USB tethering doesn’t work with Macs. To connect a Mac to the Internet via the Galaxy Tab, use the mobile access point feature instead, as described in the next section.

Tethering makes your computer use the Galaxy Tab’s Internet connection, so it inevitably increases the use of your data plan. If you’ve got a generous plan, you may be able to use tethering as your normal way of connecting your computer to the Internet. If your plan is limited, use tethering for emergencies only—for example, when your broadband connection fails.
Set the Galaxy Tab to Share Its Internet Connection via USB Tethering
To set the Galaxy Tab to share its Internet connection via USB tethering, follow these steps:
1. Connect the Galaxy Tab to your PC with the USB cable.
2. Tap the Home button to display the home screen.
3. Tap the notifications area to display the notifications panel, and then tap the Settings button to display the Settings screen.
4. Tap the Wireless And Networks button in the left pane to display the Wireless And Networks screen.
5. Tap the Tethering And Portable Hotspot button to display the Tethering And Portable Hotspot screen (see Figure 13-1).
FIGURE 13-1 On the Tethering And Portable Hotspot screen, select the USB Tethering check box to turn on USB tethering. The Galaxy Tab displays the “Tethering Or Hotspot Active” message in the notifications area for a moment, and displays the USB symbol in the indicator icons area.
6. Select the USB Tethering check box to turn on tethering.
The first time you turn on tethering, Windows installs the driver for the Samsung Android USB Remote NDIS Network Device. You’ll see a pop-up message in the notifications area saying that Windows is installing driver software. If you click the pop-up message, you’ll see a Driver Software Installation dialog box such as the one shown here. Click the Close button when Windows completes the installation.

With the driver in place, Windows automatically starts using the Galaxy Tab’s Internet connection, so you can access the Internet from your PC as usual. Depending on how the Galaxy Tab’s Internet connection speed compares with your regular Internet connection, accessing the Internet may be slower than usual.
When USB tethering is on, the Galaxy Tab displays a square blue icon containing a USB symbol at the left end of the notifications area, as you see here.


You can use USB tethering and the portable Wi-Fi hotspot at the same time if you want. But as you’d imagine, the more devices that share the Galaxy Tab’s Internet connection, the farther performance drops.
When you’ve finished using the Galaxy Tab as a mobile access point, turn it off. Follow these steps:
1. Tap the Home button to display the home screen.
2. Tap the USB icon to display its pop-up panel.
3. Tap the Tethering Or Hotspot Active icon on the pop-up panel to display the Tethering And Portable Hotspot screen in the Settings app.
4. Clear the USB Tethering check box.
When you need to connect multiple computers or devices to the Internet via your Galaxy Tab’s Internet connection, you can turn the Galaxy Tab into a portable Wi-Fi hotspot—a mobile wireless access point. The Galaxy Tab creates a wireless network that it shares its Internet connection on. You then connect the computers or devices—up to five of them—to the Galaxy Tab’s wireless network just as you would to any other wireless network.
Using the Galaxy Tab as a mobile access point for several devices can go through your data plan faster than teenagers devouring pizza. Unless you have a generous plan, you’ll probably want to use the Galaxy Tab as a mobile access point only for short periods or for emergencies.
Set Up the Galaxy Tab as a Portable Wi-Fi Hotspot
To set up the Galaxy Tab as a portable Wi-Fi hotspot, follow these steps:
1. Tap the Home button to display the home screen.
2. Tap the notifications area to display the notifications panel, and then tap the Settings button to display the Settings screen.
3. Tap the Wireless And Networks button in the left pane to display the Wireless And Networks screen.
4. Tap the Tethering And Portable Hotspot button to display the Tethering And Portable Hotspot screen.
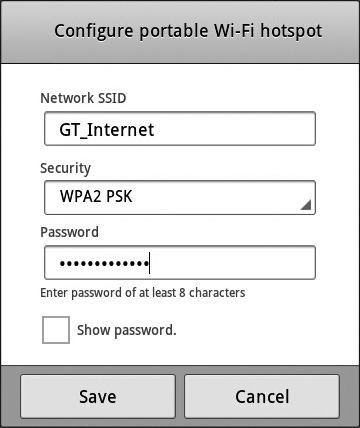
5. Tap the Configure Portable Wi-Fi Hotspot button to display the Configure Portable Wi-Fi Hotspot dialog box (shown here with settings chosen).
6. In the Network SSID text box, type the name you want to give the wireless network. SSID is the abbreviation for service set identifier—in other words, the name for the wireless network.


The Galaxy Tab’s Configure Portable Wi-Fi Hotspot dialog box offers two security options: Open and WPA2 PSK. Open uses no security, so anybody can connect to it. Unless you control all wireless devices within range of the Galaxy Tab, this lack of security is usually a bad idea. WPA2 PSK uses Wi-Fi Protected Access version 2 (WPA2) with a pre-shared key (PSK)—what most people call a password. You should use this setting for your Galaxy Tab’s wireless network.
7. Tap the Security pop-up button, and then tap WPA2 PSK on the pop-up menu. The dialog box expands to display the Password text box.
8. Type the password in the Password text box. Samsung recommends using at least eight characters. This is normally a good idea, but using a shorter password (six characters or more) is okay for short-term use.
9. Tap the Save button to close the Configure Portable Wi-Fi Hotspot dialog box. The Galaxy Tab returns you to the Tethering And Portable Hotspot screen.
10. Select the Portable Wi-Fi Hotspot check box. If the Galaxy Tab is using Wi-Fi to connect to the Internet, it automatically switches to the cellular connection. The Galaxy Tab displays the Portable Wi-Fi Hotspot icon to the left of the notifications area, as shown here.

The Galaxy Tab is now acting as a portable Wi-Fi hotspot. While it does so, you can use the Galaxy Tab as normal—but the Internet connection speed will appear to be slower when other computers and devices are using the connection.

Keep an eye on the Portable Wi-Fi Hotspot icon in the indicator icons area. It’s easy to forget that the portable Wi-Fi hotspot stays on even when the Galaxy Tab goes to sleep.
Connect a Computer or Device to the Galaxy Tab’s Wireless Network
After you turn on the Galaxy Tab’s Portable Wi-Fi Hotspot feature, you can connect a computer or device to the wireless network just as you would to any other wireless network. For example:
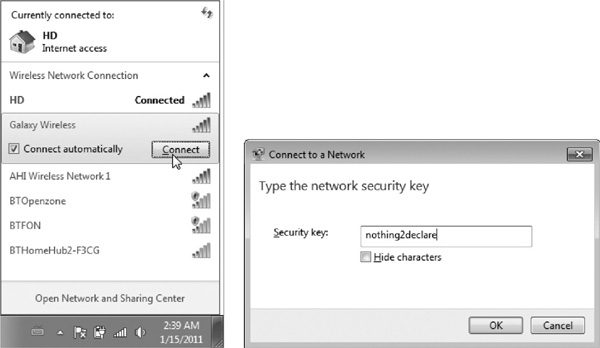
• Windows 7 Click the wireless network icon in the system tray, and then click the name of the Galaxy Tab’s network in the list of wireless networks. Click the Connect button, as shown on the left in the next illustration. In the Connect To A Network dialog box that Windows displays (shown on the right in the illustration), type the password in the Security Key text box, and then click the OK button.

• Mac OS X On the menu bar, click the Wi-Fi icon (on Lion) or AirPort icon (on Snow Leopard or Leopard), and then click Turn Wi-Fi On (on Lion) or Turn AirPort On (on Snow Leopard or Leopard), unless Wi-Fi or AirPort is on already. Click the Wi-Fi icon or AirPort icon again, and then click the name of the Galaxy Tab’s wireless network, as shown on the left in the next illustration. In the dialog box that opens (shown on the right in the next illustration), type the password, select the Remember This Network check box if you want to be able to use the network again, and then click the Join button.

Turn Off the Mobile Access Point
When you’ve finished using the Galaxy Tab as a mobile access point, turn it off. Follow these steps:
1. Tap the Home button to display the home screen.
2. Tap the Portable Wi-Fi Hotspot icon on the system bar to display a pop-up panel.
3. Tap the Tethering Or Hotspot Active icon on the pop-up panel to display the Tethering And Portable Hotspot screen in the Settings app.
4. Clear the Portable Wi-Fi Hotspot check box.
If you need to connect to the network at your workplace from elsewhere, you can create a virtual private network connection on the Galaxy Tab. By using virtual private networking, you establish a secure tunnel through an insecure public network (usually the Internet), so that the Galaxy Tab is connected securely to your workplace’s network.

Most virtual private networks use a password or a digital certificate to authenticate (verify the identity of) the user or computer who is trying to connect. A password authenticates the user; you simply type it in on the Galaxy Tab. A digital certificate authenticates the Galaxy Tab itself; you need to install the digital certificate, as discussed in the sidebar “Install a Digital Certificate on the Galaxy Tab,” later in this chapter.
To set up a VPN connection, you’ll need to know the following information:
• Encryption type The Galaxy Tab can use PPTP, L2TP, L2TP/IPSec with PSK, or L2TP/IPSec with CRT. If your eyes just glazed over at that explosion of abbreviations, see the nearby sidebar titled “Essential VPN Abbreviations and Acronyms.”
• VPN server The server address can be either a hostname (for example, vpnserv. surrealpcs.com) or an IP address (for example, 212.1.12.101).
• DNS search domains You may need to tell the VPN connection where to search for DNS information. Some VPN connections do not need you to specify DNS search domains.
Once you’ve gathered the information detailed in the previous section, you’re ready to set up a VPN connection. To do so, follow these steps:
1. Tap the Home button to display the home screen.
2. Tap the notifications area to display the notifications panel, and then tap the Settings button to display the Settings screen.
3. Tap the Wireless And Networks button to display the Wireless And Networks screen.
4. Tap the VPN Settings button to display the VPN Settings screen, the top of which is shown here. At first, the list of VPNs will probably be empty, as in this example.

5. Tap the Add VPN button to display the Add VPN screen (shown here).

6. Tap the button for the type of security the VPN uses:
• Add PPTP VPN Tap this button to create a VPN connection using PPTP.
• Add L2TP VPN Tap this button to create a VPN connection using L2TP.
• Add L2TP/IPSec PSK VPN Tap this button to create a VPN using either L2TP or IPSec with a pre-shared key (a password).
• Add L2TP/IPSec CRT VPN Tap this button to create a VPN using either L2TP or IPSec with a digital certificate.
7. When you tap the button, the Galaxy Tab displays the Add PPTP VPN screen (shown in the upper-left corner of Figure 13-2), the Add L2TP VPN screen (shown in the upper-right corner), the Add L2TP/IPSec PSK VPN screen (shown in the lower-left corner), or the Add L2TP/IPSec CRT VPN screen (shown in the lower-right corner).
FIGURE 13-2 Set up the details of the VPN connection on the Add PPTP VPN screen (top left), the Add L2TP VPN screen (top right), the Add L2TP/IPSec PSK VPN screen (lower left), or the Add L2TP/IPSec CRT VPN screen (lower right). Each type of connection needs different items of information.
8. For any type of VPN, tap the VPN Name button, type a descriptive name in the VPN dialog box that opens, and then tap the OK button.
9. For any type of VPN, tap the Set VPN Server button, type the VPN server’s hostname or IP address in the Set VPN Server dialog box, and then tap the OK button.
10. Set up the security method for the VPN:
• PPTP VPN Select the Enable Encryption check box.
• L2TP VPN Select the Enable L2TP Secret check box. Then tap the Set L2TP Security button, type the password in the Set L2TP Security dialog box, and tap the OK button.
• L2TP/IPSec VPN using a pre-shared key Tap the Set IPSec Pre-Shared Key button, type the key in the Set IPSec Pre-Shared Key dialog box, and then tap the OK button. Next, select the Enable L2TP Secret check box. Then tap the Set L2TP Security button, type the password in the Set L2TP Security dialog box, and tap the OK button.
• L2TP/IPSec VPN using a certificate Select the Enable L2TP Secret check box. Then tap the Set L2TP Security button, type the password in the Set L2TP Security dialog box, and tap the OK button. Next, tap the Set User Certificate button to display the Set User Certificate dialog box (shown below on the left), then tap the option button for the user certificate you want to install. (There may be only a single certificate available, as in this example.) Tap the Set CA Certificate button to display the Set CA Certificate dialog box (shown below on the right), then tap the option button for the certificate.

11. For any type of VPN, if you need to set DNS search domains for the VPN connection, tap the DNS Search Domains button, type the addresses of the search domains in the DNS Search Domains dialog box that opens, and then tap the OK button. For example, if you enter surrealpcs.com as a search domain, you’ll be able to connect to corp.surrealpcs.com by simply entering corp rather than the full address.
12. When you’ve finished choosing all the settings for the VPN, tap the Menu button in the upper-right corner of the screen to display the menu (shown here), and then tap the Save button to save the VPN configuration.

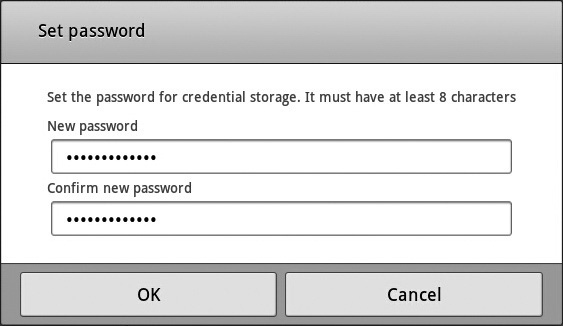
13. If the Set Password dialog box (shown here) appears, type the password to use for credential storage in the New Password box and the Confirm New Password box. The password must be eight characters or more. Then tap the OK button.

When you finish setting up the VPN, it appears in the VPNs list on the VPN Settings screen in Wireless And Networks Settings.

To delete a VPN connection, go to the VPN Settings screen, and then tap and hold down its button in the VPNs list. In the dialog box that opens, tap the Delete Network button.
To connect to the remote network using your VPN, follow these steps:
1. Tap the Home button to display the home screen.
2. Tap the notifications area to display the notifications panel, and then tap the Settings button to display the Settings screen.
3. Tap the Wireless And Networks button to display the Wireless And Networks screen.
4. Tap the VPN Settings button to display the VPN Settings screen.
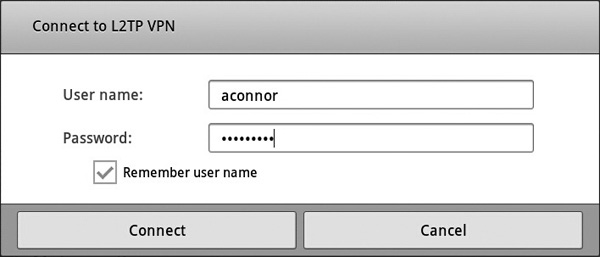
5. Tap the button for the VPN you want to connect to. The Galaxy Tab displays the Connect To dialog box (shown here).

6. Type your user name in the User Name text box.
7. Type your password in the Password text box.
8. Select the Remember User Name check box if you want the Galaxy Tab to remember your user name. This is usually helpful.
9. Tap the Connect button. The Galaxy Tab closes the Connect To dialog box and shows Connecting on the VPN’s button on the VPN Settings screen as it connects.
When the Galaxy Tab establishes the connection, the notifications area briefly displays a message telling you it has connected.
After the message disappears, the notifications area continues to display the VPN symbol to remind you that you’re connected.
You can now work on the network as if you were directly connected to it from within the network, but data will transfer only at the speed of your Internet connection or more slowly.
When you have finished using the VPN, disconnect from it like this:
1. Tap the Home button to display the home screen.
2. In the notifications area of the System bar, tap the VPN’s button to jump to the VPN Settings screen.
3. Tap the button for the VPN that’s connected. You can also tap and hold down on the VPN’s button in the notifications area to display the dialog box for the VPN, and then tap the Disconnect From Network button.
Connecting to your work network via VPN is useful, but you may need to take your presence a step further, and take control of your PC or Mac remotely from the Galaxy Tab.
Taking control enables you to work on your PC or Mac pretty much as if you were sitting at it. The main differences are practical: You can see only as much of the screen as fits on the Galaxy Tab’s screen; you’re stuck with an onscreen keyboard unless you connect a keyboard; and you point with a touch screen rather than a mouse unless you connect a mouse. But if you’re patient, it works fine. And if it means you can take care of a project update or troubleshoot a sick server without having to drive to the office, you can probably find the patience.
At this writing, you can get various Android applications for controlling your PC or Mac remotely. In this section, I’ll introduce you to the three main contenders for your money.
The remote-control application you’ll probably want to start with is Wyse PocketCloud, which you can download for free from Android Market. Wyse PocketCloud is the starter version of Wyse PocketCloud Pro, which costs around $15 and offers full features. PocketCloud can connect to both Windows PCs and Macs. For Windows PCs, you can use either RDP or VNC; for Macs, VNC is the only option.
Wyse has crippled PocketCloud by limiting it to a single saved connection and saddling it with ads. So if you find PocketCloud works for you, you’ll probably want to upgrade to the Pro version. Figure 13-3 shows PocketCloud accessing a Mac.
FIGURE 13-3 Wyse PocketCloud is an easy-to-use client for both RDP and VNC.

PocketCloud has an Auto Discovery Setup feature that requires downloading and installing the PocketCloud companion software on the PC or Mac. Once you’ve done this, Auto Discovery Setup can grab the information automatically across the network by using your Gmail account.
If you need to connect only to Windows PCs, try Remote Desktop Client from Xtralogic, Inc. (around $25). Remote Desktop Client (shown in Figure 13-4 controlling a PC running Windows 7) offers strong features for optimizing and managing RDP connections. For example, you can resize the Windows desktop to fit the Galaxy Tab’s screen, choose whether to transmit graphical information such as desktop backgrounds and themes, and play sounds from the remote PC on the Galaxy Tab.
FIGURE 13-4 Remote Desktop Client has strong features for making the most of RDP connections to Windows PCs. Here, Remote Desktop Client has resized the desktop to fit the Galaxy Tab’s screen, making navigation much easier.
When you need to connect to your PC or Mac across the Internet without having to configure a firewall to pass traffic on particular ports or track your computer’s IP address, you can use a tool such as LogMeIn Ignition from LogMeIn, Inc. (around $30).
LogMeIn Ignition uses three components:
• LogMeIn service This online site (www.logmein.com) passes information between the computer you’re using (for example, the Galaxy Tab) and the remote computer. You need to create an account at this site to use LogMeIn Ignition.
• LogMeIn Ignition This application runs on the Galaxy Tab (and on many other devices).
• LogMeIn program This program runs on your PC or Mac and keeps in touch with the LogMeIn service.
Once you have set up your account, installed and configured LogMeIn Ignition on the Galaxy Tab, and installed and configured the LogMeIn program on the PC or Mac, LogMeIn works smoothly and effectively. Figure 13-5 shows LogMeIn Ignition accessing a Mac across the Internet.
FIGURE 13-5 LogMeIn Ignition gives you remote access to a Mac (shown here) or PC across the Internet without your needing to reconfigure your firewall or router.
LogMeIn Ignition also has a lot of neat tricks, such as enabling you to easily change the resolution on the remote computer to better suit the device you’re using. For example, when using LogMeIn Ignition on the Galaxy Tab, you’ll probably want to lower the resolution so that you can see things at a reasonable size without having to scroll the screen all the time.