
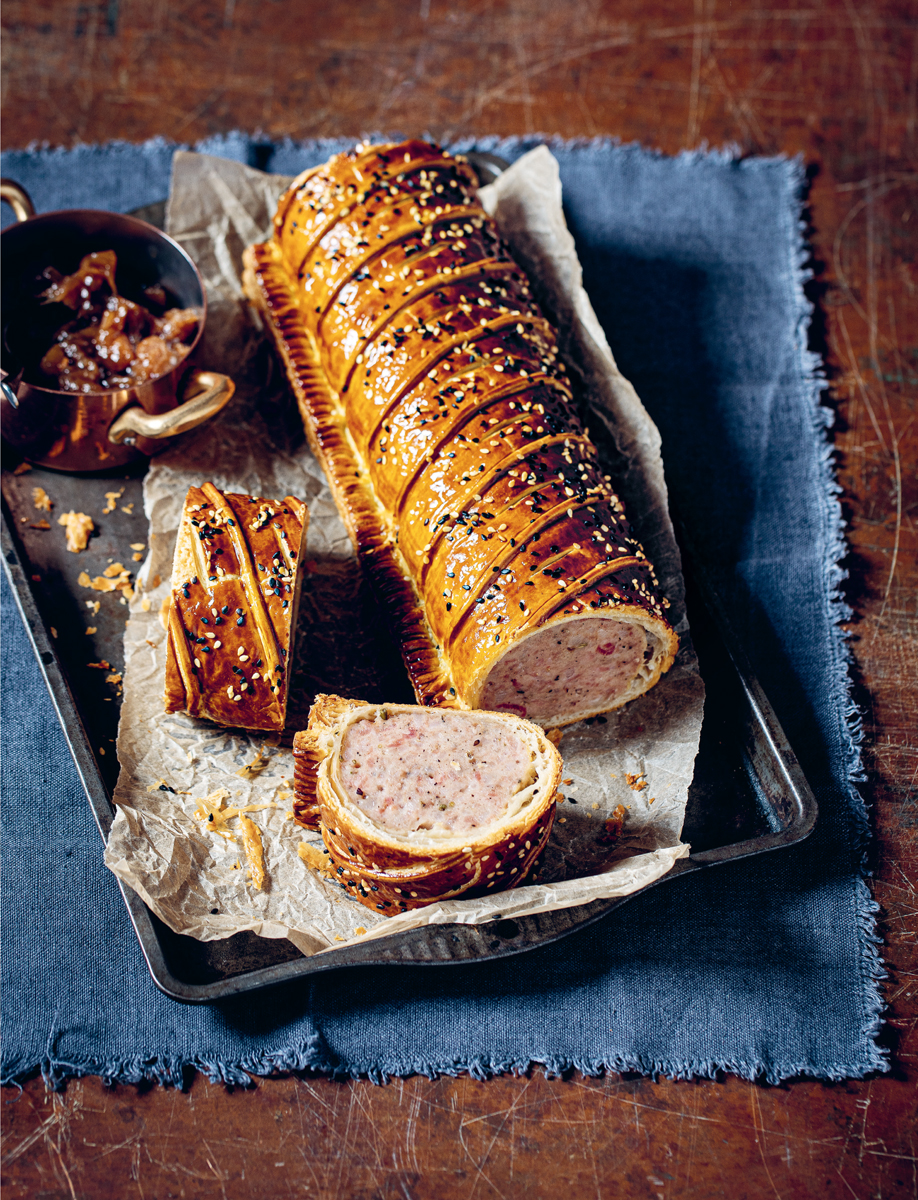
The Ultimate Sausage Roll
In an attempt to find the perfect example, we have tested different flavours and textures for the filling of our sausage rolls at The Pie Room. It always comes back to one thing: simplicity. The filling should be tasty but not overcrowded with too many flavours and textures. The addition of a little chopped bacon and a few thyme leaves to Cumberland sausagemeat are the only changes we make, but the devil is in the detail. For me, the key to the Ultimate Sausage Roll actually lies in the ratio of meat to pastry. When the meat takes longer to cook, the crisper the pastry will be.
SERVES 4
400g rough puff pastry (or shop-bought puff pastry)
2 egg yolks beaten with 2 teaspoons water, for brushing
pinch of black sesame seeds
pinch of white sesame seeds
Plum and Star Anise Chutney, to serve
For the filling
700g Cumberland sausages, skins removed
150g streaky bacon, finely chopped
25g thyme, leaves picked
⅓ teaspoon table salt
large pinch of freshly ground black pepper
Equipment
large plastic piping bag (optional)
Line a large baking tray with parchment paper. On a lightly floured surface, roll the pastry out to 5mm thick in a 40cm x 25cm rectangle. Slide the rolled-out pastry onto the lined tray and chill in the refrigerator for 30 minutes.
Meanwhile, put the sausagemeat, bacon, thyme, salt and pepper into a bowl and mix well with your hands. Fill a large plastic piping bag with the sausagemeat filling. If you don’t have a piping bag, shape the filling into a 6cm wide sausage and wrap tightly in clingfilm, firmly twisting the ends. Chill the filling in the refrigerator for 20 minutes.
Remove the rolled-out pastry from the refrigerator and dust off any excess flour from the surface. Leave the pastry on the parchment paper.
Using kitchen scissors, snip the tip of the piping bag to make a 5cm wide opening. Working from one end of the pastry rectangle, slowly pipe the sausagemeat filling down the length of the pastry 6cm inside one edge. Alternatively, remove the clingfilm from the sausagemeat, unwrapping it over the pastry rectangle, and place the filling 6cm inside one edge of the pastry.
Lightly brush the larger exposed area of pastry all over with egg wash, leaving the narrow 6cm border clear. Fold the egg-washed pastry over the filling to meet the narrow border, align the pastry edges and press firmly together.
Lightly dust the tines of a fork with flour and tap off any excess. Working down the length of the seam, firmly press the ends of the fork into the pastry to leave an impression of the tines. Whenever necessary, dust the fork with more flour to stop it sticking to the pastry.
Lightly brush the sausage roll all over with egg wash and return to the refrigerator for 10 minutes to allow the egg wash to dry. Brush a second layer of egg wash over the sausage roll and then, using a sharp knife, lightly score the top of the pastry with diagonal lines all the way down its length. (This gives the pastry a little stretching room and stops it from tearing open at the seam.) Return the sausage roll to the refrigerator to chill for a further 10 minutes.
Preheat the oven to 190°C fan/210°C/gas mark 6½.
Trim a little off the fluted seam of the pastry to neaten it into a straight edge, then brush a final layer of egg wash all over the sausage roll. Sprinkle the black and white sesame seeds along the top of the roll. Pop the tray into the preheated oven and bake the sausage roll for 25 minutes. Check the internal temperature of the filling with a digital probe thermometer – you are looking for 75°C or above. If necessary, return the sausage roll to the oven and check the temperature again every 5 minutes until it reaches 75°C. Alternatively, insert a metal skewer into the centre of the sausage roll and then press it against your hand – it should be very hot to the touch.
Remove the tray from the oven and transfer the sausage roll to a wire cooling rack. Leave to cool for 10 minutes before cutting the sausage roll with a serrated knife into eight equal slices. Serve warm with spoonfuls of chutney.
The Ultimate Sausage Roll
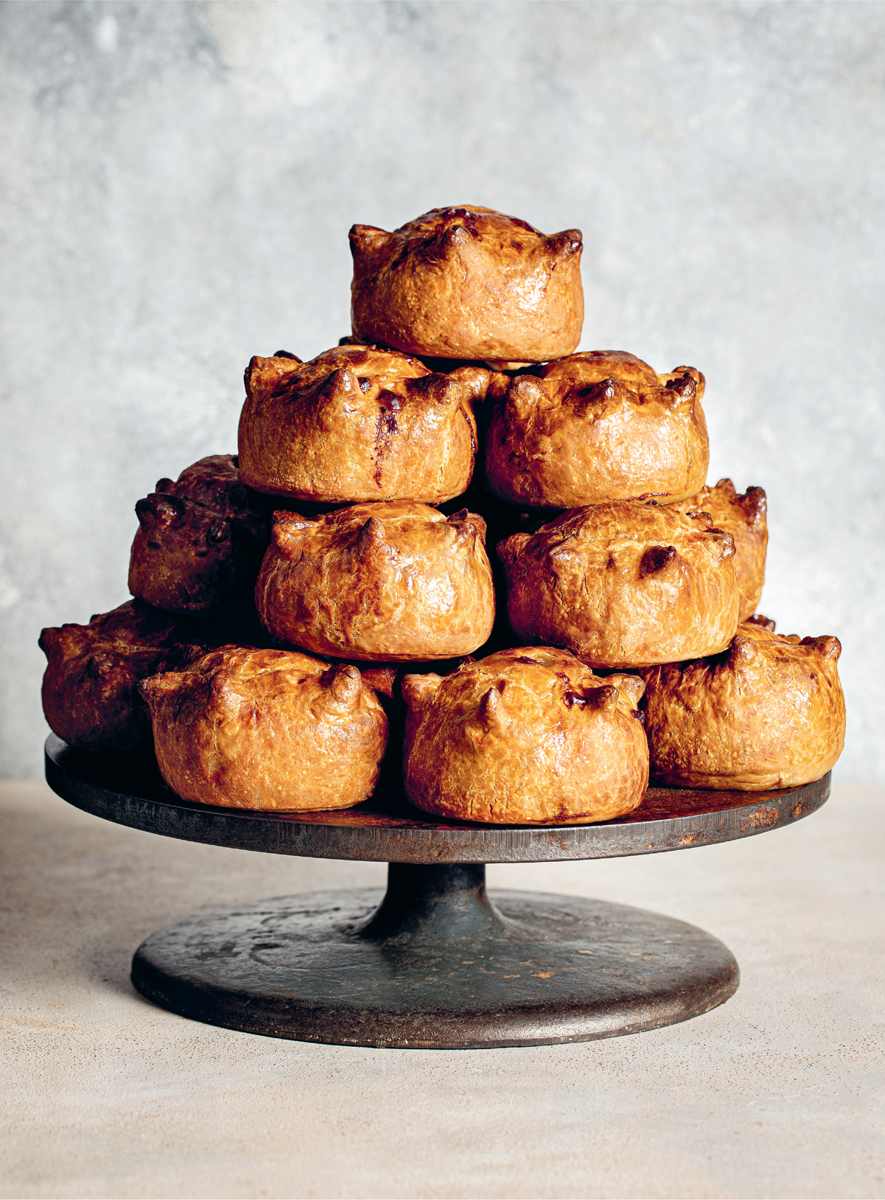
Gala Pie
The gala pie is an evolution of the classic pork pie. The addition of boiled egg to the centre of the filling instantly catapults this pie to British picnic dish status. When I first started working on this recipe, I always wondered why you never see a gala pie with a gently cooked, soft egg, rather than the usual greying or pale yellow, chalky yolk that is so unappealing. That became my first focus, working out the correct egg to meat and pastry ratio so that the egg yolk remains just soft while the meat and pastry are well cooked. The results are a beautiful slice!
SERVES 6-8
600g shortcrust pastry
10g butter, for greasing
1 egg yolk beaten with 1 teaspoon water, for brushing
For the pie filling
6–8 medium organic eggs, at room temperature
850g coarsely ground pork mince
200g Cumberland sausages, skins removed
200g streaky bacon, cut into 2cm strips
50g sage, leaves picked and finely chopped
1½ teaspoons fine table salt
For the jelly
6 bronze gelatine leaves
100ml dry cider
250ml hot pork or beef stock
3 sage leaves
½ teaspoon fine table salt
Equipment
900g (2lb) loaf tin and digital probe thermometer
Bring a pan of water to the boil and fill a large bowl with iced water and keep it close by. Carefully lower the eggs into the boiling water with a spoon, making sure you don’t crack them on the base of the pan, and boil for 6 minutes. Remove the eggs from the pan using a slotted spoon and transfer to the bowl of iced water. Leave the eggs to cool for 10 minutes and then once cool enough to handle, peel the shells from the eggs and set aside on paper towels in the refrigerator.
Grease the loaf tin with the butter. Lay a strip of parchment paper along the base of the tin allowing the ends to overhang the sides. (This will help to remove the pie from the tin once cooked.)
On a lightly floured surface, roll out one-third of the dough to a 5mm thick strip long enough to cover the top of the tin. Lay this strip on a tray and place in the refrigerator until needed. Roll out the remaining dough into a large rectangle 5mm thick. Use the remaining dough to line the prepared tin, making sure there is a 2cm excess of pastry overhanging each edge. Put the pastry-lined tin into the freezer for 15 minutes or until the dough has set hard.
Place the pork mince, sausagemeat, bacon, sage and salt in a bowl and mix together with your hands until well combined. Weigh the filling mixture and divide it into two equal halves. Put half the filling mixture into the pastry-lined loaf tin, packing it down and forming a small trench along the centre of the filling for the eggs to nestle in.
Using a sharp knife, take a thin slice off the top and bottom of each boiled egg (being careful not to slice into the yolk). Line up the eggs along the trench in the pie filling. Cover the eggs with the remaining pie filling, gently packing the meat down.
Lightly brush the overhanging edges of the pastry case with the egg wash. Take the strip of pastry out of the refrigerator and lay it across the top of the pie to form the lid. Firmly crimp together the overhanging pastry edges and the pie lid (see here for the crimping technique). Brush the top of the pie with more of the egg wash and chill in the refrigerator for 15 minutes. Score the lid of the pie with diagonal lines (being careful not to cut right through the pastry), then using a small 2cm cutter (or the lid of a pen), make 4 or 5 holes in the pie lid, spacing them evenly along the length of the lid. (This will allow steam to escape from the pie during cooking.) You can add little collars to the steam holes by cutting out slightly larger circles of pastry and punching the same-sized holes out of those, lightly brushing them with egg wash and attaching.
Roll strips of tin foil around a pen to create 5cm long chimneys, and poke them into the steam holes (expanding them slightly when they are inside until they touch the edges) to help any fat escaping during cooking travel up them, rather than across the surface of the pie.
Preheat the oven to 180°C fan/200°C/gas mark 6.
Bake in the preheated oven for 1 hour or until the central temperature of the pie reads 50°C on a digital probe thermometer. Once the pie is at temperature, remove from the oven and allow to rest for 30 minutes.
To make the jelly, put the gelatine leaves in a bowl with enough cold water to cover and add a few ice cubes. Leave to soften.
Bring the cider to the boil in a small saucepan and reduce by two-thirds. Add the stock, sage and salt. Squeeze the gelatine to remove any excess water and then whisk into the hot stock. Pass the mixture through a sieve and then, preferably using a funnel, carefully pour the jelly mixture through the steam holes of the pie until it is full up. Refrigerate for at least 1 hour before serving.
Using the overhanging ends of the parchment paper, lift the pie out of the tin and place on a board. Using a serrated knife, cut the pie into thick slices and serve with spoonfuls of piccalilli.

Gala Pie
Prawn Thermidor Vol-au-Vents
Thermidor is one of my all-time favourite dishes, but it is usually served as tender lobster meat in an inedible shell. I’ve always believed everything on a plate should be edible, hence the pastry tart case, which actually adds a lightness to the dish. At the Holborn Dining Room, we serve a version of this Thermidor tart with lobster, which you can substitute for the prawns if you are feeling flash.
MAKES 5
200g raw tiger prawns, peeled
20g butter
1 quantity of Hollandaise Sauce
25g tarragon leaves, picked and chopped, plus extra to garnish
100g Gruyère cheese, finely grated
1 teaspoon English mustard
Preheat the oven to 190°C fan/210°C/gas mark 6½.
Slice each prawn in half horizontally. Heat the butter in a frying pan over a medium heat. When the butter starts to bubble, add the prawns to the pan and toss in the butter for 1 minute until just pink. Remove the prawns from the pan, drain and transfer to paper towels to remove any excess moisture.
Pour the hollandaise sauce into a mixing bowl. Add the tarragon leaves, Gruyère and mustard to the bowl and fold through the sauce. Lastly, add the just-cooked prawns.
Place the baked vol-au-vent cases on a baking tray. Spoon the Thermidor mixture into the vol-au-vent cases, dividing the prawns equally. Fill the cases so that the Thermidor mixture is just above the rim of the pastry. If any bubbles over the top during baking, it only makes the dish look even tastier at the table.
Place the tray in the preheated oven and bake for 10 minutes. Check the temperature of the Thermidor mixture in the middle with a digital probe thermometer, it should read 65°C or above. If not, pop the tray back in the oven for a further few minutes before serving, topped with a few extra tarragon leaves.

Prawn Thermidor Vol-au-Vents
Hot Pork Pie
For centuries, pork pies have firmly held a place in British food culture as a way to use up cuts of pork less desirable than, say, fillet or loin, but truly delicious when handled with care. The most common style of pork pie found in the UK is the cold, jellied picnic pie, however my preferred way to serve a pork pie is piping hot, just out of the oven. The pastry is crispier, the fats are still unctuous, juicy and melting, and the herbs are fragrant.
The first time I ate a hot pork pie was at a pub in the West Country: I remember so clearly wondering why we had never served a hot version in the Holborn Dining Room. As soon as I went back to work, I immediately set about rectifying that. In this recipe, a traditional pork pie dolly (a smooth wooden tool) is used to shape the dough. You can find a dolly easily online, but you could also use a jam jar or a well-buttered metal ring of the same diameter. Roll the pastry into a circle, use it to line the ring, fill and press on a lid, then carefully remove the pie from the ring. Try using a dolly though – you will feel like a character from a Dickens novel (dressing up as one is not necessary, though fully applauded).
SERVES 4
plain flour, for dusting
2 egg yolks beaten with 1 teaspoon water, for brushing
For the filling
500g pork shoulder, half minced and half roughly chopped
120g smoked streaky bacon, roughly chopped
100g lardo, cut into 1cm dice
1 teaspoon fennel seeds
1 teaspoon yellow mustard seeds
1½ teaspoons fine table salt
30g sage, leaves picked and finely chopped
a few good twists of freshly ground black pepper
To serve
Equipment
7.5cm diameter pie dolly and digital probe thermometer
Line a baking tray with parchment paper.
Weigh out the pastry dough into four balls weighing 150g and four smaller balls weighing 40g. On a lightly floured surface, flatten the 40g dough balls and roll out to 5mm thick circles. Lay the pastry circles on the lined baking tray and chill in the refrigerator until needed.
Combine all the ingredients for the filling in a mixing bowl. Using your hands, work everything well for a few minutes until the mixture holds together. Split the mixture evenly into four balls and set aside.
Take one of the 150g dough balls and gently flatten it out into a circle until it is slightly wider than the pie dolly. Dust the pie dolly well with flour, centre it on top of the dough circle and then firmly press it down into the dough. The dough will rise up the sides of the dolly and puff out like an inflatable swimming ring. Lift the dolly out of the dough and dust it with more flour. Return the dolly to the centre of the dough and, cupping the edges of the dough in your hands, squeeze it up the dolly while at the same time turning and also pushing down on the dolly. Imagine a pottery wheel as you turn and squeeze, keeping the pastry as tight to the dolly as possible. Periodically, pause to lift out the dolly and dust with more flour to prevent the pastry from sticking to it. Keep working the pastry dough in this way until the wall of the pastry case is about 7–8cm in height and the base is 5mm thick.
Carefully remove the dolly from the pastry case and pack it with one of the balls of pork meat filling.
Repeat with the remaining 150g balls of dough until you have four pie cases filled with the pork meat filling. There should be a slight excess of pastry at the top of each case, so gently curl that outwards to form a collar.
Preheat the oven to 190°C fan/210°C/gas mark 6½.
Take the pastry lids out of the refrigerator. Wet the pie collars with a little water and lay the lids on top. To join, firmly press the collars and lids together. Crimp the edges (see here for crimping technique) into the middle and then transfer the pies back onto the lined baking tray.
Using a skewer or the tip of a knife, make a small hole in the top of each pie to allow the steam to escape. Avoiding the base, brush the wall and lid of each pie with the egg wash and return the pies to the lined baking tray.
Place the tray in the preheated oven and bake the pies for 35 minutes or until the core temperature reads 70°C on a digital probe thermometer. If you don’t have a probe thermometer, insert a metal skewer into the centre of a pie and leave it there for 10 seconds – when it comes out, the skewer should be piping hot. Remove the pies from the oven and leave to rest for 10 minutes before serving with mash and gravy.

Hot Pork Pie

Sardine, Olive & Onion Tartlets
Based on the classic Pissaladière from France, in this dish the sweet, savoury onions act as a foil to the oily sardines, while thyme continues the earthy flavour. If you can’t get fresh sardine fillets, use tinned and lay them flat rather than curling them up.
SERVES 4
300g rough puff pastry (or shop-bought puff pastry)
1 egg yolk beaten with 1 teaspoon of water, for brushing
20ml vegetable oil
4 medium Spanish onions, peeled and sliced
500g fresh sardine fillets, pin boned
120g pitted green olives, halved
3 thyme sprigs, leaves picked
10ml extra-virgin olive oil
sea salt and freshly ground black pepper
On a lightly floured surface, roll the pastry out to 5mm-thick in a 40cm x 30cm rectangle. Slide the rolled-out pastry onto a sheet of parchment paper. Using the egg wash, brush a 2.5cm border all the way around the rectangle of pastry and then crimp in the edges to form a frame (see here). Lifting the parchment paper, slide the whole thing onto a baking tray and chill in the refrigerator for 25 minutes.
Preheat the oven to 200°C fan/220°C/gas mark 7. While the pastry is chilling, prepare the onions. Put a non-stick frying pan over a medium heat. Add the vegetable oil to the pan and heat for 1 minute, then add the sliced onions and ¼ teaspoon salt. (The salt will draw the moisture from the onions and speed up the cooking.) Stirring regularly with a wooden spoon, cook the onions for 10–15 minutes or until well browned and caramelised. If the onions are cooking too quickly, turn the heat down. Scrape the onions out of the pan and onto a plate and leave to cool while you prepare the pastry.
Remove the rolled-out pastry from the refrigerator. Brush the crimped pastry edge with the remaining egg wash and prick the pastry inside the frame all over with a fork, right up to the edges. Pop the tray into the preheated oven and bake the pastry for 15 minutes. Remove the tray from the oven, lay a sheet of parchment paper over the top of the pastry and fill the centre with just enough baking beans to weigh down the middle. Return the pastry to the oven for a further 10 minutes. Remove the tray from the oven and carefully lift out the parchment paper with the baking beans. Set aside the pastry on the baking tray and leave to cool, but leave the oven on.
Once the pastry has cooled, spread the cooked onions evenly across the base of the tart. Season the sardines with salt and pepper, then roll up each fillet into a tight coil. Nestle the sardines on their sides in the onions and intersperse the olives to fill in the gaps.
Put the tart back into the hot oven for 8 minutes or until the sardines are just cooked – they should be slightly firm and no longer translucent. Remove the tray from the oven and carefully transfer the tart to a serving platter. Scatter the fresh thyme leaves across the top of the tart and drizzle all over with the olive oil. Serve while still warm from the oven.

Sardine, Olive & Onion Tartlets
Leek & White Pudding Croquettes
The savoury flavours of white pudding, a traditional Scottish breakfast sausagemeat, combine with freshly grated nutmeg to make these melting croquettes so moreish. I prefer to leave the croquettes to cool for a few minutes so they aren’t too hot to eat and you can enjoy the flavours, instead of juggling them around in your mouth.
MAKES 12
70g butter
½ leek, finely sliced
90g plain flour
550ml whole milk
150g white pudding, finely crumbled
¼ whole nutmeg, freshly grated
½ teaspoon table salt
a few good grinds of black pepper
2 eggs
100g panko breadcrumbs or plain white breadcrumbs
1 litre vegetable oil
Melt the butter in a saucepan over a low-medium heat. Add the sliced leek and cook for 2 minutes to soften. Add 60g of the flour and cook for a further 6 minutes, stirring continuously.
Warm 500ml of the milk in another pan or microwave. Add half the warm milk to the pan with the leeks and, stirring continuously, simmer until it thickens. Continuing to stir, add the rest of the warm milk and bring it back up to a simmer. Reduce the heat to low and continue to cook for 15 minutes or until the mixture is thick and stodgy. Take the pan off the heat, stir the crumbled white pudding through the mixture and then season with the nutmeg, salt and a good amount of freshly ground black pepper.
Line a baking tray with clingfilm. Pour the croquette mixture onto the tray, cover the surface with more clingfilm and allow to cool to room temperature. Once cool, chill in the refrigerator for 1½ hours.
When ready to cook, take the tray from the refrigerator and divide the mixture into 12 equal portions, each weighing around 45g. Dust your hands with flour and then roll the mixture into 12 neat cylinders.
Scatter the remaining flour over a plate, crack the eggs into a small bowl and beat with the remaining milk. Tip the breadcrumbs into a larger bowl with enough room to toss the croquettes. First, roll each croquette through the flour and then dust off any excess. Next, dip each croquette in the beaten egg, again shaking off any excess. Finally, transfer each croquette to the bowl of breadcrumbs and toss them a few times until they are evenly coated. Transfer to a baking tray.
Fill a heavy-based pan with the vegetable oil and heat to 180°C. When the oil has reached temperature, lower the croquettes into the oil and fry them for 3 minutes or until golden brown. Fry the croquettes in small batches, if necessary, to avoid overcrowding the pan. Using a slotted spoon, remove the croquettes from the hot oil and drain on paper towels before serving.

Leek & White Pudding Croquettes
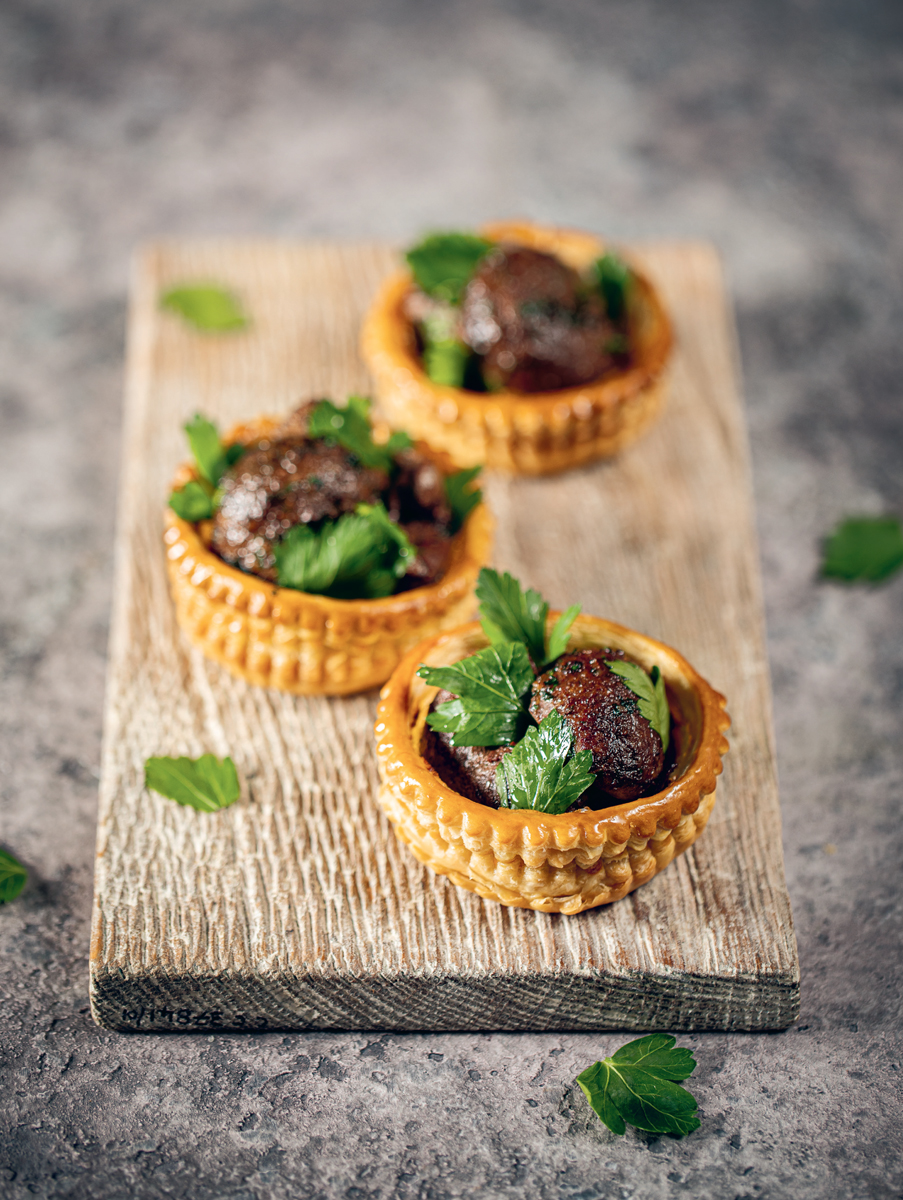
Devilled Kidney Vol-au-Vents
Did vol-au-vents ever go out of fashion? Not in my house, friends. The case can be used for so many canapés, there are endless options for this neat little basket! I got into offal quite late; being served tough kidneys at school was almost enough to put me off for life, but I was converted in my twenties and have never looked back.
MAKES 5
For the vol-au-vents
450g classic puff pastry (or shop-bought)
plain flour, for dusting
1 egg beaten with 1 teaspoon water, for brushing
For the filling
10 lamb kidneys
15g plain flour
25ml vegetable oil
80g Devilled Butter
1 tablespoon Worcestershire sauce
1½ teaspoon table salt
20g flat-leaf parsley, leaves picked but not chopped
Equipment
8cm and 6cm round pastry cutters
First, make the vol-au-vent cases. Preheat the oven to 190°C fan/210°C/gas mark 6½ and line a baking sheet with parchment paper. Lightly dust the work surface with flour and then roll the pastry into a large square 5mm thick. Place onto the lined tray and chill in the refrigerator for 15 minutes.
Remove the tray from the refrigerator and cut ten discs from the pastry dough using an 8cm round cutter. Rearrange five of the discs on the lined tray so they are spaced a little apart and brush lightly with the egg wash. For the remaining discs, using a smaller 6cm round cutter, remove the centres and discard. Working quickly while the pastry is still cold, carefully lift these rings up and lay over the whole discs on the tray, fitting them neatly on top as collars. Brush the collars with the egg wash and, using a fork, prick the centres of the vol-au-vents (but not the collars). Bake in the preheated oven for 20 minutes until the pastry is puffed and golden. Transfer the vol-au-vent cases to a wire rack to cool.
Once cool, using a small sharp knife, carefully remove any pastry from the centre of each vol-au-vent case to expose a deep hole. Be gentle or you may break a hole through the bottom or the sides. Store in an airtight container while you make the filling.
Peel the membranes (very thin skins) from the kidneys and split them lengthways with a sharp knife. Using a pair of kitchen scissors, snip out the white membrane. Tip the flour onto a plate and coat the kidneys in the flour.
Heat the oil in a large frying pan over a high heat. Once the oil is shimmering, drop in the kidneys, shaking off any excess flour as you take them from the plate. Cook the kidneys on one side for 1 minute then turn over and cook for a further 1 minute on the other side.
Remove the pan from the heat and add the devilled butter, Worcestershire sauce and salt. Move the kidneys around the pan to help melt the butter for a further 1 minute until the kidneys are well coated.
Scatter three-quarters of the picked parsley leaves into the pan and stir through. Spoon the kidney mixture into the vol-au-vent cases, dividing it equally, and sprinkle the remaining parsley leaves over the top to decorate.
Devilled Kidney Vol-au-Vents
’Nduja Stuffed Brioche
’Nduja is the spicy, smoked Italian pork salumi that combines so many good bits of the pig – offal, shoulder, tripe – all mixed with Calabrian chilli. It’s so addictive that I have to stop myself adding it to everything. Stuffed inside a warm pillow of brioche, however, ’nduja feels at home in this rich but incredibly light type of bread. For this recipe you will need small brioche moulds, which are easily available online. Try to get the non-stick ones, if you can.
MAKES 8
160g spreadable’nduja sausage
10g butter, softened
400g brioche dough
1 egg yolk, beaten with 2 teaspoons milk
3g black poppy seeds
sea salt
Equipment
8 small brioche moulds (7–8cm diameter)
With floured hands, divide the ’ndjua sausage into 20g portions and roll into balls. Place on a small tray lined with parchment paper and freeze for 1½ hours or until hard.
Lightly brush eight small brioche moulds with the softened butter.
Weigh out the brioche dough and divide it into 50g portions. On a lightly floured surface, roll each piece of dough into a ball and then flatten into a disc approximately 8–10cm in diameter.
One by one, take the ’ndjua from the freezer and encase them in the brioche dough discs, pinching the dough together around the ’nduja to seal. Roll each ball between your palms until the surface is perfectly smooth. Place one ball into each of the buttered brioche moulds.
Place the moulds on a baking tray and leave somewhere warm (such as inside an airing cupboard or on a shelf above a radiator as the dough won’t rise when it is cold), and leave to prove for 2 hours.
Preheat the oven to 200°C fan/220°C/gas mark 7.
Lightly brush the tops of the brioche with the egg wash and then sprinkle a pinch of poppy seeds and a little sea salt over each. Place the moulds on the tray in the preheated oven and bake for 15 minutes, then lower the heat to 180°C fan/200°C/gas mark 6 for a further 5 minutes or until a skewer inserted into the brioche bun comes out clean.
Remove the brioche from the oven, turn them out of the moulds and allow to rest on a wire cooling rack for 5 minutes before serving while still warm.

’Nduja Stuffed Brioche
Haggis Scotch Egg
A well-made Scotch egg with a warm, jammy yolk, juicy forcemeat and crispy breadcrumb coating is a thing of beauty. A near perfect snack, the Scotch egg can be a vehicle for so many variations on the original recipe. This is one of my favourites. The flavours are simple and clean, relying purely on quality ingredients being handled with a little care. If the idea of eating haggis has previously felt intimidating, this is a great way to try it and then, inevitably, fall deeply in love with it.
MAKES 4
160g good-quality pork sausagemeat
160g haggis
2 rosemary sprigs, finely chopped
½ teaspoon sea salt
white pepper
5 medium organic eggs, at room temperature
50g plain flour
50ml semi-skimmed milk
150g panko breadcrumbs or plain white breadcrumbs
1 litre vegetable oil
Place the sausagemeat in a large bowl and crumble in the haggis. Add the rosemary, sea salt and grind in a little white pepper, then mix well. Divide the mixture into four equal balls, each weighing 80g, and chill in the refrigerator.
Meanwhile, fill a small saucepan with enough water to cover four of the eggs (but don’t actually add the eggs) and bring to the boil. Fill a large bowl with iced water and keep it close by. Carefully lower 4 eggs into the boiling water with a spoon, making sure you don’t crack them on the base of the pan, and boil for 6 minutes. Remove the eggs from the pan using a slotted spoon and transfer to the bowl of iced water. Leave the eggs to cool for 10 minutes and then once cool enough to handle, peel the shells from the eggs and set aside to dry on paper towels.
Take three bowls. Put the flour into the first bowl, crack the remaining egg into the second bowl and beat it with the milk, then place the breadcrumbs into the final bowl, lightly crushing some of the crumbs in your hands for texture.
Flatten out the sausagemeat balls and wrap them in an even layer around the boiled eggs, making sure each egg is snugly wrapped in the meat. Roll each meat-wrapped egg in the flour and then dust off any excess. Next, dip the floured eggs in the beaten egg. Finally, coat each egg in the breadcrumbs, making sure they are well covered. Leave the eggs resting on the breadcrumbs in the bowl until ready to cook.
Preheat the oven to 180°C fan/200°C/gas mark 6. Fill a heavy-based pan with the vegetable oil and heat to 180°C (use a digital probe thermometer to check the temperature). When the oil has reached 180°C, lower the eggs into the oil and fry them for 1 minute 30 seconds or until golden brown. Using a slotted spoon, remove the eggs from the hot oil and place on paper towels to drain. Transfer the fried Scotch eggs to a baking tray and bake in the preheated oven for 5 minutes. Remove the Scotch eggs from the oven and leave to rest for 2 minutes before swiftly cutting them in half with a serrated knife for a clean cut through and serving while still warm.

Haggis Scotch Egg
