Deploying an Azure SQL Managed Instance or Database is a different but similar experience than deploying SQL Server on Azure Virtual Machine. The experience is the same because you can use the Azure portal and CLI. The difference is that Azure is managing the virtual machine and infrastructure, so several of the options you pick for a virtual machine you do not have to worry about.
In this chapter, you will learn the options and process to deploy and connect to an Azure SQL Managed Instance and Database. You will also learn the options to migrate existing databases into Azure SQL. In addition, you will learn some implementation details of the architecture used to host Azure SQL Managed Instances and Databases.
An Azure subscription.
A minimum of Contributor role access to the Azure subscription. You can read more about Azure built-in roles at https://docs.microsoft.com/en-us/azure/role-based-access-control/built-in-roles.
Access to the Azure Portal (web or Windows application).
Installation of the az CLI (see https://docs.microsoft.com/en-us/cli/azure/install-azure-cli?view=azure-cli-latest for more details). You can also use the Azure Cloud Shell instead since az is already installed. You can read more about the Azure Cloud Shell at https://azure.microsoft.com/en-us/features/cloud-shell/.
You will run some T-SQL in this chapter, so install a tool like SQL Server Management Studio (SSMS) at https://docs.microsoft.com/en-us/sql/ssms/download-sql-server-management-studio-ssms?view=sql-server-ver15. You can also use Azure Data Studio at https://docs.microsoft.com/en-us/sql/azure-data-studio/download-azure-data-studio?view=sql-server-ver15.
For migration scenarios, you will need to download the Data Migration Assistant (DMA) tool from https://docs.microsoft.com/en-us/sql/dma/dma-overview and have access to a SQL Server instance.
Pre-deployment Planning
Before you jump into deploying an Azure SQL Database or Managed Instance, I recommend you spend some time doing some pre-deployment planning. Reviewing your choices and making a few informed decisions will save you time and money.
New Deployment or Migration
Azure Migration Program – https://azure.microsoft.com/en-us/migration/migration-program/
The Microsoft Data Migration Guide – https://datamigration.microsoft.com/
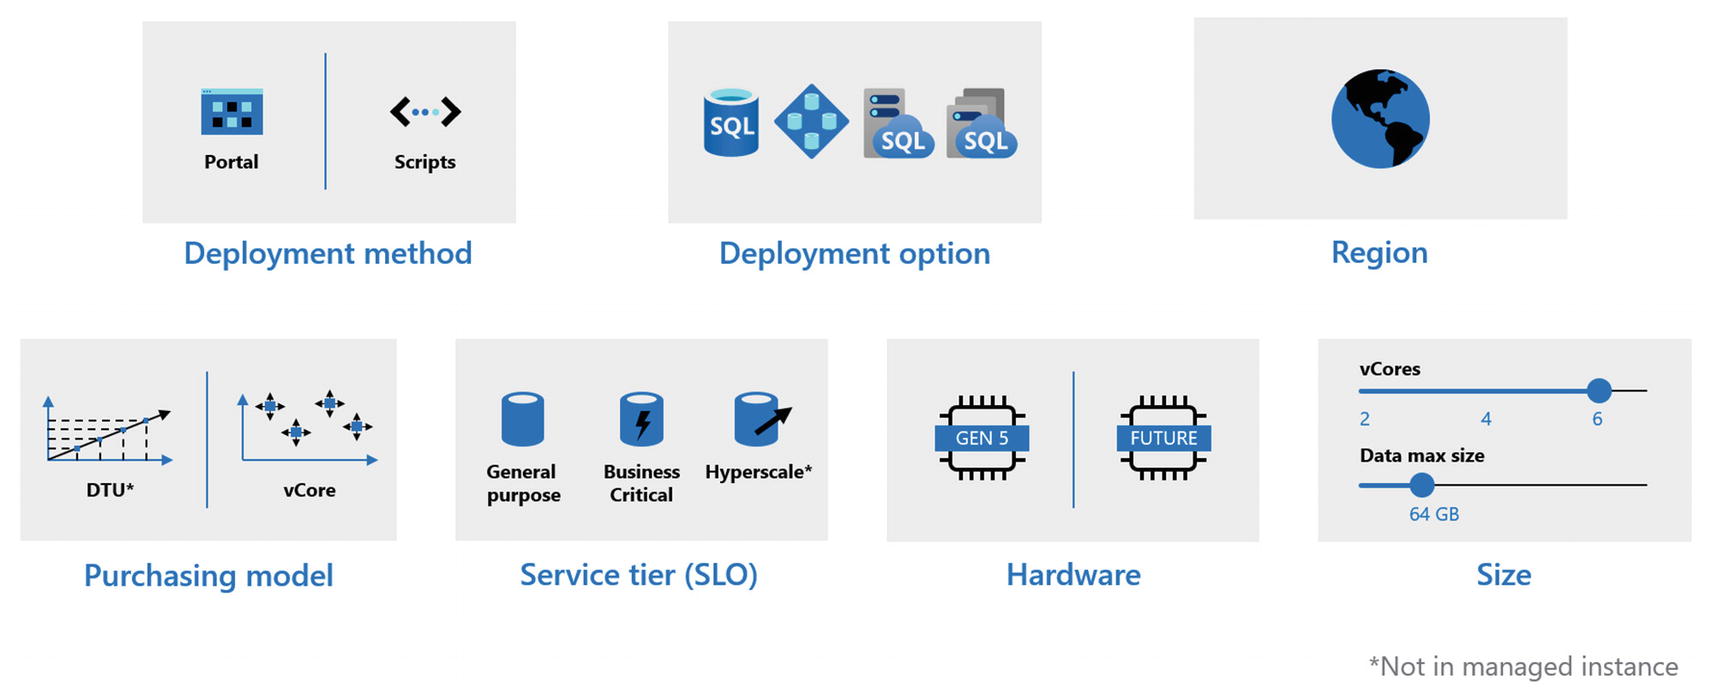
Making Deployment Choices
Whether you are migrating or creating a new deployment, you have several choices to make that is worth the time to plan out. Chapter 2 of this book is invaluable to go back and read as it describes choices and differences between Azure SQL Managed Instance and Azure SQL Database.
If you need SQL Server instance features like SQL Server Agent, Database Mail, and cross-database queries, Managed Instance is the choice you need to make.
If your database size is > 8TB, your only choice as of the time of writing this book is Azure SQL Database Hyperscale.
Past these two choices, either Azure SQL Managed Instance or Database likely meets your needs. However, as I called out in Chapter 2 of the book, there can be advantages in using Azure SQL Database because Microsoft will manage both the infrastructure and the SQL Server instance to let you focus on the database. Furthermore, Azure SQL Database can offer you more options such as Serverless compute and Automated Tuning for indexes.
Deployment choices for Azure SQL
Deployment Method
You can deploy an Azure Managed Instance using the Azure Portal or through a CLI with the az utility, PowerShell, or even REST APIs (az rest can be used if you do not want to write code).
If you are just trying out Azure SQL or doing a proof of concept, you can easily use the Azure Portal. However, for a repeatable process to deploy (imagine if you needed to for some reason redeploy at any time), a script using a CLI is a better option. Remember you also can use Azure templates to help automate deployments. You can read more about using Azure templates for Azure SQL at https://docs.microsoft.com/en-us/azure/azure-sql/database/arm-templates-content-guide?tabs=single-database.
Another option for developers to automate deployment is with Azure DevOps and Pipelines. I really like this blog post by my colleague at Microsoft Arvind Shyamsundar on DevOps and Azure SQL at https://devblogs.microsoft.com/azure-sql/devops-for-azure-sql/.
Deployment Option
I discussed earlier whether you will consider Azure SQL Managed Instance or Database. Within each of these options are a choice of using a pool. Azure SQL Managed Instance offers a Managed Instance Pool which could be a better fit for a smaller, cost-effective Managed Instance. Deployment times are also much faster with pools. You can read more about Managed Instance Pools at https://docs.microsoft.com/en-us/azure/azure-sql/managed-instance/instance-pools-overview.
Azure SQL Database provides an option called an elastic pool. An elastic pool can be a good choice if you plan to use Azure SQL Database to host many databases. ISVs and Software as a Service (SaaS) developers often look at this choice to save costs and manage databases more efficiently. You can read more about elastic pools at https://docs.microsoft.com/en-us/azure/azure-sql/database/elastic-pool-overview.
Region
Choosing a specific Azure region can be important just as I described in Chapter 3 on virtual machines. You need to make sure your deployment options are available in your Azure region choice. A full list of Azure products by region can be found at https://azure.microsoft.com/en-us/global-infrastructure/services/.
You may have certain compliance and security requirements which also dictate what region you choose.
You may be implementing specific HADR options like Availability Zones, Geo-replication, or Auto-Failover Groups and have specific regions in mind to make those deployments successful.
If you need to move an Azure SQL Managed Instance or database to another region, read a checklist in our documentation at https://docs.microsoft.com/en-us/azure/azure-sql/database/move-resources-across-regions.
Azure SQL Database is a “Ring 0” service which means it gets deployed in every region as a default service. Managed Instance is not exactly at that status yet, but it is generally available in all regions.
In addition, you need to consider where your application will be hosted and latency requirements between where the application will be hosted and your Azure SQL deployment. Consider performance and proximity to other services. I was chatting with my colleague Anna Thomas on this topic. She said, “…but I feel that it’s not just where the application is – where are the users? Where should the application be? If you have geo-replication or auto-failover groups, how do you build a globally available solution?”
Purchasing Model
For Azure SQL Database only, you will need to choose a Purchasing model. The choices are DTU or vCore. I explained these models and the history behind them in Chapters 1 and 2 of the book. While the DTU model may be a valid choice for you, I recommend the vCore model.
If you select the DTU model and want to move to the vCore model at a later date, consult the documentation at https://docs.microsoft.com/en-us/azure/azure-sql/database/migrate-dtu-to-vcore.
Service Tier (SLO)
If Azure SQL Managed Instance is your deployment option, then you will need to select a Service Tier of General Purpose (GP) or Business Critical (BC). A SLO stands for Service Level Objective and is the combination of choices of Purchasing Model, Service Tier, and Hardware. I described these service tier options in Chapter 2 of the book. While resource limits and performance may differ, one of the primary differences with these tiers is how Availability works which you will learn more about in Chapter 8 of the book. One notable difference for Business Critical is that it supports In-Memory OLTP capabilities. A comparison between GP and BC for Managed Instance can be found at https://docs.microsoft.com/en-us/azure/azure-sql/database/service-tiers-general-purpose-business-critical.
You will see later in this chapter that the time it takes to deploy for Managed Instance can be lengthy. Changing between GP and BC is possible but could result in significant downtime.
If Azure SQL Database is your deployment option, then you also have the choice of General Purpose (GP) vs. Business Critical (BC) service tiers. In addition, you have the choice of Hyperscale. If you choose General Purpose, you also have the choice of Provisioned vs. Serverless. This is also called a computer model or tier. I covered all these options in Chapter 2 of the book.
GP vs. BC is a similar choice as with Azure SQL Managed Instance. Read the same documentation page at https://docs.microsoft.com/en-us/azure/azure-sql/database/service-tiers-general-purpose-business-critical for a comparison. Hyperscale is your best choice for very large databases and has some attractive capabilities for scaling, replicas, and restore performance. You can read more about Hyperscale at https://docs.microsoft.com/en-us/azure/azure-sql/database/service-tier-hyperscale. Serverless is a unique option we have created for autoscale and scenarios where your database may always not be utilized. It provides a new cost-effective way to deploy and use an Azure SQL Database. Read more about Serverless at https://docs.microsoft.com/en-us/azure/azure-sql/database/serverless-tier-overview.
Switching between GP and BC for Azure SQL Database is typically significantly faster than with Managed Instance. You can also switch between Serverless and Provisioned easily. However, Hyperscale is the one option you cannot switch back once you choose it without completing migrating your database to the new deployment option .
Hardware
Even though for Azure SQL we abstract you from the infrastructure and virtualization used for the deployment, we provide options for a hardware generation .
We are constantly looking to take advantage of new hardware supplied within the Azure infrastructure so these choices may be new by the time you are reading this book.
As of summer of 2020, the only hardware generation choices aside from the default Gen5 generation are with Azure SQL Database. The Fsv2-series is available in certain regions for General Purpose. This hardware option provides more CPU performance per vCore than Gen5. The M-series option for Business Critical offers more memory and vCores. Keep track of the latest on hardware generations at https://docs.microsoft.com/en-us/azure/azure-sql/database/service-tiers-vcore?tabs=azure-portal#hardware-generations.
You might see some evidence of Gen4 hardware as you use Azure SQL. This hardware generation is being phased out, so focus on Gen5 or newer hardware generations.
Sizes
Once you have figured these options, you have choices on size. The DTU model for Azure SQL Database has a DTU number you can choose (and a data size). For the vCore purchasing you model, you have both number of vCores and database size to select. There are a few differences on how these options work depending on your other choices. I will describe these differences as I walk you through the deployment process in the rest of this chapter.
Price
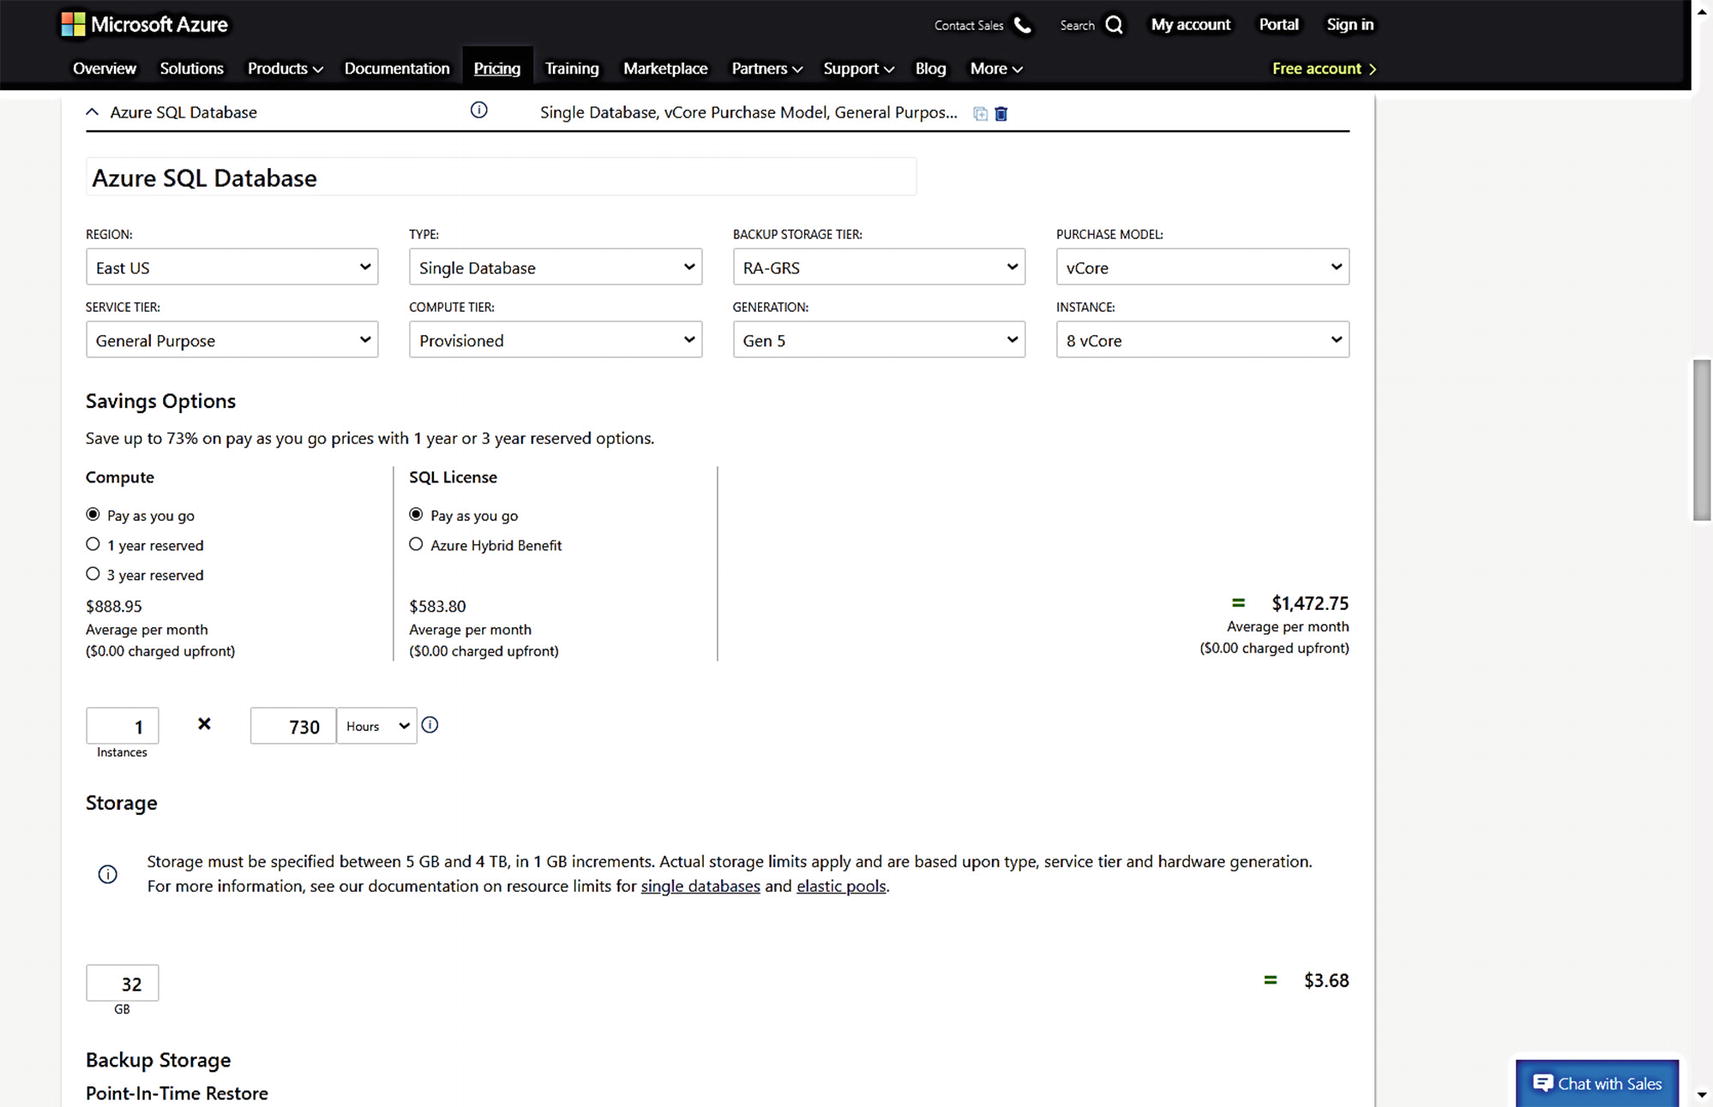
The pricing calculator for Azure SQL Database
Consider Resource Limits
Max Memory
Max Log Size
Log Rate Governance
IOPS and I/O latency
Max size of Tempdb
Max concurrent workers
Backup Retention
I will discuss more about Log Rate Governance and IOPS and I/O latency in Chapter 7 of this book. For now, keep these concepts in mind as they can affect performance of applications such as those that are heavy transaction log users.
To see the specific limits for Azure SQL Managed Instance, please see these very well-documented tables at https://docs.microsoft.com/en-us/azure/sql-database/sql-database-managed-instance-resource-limits.
To see the specific limits for Azure SQL Database, please see the table at https://docs.microsoft.com/en-us/azure/sql-database/sql-database-vcore-resource-limits-single-databases.
You should also know that you have overall Azure SQL limits per subscription per region. You can view what these limits are at https://docs.microsoft.com/en-us/azure/sql-database/sql-database-managed-instance-resource-limits#regional-resource-limitations and https://docs.microsoft.com/en-us/azure/sql-database/sql-database-resource-limits-database-server#maximum-resource-limits.
It is possible to make a request to Microsoft increase your subscription limits . This is called a quota increase request. Read more at https://docs.microsoft.com/en-us/azure/sql-database/quota-increase-request.
Deploying Azure SQL Managed Instance
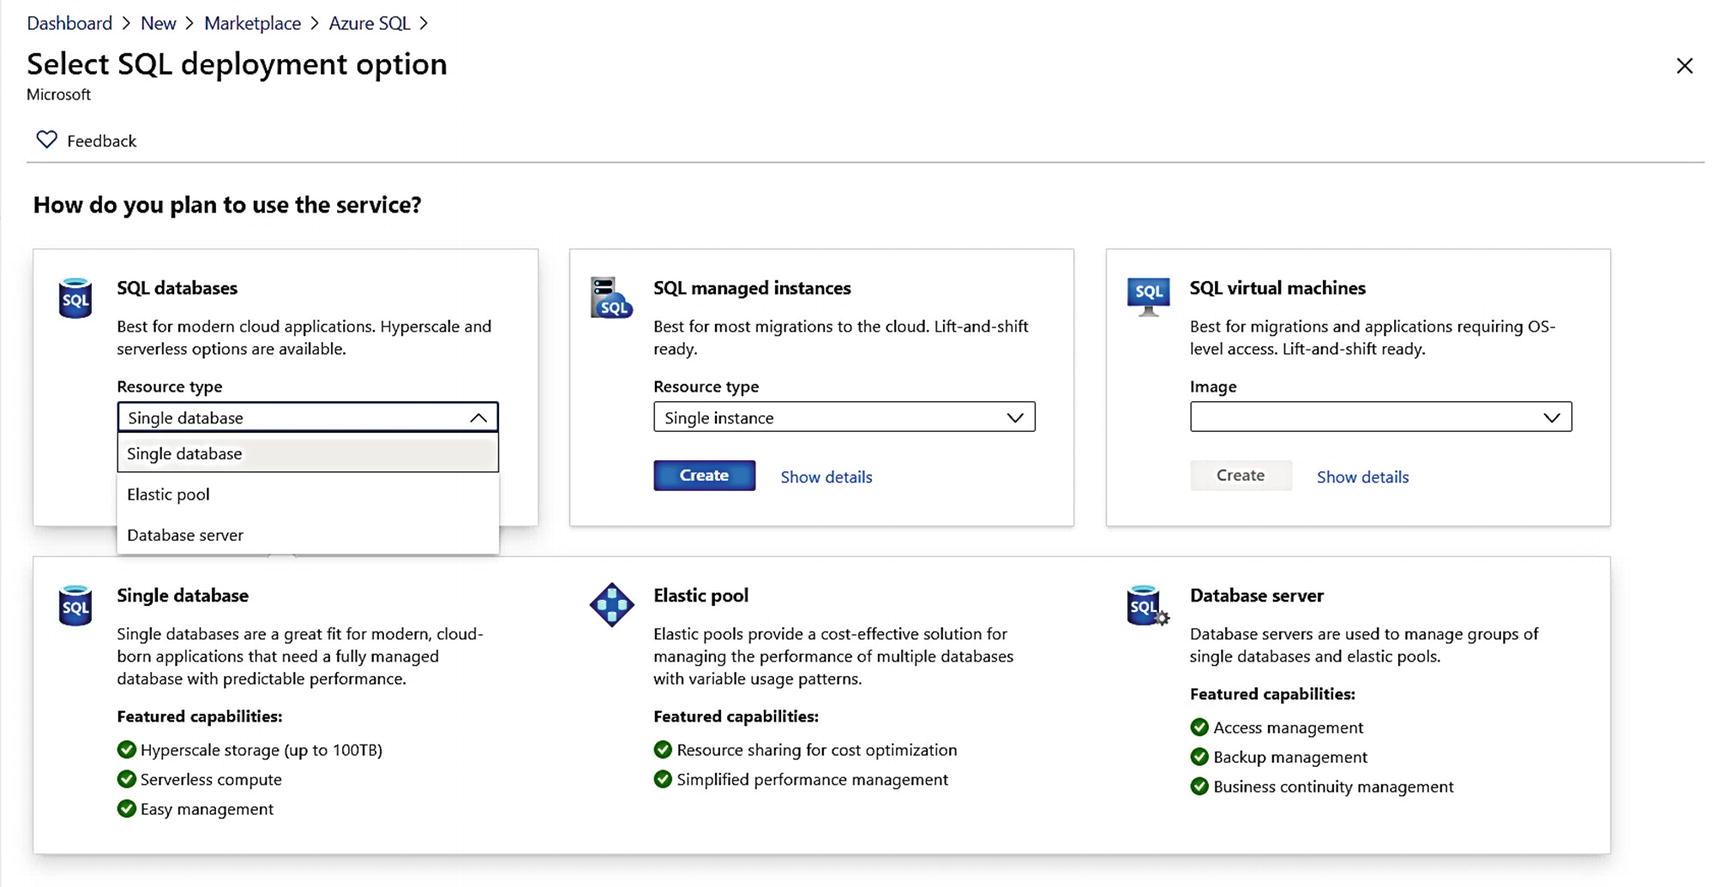
Similar to the process I documented in Chapter 3 for a virtual machine, deploying an Azure SQL Managed Instance through the Azure Portal starts by using the Azure SQL option from the Azure Marketplace (I showed you this view in Figure 3-1).
Using the three Azure SQL choices, you would select SQL Managed Instance and single instance and then click Create.
At the time of writing this book, an instance pool can only be created through PowerShell. I will talk more about Instance Pools in the section titled “Implementation Details.” You can read more about Instance Pools at https://docs.microsoft.com/en-us/azure/azure-sql/managed-instance/instance-pools-overview.
The initial Azure SQL Managed Instance screen in the portal
Deployment and Options
Let us walk through each screen with deployment options of a Managed Instance and then deploy it through the Azure Portal.
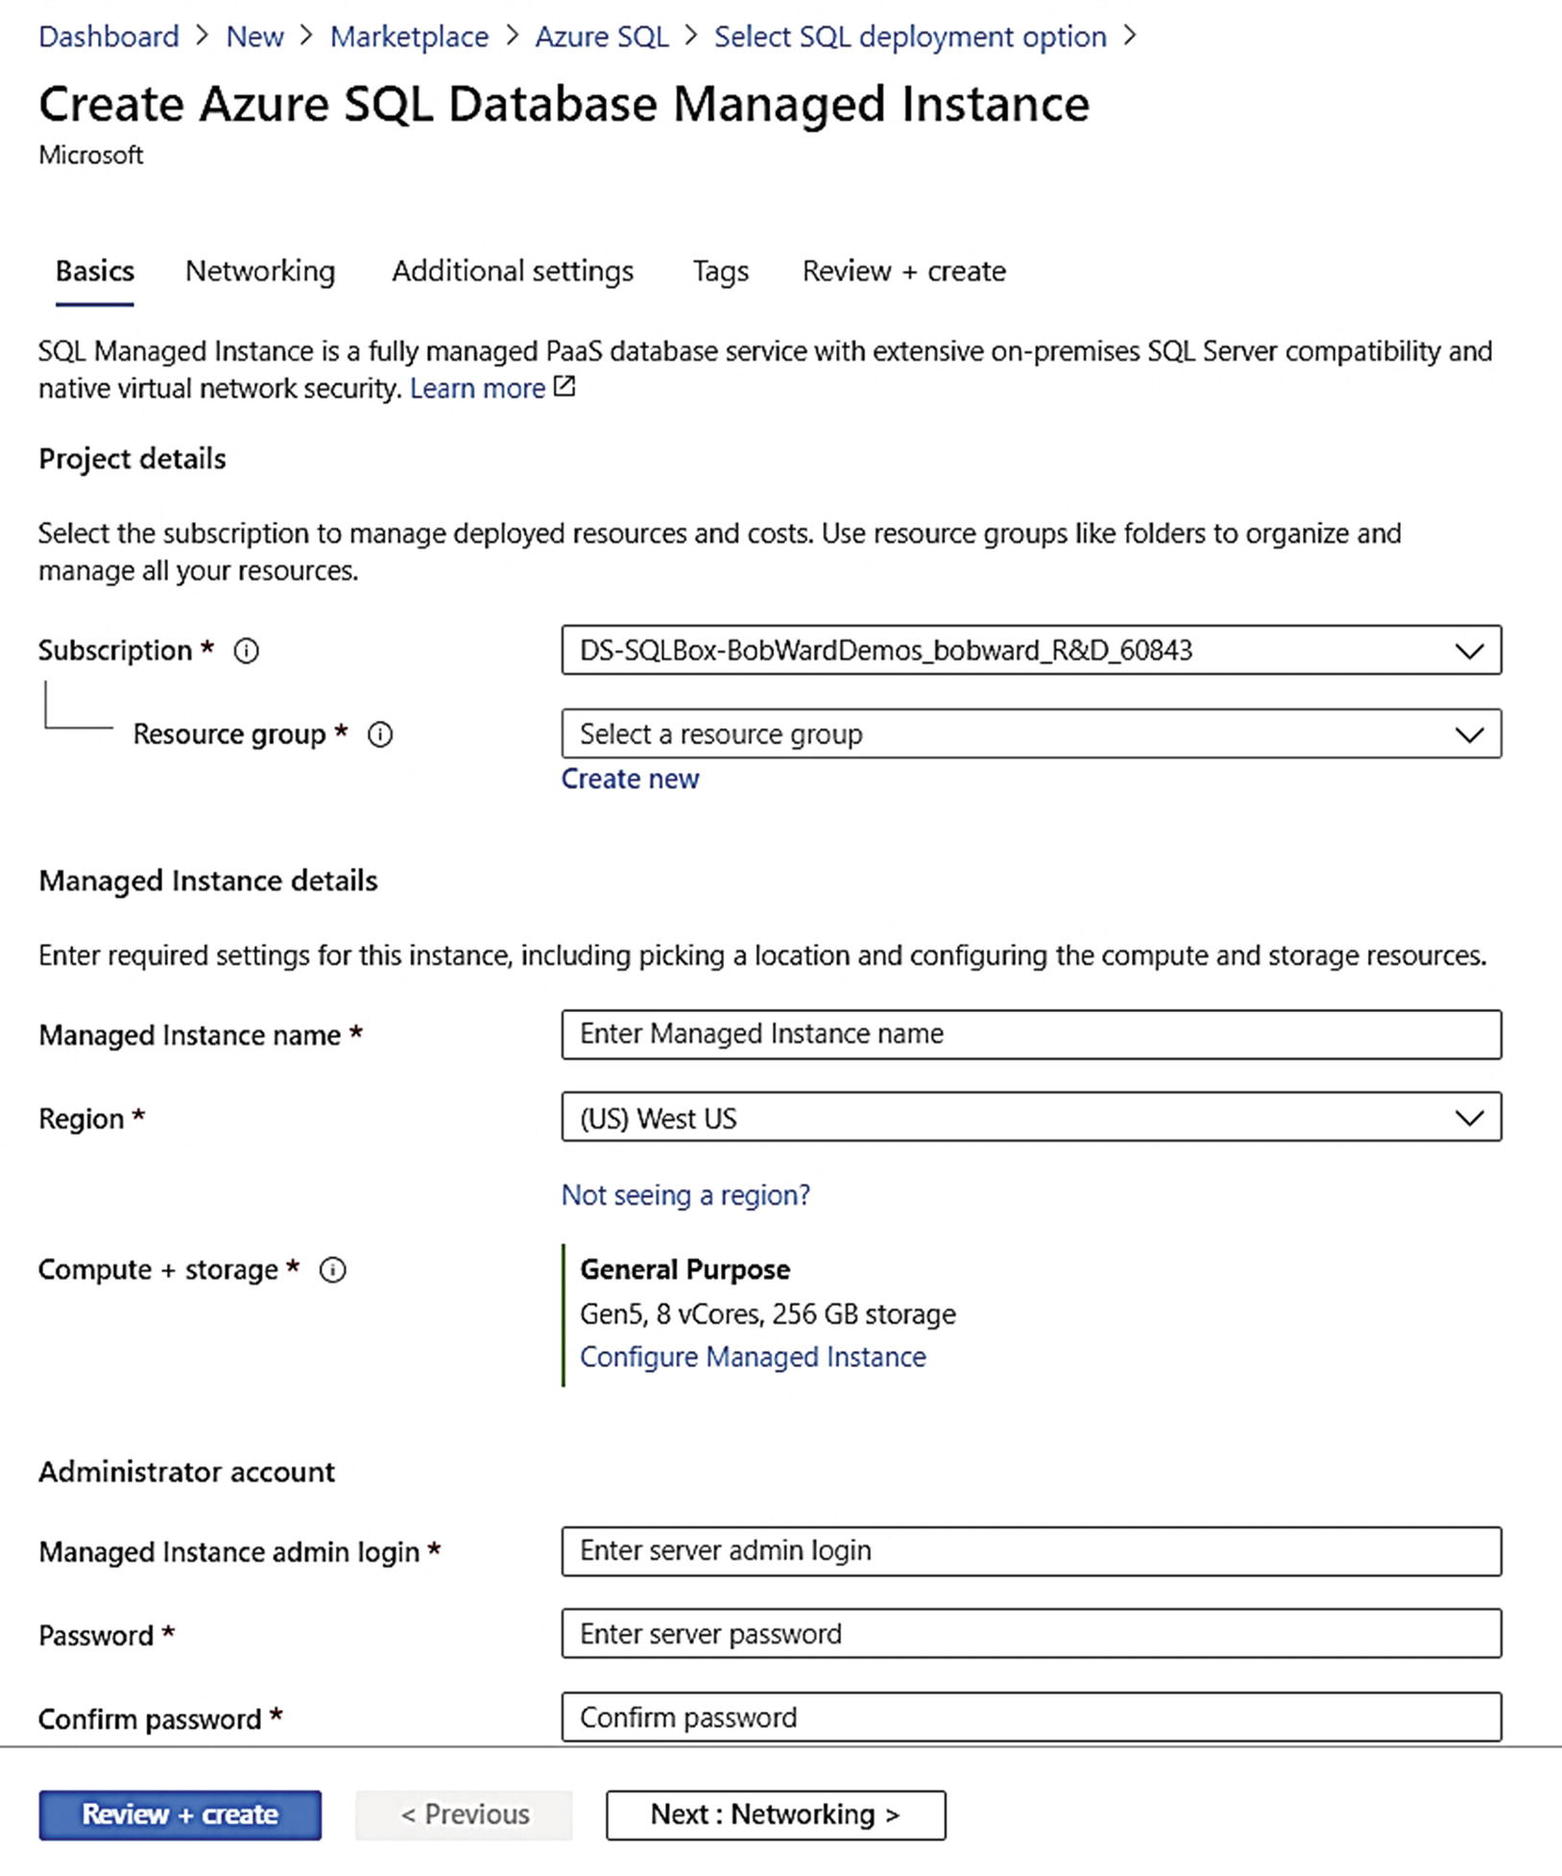
Basics
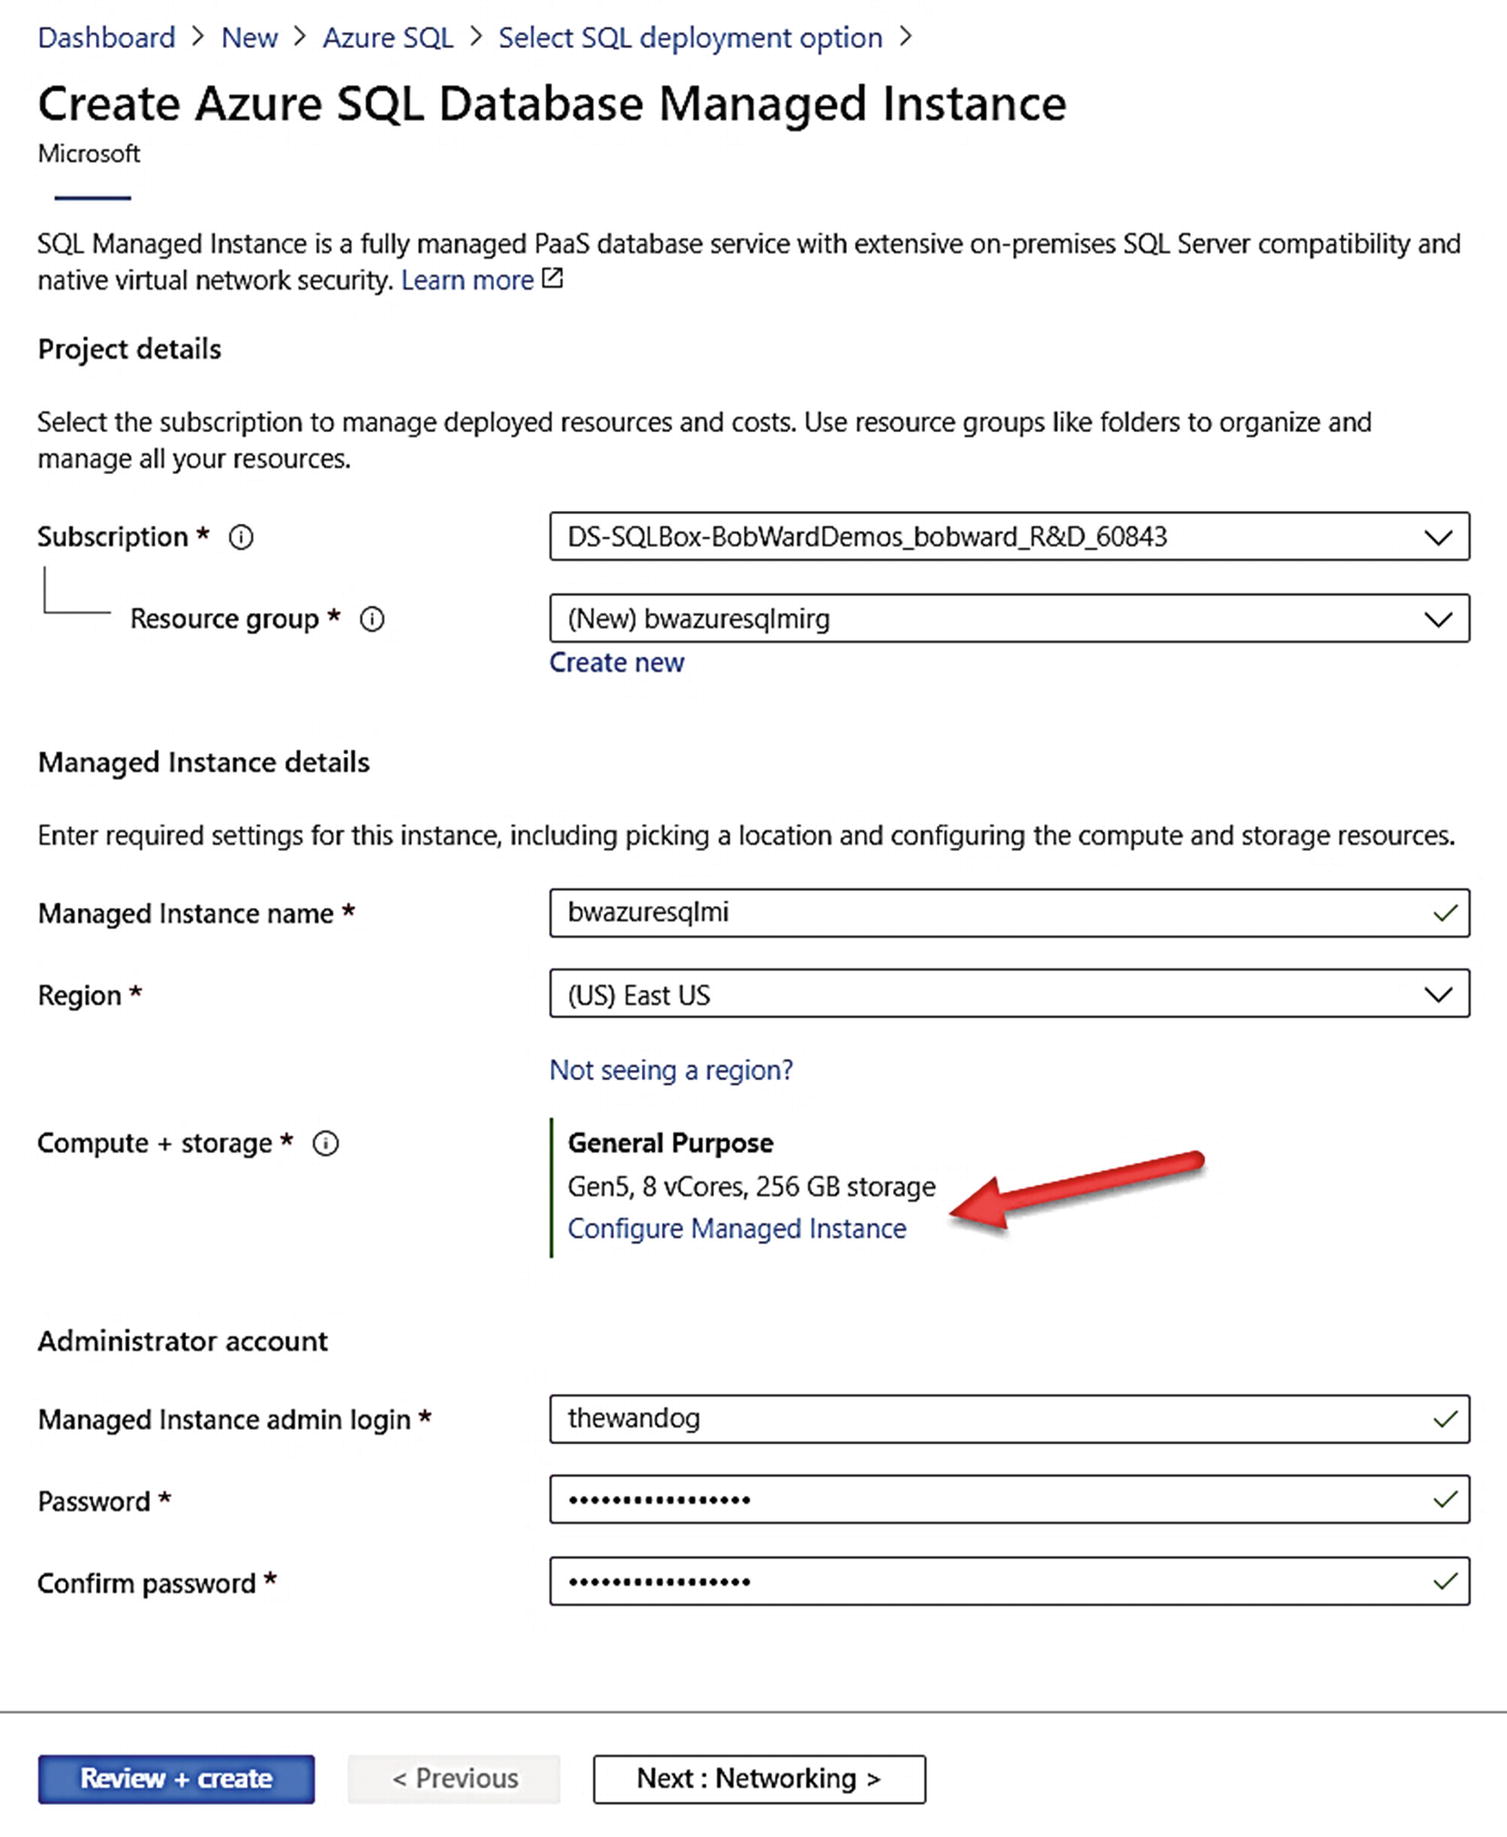
Filling out the basics for an Azure SQL Managed Instance deployment
The Administrator account becomes a SQL Server login assigned to the sysadmin role.
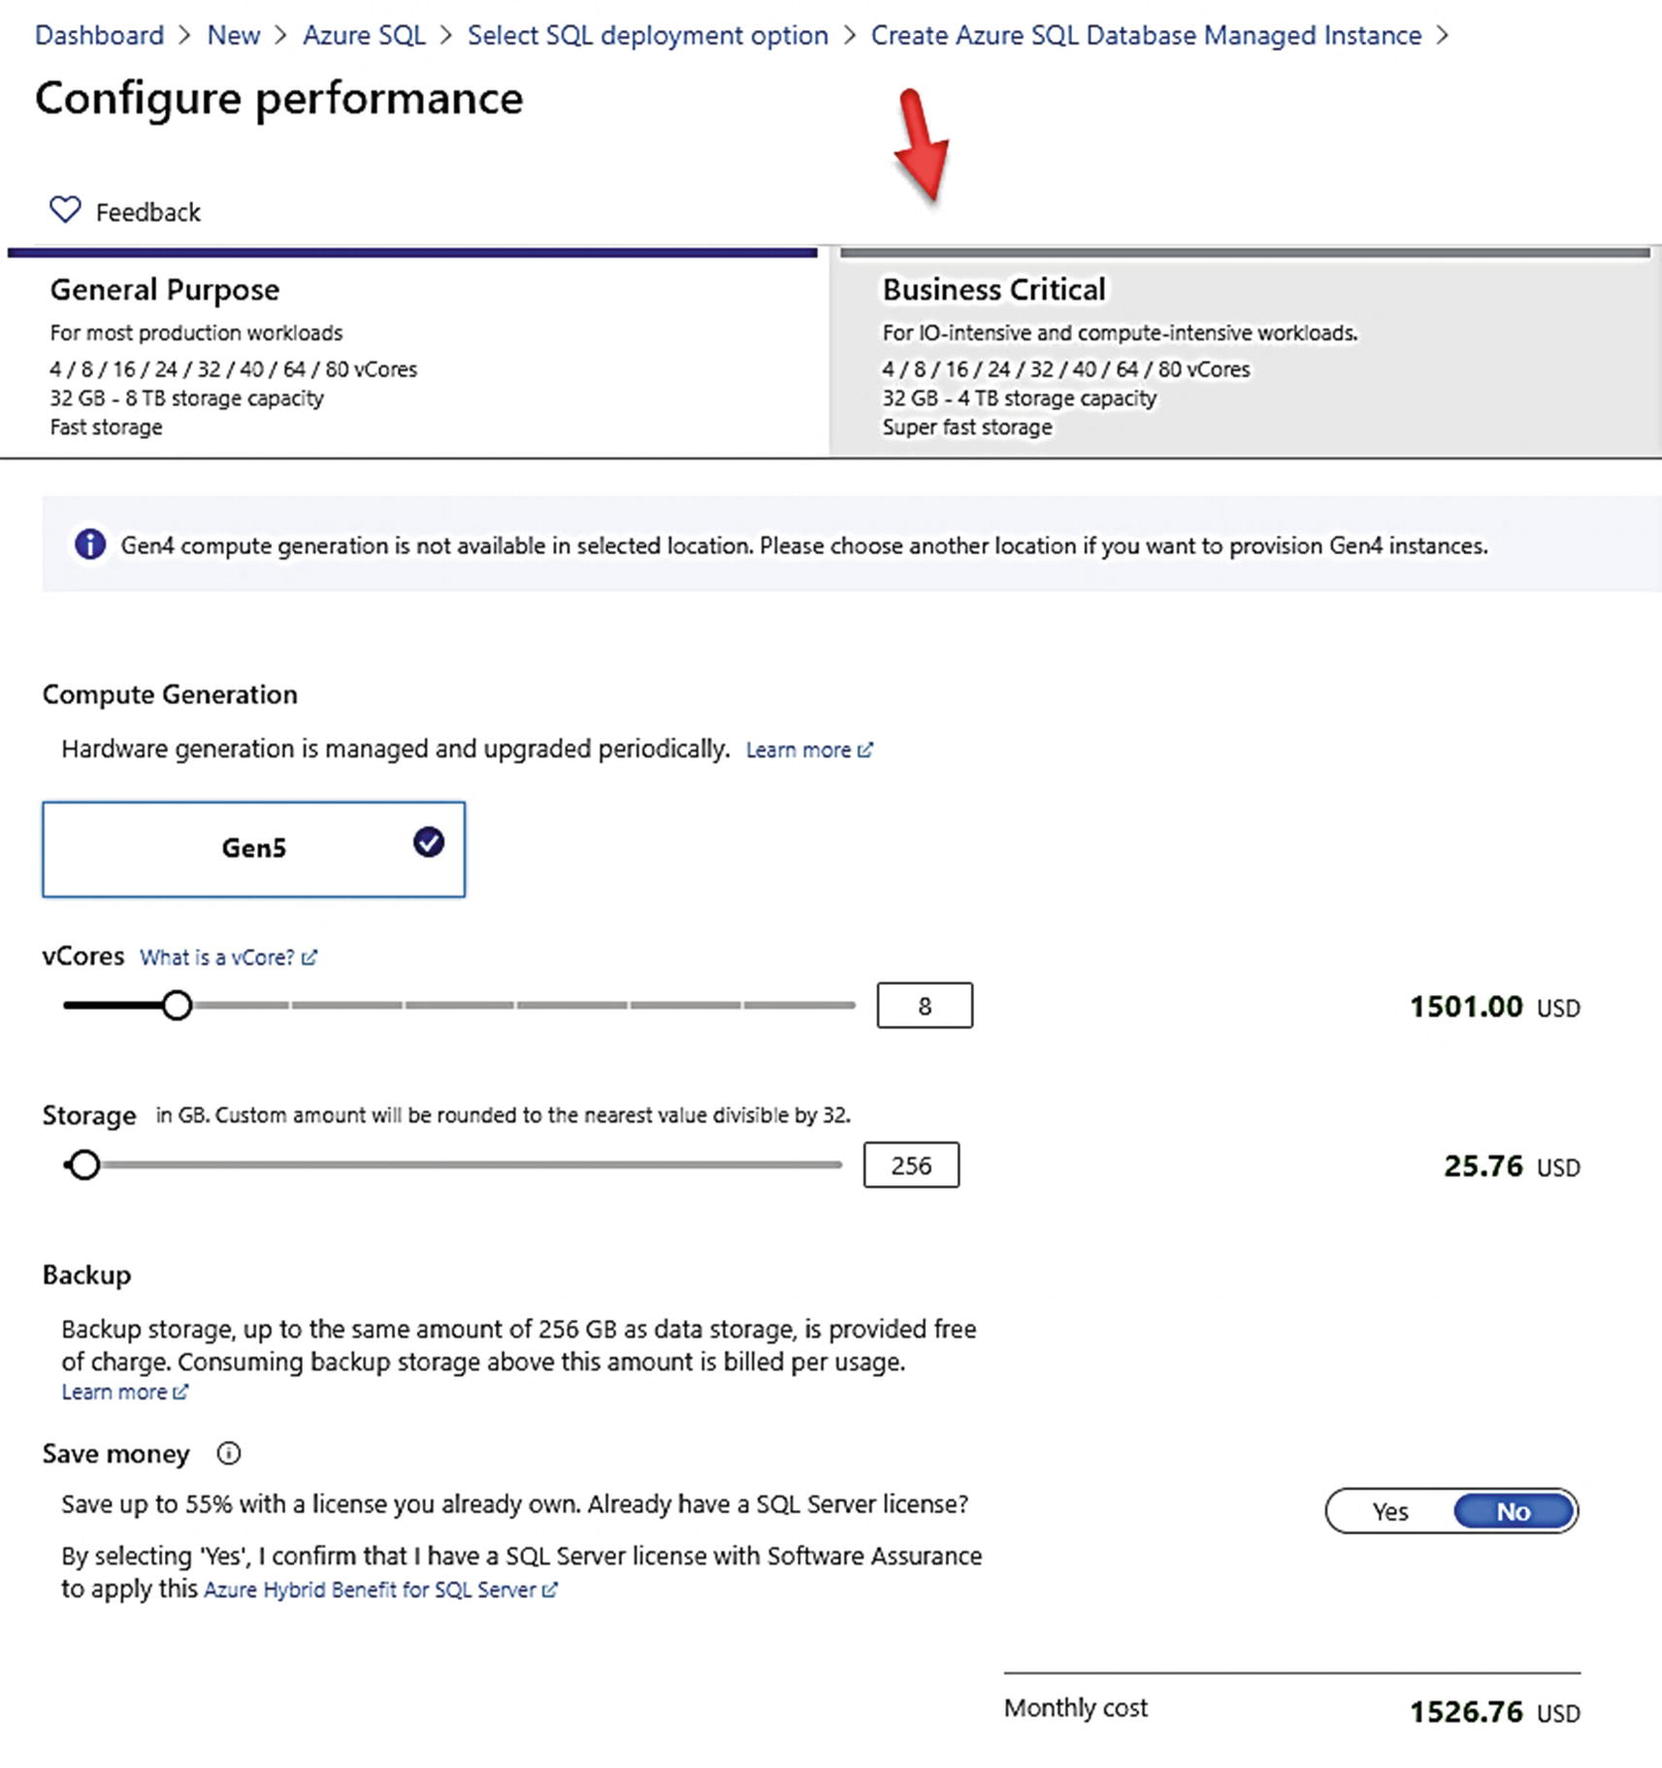
Azure SQL Managed Instance Service Tier options
Access to the In-memory OLTP feature
Higher availability because BC uses a local storage and replica architecture
Below this are slider bars to choose the desired number of vCores and Maximum Storage. As you use each slider, the expected costs are updated to the right. vCores are only allowed in the increments shown on the screen. Managed Instance today supports up to 80 vCores for both GP and BC. 4 vCores is the minimum choice (Instance Pools support 2 vCore deployments).
4 vCores have a max storage limit of 2TB for GP and 1TB for BC.
Any other vCore choice past this supports up to 8TB for GP and 4TB for BC.
I discussed the architecture of Business Critical deployments in Chapter 2 of the book and will elaborate more on this architecture in Chapter 8. The reason for the lower limit of storage for BC is the fact that databases are stored on local SSD drives which have lower capacity than using Azure Storage.
Tempdb max sizes are dependent on vCore selections but are counted toward the overall maximum storage limit. In fact, all databases including system databases count toward the overall max instance storage size.
You also have a choice to save money using your existing SQL Server licenses with Azure Hybrid Benefit (AHB).
There is also a statement about backup storage and costs on this page. I will discuss more about Backups and Managed Instance in Chapter 8 of the book. Click Apply after you make any changes (Apply is only enabled if you change the defaults. You can click the X to get back to the Basics screen). For my example, I will leave the choice at 8 vCores and 256Gb of max storage.
Hitting Apply will not deploy the Managed Instance yet but take your time to get your choices here as close to correct as possible. Why? You can change them later, but Managed Instance changes to tiers and sizes can be a long operation. Instance pools will not require as much time.
Networking
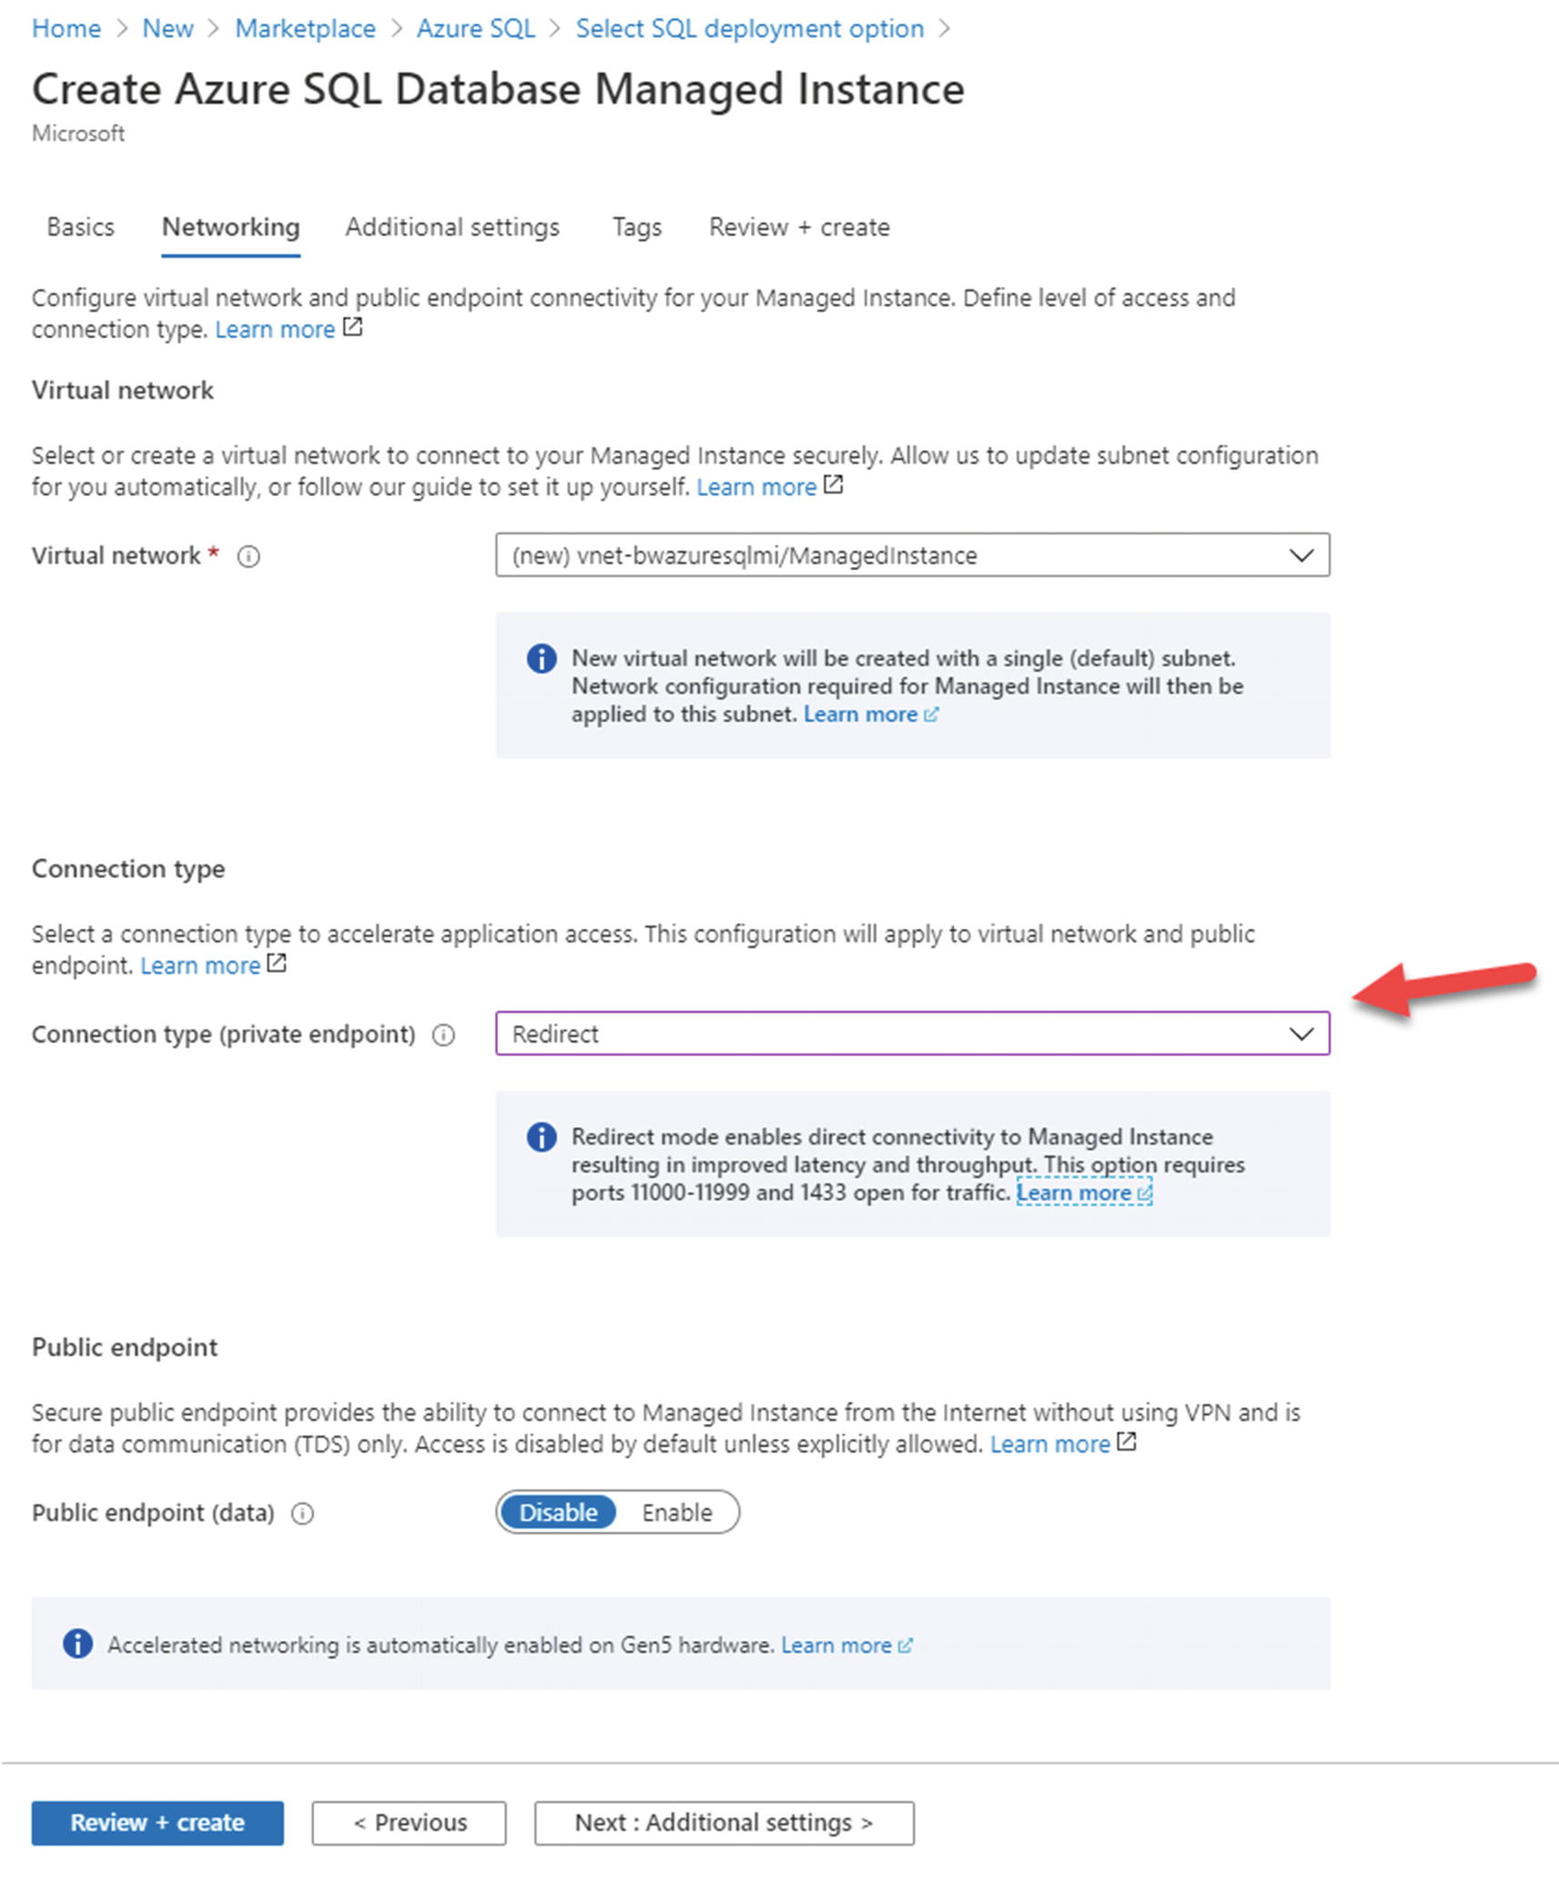
Azure SQL Managed Instance Networking options
Virtual Network
You can see at the top of the screen that a new virtual network will be created to host the Azure SQL Managed Instance. One of the advantages of Managed Instance is that it is deployed in a private virtual network. You could deploy your own Azure Virtual Network first (you can use the Azure portal or CLI) and select that virtual network on this deployment screen. If you choose to use your own virtual network, you must configure it a specific way which you can read at https://docs.microsoft.com/en-us/azure/azure-sql/managed-instance/vnet-existing-add-subnet.
Connection Type
Notice on my screen I have chosen a connection type of Redirect. The default is proxy. A proxy connection requires that any connection to the Managed Instance by a tool or application (a connection to the TDS port 1433) must always go through a gateway. A redirect connection type uses the gateway to find the direct virtual private IP address of the node containing the Managed Instance. All subsequent traffic flows directly to the node. You can read more about these connection types at https://docs.microsoft.com/en-us/azure/azure-sql/managed-instance/connection-types-overview. Proxy can be more secure, but redirect can be faster. The virtual network and included subnet will have all the appropriate Network Security Group (NSG) rules applied for these types if you choose to create the virtual network as part of this deployment step.
Public Endpoint
You have the option to enable TDS traffic on a public endpoint. The public endpoint will be enabled on port 3342 (and get redirected in the virtual network to the node instance port 1433). While I do not recommend using this option, it is one of the quickest ways to get connected to a Managed Instance. There could be other scenarios where you want to enable this. You can read more about the public endpoint for Managed Instance at https://docs.microsoft.com/en-us/azure/azure-sql/managed-instance/public-endpoint-overview.
Notice that Accelerated networking is automatically enabled for the Managed Instance.
Additional Settings
Additional settings for Managed Instance
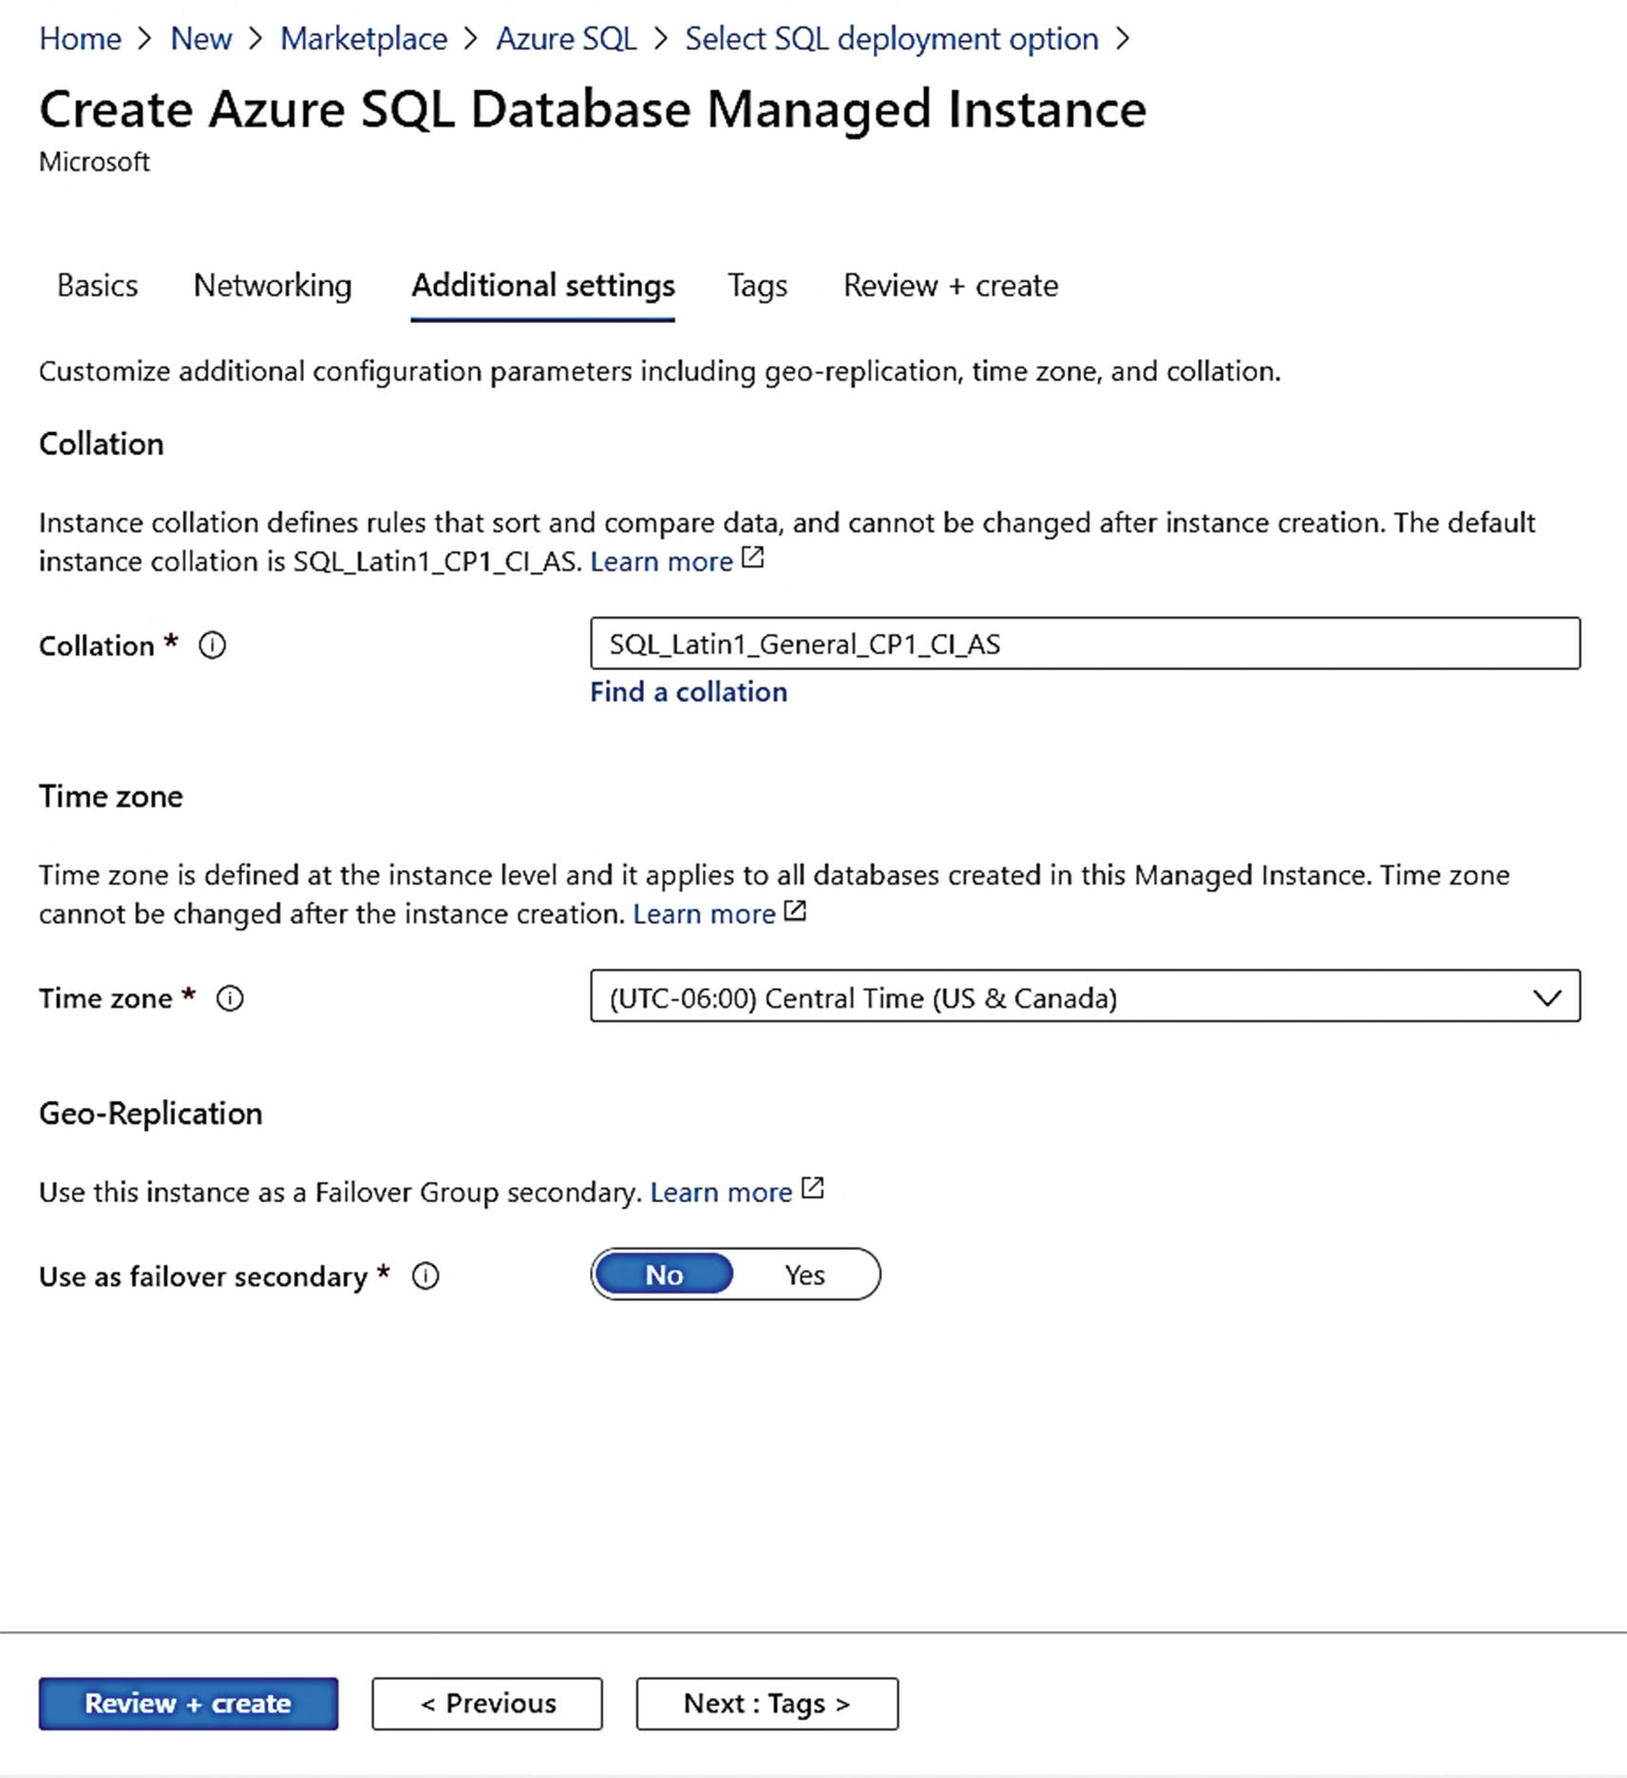
The Collation here is like setting a collation for a SQL Server. It is important to know that you cannot change the instance collation after it is supplied here.
You can set and change database collations on Managed Instance after deployment.
The Time zone is the recognized time zone by the SQL Server engine on the Managed Instance node. I have changed this to my local time zone, but it can be UTC or whatever time zone you want to choose. You cannot change this after deployment.
The Managed Instance can be part of a failover group which we will talk more about in Chapter 8 of the book. You will use that option when you review those topics later. For now, leave it to the default of No.
Tags
Click Next: Tags > to define a tag like how I described in Chapter 3 with Azure Virtual Machines. I will use a Name = Environment and Value = Development with a SQL managed instance resource.
Deploy!
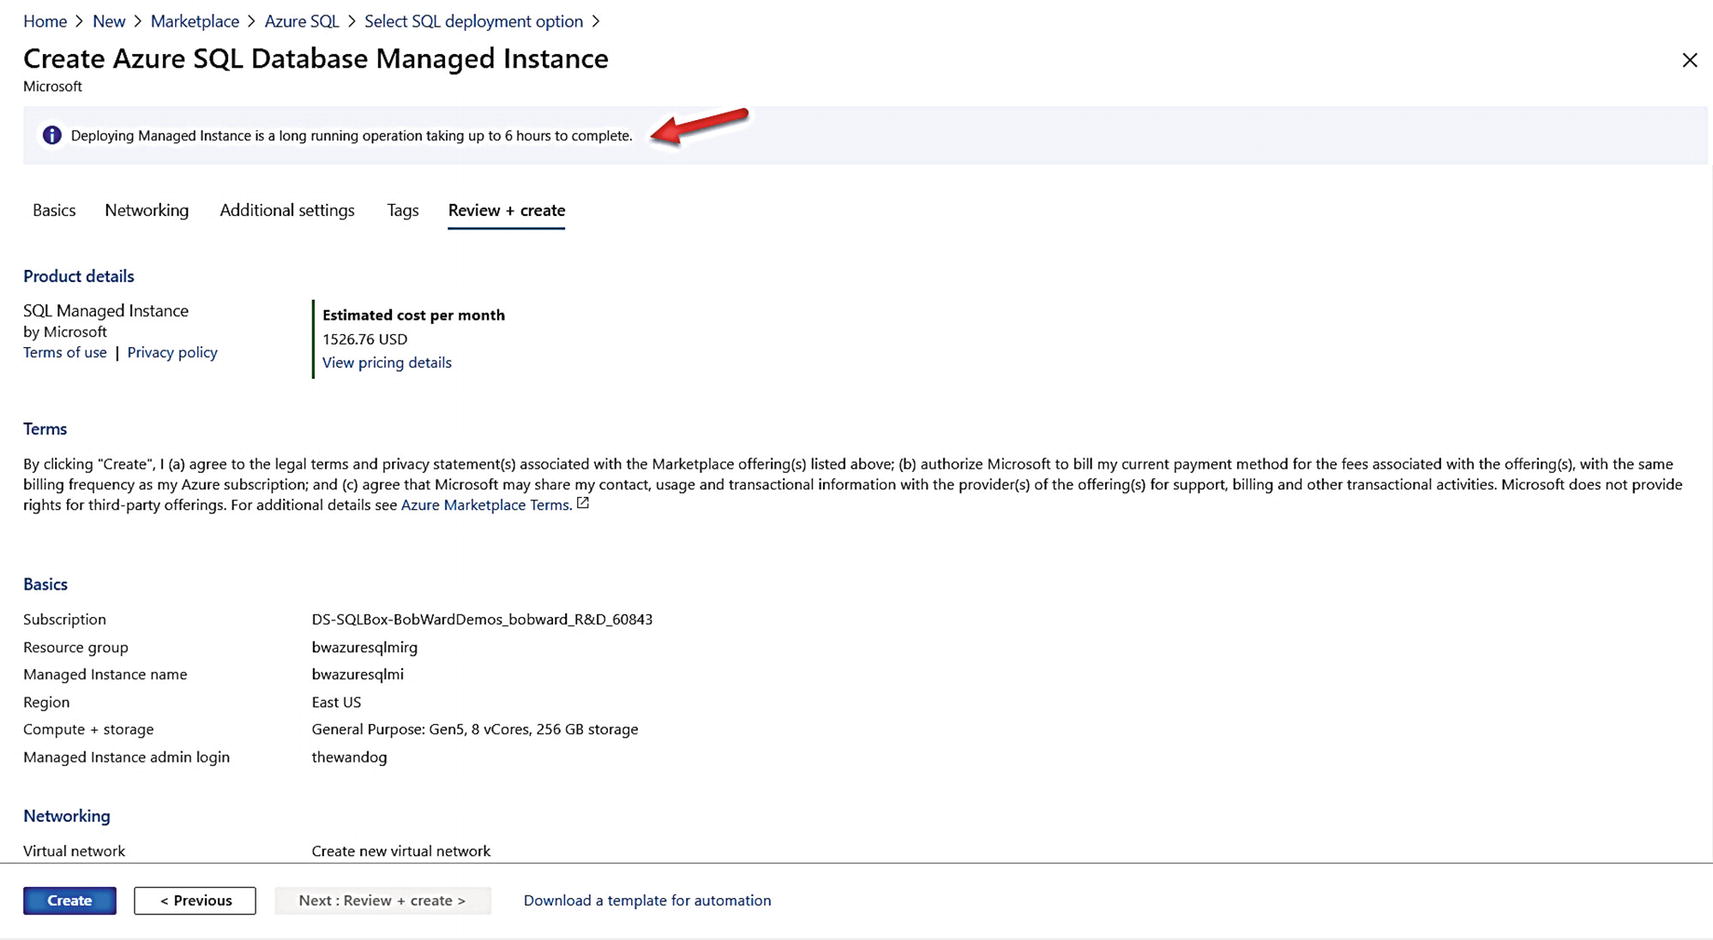
The validation screen for Managed Instance before deploy
Like Figure 3-16 for Azure Virtual Machine, this screen shows estimated costs, Terms of use, Privacy Policy, a review of all the options you have chosen, and the option to download an Azure template that describes these deployment options. Notice the important warning at the top of the screen on the time it takes to deploy. So, click Create to deploy, leave this screen open to see the progress, and read on to the next section about deploying with a CLI and then some architecture and implementation details you might find interesting why the deployment runs. This section will explain a bit why the deployment can take so long.
Deploying with a CLI
An Azure Managed Instance can be deployed with command-line interfaces (CLI) through the az sql mi (https://docs.microsoft.com/en-us/cli/azure/sql/mi?view=azure-cli-latest) command interfaces or through New-AzSQLInstance PowerShell cmdlet (https://docs.microsoft.com/en-us/powershell/module/az.sql/New-AzSqlInstance).
I went down the path to build an example with az sql mi and found that I needed to run several az CLI commands to create the virtual network, subnet, and all associated settings. Therefore, I only recommend you use the az sql mi CLI with Azure templates. An example template can be found at https://docs.microsoft.com/en-us/azure/azure-sql/managed-instance/create-template-quickstart?tabs=azure-cli.
PowerShell requires you to set up the virtual network and other context before executing New-AzSQLInstance. There is a good tutorial on using PowerShell at https://docs.microsoft.com/en-us/azure/azure-sql/managed-instance/scripts/create-configure-managed-instance-powershell.
Implementation Details
These implementation details may change over time as we change and improve the service. I offer up some of these details so you can understand how we build, manage, and run the service.
Azure SQL Managed Instance is deployed on nodes (virtual machines) powered by Azure Service Fabric in a concept called a ring or virtual cluster. A virtual cluster is a dedicated set of isolated virtual machines that run in a virtual network subnet. Using a dedicated ring or cluster gives Managed Instance the isolation and private connection that was lacking for years from Azure SQL Database (which you will see has also been resolved).
When you deploy your first managed instance in a new virtual network (subnet) as I did in my example, you are in fact deploying an entire virtual cluster. This explains why the initial deployment can take so long to complete. You can deploy other managed instances in the same virtual network subnet, and the deployment is much faster.
A managed instance is a full SQL Server engine database instance deployed in a dedicated virtual machine in the virtual cluster. Microsoft will decide how to deploy these virtual machines on various nodes of the cluster. It is possible that a node may have one virtual machine with an instance or multiple virtual machines. As per the promise of Platform as a Service (PaaS), Microsoft abstracts you from those details. Your interface with the Managed Instance is through either standard SQL Server interfaces such as T-SQL or Azure interfaces such as the portal, CLI, or REST API. You will never directly access the underlying virtual machines.
This architecture explains also why certain management operations such as scaling vCores can also take a long period of time as some of these operations can require a deployment of a new virtual cluster with either attaching files from Azure Storage or reseeding a replica.
I described some of the architecture of General Purpose (GP) vs. Business Critical (BC) tiers in Chapter 2 of the book. I will describe them further in Chapter 8 of the book. Either of these service tiers uses the same virtual cluster architecture just with different storage and HA implementations.
Resource limits for a Managed Instance such as memory limits, max storage size, and others are enforced through several mechanisms. For example, memory limits are enforced with Windows Job Objects (and you cannot configure “max server memory”). You can read more about Windows Job Objects at https://docs.microsoft.com/en-us/windows/win32/procthread/job-objects. Storage capacity (or max size) is enforced by The File Server Resource Manager (FSRM) which you can read more about at https://docs.microsoft.com/en-us/windows-server/storage/fsrm/fsrm-overview.
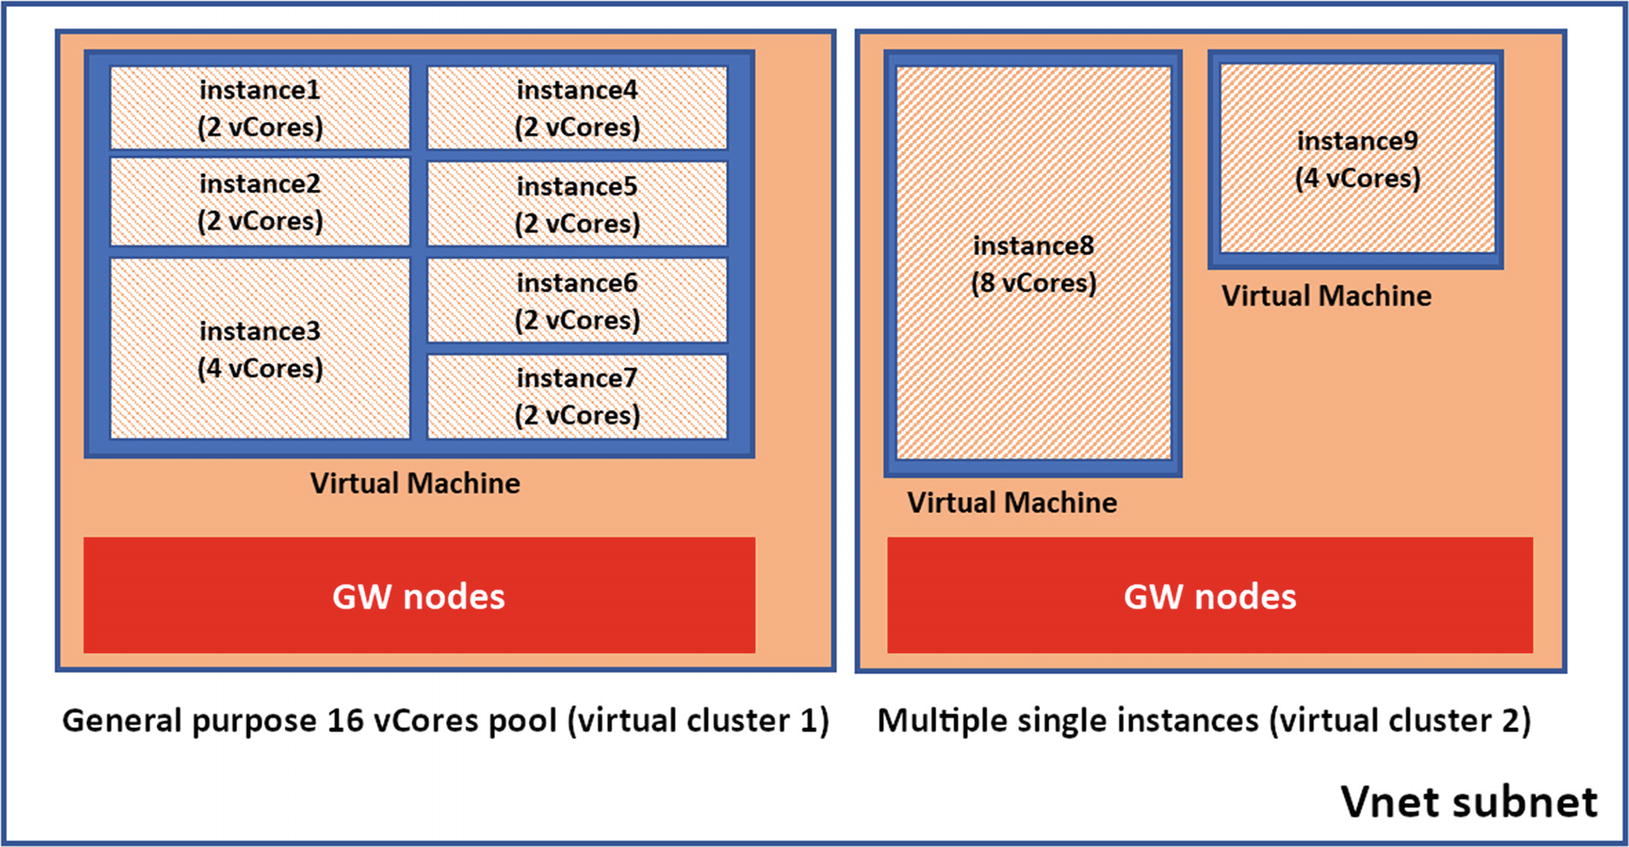
The Managed Instance and pool architecture
Connecting and Verifying Deployment

Deployment complete for Managed Instance

The activity log for the deployment for Managed Instance
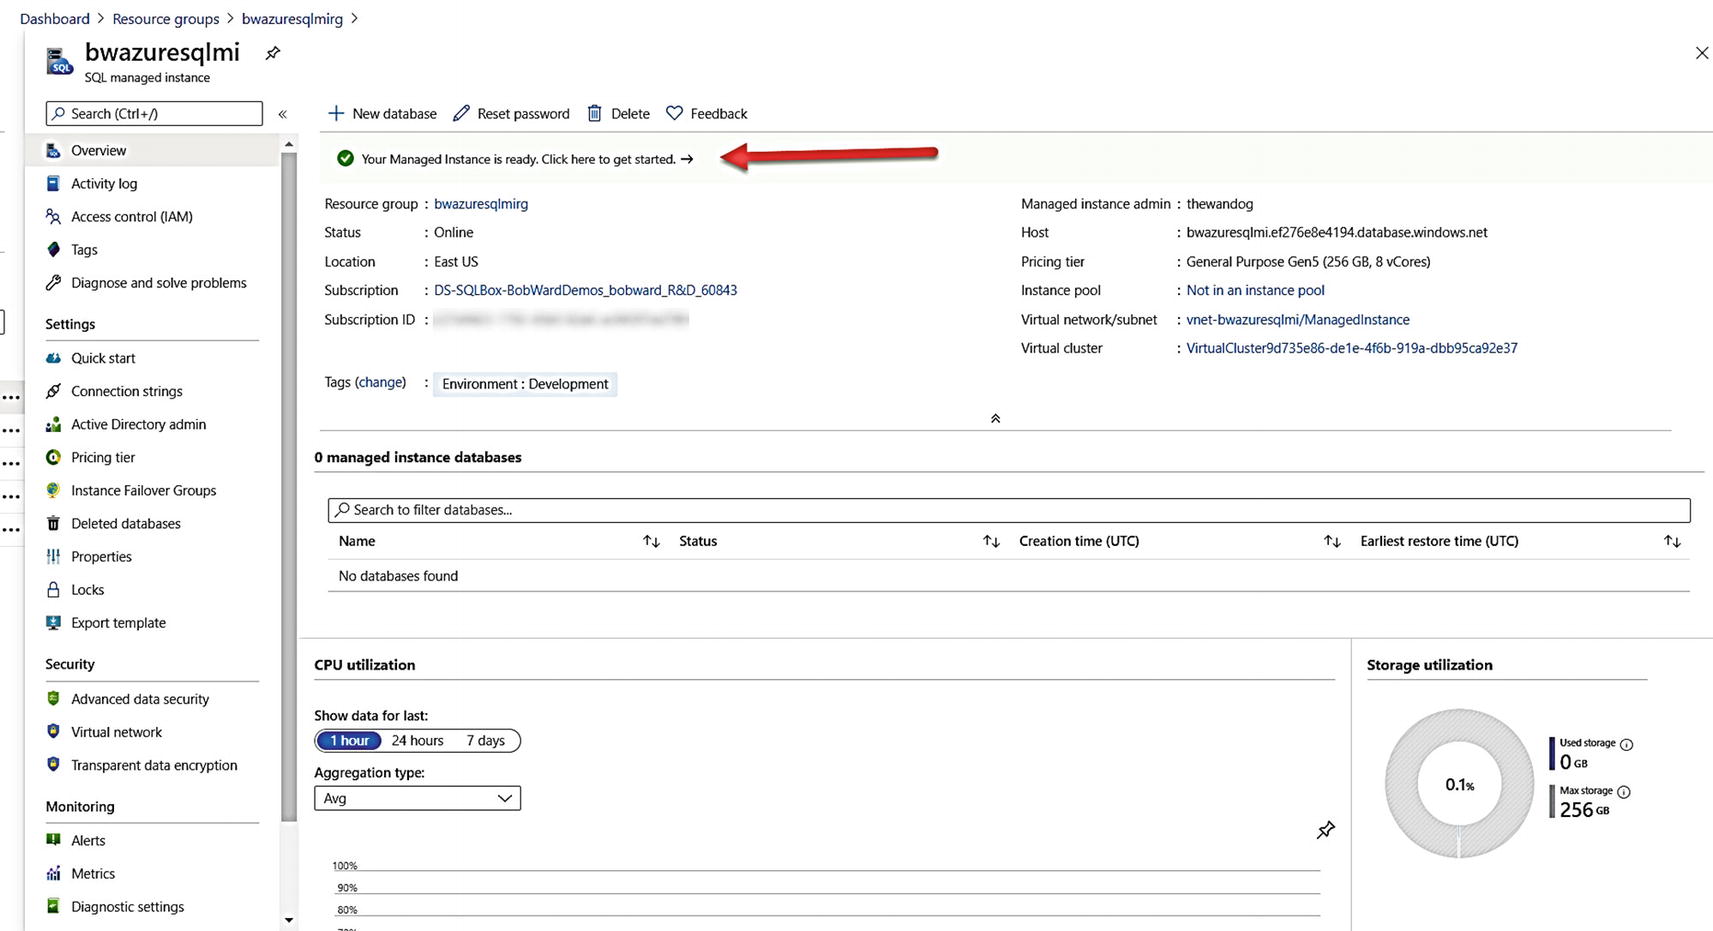
The Overview screen for Azure SQL Managed Instance
One of the first steps you will want to do at this point is try and connect to the new instance and verify the deployment. I like to verify my SQL Server installations with a set of simple T-SQL queries, but I will show you other navigation details as well.
Connect to a Managed Instance
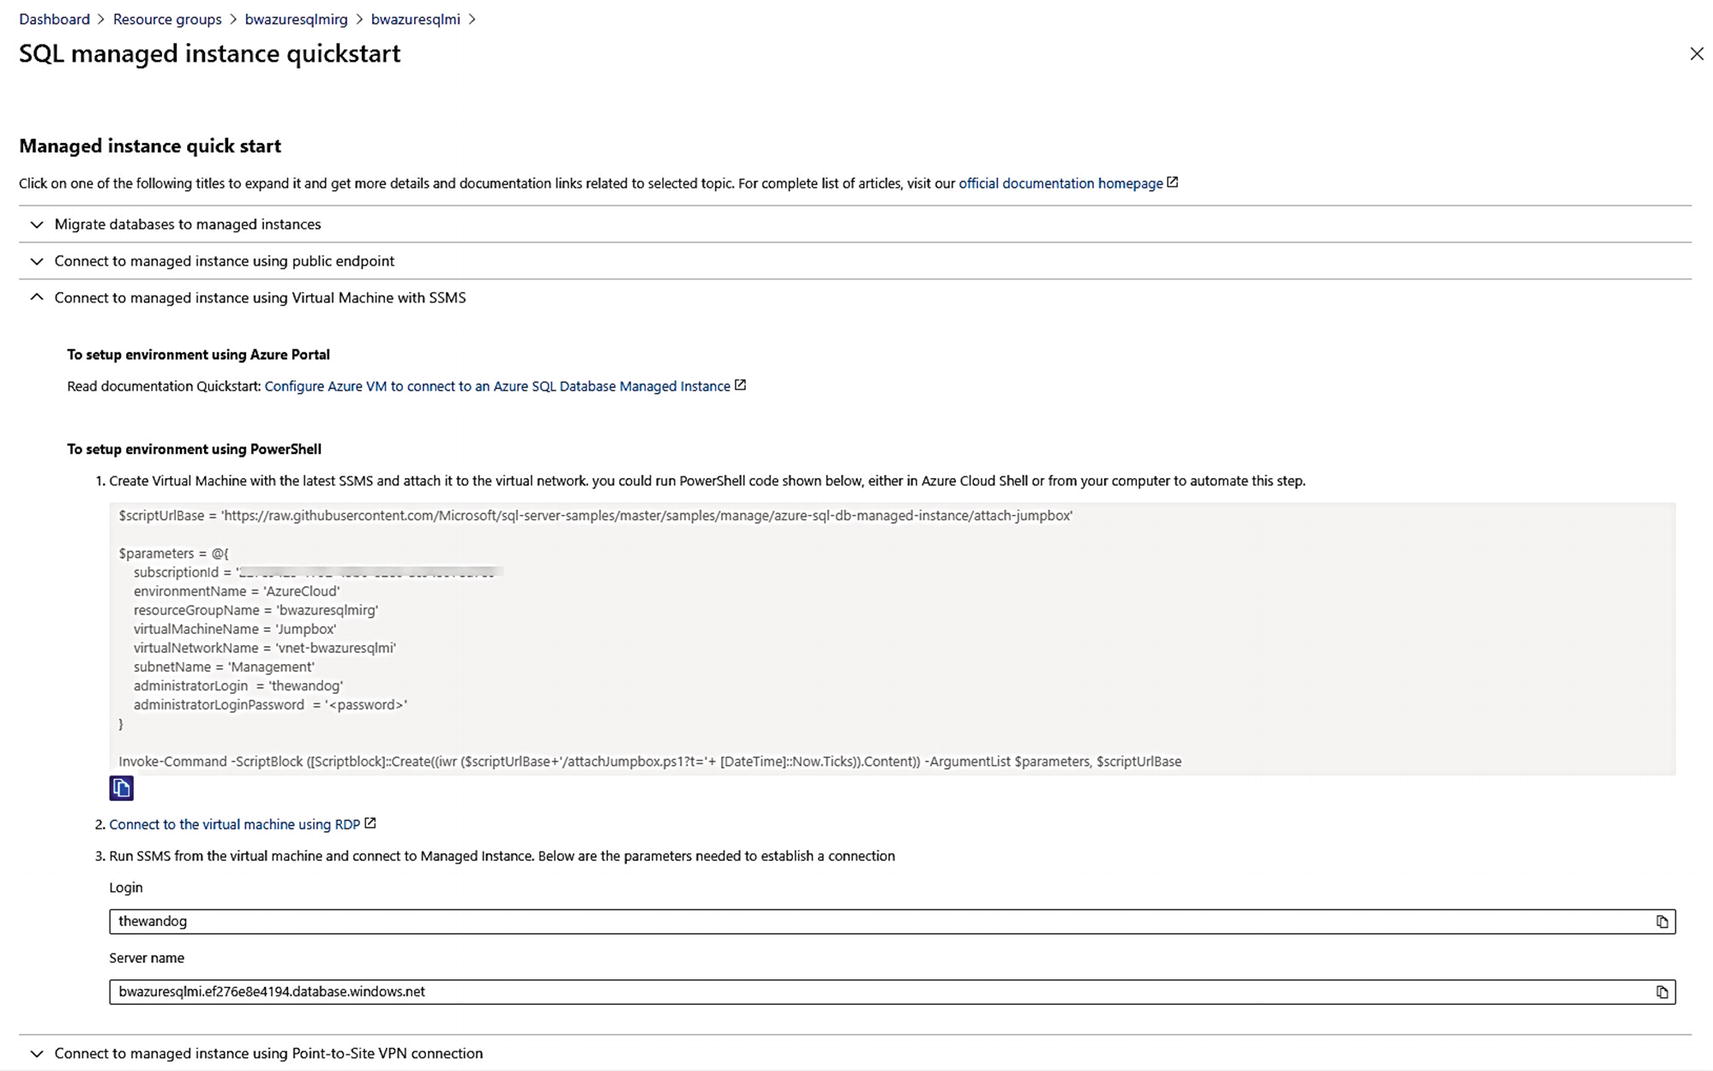
Connecting to Azure SQL Managed Instance with a VM
The list on this screen points to guidance on how to perform various tasks for a newly deployed Azure SQL Managed Instance. Since I did not enable the Public endpoint for the deployed Managed Instance, I have expanded the option to connect through a Virtual Machine.
I will follow these steps by first using the provided PowerShell script and executing it from the Azure Cloud shell. I used the copy button , edited the script, to provide an admin password, and then pasted the script into an Azure Cloud Shell.
This virtual machine is deployed in the same virtual network as the Azure SQL Managed Instance. Therefore, you can RDP into this virtual machine and then use tools like SSMS (which is already installed in this VM) to connect to the Managed Instance. The screen shows you the DNS name to use to connect with SSMS (in my case, the server name to connect to is bwazuresqlmi.ef276e8e4194.database.windows.net).
You can navigate to the newly created virtual machine by finding the Resource Group of the Managed Instance (which is bwazuresqlmirg in my example). The new VM is called Jumpbox. Navigate to the overview screen for this VM and select Connect and use the RDP file with a Remote Desktop Client. Once you use RDP to log in to the Windows Server, use SSMS to connect to the Managed Instance name with the SQL admin login and password you used during deployment.
The concept of using a virtual machine to connect to SQL Server for a Managed Instance is called a jumpbox. Jumpbox is the actual name of the VM created by the script provided as an example by Microsoft (but can be any name).
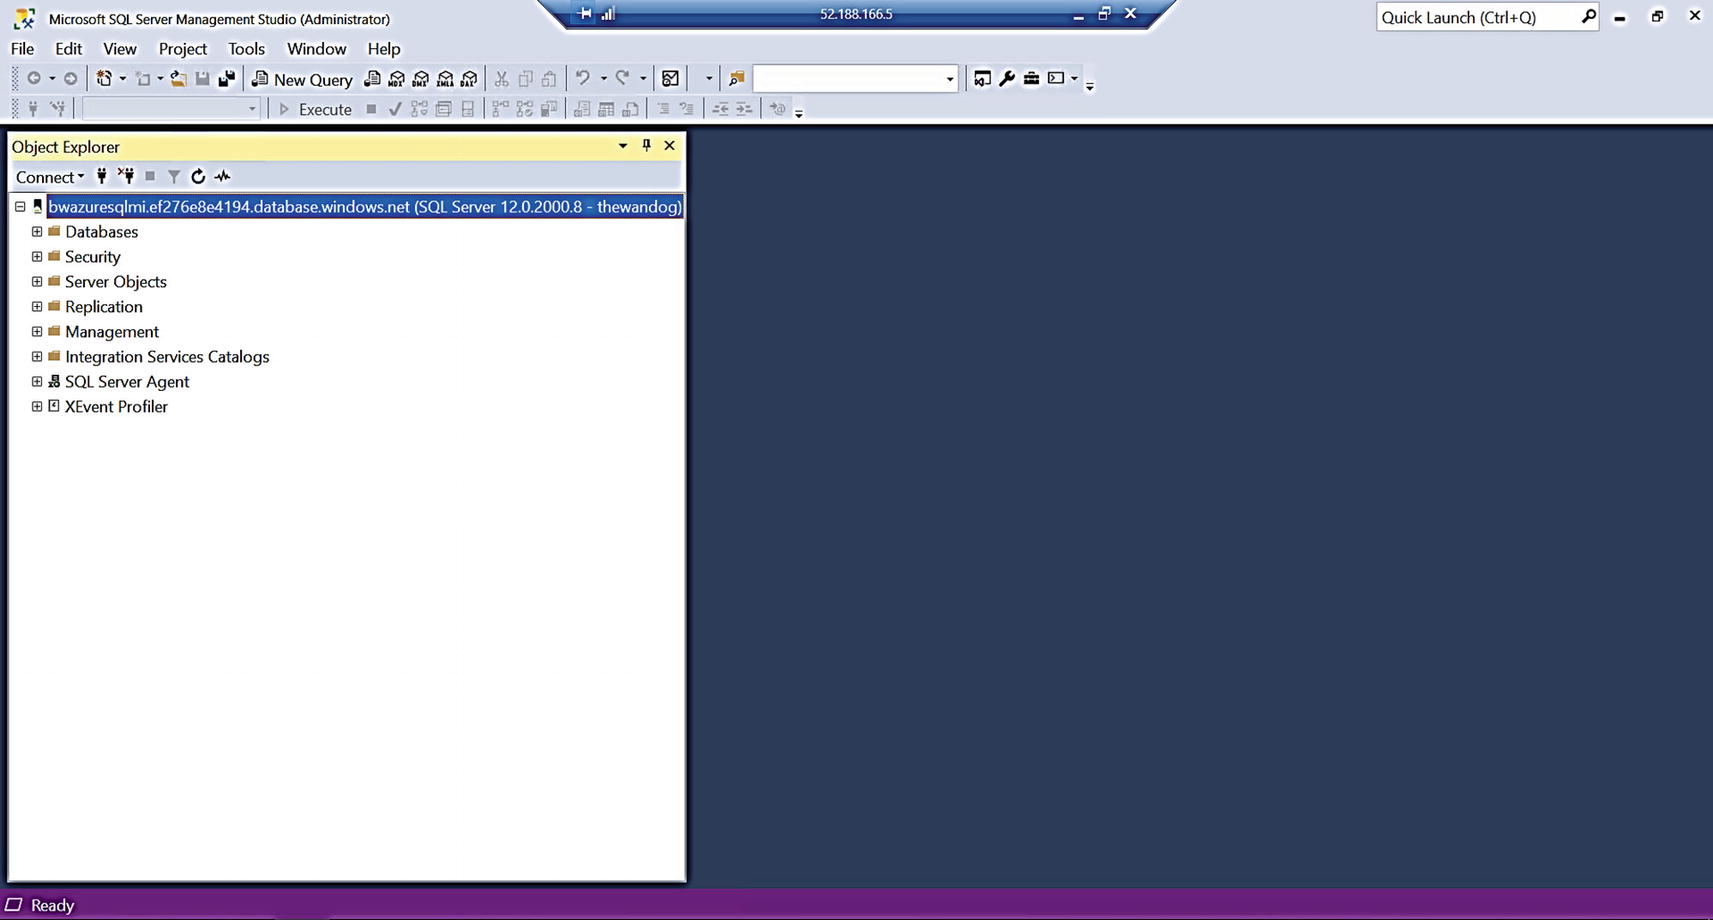
SSMS connected to Azure SQL Managed Instance through a jumpbox
If you want to connect from on-premises, you would need to either enable the public endpoint or connect your network to the Azure virtual network created.
Verify the Deployment
Notice that Object Explorer in SSMS looks almost identical to a SQL Server except for the Fully Qualified Domain Name (FQDN) for the server name.
To verify an installation of SQL Server, I often use a few techniques including running queries against system catalog views and DMVs and look at the ERRORLOG.
Examining the ERRORLOG
You do not have access to the filesystem for the virtual machine hosting the Managed Instance. To look at the ERRORLOG, we will need a tool like SSMS or T-SQL.
You can use Object Explorer in SSMS to view the ERRORLOG, but I prefer just T-SQL so can I execute sp_readerrorlog to look at the current ERRORLOG file. I must warn you that we dump all types of extra information in the ERRORLOG for a Managed Instance (yes even more than a SQL Server). My colleague Dimitri Furman wrote a blog post with some sample code to filter down the ERRORLOG for a Managed Instance. You can view this at https://techcommunity.microsoft.com/t5/datacat/azure-sql-db-managed-instance-sp-readmierrorlog/ba-p/305506.
I can see that eight logical processors were detected which is what I expect given I deployed an 8 vCore instance.
The memory detected is how much memory the SQL Server engine detects from the host or VM. You will see in several places in the book how Azure will use Windows Job Objects to limit the memory visible to SQL Server to enforce resource limits per service tier and vCores. You will find for this Managed Instance the job object will not allow SQL Server to access all the memory as shown here in the ERRORLOG. In fact, you should never rely on what the ERRORLOG shows but instead on the DMV sys.dm_os_job_object which I will show you how to use in the next section.
Verification Queries
I explained in Chapter 1 of the book in describing the history of Azure SQL why v12 was a monumental moment for the service. Since that time, we have not changed the major version of 12.
Per the documentation at https://docs.microsoft.com/en-us/sql/t-sql/functions/serverproperty-transact-sql, the value of 8 is for a Managed Instance.
This DMV is really intended to show you resource limits for a specific Azure SQL Database, but it also works for Managed Instance (you will see a row for all databases including system databases except for tempdb). You can view limits like memory, max storage, log rates, and so on. You can read the documentation for this DMV at https://docs.microsoft.com/en-us/sql/relational-databases/system-dynamic-management-views/sys-dm-user-db-resource-governor-azure-sql-database?view=azuresqldb-current. Note that the docs say this is mostly for internal use, which means it might change in the future:
There is an undocumented DMV called sys.dm_instance_resource_governance which shows resource limits at the instance level.
This is a DMV specific to Azure (although I tested it and it works for a SQL Server, but you can’t rely on the results there because it is not applicable) that shows resource limits Azure applies to a Managed Instance using Windows Job Objects. The specific column I look at is memory_limit_mb which shows me the true amount of memory the Managed Instance has access to. I talked about Windows Job Objects in the preceding section “Implementation Details.”
You may be asking at this point what is so special about Managed Instance, since from the perspective of using a tool like SSMS, it feels like a SQL Server running in an Azure Virtual Machine. This is the point of a Managed Instance. We want you to have the feel of a SQL Server instance, but not worry about the details you might have to consider with a virtual machine. And since Azure SQL Managed Instance (MI) is a PaaS service, you will see the benefits of using MI, especially when it comes to a versionless SQL Server, predictable performance, and built-in high availability and disaster recovery.
Migrating to Azure SQL Managed Instance
As part of deploying an Azure SQL Managed Instance, you may be migrating existing databases. The process to migrate should include assessment and planning, the actual migration, application changes, and post-migration optimization.
Let us look at each of these aspects to the migration process.
Assessment and Planning
An assessment for migration includes analyzing any problems that might occur for your migration depending on what the source of your migration and your preferred Managed Instance deployment option. This is when you use the details I described with pre-deployment planning earlier in this chapter.
Most users migrating to Azure SQL Managed Instance are coming from an existing SQL Server installation. However, it is possible to migrate from other data platforms including Oracle. Check out this blog post on how to migrate from Oracle to Azure SQL Managed Instance, https://techcommunity.microsoft.com/t5/microsoft-data-migration/migrate-your-oracle-database-to-azure-sql-database-managed/ba-p/368750.
The key to getting an entire migration project started is to use Azure Migrate at https://azure.microsoft.com/en-us/services/azure-migrate/. From there, you can start an Azure Migrate project and use the Data Migration Assistant (DMA) tool (https://docs.microsoft.com/en-us/sql/dma/dma-overview) and Data Migration Service (DMS) (https://azure.microsoft.com/en-us/services/database-migration/).
I could show you a ton of details here and walk you through an example. But I have something better. My colleague Anna Thomas developed an entire workshop complete with slides and exercises at https://github.com/microsoft/sqlworkshops-sqlg2c/tree/master/sqlgroundtocloud (Modules 4 and 5). Anna walks you through everything to see how DMA and DMS work to perform an assessment and migration. You have the choice to migrate all the databases for the instance or one or more databases incrementally.
Two important things you should consider as you migrate are in the documentation, and I want to highlight them here.
When you are migrating a database protected by Transparent Data Encryption to a managed instance using native restore option, the corresponding certificate from the on-premises or Azure VM SQL Server needs to be migrated before database restore.
Restore of system databases is not supported. To migrate instance-level objects (stored in master or msdb databases), we recommend to script them out and run T-SQL scripts on the destination instance.
One last important point: consider using a database compatibility level that matches your current SQL Server installation and then move later to the latest compat level. Learn more about dbcompat at https://aka.ms/dbcompat.
Migration
To perform an actual migration of an existing SQL Server instance (the entire instance or just a database), Azure SQL Managed Instance provides a great capability to make this faster and better: the ability to restore a database from a backup of SQL Server.
This allows you to perform an offline migration (restore a full database backup) while the application is down and then connect back again to the Managed Instance when the restore finishes.
The Database Migration Service (DMS) specifically allows for an online migration using technology based on SQL Server Log Shipping to restore a full backup and then a series of log backups until you are ready for the migration cutover. Anna’s workshop goes through both options.
In addition, you can watch me on the Microsoft Mechanics channel at https://youtu.be/P_4EaqVR5PI and go through the entire migration process including a demo of migration to a Managed Instance. One of the aspects of using DMA I love is the SKU recommendation PowerShell script. This script analyzes your current SQL Server workload to guide you on Azure SQL Managed Instance deployment choices. Read more at https://docs.microsoft.com/en-us/sql/dma/dma-sku-recommend-sql-db?view=sql-server-ver15.
Even though I am the person interviewed for this video and demo, the real heroes behind the scenes are the migration team, including folks like Venkata Raj Pochiraju and Sreraman Narasimhan.
Application Changes
One of the best stories for migration is the minimal changes required by your application after migrating to Managed Instance. The most basic change for you to make is the connection string to use the new server name. You may also have to change the authentication method (SQL Authentication or Azure Active Directory). But other than that, provided you are using all the features supported by Managed Instance, these may be the only changes you need to get your application up and running.
Post Migration
After you have migrated your database(s) and made the necessary application changes, you may want to make some configuration changes or adjustments for security, performance, and availability.
Here is the good news. The rest of the book is devoted to these topics, so you have the resources you need to make any changes to go bigger with Azure.
Deploying an Azure SQL Database
Deploying an Azure SQL Database is both different and like Azure SQL Managed Instance. The experience is similar as you will use the Azure Portal or CLI (or even T-SQL) to deploy a database but different since you are…well deploying a database, not an instance of SQL Server. Since you are deploying just a database, you get more options as I have described in this book, including Serverless and Hyperscale.
Decide to deploy a single database or elastic pool.
Choose a Resource Group and Region.
Choose an existing or new logical database server.
Choose your purchasing model, compute model, service tier, and size.
Optionally supply other configuration choices.
Deploy it!
Deployment and Options
Using Azure SQL to choose to deploy an Azure SQL Database
Basics
Defining a Database server as part of Azure SQL deployment
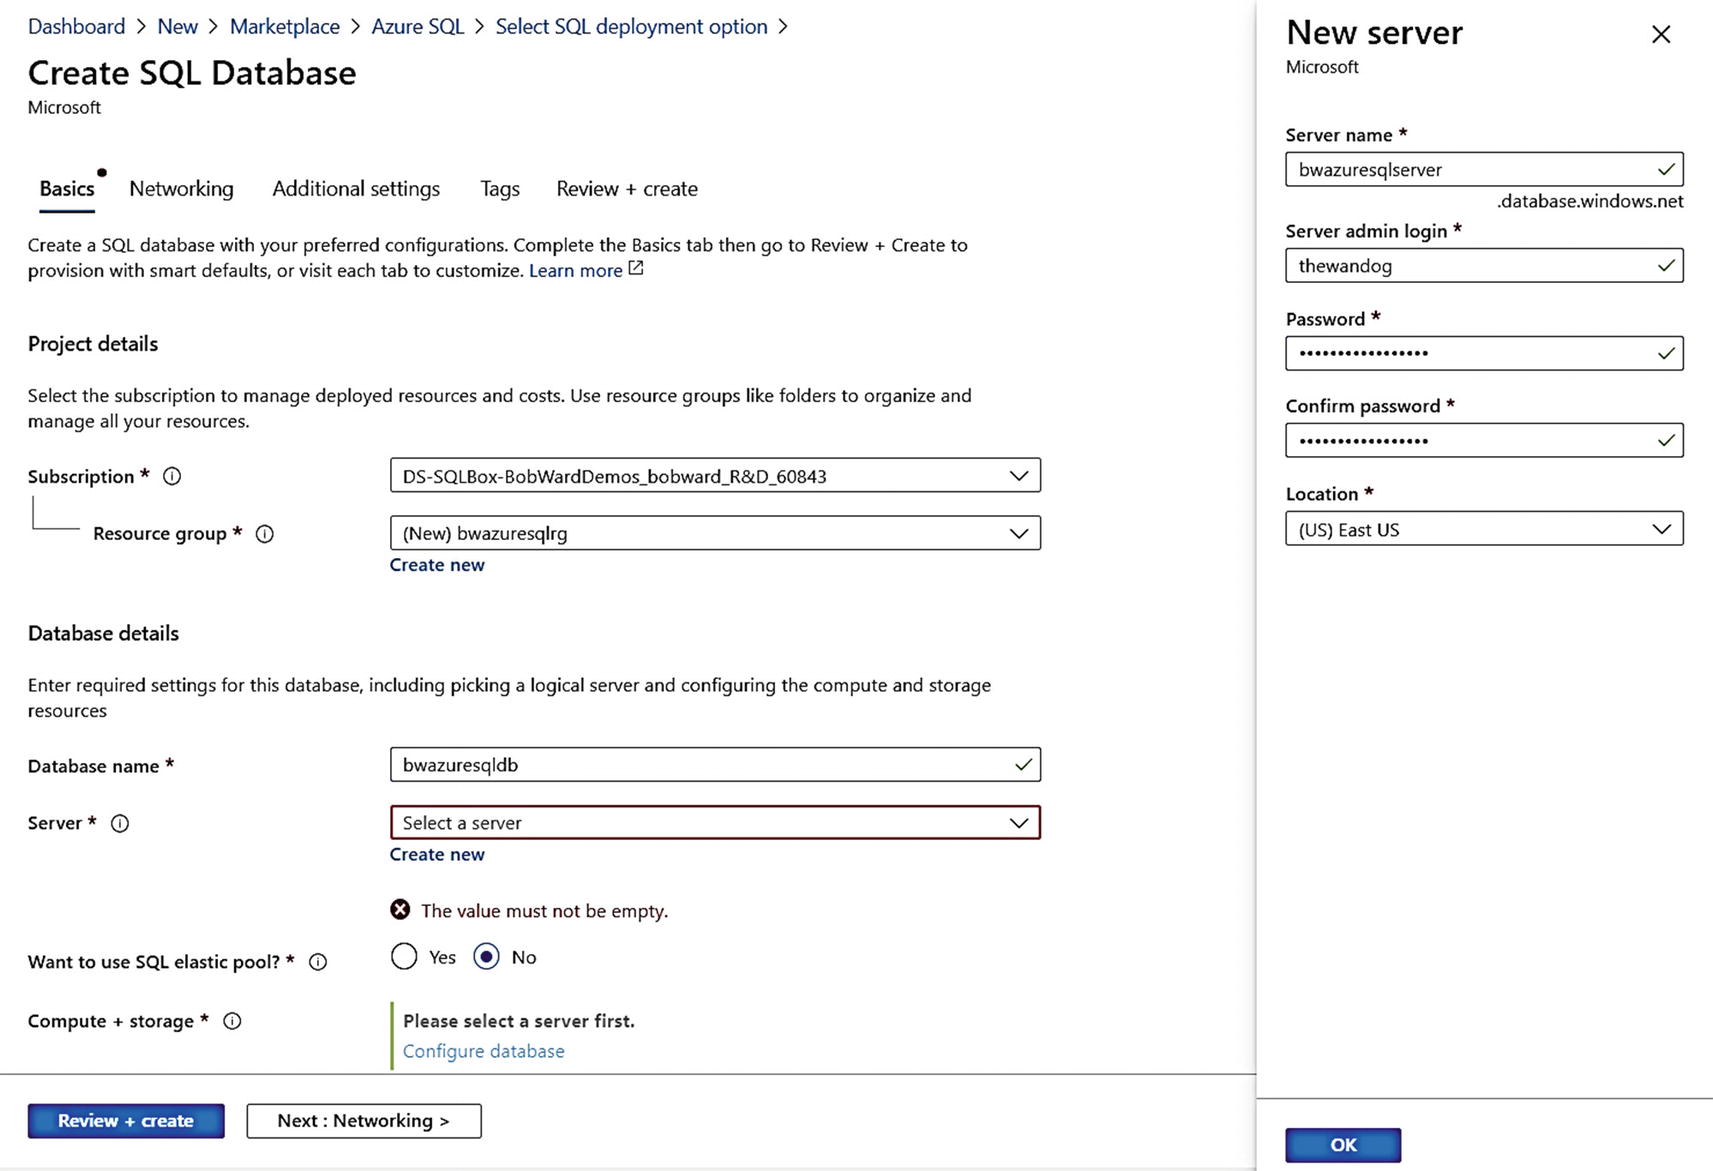
You can see from my screen that I have already created a new Resource Group, defined a Database name, and chose to create a new Database server. You may be wondering why you need a Database server when the promise of Azure SQL Database is “you own the database; Azure will manage everything else.”
A Database server , also known as a logical server , is a collection of metadata stored in the Azure infrastructure used to organize one or more Azure SQL databases. It is not a single SQL Server instance on a physical server. A Database server contains a logical master database just like a true SQL Server instance. Notice the region is associated with the logical server, not the database. Any database created for the logical server will be hosted in the region of the server. All connectivity and networking will be associated with the logical server. In fact, you could create a logical server first, connect to that server, and use T-SQL CREATE DATABASE to create Azure SQL databases. The login and password you supply for the logical server becomes a login in the logical master database which is a server-level principal who is effectively a server admin for all databases. In Modules 6 and 7, I will show you how to integrate Azure Active Directory (AAD) for an admin login.
Once you click OK for the logical server (it will be created as part of the deployment), you can choose if you want to make this part of an elastic pool and select your options for purchasing model, service tier, and size. I will not spend a lot of time in the book discussing the details of how to create and manage an elastic pool. I recommend you use this documentation to learn and go further with using elastic pools, https://docs.microsoft.com/en-us/azure/azure-sql/database/elastic-pool-overview.
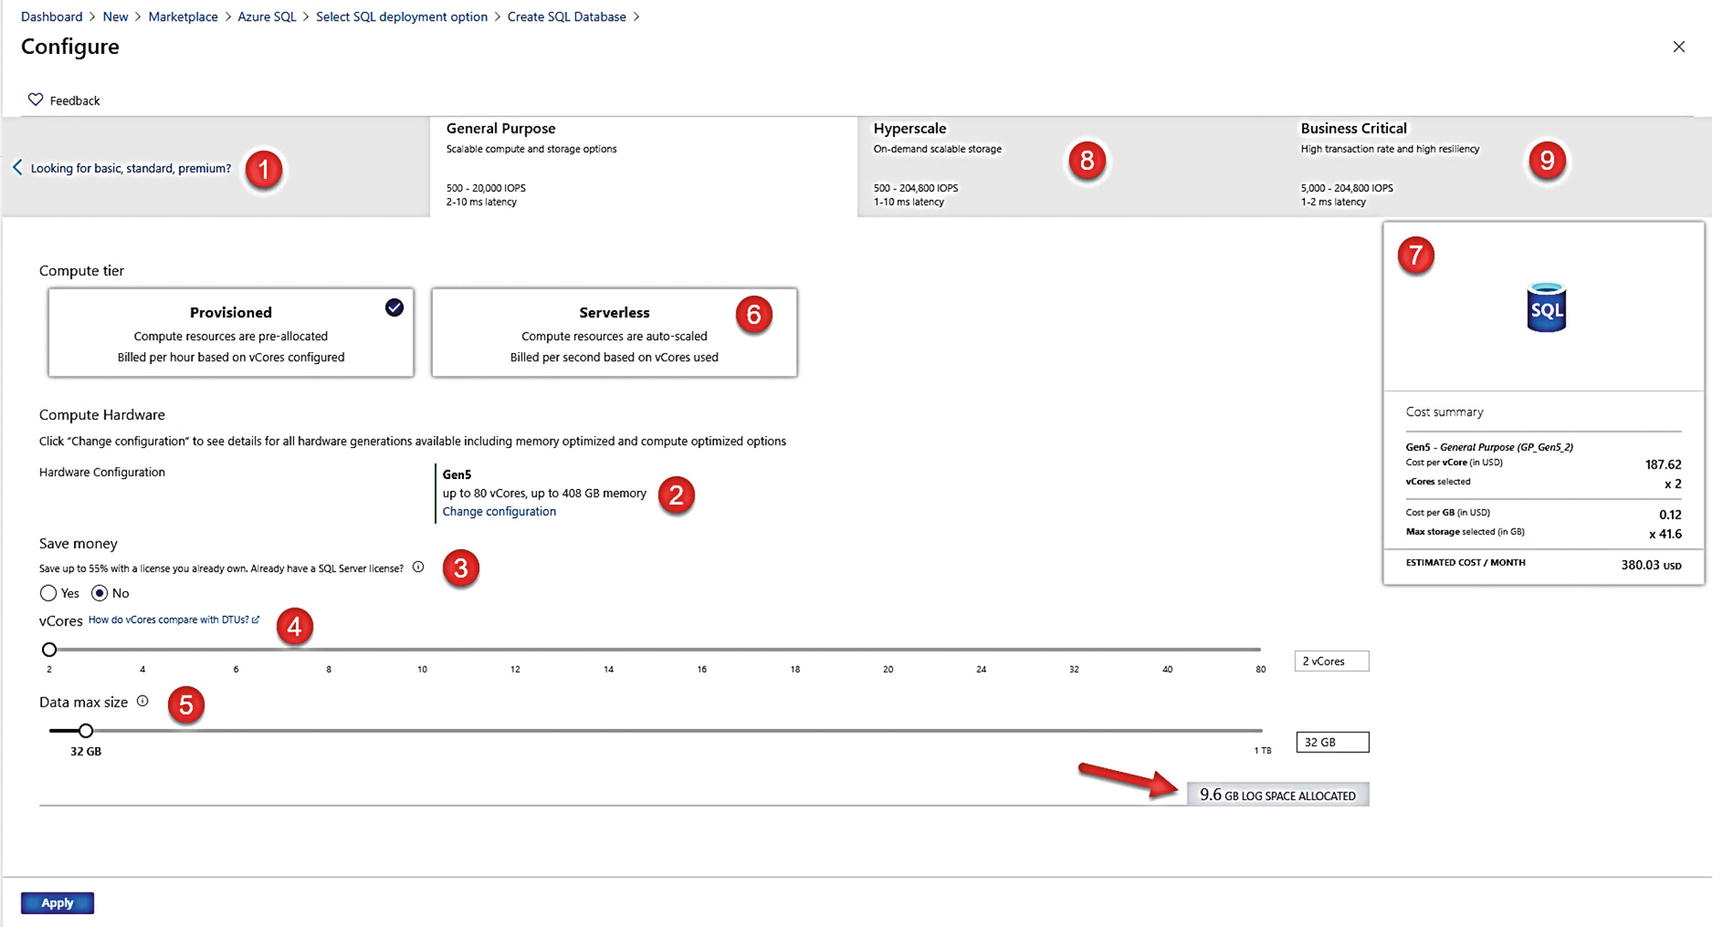
Azure SQL purchasing, compute, service tier, and size options
- 1.
The default purchasing model is vCore. You can select on this screen the ability to choose the DTU purchase model. While I will not cover details about deploying the DTU model, you can read about this option at https://docs.microsoft.com/en-us/azure/azure-sql/database/service-tiers-dtu.
- 2.
The default hardware generation for the vCore model is Gen5. As I described in pre-deployment planning, choosing Change configuration allows you to pick other hardware generations such as Fsv2- and M-series.
- 3.
Just like a Managed Instance, you can choose to apply your existing SQL Server license with Azure Hybrid Benefit (AHB).
- 4.
Just like a Managed Instance, you have a slider bar to choose the number of vCores for your deployment. You will notice that for Azure SQL Database, you have more granular choices for vCores.
- 5.
Just like a Managed Instance, you have a slider bar for Data max size. The more vCores you choose, the larger the max size. This max size is the maximum size of the single database file hosting your database. Notice below the size is a number for LOG SPACE ALLOCATED. You are given for free a maximum transaction log size that is 30% over your data max size.
Note If you are worried this may not be enough, we continuously back up the transaction log and have Accelerated Database Recovery enabled by default (which means a long active transaction does not hold up log truncation). As much as I tried, I never ran out of log space in my testing with Azure SQL Database.
- 6.
Provisioned is the default Compute model. For the General Purpose service tier, you have the choice of the Serverless model. I will show you Serverless options in the section titled “Deploying Serverless” later in this chapter.
- 7.
As you make choices, the portal will show you estimated costs per month broken out by costs for vCores and storage.
- 8.
Besides General Purpose, you also have the choice to deploy a Hyperscale service tier. I will show you the process of deploying Hyperscale in the following section titled “Deploying Hyperscale.”
- 9.
You also have the choice to choose the Business Critical service tier. I will show you the process of deploying a Business Critical database in the following section titled “Deploying Business Critical.”
I know there are many choices which is one of the benefits of Azure SQL Database but does require some thinking for your requirements. Thankfully, changing these options or resizing your Azure SQL Database is flexible and fast (the exception is Hyperscale).
I will leave the default of General Purpose, 2 vCore, 32Gb max data size and click Apply.
Networking
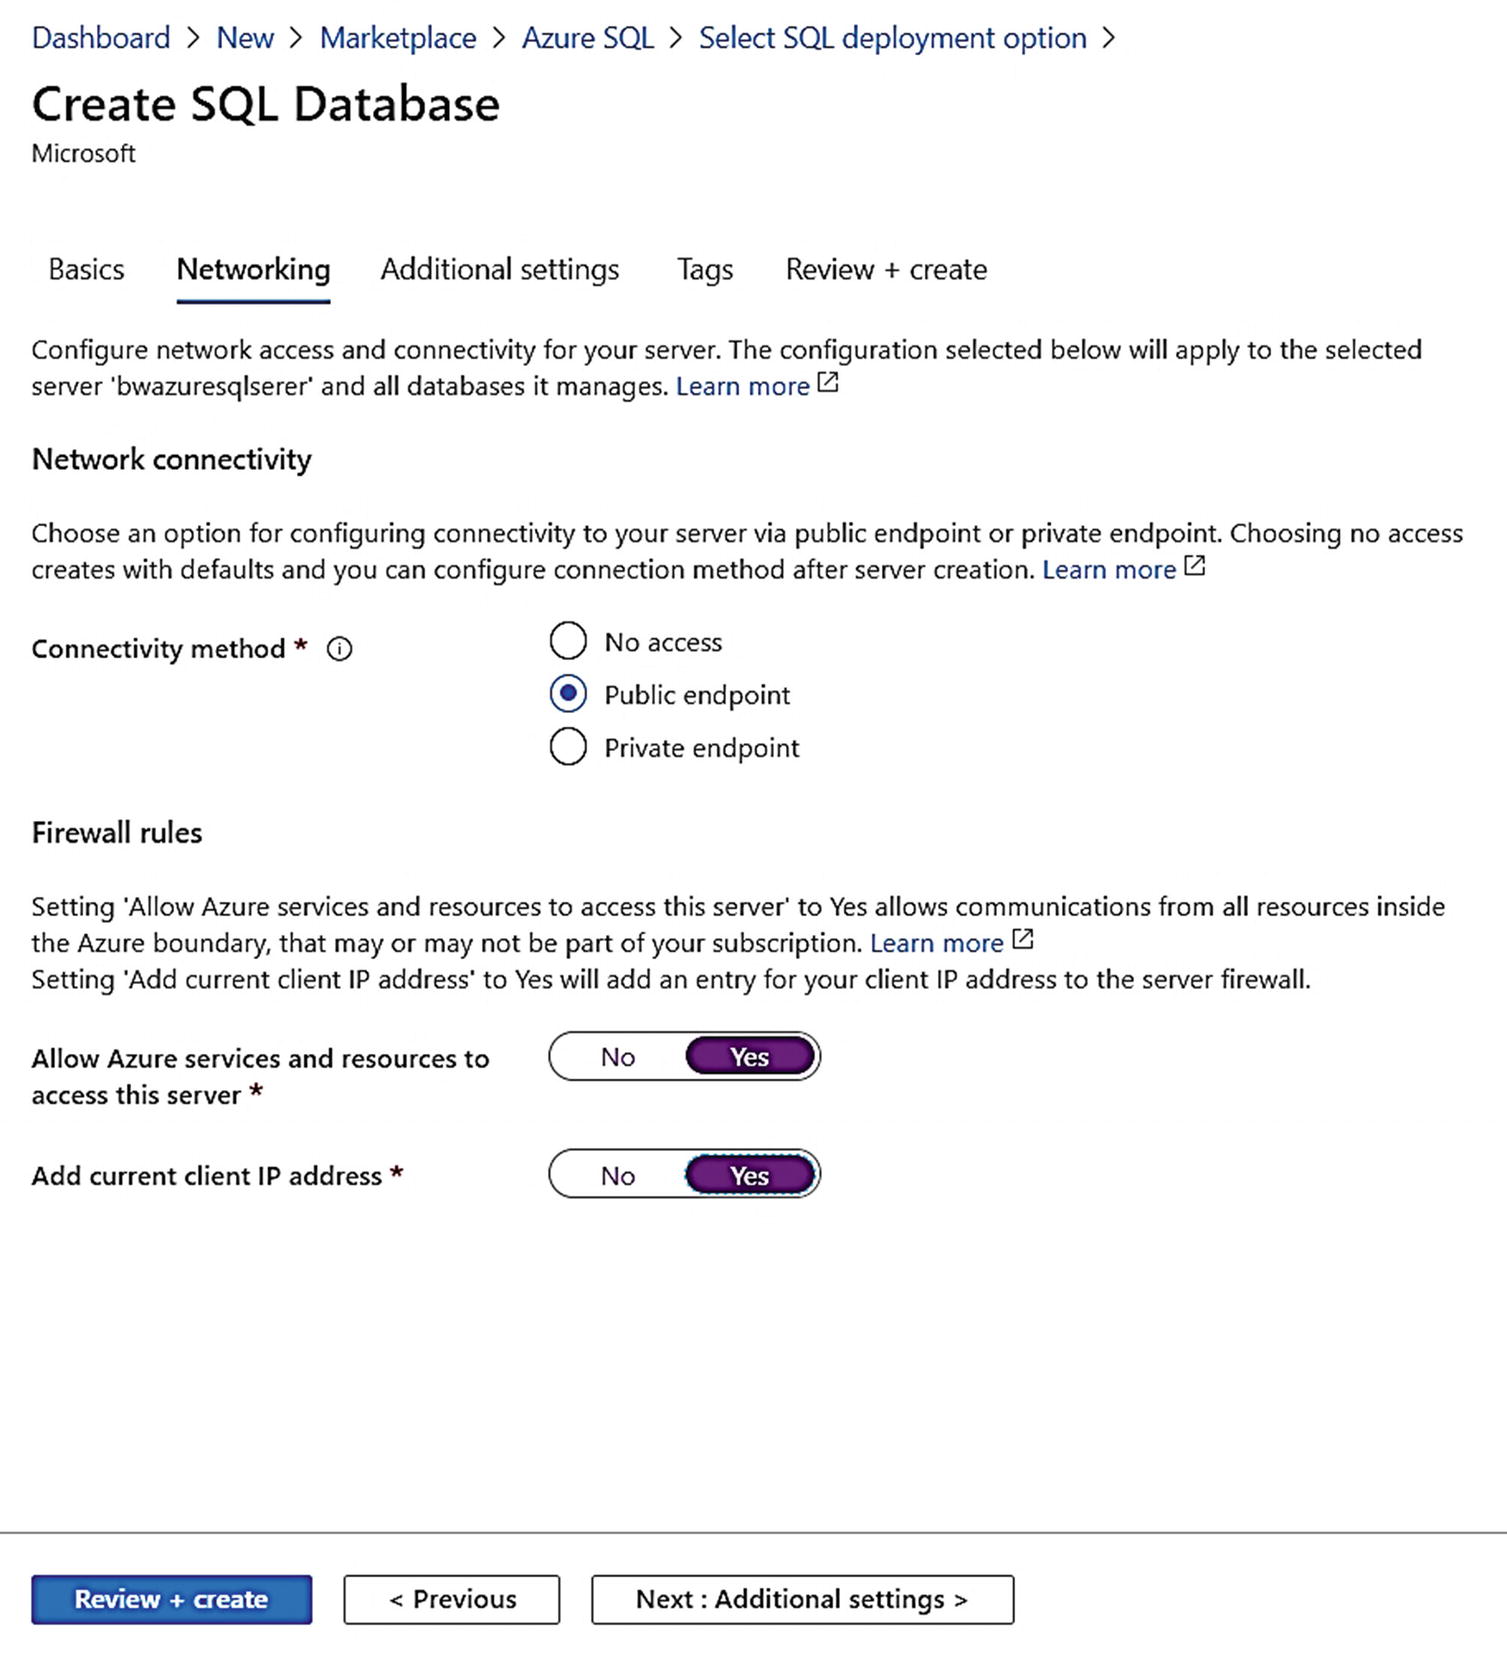
Networking choices when deploying an Azure SQL Database
Unlike Azure SQL Managed Instance, Azure SQL Database is not part of a virtual network. You have three choices during deployment:
No access – Deploy the database, but do not allow any connectivity until you are ready to make your choice.
Public endpoint – Expose connectivity of the logical server and/or database to the public within Azure or to the Internet (or both).
Private endpoint – This is a new addition to Azure SQL Database to make it very secure. This allows you to deny public access to your server and/or database and only allows private connectivity within defined virtual networks in and outside of Azure.
For now, I will select Public endpoint and set Allow Azure services and resources access this server to Yes and Add current client IP address to Yes. This allows me to deploy an Azure Virtual Machine and connect to this database or to connect with SQL client tools on the client computer where I am currently deploying the browser. My client IP address will be added to a firewall rule to connect to the logical server associated with this database. I will show you how to tighten up the security of this model in Chapters 6 and 7 of the book.
Additional Settings
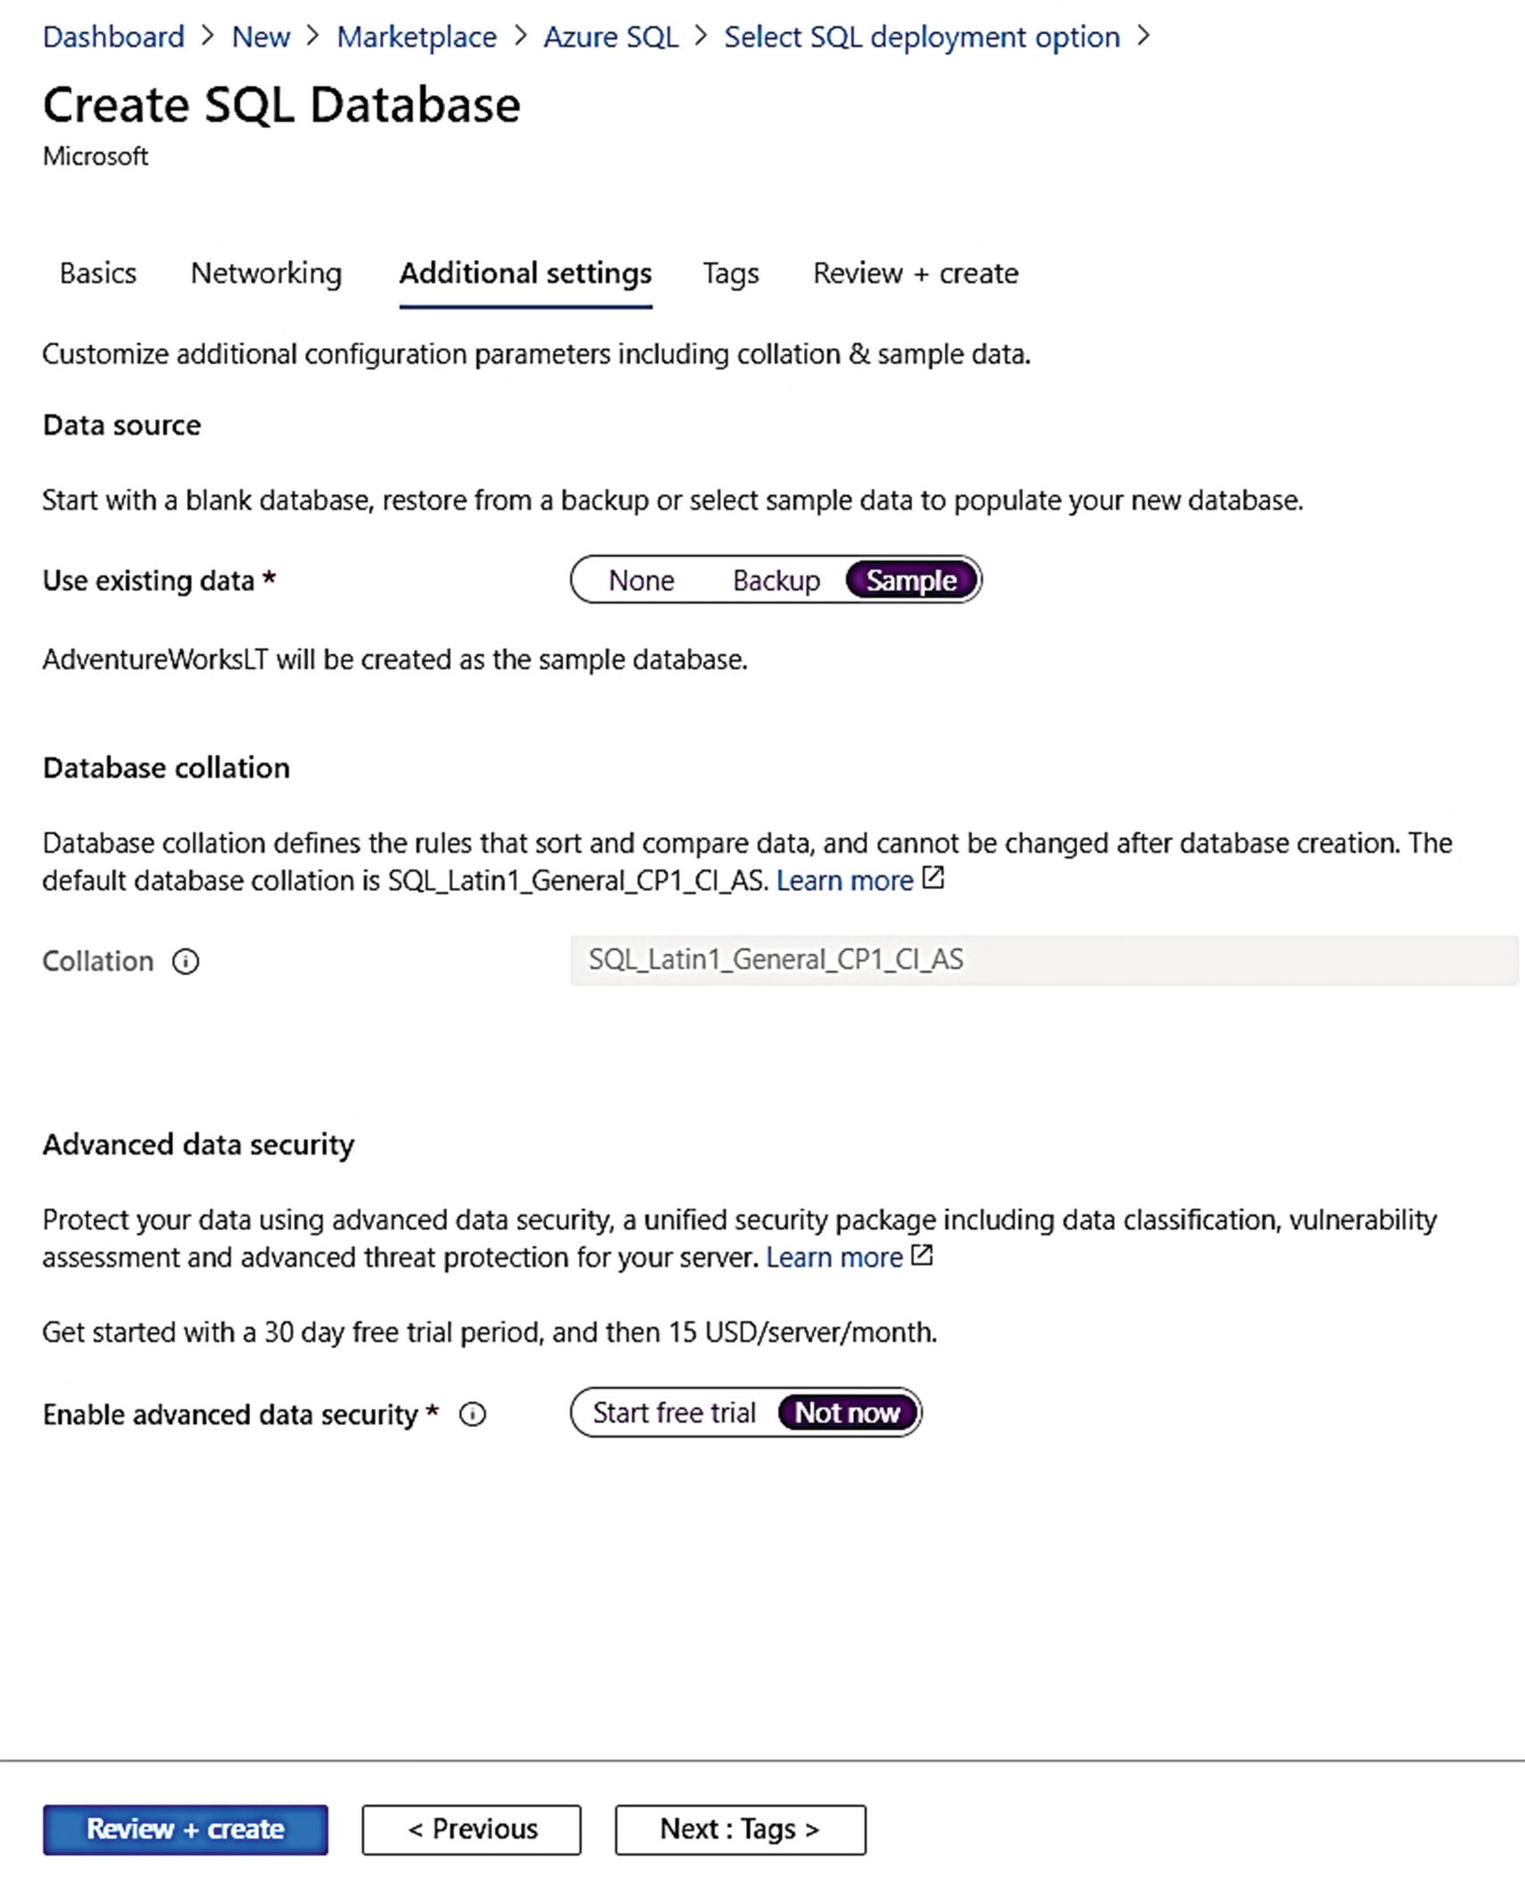
Additional settings for the deployment of Azure SQL Database
Your first choice is to either create a blank database or create a database based on a backup of a geo-replicated Azure SQL Database or from the sample AdventureWorksLT (LT stands for light). You can learn more about how to restore from a geo-replicated backup at https://docs.microsoft.com/en-us/azure/azure-sql/database/recovery-using-backups#geo-restore. I will choose the sample AdventureWorksLT database because I want to show some demonstrations of other capabilities using that database later in the book.
Your next choice is Database collation . Since I chose a sample database, the collation is already decided. For a new blank database, it is important to choose this during deployment because you cannot change it later.
The final choice is to enable Advanced Data Security . I will not enable this for now and show you more about this capability in Chapters 6 and 7 of the book.
Tags
Click Next: Tags > to define a tag for the deployment. Just like with Azure Virtual Machine and Managed Instance, I will use a Name = Environment and Value = Development. In this case, I will leave the resources selected for both SQL Database and SQL database server.
After you deploy, you can now search for Tags for your description and see all your resources that are “for development purposes.”
Deploy It!
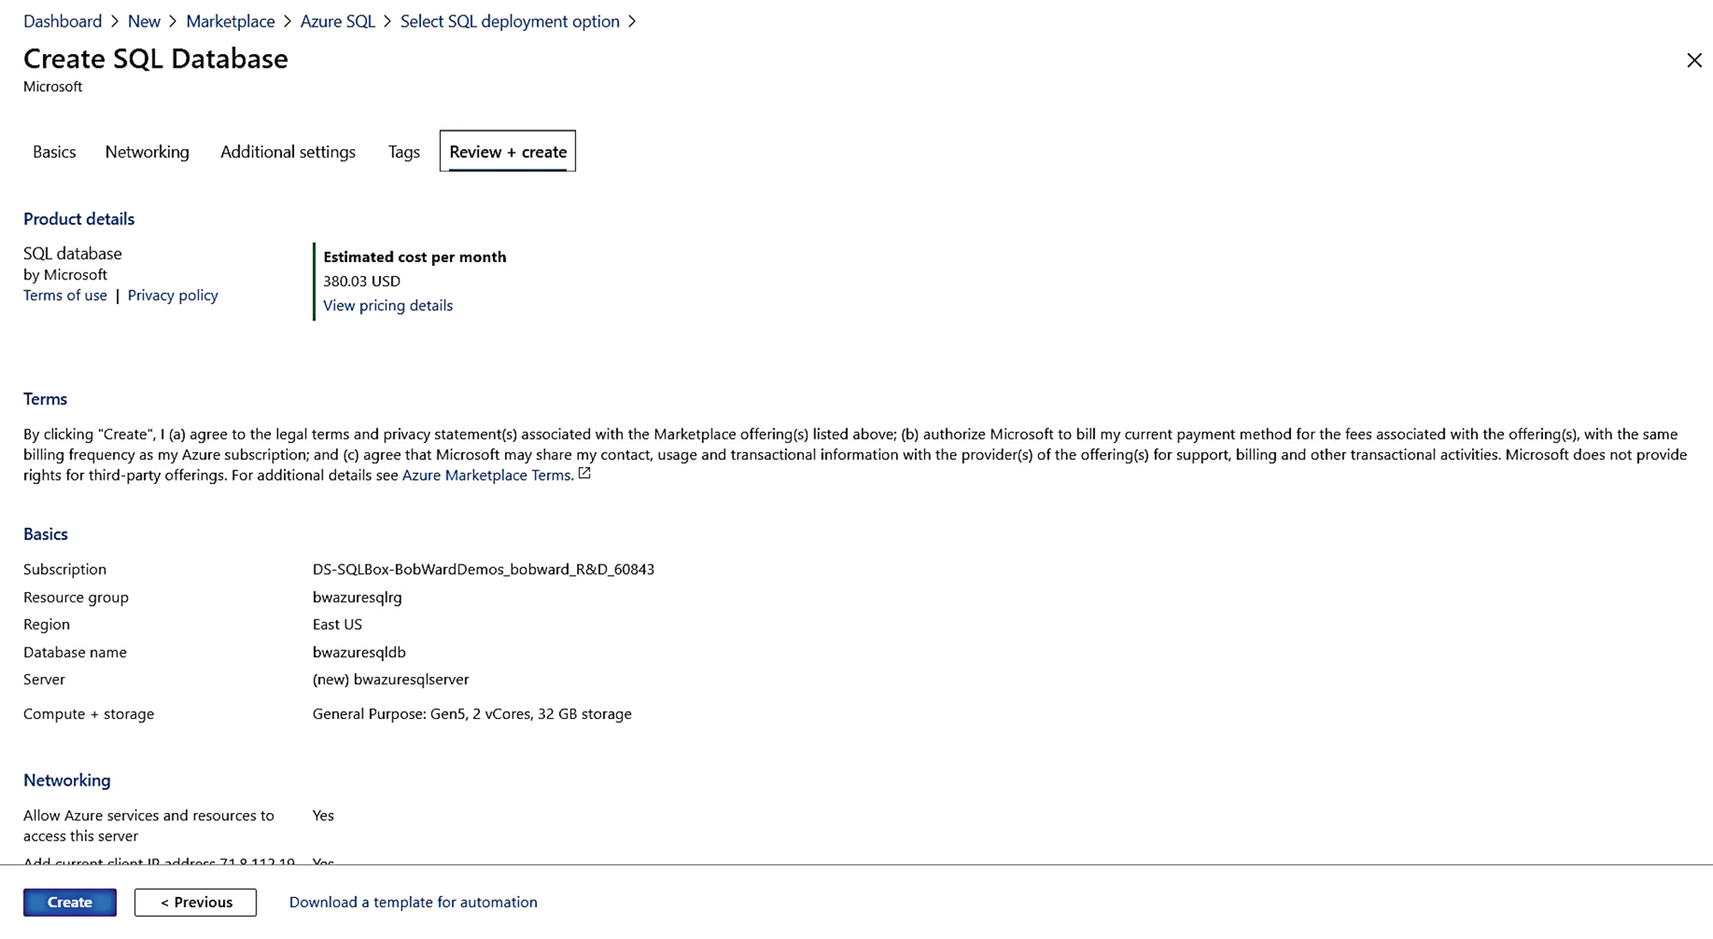
Final screen before deployment of Azure SQL Database
Just like with Managed Instance, you can see estimated costs, Terms of Use, privacy policy, a review of your choices, and the ability to download an Azure template.
Click Create to see the deployment take off. Just like with Managed Instance, if you do not leave this screen, you will see a progress of your deployment in both the Notifications area of the portal and on your main screen.
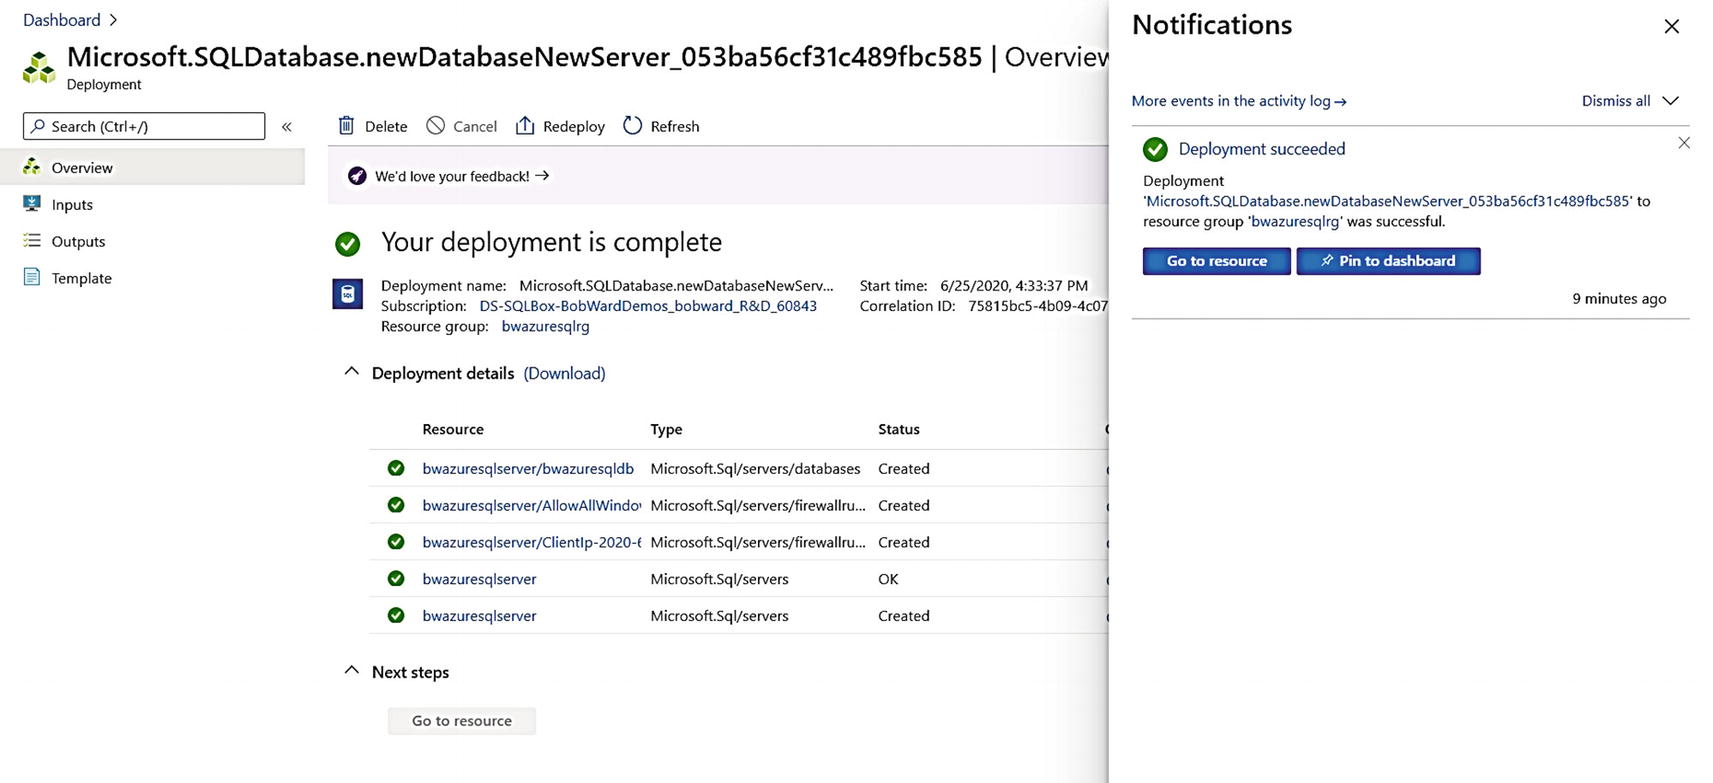
A completed deployment of Azure SQL Database
I have found that I can connect to the logical server and use the database being deployed even before I get signaled the deployment is complete.
Just like a Managed Instance deployment, you can click More events in the activity log to see the sequence of deploying all resources.
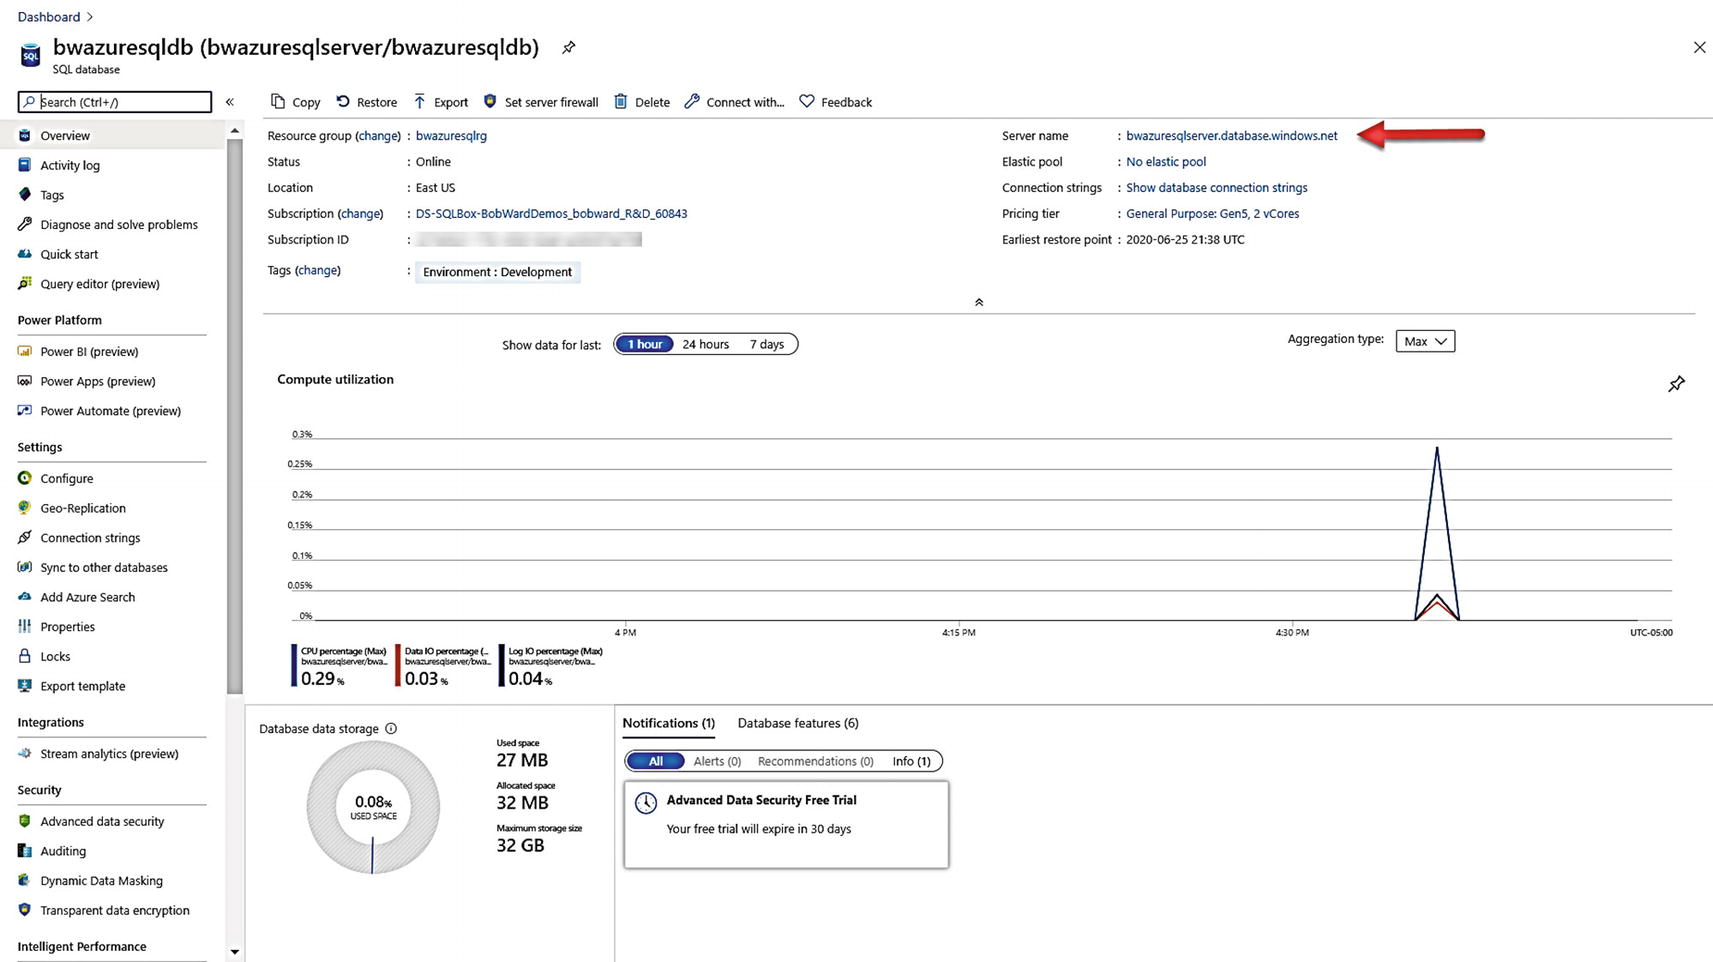
The Overview screen of an Azure SQL Database
Just like with a Virtual Machine and Managed Instance, the portal shows a Resource Menu, Command Bar, Working Pane, and Monitoring Pane. While this looks like other Azure resources, most of this information is specific to Azure SQL Database. We will use many of these options throughout the rest of the chapter as you explore security, performance, availability, and other features.
Let us see the experience of deploying an Azure SQL Database Business Critical, Hyperscale, and Serverless database on the same logical server. In the Working Pane, click the Server Name.
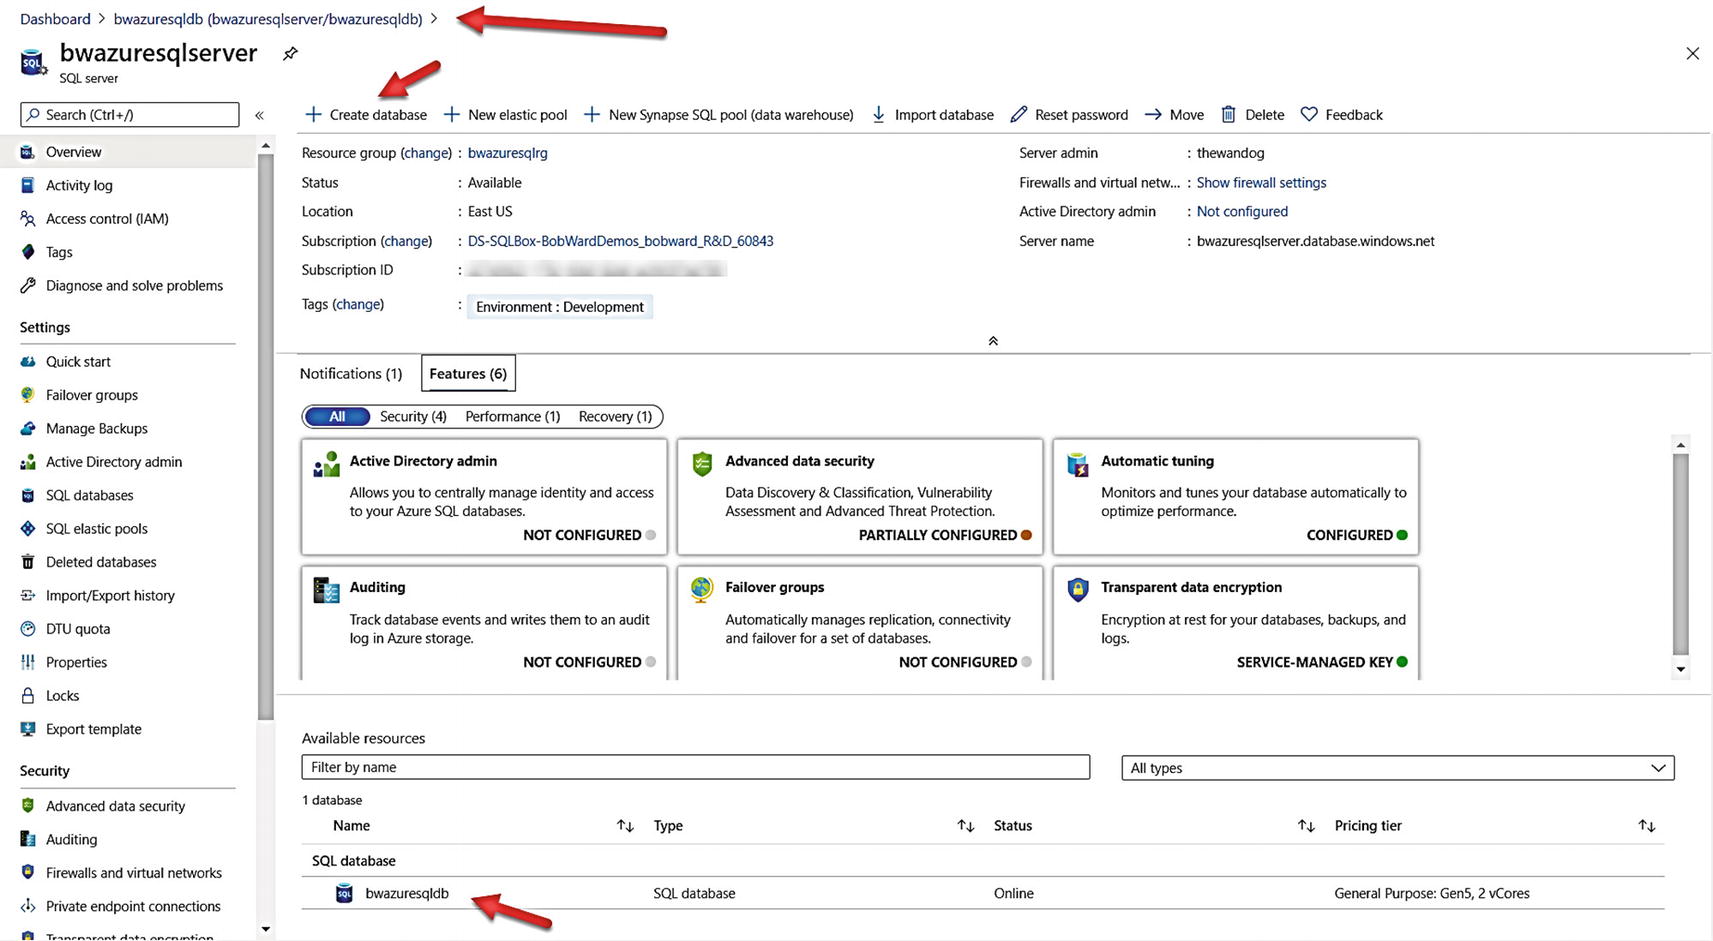
Overview of an Azure SQL Database Server
Notice at the bottom the database we just deployed. I also want to stop and point out a key feature of the portal called breadcrumbs. You were brought to the overview screen of the database server by selecting it from the overview screen of the database. The breadcrumbs “show you where you came from” and allow you to navigate to a specific resource in the portal.
Click Create database from the command bar.
The following sections for Business Critical, Serverless, and Hyperscale require costs if you leave these deployments active. You can choose to go through and deploy these or just follow along.
Deploying Business Critical
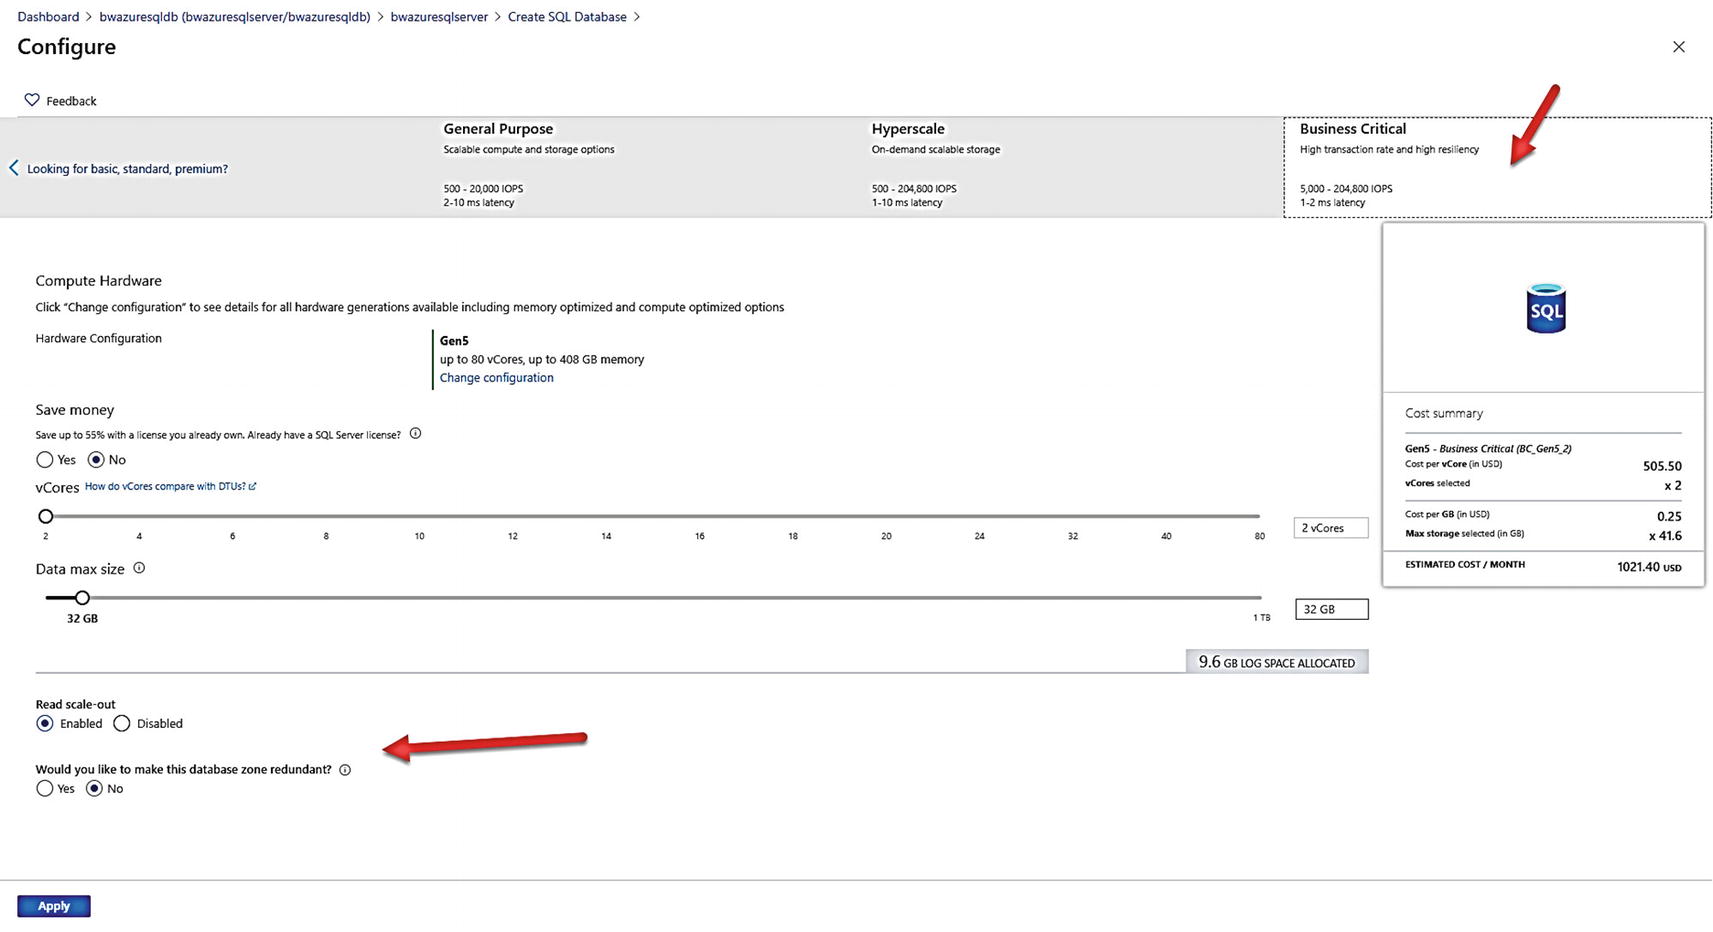
Azure SQL Business Critical service tier choices
You still choose the number of vCores and Data max size. But you also choose whether this database will enable read scale-out and zone redundancy. I will discuss these high availability capabilities in Chapters 10 and 11 of the book. For now, I will leave Read scale-out Enabled (you should; it is free) and select Yes for zone redundancy.
Click Apply and put in a database name. I will use a new name and call it bwazuresqldbbc. Instead of making additional choices, I will choose Review + create and then Create.
You could make other choices here including setting up a Private endpoint for your database different than the choice made for the first database on the server.
Once this deployment is complete (it should be fast), you can click Go to resource and see you now have a Business Critical database deployed. Click the Server name again and repeat the process to create a new database.
Deploying Serverless
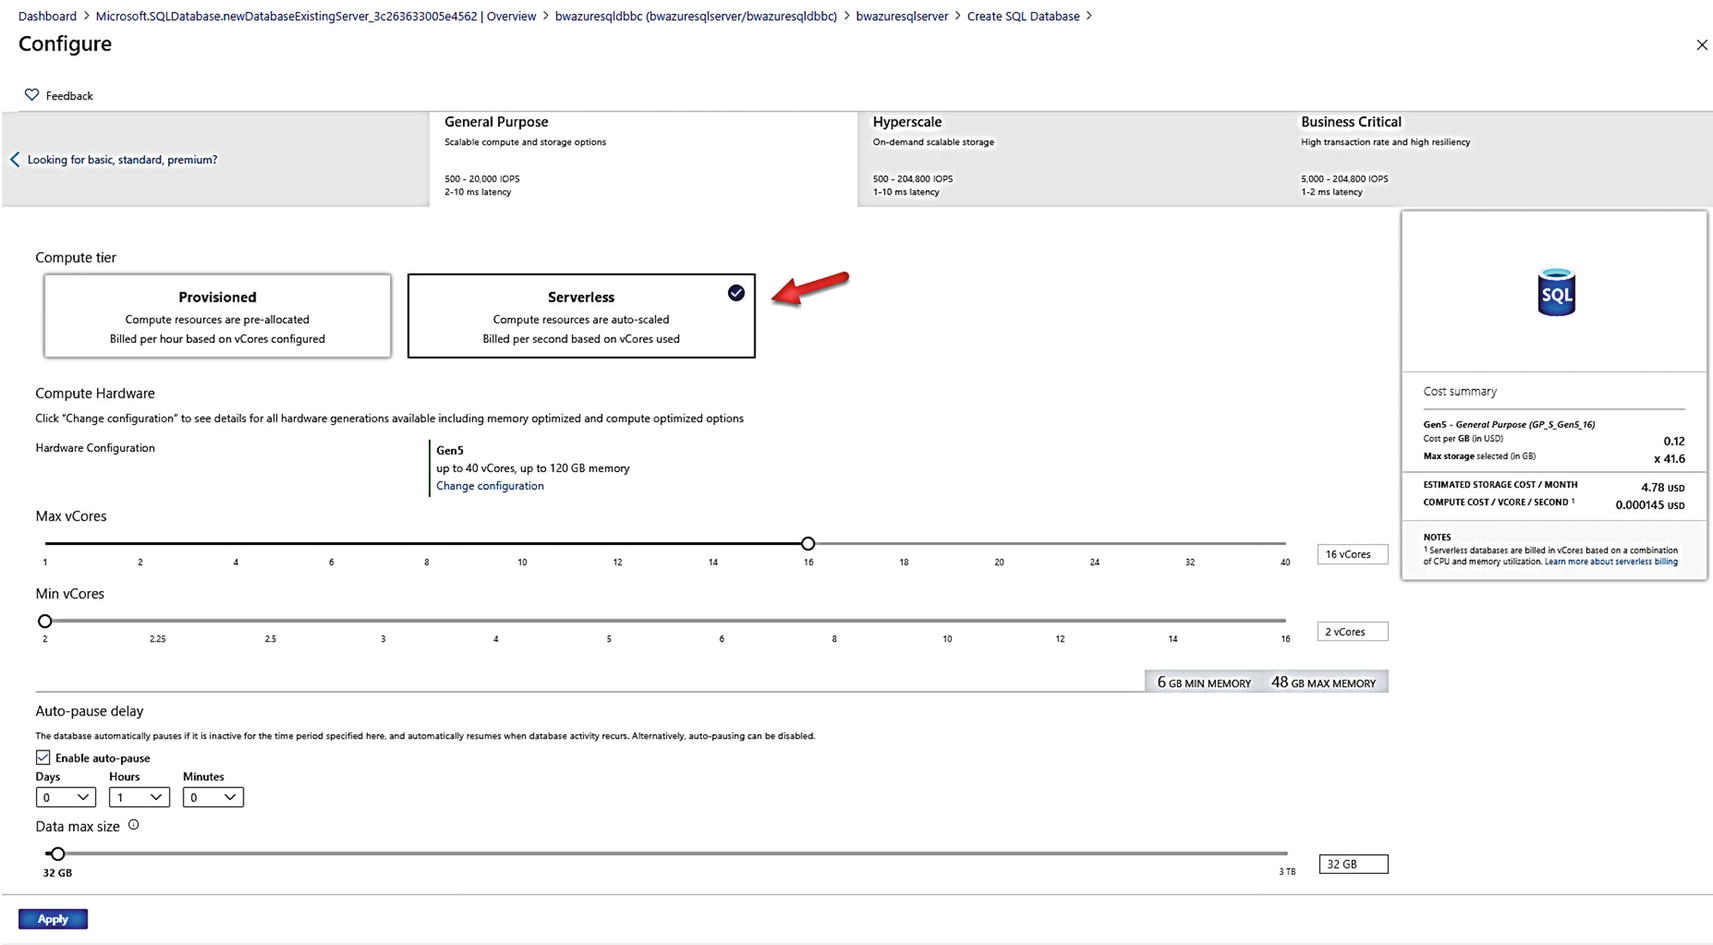
Serverless compute options
Instead of a slider to choose vCores, I can choose a min and max vCore. Serverless will autoscale based on the CPU needs of my workload. Notice the values for min and max memory. This means that for my Serverless database I can use a maximum of 48Gb, but when my usage is idle, my memory may be trimmed down to as low as 6Gb. Think of this like max and min server memory configuration values for SQL Server. The difference is that our Azure services will trim memory (almost like external memory pressure) if usage is idle.
So, what defines idle? That is the choice for Auto-pause delay. If there is no usage for 1 hour, the compute for this database will be paused and memory resources reclaimed. Drill more into Serverless at https://docs.microsoft.com/en-us/azure/azure-sql/database/serverless-tier-overview.
Click Apply and put in a database name. I used bwazuresqldbserverless. Click Review + create. Notice on the validation screen the costs is listed as per second which is one of the great stories of saving costs with Serverless. Click Create and wait for the deployment to finish. When the deployment is finished, click Go to resource. Notice in the Monitoring Pane metrics for Compute utilization vs. App CPU billed. This helps you track billing per second of compute usage for a Serverless database.
Click the Server name again so you can create a Hyperscale database.
Deploying Hyperscale
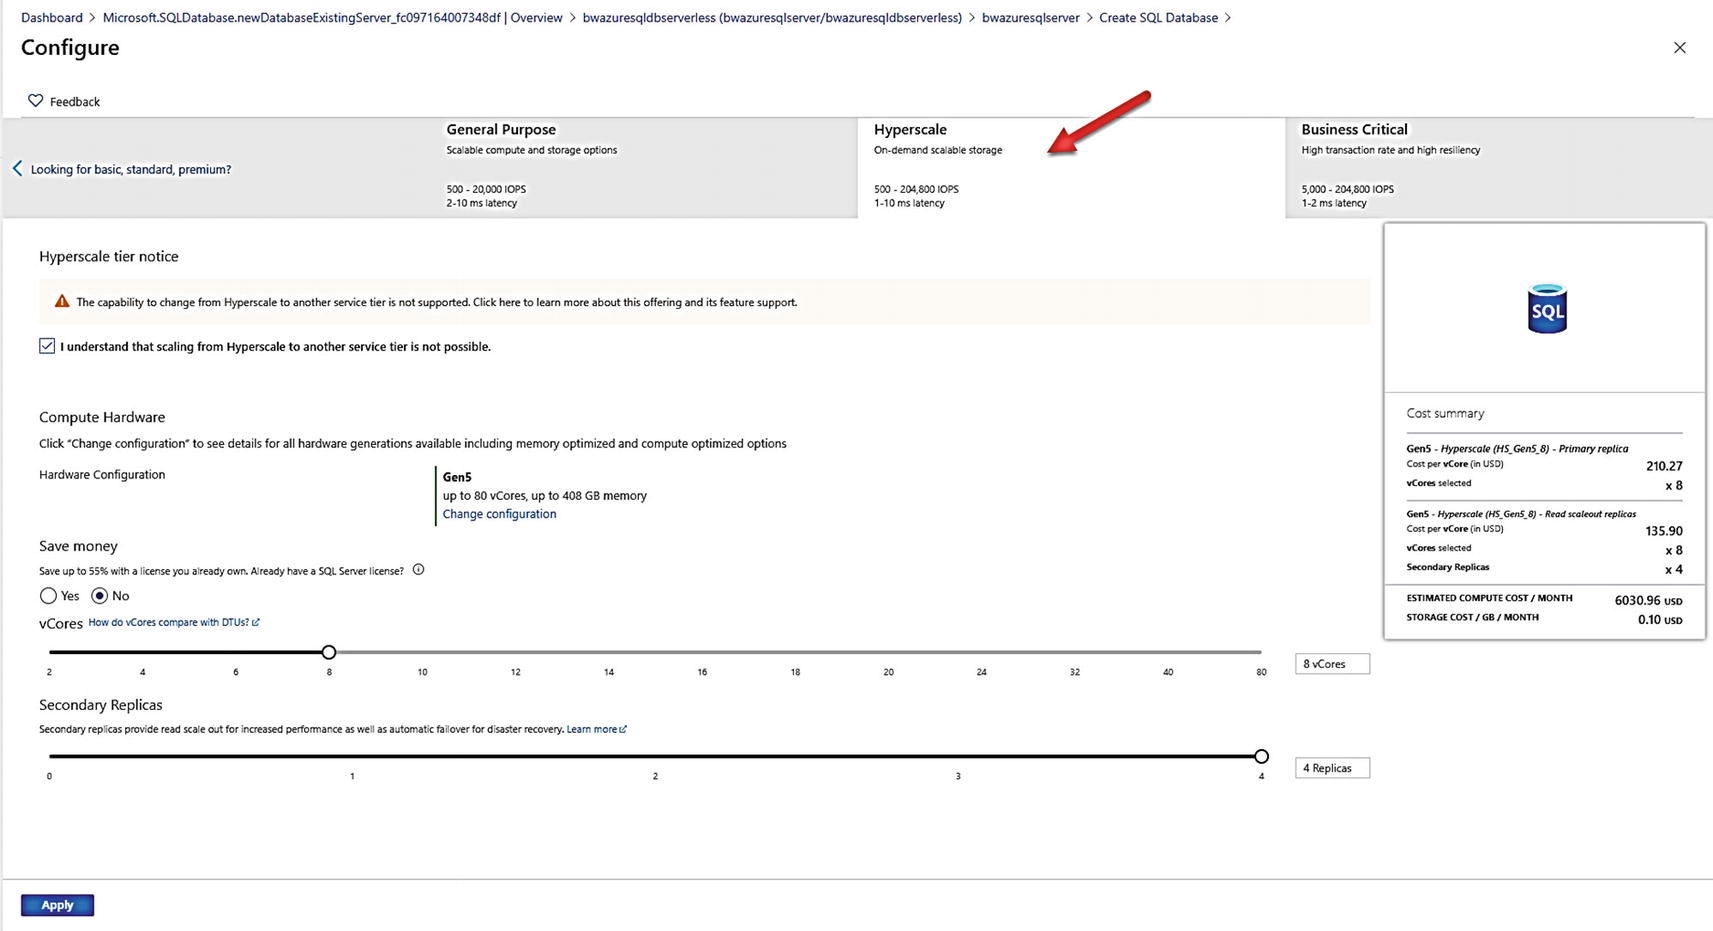
Hyperscale deployment options
The first thing you may notice about this screen is that you must select the option that you understand that by choosing Hyperscale you cannot change the service tier (to General Purpose or Business Critical) once you deploy.
The slider for vCores looks just like General Purpose and Business Critical. But notice there is no Data max size. Hyperscale is theoretically limitless (although today we limit you to a 100TB database but a large transaction log). When you deploy a Hyperscale database, we create an initial size of ~40Gb and then just grow as you need space.
Hyperscale offers a unique choice for number of replicas. You will learn in Chapter 8 of this book about how Hyperscale provides unique availability. Allowing you to specify up to four replicas which can be used for read scale is one of them.
I will choose 8 vCores and four Secondary Replicas. Click Apply, put in a database name (I will use bwazuresqldbhyper), and click Review + create. I will click Create to start the deployment.

Available databases from an Azure logical server
Notice that my Serverless database is already paused because quite frankly I had paused for an hour before I deployed the Hyperscale database. Before we try to connect to these databases, let us explore more how to deploy with CLI tools and some implementation details of Azure SQL Database.
Deploying with a CLI
An Azure SQL Database can be deployed with command-line interfaces (CLI) through the az sql db (https://docs.microsoft.com/en-us/cli/azure/sql/db?view=azure-cli-latest) command interfaces or through New-AzSQLDatabase PowerShell cmdlet (https://docs.microsoft.com/en-us/powershell/module/az.sql/New-AzSqlDatabase).
Unlike Managed Instance, it is easier to use the az CLI for Azure SQL Database without an Azure template because I only have to create the logical server and then I can create the database (I don’t have to create a virtual network and all the components first).
The only option that cannot be done with the az CLI for database that I could in the portal is to set Allow Azure services to Yes and set the current Client IP address for a firewall rule. You can easily configure this after the deployment or use an Azure template.
PowerShell does give you all the options you need to deploy as with the portal. There is a good tutorial on using PowerShell at https://docs.microsoft.com/en-us/azure/azure-sql/database/scripts/create-and-configure-database-powershell?toc=/powershell/module/toc.json.
An Azure template is still a great idea to use and in fact is the best option to automate deployment of many databases. Read about how to use Azure templates and Azure SQL Database at https://docs.microsoft.com/en-us/azure/azure-sql/database/single-database-create-arm-template-quickstart.
Implementation Details
These implementation details may change over time as we change and improve the service. I offer up some of these details so you can understand how we build, manage, and run the service.
In Chapter 1 of this book, I covered the incredible history of how we have built an architecture to power millions of databases for Azure SQL Database. Let me give you a few more details about how we implement Azure SQL Database behind the scenes.
As I interviewed many people in the Microsoft engineering team behind the scenes about Azure SQL Database even as I write this chapter, we are looking into how to make our implementation more efficient. Therefore, it is possible even some of these details could be a bit outdated by the time you read this chapter. That is the speed of the cloud and an author’s nightmare!
Dedicated Rings and Instances
Unlike Managed Instance, we pre-deploy rings dedicated to hosting Azure SQL Databases. With only a few exceptions, each database is hosted by a dedicated SQL Server instance (exceptions being “subcore” DTU options and elastic pools). This allows us to provide better isolation for a customer and keep the “just worry about the database” model while opening some instance-level surface area (e.g., DMVs and columnstore indexes). We may provision these instances on the same VM or node, but those details are abstracted from you, provided we keep to our SLA agreement and objectives for performance.
All the rings and instances are powered and managed using Azure Service Fabric . This is the same service fabric software that you can build your own microservices. The Azure Service Fabric architecture is well documented at https://docs.microsoft.com/en-us/azure/service-fabric/service-fabric-architecture.
The Logical Server
As I stated earlier in this chapter, a database or logical server is just a metadata concept. We provide an interface to a server and a master database. But, when you query various aspects of the master database, we may be pulling data from other stores or files within the service to show you the information. There is a good description of why you need a logical server for even one database at https://docs.microsoft.com/en-us/azure/azure-sql/database/logical-servers.
Storage, Compute, and Gateways
You will see in Chapter 8 for Availability more details on the architecture behind the scenes on how we implement High Availability (HA) for General Purpose, Business Critical, and Hyperscale service tiers. We achieve certain HA capabilities by either using Azure Storage or local storage with technologies like Always On Availability Groups.
In each of these cases, one of the key components for connectivity is a gateway. Gateways are nodes that basically route traffic to nodes hosting SQL Server databases. I mentioned the use of redirect vs. proxy connection types with a Managed Instance earlier in the chapter. The same concept will apply with an Azure SQL Database. Gateways are critical to connectivity in that they provide abstractions to an application for connectivity no matter where the node for the database lives which you will learn more about in Chapter 6 on Security and Chapter 8 on Availability.
Serverless
Serverless compute models involve several interesting technologies we implement within the standard deployment of a SQL Server. Many of these details are described in our documentation at https://docs.microsoft.com/en-us/azure/azure-sql/database/serverless-tier-overview.
Since storage and compute are separated for a Serverless deployment, pausing a database is not that difficult since no application is connected. We just need to keep around enough state information that when a new login is made, we can connect the database to an instance and “warm up” the application.
Autoscaling is more interesting. We need to scale up or down the database CPU resources without application disruption. And if we can scale on a node that can meet the new scaling demand, there is no disruption. However, if we cannot meet that demand, we may need to use an Azure Load Balance to keep the application connected if possible until a new node is found to meet demand, but there can be a disconnection when the new node is brought up.
Memory management is also different in that we must deploy memory policies to reclaim memory for the SQL Server instance when CPU or cache utilization is low. Think of this concept as though we are signaling SQL Server there is external memory pressure and lowering the target for memory. Autoscaling and Memory Management for Serverless is described more at https://docs.microsoft.com/en-us/azure/azure-sql/database/serverless-tier-overview#autoscaling.
Hyperscale
Hyperscale is a unique implementation for a database within the same architecture of databases (dedicated rings and nodes) implemented much differently than General Purpose or Business Critical service tiers.

The Hyperscale architecture
Separate of compute and storage
Just like General Purpose, we store database files on Azure storage. But notice here we use Azure Standard Storage. Speed to access the database files is not as important because of the caching system.
The caching system
We use a combination of page servers (actual nodes that host database pages) and buffer pool caches (think SSD drives that extend the buffer pool) on page servers and compute nodes.
Log Service
For Hyperscale, any logged changes are still in a log cache on the primary compute node. However, when log changes must be flushed to disk (a commit), these I/O requests are redirected to another node where a component called the Log Service runs (this is also called Xlog). The Log Service is responsible for ensuring changes are stored locally (called the Landing Zone) and are refreshed to the caching system, secondary replicas, and eventually to Azure storage.
Decoupled Replicas
In a way Hyperscale provides you the best of both the General Purpose and Business Critical tiers. The actual database and transaction log files are stored in Azure Storage (which has its own redundancy), but we also have replicas for extremely fast high availability.
However, the secondary replica system does not use Always On Availability Groups. In fact, the primary and secondary replicas are not aware of each other. Secondary replicas use a log change methodology but are fed changes from the Log Service. Commits on the primary replica can proceed once the Log Service has hardened the changes not sending to a replica.
High availability is even allowed with no secondary replicas. How? If the primary node has an issue, we can deploy a new primary replica on a new node and use page servers or even the database files on Azure Storage because it is decoupled. Having said this, RTO is much faster with the presence of secondary replicas. The secondary replica system (because you can have four of these) provides the best read-scale option for Azure SQL Database.
Hyperfast Backup and Restore
Because most of the data access comes from the caching system, reading database pages from the database files is rare with a warm system. This allows us to use snapshot backups for database files. Snapshot backups are extremely fast since we just copy the files to another storage location. And the other amazing story is Restore. Restoring a database snapshot is crazy fast!
My colleague Kevin Farlee has an excellent video describing the Hyperscale architecture including the great story of restore at https://youtu.be/Z9AFnKI7sfI.
Resource Governance
To meet the SLA requirements for Azure SQL Database, we must put some resource limits on the usage of the database. I have described some of these limits in this chapter. Behind the scenes, we use these technologies to enforce these limits:
SQL Server Resource Governor
Azure SQL Managed Instance allows for user-defined workload groups and pools. Azure SQL Database uses Resource Governor behind the scenes to enforce certain limits. Moving to a dedicated SQL Server instance was a key driver in allowing us to use Resource Governor.
Engine enhancements
The engine has been enhanced in Azure to detect the generation of a certain size and rate of transaction log records and govern the application if necessary. The primary signal this governance is happening is seeing a wait type of LOG_RATE_GOVERNOR. You can read more about log rate governance at https://docs.microsoft.com/en-us/azure/azure-sql/database/resource-limits-logical-server#transaction-log-rate-governance.
Windows Job Objects
I have mentioned this technology before in this chapter. Windows Job Objects allow us to control resource usage on the SQL Server engine process to ensure we properly enforce resource limits like memory.
File Source Resource Manager (FSRM)
FSRM provides a mechanism so we can properly enforce storage maximum sizes outside of what we control through SQL Server file size limits.
We have created a great blog post talking about how we enforce resource limits using these technologies and why we use them at https://azure.microsoft.com/en-us/blog/resource-governance-in-azure-sql-database/.
Connecting and Verifying Deployment
Once you deploy an Azure SQL Databases, you are likely going to want to quickly connect and verify aspects of the deployment.
Connecting to Azure SQL Database
Earlier in this chapter, I deployed my logical server and Azure SQL Database allowing public endpoint access with options to access through Azure services and with a firewall rule for the client IP address where I deployed through the portal. I will show you how to connect using both techniques.
Because I used the option Allow Azure services and resources to access this server when I deployed the logical server for the database, I can use an Azure Virtual Machine or even sqlcmd from the Azure Cloud Shell to connect to this server and database.
To connect with Azure Cloud shell, you need to find the name of the logical server for the deployment. There are many ways to do this through the portal. You can simply look at your resource groups or resources from the home of the portal and find the server bwazuresqlserver (or your name).
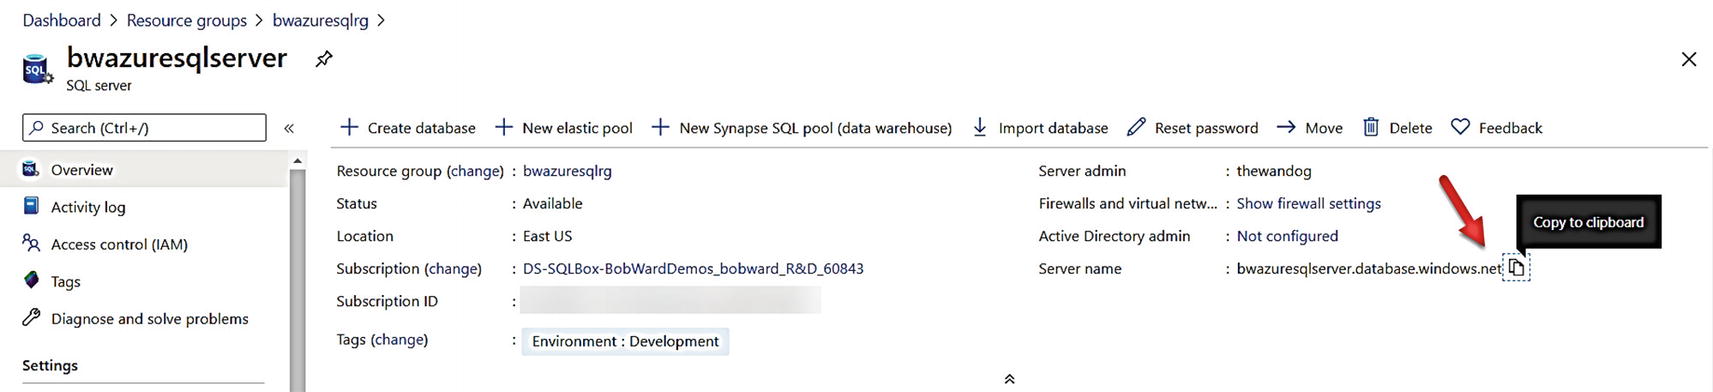
Find the Server name to connect
Notice I clicked next to the server name to copy the Fully Qualified Domain Name (FQDN) to the clipboard. You will find the FQDN is a combination of the logical server name and .database.windows.net.
Azure SQL Database also supports the concept of a DNS alias which you can read about at https://docs.microsoft.com/en-us/azure/azure-sql/database/dns-alias-overview.
I can now bring up the Azure Cloud Shell (you can use the home page of the portal, but I like to use https://shell.azure.com).

Using sqlcmd from the Azure Cloud Shell
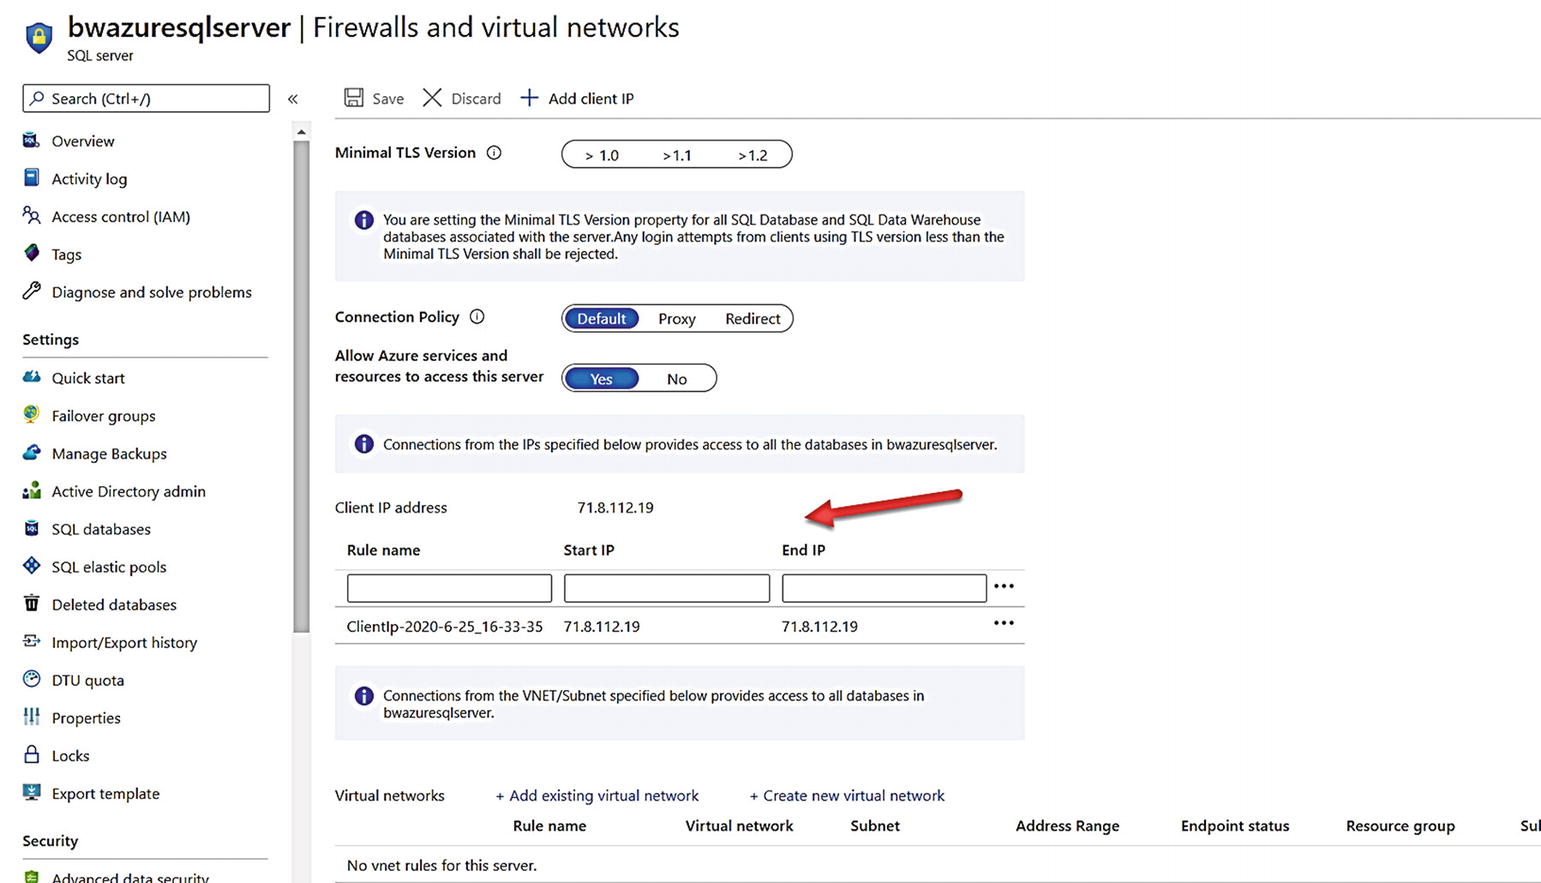
Configure firewall rules for Azure SQL Database
A firewall rule is very much like a firewall rule you would configure in Windows Server or Linux. If you have used SQL Server before you know that by default, we do not open the firewall rules in the OS for port 1433 by default. The firewall rule earlier is opening access to the gateway for this logical server for this specific IP address. Firewall rules can be specified at the logical server or database level. You can read more about firewall rules for Azure SQL Database at https://docs.microsoft.com/en-us/azure/azure-sql/database/firewall-configure.
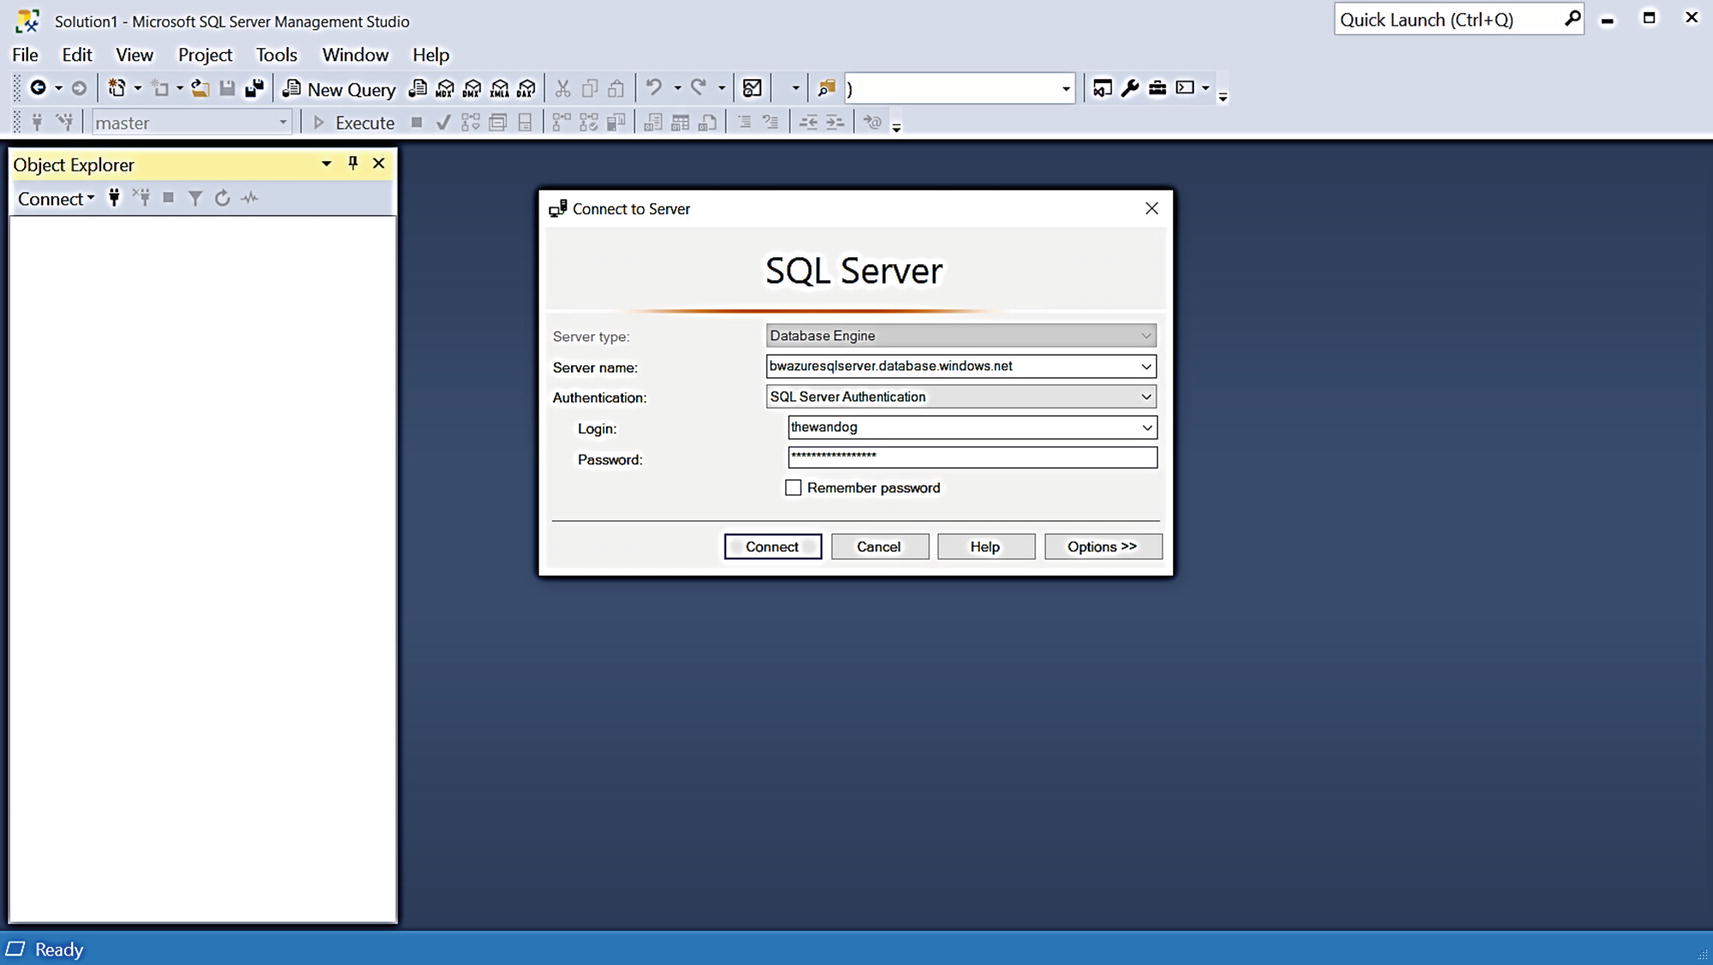
Connecting to Azure SQL Database with SSMS
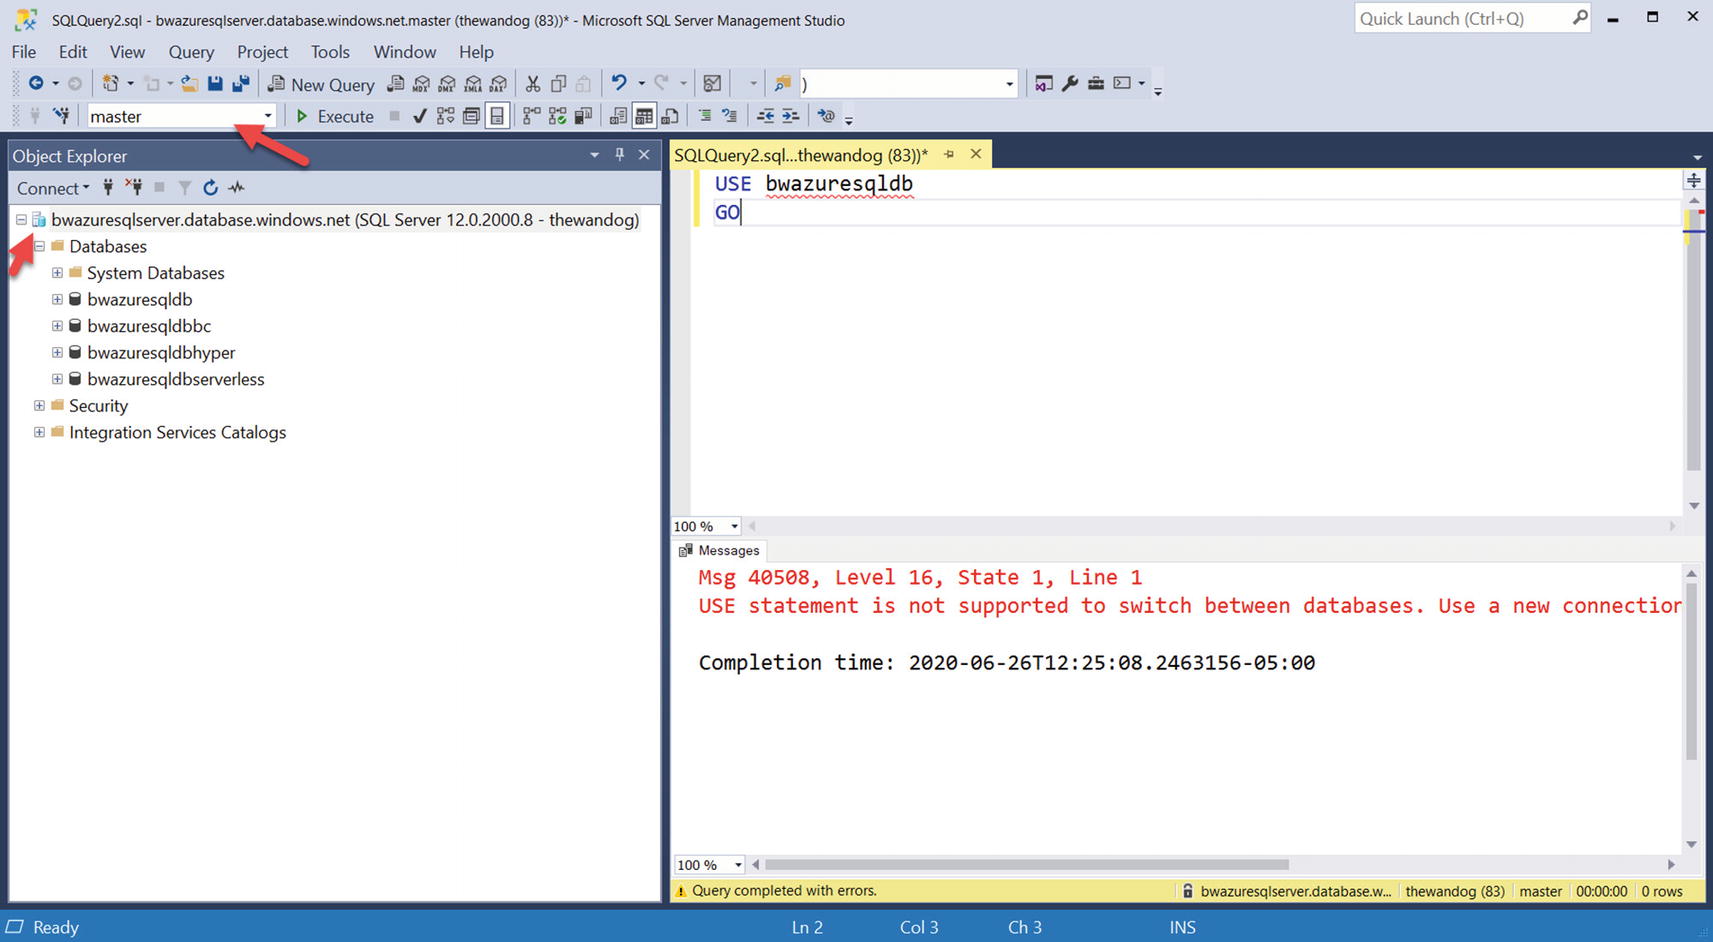
Trying to switch database context for Azure SQL Database
You can first see some differences for Object Explorer (OE) including the color of the icon (Azure blue) for the server name. Notice also there are not as many choices in OE as there are with SQL Server or Managed Instance (because this is not a full SQL Server instance).
When I connected with SSMS specifying no options, I was put in the context of the logical master for the logical server. I tried to change database context with the familiar T-SQL USE statement, but if fails. Why?
If you think about T-SQL USE on a SQL Server, the engine switches context to a database stored on the instance. For an Azure SQL Database logical server, the databases are on separate SQL Server instances that can be spread across various rings in the Azure region. The USE statement is not built to redirect connections to different server.
Therefore, for SSMS, you can either specify the database to connect to before you hit the Connect button (use the Options button) or switch database context using the drop-down box (which does change the connection context).
In Chapter 5 of the book, I will show you how to configure the connection type for the Azure SQL Database to use redirect instead of proxy. In Chapter 6 of the book, I will show you how to make the connection to the database more secure.
Verifying Deployment
While you can use the Activity Log to verify the deployment of the database, there is no method to see the ERRORLOG behind the SQL Server instance. Therefore, you can use several T-SQL queries to examine the deployment:
Even though there are some queries that make sense to run in the context of the logical master, I ran these queries in the context of my database bwazuresqldb.
Just like with a Managed Instance, I can use this to look at CPU and memory information for the database deployment. Keep in mind though that true limits must be observed with other DMVs as described as follows:
I used sys.dm_os_process_memory with Managed Instance, but that is not supported with Azure SQL Database.
This is one of the most common DMVs in the world to check the state of what is running on a SQL Server. I run this just to make sure all the normal background processes are running, including LAZ WRITER, RECOVERY WRITER, LOCK MONITOR, and so on.
Per the documentation at https://docs.microsoft.com/en-us/sql/t-sql/functions/serverproperty-transact-sql, the value of 5 is a SQL Database.
This is a DMV specific to Azure (although I tested it and it works for a SQL Server, but you can’t rely on the results there because it is not applicable) that shows resource limits Azure applies to the Database using Windows Job Objects. The specific column I look at is memory_limit_mb which shows me the true amount of memory the database has access to. I talked about Windows Job Objects in the section “Implementation Details.”
I do not recommend you rely on any results of running these queries in the context of the logical master. Even though you might see results, they do not mean anything since the logical master is not a true physical master database. There are a few queries that make sense to run in the logical master which you will see later in the book.
Migrating to Azure SQL Database
Migrating to Azure SQL Database involves the same process as with a Managed Instance of assessment and planning, migration, application changes, and post migration.
Azure SQL Database has more restrictions on features, so you may find your assessment is going to find more problems you need to take care before migrating. An example is a feature like Service Broker which is supported in Managed Instance but not in Azure SQL Database.
Let me give you a simple example. When I first tried to migrate the example WideWorldImporters (https://github.com/Microsoft/sql-server-samples/releases/tag/wide-world-importers-v1.0) to Azure SQL Database, I ran into a bunch of problems because certain features used in the sample didn’t work in Azure SQL Database. Therefore, I needed to use the Standard WideWorldImporters found at https://github.com/Microsoft/sql-server-samples/releases/download/wide-world-importers-v1.0/WideWorldImporters-Standard.bacpac.
Migrating to Azure SQL Database involves migrating your schema (all your definitions) first and then the data. You can use DMS and DMA to do this. Read more about how to do this at https://docs.microsoft.com/en-us/azure/dms/tutorial-sql-server-to-azure-sql. Like Managed Instance, consider using a database compatibility level that matches your current SQL Server installation and then move later to the latest compat level. Learn more about dbcompat at https://aka.ms/dbcompat.
You can also load your data into Azure SQL Database using SSIS packages, Azure Data Factor, bcp, or a BACPAC file. Remember that minimal logging for bulk import is not supported in Azure SQL Database.
Even though the Microsoft Mechanics video I did on migration focuses demonstrations more on Azure Managed Instance, it is still worth watching for tips on migration to Azure SQL Database. Watch the video at https://youtu.be/P_4EaqVR5PI. One of the aspects of using DMA I love is the SKU recommendation PowerShell script. This script analyzes your current SQL Server workload to guide you on Azure SQL Database deployment choices. Read more at https://docs.microsoft.com/en-us/sql/dma/dma-sku-recommend-sql-db?view=sql-server-ver15.
Like Managed Instance, the application needs to change the connection string and possibly authentication method. Depending on what T-SQL features and language constructs are used, further application changes may be needed. The DMA tool does a good job of finding these based on database compatibility. To be more thorough, please look over this documentation for T-SQL differences at https://docs.microsoft.com/en-us/azure/azure-sql/database/transact-sql-tsql-differences-sql-server.
Use the rest of the chapters in the book to guide you on any post-migration changes you need to make to fully take advantage of security, performance, and availability in Azure.
Summary
In this chapter, you learned how to go through a pre-deployment exercise to make the best choices possible to deploy Azure SQL Managed Instance or Database. You learned the details of deployment for both a Managed Instance and Database along with some interesting implementation details.
You learned how to connect and run verification queries against a Managed Instance and Database deployment. You also learn migration techniques and tools to migrate an existing SQL Server to Azure SQL Managed Instance and Database.
Now that you have deployed, learn more in the next chapter about how to make configuration choices and compare these choices to configuring a SQL Server instance or database.