Now that you have deployed and configured your Azure SQL Managed Instance or Database, you will want to ensure you have done all the right things to fully secure your Azure SQL deployment. Azure SQL has all the capabilities that come with SQL Server for security plus more.
My colleague Anna Hoffman asked me why I keep calling security, performance, and availability the meat and potatoes of SQL Server and Azure SQL. I can’t take credit. This phrase comes from my longtime colleague, the famous Conor Cunningham. Conor and I have together presented several demos at the PASS Summit keynote. One time I was thinking of doing some pretty leading edge demos, and Conor stopped me and said, “Bob, that is nice, but our customers expect you and I to showcase the core innovation of the engine. Things like security, performance, and availability. You know, the meat and potatoes of SQL Server.” The phrase has stuck ever since.
For those who don’t know the phrase, it is one we use in Texas to mean something fundamental or core. A basic meal consists of meat and potatoes. Not a problem for me since I love both.
So in this chapter, we will explore all the capabilities and tasks you normally use to secure a SQL Server and compare it with Azure SQL. You will also learn about unique capabilities and methods you will use to secure your Azure SQL Managed Instance and Database deployments.
An Azure subscription.
A minimum of Contributor role access to the Azure subscription. You can read more about Azure built-in roles at https://docs.microsoft.com/en-us/azure/role-based-access-control/built-in-roles.
Access to the Azure Portal (web or Windows application).
A deployment of an Azure SQL Managed Instance and/or an Azure SQL Database as I did in Chapter 4.
To connect to Managed Instance, you will need a jumpbox or virtual machine in Azure to connect. I showed you how to do this in Chapter 4 of the book. One simple way to do this is to create a new Azure Virtual Machine and deploy it to the same virtual network as the Managed Instance (you will use a different subnet than the Managed Instance).
To connect to Azure SQL Database, you can use your on-premises client using firewall rules, but this chapter also shows you how to connect using a private endpoint in a virtual network, so you will need an Azure Virtual Machine. For my example, I will use the virtual machine I created in Chapter 3 of the book, called bwsql2019.
Installation of the az CLI (see https://docs.microsoft.com/en-us/cli/azure/install-azure-cli?view=azure-cli-latest for more details). You can also use the Azure Cloud Shell instead since az is already installed. You can read more about the Azure Cloud Shell at https://azure.microsoft.com/en-us/features/cloud-shell/.
You will run some T-SQL in this chapter, so install a tool like SQL Server Management Studio (SSMS) at https://docs.microsoft.com/en-us/sql/ssms/download-sql-server-management-studio-ssms?view=sql-server-ver15. You can also use Azure Data Studio at https://docs.microsoft.com/en-us/sql/azure-data-studio/download-azure-data-studio?view=sql-server-ver15. I installed both SSMS and ADS in the bwsql2019 Azure Virtual Machine.
Security Capabilities and Tasks
As I studied Azure SQL and compared this to my own knowledge of SQL Server security, I found out that Azure SQL Managed Instance and Azure SQL Database have just about all the capabilities for security as SQL Server. And the tasks you use to secure an Azure SQL deployment will feel a lot like SQL Server.
Before we dig into some of the details, let’s review a few of these important capabilities and tasks.
Security Capabilities
This list doesn’t represent all the capabilities because as I’ve mentioned already that many fundamental security capabilities in SQL Server are available in Azure SQL. However, it is worth mentioning a few capabilities to ensure you know what is possible. We will dive into more details and see examples later in the chapter.
Active Directory Authentication
You have seen in this book during deployment that you provide an admin SQL Server login and password for authentication. With SQL Server, you are used to using Windows Authentication, also known as Integrated Security, using protocols like Kerberos for a more secure solution.
Since the platform for Azure SQL is abstracted, you don’t have access to set up domain authentication services and Kerberos with Windows Server. SQL Server on Linux provides Kerberos authentication using Active Directory, but that technique still uses a domain-joined system with a Window Server.
Azure Active Directory (AAD) to the rescue! AAD provides domain services and Kerberos authentication for Azure services like Azure SQL. You will see later in this chapter how to set up an AAD admin for Azure SQL and add logins and users based on AAD.
Azure RBAC and Locks
Azure Role-Based Access Control (RBAC) provides an authorization system for Azure SQL resources for operations like deployment. You will learn more about Azure RBAC and Azure SQL in the section later in this chapter “Authentication and Access.”
Auditing
Auditing actions and operations against SQL Server has been available through the SQL Server Audit capability for several releases. Azure SQL provides SQL Server Audit capabilities and goes further using technologies like Log Analytics. You will learn in this chapter how to configure and use audits.
Data Encryption
SQL Server provides various methods to encrypt data and connections, including TLS, column level encryption, Transparent Data Encryption (TDE), and Always Encrypted. Azure SQL supports all these encryption methods and techniques which use services like Azure Key Vault for maximum control of keys. Azure SQL enables TDE by default for newly created databases.
Dynamic Data Masking
Dynamic Data Masking can protect the view of sensitive data to granted users shifting the logic to the database from the application. Dynamic Data Masking is supported with Azure SQL through the same T-SQL statements as SQL Server but also provides visual aids through the Azure portal.
Advanced Data Security
Azure SQL provides new capabilities to help you classify, analyze, and protect your data assets through Data Classification, Vulnerability Assessments, and Advanced Threat Protection. This suite of services is known as Advanced Data Security. Some of this functionality exists in SQL Server, but Azure SQL provides even more capabilities and visual aids through the Azure portal.
Security Tasks
The tasks to secure Azure SQL are very similar to SQL Server, but some of these tasks require specific work to integrate with the Azure infrastructure. You will learn how to use the security capabilities of Azure SQL on how to accomplish these tasks in this chapter.
Set Up and Configure Network Security
With SQL Server, you sometimes must deal with OS firewalls, but generally, your assets are protected within your data center. For Azure, you need to consider how to secure your network connectivity either with firewall or virtual networks.
Set Up and Configure Authentication and Authorization
For SQL Server, you are used to establishing logins and users for certain roles and then granting access to databases and objects. For Azure SQL, this process will be very familiar with some differences for Azure SQL Database.
Set Up and Configure Data Protection
You want your data protected, so you will learn in this chapter how to set up encryption for connections and data. You will also learn how to configure and use Dynamic Data Masking.
Monitor Security
Auditing can be a key aspect to ensuring your deployment is protected. You will learn in this chapter how to configure and monitor audits for access to your Azure SQL assets.
Go Bigger with Advanced Data Security
You will learn in this chapter how to take advantage of Data Classification, Vulnerability Assessments, and Advanced Threat Protection.
Network Security
Most administrators who install SQL Server use a private network within a company infrastructure. Firewalls block incoming traffic within this network. In addition, Operating Systems provide firewalls to protect ports for applications like SQL Server. In fact, if you have installed SQL Server before, you know that by default the firewall for port 1433 is blocked for both Windows and Linux. You generally must take action to add an exception for this port for remote connectivity to SQL Server.
Azure SQL is no different except that you have options to allow connectivity to the SQL Server instance behind the scenes as a public endpoint on the Internet or private within a virtual network.
I will admit to you as you review the information in this section of the chapter that you should absolutely consult networking experts in your organization to configure Azure SQL Managed Instance or Database for the requirements you need.
Azure SQL Managed Instance Network Security
As you saw in Chapter 4 to deploy Azure SQL Managed Instance, a virtual network and private connectivity are baked into the Managed Instance experience (although you can expose a public endpoint).
Since you use a virtual network, you will have choices to connect from a resource in the same virtual network as the Managed Instance (using a different subnet) or to connect with another virtual network that is connected to the Managed Instance Virtual Network.
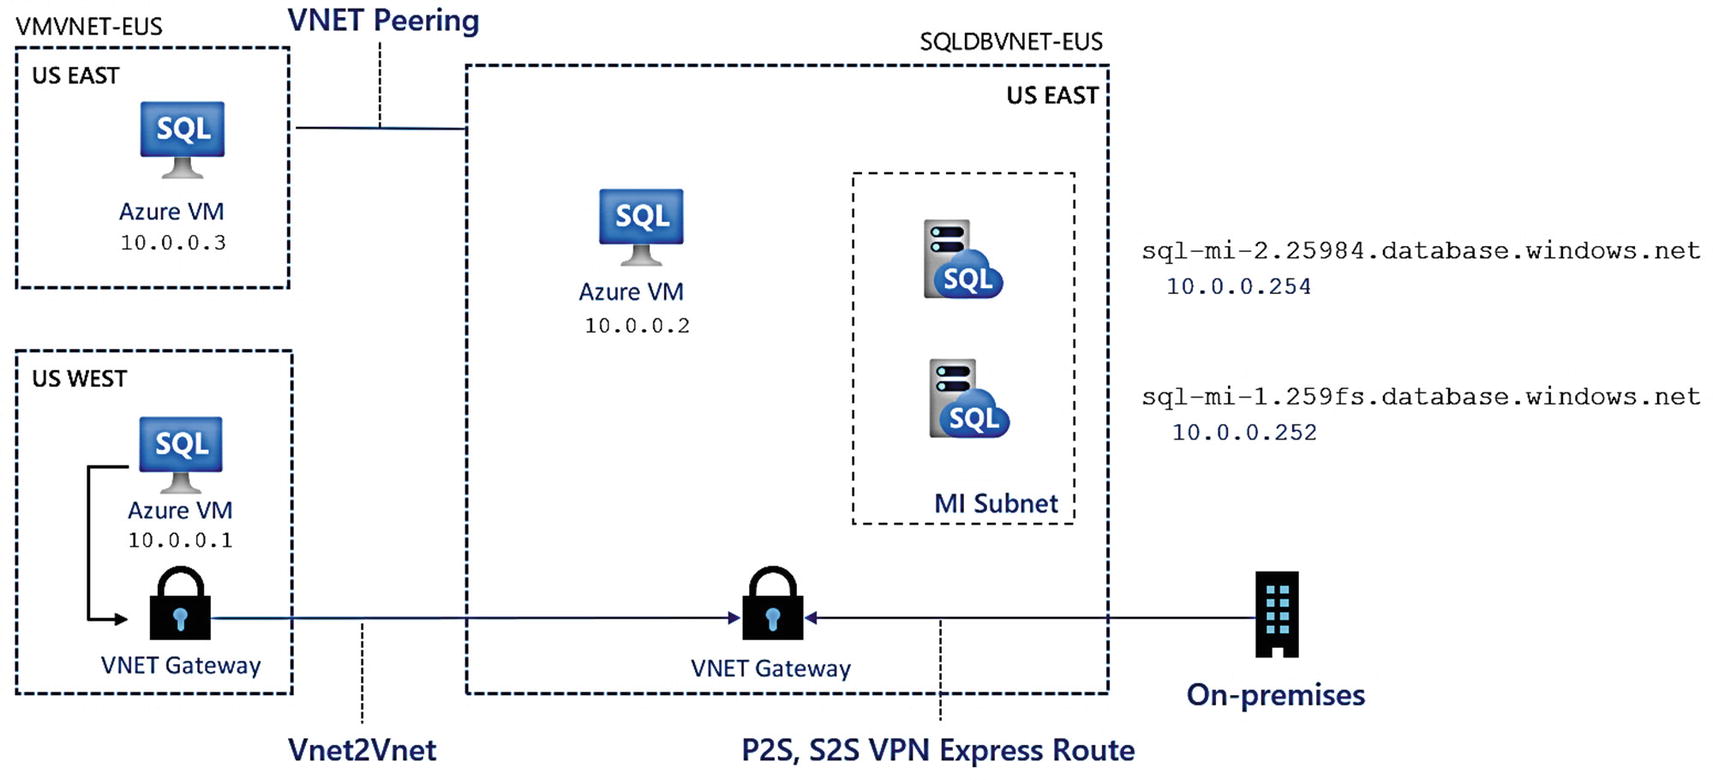
Network security to Azure SQL Managed Instance
Based on this figure, the Azure VM with a Private IP address of 10.0.0.2 is very much like the jumpbox VM I deployed in Chapter 4. Let’s say though that you want to connect to one of these Managed Instances from another virtual network or on-premises.
VNet Peering allows you to connect from a resource in one virtual network that is peered to another. In the preceding figure, the Azure VM with the Private IP address of 10.0.0.3 is an example. Check out this blog post for instructions to connect to a Managed Instance with VNet peering: https://techcommunity.microsoft.com/t5/azure-database-support-blog/connect-to-azure-sql-database-managed-instance-with-virtual/ba-p/369077. You can read more about virtual network peering at https://docs.microsoft.com/en-us/azure/virtual-network/virtual-network-peering-overview. Virtual network peering can occur within a region or across regions.
If you would like to connect to the Managed Instance from on-premises, you will need to use an Azure Virtual Network Gateway . There are several options to connect your on-premises environment with a virtual network gateway: Point-to-Site (P2S), Site-to-Site (S2S), and ExpressRoute. ExpressRoute is by far the fastest (but the most expensive) way to connect with a gateway. You can learn about all of these gateway options at https://docs.microsoft.com/en-us/azure/vpn-gateway/vpn-gateway-about-vpngateways. As I’ve said earlier in this chapter, if networking is not your area of expertise (it is not mine), then I would consult networking engineers in your organization on the best option.
Our documentation also provides an overview of your networking options for a Managed Instance at https://docs.microsoft.com/en-us/azure/azure-sql/managed-instance/connect-application-instance. Here is an important point made in the documentation if you have connectivity issues:
If you’ve established an on-premises to Azure connection successfully and you can’t establish a connection to SQL Managed Instance, check if your firewall has an open outbound connection on SQL port 1433 as well as the 11000–11999 range of ports for redirection.
The documentation also has a tutorial to set a P2S connections from your on-premises network to a Managed Instance at https://docs.microsoft.com/en-us/azure/azure-sql/managed-instance/point-to-site-p2s-configure.
A virtual network gateway can also be used to connect an existing virtual network in Azure instead of using VNet Peering. If you are running inside Azure, VNet Peering is probably your choice because everything is private and network latency is typically faster. However, there may be some reasons why you need a VNet2VNet gateway scenario. Here is a great resource to compare both options: https://azure.microsoft.com/en-us/blog/vnet-peering-and-vpn-gateways/.
It is important to know that besides the SQL Server endpoint (the standard TCP port to connect and run queries), an Azure SQL Managed Instance has a Management endpoint. Since a Managed Instance is deployed in its own virtual cluster, various services outside the cluster but within Azure (such as deployment within Resource Manager) must be able to access the cluster. That access is through the Management endpoint. The Management endpoint is a public endpoint protected by firewalls. This means when you use the portal or CLIs to manage the Manage Instance (e.g., scaling operations), you are connecting to this endpoint. Read more about how the Management endpoint is protected at https://docs.microsoft.com/en-us/azure/azure-sql/managed-instance/connectivity-architecture-overview#management-endpoint.
You can enable a public endpoint for an Azure SQL Managed Instance. If you decide to do this, the endpoint is on port 3342, not 1433. Additionally, you can use Network Security Group (NSG) rules to effectively set up a firewall on the port. Read more at https://docs.microsoft.com/en-us/azure/azure-sql/managed-instance/public-endpoint-configure.
I showed during deployment in Chapter 4 the connection type of Proxy vs. Redirect. Even though the SQL Server endpoint is in a private virtual network, technically a Proxy connection is more secure because all traffic is routed through a Gateway. With a redirect connection, the connection is first made to the Gateway, and then all subsequent traffic goes directly to the Managed Instance node. Redirect can be much faster, and since a private endpoint is being used, I recommend this option. Any use of a public endpoint always uses proxy connection. You can learn more about these policies at https://docs.microsoft.com/en-us/azure/azure-sql/database/connectivity-architecture#connection-policy.
There is no exercise or example here for Managed Instance network security since I already showed you how to connect to Azure SQL Managed Instance with a jumpbox VM in Chapter 4 of the book.
Azure SQL Database Network Security
Network security for Azure SQL Database (any deployment option) is a bit different than Managed Instance because when you deploy a database, we do not have a dedicated private virtual cluster. Rather, all database deployments share virtual clusters (rings) in Azure regions. Remember that when I talk about these network security options, they apply to the logical server for all databases. The only exception to this rule is that you can configure firewall rules specific to a database different than the logical server.
This doesn’t mean you can’t be protected and have a private endpoint to your database deployment as you will see in this section of the chapter.
Using the Public Endpoint
Allow access to Azure services – This option allows any Azure resource (e.g., VM, Application, or Cloud shell) to access the public endpoint for the database deployment.
Firewall rules – This option allows you to create specific firewall rules for client computers outside of Azure. I used this technique in Chapter 4 to connect to the logical server I deployed with my laptop and SQL Server Management Studio (SSMS).
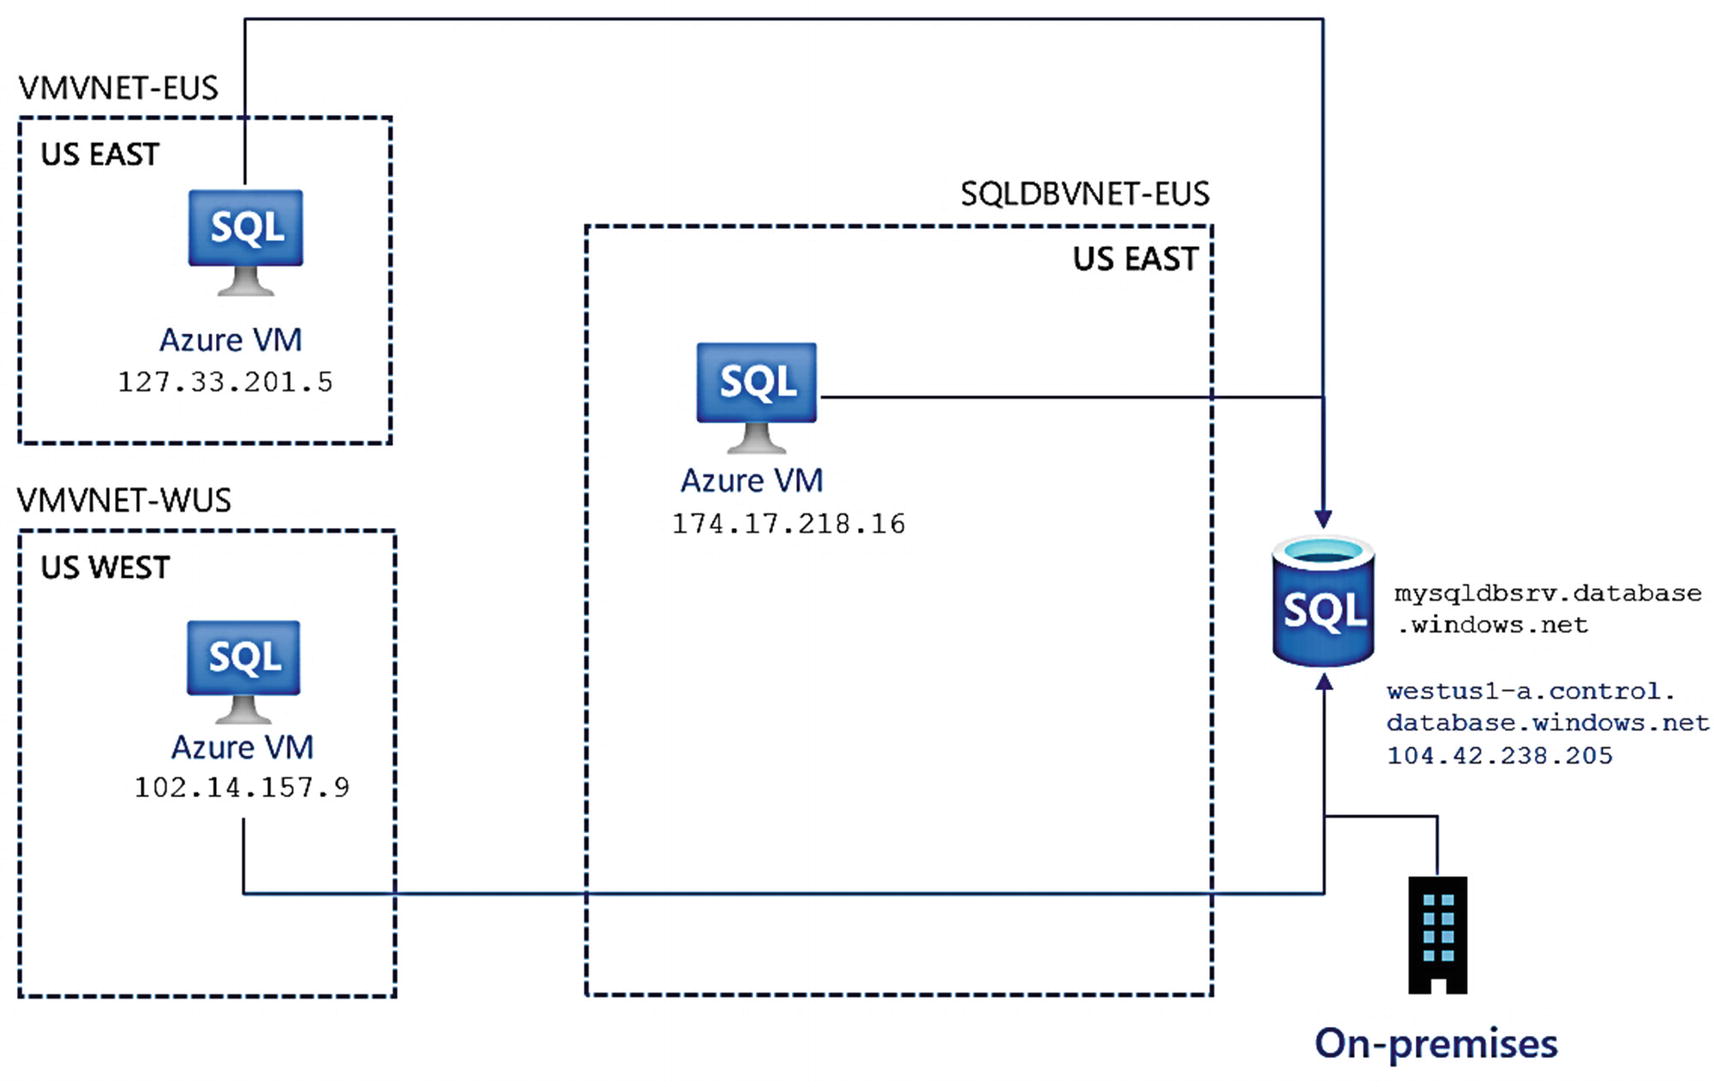
Connecting to a logical server with a public endpoint
You can see in this figure Azure VM resources that are connected through the Allow access to Azure services and on-premises computers connecting through a firewall rule. Notice the IP addresses of the Azure Virtual Machines are using their public IP address because even they are using a public endpoint connection within Azure.
To be clear, you could use Allow access to Azure services and turn OFF all other firewall rules. While this is not a private endpoint scenario, it does prevent any connection unless it comes within Azure to connect to the logical server.
Notice in this figure the name of the logical server is mysqldbsrv.database.windows.net (this is from an example that is not the logical server I used). That is the name of the logical server, but how does the public endpoint get resolved on the Internet? Notice underneath this name in the figure is a public IP address and a network name of westus1-a.control.database.windows.net. This name is part of the DNS name of the node for the gateways when connecting to the logical server.
Since Allow access to Azure services is enabled, let’s use the Azure Virtual Machine I created in Chapter 3, bwsql2019, to examine connectivity properties to the logical server.
This IP address is the Public IP address of the Azure Virtual Machine, bwsql2019. This proves that the VM is connecting to the logical server over a public endpoint. However, the VM has access (without allowing the connection through a firewall) because I used the option Allow access to Azure services.
Another interesting way to look at the public endpoint aspect to Azure SQL Database is to examine the DNS infrastructure of the logical server. You can use the nslookup command to do this (nslookup is available by default on Windows and Linux operating systems. See more at https://docs.microsoft.com/en-us/windows-server/administration/windows-commands/nslookup).
The top result is IP Address 168.63.129.16. It turns out this address is a special virtual IP address used for Azure communications , so within Azure your address will always say this (see more information at https://docs.microsoft.com/en-us/azure/virtual-network/what-is-ip-address-168-63-129-16).
The results at the bottom show the DNS hierarchy of the logical server, which includes a DNS server within the control ring (gateways) of Azure.
There is a third option to secure the connectivity to access the logical server. Let’s say you want to turn off Allow access to Azure services but don’t want to have to use a fixed IP address for a firewall rule. You can use a virtual network service endpoint to allow only specific Azure sources in a virtual network (which could include on-premises connections) to connect to the logical server. This is still a public endpoint connection but strictly limited to resources from a specific Azure Virtual Network. Read more about how to use a virtual network service endpoint at https://docs.microsoft.com/en-us/azure/azure-sql/database/vnet-service-endpoint-rule-overview.
Let’s use different technique to tighten up the security of the network connectivity to the Azure logical server .
Using Private Link
Let’s say you do not want to allow any public endpoint access to your Azure SQL Databases regardless whether connections come from within or outside of Azure. The Azure team has created a concept called private link to allow PaaS services like Azure SQL Database to restrict access only through a private endpoint. You can read an overview about Private Link at https://docs.microsoft.com/en-us/azure/private-link/private-link-overview.
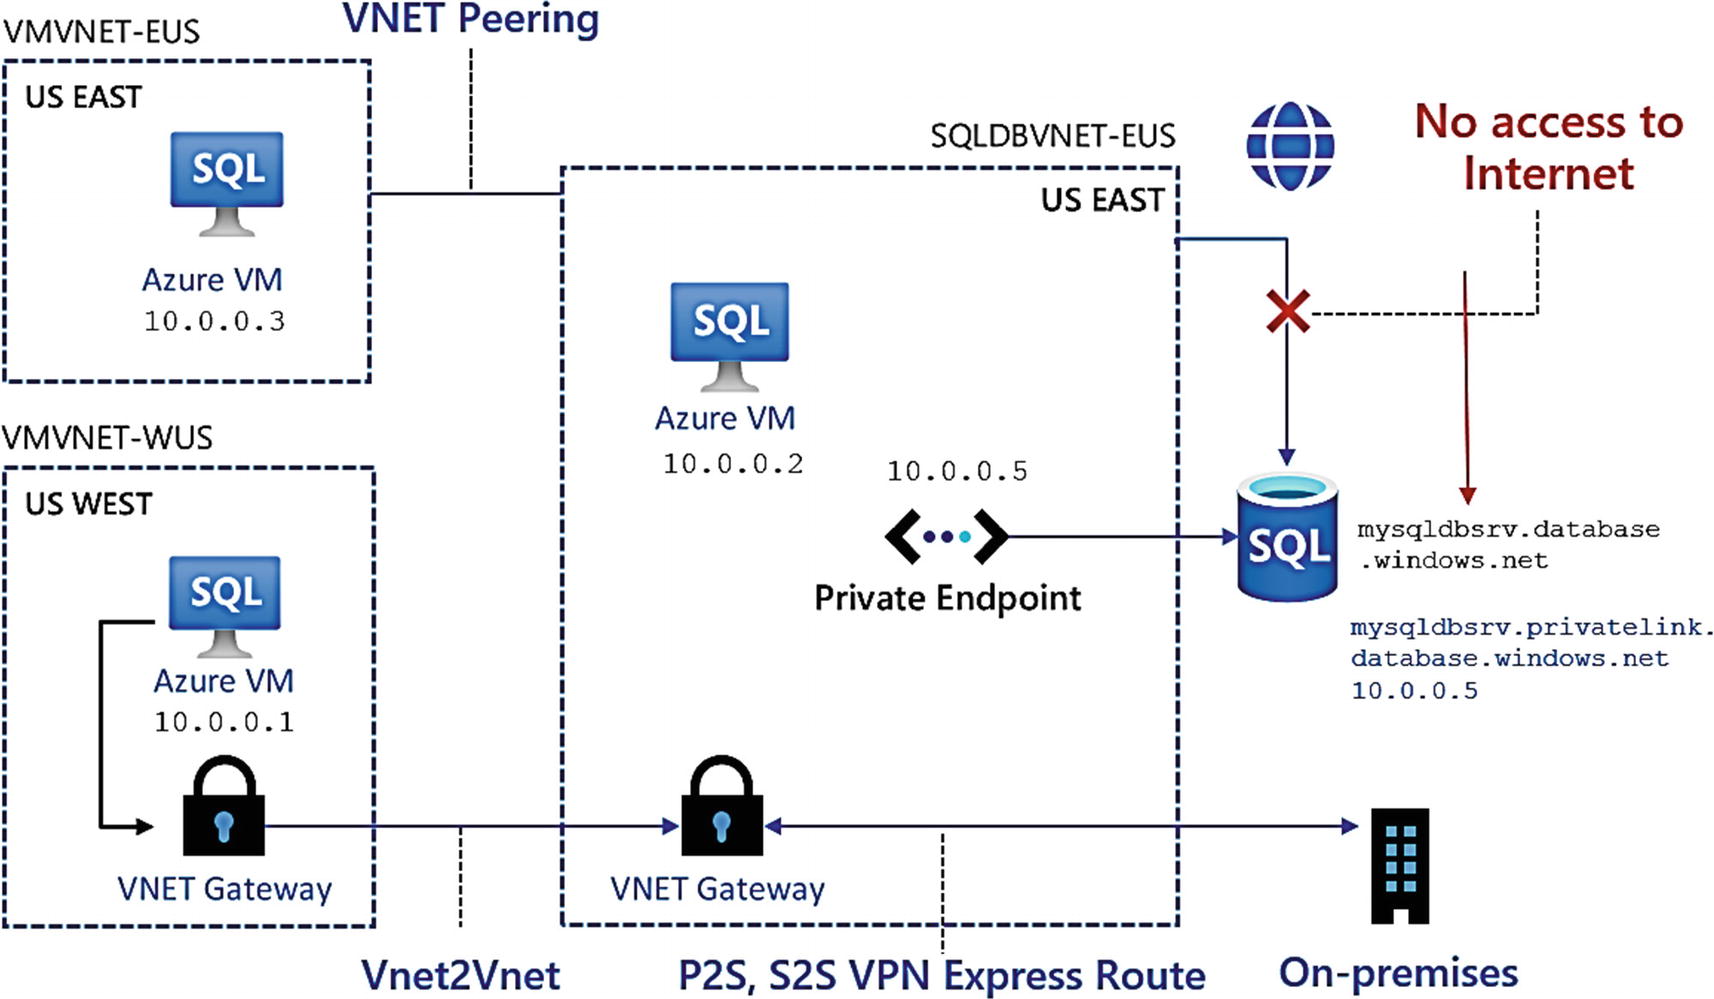
Private link with Azure SQL Database
Private link will expose a private endpoint in an existing Azure virtual network. Notice in this diagram the DNS name for the logical server is no longer in a public DNS hierarchy.
Let’s see how to implement a private link connection using the existing deployment of Azure SQL Database from Chapter 4 and the Azure portal.
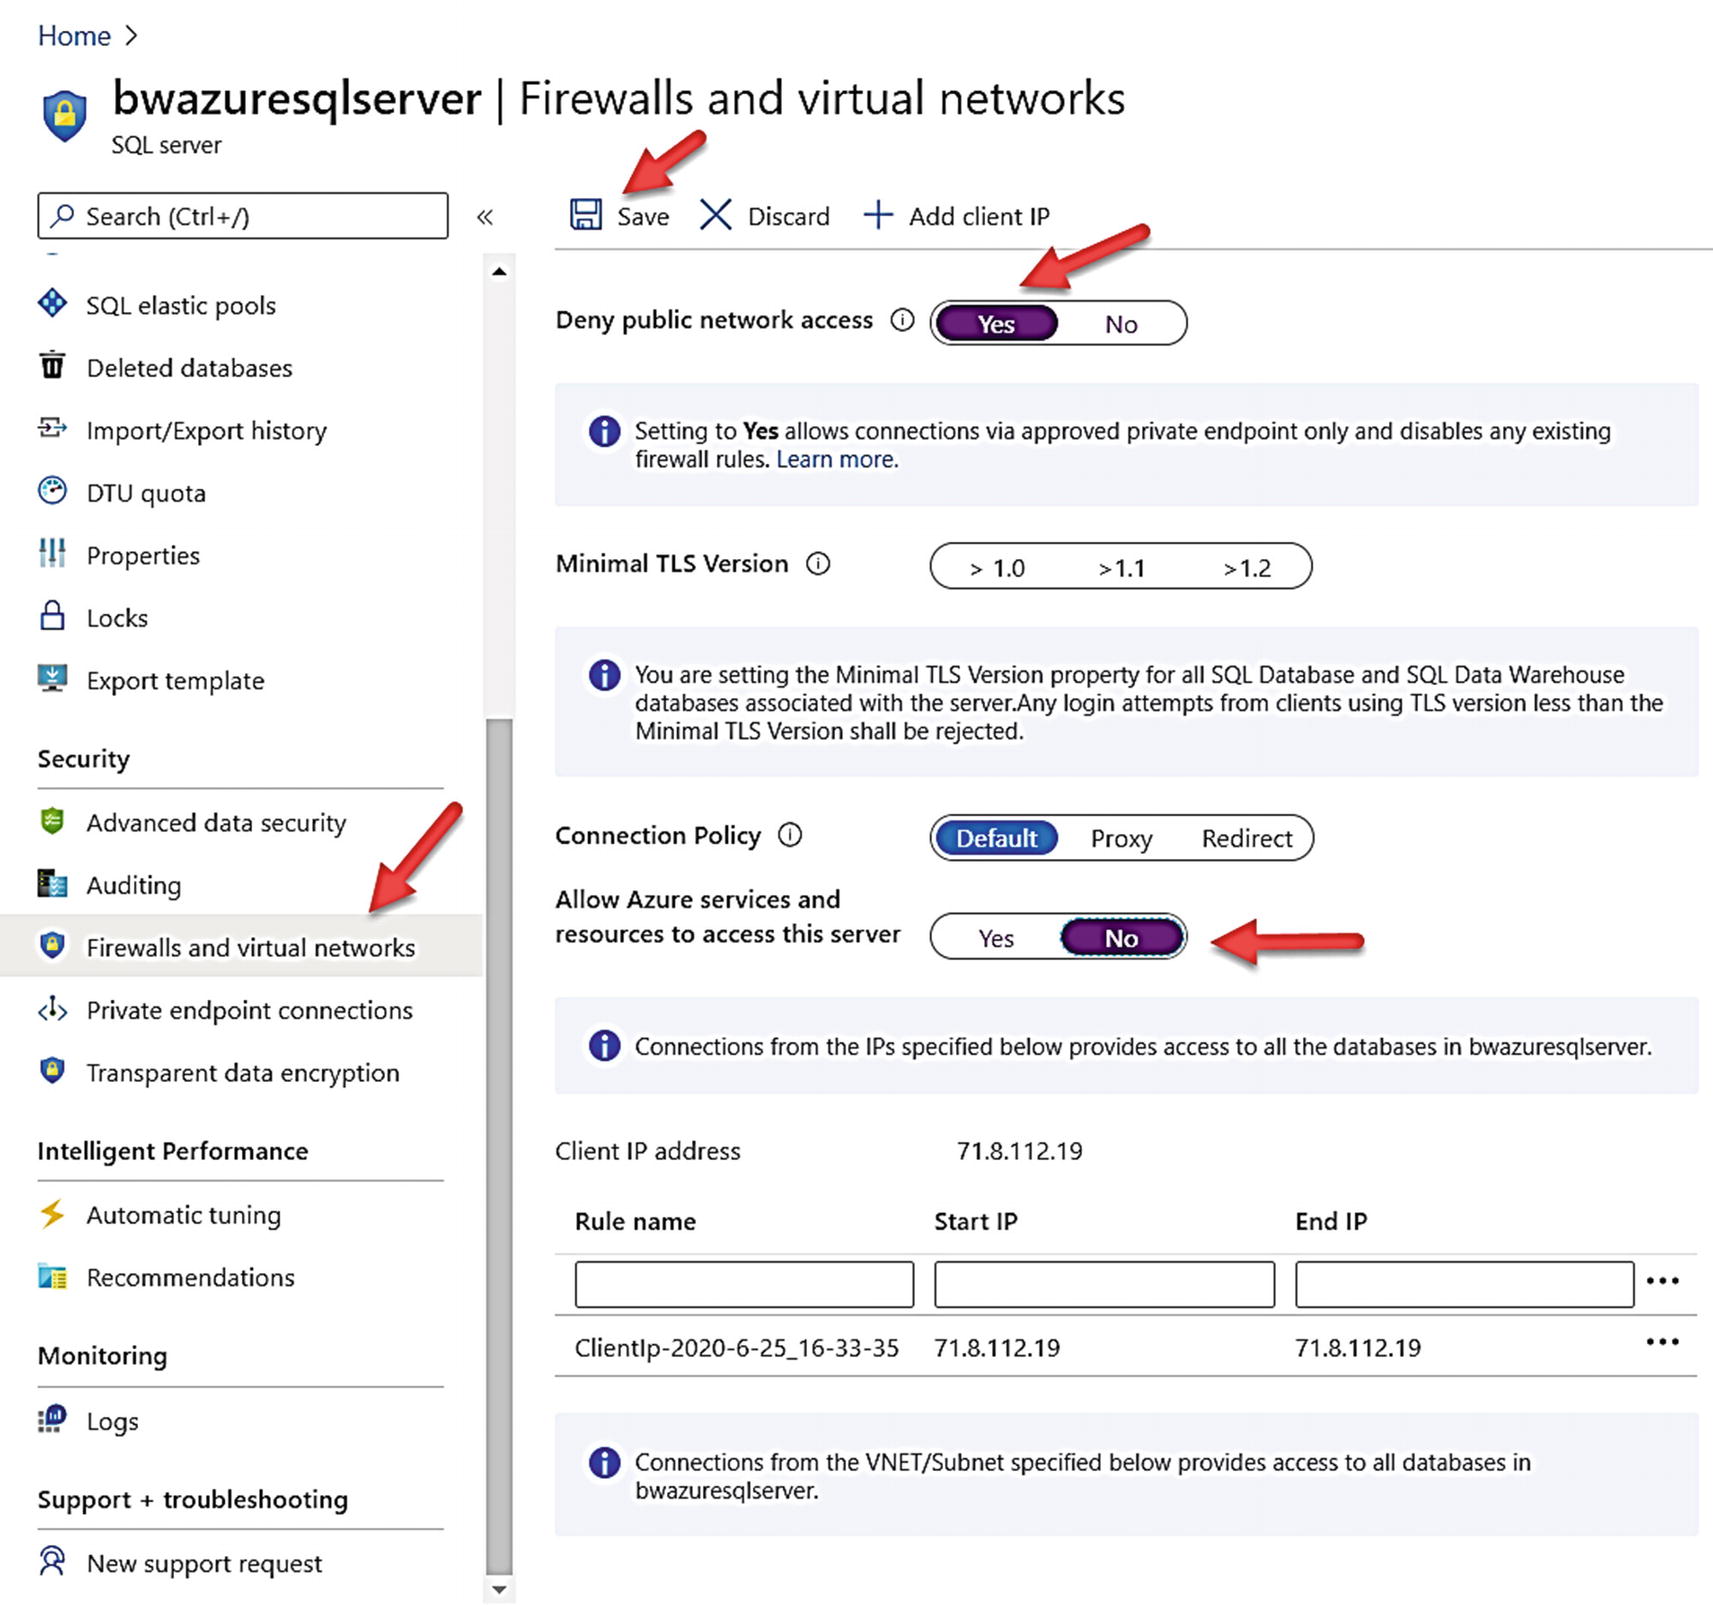
Turning off public endpoint for Azure SQL Database
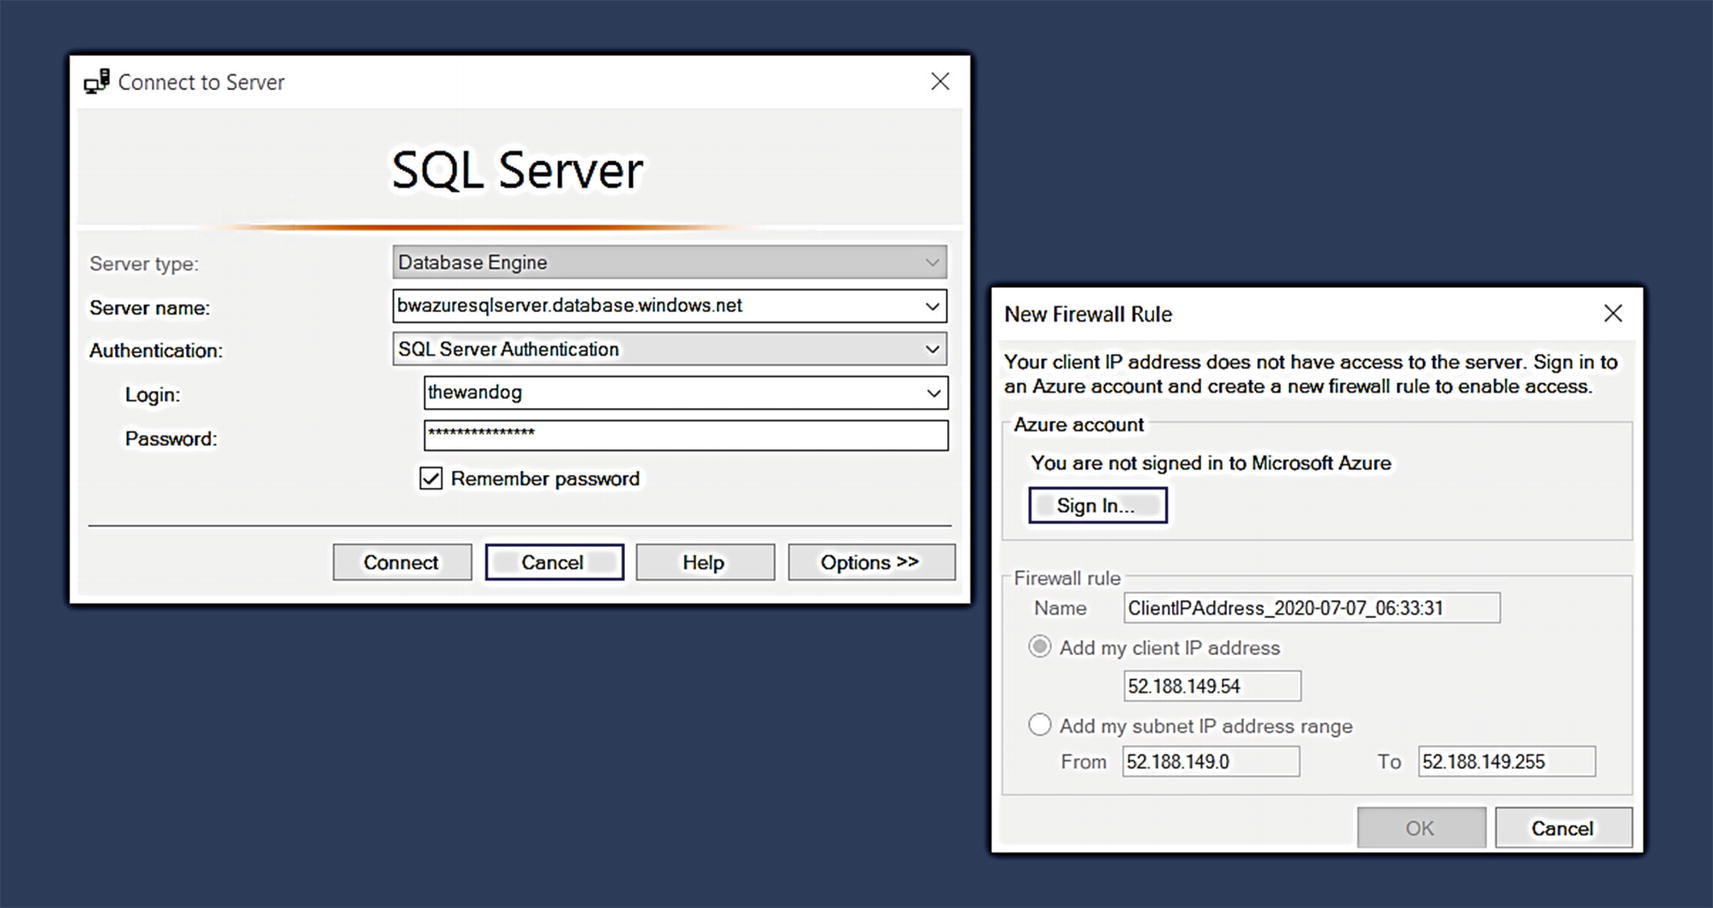
Connection error with no access to Azure SQL Database
This error is a detection that the client has no access but can add a firewall rule to get connected. However, there is another way.
I need to create a private link and associate this with my Azure SQL Database logical server and the virtual network of my Azure Virtual Machine.
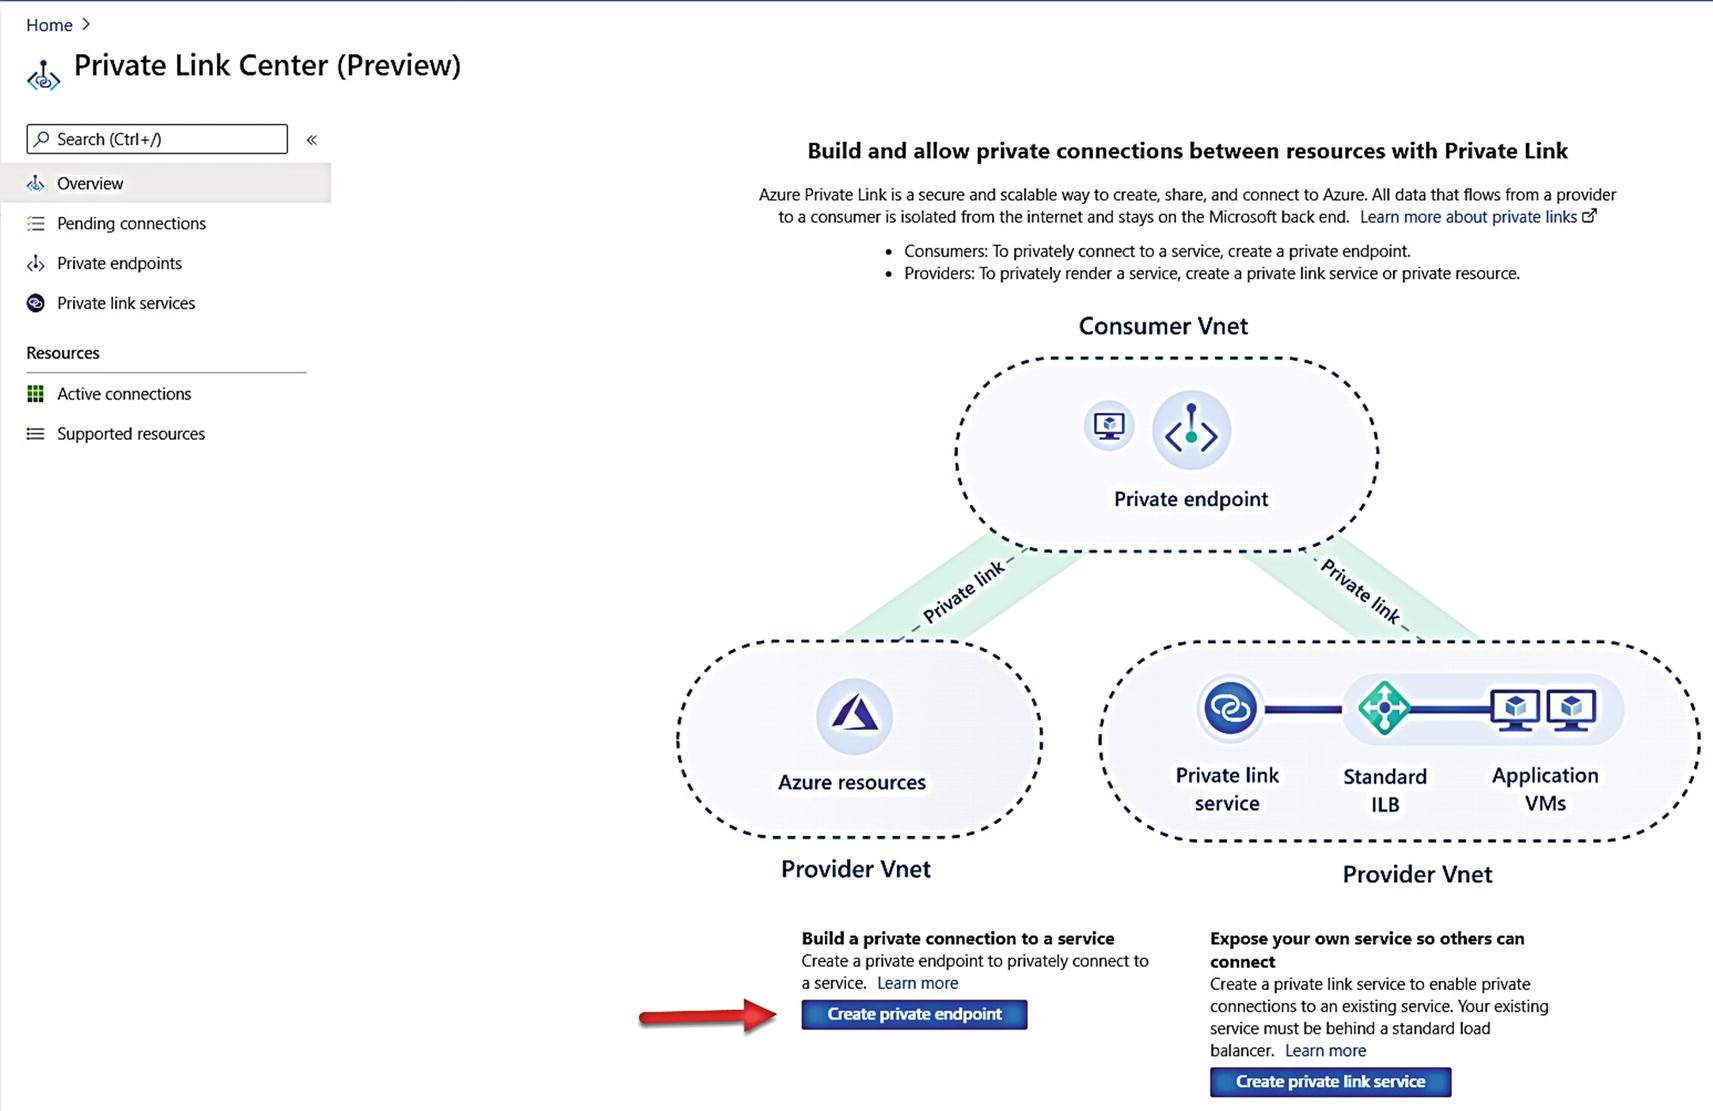
Using the Private Link Center
Like other Azure resources, you will now go through a series of screens starting with Basics to fill out information about the resource to deploy it.
Figure 6-7 shows how I will use Basics to place the private endpoint in the same resource group as my Azure SQL Database, give it a name, and place it in the same region as the virtual network of my Azure Virtual Machine.
The private endpoint must be in the same region as the Azure Virtual Network you choose. Remember the endpoint now becomes a resource in that VNet. However, your client connection could be in another virtual network using VNet Peering or VNet Gateways as seen in Figure 6-3.
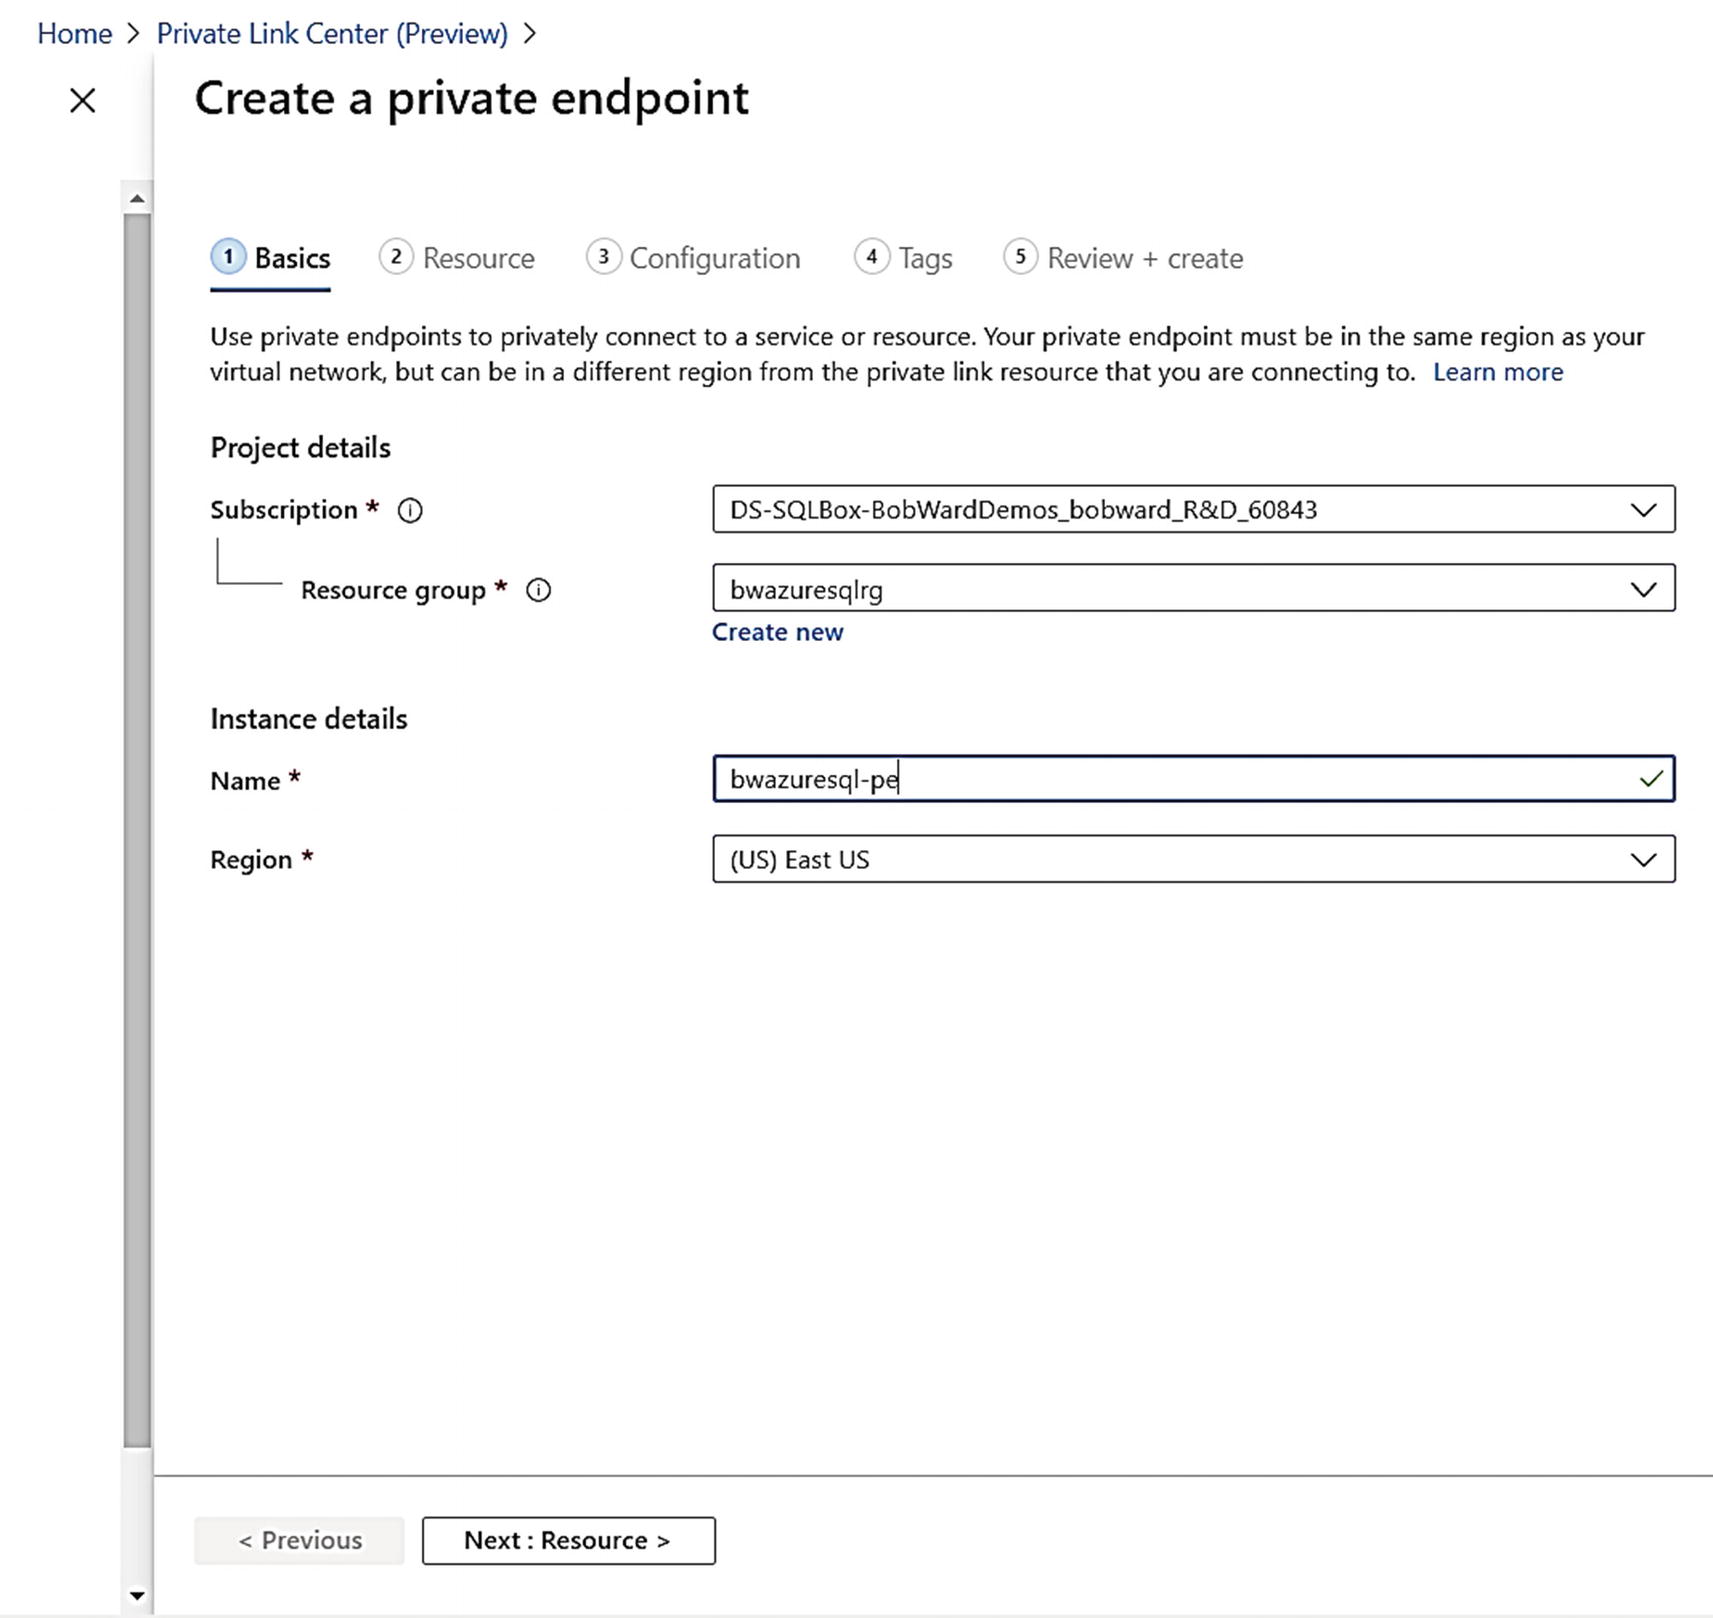
Basics for creating a private endpoint
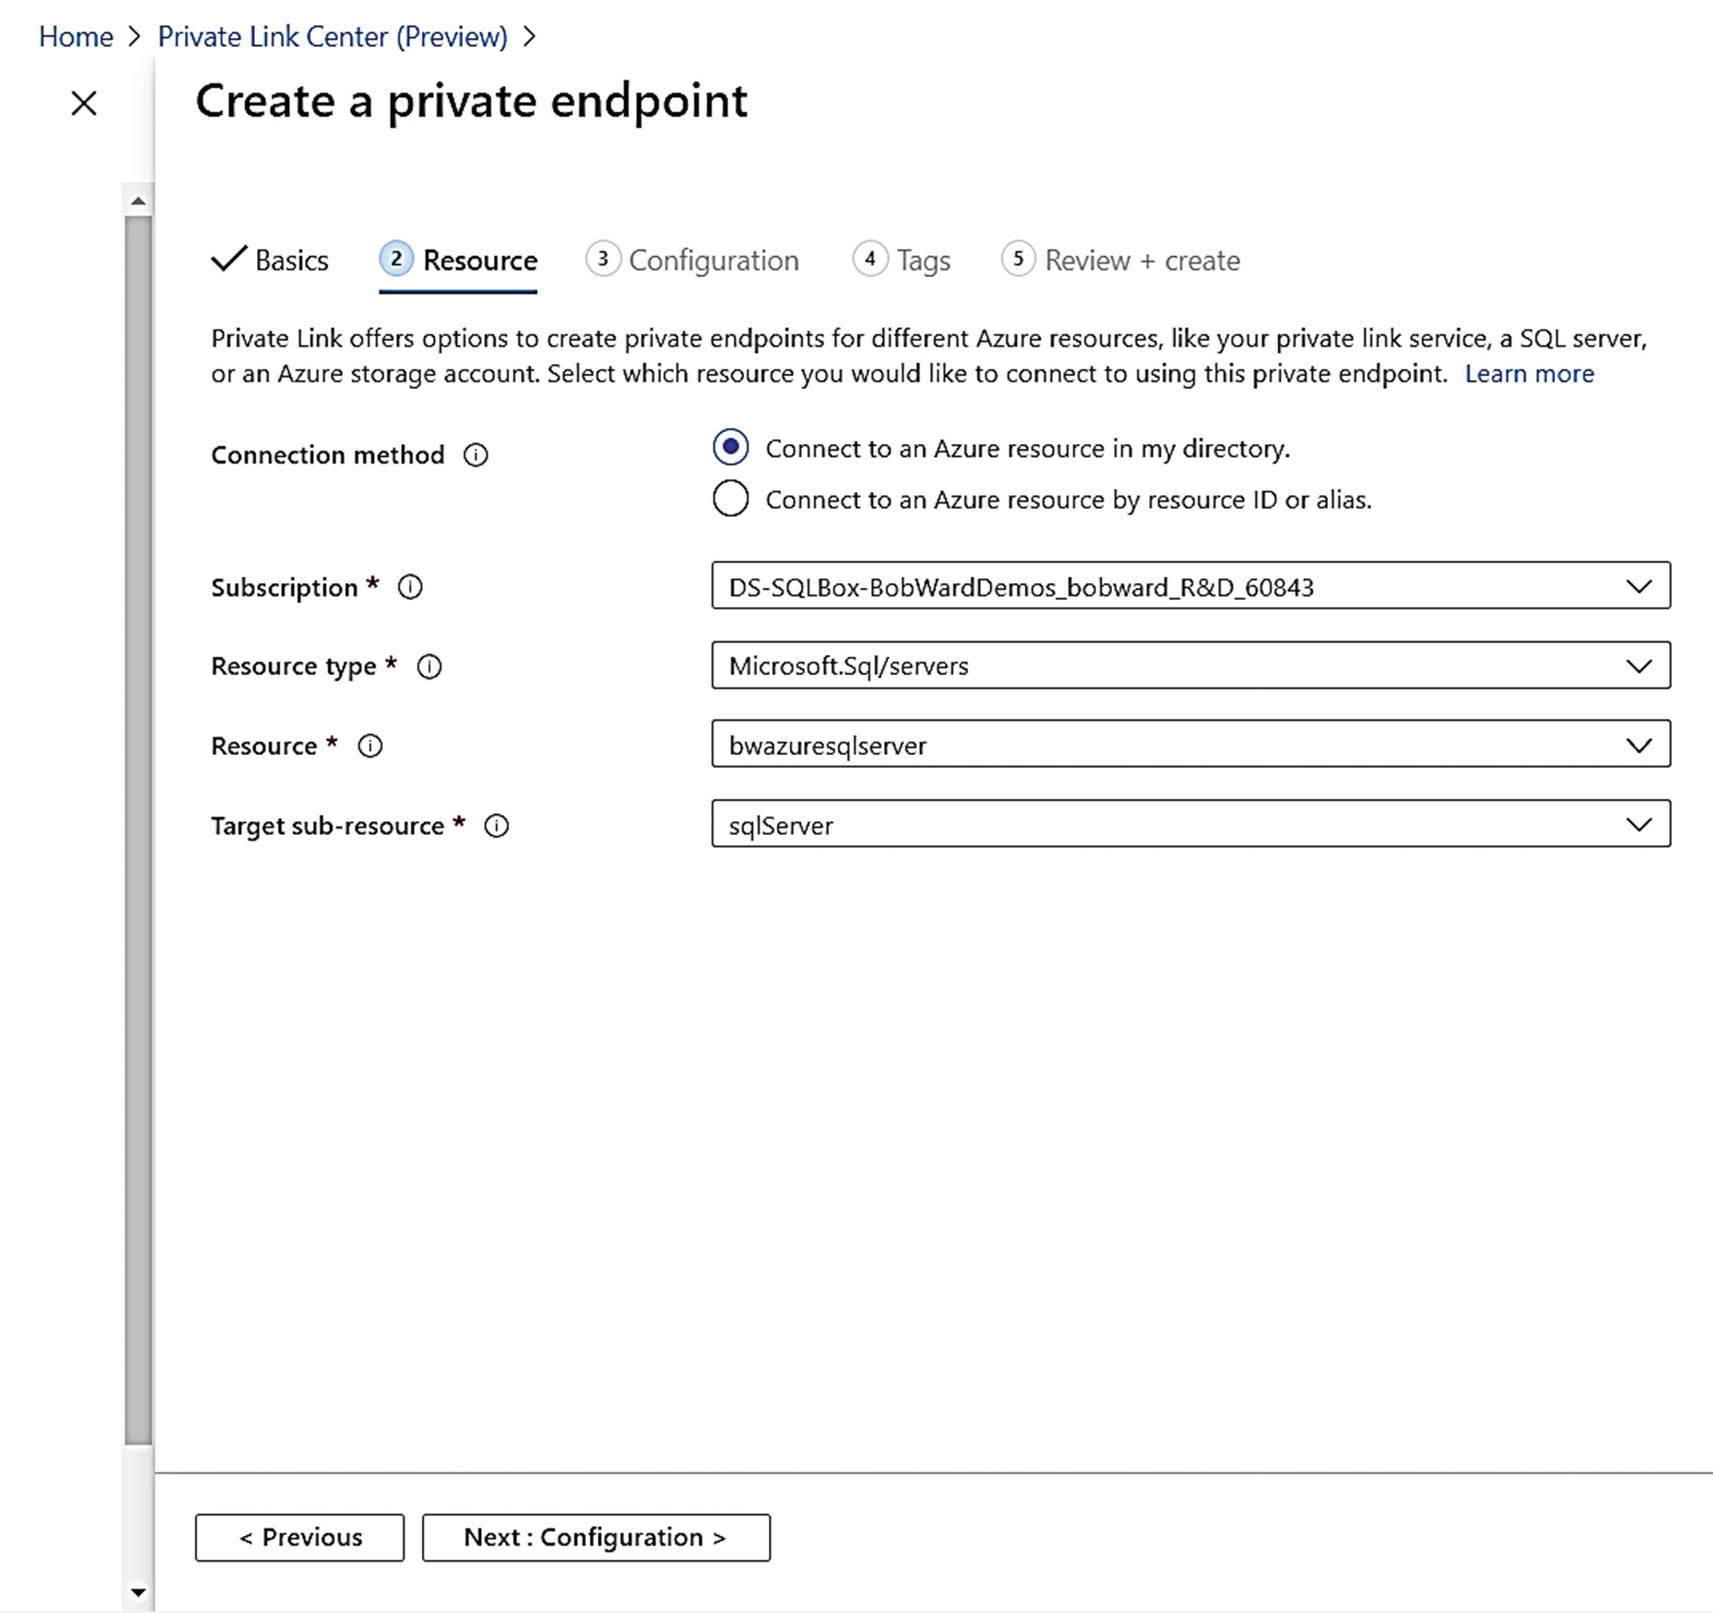
Associating the private endpoint with Azure SQL Database
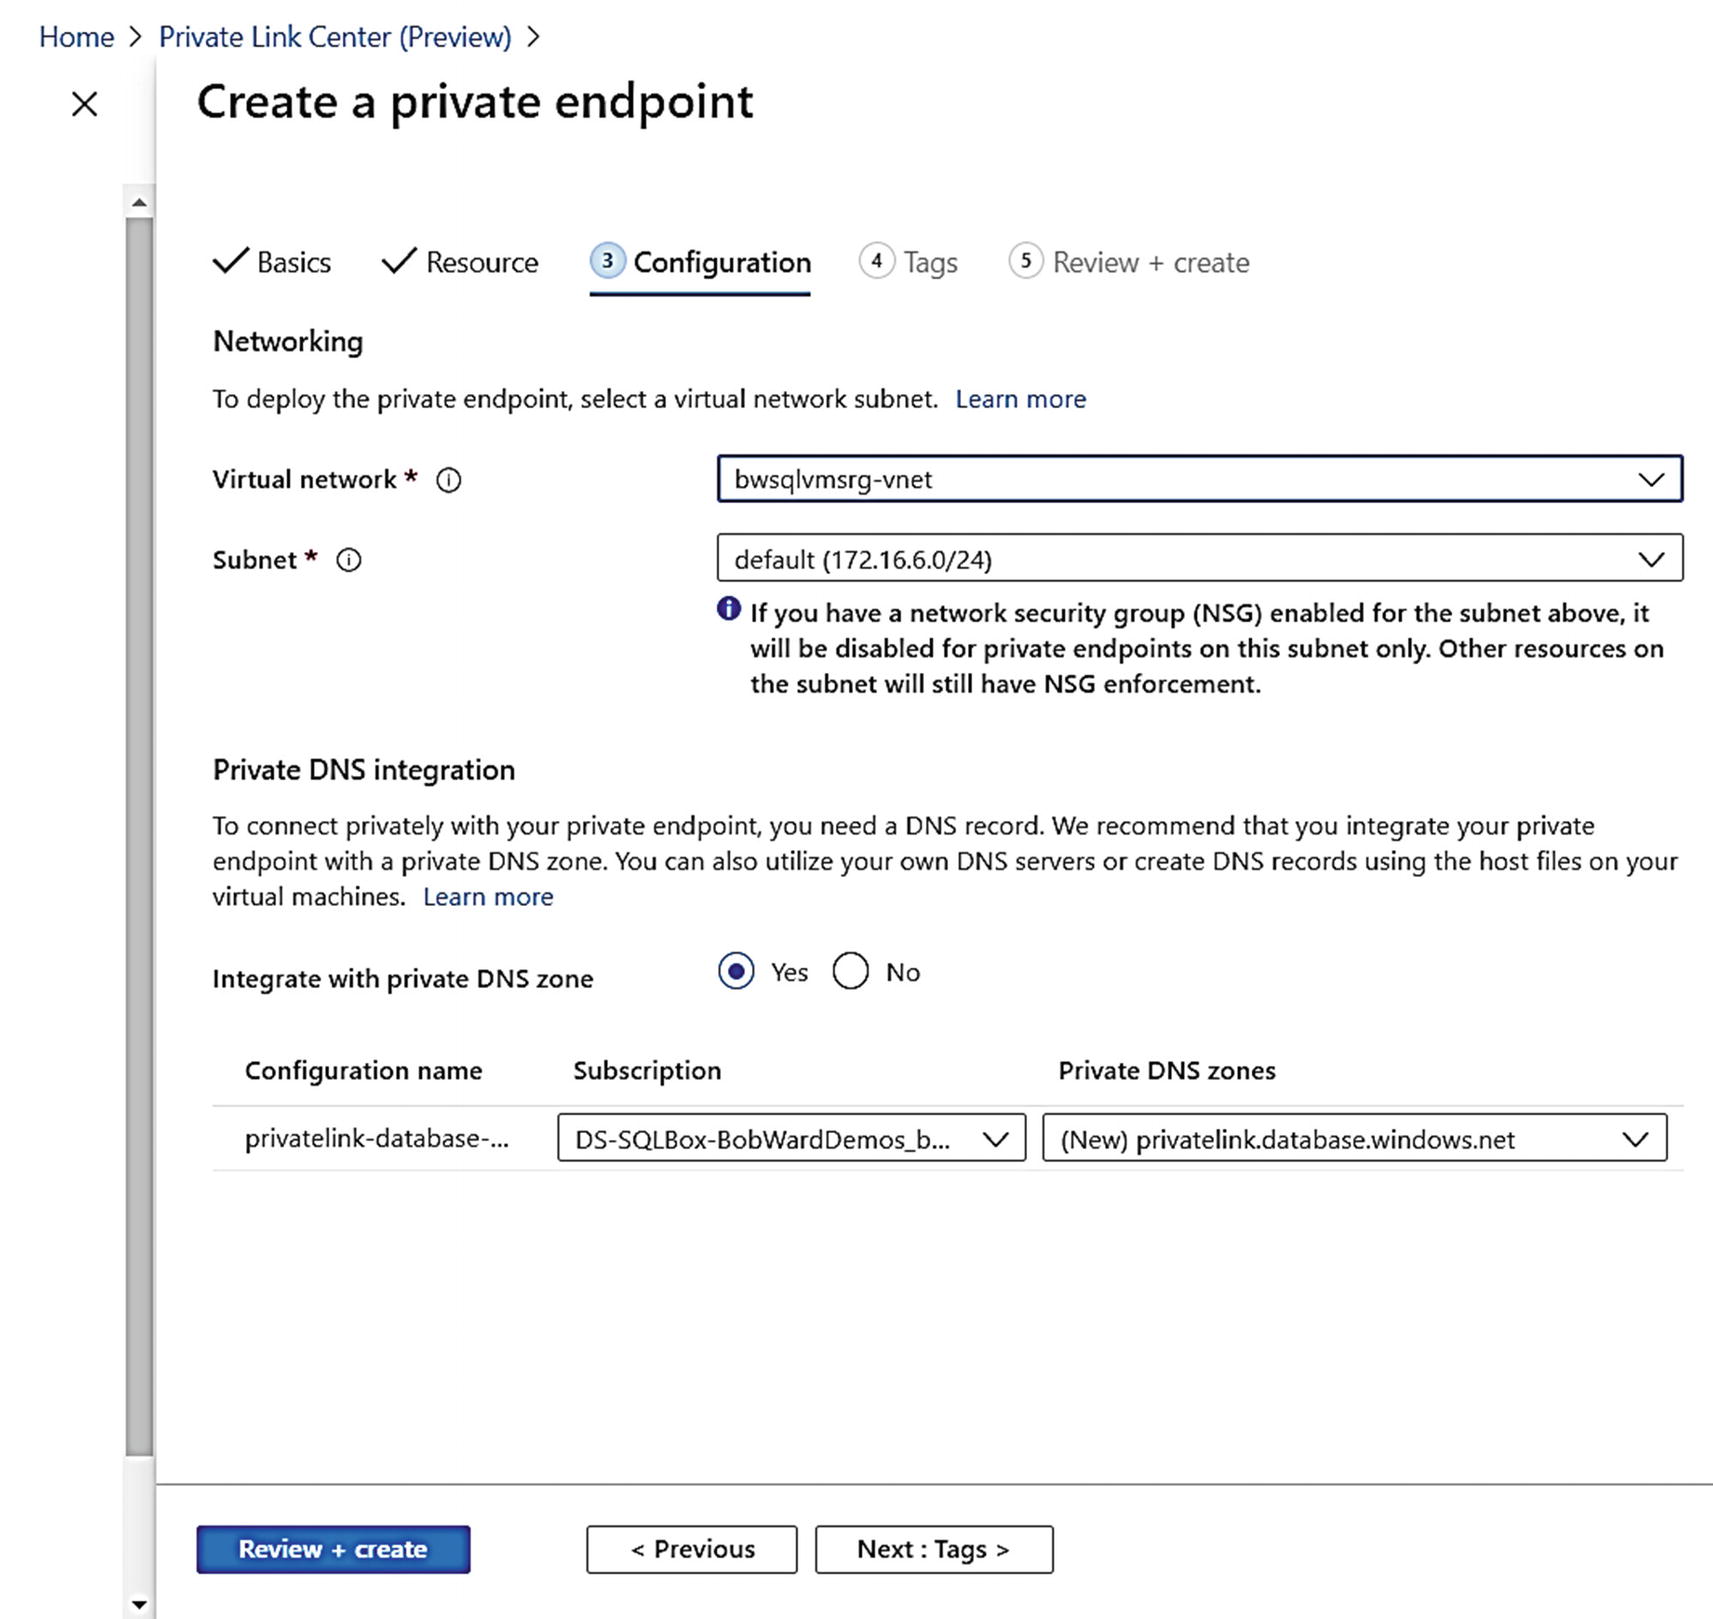
Configuring a private endpoint for Azure SQL Database
I found the virtual network of my Azure Virtual Machine on the Working Pane of the Overview of the virtual machine bwsql2019.
Leave the default for the DNS zone information. I decided to not put a tag on this source so just clicked Review + create and then Create. The deployment for the private endpoint took only a few minutes to complete.
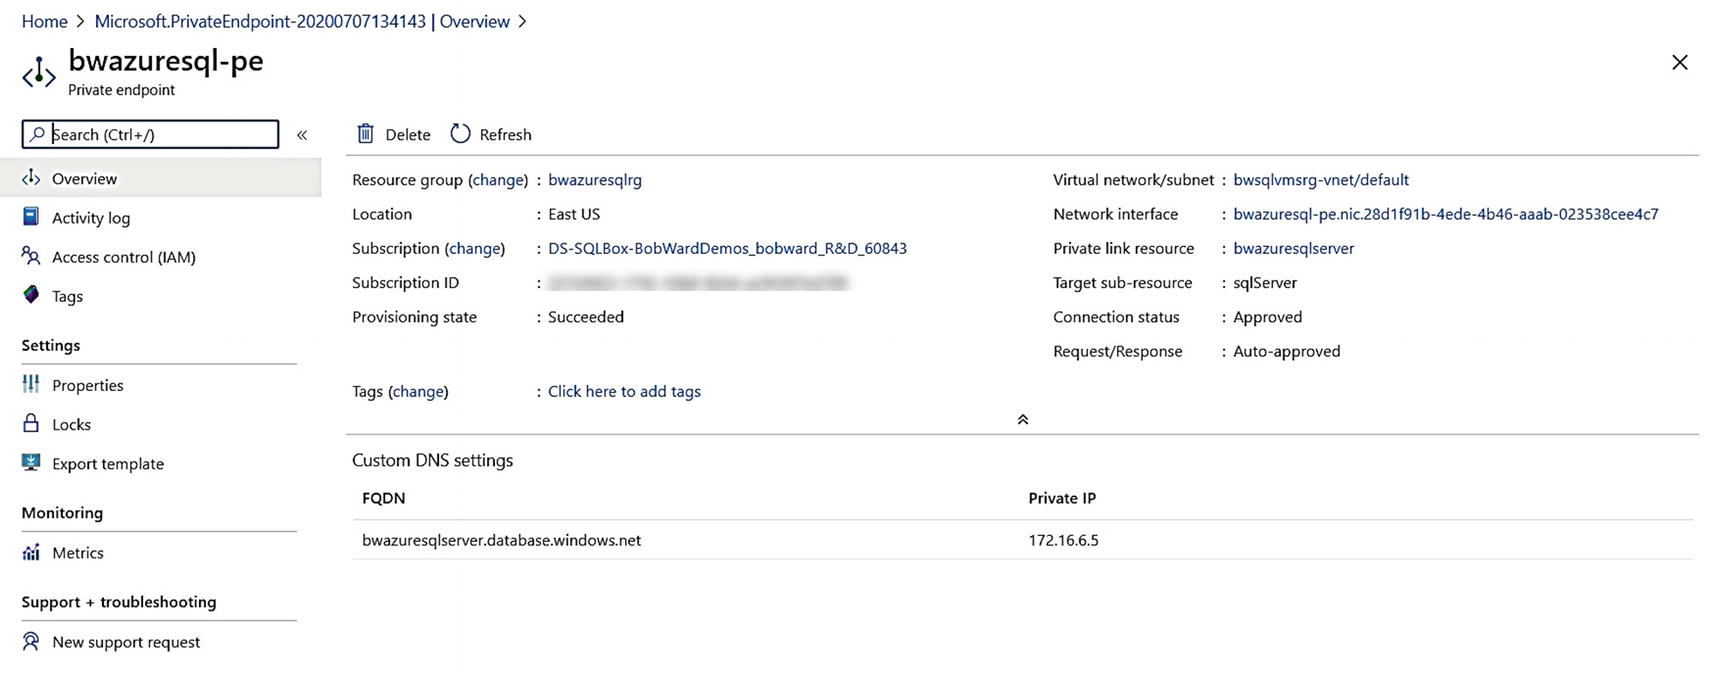
Deployed private endpoint
Take note of the Private IP on this screen of 172.16.6.5. This address is a Private IP for the private endpoint within the IP range for the virtual network bwsqlvmsrg-vnet.
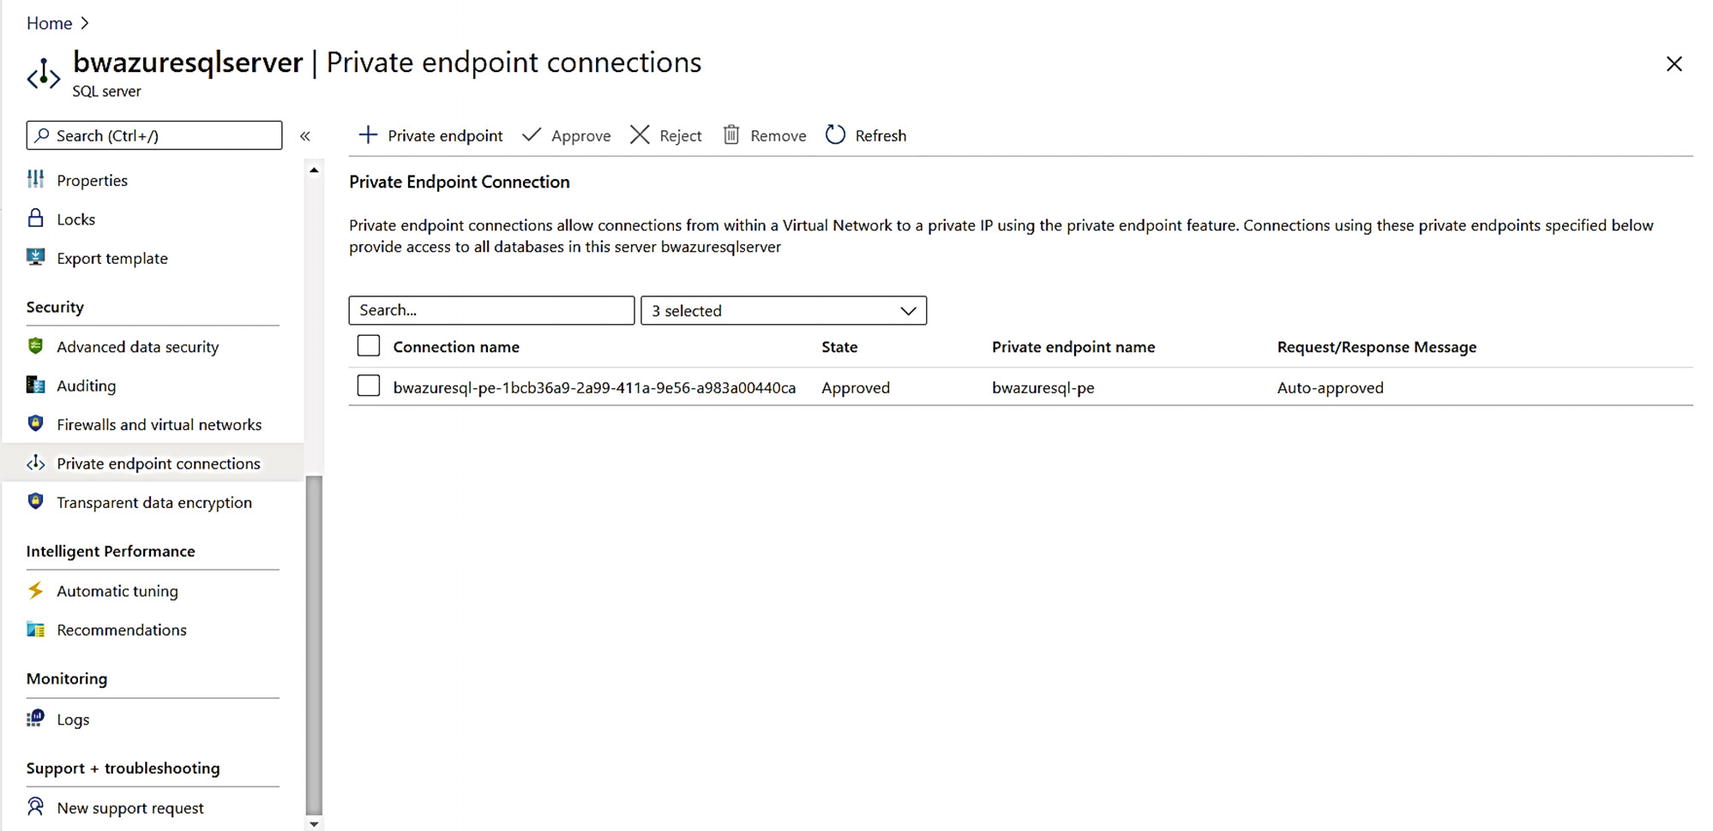
A private endpoint connection for Azure SQL Database
You can see the private endpoint in my case was “auto-approved,” but you can use an approval process to approve a private endpoint to be associated with an Azure SQL Database. Read more at https://docs.microsoft.com/en-us/azure/private-link/private-endpoint-overview#access-to-a-private-link-resource-using-approval-workflow.
Notice the private IP address of the server and the new DNS name which is not in the public hierarchy .
Read more in our documentation at using Azure Private Link for Azure SQL Database at https://docs.microsoft.com/en-us/azure/azure-sql/database/private-endpoint-overview. For anyone wanting to integrate their on-premises environment, pay special attention to this documentation page: https://docs.microsoft.com/en-us/azure/azure-sql/database/private-endpoint-overview#connecting-from-an-on-premises-environment-over-vpn.
Private link connections for Azure SQL Database currently only support Proxy connection types. We had left the Connection Policy for our Azure SQL Database as Default, so if a connection uses Private Link which is inside of Azure, it will not use Redirect but Proxy.
Technically, Private Link is even more secure than the virtual network configuration of Managed Instance which is why we are even looking to enable this functionality for Managed Instance in the future.
Go further with your knowledge of Azure SQL and Network Security by watching videos from Anna Hoffman and Rohit Nayak as part of the Data Exposed Channel at www.youtube.com/playlist?list=PL3EZ3A8mHh0xtbf4Cr2yR4-xsUtELwPjw.
Authentication and Access
You have now successfully deployed an Azure SQL Managed Instance and Database(s) and connected using a secure network architecture. When you deployed both Azure SQL services, you specified an admin, which is a SQL login and password. The next steps are to set up and configure other logins and users just like you would a SQL Server deployment. I call this process setting up Authentication. Then you will want to grant access to users to the objects they need based on the requirements of your application and business.
Before we talk about the details of authentication and access for Azure SQL, let’s review first the authentication and access for Azure SQL resources outside of SQL but in the Azure infrastructure called Azure Role-Based Access Control (RBAC).
Azure Role-Based Access Control (RBAC)
I’ve mentioned the concept of Azure RBAC in previous chapters in the book. Today when you deploy SQL Server on Windows or Linux, you must have certain rights and privileges to install SQL Server. For example, on Windows, most use local administrator accounts when installing SQL Server.
At this point in the book, I’ve listed in several chapters the requirements to deploy Azure SQL such as the Contributor role. An Azure account user that is part of the Contributor role has the permissions to manage everything, except grant access to resources to other accounts (that access is reserved for members of the Owner or User Access Administrator roles).
Therefore, if you are assigned the Contributor role for your Azure subscription, you should have the rights to deploy Azure SQL Managed Instances and Databases.
It is possible you want to set up a system for your organization so that some Azure users have rights to deploy or manage Azure SQL Managed Instances and Databases but not access the resources. Think of an administrator that only deploys or manages resources but doesn’t have access to the underlying SQL Server.
Azure provides the following built-in roles for these purposes:
SQL DB Contributor
Members of this role can deploy and manage Azure SQL databases but not access them.
SQL Server Contributor
Members of this role can deploy and manage Azure SQL logical servers and databases but not access them.
SQL Security Manager
Members of this role can manage security policies of Azure SQL logical servers and databases but not access them.
SQL Managed Instance Contributor
Members of this role can deploy and manage Azure SQL Managed Instances but not access them.
You can read more about Azure built-in roles at https://docs.microsoft.com/en-us/azure/role-based-access-control/built-in-roles. You can learn more about role definitions at https://docs.microsoft.com/en-us/azure/role-based-access-control/role-definitions.
Authentication for Azure SQL Managed Instance
When you deploy SQL Server on Windows, the default authentication mode is Windows only. This means only Windows users can log in to SQL Server. Mixed mode security allows both SQL and Windows logins (Linux requires mixed mode). Azure SQL Managed Instance forces Mixed Mode security and you cannot change this.
When you deploy an Azure SQL Managed Instance, you specify an Administrator Account as I showed you in Figure 4-4. This account will be created as a SQL login for the SQL Server instance and added as a member of the sysadmin role. The sa login is disabled by default, but you can enable and use it (but I don’t recommend it).
With this sysadmin login, you can add other SQL logins, assign them to roles (even sysadmin) just like SQL Server. You can also create users in database and map them to logins just like SQL Server.
You cannot change the admin once you deploy. You can reset the password for the admin through the Azure portal, az CLI, or PowerShell.
You can even create a contained database which supports containers users just like SQL Server. You can read more about contained database users at https://docs.microsoft.com/en-us/sql/relational-databases/security/contained-database-users-making-your-database-portable.
Azure Active Directory Authentication
Since you don’t have access to the underlying Windows Operating System of the VMs, you cannot join domains and set up Windows Authentication. Therefore, we provide the ability for you to add Azure Active Directory logins to your Managed Instance.
When you use Windows or domain authentication with SQL Server, you are using behind-the-scenes Active Directory Domain Services. SQL Server on Linux even supports this concept. Azure provides the same type of service through Azure Active Directory Services (AADS).
The first step in using Azure Active Directory authentication for a Managed Instance is to provision an administrator for the Managed Instance from an Azure Active Directory user. To use AAD with Managed Instance, you first need to create an AAD domain. You can read the process for setting this up at https://docs.microsoft.com/en-us/azure/active-directory-domain-services. It is possible when you sign into the Azure Portal, you are already part of an AAD for your organization. For me, that is the case at Microsoft.
To set up an AAD admin for a Managed Instance, you must have “Administrator” rights for your AAD to grant read permissions. I don’t have these at Microsoft. The documentation shows the process to configure this AAD admin at https://docs.microsoft.com/en-us/azure/azure-sql/database/authentication-aad-configure?tabs=azure-powershell#provision-azure-ad-admin-sql-managed-instance. This covers both the portal and CLI options to configure an AAD admin for Managed Instance.
If you look at the logins for a Managed Instance, you will notice two logins that are created by default for any Managed Instance: WASDRGTenantMonitoringRO and xtsuser (which is actually disabled). These logins are part of the internal role Microsoft creates for DevOps purposes. These roles only have CONNECT and VIEW SERVER STATE permissions, don’t have access to your data, and have no ability to make any modifications.
You can read more about authentication and access for Azure SQL Managed Instance at https://docs.microsoft.com/en-us/azure/azure-sql/database/logins-create-manage.
Authentication for Azure SQL Database
When I showed you how to deploy an Azure SQL Database in Chapter 4 of the book, I supplied a Server admin login . I used this login to connect to the logical server using SQL Authentication. Just like Managed Instance, mixed mode security is forced for the logical server. This admin account is a server-level principal for the logical server and is mapped as dbo in all databases.
You cannot change the admin once you deploy. You can reset the password for the admin through the Azure portal, az CLI, or PowerShell.
If you would like to create other logins who have admin capabilities (but not full server admin), you use the CREATE LOGIN statement to create standard SQL logins for the logical server in the context of the logical master database. You can then create a user in context of the logical master database and assign this user to two special roles for Azure SQL Database using ALTER ROLE:
dbmanager – Users assigned to this role can create and manage databases and will be mapped to the dbo of that database, so has full database owner permissions.
loginmanager – Users assigned to this role can create new logins in the context of the logical master but are not mapped to the dbo role of databases.
You can now use the standard process as with SQL Server to create SQL logins and map them to users in any database they need access. You can assign users to roles and even create new roles just like SQL Server.
One complexity with using logins is that when you choose a failover option like geo-replication, you must create the login on the secondary server manually.
Using Contained Users
You can also create contained database users that don’t require a login. This concept has been around a while with SQL Server using contained databases. Azure SQL Database is in a way a contained database. Contained users are also called user accounts .
The CREATE USER T-SQL statement supports contained users using the WITH PASSWORD clause. One advantage of a contained user is that the information is stored in the database and therefore replicated as part of a geo-replication failover deployment.
I’ll show you an example of how to connect and use a contained user in the next section.
Azure Active Directory Authentication
Like Managed Instance, Azure SQL Database supports Azure Active Directory (AAD) Authentication. Like using Windows authentication for SQL Server, AAD authentication can be the most secure and best method to use with Azure SQL Database. You can create an AAD server admin (in addition to the SQL server admin you create during deployment) for the logical server. You can then create contained users based on an AAD account. You can even create users based on AAD groups.
Let’s explore using the logical server and databases I deployed in Chapter 4 how to set up an AAD admin, how to connect with the admin, and how to create and connect with AAD contained users.
Create and populate Azure AD.
Create an Azure Active Directory administrator.
Create contained database users in your database mapped to Azure AD identities.
Connect to your database by using Azure AD identities.
Microsoft has already created and populated an Azure AD and associated it with my subscription. So I’ll now create an Azure AD administrator.
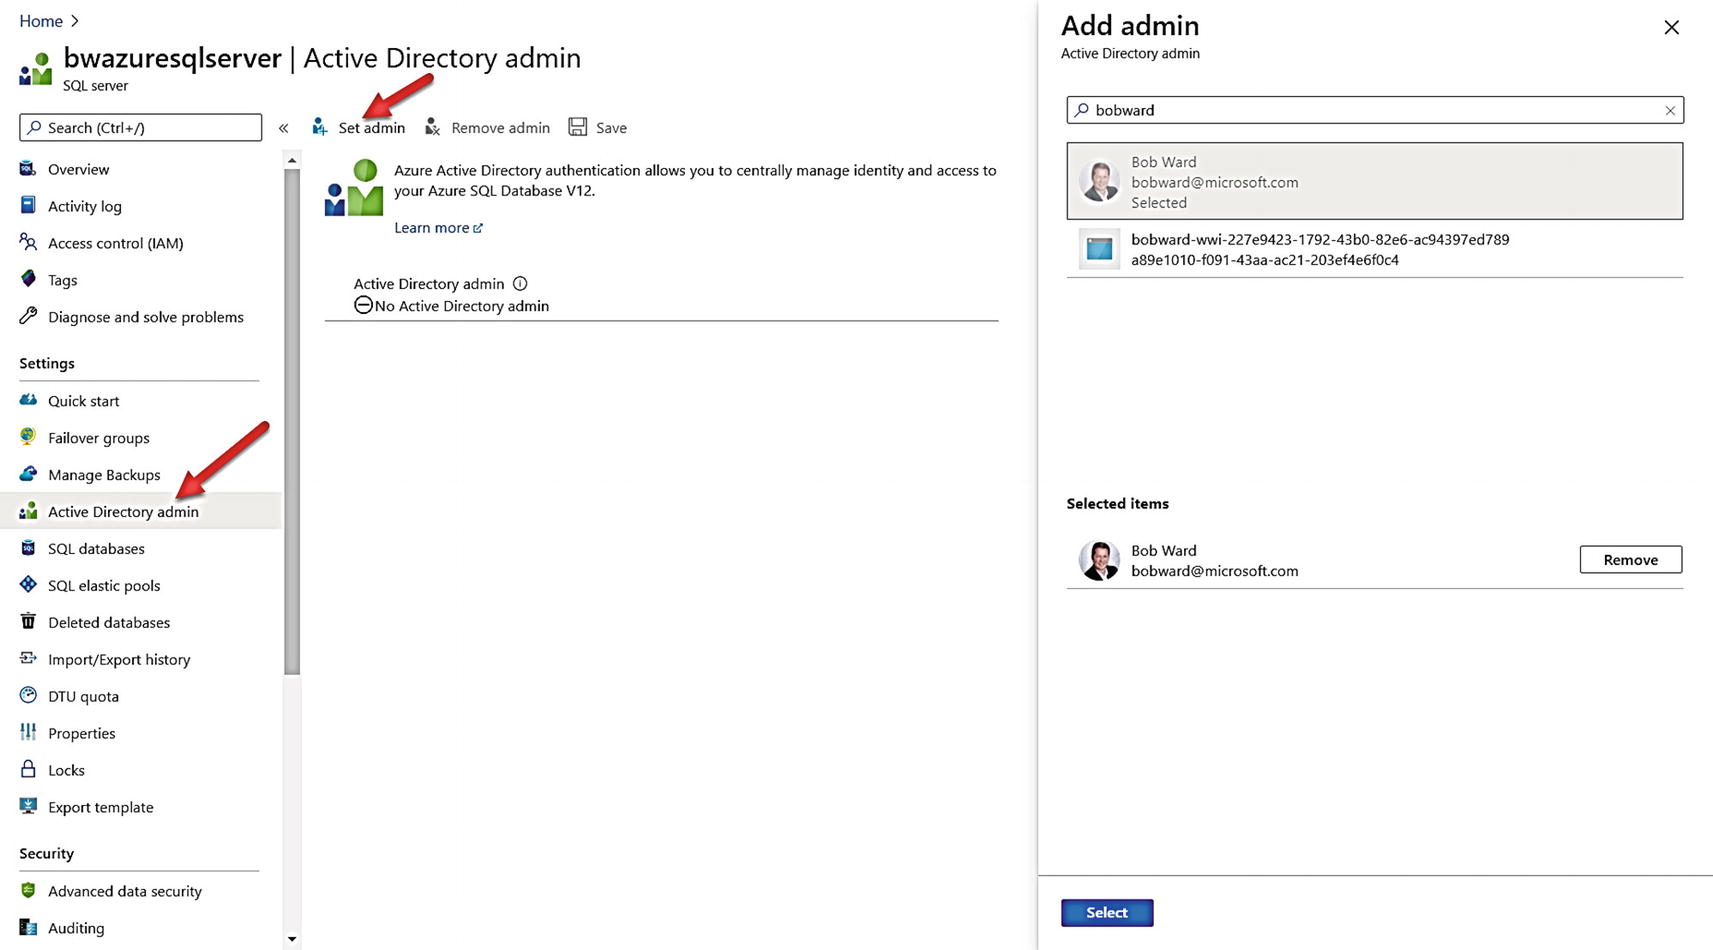
Creating an AAD admin for Azure SQL Database
I then click Save, and within a few seconds, the AAD admin is created.
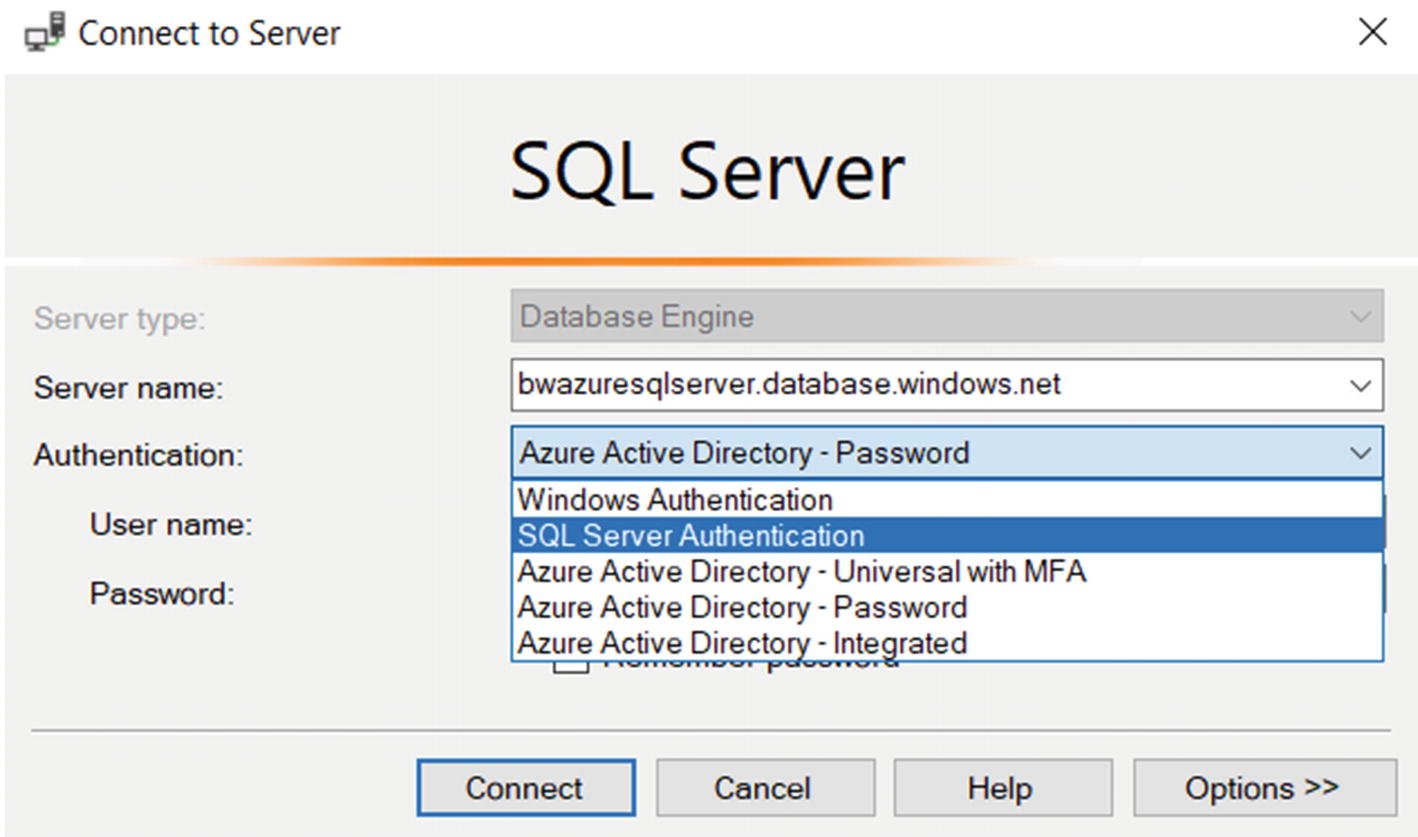
AAD options when connecting with SSMS
Let’s look at each of these options:
AAD – Universal with MFA
Log in with your AAD account but require multi-factor authentication (MFA). MFA is a secure method used for many secure connection purposes including websites, and AAD for Azure SQL Database supports this. Learn more at https://docs.microsoft.com/en-us/azure/azure-sql/database/authentication-mfa-ssms-overview.
AAD – Integrated
This option is like Windows Authentication when you are logged into a client computer using your AAD credentials. Windows 10 offers this type of capability. Learn more about a seamless AAD experience at https://docs.microsoft.com/en-us/azure/active-directory/hybrid/how-to-connect-sso.
AAD – Password
Use this method if you are using a client where your computer is not domain joined. You can put in your full AAD account with password.
At Microsoft, we have a policy where we must use MFA, so I’ll use that method to connect. In my VM when I choose this method, I get a dialog box to complete the MFA process.
The AAD admin is going to look a big strange to the average SQL Server user since it technically is not a login in the logical master. It is a user where the type is EXTERNAL.
EXTERNAL_GROUP is a type for an AAD user or group. And EXTERNAL for authentication_type is reserved for an AAD connection.
SELECT user_name( ) in logical master would have yielded your AAD login since you are added as a user in the logical master.
PowerShell supports creating an AAD admin using the Set-AzSqlServerActiveDirectoryAdministrator cmdlet, and az CLI supports az sql server ad-admin create.
You can also create AAD contained users based on the display name of a security group in AAD or with an AAD token. Learn more how to do this at https://docs.microsoft.com/en-us/azure/azure-sql/database/authentication-aad-configure?tabs=azure-cli#create-contained-users-mapped-to-azure-ad-identities.
Learn how to connect with an application at https://docs.microsoft.com/en-us/azure/azure-sql/database/authentication-aad-configure?tabs=azure-cli#using-an-azure-ad-identity-to-connect-from-a-client-application.
The popular sqlcmd utility supports the -G parameter to connect with AAD.
- The new popular tool Azure Data Studio supports AAD authentication with MFA. Figure 6-14 shows an example where I connected with AAD to my Azure SQL Database.
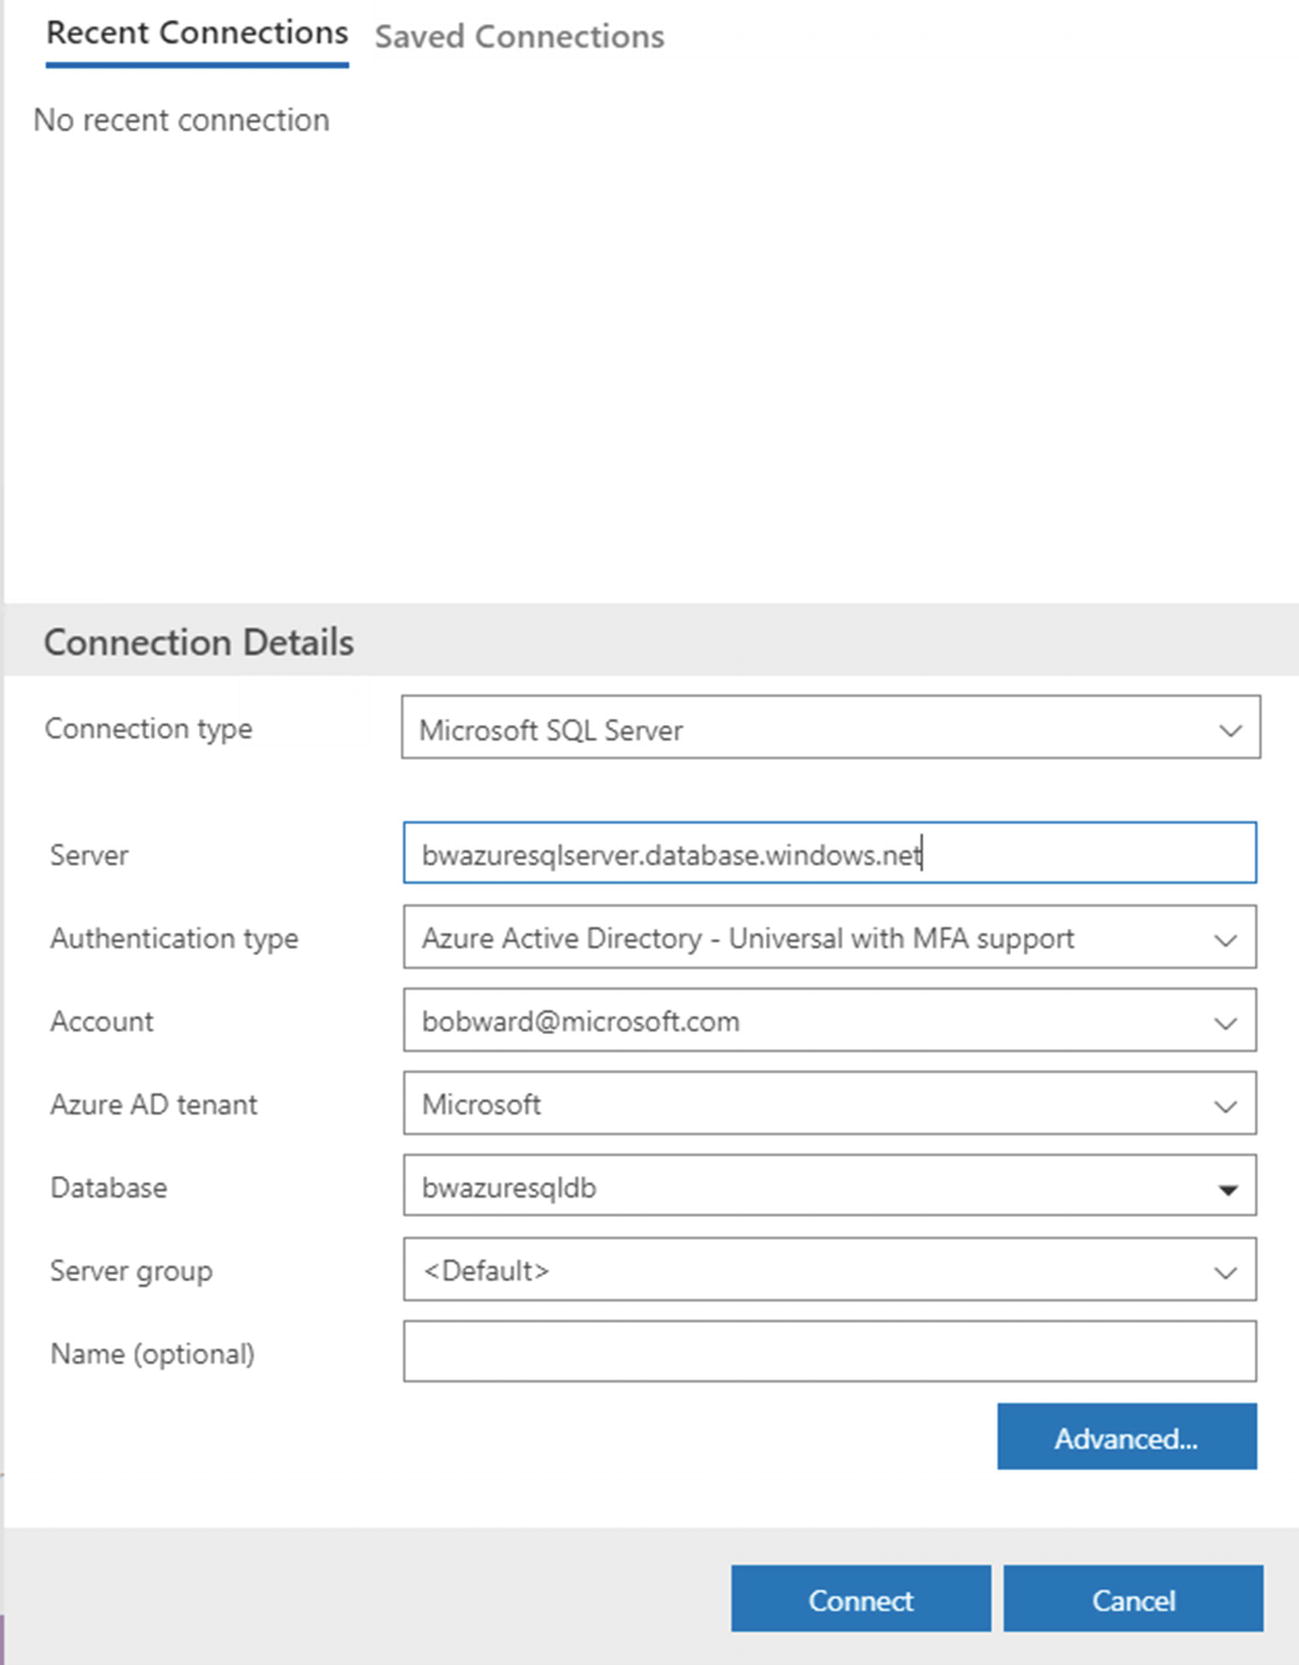 Figure 6-14
Using AAD with Azure Data Studio
Check out our documentation for more information about the trust architecture and limitations using AAD users and groups: https://docs.microsoft.com/en-us/azure/azure-sql/database/authentication-aad-overview. Also, read about how to configure a conditional access policy with AAD at https://docs.microsoft.com/en-us/azure/azure-sql/database/conditional-access-configure#configure-conditional-access.
Set Up and Configure Access
Now that you have created logins and users, what do you do now? You do what you do for SQL Server. You grant access and permissions to objects within your database to meet your application requirements.
This could involve creating schemas, roles, and grant or revoking specific permissions. To get a primer on permissions for SQL Server, refer to the docs at https://docs.microsoft.com/en-us/sql/relational-databases/security/permissions-database-engine?view=sql-server-ver15.
Don’t forget that row-level security (RLS) is supported in Azure SQL just like SQL Server. Read about RLS at https://docs.microsoft.com/en-us/sql/relational-databases/security/row-level-security?view=sql-server-ver15.
You can read more about authentication and access for Azure SQL Database at https://docs.microsoft.com/en-us/azure/azure-sql/database/logins-create-manage.
Protecting Your Data
Ensuring you have set up proper authorization to connect and access data is just the first step. You need to protect your data for all aspects of your deployment, including connections, data at rest, data end to end, and ensuring only the right people can view important data. Azure SQL has all the capabilities to protect data just like SQL Server.
Encrypting Connections
Like SQL Server, Azure SQL supports encryption of connections through the Transparent Layer Security (TLS) protocol (you can read about TLS at https://en.wikipedia.org/wiki/Transport_Layer_Security).
By default, Azure SQL Managed Instance enforces encryption for connections. Tools and applications should enable an encrypted connection for a Managed Instance to avoid client/server negotiation. In addition, you can force a minimal TLS version for a client connection. The latest TLS version, 1.2, fixes some known security vulnerability, so you may consider requiring this version. You can set the minimal version through the Azure portal, through PowerShell (Set-AzInstance) or az cli (az sql mi update). You can read more about TLS and Managed Instance at https://docs.microsoft.com/en-us/azure/azure-sql/managed-instance/minimal-tls-version-configure.
Azure SQL Database forces encrypted connections whether the client or application enables it. You can verify this by examining the encrypt_option column for sys.dm_exec_connections and seeing it will always be a value of TRUE for any user TCP connection. Azure SQL Database also offers enforcement of a minimal TLS version (1.0, 1.1, and 1.2) through the Azure portal, PowerShell (Set-AzSqlServer), and az cli (az sql server update). You can read more at https://docs.microsoft.com/en-us/azure/azure-sql/database/connectivity-settings#minimal-tls-version.
Because Azure SQL Database forces an encrypted connection, a best practice is to enable this for your client tool or application. This speeds up connection time since the server must negotiate with the client to set the encryption if not set by the client.
Transparent Data Encryption (TDE)
Transparent Data Encryption (TDE) is an encryption at rest technology that has been in use with SQL Server for many releases. The concept is that the SQL Server engine will encrypt and decrypt data to the files for the database as data is written and read from disk. This way, the data in the file is encrypted to protect any offline attempt to access the files of the database. Azure SQL Managed Instance and Database enable this option by default.
You might wonder why you would need this encryption option since you or anyone doesn’t have access to files in the underlying virtual machines of Azure SQL. Enabling TDE by default is just another mechanism in Azure’s commitment to a defense-in-depth methodology to protect your data. Many use TDE with SQL Server deployments in their own data center to protect from an unexpected intrusion to access database files outside the engine. The same holds true for Azure even though the Azure ecosystem has many protection mechanisms in place for data centers.
For Azure SQL Managed Instance, TDE is on by default for the instance, which means all databases created for the instance are enabled by TDE. You cannot disable this option for the instance, but you can individually disable TDE through ALTER DATABASE or tools like SSMS. One option you do have for a Managed Instance is to control what keys are used for encryption for TDE. By default, Azure SQL Managed Instance uses a service-managed key, which means Azure SQL manages a certificate for the key (rotates the key and protects it with a root key within Azure).
Azure SQL Database also supports configuring TDE for databases with ALTER DATABASE (ENCRYPTION option) but also allows you to enable and disable TDE through the Azure portal, PowerShell (Set-AzSqlDatabaseTransparentDataEncryption), and az cli (az sql db tde set). The default key management is also a service-managed key at the logical server level.
Bring Your Own Key (BYOK)
SQL Server provides a method to use an Extensible Key Management (EKM) provider to protect the Database Encryption Key (DEK) used to encrypt data with TDE. One of the EKM providers allowed is Azure Key Vault. This allows keys used for encryption to be stored outside of SQL Server.
Azure SQL provides a similar mechanism affectionately called Bring Your Own Key (BYOK). You may also see this referred to as Customer-managed key . The mechanism to use Azure Key Vault for BYOK is referred to as a TDE protector . Azure Key Vault is a service in Azure to help you centrally store and manage secrets and keys. As stated in the introductory documentation for Azure Key Vault at https://docs.microsoft.com/en-us/azure/key-vault/general/overview, Azure Key Vault is “Secrets and keys are safeguarded by Azure, using industry-standard algorithms, key lengths, and hardware security modules (HSMs). The HSMs used are Federal Information Processing Standards (FIPS) 140-2 Level 2 validated.”
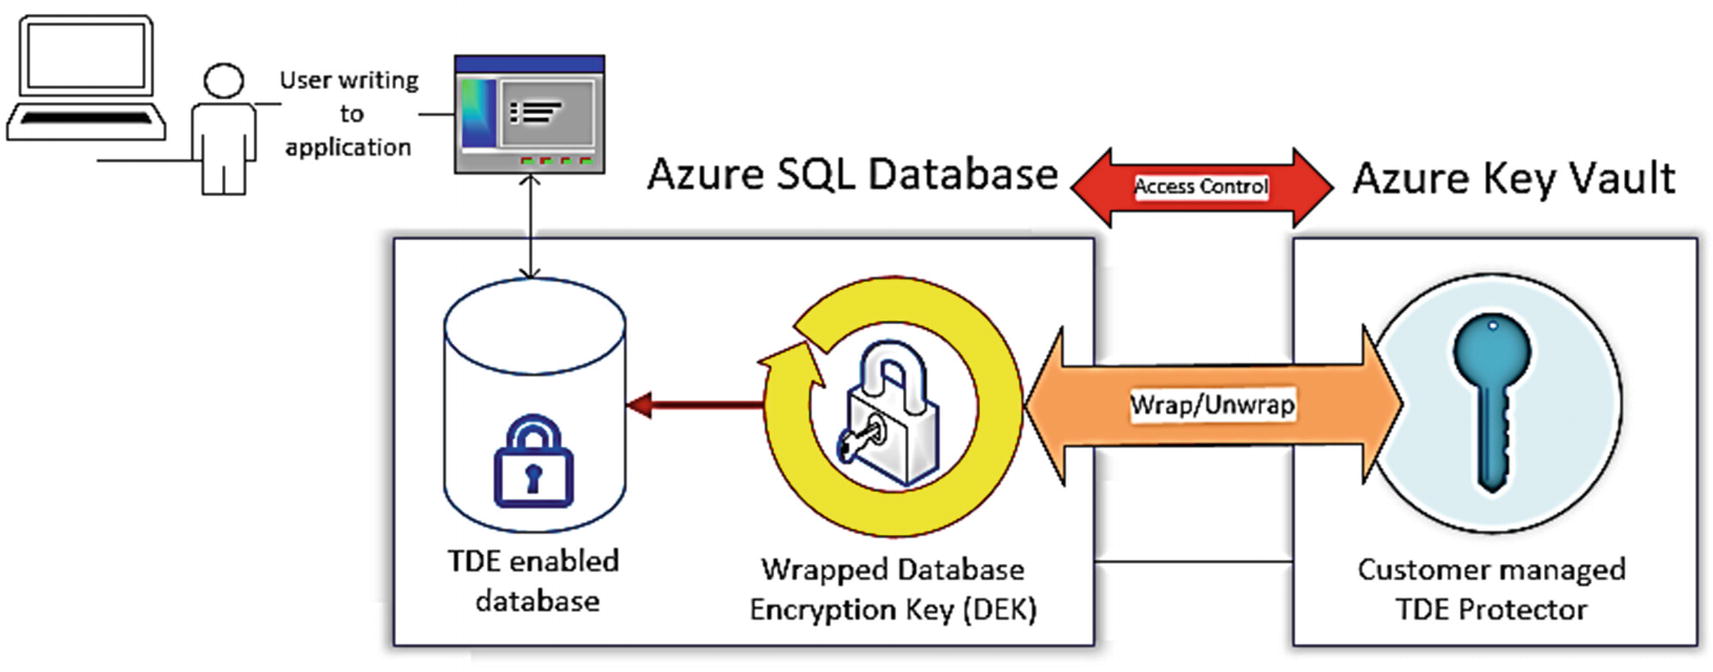
Using Azure Key Vault for BYOK with TDE
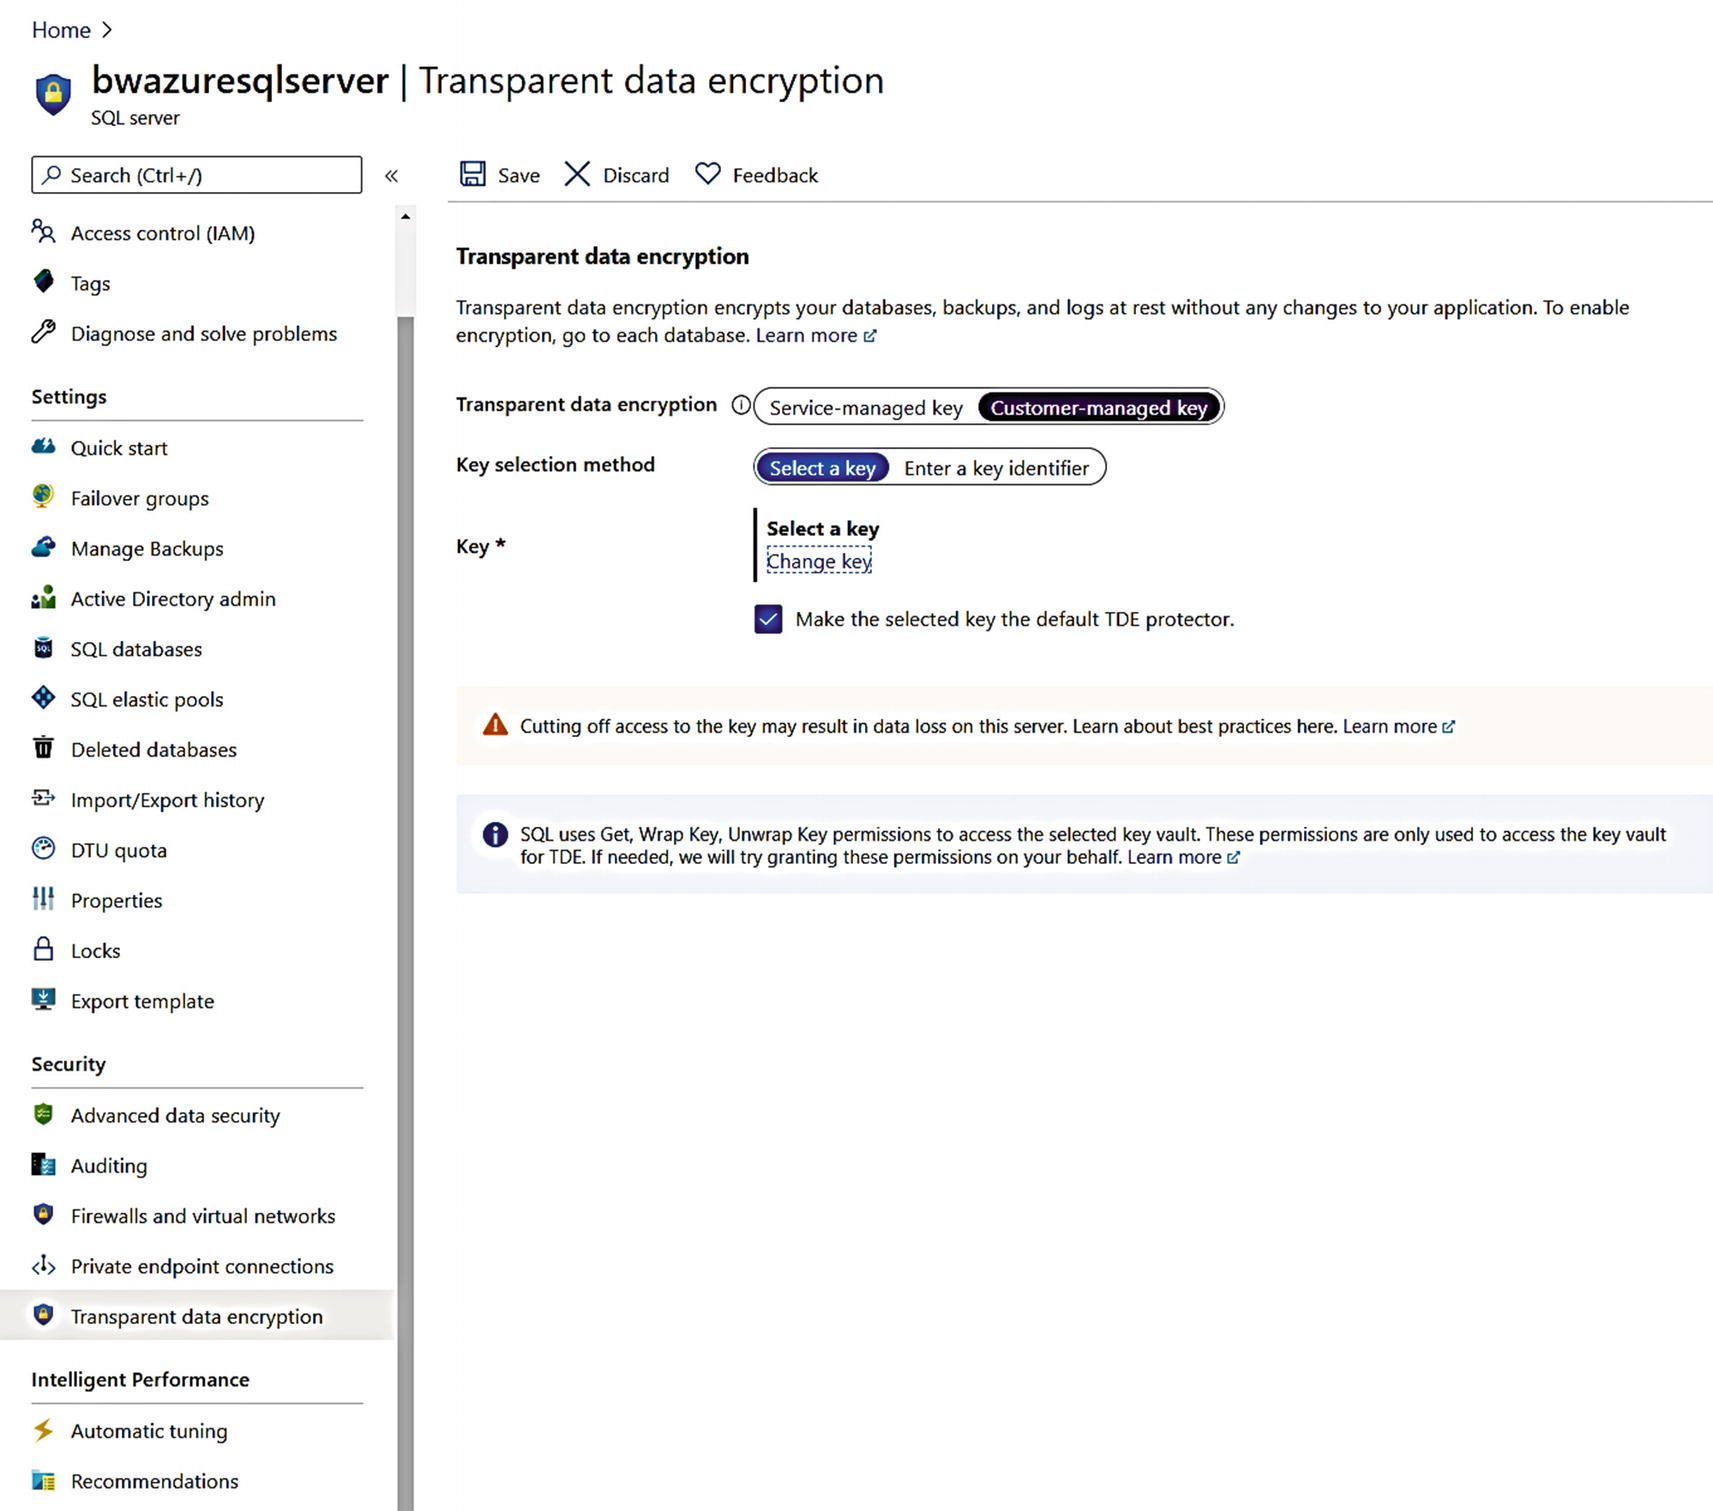
Changing to a customer-managed key for TDE
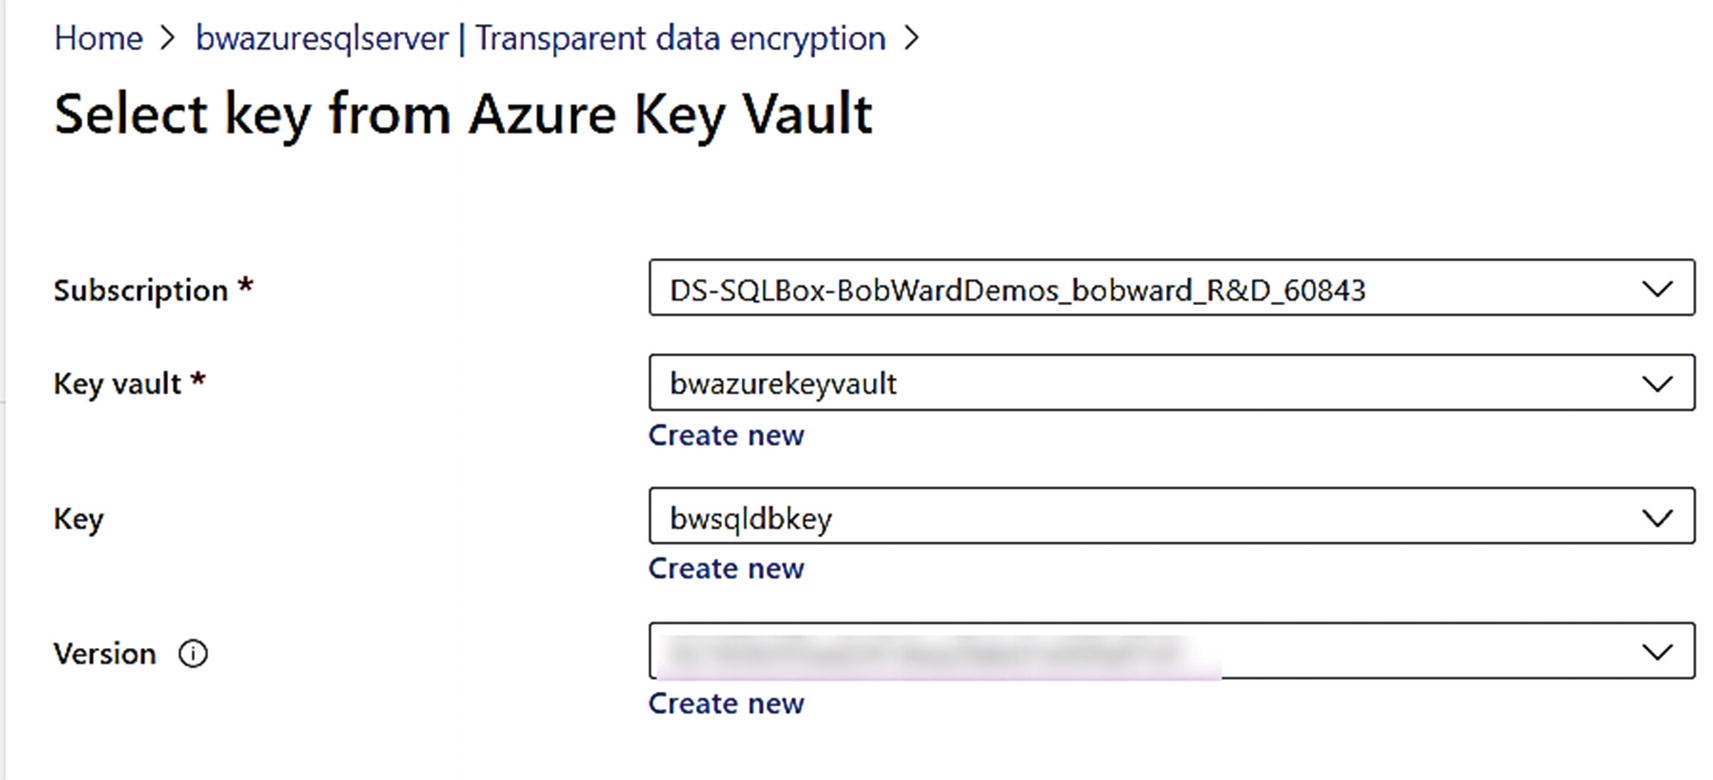
Choosing a key from Azure Key Vault
I chose Select and then Save on the next screen. Within a few seconds, my key is now enabled as the TDE protector.
COPY_ONLY backups for Managed Instance are only supported when you use BYOK (because you have the keys to restore). Learn more about COPY_ONLY backups at https://docs.microsoft.com/en-us/sql/relational-databases/backup-restore/copy-only-backups-sql-server.
Your key vault and Azure SQL deployment must belong to the same Azure Active Directory tenant.
Like any scenario where you manage keys, you should back them up regularly. Learn more about Azure Key Vault backups at https://docs.microsoft.com/en-us/azure/key-vault/general/backup.
There are considerations for BYOK with high availability. Read more at https://docs.microsoft.com/en-us/azure/azure-sql/database/transparent-data-encryption-byok-overview?view=sql-server-ver15#high-availability-with-customer-managed-tde.
When using BYOK with Azure SQL , I highly recommend you read thoroughly our documentation at https://docs.microsoft.com/en-us/azure/azure-sql/database/transparent-data-encryption-byok-overview.
Always Encrypted
Always Encrypted is a technology based on work from Microsoft research used to provide end-to-end encryption for SQL applications. It was introduced in SQL Server 2016 and has all the same capabilities in Azure SQL. Just like with SQL Server, keys for Always Encrypted can be stored in Azure Key Vault. Read the entire story about how Always Encrypted works and how to set it up at https://docs.microsoft.com/en-us/sql/relational-databases/security/encryption/always-encrypted-database-engine.
The one exception in capabilities at the time of the writing of this book is secure enclaves. Secure enclaves extend the capabilities of Always Encrypted but is currently not available for Azure SQL Managed Instance or Database. You can read more about secure enclaves with Always Encrypted at https://docs.microsoft.com/en-us/sql/relational-databases/security/encryption/always-encrypted-enclaves.
Dynamic Data Masking (DDM)
One other method to protect your data is to control which users have access to view sensitive data. Many applications provide this type of protection by masking data in the display layers of their program. For example, a web application may display a phone number as XXX-XXX for some users and the full phone number for others. The problem with this approach is that the application must be modified if any rule changes on the masks used or which users can see data or masked data.
SQL Server provides a method to control masking of data at the database layer instead of the application. Then any application or tool would only see data based on masking rules defined with T-SQL. This feature is called Dynamic Data Masking (DDM) and was introduced in SQL Server 2016. You can read the full documentation of DDM at https://docs.microsoft.com/en-us/sql/relational-databases/security/dynamic-data-masking.
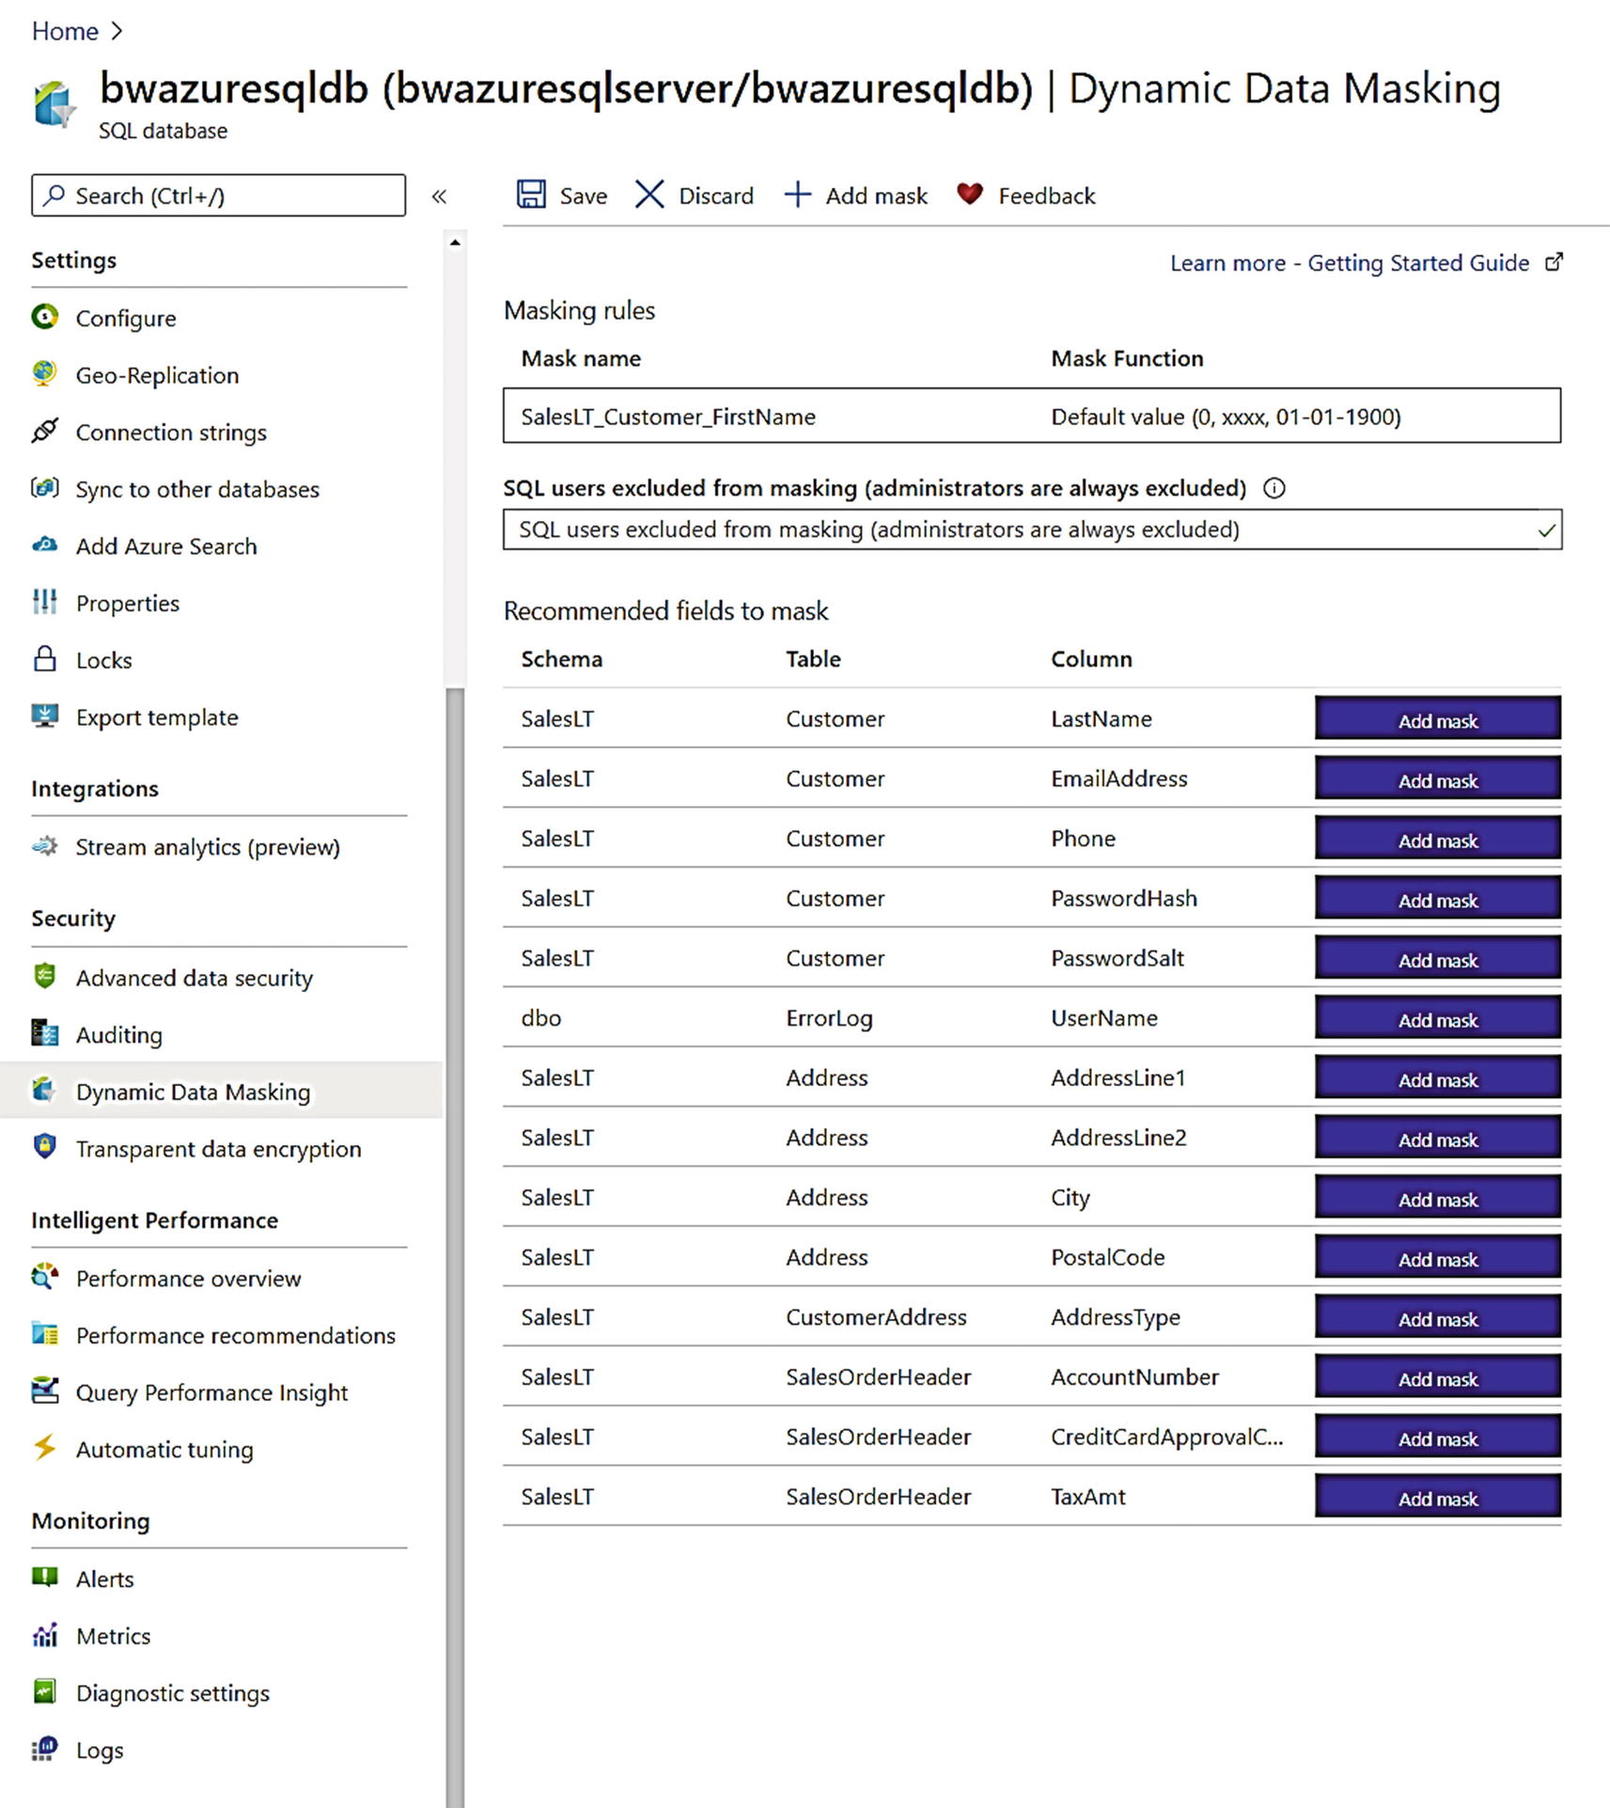
Dynamic Data Masking through the Azure portal
You can see using the Azure portal will provide recommendations on columns to mask based on the column names (e.g., LastName or EmailAddress).
Monitoring Security
After you have configured security for authentication, access, and data protection, you will most likely want to monitor all activity against your Azure SQL Managed Instance and Database deployments.
Monitoring typically means auditing activity against your deployment. You can audit activities against your deployment within the Azure ecosystem (or outside of SQL) and activity within Azure SQL.
Monitoring the Azure Ecosystem
When you deploy and manage SQL Server on Windows and Linux, the operating system provides several different methods to audit activity outside of SQL Server. You may have other methods within your data center to audit this type of activity.
The Azure ecosystem provides this same type of audit capabilities. You may have seen in Chapter 4 after deploying Azure SQL Managed Instance and Database the Activity Log for these types of activities.
The Activity Log is a platform log supported by the Azure ecosystem for all subscriptions. In fact, the activity log is a record of all events for your Azure subscription and includes events specific to Azure SQL Managed Instance and Database. Basically, any operation you perform against an Azure SQL resource that is outside of SQL Server is recorded in the Activity Log. I’ve used the Windows Event Log for many years, and I like to think of the Activity Log as the Event log of Azure.
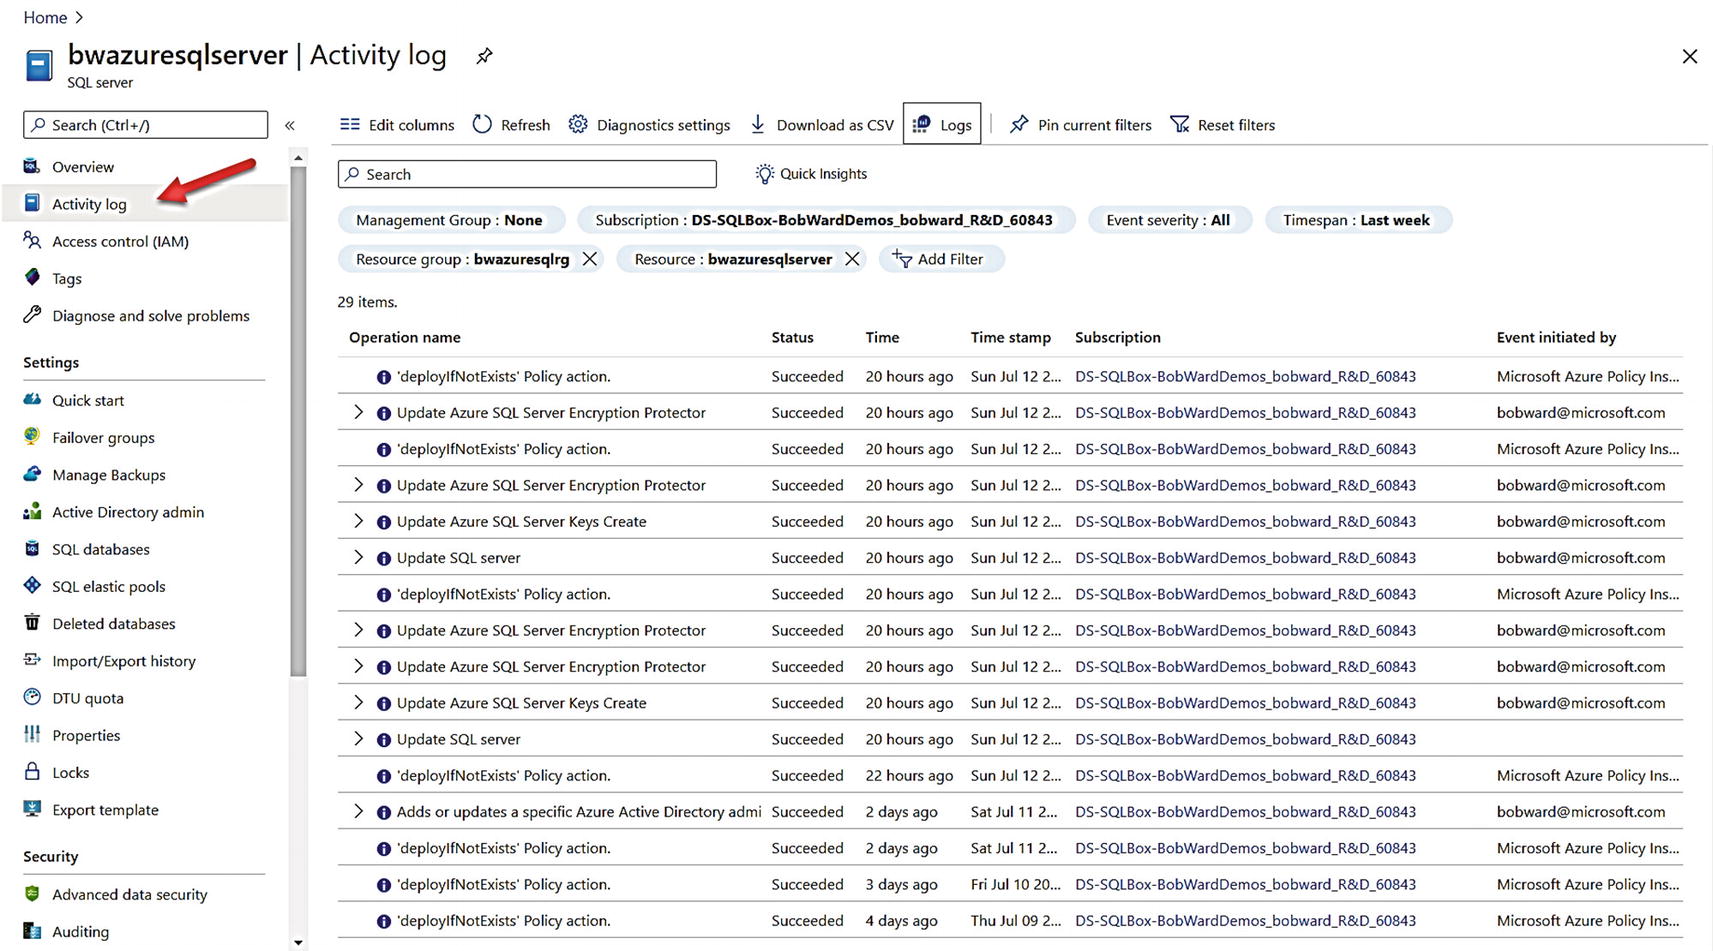
The activity log for Azure SQL Database logical server
You can see at the top of this screen filters automatically set to the logical server, but at this point, you can adjust these to any resource in your subscription (or for all events in your subscription). You also have options here to download the log as .csv file. You can review activity log entries through the portal, through PowerShell (Get-AzLog), az CLI (az monitor activity-log), or even REST (https://docs.microsoft.com/en-us/rest/api/monitor/). If you look at the column Event initiated by, you can see that some events are logged based on an operation from the Azure infrastructure and some based on actions by a user. If you look at the Operation name, you can tell from some entries what the activity is all about. For example, Update Azure SQL Server Encryption Protector was an action when I enabled TDE BYOK for the server and a good example of an operation outside the scope of SQL. The operation “deployifNotExists” Policy action are Azure Policy compliance checks. It is common to see these coupled with operations against an Azure resource. Read more at https://docs.microsoft.com/en-us/azure/governance/policy/concepts/effects.
By default, Azure activity log entries are kept for 90 days (and the roll over). If you want to keep activity log entries longer than this, you can create a Log Analytics workspace. A Log Analytics workspace also gives you more capabilities to query and visualize activity log entries. On this screen, there is an option at the top for Diagnostic settings. This allows you to create a Log Analytics workspace and add activity log entries to it. You also have the option to send activity log entries to Event Hub for streaming. To read more about using the Activity Log in general, go to https://docs.microsoft.com/en-us/azure/azure-monitor/platform/activity-log.
Auditing Azure SQL Managed Instance
Since Azure SQL Managed Instance is very much like a full SQL Server instance, many of the familiar tools and features for auditing are available to you.
Tracking Logins
SQL Server provides the ability to turn off this tracking or also track successful logins. That capability is not available for a Managed Instance (even though SSMS gives you the appearance it is allowed) because it requires a restart of SQL Server which you don’t have access to do.
Since Azure SQL Managed Instance gives you full access to Extended Events, there are events you can use to track logins, including process_login_finish, login_event, and login. Extended Events for Azure SQL Managed Instance supports all events, actions, and targets. File targets must use Azure Blob Storage since you don’t have access to the underlying OS file system .
SQL Server Audit
Audit files are stored in Azure Blob Storage. Read more how to do this at https://docs.microsoft.com/en-us/azure/azure-sql/managed-instance/auditing-configure#set-up-auditing-for-your-server-to-azure-storage.
The option to shut down SQL Server on an audit failure is not supported (but continue and fail options are supported).
If you have never used SQL Server Audit, look through the documentation at https://docs.microsoft.com/en-us/sql/relational-databases/security/auditing/sql-server-audit-database-engine.
SQL Server Audit produces files to track activity based on the Extended Event format (SQL Server Audit uses Extended Event sessions behind the scenes). Azure SQL Managed Instance also allows you to produce audit events to Azure Monitor Logs and Event Hub. The option TO EXTERNAL MONITOR has been added to the CREATE SERVER AUDIT T-SQL statement.
See an example of how to configure SQL Server Audit to Azure logs or Event Hub at https://docs.microsoft.com/en-us/azure/azure-sql/managed-instance/auditing-configure#set-up-auditing-for-your-server-to-event-hubs-or-azure-monitor-logs.
Auditing Azure SQL Database
Auditing activity for Azure SQL Database is provided through metrics in Dynamic Management Views (DMVs) and Azure Metrics. In addition, the SQL Server Audit capability is exposed as a feature called SQL Database auditing.
Tracking Connections
Azure SQL Database provides a DMV called sys.event_log that can be queried in the context of the logical master database of the logical server. This DMV shows information collected in 5-minute aggregate intervals for connectivity metrics. This DMV doesn’t track individual successful or failed connection but rather connectivity metrics across all databases (including the logical master) for the logical server.
Number of successful connections
Number of failed connections due to invalid login name
Number of failed connections due to blocked firewall rule
While this information is stored across all databases, you can use Azure Metrics and Logs to capture aggregate numbers for failed connections, connections blocked by firewall rules, and successful connections.
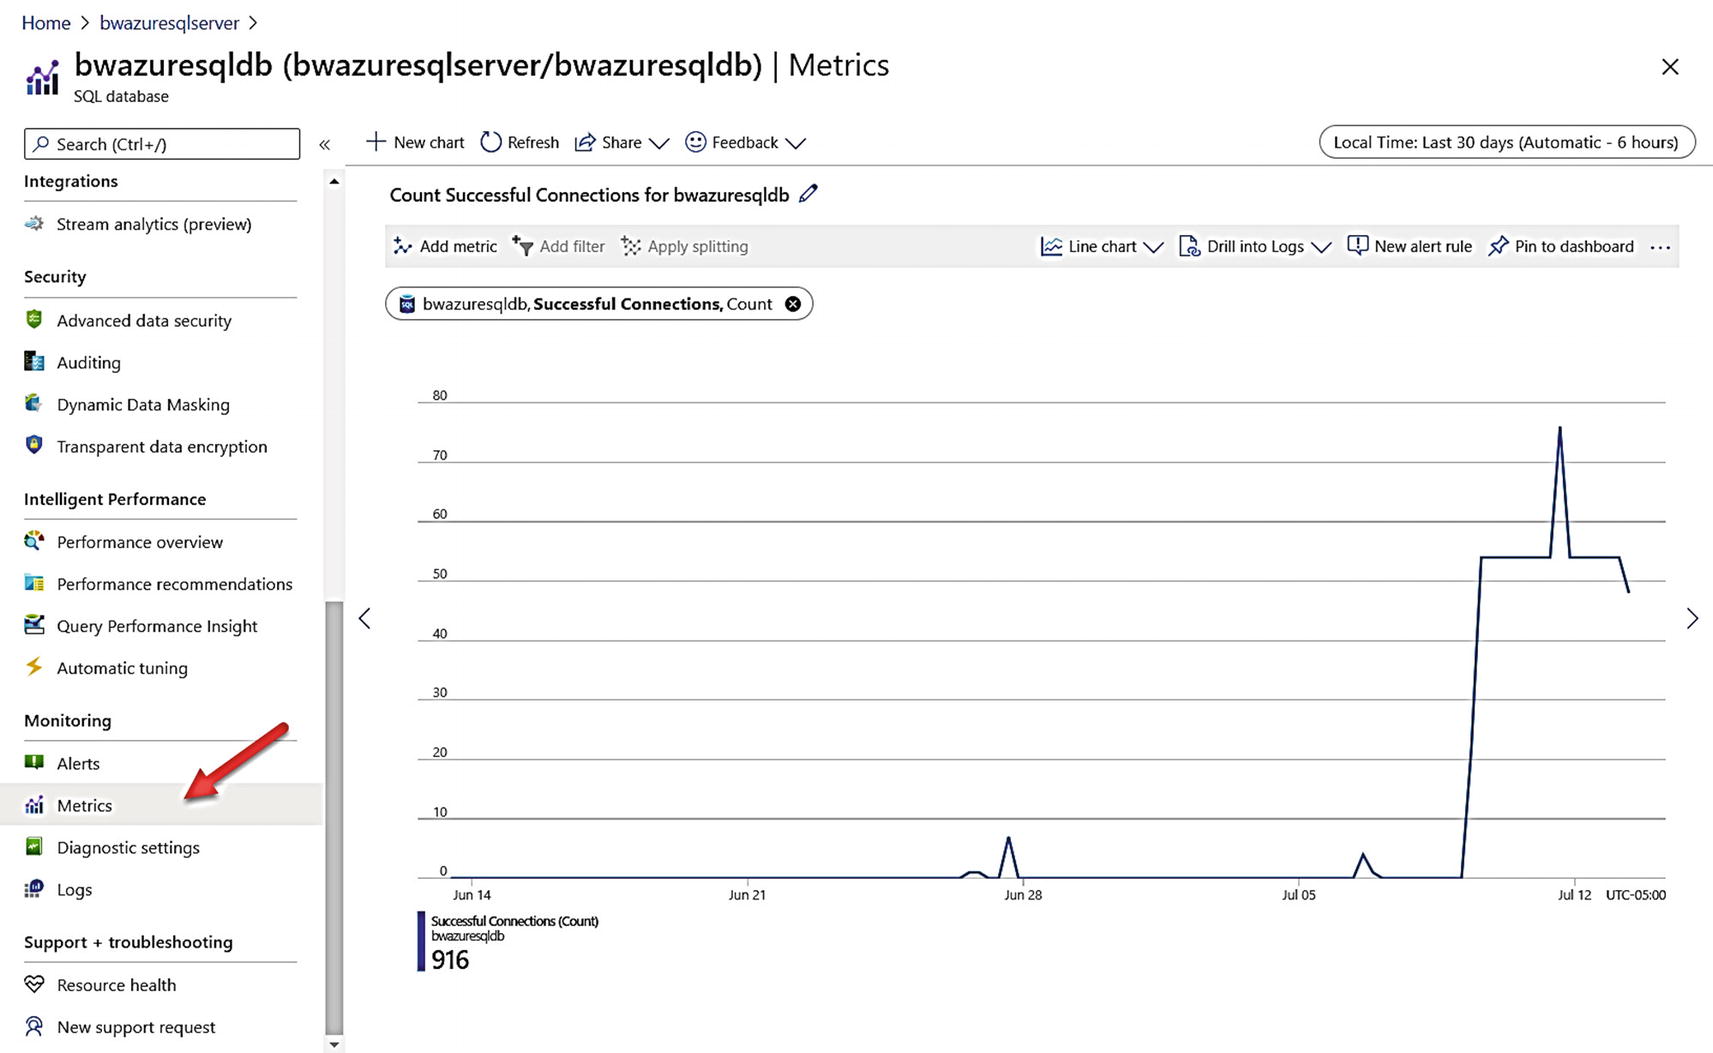
Tracking successful connections with Azure Metrics
SQL Database Auditing
Since you don’t have access to the underlying SQL Server instance for an Azure SQL Database, you don’t have access to use the T-SQL statement CREATE SERVER AUDIT to use SQL Server Audit capabilities.
Therefore, we have created interfaces outside of Azure SQL Database to audit database and logical server activities. We call this SQL Database auditing . Read the complete documentation at https://docs.microsoft.com/en-us/azure/azure-sql/database/auditing-overview. SQL Database Auditing can be enabled through the Azure portal, PowerShell (Set-AzSqlDatabaseAudit and Set-AzSqlServerAudit), az cli (az sql db audit-policy), and REST APIs (https://docs.microsoft.com/en-us/rest/api/sql/database%20auditing%20settings/createorupdate).
You can direct SQL Database auditing to an Azure storage account, a Log Analytics workspace, or Event Hub for streaming.
Let’s look at an example of creating an audit for the logical server and direct the audit to a Storage Account and Log Analytics workspace (and explain why you might want to you one vs. the other or both). Auditing the logical server will audit all activities for all databases.
You could also create a separate audit specific to each database, but when you audit a logical server, all activities for all databases go into that audit as well.
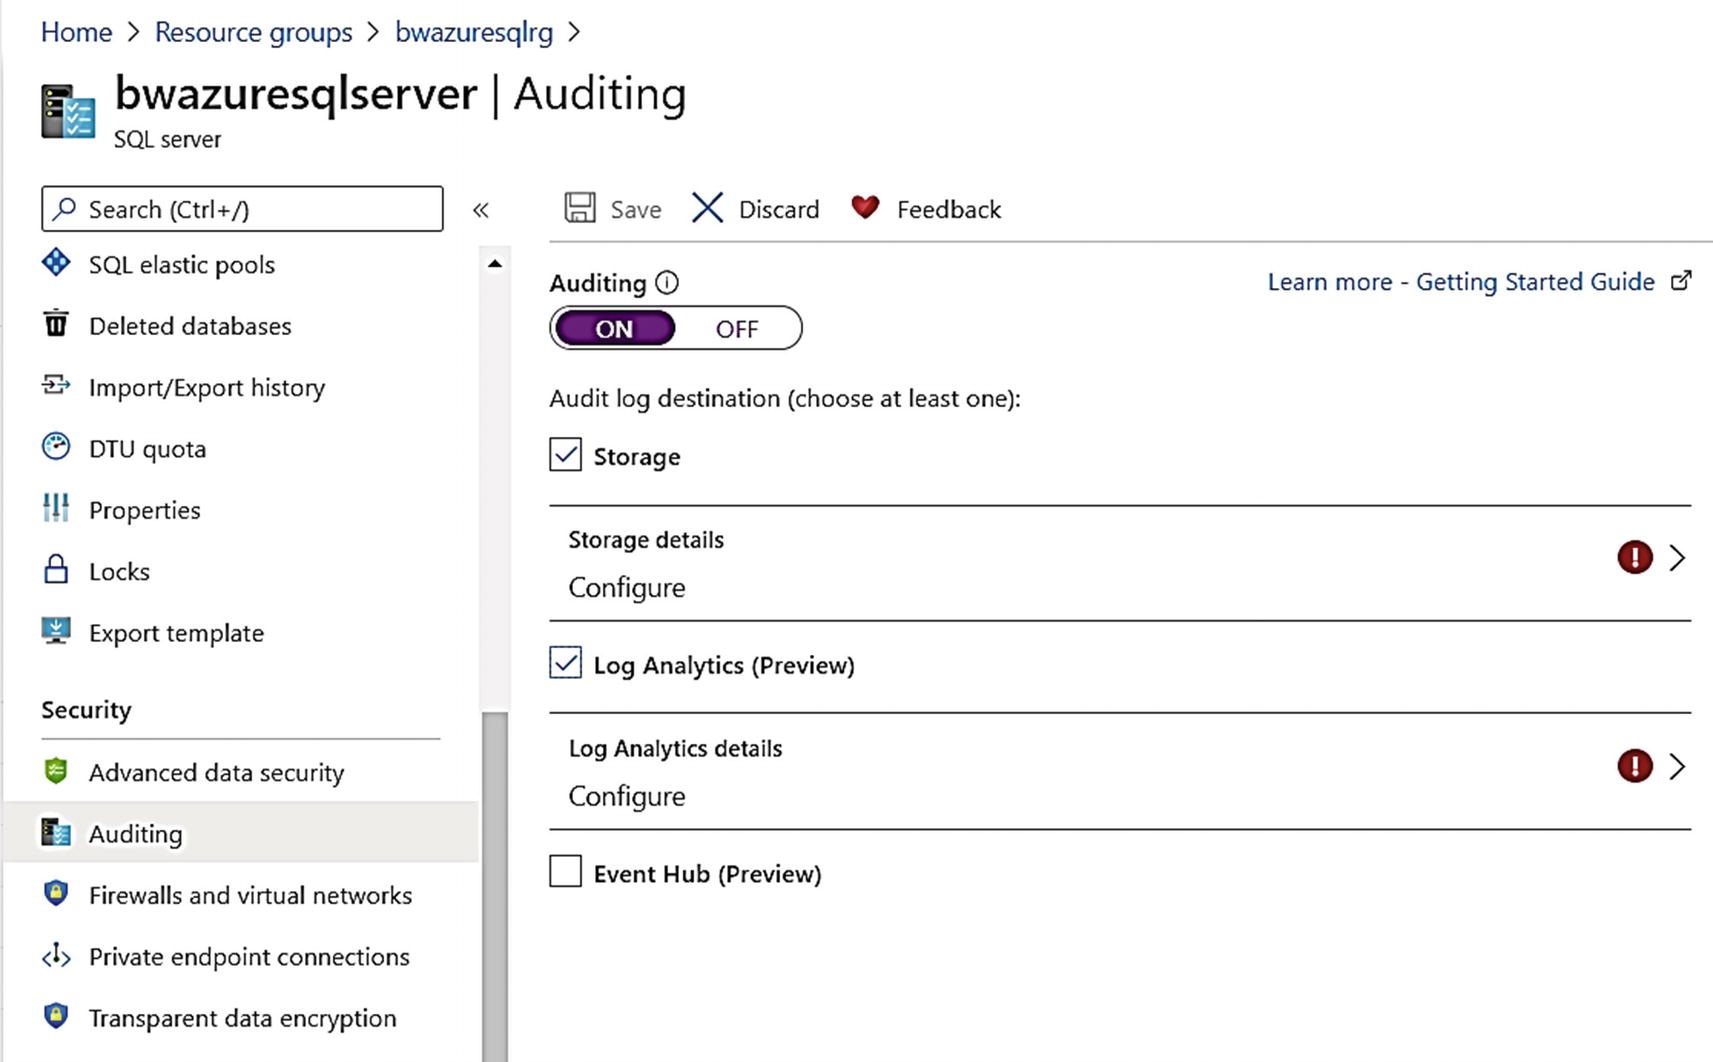
Configuring auditing for Azure SQL Database
To have the audits started, I need to configure the Azure Storage details and Log Analytics details.

Configuring storage details for auditing for Azure SQL Database
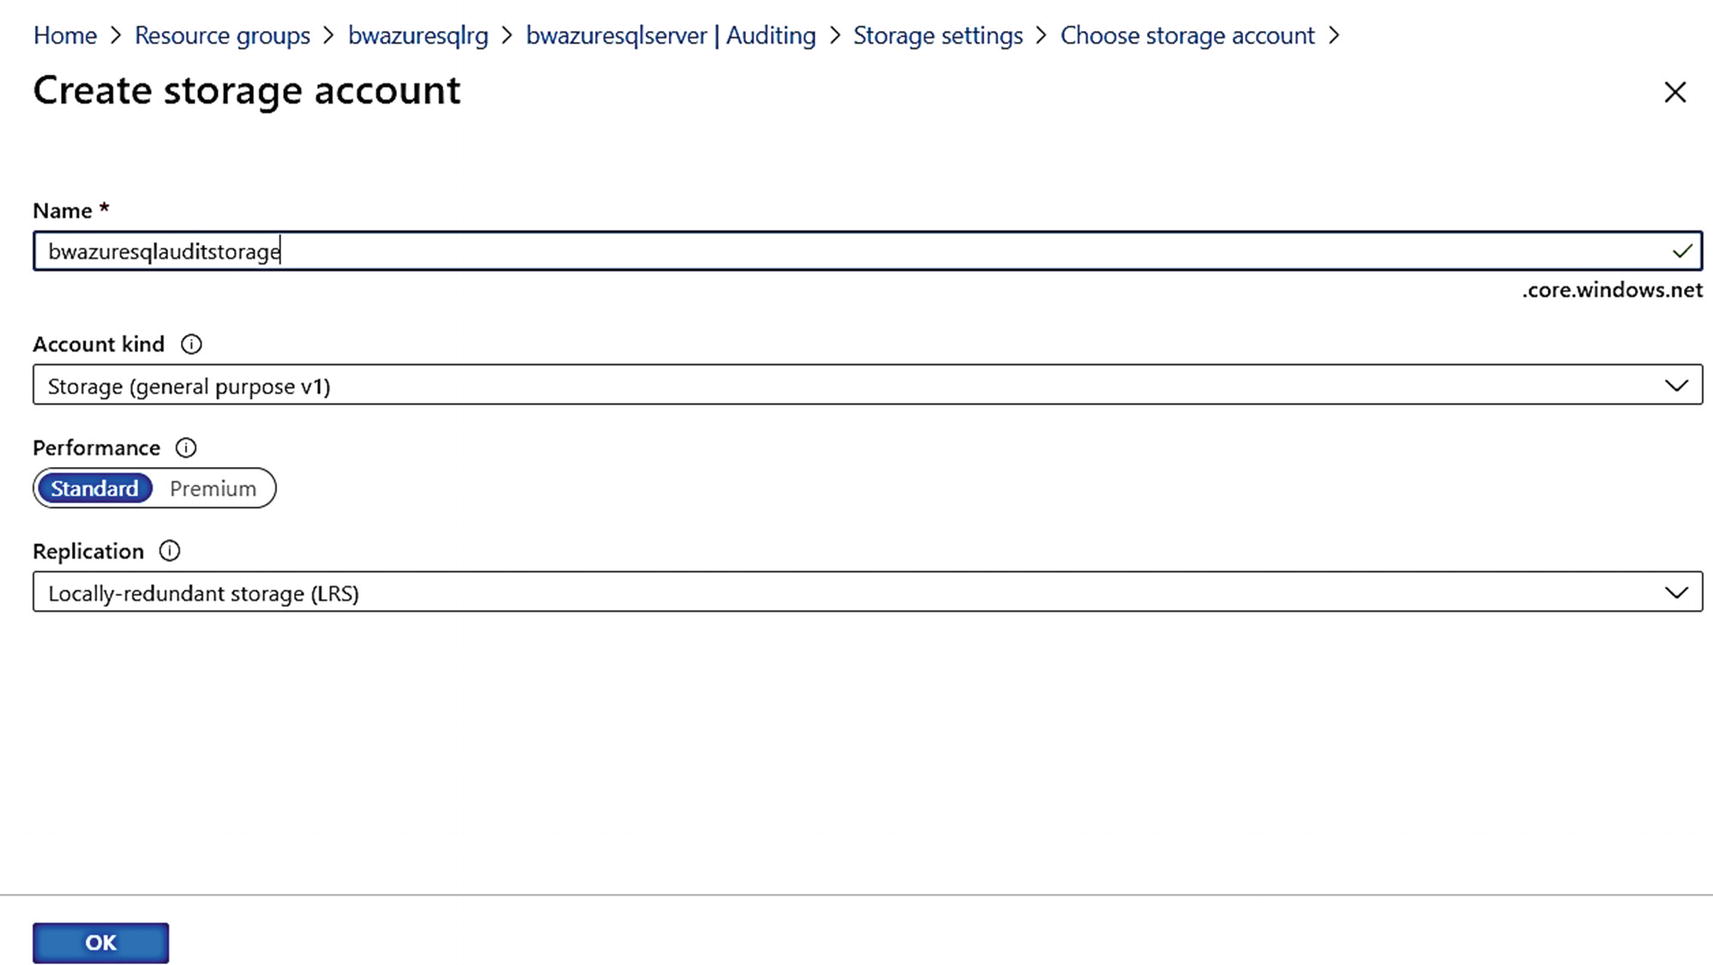
Creating a new storage account for auditing for Azure SQL Database
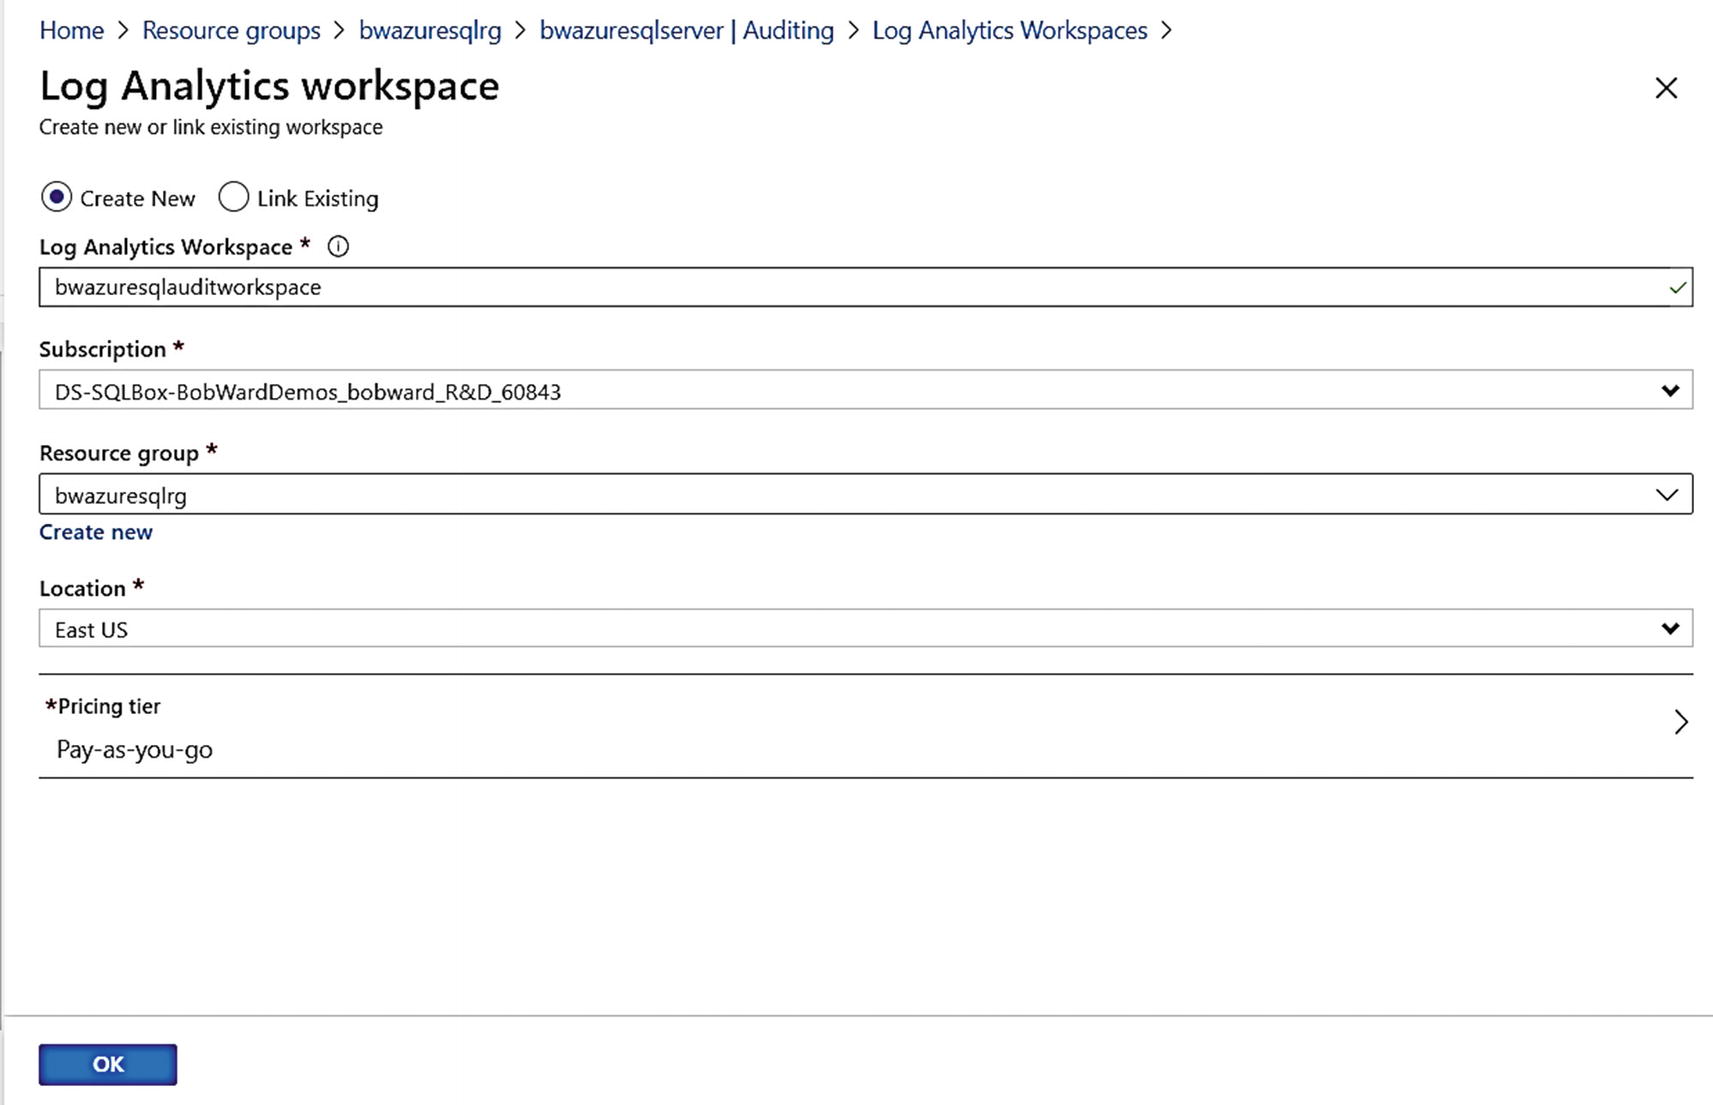
Creating a Log Analytics workspace for auditing for Azure SQL Database
I then clicked Save to save the audit configuration for Storage and Log Analytics. Once this was successful, the user interface looks odd here since it is tempting to hit Save again. Don’t do that or hit the X in the right-hand corner! Just select Overview in the Resource menu of the logical server.
BATCH_COMPLETED_GROUP – Audit all successful SQL statements.
SUCCESSFUL_DATABASE_AUTHENTICATION_GROUP – Audit a successful login to a database.
FAILED_DATABASE_AUTHENTICATION_GROUP – Audit a failed connection to a database.
All the possible action groups to use can be found at https://docs.microsoft.com/en-us/sql/relational-databases/security/auditing/sql-server-audit-action-groups-and-actions. You can use the PowerShell cmdlet Set-AzSqlDatabaseAudit to enable other action groups.
With SQL Server, you typically can view an audit through SSMS or using the system function sys.fn_get_audit_file. It turns out you can do the same thing for each database as part of the logical server. Let’s look at two different ways to view this audit data using the Azure portal.
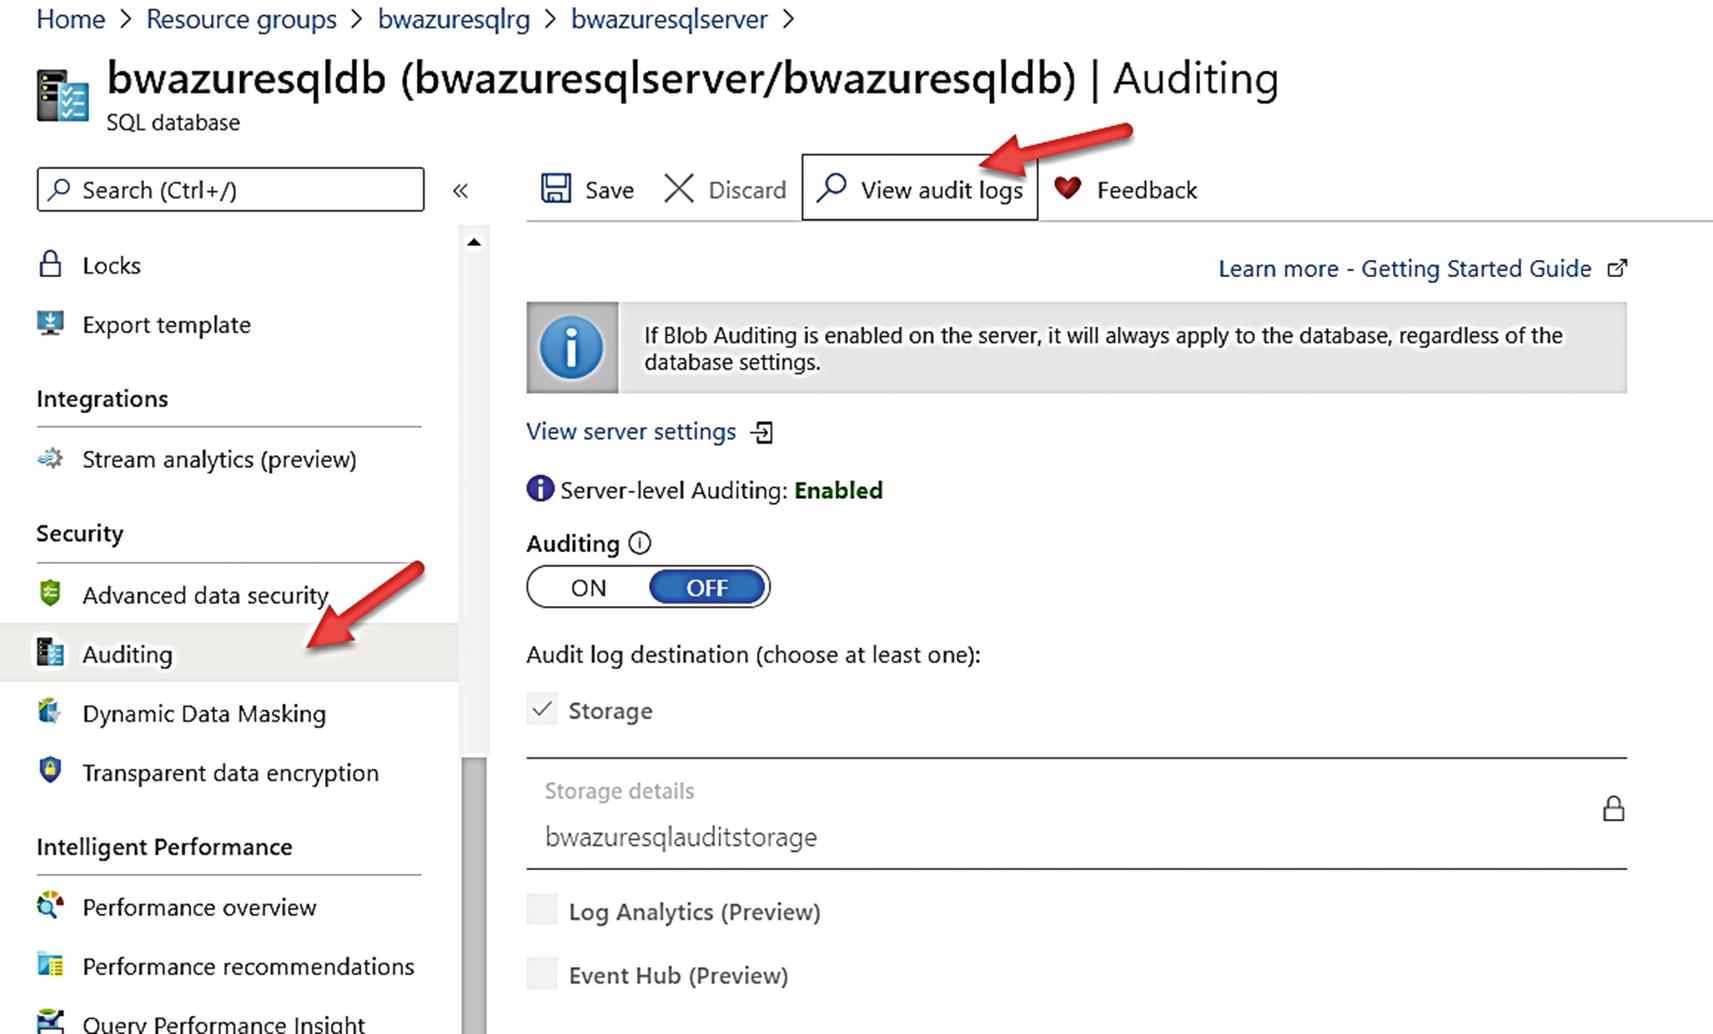
Selecting an audit for an Azure SQL Database
Notice on this screen Auditing is off for the database, but the information message above it says it is enabled for the server. This means auditing is also enabled for this database.

Viewing audit for Azure SQL Database
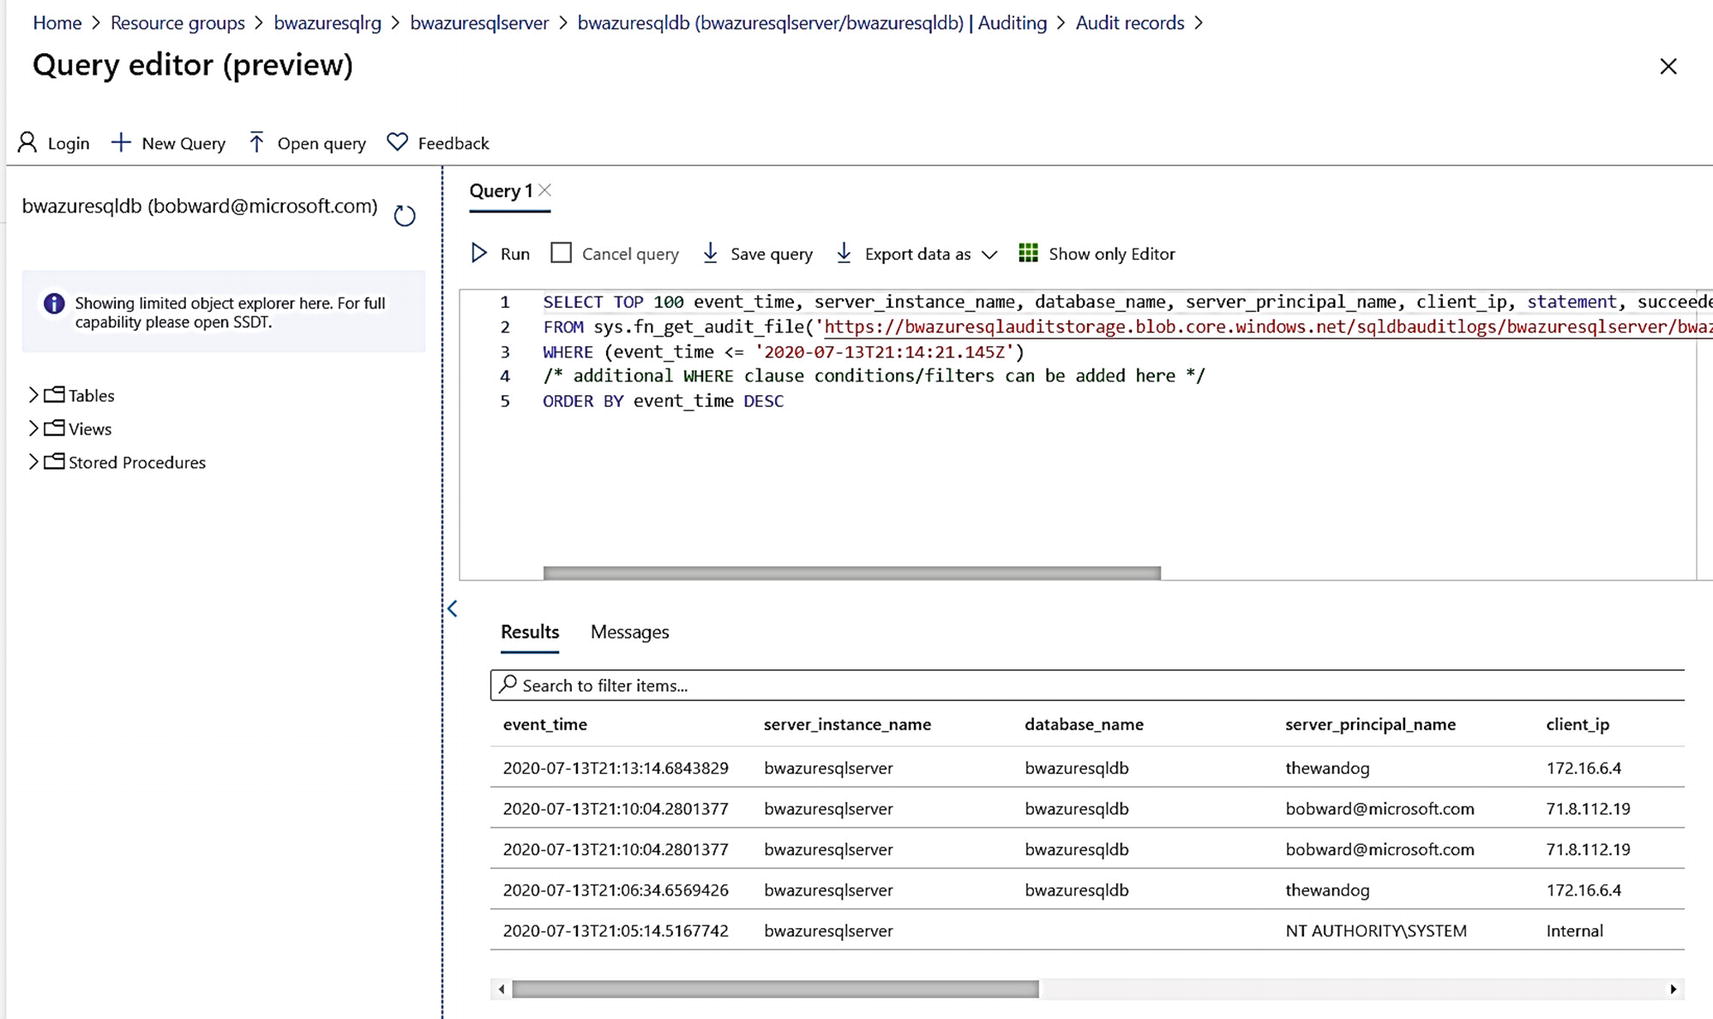
Using the Query Editor to view audit data
Notice a query is automatically populated to use sys.fn_get_audit_file to read from the Azure storage account I configured for auditing and is the same result as the Audit records in the previous screen. I now will use the breadcrumbs at the top of the screen to go back to the Audit Records and view audit data for the database (I’ll get prompted to discard my changes).
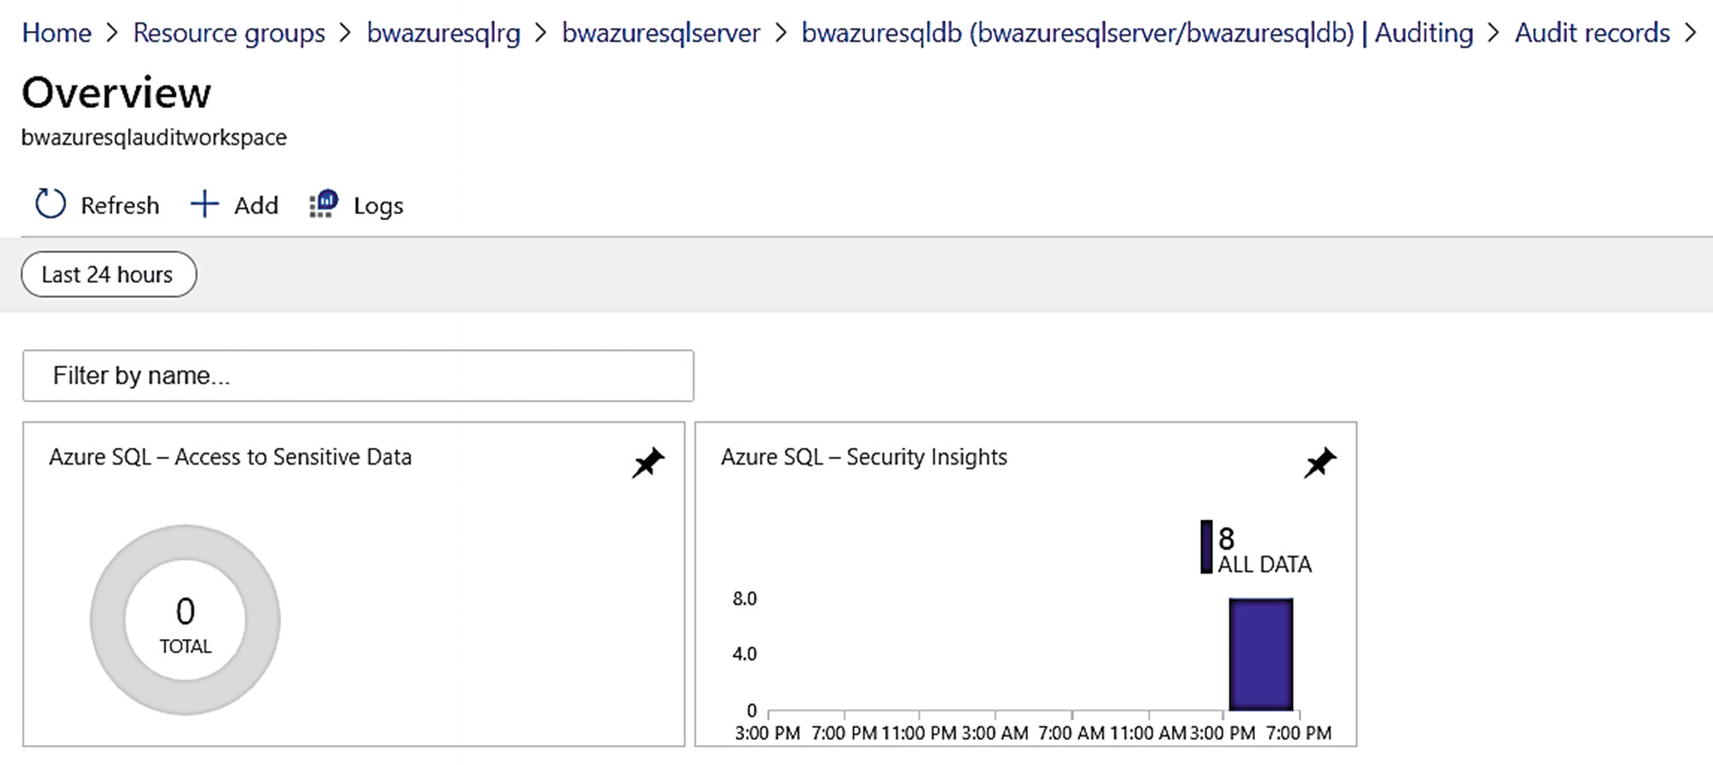
Log Analytics dashboard for auditing for Azure SQL Database
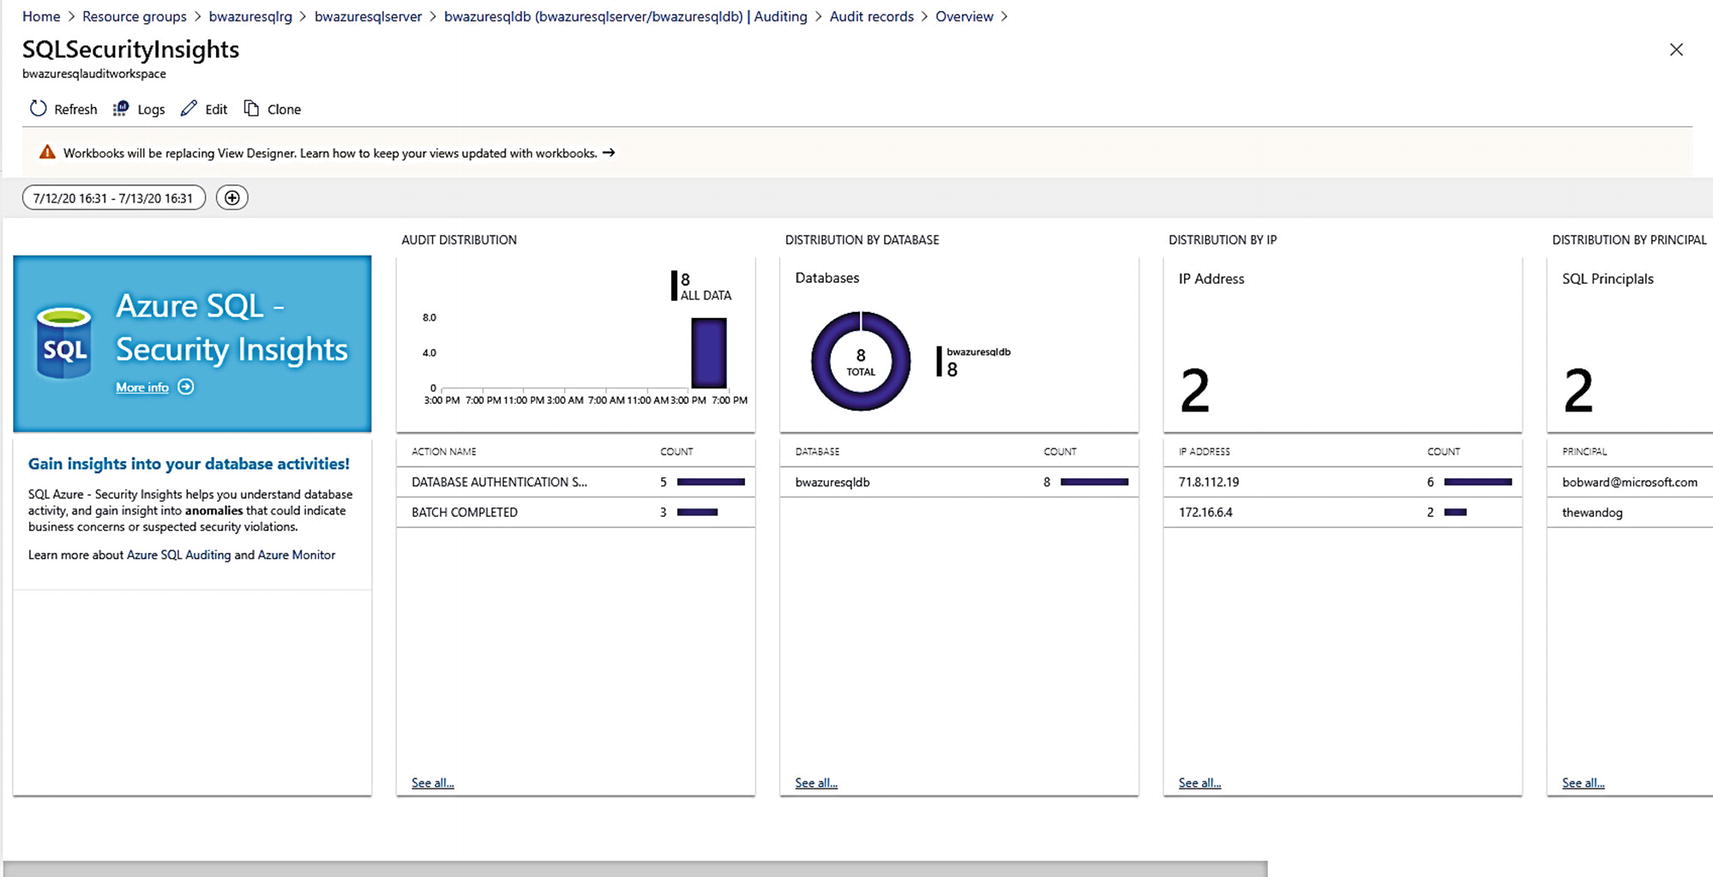
Azure SQL – Security Insights dashboards
I’ll leave these audits active as they might help when looking at certain scenarios later in the book. Use the breadcrumbs to navigate back to the Overview of the logical server.
Advanced Data Security
Now that you have seen how to authenticate, protect your data, and audit activities to monitor security, let me show you some capabilities to go further with security with Azure SQL. We call this suite of capabilities Advanced Data Security (ADS). At any point, you can read our documentation covering ADS at https://docs.microsoft.com/en-us/azure/azure-sql/database/advanced-data-security.
Advanced Data Security is managed and works the same with Azure SQL Managed Instance and Database. I’ll use my Azure SQL Database for examples in the rest of this section of the chapter.
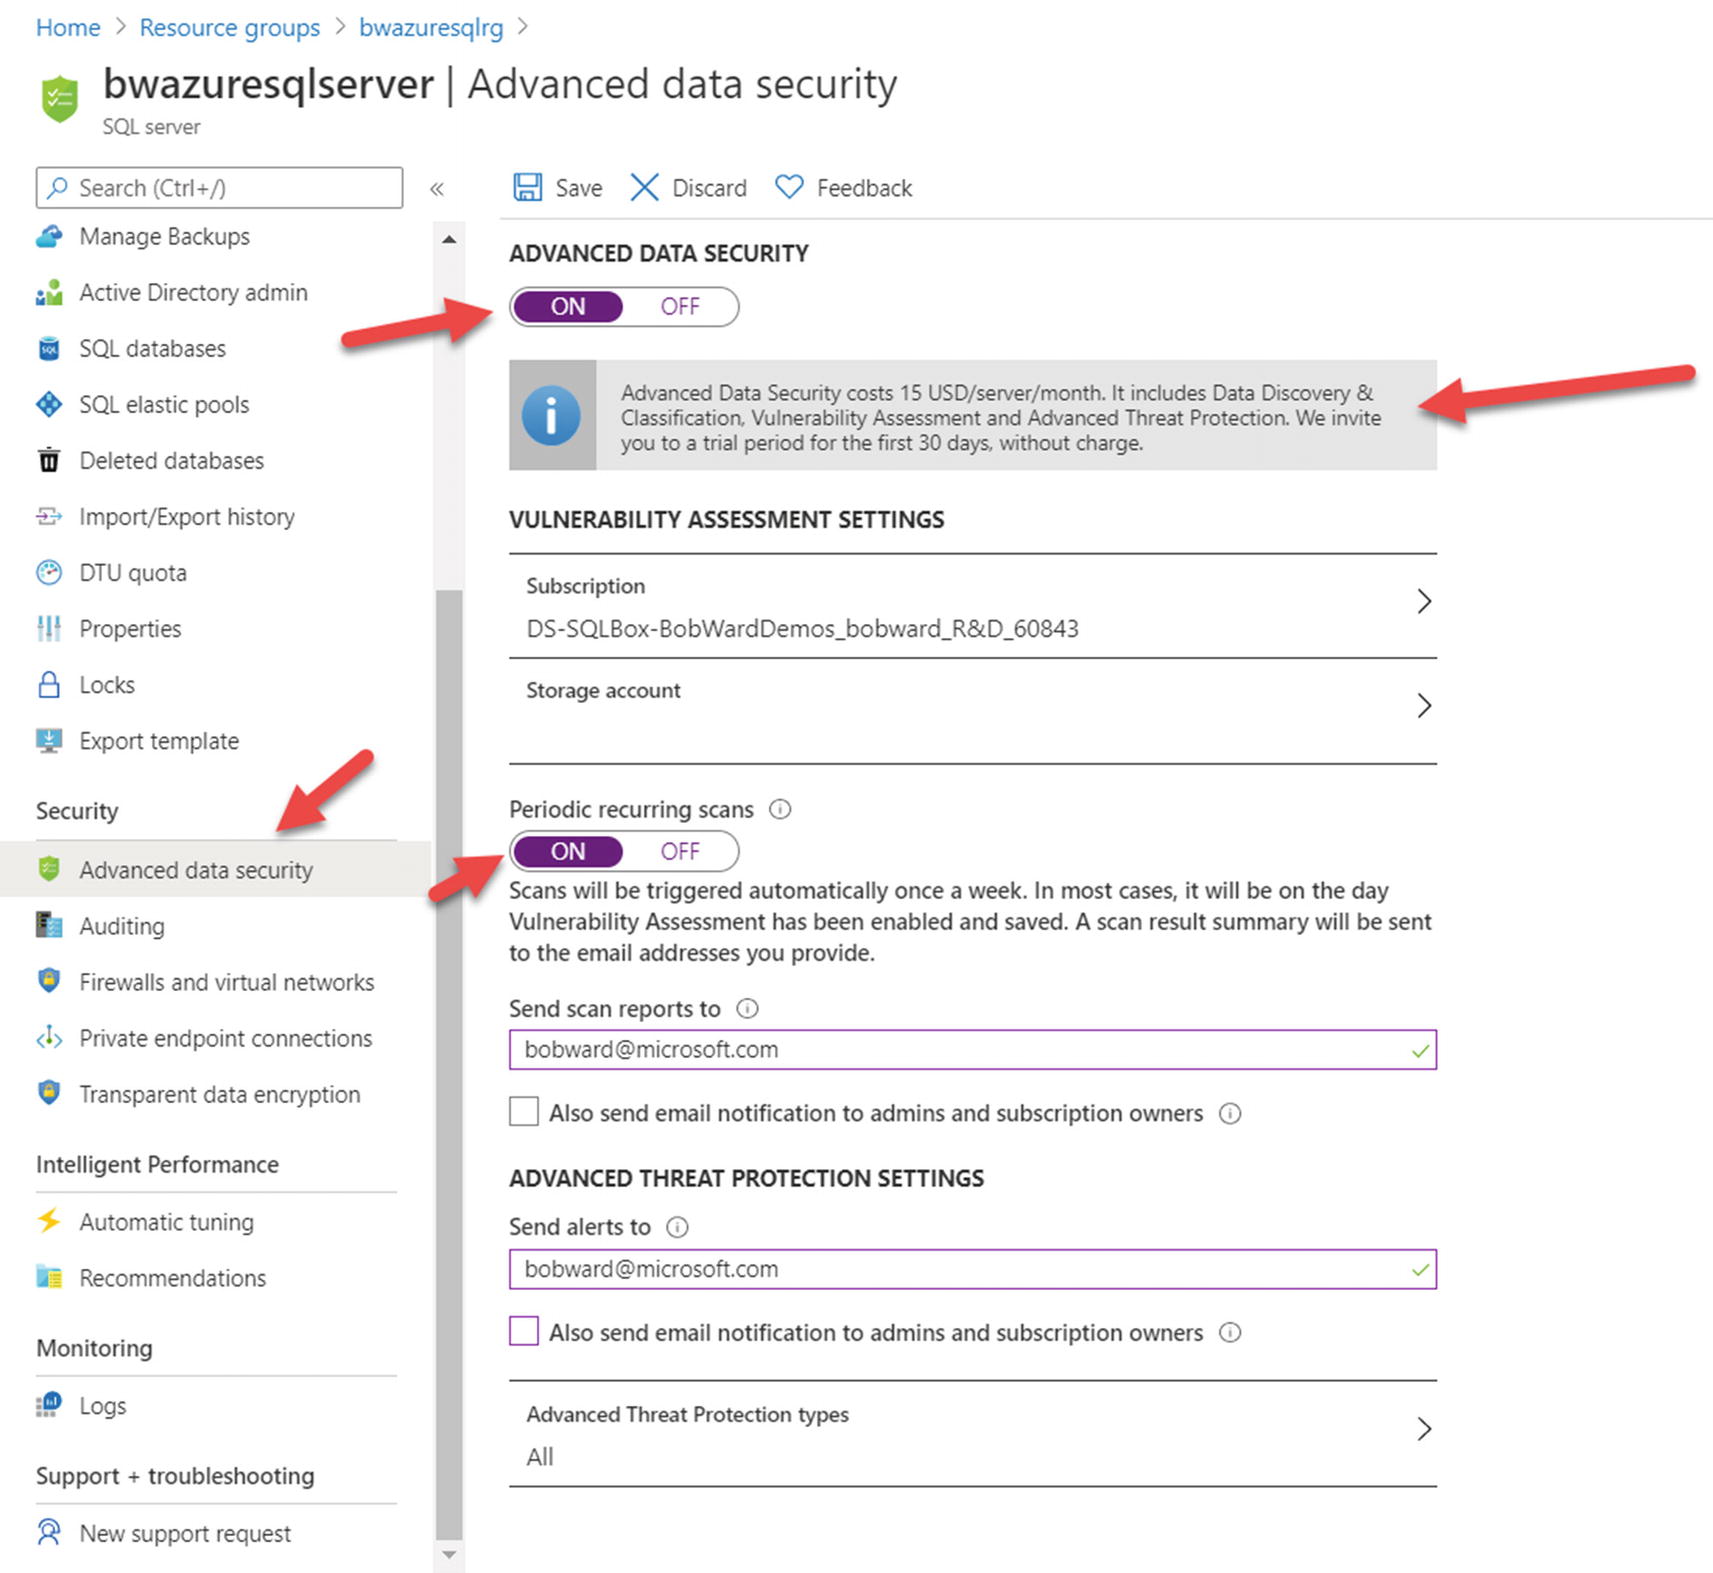
Configuring Advanced Data Security
There are a few things worth pointing out here on this screen. I turned Periodic recurring scans to ON. This means Vulnerability scans are done on a scheduled basis. I also added an email account to send the scanned results. I also added an email address to send Advanced Threat Protection alerts. Also notice that Advanced Data Security does not come for free included with your costs for the database. There is a trial period of no charge, but then after that, there is a small charge each month for using these services. Before saving, I selected the Storage Account for auditing bwazuresqlauditstorage to hold the Vulnerability results.
Notice on this screen you can configure different Advanced Threat Protection (ATP) types to track which include SQL injection, Brute Force, and others (or just use the default of All). You will learn more about ATP types later in this chapter.
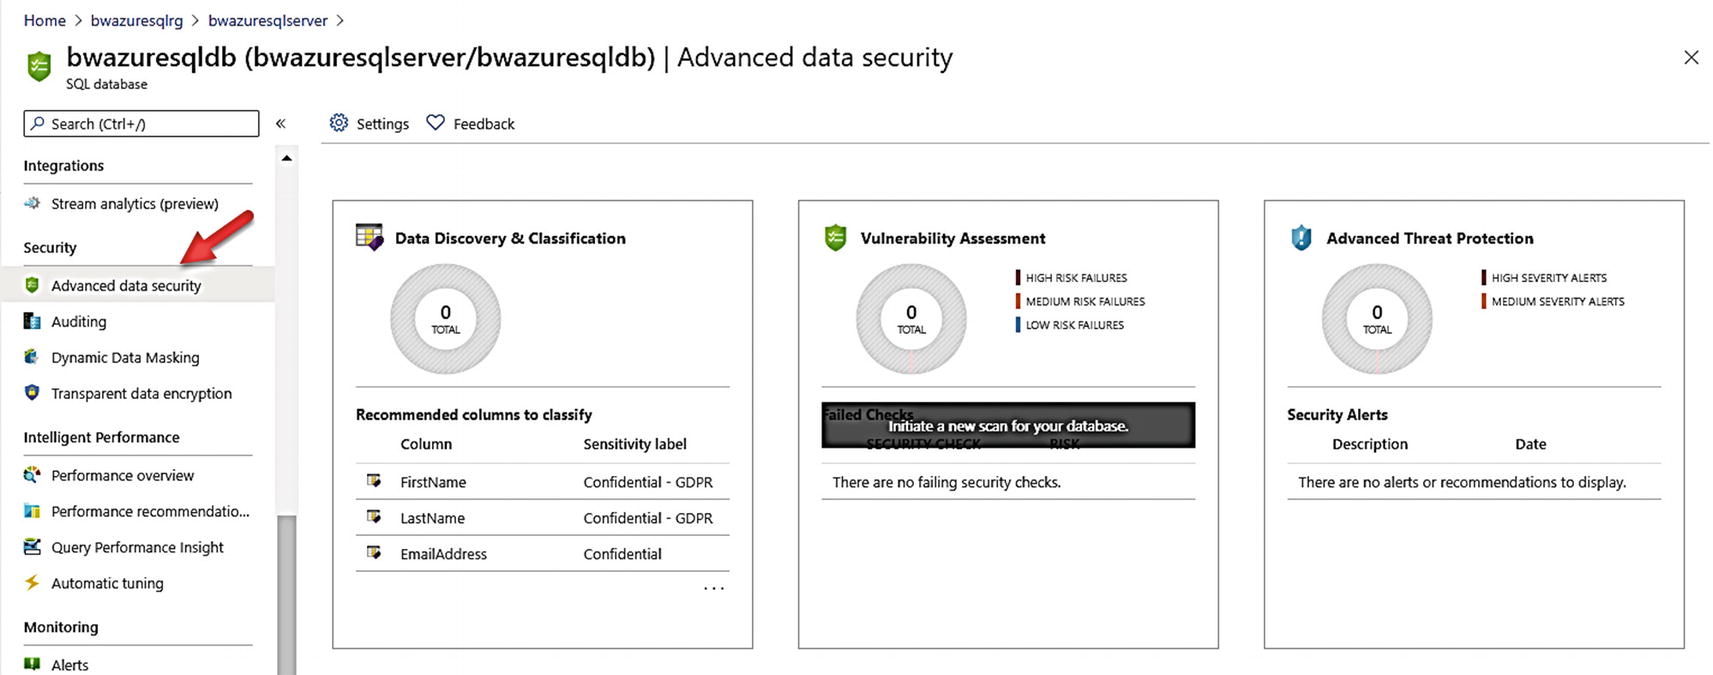
Advanced Data Security for Azure SQL Database
Data Classification
You may be in a situation where you need to classify and label columns for tables in your database and then audit access to these columns. One possible scenario where you need to do this is for compliance with certain regulations such as General Data Protection Regulation (GDPR).
Azure SQL and SQL Server provide a capability to label and classify your columns through T-SQL statements like ADD SENSITIVITY CLASSIFICATION. You can use T-SQL against SQL Server, Azure SQL Managed Instance, and Database. You can see how to use T-SQL for Data Classification in a workshop I built for SQL Server 2019 at https://github.com/microsoft/sqlworkshops-sql2019workshop/blob/master/sql2019workshop/03_Security.md.
In addition, PowerShell cmdlets exist to work with data classification for Azure SQL. See Set-AzSqlDatabaseSensitivityClassification and Set-AzSqlInstanceDatabaseSensitivity as examples. az CLI also provides interfaces for data classification such as az sql db classification.
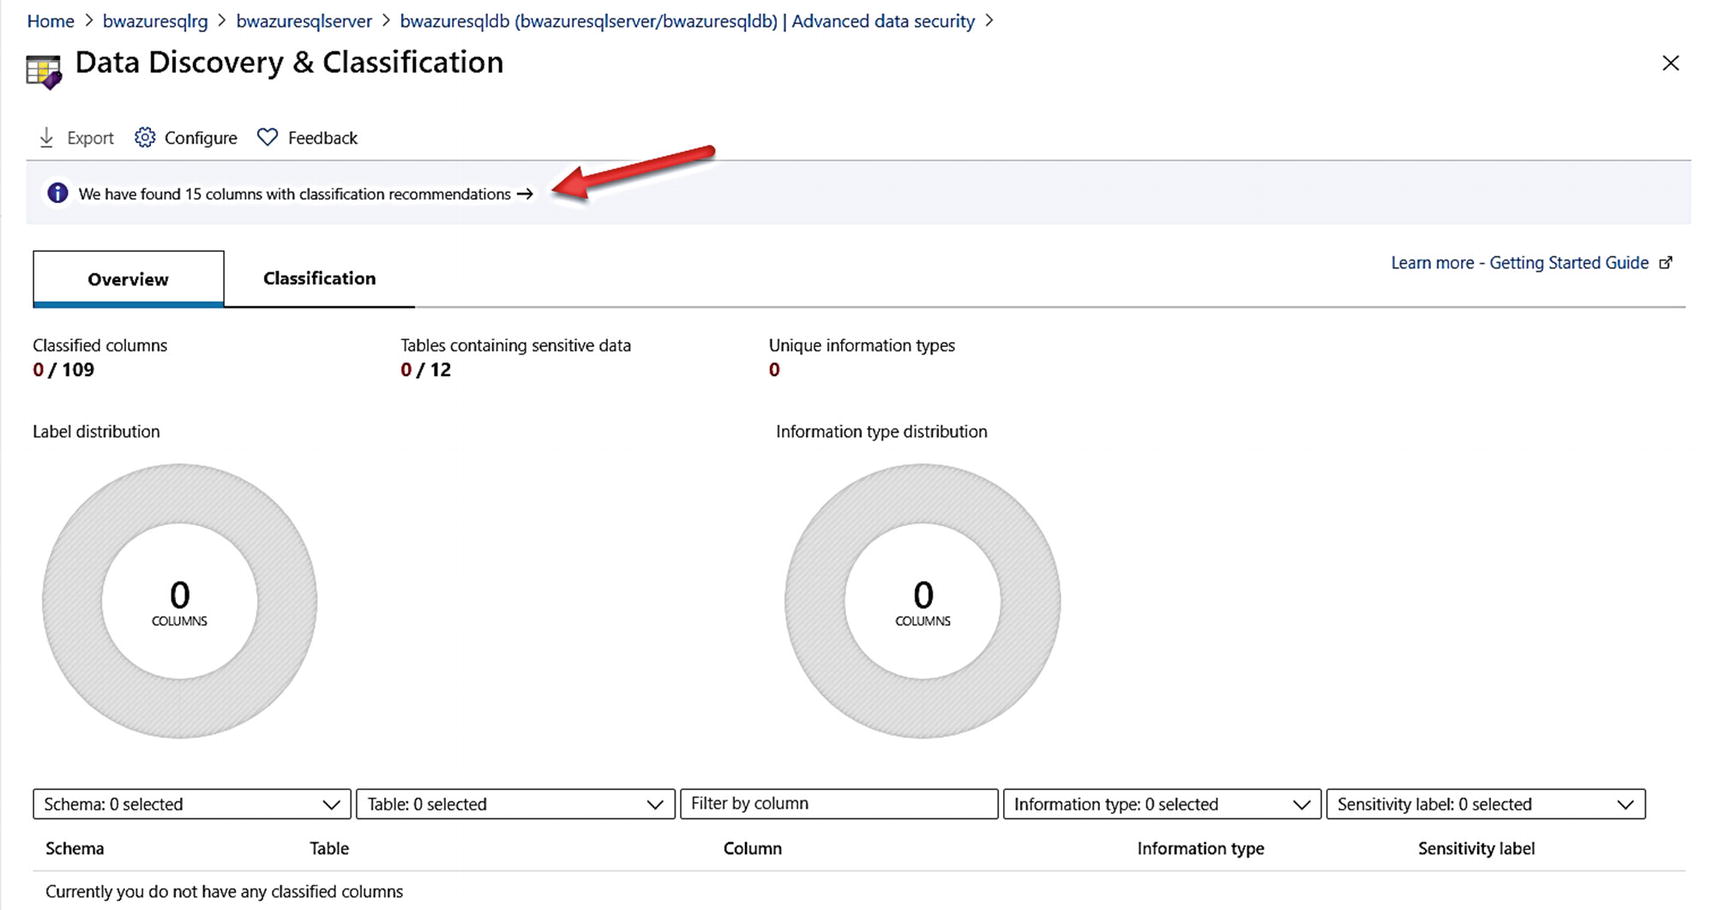
Data Classification for Azure SQL Database
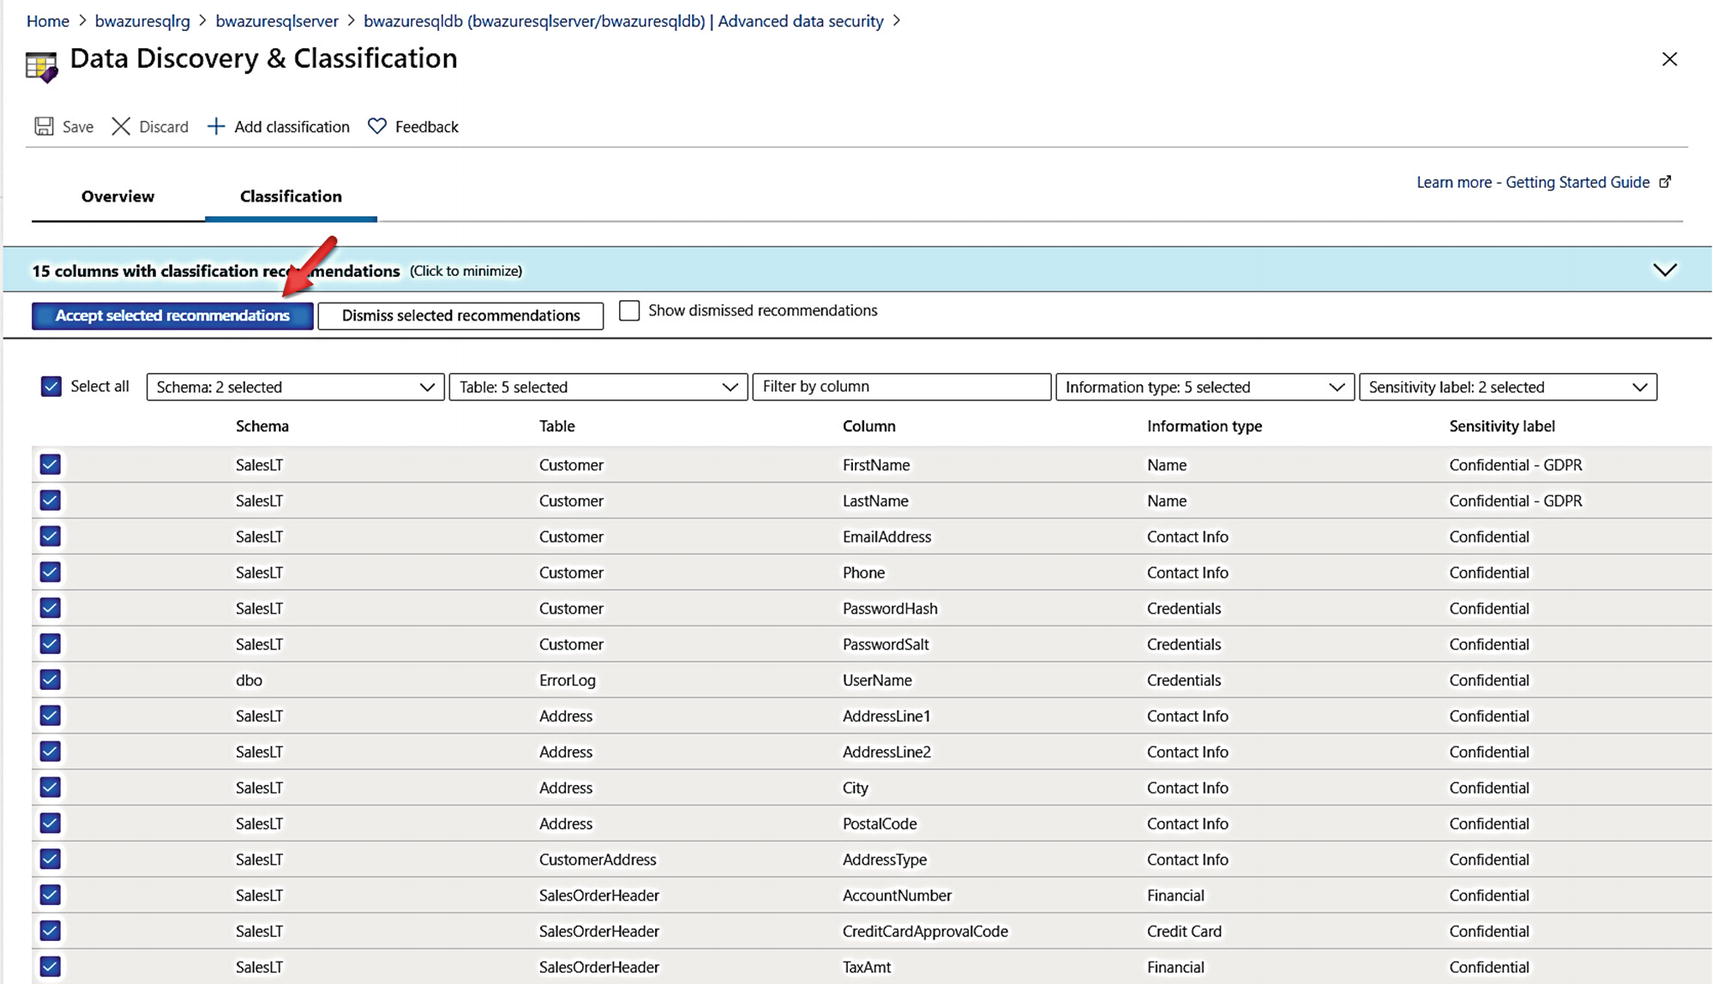
Recommendations for Data Classification

Data classification dashboard populated
You have several options to manage classifications at this point. If you select Classification, you can add a classification through the portal. As a developer, you can query the sys.sensitivity_classifications catalog view to see classification definitions. You can also use PowerShell to view classification definitions with Get-AzSqlDatabaseSensitivityClassification and even recommendations with Get-AzSqlDatabaseSensitivityRecommendation. Similar interfaces exist for Azure SQL Managed Instance.
If you select Configure as seen in Figure 6-34, you can add your own Information Types and Sensitivity Labels that can now appear as options to choose for other classifications in the portal. This is called SQL Information Protection policies and is only available with certain permissions in your Active Directory. Because this is considered an information protection policy for the Azure tenant, you must have administrative privileges, which I don’t at Microsoft (another example of separation of duties for a corporation). You can read more about information protection policies at https://docs.microsoft.com/en-us/azure/security-center/security-center-info-protection-policy.
When you add classifications, you can add your own information types and labels for a new column through the portal, T-SQL, and PowerShell. However, they won’t show up as options to choose from a list of information types and labels unless you use information policies.
Once you have classified columns for your tables, you will likely want to audit who has accessed these columns. Since we configured auditing previously in this chapter, we should be able to see this access.
I’ll use my Azure VM bwsql2019 with SSMS to connect (with my AAD account) to the logical server and the context of the bwazuresqldb database. I then will use Object Explorer to find the SalesLT.Customer table, right-click the icon for the table, and use the Select Top 1000 rows option.
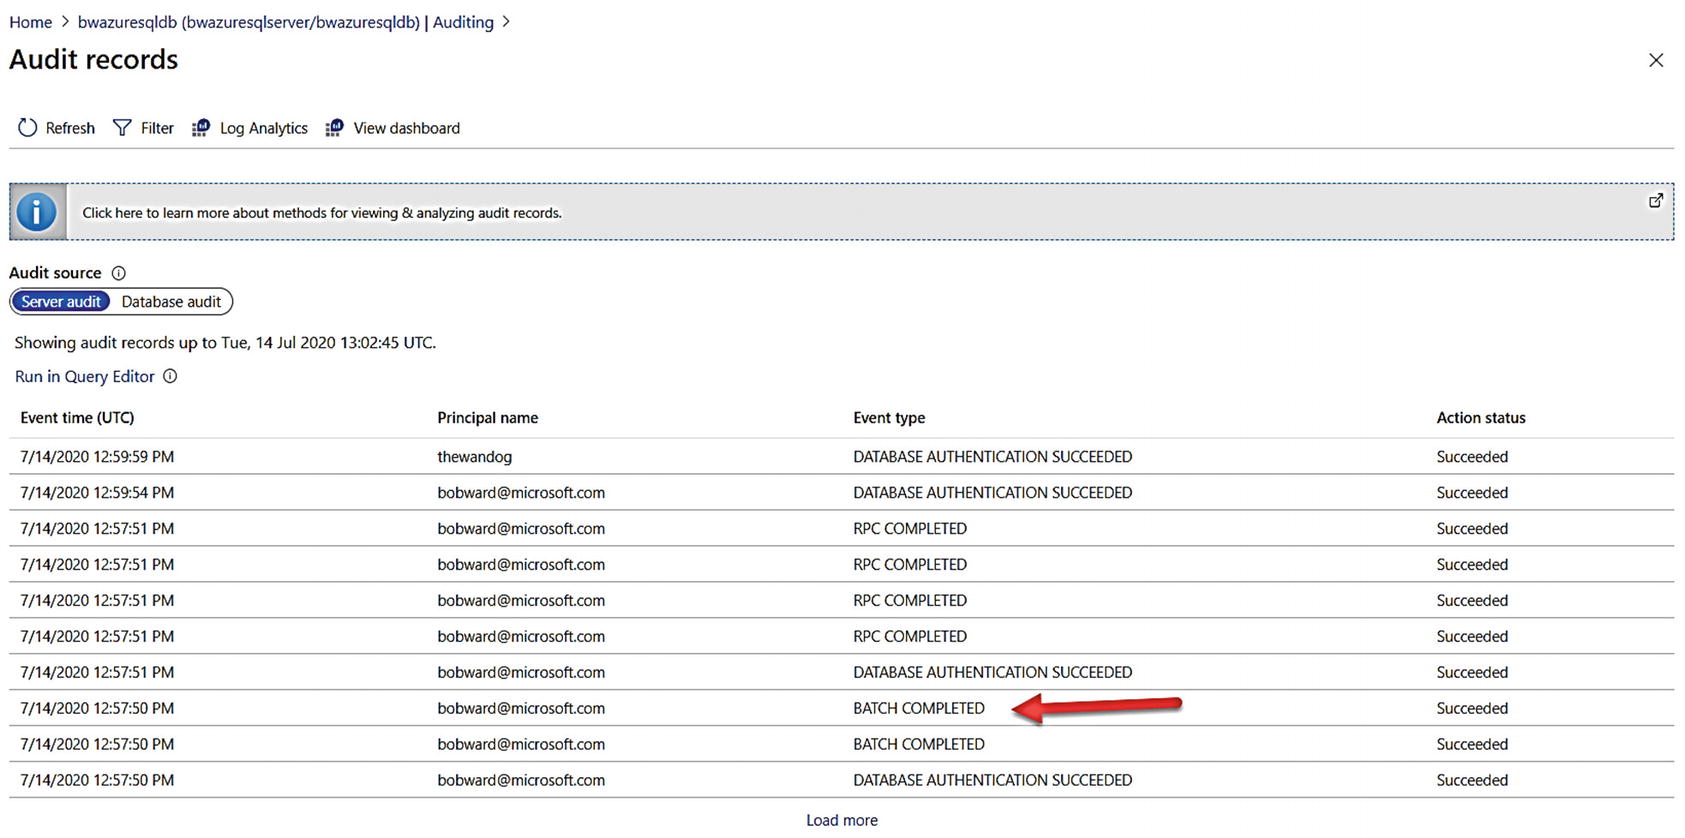
Audit records from SQL Database Audit
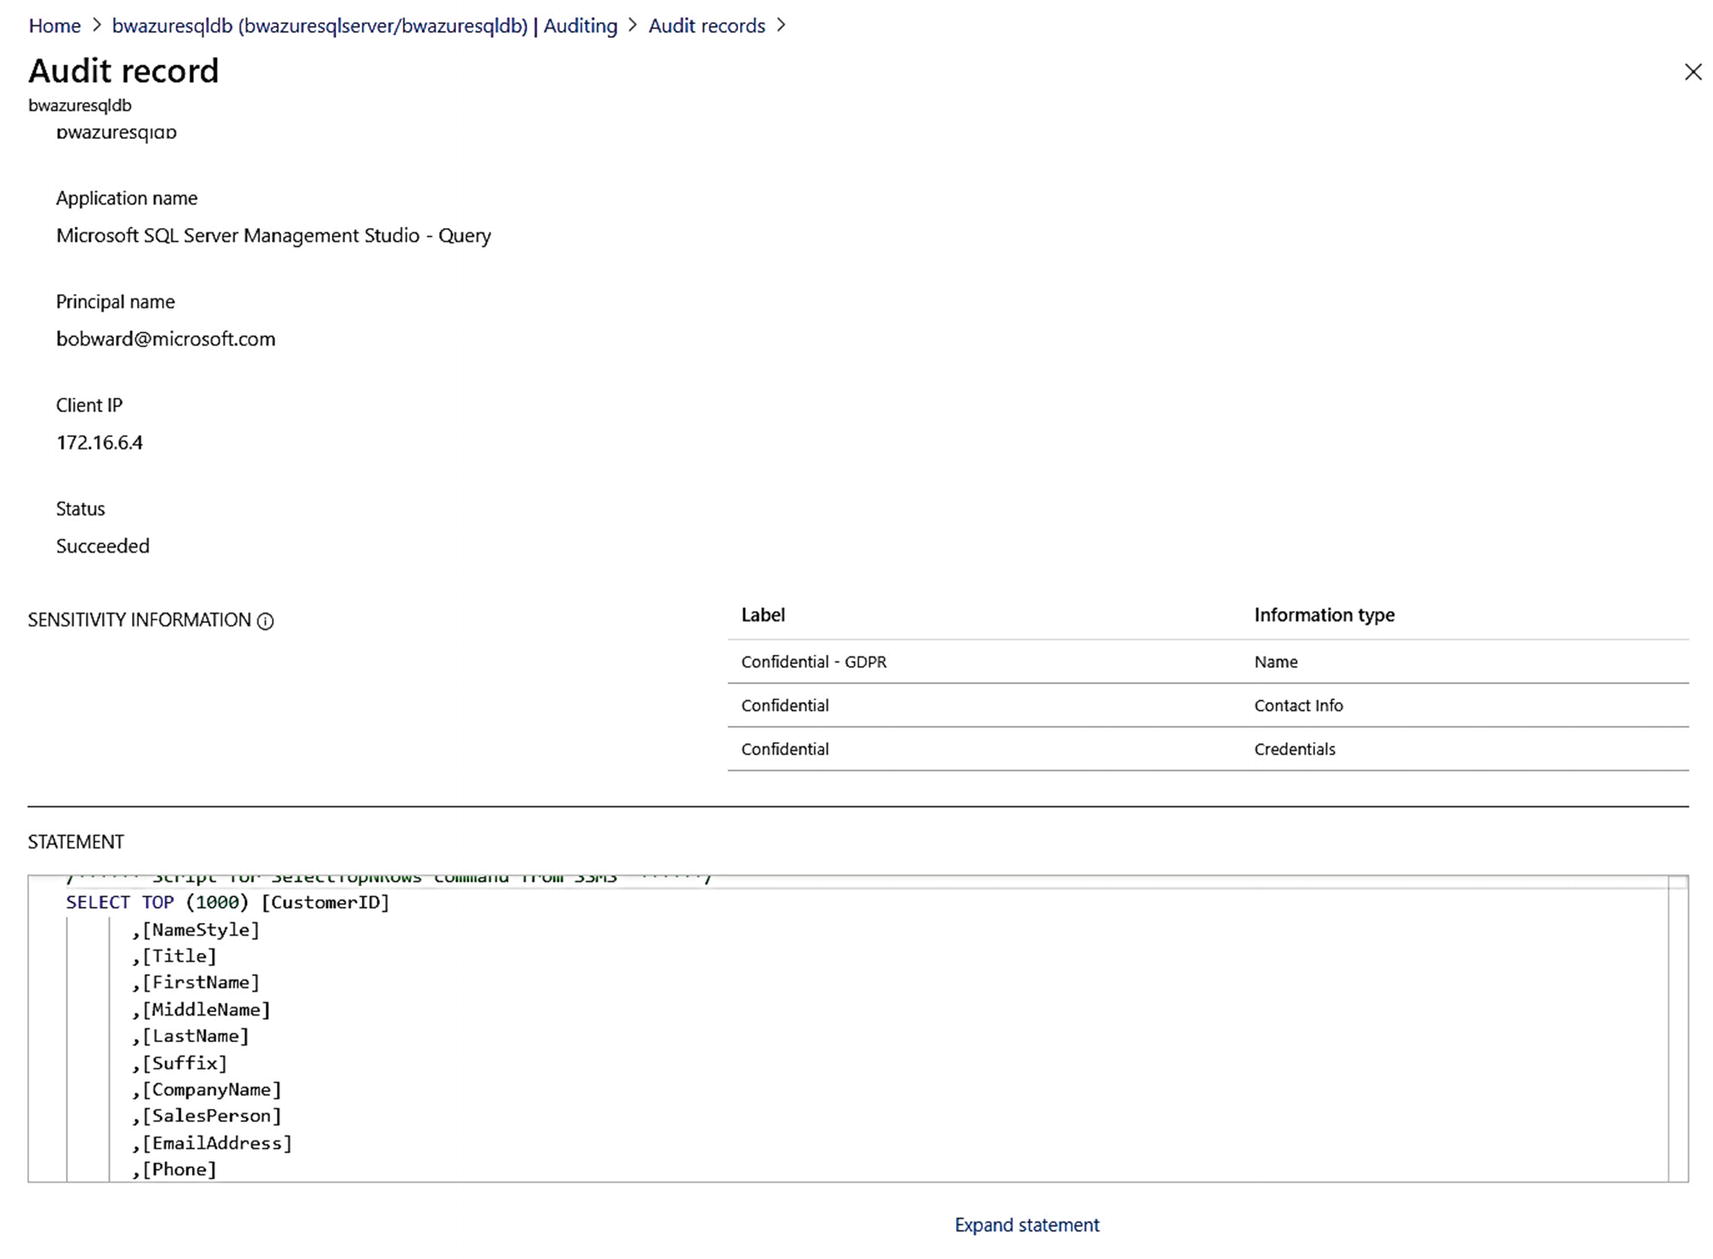
An audit record showing sensitivity information access
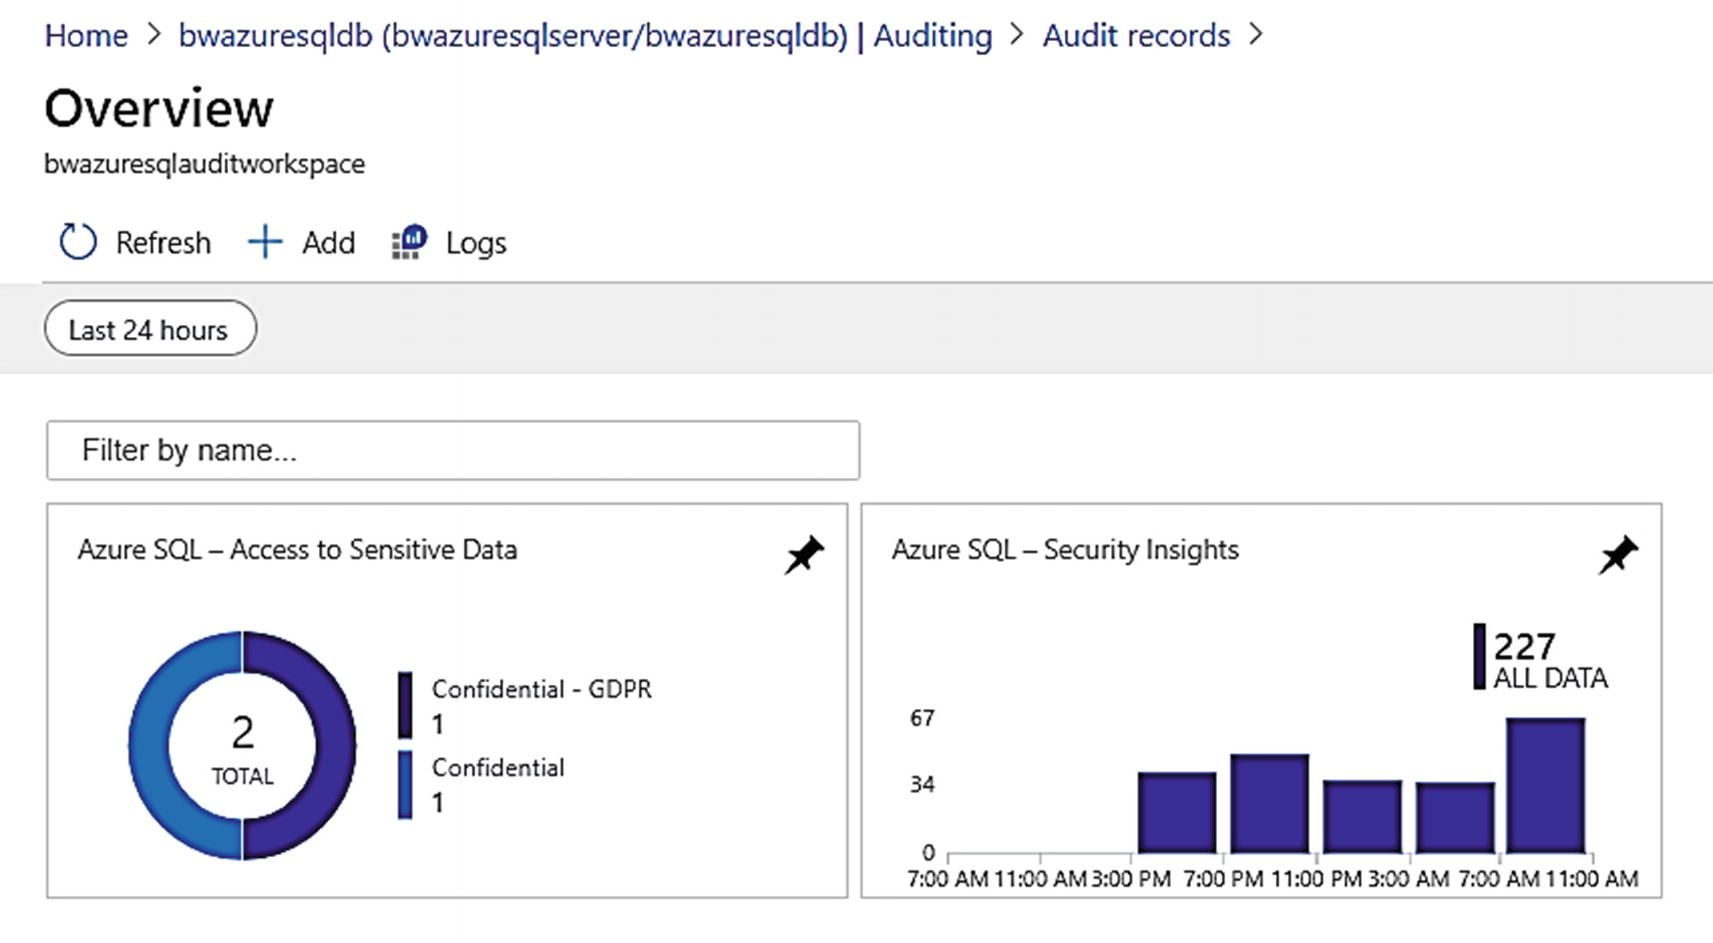
Log analytics dashboard showing access to sensitive data
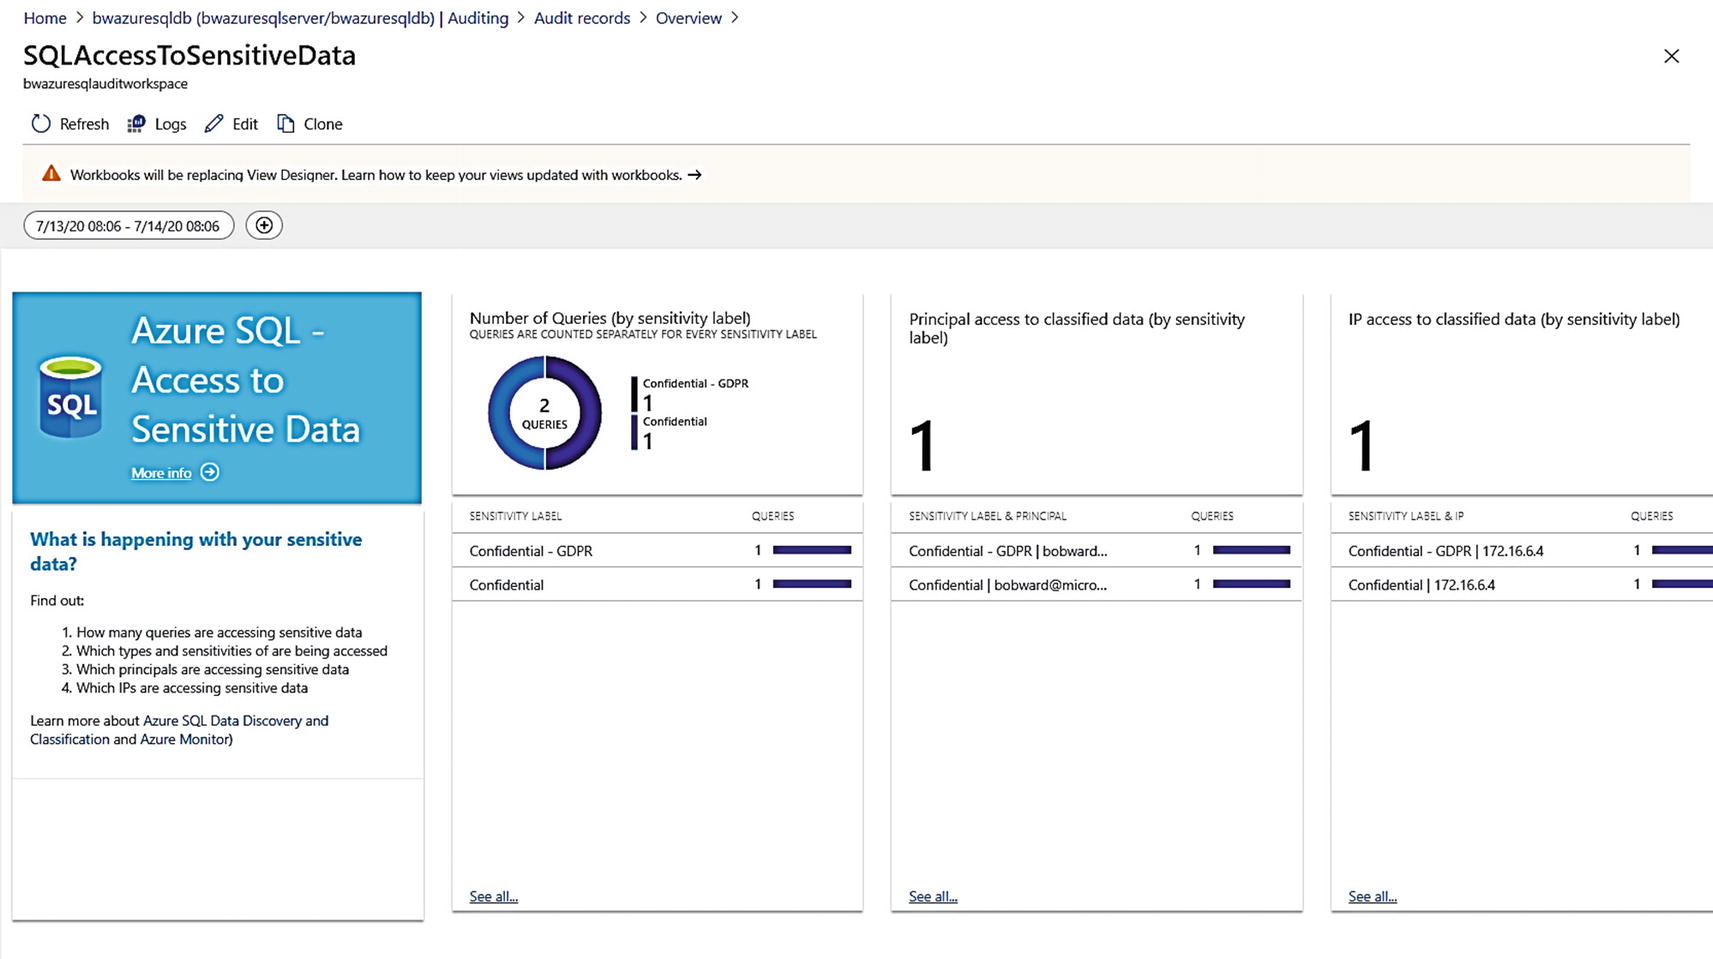
Access to sensitive data audit dashboard
Data classification functionality is included in SSMS and works against SQL Server 2019 and Managed Instance (but not Azure SQL Database). This functionality existed in SQL Server 2017 but used a different approach. If SSMS is pointed to a SQL Server 2019 or Managed Instance, it uses T-SQL interfaces. Any modifications to Data Classification through SSMS will show up in the Azure portal for Managed Instance and likewise in SSMS.
For a complete review of Data Classification, look through the documentation at https://docs.microsoft.com/en-us/azure/azure-sql/database/data-discovery-and-classification-overview.
You can now use the breadcrumbs at the top to navigate back to the overview of your database.
Vulnerability Assessment
Another aspect to securing your data is to proactively monitor and check for any known security vulnerabilities. But what are known vulnerabilities? Azure SQL has a knowledge base of rules we have built (based on an industry standard from www.cisecurity.org/cis-benchmarks/) to scan your Azure SQL Manage Instances and Databases for configurations that might be considered vulnerable. I like to think of a vulnerability assessment like a virus checker which uses a scan method to look for possible issues.
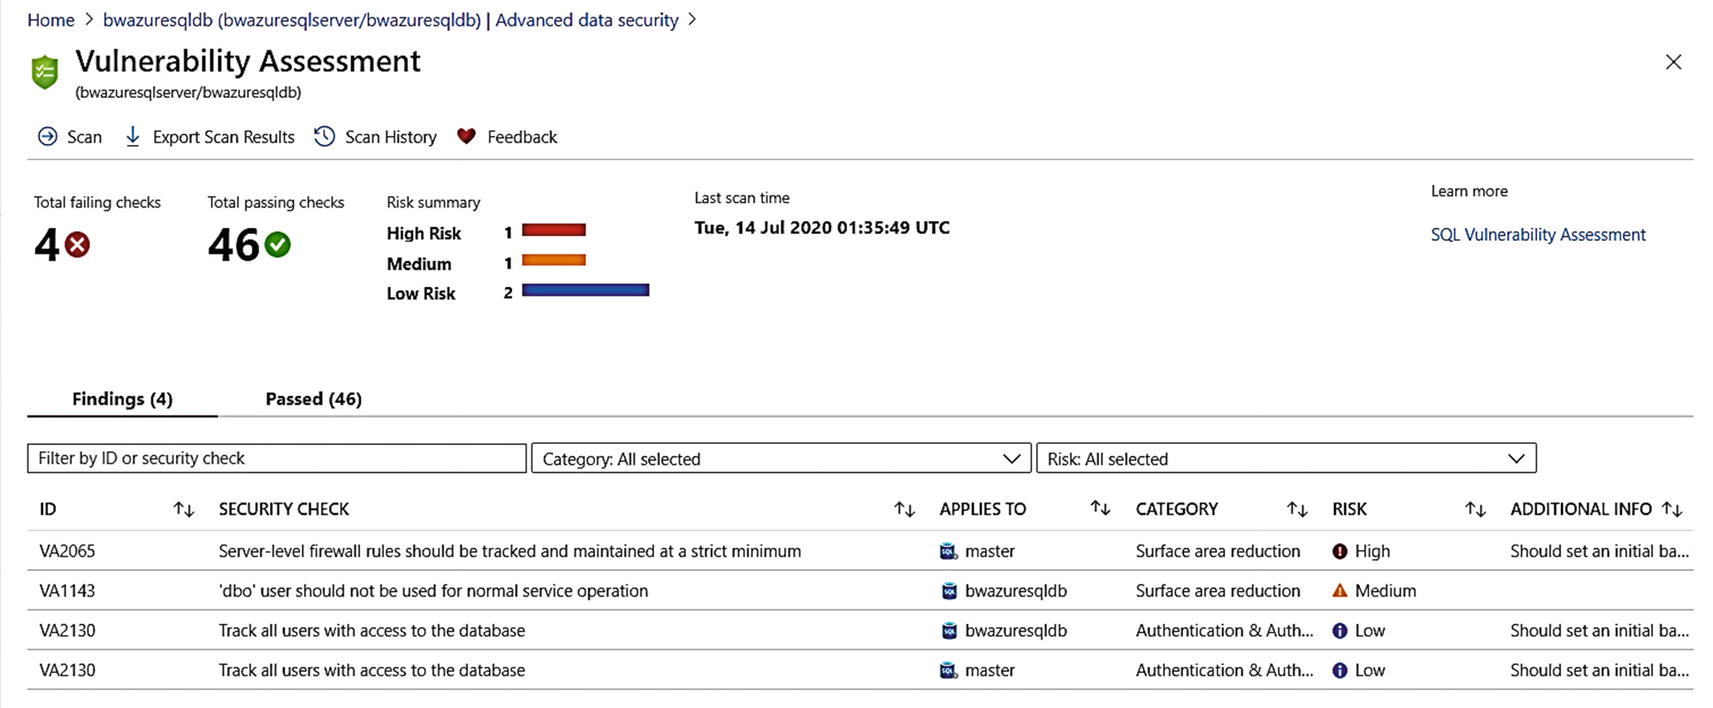
A scanned vulnerability assessment for Azure SQL Database
From the command bar, you can initiate a scan on-demand (remember when we configured Advanced Data Security, we set up for periodic scans which is once a week) or click Scan if you don’t see results immediately. A scan is very lightweight, typically only takes a few seconds, and is completely a read-only operation. You can also from the command bar export results to a .csv file and go back and look at the history of previous scans.
You can see in the results of the scan that we categorize Findings as High Risk, Medium, and Low Risk. You can also see there is an option to look at Passed results, which are checks we make that we determine are good on your deployment (at least for this scan).
Let’s look at one of these rules that have fired to see how you can use Vulnerability Assessments in an effective way.
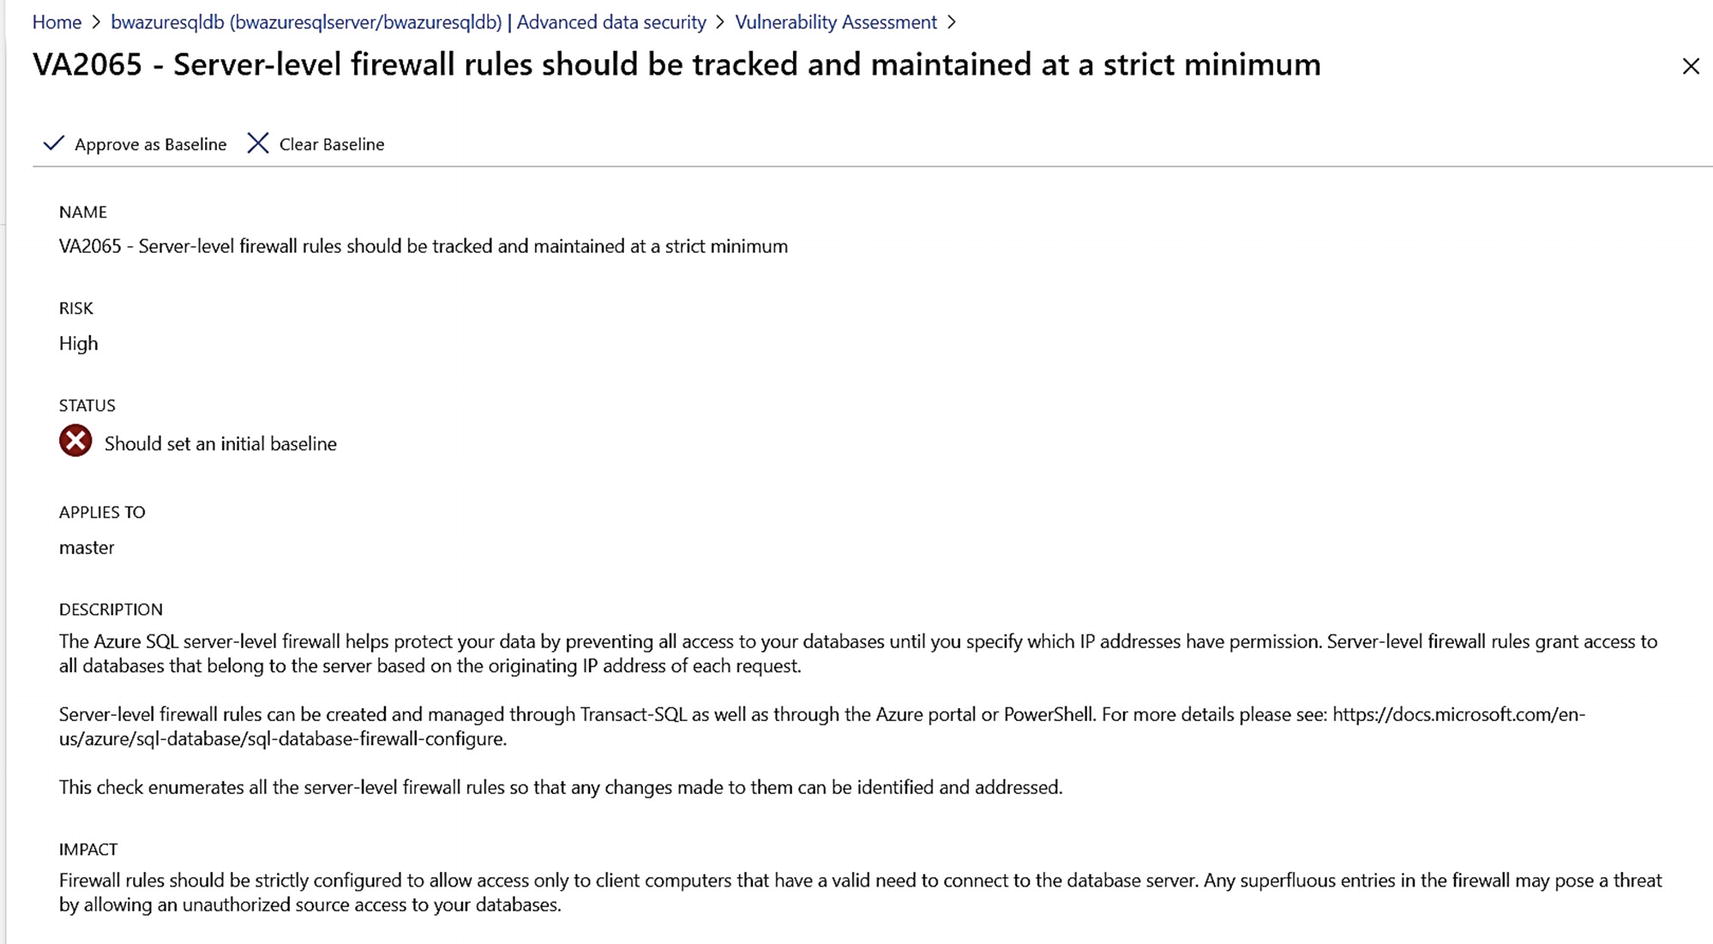
A high risk vulnerability detected for Azure SQL Database
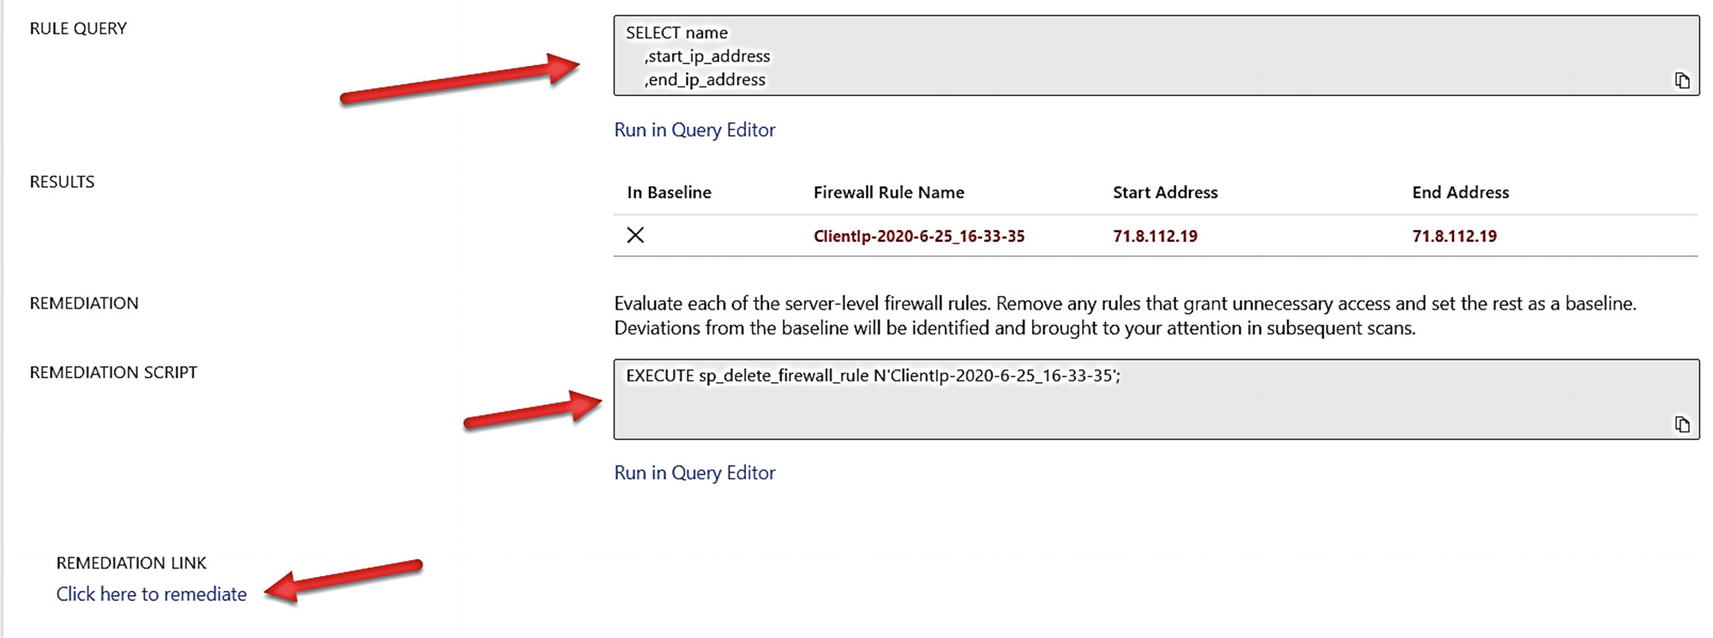
Details of high risk rule from Vulnerability Assessment
This page shows you the query we use to detect the rule and remediation steps both with T-SQL and a link that will allow you to change this in the Azure portal. Once you make the remediation, the fired rule will move to the Passed category. Since we have private link configured for this logical server, it may make sense to remove this firewall rule. If you later added the firewall back after a scan, the subsequent scan would pick it back up again.
The existence of a firewall rule doesn’t mean you will be open to widespread hacking. As I’ve started earlier in this chapter, it is not the most secure way to allow connections to your server.
Let’s say you are OK with the firewall rule and don’t want any scans to flag this as a high-risk problem. You can use the option on the command bar for the rule to Approve as Baseline. When you do that, this rule will never fire unless you clear the baseline. You can apply a baseline to any rule that is fired.
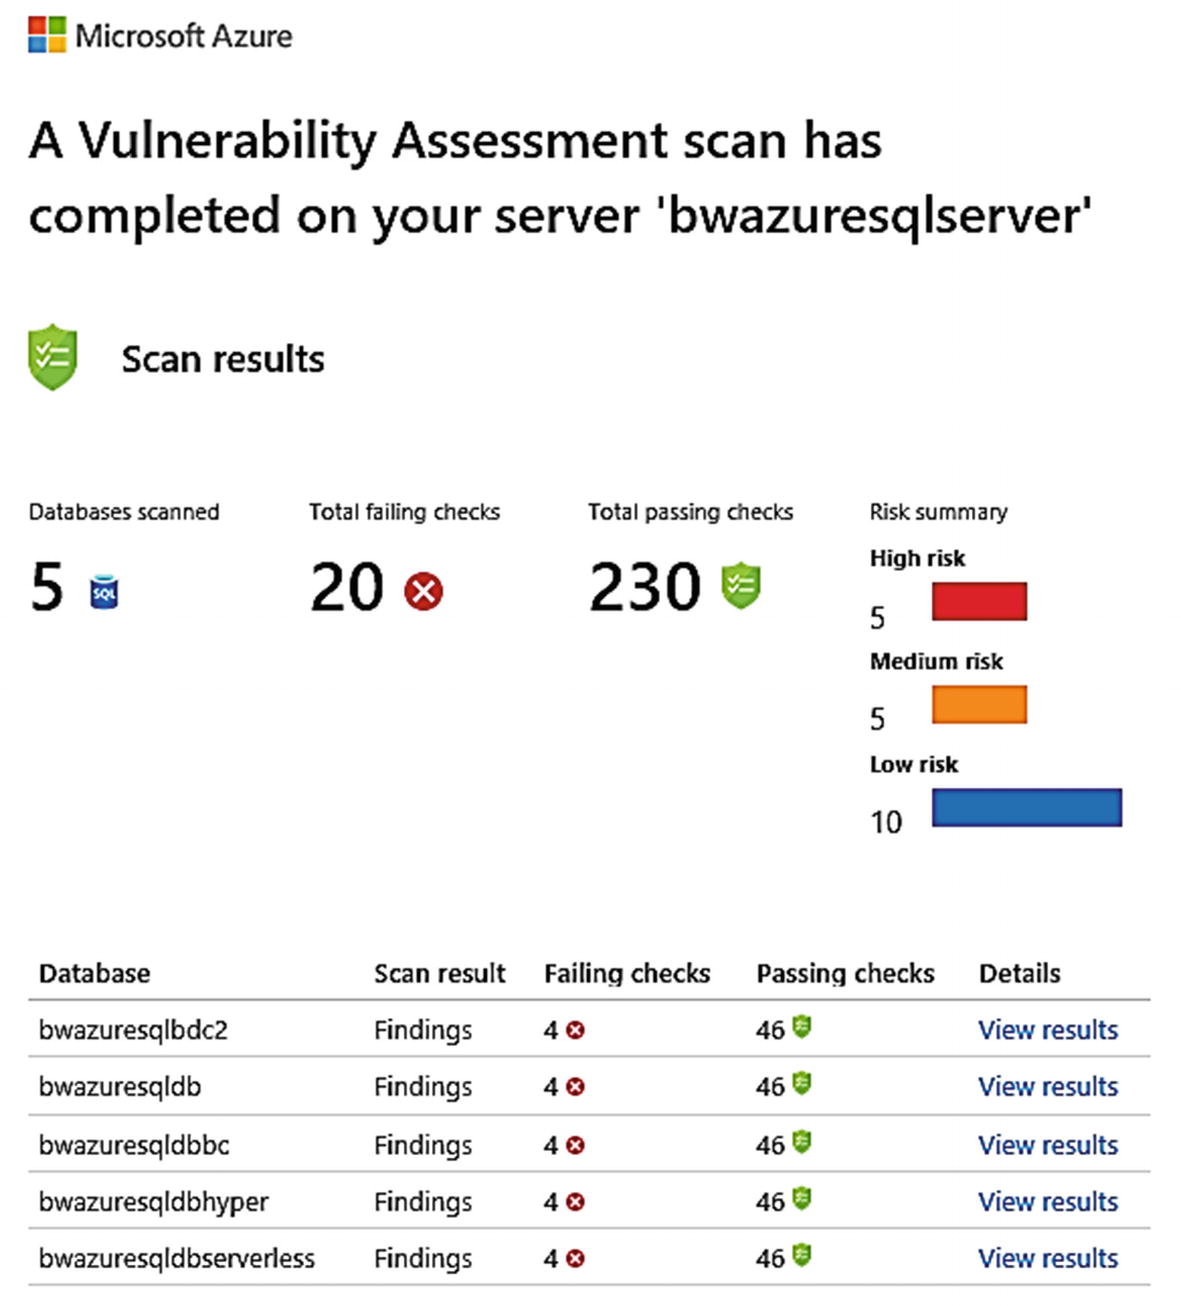
Email of schedule scan for logical server
You can also use PowerShell (e.g., Get-AzSqlDatabaseVulnerabilityAssessmentScanRecord) to show and manage Vulnerability Assessments.
SSMS provides a feature to run a Vulnerability Assessment. It works against both Managed Instances and Database and has similar rules, but the tool is not integrated or tied into Azure portal or PowerShell.
You can learn more about Vulnerability Assessments at https://docs.microsoft.com/en-us/azure/azure-sql/database/sql-vulnerability-assessment.
Advanced Threat Protection (ATP)
The last component of Advanced Data Security is Advanced Threat Protection (ATP). I mentioned the history behind ATP in Chapter 1 of the book. ATP is a service run in Azure that is designed to detect potential harmful attacks, access, or exploits to Managed Instance or Database.
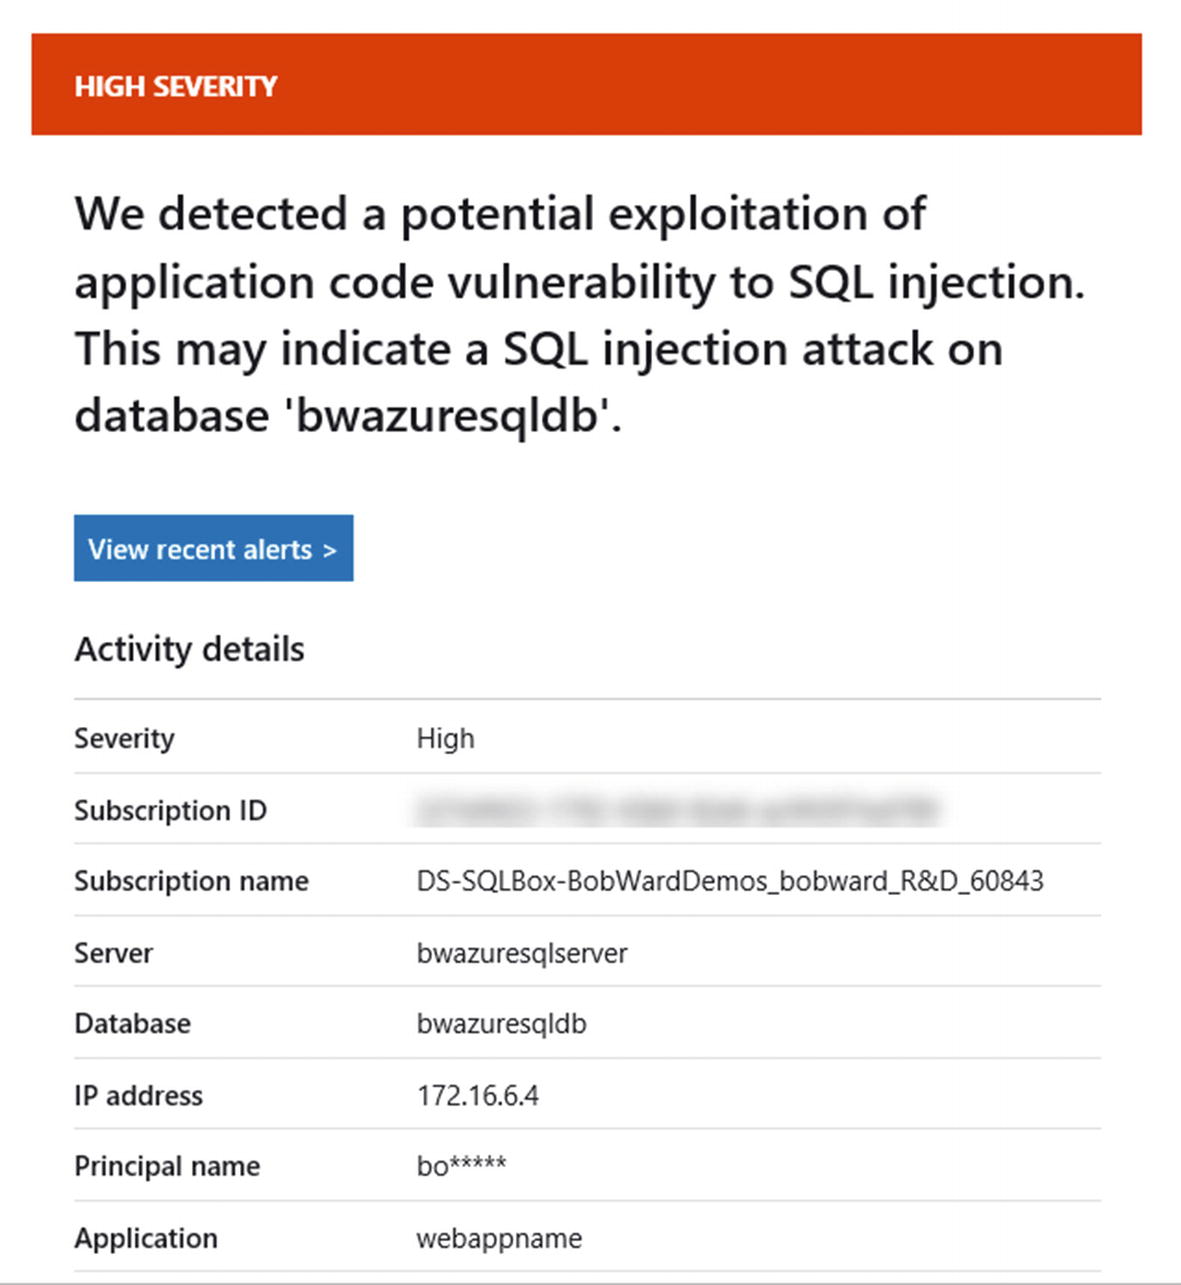
ATP uses Extended Events and Machine Learning technology to detect and alert you to certain types of suspicious activities. An example of a suspicious activity is code designed for a SQL injection . You can read all the various rules and alerts detected by ATP at https://docs.microsoft.com/en-us/azure/security-center/alerts-reference#alerts-sql-db-and-warehouse.
While we don’t document the details of how we detect all rules, I can show you how to simulate a SQL injection using SSMS to see an alert fire.
We filter out SSMS as an application because no one sends in injections from a tool like SSMS. Therefore, I used a different application name to simulate a real application sending a query that looks like it could be a SQL injection attack.
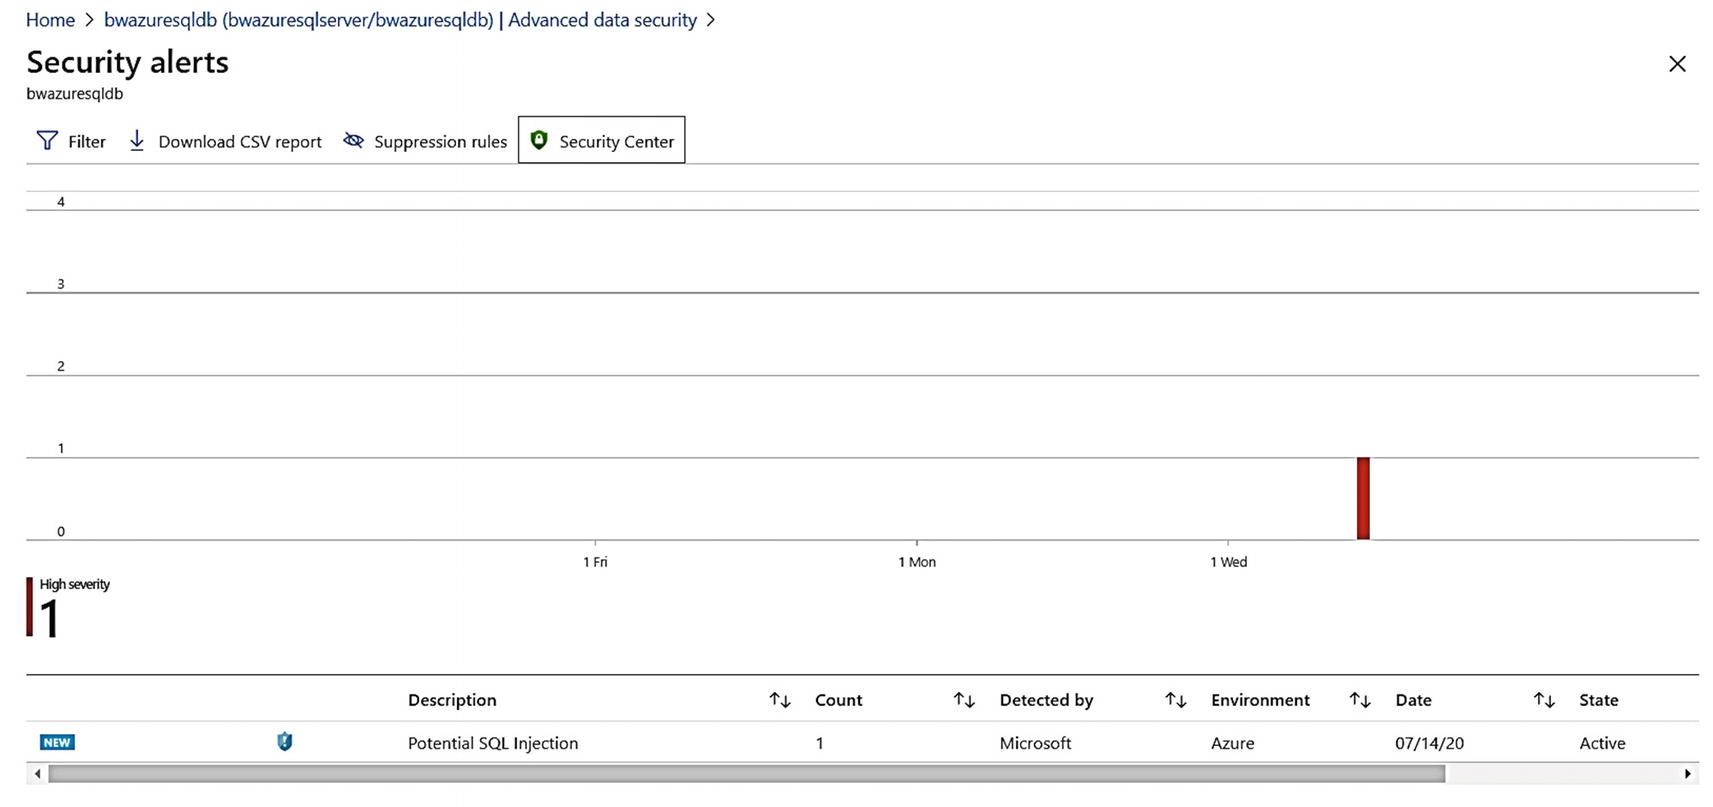
A SQL injection detected by Advanced Threat Protection
SQL injection is an interesting security topic and we have documentation at https://docs.microsoft.com/en-us/sql/relational-databases/security/sql-injection to explain it and why the query pattern I used was detected as an injection.
Email for security alert from Advanced Threat Protection
You can see on the dashboard screen you have an option to download a report as a .csv file or create rules to suppress certain types of alerts.
ATP also has interfaces for PowerShell (e.g., Set-AzSqlDatabaseThreatDetectionPolicy) and az CLI (e.g., az sql db threat-policy).
Advanced Threat Protection (ATP) is one of the signature capabilities that is unique to Azure. ATP works for Managed Instance and Azure SQL Database and at the time of the writing of this book was in preview for Azure Virtual Machine.
Azure Security Center
Among the benefits of deploying your resources in Azure are services that work across all your resources. Azure Security Center (ASC) is a security management system that works within the Azure ecosystem across all your Azure assets. You can read the full story of the Azure Security Center at https://docs.microsoft.com/en-us/azure/security-center/.
Every Azure subscription gets the Free tier of the Azure Security Center which covers resources like Virtual Machines. You can pay a monthly subscription fee for the Standard tier. The standard tier will include integration into assets like Azure SQL and more. You can compare the features of Free vs. Standard tier at https://azure.microsoft.com/en-us/pricing/details/security-center/.
There are a few ways you can access ASC with Azure SQL. One is from an icon on your home page of your Azure portal. The other way you saw in Figure 6-43 is Advanced Threat Protection at the command bar.
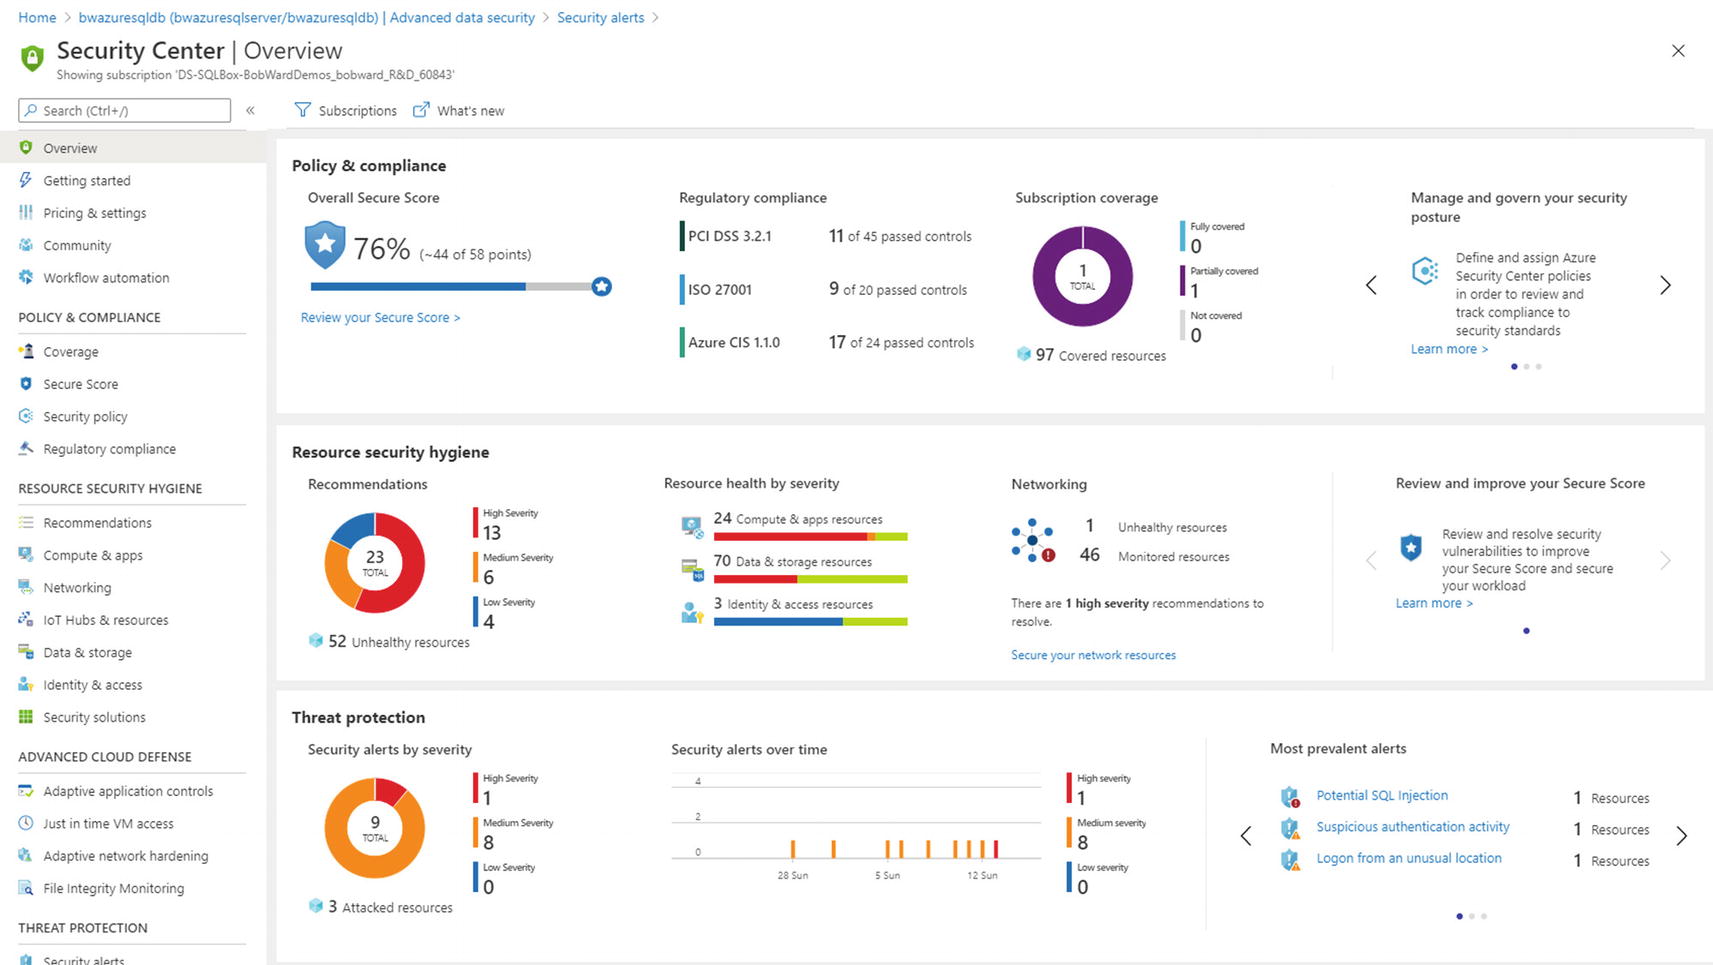
The Azure Security Center
You can see in the Threat protection section information about threats detected by ATP for Azure SQL. The Azure Security Center is truly one of the most innovative services in Azure and is well worth your time and investment to use across all your Azure resources.
Summary
In this chapter, you learned how Azure SQL security is just like SQL Server in many ways. You learned how to secure your network and authenticate logins and users including with Azure Active Directory. You learned how to protect your data with various encryption techniques. You learned all the audit capabilities you can use outside and in Azure SQL. Furthermore, you learned to go further with the cloud using Advanced Data Security.
I believe Azure SQL Security has the capabilities for any enterprise. Security is something baked into our engineering teams. As Andrea Wolter, Senior Program Manager in our security team, tells it, “Trust is the most fundamental design principle for Azure SQL. From early design on, every feature is scrutinized by security reviews and on an ongoing regular basis. And this is more than plainly implementing the Security Development Lifecycle (SDL). We continuously test our services and infrastructure in so-called wargame exercises and the results are shared with the teams to keep improving our security posture against potential attack vectors even before they could get used.”
You have learned in this book that the speed of the cloud helps us innovate and adapt quickly. Security is always part of that innovation. According to Joachim Hammer, Principal Group PM Manager for Security, “We continue to invest in a three-pronged approach to ensure Azure SQL meets the most stringent security requirements as well as regulatory compliances in the industry. These areas include State-of-the-art, built-in Security Controls, Trust and Compliance, and Threat detection and assessment.”
In the next section, we will explore and dive deep into the second major aspect to the core of Azure SQL: performance.