CHAPTER VI
MISCELLANEOUS TOOLS
The Principles on which Edge Tools Operate.
All cutting and piercing edge-tools operate on the principle of the wedge. A brad-awl furnishes an example which all can readily understand. The cutting edge of the awl severs the fibres of wood as the instrument enters, and the particles are compressed into a smaller compass, in the same manner as when a piece of wood is separated by a wedge. A chisel is a wedge in one sense; and an ax, drawing knife, or jack-knife is also a wedge. When a keen-edged razor is made to clip a hair or to remove a man’s beard, it operates on the principle of the wedge.
Every intelligent mechanic understands that when a wedge is dressed out smoothly, it may be driven in with much less force than if its surface were left jagged and rough. The same idea holds good with respect to edge-tools. If the cutting edge be ground and whet to as fine an edge as may be practicable with a fine-gritted whet-stone, and if the surface back of the cutting edge be ground smooth and true, and polished neatly, so that one can discern the color of his eyes by means of the polished surface, the tool will enter whatever is to be cut by the application of much less force than if the surfaces were left as rough as they usually are when the tool leaves the grindstone. All edge-tools, such as axes, chisels and planes, that are operated with a crushing instead of a drawing stroke, should be polished neatly clear to the cutting edge, to facilitate their entrance into the substance to be cut.
Hints on the Care of Tools.
The following hints on the best means of keeping tools in good condition cannot fail to be useful:
WOODEN PARTS.—The wooden parts of tools, such as the stocks of planes and handles of chisels, are often made to have a nice appearance by French polishing; but this adds nothing to their durability. A much better plan is to let them soak in linseed oil for a week, and rub them with a cloth for a few minutes every day for a week or two. This produces a beautiful surface, and at the same time exerts a solidifying and preservative action on the wood.
IRON PARTS.—Rust preventives.—The following receipts are recommended for preventing rust on iron and steel surfaces:
1. Caoutchouc oil is said to have proved efficient in preventing rust, and to have been adopted by the German army. It only requires to be spread with a piece of flannel in a very thin layer over the metallic surface, and allowed to dry up. Such a coating will afford security against all atmospheric influences, and will not show any cracks under the microscope after a year’s standing. To remove it, the article has simply to be treated with caoutchouc oil again, and washed after 12 to 24 hours.
2. A solution of india rubber in benzine has been used for years as a coating for steel, iron, and lead, and has been found a simple means of keeping them from oxidizing. It can be easily applied with a brush, and is as easily rubbed off. It should be made about the consistency of cream.
3. All steel articles can be perfectly preserved from rust by putting a lump of freshly burnt lime in the drawer or case in which they are kept. If the things are to be moved (as a gun in its case, for instance), put the lime in a muslin bag. This is especially valuable for specimens of iron when fractured, for in a moderately dry place the lime will not want any renewing for many years, as it is capable of absorbing a large quantity of moisture. Articles in use should be placed in a box nearly filled with thoroughly pulverized slaked lime. Before using them, rub well with a woolen cloth.
4. The following mixture forms an excellent brown coating for protecting iron and steel from rust: Dissolve 2 parts crystallized iron chloride, 2 antimony chloride, and 1 tannin, in water, and apply with sponge or rag, and let dry. Then another coat of the paint is applied, and again another, if necessary, until the color becomes as dark as desired. When dry it is washed with water, allowed to dry again, and the surface polished with boiled linseed oil. The antimony chloride must be as nearly neutral as possible.
5. To keep tools from rusting, take 1/2 oz. camphor, dissolve in 1 lb. melted lard; take off the scum and mix in as much fine black lead (graphite) as will give it an iron color. Clean the tools, and smear with the mixture. After 24 hours, rub clean with a soft linen cloth. The tools will keep clean for months under ordinary circumstances.
6. Put 1 quart fresh slaked lime, 1/2 lb. washing soda, 1/2 lb. soft soap in a bucket; add sufficient water to cover the articles; put in the tools as soon as possible after use, and wipe them up next morning, or let them remain until wanted.
7. Soft soap, with half its weight of pearlash; one ounce of mixture in about 1 gallon boiling water. This is in every-day use in most engineers’ shops in the drip-cans used for turning long articles bright in wrought iron and steel. The work, though constantly moist, does not rust, and bright nuts are immersed in it for days till wanted, and retain their polish.
Names of Tools and their Pronunciation.
Pane, Pene, Peen, which is correct? Pane is the correct word for the small end of a hammer head, Pene or Peen being corruptions. As soon as you leave without any necessity or reason the correct word Pane, you enter a discussion as to whether Pene or Peen shall be substituted, with some advocates and custom in favor of both. If custom is to decide the matter, Pane will have it all its own way, because, of the English speaking people of the earth, there are, say, thirty-six millions in England, four millions in the West Indies, six or seven millions in Australia with the Cape of Good Hope and other English colonies to count in, who all use the original and correct word Pane, besides Canada and the United States; the former having a majority in favor of Pane from their population being largely English, Scotch, etc., and the latter having some of its greatest authorities, Pane-ites and therefore uncorrupted. Don’t let us, as Tennyson says,
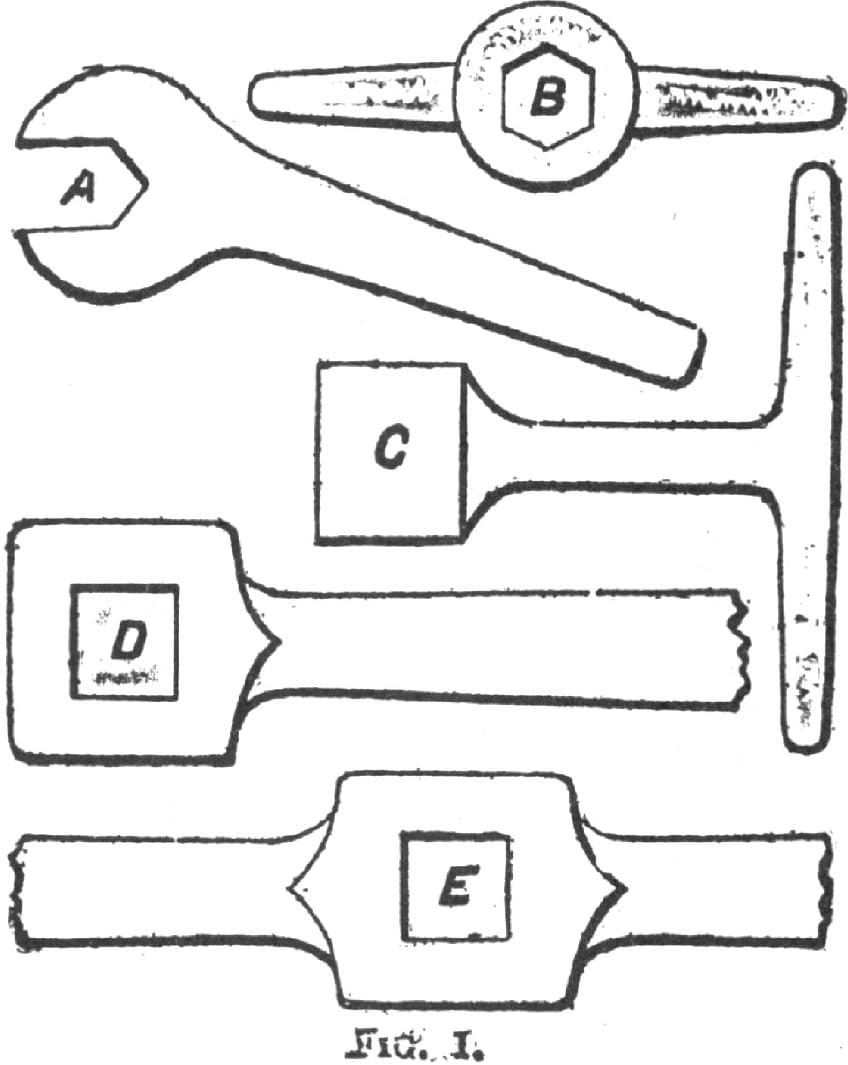
Fig. 119—Shows various Styles of Wrenches
“Think the rustic cackle of your burg,
The murmur of the world.”
Peen may be used in all parts of the country where “Old Fogy” has been, but it is not used where I have been and that is in Great Britain, the West Indies, South American English-speaking countries, as Guiana, and not in some parts of the United States; or rather by some mechanics in the United States.
The fact is these corruptions are creeping in and creating dire confusion in many cases. For example: A lathe-work carrier or driver has now got to be called a “dog” in the United States. This is wrong, because if the word carrier is used as in other English-speaking countries, the thing is distinct, there being no other tool or appliance to a lathe that is called a carrier. But if the word used is “dog” we do not know whether it means a dog to drive work between the centers of the lathe, or a dog to hold the work to a face-plate, the latter being the original and proper “dog.”
Again, in all other English-speaking countries, a key that fits on the top and bottom is a “key,” while one that fits on the sides is a “feather.” Now a good many in the United States are calling the latter a “key,” hence, with the abandonment of the word “feather,” a man finding in a contract that a piece of work is to be held by a key, don’t know whether to let it fit on the top or bottom or on the sides, and it happens that some mechanics won’t have a feather when a key can be used, while others won’t have a key at any price.
Let us see what has come of adopting other corruptions in the United States, and I ask the reader the following questions: If I ask a boy to fetch me a three-quarter wrench, is he not as much justified in bringing me one to fit a three-quarter inch tap as a three-quarter inch nut wrench? How is he to know whether a solid wrench, hexagon wrench or a square wrench is meant? In other English-speaking countries, an instrument for rotating the heads of tools, and having a square hole to receive such heads, is a wrench. Thus a three-quarter wrench is a wrench that will fit a three-quarter tap. A “wrench” that spans the side of a nut, and is open at the end, is termed a “spanner.” There can be no mistake about it, it is a spanner or a thing that spans.
Now, suppose the “wrench” goes on the end of the nut head, you call it a box wrench, because its hole is enclosed on all sides but one, and it boxes in the bolt head. Thus the term wrench is properly applied to those tools in which the head of the work is enveloped on all sides by the tool (but not of course, at the end or ends).
For example, in Fig. 119, A is a spanner, B a box wrench, E a double (handled) and D a single wrench, and from these simple elements a name can be given to any form of wrench that will indicate its form and use. Thus, Fig. 120 will be a pin spanner, so that if a boy who did not know the tools was sent to pick out any required tool from its name he would be able to do so if given the simple definitions I have named. These definitions are the old ones more used among the English-speaking people than “monkey wrench,” which indicates a cross between a monkey and a wrench.
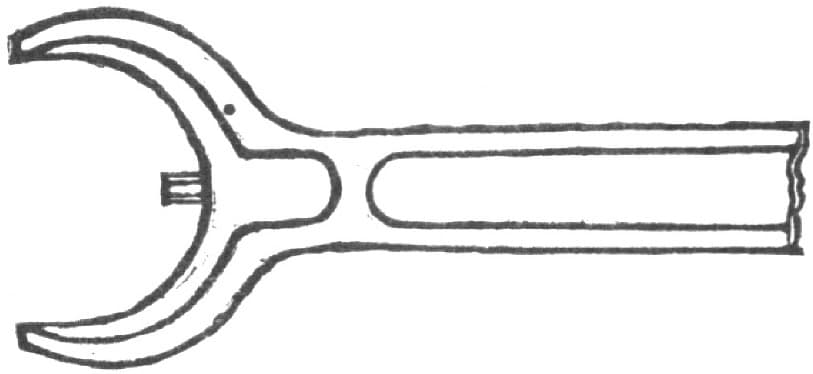
Fig. 120—A Pin Spanner
No, no, don’t let the errors of a minority influence us simply because we happen to be in a place or town where that minority is prominent, and if we are to make an American language let it be an American improvement, having system and reason in its composition. A man need not say p-e-n-e, pane, because the majority of those around his locality were Irishmen and would pronounce it that way whether you spell it pane, pene, or peen. A man need not spell h-a-m-m-e-r and pronounce it hommer because the majority of those in the place he is in are Scotchmen. And we need not alter pane to pene or peen promiscuously because a majority of those around us do so, they being in a minority of those speaking our language, especially since pene or peen does not signify the thing named any plainer than pane, which can be found in the dictionary, while the former can’t be found there.
We have got now to some Americanisms in pronunciation that are all wrong, and that some of our school-teachers will insist on, thus: d-a-u-n-t-e-d is pronounced by a majority of Americans somewhat as darnted, instead of more like dawnted: now, if daun, in daunted, is pronounced darn, please pronounce d, a, u in daughter and it becomes “darter.” I shrink from making other comparisons as, for example, if au spells ah or ar, pronounce c-a-u-g-h-t.
We are the most correct English-speaking nation in the world, and let us remain so, making our alterations and additions improvements, and not merely meaningless idioms. —By HAMMER AND TONGS.
NOTE.—This writer talks learnedly, but nevertheless he is condemned by the very authority which he cites (and correctly too) in support of his pronunciation of the word Pane. Webster’s Unabridged gives the au in daunted the sound of a in farther so that the word (our contributor to the contrary notwithstanding), should be pronounced as though spelled Darnted.—ED.
Tongs for Bolt-Making.
I send a sketch of a pair of tongs suitable for making bolts. The jaws are eight inches and the reins ten inches long. A glance at the engraving, Fig. 121, will show that it is not necessary to open the hands to catch the head on any size of bolt. These tongs should be made very light. The trouble with all nail grabs is that the rivet is put too near the prongs, and when you try to get nails out of the bottom of a keg the reins catch in the top and the tongs can’t open far enough. —By SOUTHERN BLACKSMITH.

Fig. 121—Tongs Designed by “Southern Blacksmith”
Home-Made Fan for Blacksmith’s Use.
To construct a home-made hand blower proceed as follows: Make two side pieces of suitable boards of the shape shown in Fig. 122 of the accompanying sketches. Make a narrow groove in the line marked A. Procure a strip of sheet-iron of the width the blower is desired to be, and bend it to correspond with the groove. Then the two sides are to be clasped upon the sheet-iron, with small bolts. This will form the blower case. The small circle shown in the center of Fig. 122, incloses a portion to be cut out for the admission of the current of air. The shaft is made by taking a block of wood large enough to make a pulley about 13/4 inches in diameter, the length of the block being from bearing to bearing of shaft. Bore a central longitudinal hole 1/2-inch in diameter in the block, turn a plug to fit the hole. Put the plug in place and place all on the lathe and turn, leaving the part where fans are to be attached about 12/5 inches in diameter. Square this part and fasten the fans thereto, as shown in Fig. 123. Constructed as there shown they are intended to revolve from left to right. On removing the block from the lathe the wooden plug is withdrawn and a rod of half-inch iron is put in, projecting at each end an inch and a quarter for journals. The bearings for the shaft are simply blocks of wood screwed to the sides of the case, with holes bored to fit the shaft as shown in Fig. 124. The dimensions of my blower are as follows: Case, 9 inches in diameter inside of sheet-iron; width of case, 3 inches; central opening, to admit air, 3 inches in diameter; pulley, 13/4 inches in diameter. The fans are of pine, one-quarter inch thick at the base, diminishing in thickness to one-eighth inch at the point. Fig. 125 shows my portable forge, upon which the above described fan is employed. The frame is made of four-foot pine fence pickets. The fire-pot is an old soap kettle partly filled with ashes to prevent the bottom from getting too hot.—By E. H. W.
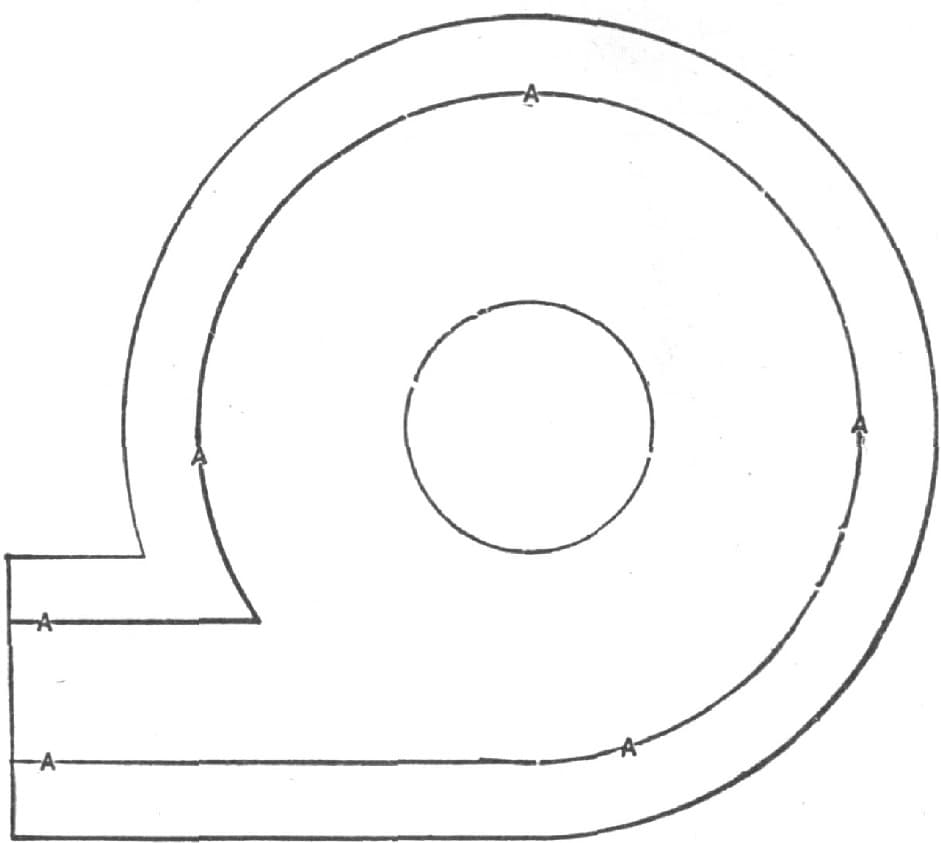
Fig. 122—Side Elevation of “E. H. W.’s” Blower
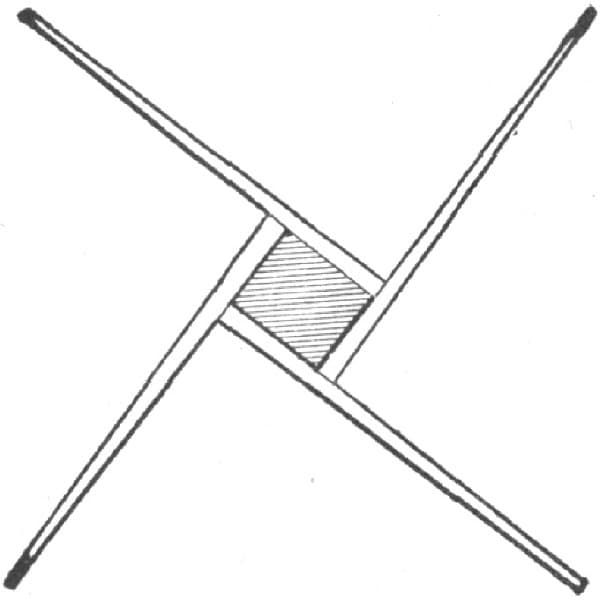
Fig. 123—Manner of Attaching the Fans to the Shaft of Blower
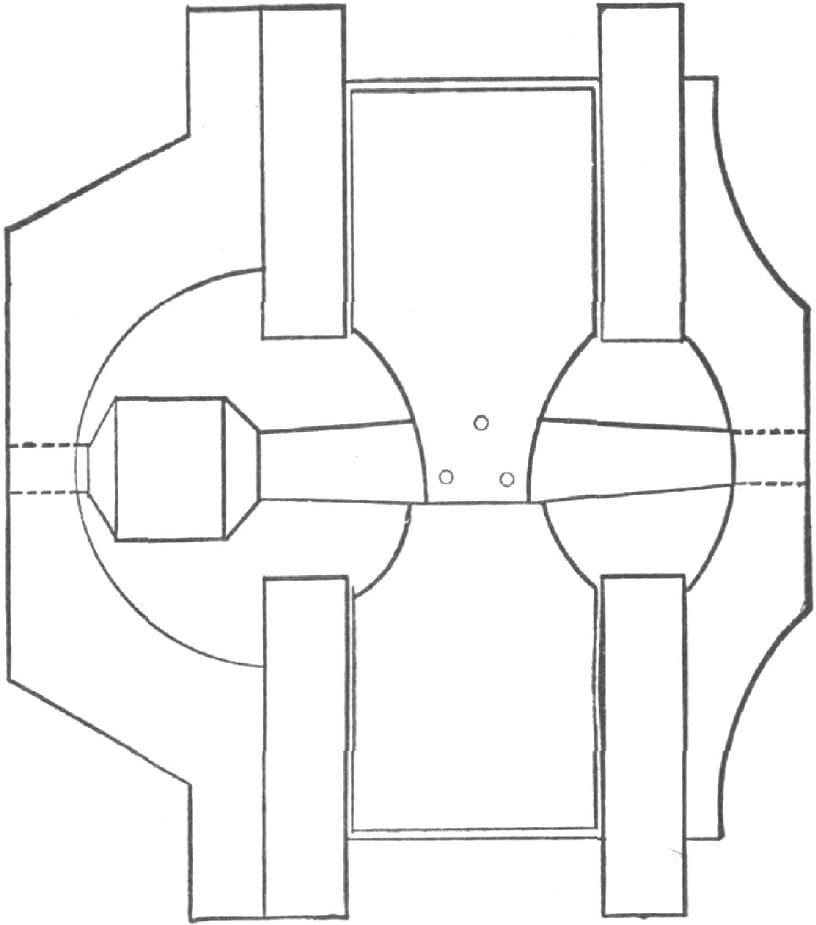
Fig. 124—Cross-section Through Blower, showing Bearings for Shaft

Fig. 125—General View of Blower, in connection with Forge
Making a Pair of Pinchers.
The subject of my remarks is one of the simplest yet most useful tools in the shop, a pair of pinchers. Fully one-half of my brother smiths will say, “Who doesn’t know all about pinchers?” From the appearance of two-thirds of those I see in use, I am convinced that if the makers knew all about them, then they slighted their work when they made them. To make a neat and strong pair of pinchers, forge out of good cast steel such a shape as is shown in Fig. 126, and then bend to shape, as in the dotted lines. When one-half of the forging is done, forge the other jaw in same way, and make sure that they have plenty of play before riveting them together. Then fit and temper, and you will have a strong neat tool, as shown in Fig. 127. Fig. 128 represents the style of pinchers generally made. They are awkward and weak looking, and work about as they look. The cutting edge is entirely too far from the rivet. By J. O. H.
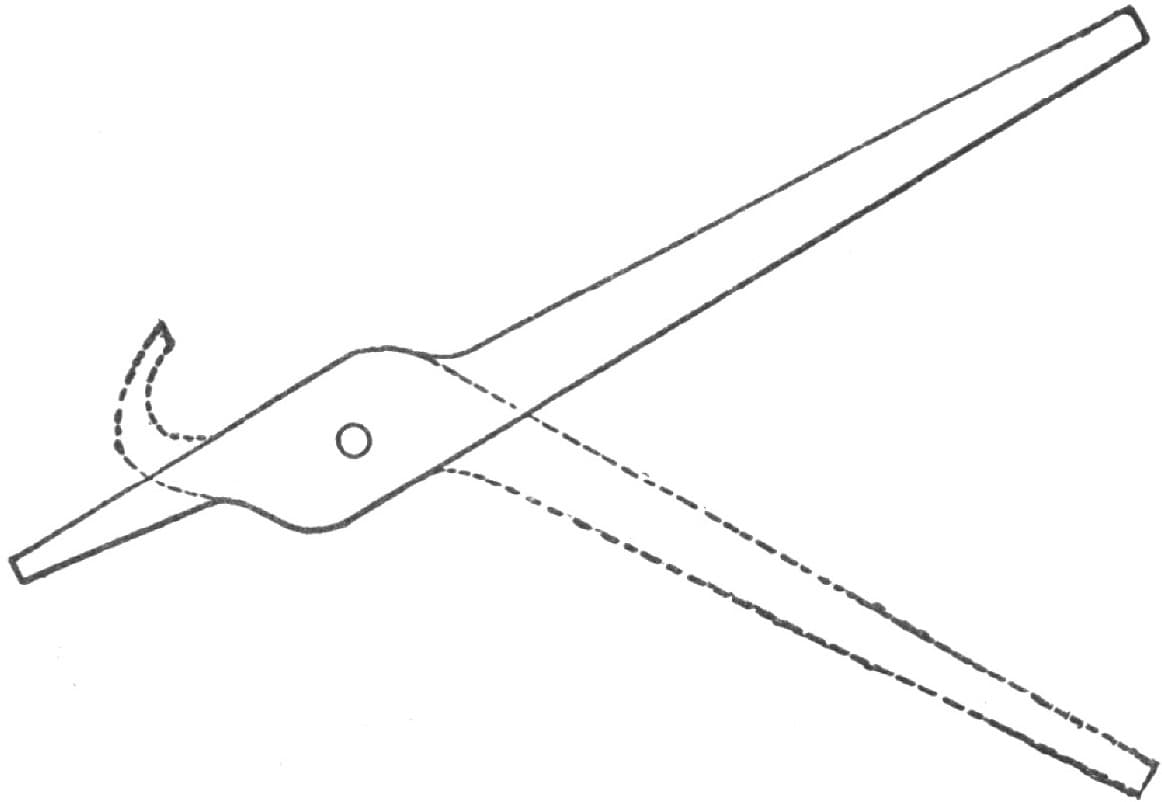
Fig. 126—Shows Method of Forging

Fig. 127—Showing the Pinchers Finished
A Handy Tool for Holding Iron and Turning Nuts.
Fig. 129 represents a small tool I use in my shop and find very handy to hold round iron and turn nuts, etc., in hard places. Wheelwrights and carriage painters, as well as blacksmiths, will find it a very convenient tool. It is of steel and is quite light. It is made the same as a pair of tongs, having teeth filed on the inside of the jaws and having clasp pullers on the end of the handles.—By L. F. F.

Fig. 128—Showing a Faulty Method of Making Pinchers
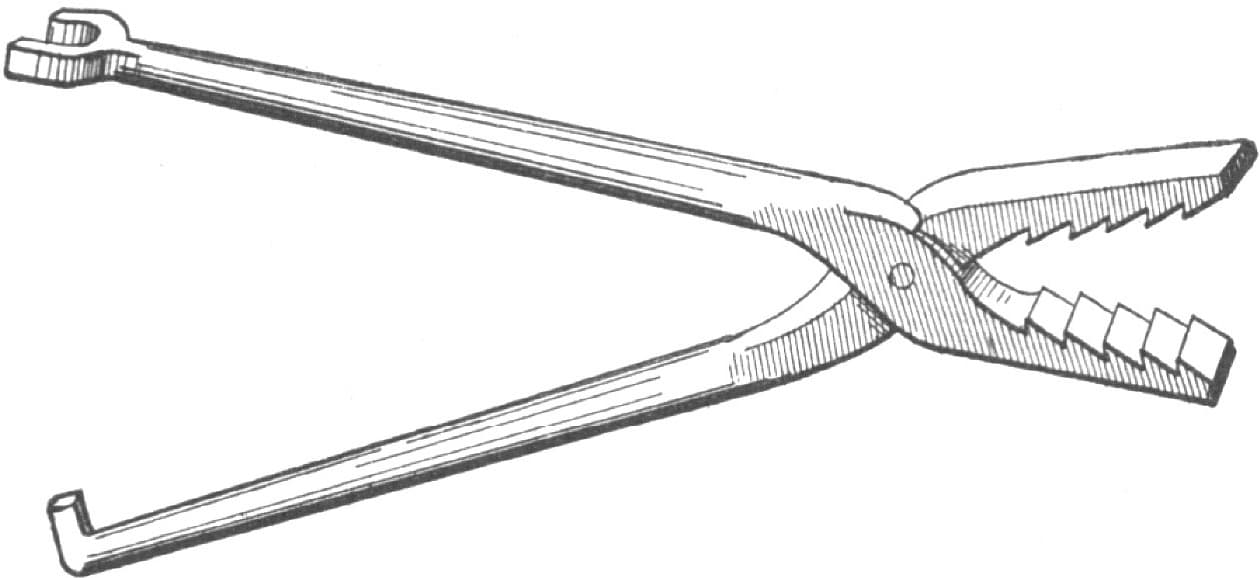
Fig. 129—Tool for Holding Iron and Turning Nuts
A Handy Tool to Hold Countersunk Bolts.
A handy tool to hold countersunk bolts in plows, etc., is made as follows: I take a piece of iron, say 3/4-inch square and ten inches long, as shown in Fig. 130, and punch a slotted hole four inches from the pointed end. The hole should be 3/4 × 1/4 inch. I then take a piece of iron 3/4-inch square and make a slotted hole in this at one end and a tenon in the other, as shown at A in Fig. 131. I next punch a 1/4-inch hole in the slotted end, and then take a piece of iron 3/4 inch × 1/2 inch and 6 inches long, and draw one end out to 1/2 inch and turn a hook on it, as shown in Fig. 132. I then punch two or three holes in the other end, take a piece of steel 3/4 inch × 1/4 inch, draw it to a point like a cold chisel; then take the piece shown in Fig. 13, split the end, and put in the small pointed piece I have just mentioned, and weld and temper. I then put all my pieces together in the following manner: After heating the tenon end of the piece A in Fig. 131 to a good heat, I place it in my vise and place on the piece shown in Fig. 130, letting the tenon of the piece A go through the piece shown in Fig. 130, and while it is hot rivet or head it over snugly and tightly. If this is done right, the tenon and slotted hole in A will point the same way. I then take the piece B shown in Fig. 131, and place it in the slot of A and join the two pieces with a loose rivet, as shown in Fig. 132, so that the piece can be moved about to suit different kinds of work. I next place the pointed end of the bolt holder against the bolt head and give the other end a tap with the hammer; then hook the piece shown in Fig. 131 over the plow bar and bear down on the cutter end with my knee, while with my wrench I take off the top. A ring may be welded in the end to use in hanging the tool up.—By C. W. C.

Fig. 130—The First Stage in the Job

Fig. 131—Two additional parts of the Tool

Fig. 132—The Parts united and Tool complete
Making a Pair of Clinching Tongs.
The following is my way of making clinching tongs: I take a piece of 5/8 square steel and forge it out the same as I would for common tongs, making the jaws 1/2 inch wide by 3/8 inch thick, one jaw 11/2 inches long and the other 21/2 inches in length. I then draw out the short jaw to 10 inches and draw the long one to 12 inches. I then turn the long jaw back as shown at A in Fig. 133 of the accompanying engravings, and shape the short jaw as in Fig. 134. I next take the 1/4-inch fuller and notch the inside of the short jaw as shown at B in Fig. 134. I then put notches in the long jaw at A, and next drill a 5/16-inch rivet hole as in other tongs and take a 5/16-inch bolt with a long thread and screw one nut on the bolt down far enough to receive both jaws and another nut. I then temper the curved jaw at A until a good file can just cut it. I next put in the bolt and bend the reins as shown in Fig. 135. The object of bending at C is to prevent the jaws from pinching your fingers if they slip off a clinch. I have a pair of tongs made in this way that I have used for the last five years.—By J. N. B.
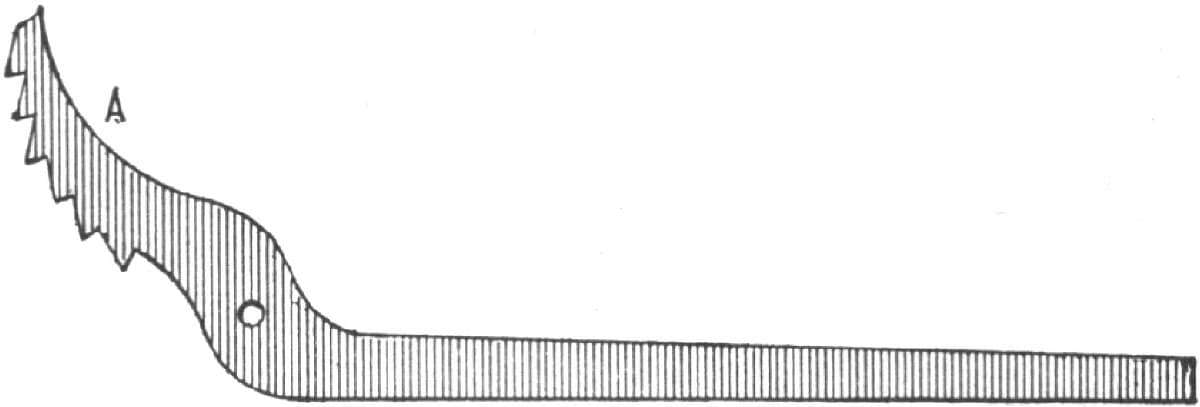
Fig. 133—The Long Jaw

Fig. 134—The Short Jaw
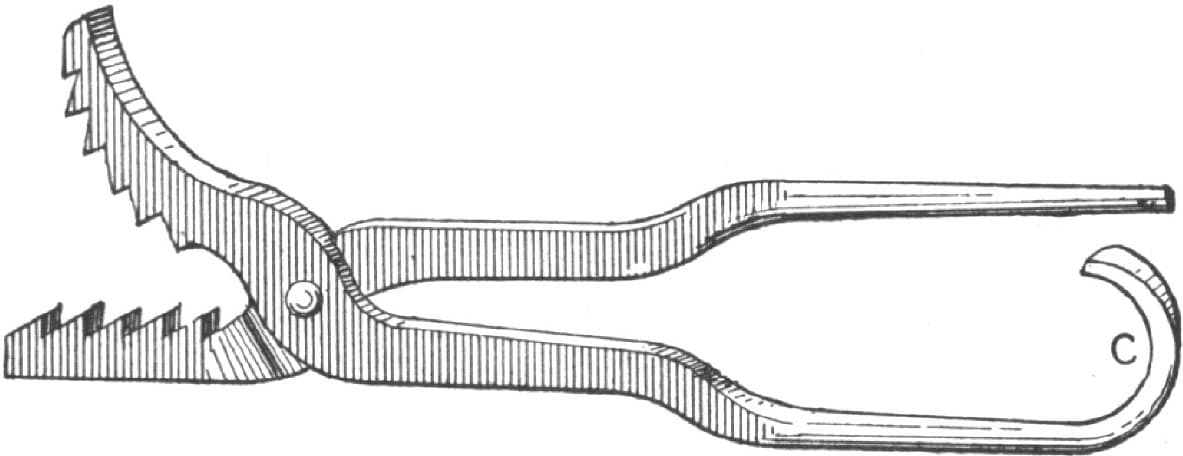
Fig. 135—The Tongs Complete
Tongs for Holding Slip Lays.
The accompanying illustration, Fig. 136, represents a pair of tongs for holding right and left hand slip lays while sharpening and pointing, and making new lays. This tool does away with the clamping or riveting of the steel and bar before taking a welding heat, because it holds the two parts together better than any clamp or rivet. The double T, or head A, is forged from Swedish iron. The handle, B, is welded to the head in the center, as shown in the illustration, and works between the forked handle C. D pushes against the end of the lay bar (right or left as the case may be), and that draws the top T up tight, and as it is bent in the same angle as a plow lay, but little power of grip is needed to hold the tongs to their place while sharpening or pointing. They clamp up so tight that often you have to tap them on the end of the handles to release the lay. Both handles have 1/4-inch holes through them and I use 1/4-inch bolts or pins in them to hold them together after they have been adjusted to fit the lay. Any good blacksmith can make these tongs and will certainly find them very useful.—By A. O. K.

Fig. 136—Tongs for Holding Slip Lays