Since the modular garden is a little different, so are some of its procedures. All rows are 4 feet long, parallel with the module width, and are measured out using the indicators on the frames. All furrows are made using the modular planting stick.
The procedures described here generally apply in most situations. Any deviations will be given in the individual vegetable planting instructions later in the book.
The gardener has a special relationship and responsibility to the earth: One’s first obligation is to do no harm! Do not poison it with chemical fertilizers or contaminate the air above it with toxic pesticides. Beyond that the soil should be respected and worked following the ways of Mother Nature. This means using only organic methods in the growing of vegetables.
The key to successful gardening is just knowing the basic fundamentals and using that knowledge sensibly. The simple act of sowing a crop has to be done at its right time as vegetables are variable in their needs. If seed is sown at the wrong time for any crop it will either fail or results will be poor. You must be aware of the classification group of each vegetable before sowing.
Crops are usually divided into four classifications: Hardy: will stand a medium frost 28° to 25°F (can sow seed as soon as soil is workable). Semi-Hardy: will stand only light frosts 32° to 29°F (sow 2 to 6 weeks before frost-free date). Tender: cannot stand even a light frost (sow after frost-free date when day temperatures are 60°F). Very Tender: (sow when both day and night temperatures are at least 60°F or above).
The Hardy Crops in this book are fava beans, peas, broccoli, garlic, and onions. The Semi-Hardy Crops are arugula, endive, lettuce, Swiss chard, parsley, beets, carrots, and radishes. The Tender Crops are tomatoes, bush beans, and pole beans. The Very Tender Crops are cucumbers, squash, and pumpkins.
Although direct seeding outdoors is the simplest and best method for most crops, for others, sowing them indoors and then transplanting outdoors later is the practical thing to do.
Either way the makeup and fertility of the earth in your garden will generally determine how well the plants grow.
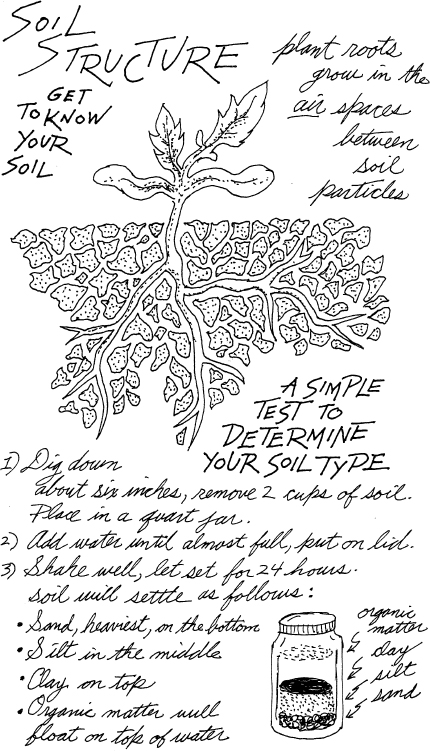
In order to properly work and water the soil you should have a basic knowledge of its structure.
Healthy soil is a living substance, it is filled with bacteria and microorganisms that break down organic matter and make their nutrients available to plants.
The size of soil particles determines its classification. Most garden soils are classified as sandy, clayey or loamy. There are also soils that are comprised of silt, but these are very rare. Silt is usually a minor ingredient in other soils.
Sand particles are large and feel rough and gritty. Their large size keeps them from packing together tightly, which results in a lot of open spaces between particles. This means that there is a lot of air in the soil and much room for roots to expand. On the other hand, this also means that water goes through these spaces very quickly. It doesn’t hold moisture very long. Sand warms up fast and does not compact to mud in wet weather. It is easily worked but provides poor anchorage for plant roots: Excellent for root crops, especially carrots.
Clay particles are very fine, so small that they cannot be seen by the naked eye. Yellow in color, clay is a common ingredient in many soils. It is the opposite of sandy soil. The particles are tightly packed; there is very little air space between them. Air, water, and roots have a hard time penetrating. Clayey soils drain poorly, are slow to dry out, and when completely dry will be as hard as a brick. When wet, they are sticky and difficult to work. They are very prone to compaction.
Loam is a composition of sand, clay, and silt. (Silt is akin to clay, but particles are a little larger.) Usually, loam also contains some organic matter. The soil particles of loam are large enough to allow adequate air spaces. Water and plant roots penetrate readily. It drains well, but at the same time holds moisture. It works fairly easily and is pretty much the ideal garden soil.
Humus is organic matter that has reached a point where it will break down no further and will remain as is for centuries. It has a black or very dark brown color. It helps the soil retain moisture and makes nutrients more available to plants, is often described as the “life-force” of the soil. Precise description is difficult. The difference between organic matter and humus is that organic matter is rough looking, with plant remains visible, while humus is just a dark spongy substance with no definite shape.
Many soils are mixtures, some perhaps even defying an exact classification. Whatever your soil type, it is what you are stuck with. Fortunately any soil can be considerably improved by the addition of organic matter.
Soil preparation is one of the most important steps in gardening. If one is to have the loose friable soil necessary to make a fine seedbed, the work must be started in the fall.
If starting a new garden this means that the earth must be double dug incorporating as much organic material as possible. A lot of work, but necessary: Furthermore, you may have to dig in more organic material for the next several years before the soil is in an acceptable condition. It all depends on different factors.
In an established garden, normally, your procedure in the fall is very different. The earth is no longer dug up. Instead, after all crops, weeds, and other residues have been cleared, you just give the soil a shallow cultivation with a rake, let it lie bare for the next several weeks, and then put down a 3- to 4-inch mulch of shredded leaves. This mulch will protect the earth, keep moisture in and allow the under-soil life to continue uninterrupted through the winter. It also gives earthworms the decomposing leaves on the bottom of the mulch to feast on adding humus to the soil.
In the spring, depending on the weather, about two or three weeks before the earliest hardy crop planting date, remove the mulch. Make a preliminary shallow cultivation with a rake to kill any larvae that may have overwintered. Level off the soil, then leave bare. Do not work the soil any further at this point; it should not be worked any more than necessary too far in advance of the time that the actual planting is to take place.
The preparation of the seedbed should be done right before the actual planting. Give another raking to uproot any weeds that may have sprouted, to smooth out any lumps, and to mix the drier surface soil with the moist soil underneath.
For the large seed vegetables that is all that has to be done. Make the furrows and sow the seed while soil is still moist.
For small seed vegetables the soil needs to be a bit finer. The density has to be such that the soil will make close contact with the seeds after firming down to ensure rapid germination.
Therefore for small seed plantings, immediately after the raking described above, go over the area again with the rake, smoothing and fining. It may be necessary to rake in several different directions, more than once, to achieve this fine seedbed. Then, right after that is done, spread a thin layer of fine compost over the entire area, make the furrows, and sow the seed.
There are two plantings per season in the modular garden. The foregoing describes the procedure for the initial planting.
The succession planting procedure is very much the same. The main difference is that in each planting unit, or units, where there has been an initial planting, that crop has to be fully harvested before you can proceed. Then, all remnants of the initial planting must be removed, the soil cleared, raked, and left bare until time for the succession planting. This in-between phase is usually a very short period.
As in the initial planting, for large seed vegetables and transplants just give a second light raking right before planting.
For small seed vegetables, also give a second light raking, but the soil needs to be broken down a bit more. Spend some extra time to make a fine seedbed. Again, for small seed, it is best to spread a thin layer of fine compost over the area.
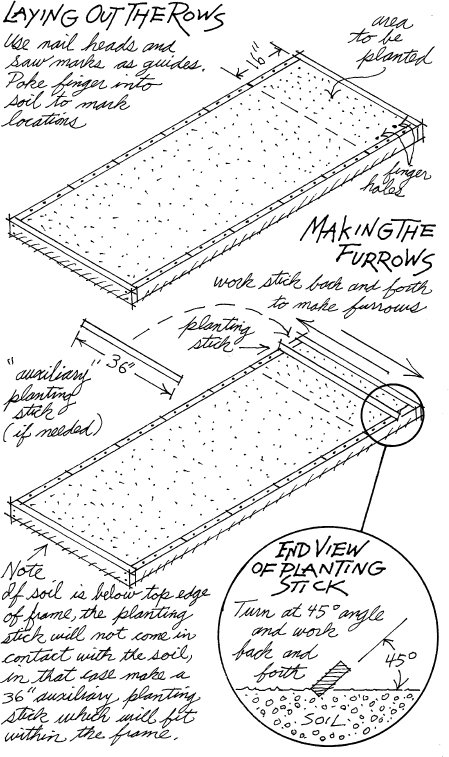
The nail heads and saw marks on the frame are the row spacing guides. You can mark where the rows are to go by just poking a forefinger in the ground at the proper points.
When the spacing of the rows has been determined, lay the modular planting stick across the module so that each end is touching the correct nail head, or saw mark. Then turn the stick to a 45-degree angle so that the edge facing the soil points straight down. When pressed into the soil at this angle the stick will make a “V” shaped furrow. Work the stick back and forth across the module until a furrow is made to the proper depth.
If the soil is below the top edge of the frame, the stick will not make contact with the ground. In that case an “auxiliary planting stick” will have to be made. This is simply a 36-inch length of 1x2 lumber. This length will fit within the sides of the frame. Holding the planting stick flat in position with one hand, with the other, place the auxiliary stick against it and tilt to a 45-degree angle, then work back and forth to make the furrow.
For small seeds make a shallow furrow, usually about ¼ inch deep. For large seeds the furrows need to be a little deeper, about 1 inch to 1½ inches deep. Plus, in some cases the large seeds may have to be pushed further into the soil with a forefinger to get the right depth. But, do not plant too deep.
As a general rule of thumb, the deeper you plant them, the longer it will take them to germinate and come up.
Plants are spaced relative to each other in different ways, which can determine to a large extent how they will develop. In a vegetable garden the object is to grow plants of high quality, getting maximum yield from the area used.
Overview
Each plant has an optimum spacing. They all need good air movement around them, but not to an extreme. Plants also seem to need the close, but not too close, companionship of their own species. If too far apart they will suffer extra exposure to harsh weather and more earth will be bare causing loss of soil moisture. Development will be uneven, weed growth will be greater, and production will be less. Too close will also reduce yield. The intense increased competition and restricted air flow will cause stress and unhealthy conditions conductive to pests and diseases.
That being said, a middle ground of reasonably close planting provides a mini-climate, a living mulch, reduces weed growth, and helps hold moisture in the soil. This usually means smaller plants, but this does not necessarily mean lower yield, because there are more plants the overall yield can be greater. For that reason, each vegetable has to be analyzed as to its individual uniqueness, area available, and any practicalities before deciding its spacing.
Conventional rows
Traditionally, plants are spaced a set distance apart within rows and rows are spaced a set greater distance apart. This means that they will line up not only within the rows but also with the plants in parallel rows: More or less like soldiers in their ranks.
In the conventional garden, due to the need of walking room, rows are very far apart. This is not a factor with the raised beds since they are never stepped into. Therefore other considerations are used to determine planting distances. There is no reason for huge spaces between rows.
Staggered rows
This scheme is similar to sowing in conventional rows. The difference is that although plants line up within the rows they do not line up with the plants in adjacent rows. All seeds are spaced the same distance within each row, but the starting point is shifted in alternating rows so that they do not line up across. Instead they are placed at a midpoint.
This staggering allows the rows to be much closer to each other. Distances can be greater, the same, or even less than within row spacing.
Rows can be as little as one fourth the distances between the plants in the rows. Diagonally they will be equidistant; each will have exactly the same space around it. Theoretically this ensures equal benefits to all plants, as every one should get about the same amount of moisture, light, and nutrients that are available.

Further, as the plants grow, foliage should just touch or overlap. This will, in effect, create an air mulch, shading the soil and keeping down the weeds.
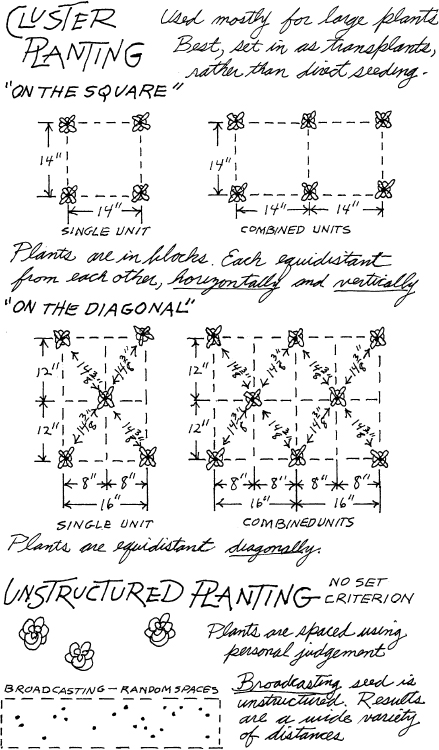
Cluster planting
Used for very large plants: For this system use transplants. Direct seeding is neither practical nor reliable. Clusters are really segments of widely spaced rows. They are formed in two ways:
1) “On the square.” Transplants are set in at the corners of a square, spaced the same both vertically and horizontally.
2) “On the diagonal.” One transplant is set in at each corner of a square or rectangle and one more in the exact center. This will space all of them equidistant diagonally.
In both cases more seedlings can be added on at the same spacing, extending the plantings. See diagrams on page 38.
Unstructured spacing
No prescribed rules are followed; spacing is in a random manner depending on one’s judgment. There are often situations where plants have to be fit into an area and there is no need for rows or other formal arrangements. Still, in these cases, the basics for healthy growth, adequate ground, and air space must be allowed.
Broadcasting, results in unstructured spacing. The results are unpredictable and upon germination distances between seedlings will vary greatly. It is sometimes used for a number of leaf crops, such as lettuce and other greens, when harvesting is done by cutting or pulling all plants at a young stage. Since none are allowed to grow to maturity, spacing is not that important. Peas are also often broadcast, as a dense stand is needed.
Sowing in hills
Hill planting is the sowing of small groups of seeds with big spaces between groups. It doesn’t mean an actual mound, but a low mound could be used. Each group of seeds is a hill. Used mostly for vine crops. See page 176 Sprawlers for an example.
A triplex row is an innovation that I have developed, born out of the frustration of trying to figure out the best way to sow certain small-seed leaf vegetables such as lettuce, endive, and arugula. I had gone back and forth from broadcasting to rows and vice versa. I was always torn between the two methods. Which was better? I agonized over this for many years; I could not make a definite decision.
Rows are more orderly, easier to weed, thin, and cultivate. But when lettuce seed was broadcast it seemed to germinate and grow faster. The closeness of the seedlings shaded the soil, keeping the moisture in.
Up to a point this closeness was an advantage and they grew quickly. However, once they passed the seedling stage this became a disadvantage, and overcrowding became a real problem.
Conversely, when lettuce was sown in single rows it did very poorly. Too much soil was left bare and the sun, along with the wind, quickly dried it out, stressing the plants.
Since I could not make up my mind as to what method was best, I reasoned that if a technique could be developed combining the advantages of broadcasting with the advantages of rows that would be the solution.
After much trial and error—success! I now sow most small-seed leaf vegetables in what I call “triplex rows.” This method retains the beneficial aspects of broadcasting while having the discipline and order of rows.
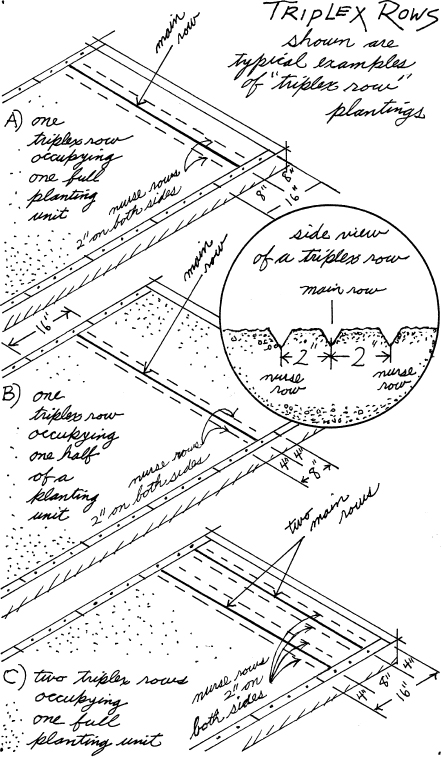
The basic triplex row method
A “triplex row” is simply three very closely spaced rows (about 2 inches apart). The center row, which I call the “main row,” is the only row in which plants are allowed to grow to maturity.
The two flanking rows are “nurse rows.” Plants in these rows will not stand to maturity. Their function is twofold:
First: To “nurse” the main row plants along by shading the soil, holding the moisture in, keeping weed seeds from sprouting and to act as a buffer from drying winds.
Second: To provide an early harvest. As soon as the plants in the nurse rows are big enough to eat they are pulled, as needed, until all have been completely harvested.
The main row plants are thinned as seedlings, harvested at semi-maturity by plucking the outer leaves, and at maturity by pulling, or cutting, the entire plant. Nurse row plants are all pulled at a young stage giving early harvests. By the time both nurse rows have been fully harvested, the main row plants will be semi-mature and are harvested by plucking their outer leaves only. New leaves will grow back. Final harvest plants when they elongate noticeably, a sign that they are ready to bolt to seed.
From the first thinnings to the final harvesting a steady supply of salad bowl material is always being produced.
The triplex row method is an important aspect of the modular garden. It provides optimum growing conditions for plants and is very productive as it makes a long harvest period possible from one sowing.
An additional benefit of this system is that the nurse row plants can be used to provide transplants to fill in any gaps that may have occurred in the main row.
The procedure for the making of a triplex row is as follows:
1) Determine the position of the main row. Then make that furrow first.
2) On both sides of this main row furrow, at a distance of about 2 inches (which is slightly more than the width of the modular planting stick), make two additional furrows. Lay the planting stick parallel to and next to one side of the main row furrow. Tilt the far edge to a 45-degree angle and make the nurse row furrow. Repeat on the other side.
3) If making two or more triplex rows, measure off the distances between main rows first. After making those main row furrows go back and make the nurse row furrows.
4) Sow the seed.
Cut-and-come-again triplex row method
This technique relies on the fact that many leafy crops will re-grow after being cut. Two, three, or more cuttings can be had from a single sowing. Harvesting is usually done at the large seedling or semi-mature stage. Used mostly for mesclun crops such as endive, arugula, lettuces, mustard, or similar. (Mesclun is a French term for a mixture of young lettuces and greens.)
Preparation and sowing is the same as in the basic triplex row method. Once germination takes place and the seedlings have come up, go over the rows, thinning any clumps.
Usually, this is the only thinning necessary. There may be situations later that develop when it will be obvious that some further thinning is needed.
Large seedling stage: Generally the first cut is made when the seedlings have developed about 4 to 6 true leaves. Cut at least ½ inch above the base of the plant. New leaves usually will re-sprout from the stump within ten to fourteen days.
Semi-mature stage: Many plants such as endive can be cut when they are fairly large, but before they are mature. There is the option of cutting at the large seedling stage or waiting until later. The semi-mature cutting should be about 1 inch above the base. The bigger stump will make them put out a mass of fresh leaves, and even prevent them from bolting to seed prematurely.
As was discussed previously, seed can be sown in rows or by broadcasting. Each method has its pros and cons.
For small seed it is important to have a fine seedbed, to space properly, and to cover lightly. In fact some small seed need not be covered at all, just pressed into the soil.
For large seed the seedbed does not have to be as fine but it is important to space properly and not plant too deep: If properly spaced, it will require no thinning.
When covering both small and large seed, using compost is recommended. You simply cannot overdo its use. Compost will help the soil maintain its moisture.
Large seed, sowing in single rows
For sowing large seed crops, there is no question, sowing in single rows is by far the best method. Peas are the only exception to this. Planting large seed crops in single rows facilitates cultivating, watering and harvesting. The procedure is described starting below:
1) After the furrows have been made, take the modular planting stick and lay it alongside one of the furrows. Holding a small amount of seeds in one hand, pick them up with the other hand and, starting at the center mark, using the stick as a support, slide your hand towards you. Use the inch markings as a guide and drop a seed at the required distances.
2) When that furrow has been completed, move the stick to the next furrow and sow as before. Continue until all of the furrows have been sown, then firm.
3) In some cases, it may be necessary to push the seed further into the soil with a forefinger to obtain the proper planting depth.
4) When all seed has been firmed, cover furrows with compost: Water with a spray.
Small seed, sowing in single rows
While I sow all of my small-seed leaf vegetables in triplex rows, there are other small-seed crops that are sown in single rows. The techniques given apply in either case. With small seed, extra care must be taken to get an even spacing. Do not rush! The procedure is as follows:
1) After all furrows have been made, take the modular planting stick and lay it alongside one of the furrows.
2) The larger small seeds such as beets, Swiss chard, and radish are big enough so that the individual seeds can be picked up with the thumb and forefinger, then sown fairly accurately, using the planting stick markings as a guide.
3) Seeds smaller than those are a problem. They’re too small to pick up individually with your fingers, and the best way to sow them eluded me season after season. It took a while, but eventually I did figure out a solution. All that is needed is a mailing envelope of any size and a ballpoint pen.
Take an envelope (one that you receive in the mail will do, no need to buy one). With a scissors, at a point of about 6 inches over from a bottom corner cut on an angle to a point about 3 inches up from that corner. The result will be a triangular shape that is open where cut and closed on the bottom and side. This is now your seed dispenser.
Take some small seed and pour it into the closed end of this dispenser. Place the bottom of the dispenser to rest in the very bottom of the “V” shaped furrow. Start with the pointed end at the center of the furrow. Hold the opposite closed end with one hand, your forefinger inside, thumb and middle finger outside. With the other hand use a ballpoint pen to push out a single seed. (A sharpened pencil or a small pointed stick can also be used.) Pulling the dispenser toward you, stop the point at every inch mark on the planting stick and push out a seed. Finish sowing that half of the furrow, then repeat on the other half to complete the sowing.
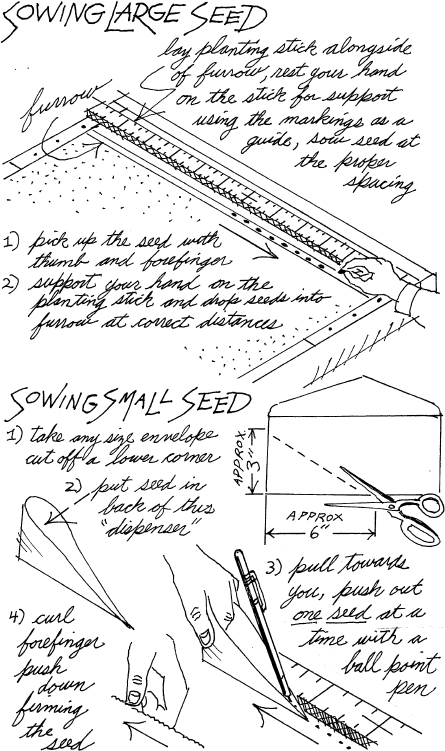
4) Seed must be firmed, curl your forefinger and using the part between the first and second joints push down on the seed pressing it into the soil. The very small seed, usually, is best left uncovered. For the larger of the small seed, such as beet and radish, cover lightly with loose compost.
Sowing small seed is a bit tedious. The tendency is to get impatient and start to rush. But time spent now will pay off when the sprouts come up. Take a short break after doing each planting unit. Upon finishing all rows, water.
Small seed, sowing in triplex rows
Sowing seed for a triplex row is basically the same as sowing three single rows. The only difference being that the three furrows are very close together.
Begin by laying the modular planting stick alongside one of the nurse row furrows. Sow as described for single rows. Move the planting stick over to the main row furrow and sow it. Then, again moving the stick, sow the other nurse row furrow. Do all three furrows from one side of the module, then go to the other side and do that half using the same technique.
Large seed, sowing by broadcasting
For large seed crops, generally, rows are by far the best way of sowing. They are orderly, easy to tend to and easy to harvest.
The exception is peas. To get good production a lot of closely spaced seed is needed. Traditionally they are sown in drills. But, then as they grow, supports are needed and it becomes a lot of work for a small yield. For this reason I choose a dwarf variety and broadcast them. The sowing is easy, a thick stand of vines is obtained and no supports are needed.
Small seed, sowing by broadcasting
For many years I used to broadcast small seeds such as lettuce, arugula and endive. But since the development of the triplex row system I no longer have any reason to do so and no small-seed crops are broadcast.
No one likes to thin. It is psychologically difficult. The key to minimizing this chore is in the sowing.
Large seed can easily be spaced at the exact distances for mature plants. Similarly, if extra care is taken to sow small-seed crops far enough apart so that the sprouts will not be too close together when they come up, little or no thinning is needed until they are large enough to eat.
Caring for the health of your plants necessitates good soil management. Keep the soil from crusting and always maintain an even moisture. One should always keep this very basic rule of thumb uppermost in mind.
Crops planted in single rows
The crops that are planted in single rows can be put into two categories: Tall growers and low growers. Their thinning and general care needs are different.
Tall-growing large seed crops: If the seed was spaced at the correct distances in the furrows, little or no thinning will be necessary. Plants should be standing at the proper spacing.
If rows are more than 4 inches apart, to avoid cultivation put down a thin mulch as soon as the seedlings are several inches tall. Soil moisture will be held in and weed growth retarded.
If no mulch is used, cultivation probably will be needed as it is important to keep the soil from compacting. But cultivate only if necessary, and then shallowly. Pull weeds if they get too big.
Low-growing small-seed crops: As the seeds germinate and grow, weeds will also be growing. In the early stages this is beneficial. They will shade the soil, keeping the moisture in and preventing it from crusting. They are in effect “unpaid helpers.”
When the seedlings have grown so that they begin to crowd each other, pull every other one and thin the weeds. At this stage they are still useful. Thin the weeds selectively, pull all within rows and any others that are too close to the plants. Let some weeds between the rows stay, as they will keep the soil from drying out.
By the time the plants are ready for the second thinning the weeds will have served their purpose and they can all be pulled.
The above gives an overview as to thinning and general care of tall and low growing crops sown in single rows. Of course, no general instructions can fully cover all crops as their needs vary. Detailed instructions are given on individual crop pages.
Leaf crops planted in triplex rows
I sow all of my small-seed leaf vegetables in triplex rows. The basic method, the cut-and-come-again method, or a combination of both can be used. The type of crop sown and its ultimate use will determine which method is the most suitable.
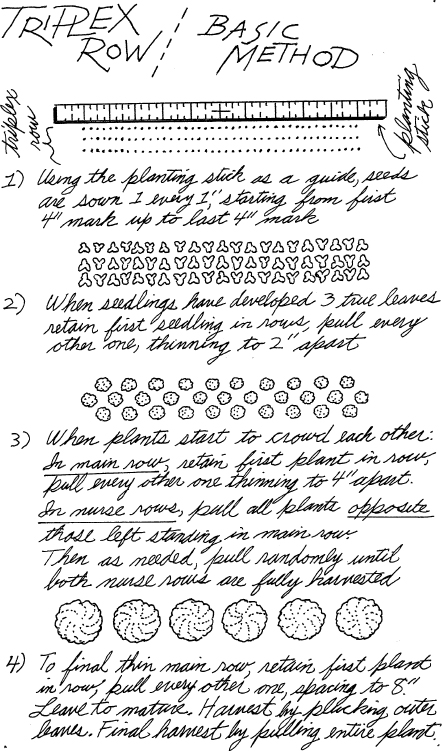
Basic method: All rows are thinned a number of times, depending on the final spacing required. The procedure is to pull plants as far as can be reached into the center of the bed, then go around to the other side and pick up from where you left off.
1) Seeds are sown at 1-inch intervals. In this hypothetical scenario envision all germinating and coming up 1-inch apart.
2) When the seedlings have developed at least three true leaves and are big enough for use, retain the first plant at one end of all rows and then pull every other one. This will leave all of the remaining plants 2 inches apart.
3) When plants have grown so that they begin to crowd each other, continue this thinning/harvest by pulling once more. Do the main row first, pull every other one spacing to 4 inches apart. But now, in both nurse rows, harvest by pulling all plants directly opposite those left standing in the main row. After that, when a harvest is needed, pull from both nurse rows. Repeat this pulling for any additional harvests until the nurse rows are eliminated.
If any of your crops call for a final 4-inch spacing do not pull any more from main row. Leave the plants to grow to maturity.
4) Most leaf crops need an 8-inch spacing. For those, final thin the main row until all left-behind plants are 8 inches apart. Then leave them to mature. All semi-mature or mature plants should be harvested, as needed, by plucking outer leaves only. The central bud will then produce more leaves. Final harvest mature plants at your discretion. But, if they begin to elongate, a sign that they are about to bolt, pull them right away.
The foregoing describes a perfect case scenario from sowing to harvest with everything going just right. It is given as a basic guideline only. Adjust for any variations that are sure to occur.
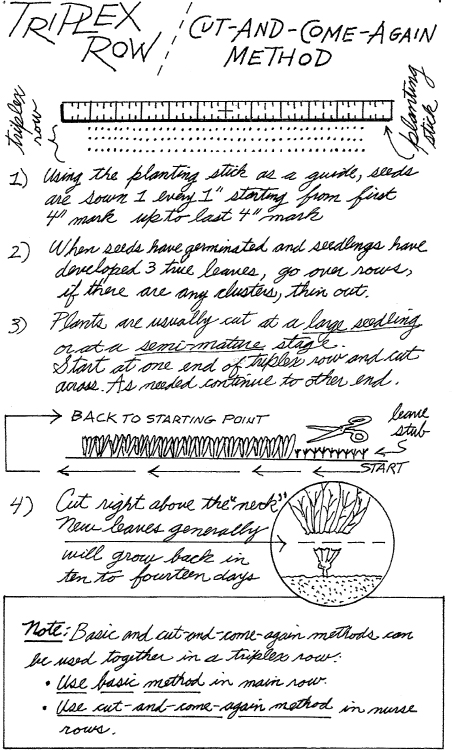
Cut-and-come-again method: This technique relies on the fact that many leaf crops will regrow after being cut allowing them to be harvested over a long period of time without doing any re-sowing. Hence, thinning is only needed when seedlings are young to establish the initial spacing. All rows are treated the same. The objective is to have an overall even distribution of the plants.
Seeds are sown at 1-inch intervals. After germination when seedlings have come up go over the rows, thin any clusters and pull all weeds. Usually that will be all that you have to do, but occasionally conditions may call for some further thinning.
Since all plants grow very close together, no cultivation is required within a triplex row. Very few new weed seeds will germinate under these conditions. If any weeds do grow, they will be exposed after every cutting. Just pull them out.
Harvesting is done either in the large seedling phase when plants have about 4 to 6 true leaves or you can allow them to grow to semi-maturity and cut them then. Depending on the size of the plant, cut at about ½–1 inch above their base. New leaves generally will grow back from the stump in ten to fourteen days.
Reap by cutting straight across the triplex row. As needed, continue in this manner all the way down to the end of the row. By that time, usually, the plants first cut will have regrown and be ready for a second harvesting: More often than not a third and sometimes even a fourth cutting can be had.

Note: This cut-and-come-again method can also be combined with the basic method as follows:
1) Basic method is used just in the main row.
2) Cut-and-come-again method used only in both nurse rows.
Adjusting the hypothetical scenario on pages 48-49 to reality It would be wonderful if seeds when sown in the furrow at 1-inch intervals would always sprout and come up 1-inch apart.
The reality is, with small seed such as lettuce, endive, and arugula, they can move very easily. Rain, normal watering, and other causes can make them shift. Also some will simply not germinate; therefore it is not usually a matter of just pulling every other one as described in the scenario because spacing will vary. That should be used as a general guideline only. It is really a matter of using good judgment when thinning to attain a nice even spacing between seedlings at all stages of their growth.
Upon germination there will always be clusters and gaps here and there. Thin out the clusters in all rows right away to get a more or less even spacing. Gaps in the main row, if extreme, can be filled by transplanting seedlings from the nurse rows.
As for the nurse rows, ordinarily, it is not worth the bother to fill in any gaps since the plants will be harvested young.
In the triplex row basic method only the plants in the main row will be grown to maturity.
Crops that were sown by broadcasting
Peas are the only vegetable sown by broadcasting in the modular garden, having been deliberately sown thickly so as to result in close-growing plants, no thinning is done. Neither is any cultivating or staking. The dwarf plants will support each other and shade the soil, choking out most weeds.
The ideal soil is light, open and fine on the surface, well drained, rough and alive below. In nature, soils are opened up by fungi, by earthworms, by roots and by dead plants that contribute organic matter. This type of soil is very fertile.
After a new garden has been double dug, has good drainage and is in good tilth, its structure should be disturbed as little as possible. The under-the-surface life will return to normal and should be allowed to continue uninterrupted. Ordinarily, there should not be any annual digging up of the beds.
The cover of close growing plants will create a mini-climate under their leaves; a “living mulch” protecting the soil and keeping it open. This living mulch and organic mulches are two of nature’s ways of protecting the soil and keeping it open: Excellent soil management techniques.
Nevertheless, now and then, there is still a need for the time honored tradition of cultivating with hand tools to control weeds and to keep the soil open.
Good soil management starts at the end of a growing season in the fall. To reduce the possibility of the carry over of disease and garden pests from one year to the next, after the crops have been fully harvested, the beds are stripped bare. They are then given an overall shallow cultivation with a rake to expose any left-behind bugs or their eggs. The plots are left fallow for several weeks then, after a light raking to uproot any weeds that may have sprouted, are mulched with a 3- to 4-inch layer of shredded leaves. (A quick way to shred leaves is to run over them with a rotary lawn mower.) This mulch will insulate the soil, allowing the under-the-surface life to continue through the cold winter months.
About two or three weeks before the date of the first spring planting the mulch is removed. The beds are then given a shallow cultivation with the rake to kill any overwintered larvae and left bare. On the planting date, a light raking is given to uproot any weed sprouts and to smooth out. For the sowing of large seed that is all that is necessary; for small seed the soil may have to be made a little finer. But don’t make it too fine or it will turn into mud when it gets wet, plus in the sun it will bake into a concrete-like surface. If rubbed between your hands, soil should crumble into small pieces. You don’t want it to be like a powder.
Once the seeds have germinated and are up, cultivation should be practiced only when there is a very good reason to do so. Overuse of the cultivating tool increases the risk of pest and disease attack, as well as causing more weeds to grow. Dormant weed seeds remain viable for years. The more the soil is cultivated, the more weed seeds will be brought to the surface and germinate. Undisturbed soil keeps the weed seeds under the surface and dormant. Use mulches as much as possible.
For leaf plants sown in triplex rows, there usually is little or no need for cultivation. The close spacing of the seedlings along with any weeds that grow create the “living mulch” effect. In the first thinning of the seedlings, weeds should be pulled selectively so as not to leave too much bare ground. But be sure to pull any pernicious weeds such as quackgrass. At the second thinning, as you thin, pull all weeds.
Once the nurse row plants have been fully harvested and the main row stands alone, occasionally, a little shallow cultivating with a hand cultivator may be necessary. When the main row plants have grown so that tops touch each other, shading the ground underneath, no further cultivation should be necessary as very few weeds will grow in shaded soil.
For large plants sown in 8-inch spaced single rows, since the spaces between rows are greater than the shadows of the young seedlings, there will be no “living mulch” effect. Therefore to avoid the need for cultivation an actual mulch will have to be put down. As soon as the seedlings are up and growing well, pull any weeds and spread a thin shredded-leaf mulch between rows and around the plants. This will hold soil moisture in and retard any further weed growth.
If a mulch is not used, cultivation probably will be needed. If the soil begins to crust, open it up using the hand cultivator. Use the tip of a tine to work around the plants being careful not to harm them by going too deep. In between rows use the full head to break up the surface: Hill up slightly around the base of stems to smother any weeds and to give more support. Do not cultivate any more than necessary. Whenever possible, pull weeds.
For widely spaced plants, such as tomatoes, cultivation is the only practical method to control weeds and prevent crusting in the early stages of their growth. Use the hand cultivator. Cultivate shallowly keeping the soil loose and friable. Hill up a little around the base of the plant stems.
When the soil has been thoroughly warmed, remove all weeds, lightly cultivate, water thoroughly, and mulch with shredded leaves. This mulch will prevent the soil from drying out in hot weather, maintaining an even soil moisture, and also help control blight.
Some vegetables grown in the garden are intercropped. Their treatment is discussed as encountered.
There will be times when transplanting a seedling from one spot to another is necessary, usually to fill a gap after a thinning. Whatever the reason, it must be done carefully to be successful.
Do not attempt to transplant until the plant has produced four true leaves or more. Avoid transplanting on a hot, windy day. Choose a cloudy, misty, or drizzling day. If this is not possible, transplant in the late afternoon after the sun has started to go down and has lost most of its heat.
The soil at the new site should be moist. If it is necessary to add water to the soil, do it a day ahead of time. Dig a hole about 6 inches deep. The seedling should be watered thoroughly a day ahead of time. Do not disturb the seedling’s roots any more than necessary. Take up as much surrounding soil as possible with it. Set it at the same depth as it was before. Firm the soil around the stem with your fingers. Leave a slight depression to hold water. Then pour about a pint of water around the base of the plant. Shade with a cardboard “tent” for a few days (to make a tent, fold a strip of cardboard in half to form a capital “A”).
It is especially important to be aware of soil structure when watering. Remember that plant roots grow in the air spaces between the soil particles. Water will fill the air spaces pushing out the air. As the water drains, air is pulled back in, replenishing the roots with oxygen.
When submerged in water, plant roots will stop growing. A waterlogged soil will interrupt growth resulting in irreversible harm. On the other hand, too little water will also interrupt growth. This is known as water stress. If this happens, the plant will think it is dying and tries to rush to seed.
It is of utmost importance to avoid either of these extremes. Strive to maintain an even moisture level in the soil.
That being the case it is obvious that the main factor in determining how much water a garden needs is the makeup of its soil. Water will go right through a sandy soil, leaving precious little behind for the plant to drink. There will be no reservoir for the roots to draw needed moisture, and very quickly the plants will need another watering. On the other hand, a soil that has a high organic content will hold the moisture and watering will have to be done less frequently. In fact, there could be periods where no watering at all is necessary.
A good soil improvement program is key to your watering program. This cannot be stressed enough. Make it a consistent routine to spread a layer of compost over the soil surface before every planting. Over the years this simple act will slowly build up the moisture-holding capacity of the soil.
Regardless of what type of soil is in the garden, it must always be kept firmly in mind that the root of a plant is what needs to get the water. On newly sprouted seedlings it is impractical to water each individual one at the root. An overall fine spraying of the entire plot is the only realistic thing to do. But once beyond that stage, overall spraying of the foliage is not only wasteful of water but in many cases harmful.
An effective watering program is one that maintains an even soil moisture throughout the life of the plant. There must always be enough water to satisfy the needs of the root system, but not so much that oxygen is denied to those roots. Too dry and the plants will start dying, too wet and the roots will start to rot.
Soil fills with water from the top down; it also loses water from the top down. You can get a good idea of the moisture content just by looking at its color. Dry soil is lighter in color than moist soil. Paleness is an indication that water is needed.
In order for watering to be effective the soil must be open and loose so that it will absorb water readily. Crusted soil will not take the water; it will puddle up and run off. If the soil is crusted, cultivate to open it up before watering.
The watering needs of plants will vary according as to what stage of growth they are in. As previously mentioned, soil structure also plays a big part in how frequently they need to be watered; some soils hold water better than others. Generally, the higher the organic content of a soil, the more water it will hold. For the efficient watering of the modular garden two watering devices are used: An impulse sprinkler and a watering wand. Each is best suited for a particular purpose.
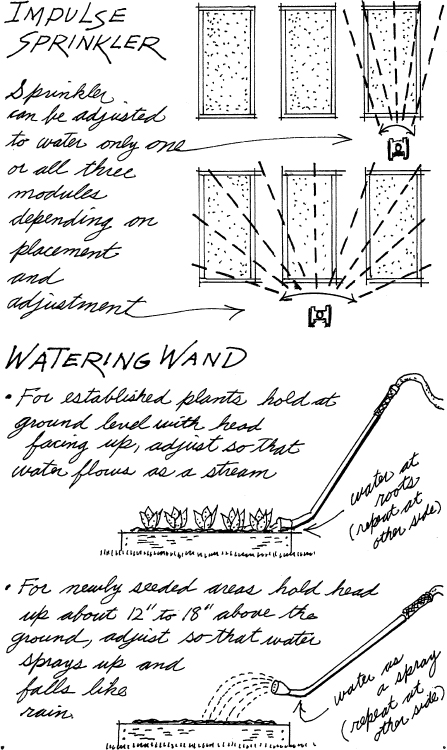
The impulse sprinkler is used for newly seeded plots. It produces a fine mist that really saturates the soil without washing it away or disturbing the seed. Further, the fine mist will not compact the soil, preventing crusting. It can be set to cover small or large areas. It is used until the seedlings have grown to the point where their roots are well fixed in the soil.
The watering wand is used after the plants have become deep rooted. At this stage the plants should no longer be watered from above, they should be watered at the roots only. With the watering wand this can be accomplished very effectively as the water can be placed precisely where it is wanted.
Again, remember, to water efficiently; make sure that it is the plant’s roots that get the water.
Note: In this chapter watering instructions are given describing procedures using a hose, impulse sprinkler, and watering wand. If facilities for their use are not available, a watering can will serve the same purpose.
When directions are given for a spray, use the watering can with the sprinkler head on.
When a stream is called for, take off the head and let the water run out of the spout and around the plant unimpeded. But control it so as to flow slowly—no surging or flooding.
For the watering of freshly seeded areas ignore length of time given for watering with the impulse sprinkler, just wet down using the can with the sprinkler head attached until soil is well moistened. If rainwater is available use that.
Watering newly seeded plots
Use the impulse sprinkler. The soil must be kept moist during the time the seeds are germinating. If new seeds dry out they will not germinate. If newly emerging seedlings, lacking the root system to go deep for moisture, dry out they die. Never forget this very important fact. Water is the most important element in the young seedlings’ life. If the seed row dries out even just once before the seedlings are well rooted, they will not survive.
Water early in the morning: Water should be absorbed into the soil quickly; it should not take longer than about ten seconds for the shiny layer of water on the surface to disappear. If it starts to take longer that is an indication that the soil has been watered enough. Depending on the soil, the average watering time for a newly seeded plot should be about fifteen to thirty minutes. Go out in the late afternoon and check the soil. If the surface has dried out it must be watered again following the same guidelines as were used for the morning watering.
Until plants are well established this regimen should be followed daily. Always water young sprouts early in the morning before the sun gets too hot. If a second watering is needed, try to do it giving enough time for the seedlings to dry before nightfall: Wet plants are more susceptible to fungal diseases at night.
In the initial planting in the spring when a crop has been sown in all three modules, the impulse sprinkler can be set to cover all. In other cases it can be set to water only one or two.
Watering established plants
Once the plants are well established they should no longer be watered from above. You should water the soil around the roots only, not the plant. At this stage use the watering wand. With the wand, water can be placed right at the base of the plant and very little is lost to evaporation.
Established plants should not be watered in the morning. Water on leaves when the sun is hot can magnify its rays and put them in danger of sun scorch. It also wastes water through evaporation. In the case of lettuce, water evaporating in the heat, could cause a shock, making the plants liable to bolt.
Use the watering wand by holding its head facing up at ground level; adjust the water flow so that it comes out as a slow stream, not a spray. Let the water flow down in between the rows and around the plants. Adjust the volume of water to suit the crop. Adjust to little more than a trickle for shallow rooted crops like lettuce and onions, to a greater volume for deep-rooted plants such as tomatoes.
For plants sown by broadcasting, move the wand along all sides until the soil has absorbed enough water.
The water should be absorbed into the soil almost as fast as it comes out of the wand. Don’t flood the surface creating puddles. When the water starts to remain on the surface longer than about ten seconds, the soil has reached its capacity. Stop. You want to water enough so that the water joins up with the moisture that’s already in the soil so that there is a good continuous amount of moisture going right down into the subsoil. But, you don’t want to give it so much water that it becomes waterlogged.
This watering should be done late in the afternoon when the sun has declined, approximately two hours before sunset. This cuts down evaporation and, since the sun has lost its heat, if a few drops get on the leaves, no damage will be done. The next day poke a forefinger into the soil. It should be moist for the full length of the finger. If the soil is dry for part or all of that depth, you need to water more.
A consistent soil moisture is paramount. You don’t want to keep going from dry to wet, wet to dry, over and over. A plant does best when it is not subjected to these extremes. For that reason use mulches whenever possible.
Watering transplants
Tomatoes and broccoli are put out as transplants. Immediately after setting them in, pour about a quart of water around each tomato plant, about a pint around broccoli.
Then, using the watering wand, water daily late in the afternoon at the root only.
Other transplants, such as those taken from a nurse row to fill in a main row gap, once set and watered at the roots, will receive the same watering treatment as the others of its kind.
Special watering situations
Although the impulse sprinkler is preferred for new sowings, in the succession plantings this is not always possible. In many cases a freshly seeded area will be next to large established crops. In a situation like this it is impossible to adjust the impulse sprinkler to precisely water just that area without wetting the foliage of the adjacent plants.
When this occurs, for practical purposes, a change of routine is called for. In these situations water both at the same time with the watering wand.
Late in the afternoon, as usual, water the established plants at the roots with the water flowing as a gentle stream. Then move over to the freshly seeded area, adjust the flow to a spray, and raise the head of the wand, facing up, about 12 to 18 inches above the ground. The water spray then arcs upward before gently falling down, like rain, on the soil.
This is done until the seeds germinate and the seedlings have become well established.
From that point on, they are treated as the mature crops. Water all at ground level with the water flowing as a slow stream.
Since different crops require different methods of harvesting no one set of general rules can apply to all.
There are, however, some common factors. Most vegetables are at their prime when young; as they grow older their quality deteriorates. The best time to pick them is right before you are going to use them or store them. Do not let them sit around for any length of time.
General harvesting guidelines for several crop groups are given starting below.
Harvesting legumes
Pods should be harvested young when they are still fairly smooth. The seeds in the pods should be just visible. This is when they are at their peak. If left to fully mature they will lose flavor and tenderness. Also, the plant sensing that it has served its purpose in producing mature seed, will stop producing and start to die. Harvest pods while young so that plants continue to produce.
When harvesting, hold the plant with one hand while picking with the other. These plants have shallow roots and can easily be pulled from the ground. Or, pods can be cut off with a scissors.
Harvesting lettuce and similar leaf vegetables
Lettuce can be harvested in a variety of ways.
1) The entire plant is pulled while very young.
2) Cut-and-come-again. This technique relies on the fact that after being cut, most leaf vegetables will re-sprout. The plants are cut a little above their base leaving a stub in the ground.
This gives further cuttings which allow them to be harvested over a period of time. The cutting is generally done at the large seedling or semi-mature stage.
3) Outer leaves of plants in the semi-mature and mature stages are plucked (not cut) leaving the center intact. Plant will produce more leaves giving you a lot more lettuce over time.
4) The plant is grown to maturity. At that stage the entire plant is pulled. In some cases, instead of uprooting the plant, it is cut off inside the bottom leaves above the center core. With enough favorable weather remaining in the season a new small head will regrow.
The guidelines given above generally can be applied to most similar leaf vegetables, such as arugula or endive. Modifications are required for some others such as Swiss chard.
Harvesting lettuce and similar leaf crops sown in triplex rows Harvesting triplex rows involves many aspects of the previously described techniques. Depending on the vegetable, harvesting can be accomplished in several ways.
Basic method: Gives a long harvest; starts with young seedlings through semi-mature to fully mature plants.
1) For an early harvest, as soon as seedlings are big enough to eat, thin all rows to get a more or less 2 inch even spacing.
2) When they begin to crowd each other, thin plants in the main row to about 4 inches apart. Then pull plants in the nurse rows that are roughly opposite of those. If any of your crops require a final 4 inch spacing, leave main row at that. Then, as needed, pull from both nurse rows until they are all used up.
3) Most leaf plants need an 8 inch main row spacing. For those, pull to get that spacing and then leave to mature. Plants in the semi-mature and mature stages are harvested by plucking (not cutting) the outer leaves only. Plant will then produce more leaves. Pluck a few at a time from each plant so that no one plant is decimated. Final harvest mature plants as you see fit. But if they begin to elongate (ready to bolt) pull them right away.
Cut-and-come-again method: Plants harvested in this way are cut at the large seedling or semi-mature stages. Usually when seedlings have developed 4 to 6 true leaves you can start cutting. For some crops it is better to cut them at the semi-mature stage. Harvesting is done by cutting at a point about ½ to 1 inch above base of plant. Start at one end of the triplex row and cut straight across. Continue down the row, as needed, to the other end. By that time the first cut plants may have regrown from the stumps and are ready for a second cutting. It is possible to get a third and even a fourth cutting: This method best for mesclun.
Harvesting root crops
Harvest while young, if left to mature they will become woody. Simply pull them from the ground by hand. If harvesting is delayed and the roots have grown too large to be easily pulled by hand, push the blade of a hand trowel down next to the root and lever back and forth loosening the soil, then pull.
Summation
The preceding are generalizations. For harvesting any crop not covered, as well as those covered, individual instructions are given in Chapters 6 and 8. Refer to the pages on each specific vegetable grown for more explicit directions.