
At both of my grandmothers’ homes, the kitchen table was always the center of activity. Whether we were cooking together, making pottery, drawing and painting, playing games, or cutting out paper and flower dolls, everything seemed to occur on that island of wood.
Things are no different at my home now. Outdoors, the huge, old farm table sits under an arbor just waiting for the welcome (and noisy) arrival of children. Indoors, on rainy days and starry nights, we have the long kitchen worktable where we play games, sculpt with pipe cleaners, model clay, and do art and cooking projects.
When my grandchildren were younger, I kept a mini “studio” for them in my tiny sunroom work area. They had a small table and chairs, just their size, a basket of brushes, clay, colored pencils, pens, watercolors, and lots of paper. When their legs got too long to fit under their table, they graduated to our kitchen table and continued the tradition started by my own grandmothers so many years ago. Even though they love working at the big people’s table, they still reminisce about “the good old days in their studio.”
Set up an area for your youngsters, or use your kitchen table, but make sure you’re okay with the likelihood of a big mess and possible accidents. You can purchase huge rolls of kraft paper, also called butcher paper, from art stores to cover your floor, table, and whatever else you’re worried about. Durable aprons will help minimize disasters, and you can decorate them for each child with fabric or acrylic paints.
Think outside the house too, and devote an outdoor space for the fresh-air art projects that kids so love to do. Your grandchild can stockpile stones, shells, twigs, rocks, leaves, seedpods, and whatever is beautiful, odd, and available to keep for future projects.
Set up a chalkboard area either on a wall or on the ground, and keep it filled with colorful sidewalk chalks or the exciting new 3-D chalks. A Chalk Cloth (see here) is the perfect indoor solution to creative or active indoor play.
Remember, whether indoors or out, step back and let your youngsters express themselves. No rules exist as to what is “good art” or bad. What is important is the doing and the sharing of time together. Stick people rather than anatomically correct drawings, lumps of clay that look like slugs instead of turtles—all these less-than-perfect creations fuel your child’s imagination and instill a wonderful sense of confidence and achievement.
Keep your indoor supplies nearby in open containers or boxes, which you can paint or decorate with collages cut from magazines or with original artwork. Outfit your containers with the following list.

Children lose themselves, or find themselves, when they’re totally immersed in creating.

Chenille stems, colored pencils, paints, crayons, and an array of papers stand ready for young Picassos.
 Camera for puppet- and bookmaking
Chalks, regular and large colored sidewalk
Chenille stems (pipe cleaners) in colors, with glittery finishes, from fat and huge to small and spindly
Clay
Cork board, aka Life Board (see here)
Fasteners, round-head for making books
Felt pieces of different colors and a felt board
Glue, white, or glue sticks (glue sticks are wonderful, easy to use, and forgiving)
Molded letters and cookie cutters that can be stamped onto clay
Paint, acrylic (water soluble) for older children
Paint, tempera for toddlers
Paint, watercolors
Paper, construction
Paper, clear, contact, for preserving artwork or making “stained glass” windows
Paper, drawing
Paper, origami, of all colors and metallic finishes
Paper punch, with round holes or stars, hearts, and other shapes
Pencils, colored
Pencils, Stubby Chubby for young artists
Pencils, watercolor (apply like a pencil, but brush with water and work like watercolors)
Pens, fabric marker (not washable)
Pens, marker in gold, silver, and copper
Pens, washable ink marker
Ribbon, for tying books
Rubber erasers
Scissors, child-safe
Tape
Tape recorder for musical moments and story making

I love the erasable vinyl Chalk Cloth (available in fabric and craft stores) as a portable chalkboard for indoor play. Chalk Cloth is sold by the yard and rolls up easily for storage. On rainy days, clear a space on a table or on the floor for indoor chalk art or a rousing game of hopscotch.

This tablecloth project happened by accident, but it has turned into a family tradition. As I walked the aisles of our local paint store, I spied a stack of 4-by-12-foot canvas drop cloths. They were well made and very inexpensive. I bought one to cover our farm table so that when my grandchildren were doing their art projects we wouldn’t worry about spills and spots.
What started out as a workhorse turned into a unicorn. The kids began using acrylics and markers to paint and draw on the cloth itself. The dropcloth turned into a beautiful tablecloth, an ongoing art project that will take many visits to complete, which will then provide a record of good times together.
Large canvas dropcloth
Waterproof colored markers
Pens
Acrylic paints
Stiff brushes of varying sizes
Just let the kids dive in!
Whether your grandchild comes once a week to visit or once a summer, growing kids change dramatically in a short time. That’s why I love to photograph my grands and then ask them to do self-portraits to post alongside their photos on our art line (see following). After their portraits have been on display for a while, they are taken down and added to a keepsake portfolio of art, which I will someday pass on to them.
Give each grandchild a tablet of drawing paper and pencils, and arrange for short periods to create the portraits. No fair peeking while the drawing is going on, and no hints, rules, or critiques.
After the drawing is complete, pull out crayons, markers, or paints for the children to add touches of color. You’ll be amazed by some of the insightful portraits your grandchild will make. Make sure your young artist always signs and dates each piece for posterity.
For children, it isn’t just the creation that matters, but the fact that their work will be on display for everyone to admire. So, instead of taping their artwork to the wall or sticking it on the refrigerator, give it center stage billing on an art line.
To frame each art piece that will be displayed, simply glue it onto a colorful sheet of construction paper that is slightly larger than the work.
Two 2-inch screw hooks
Clothesline
Clothespins, wooden (let your kids paint or decorate the pins)
Screw in the hooks about 48 inches apart (most studs are 16 inches apart) at a child’s eye height. Tie the clothesline to each hook and stretch it taut. Use the clothespins to hang your grandchild’s latest artwork.

An ever-changing array of art hangs from the line.

On rainy days, I sat for hours in my grandmother’s breakfast nook and played with a boxful of plain white pipe cleaners. With a simple twist, splice, turn, or tie, I could make just about anything.
When I went to buy my grandchildren pipe cleaners, I found a new, zippier, longer, fatter, more colorful, and glittery version of the old standby. They’re called chenille stems, fuzzy sticks, and the fat ones are Brain Noodles—they’re all great. I bought two packets for each child, one brilliantly colored and one of the beglittered fancy stems. They’ve been used and reused until some of the stems are going bald.
Keep a big basket of these fuzzy sticks in your grandchild’s play area. You’ll be amazed at the multitude of creations she will design—jewelry, people, animals, crowns, glasses, wigs, watches, woven skirts, and more. So much magic can be created from something that a grown-up might overlook or dismiss as mundane. And speaking of grown-ups, why not pull out some chenille stems and create alongside your grandchildren—it’s good to be a child with them sometimes.

Straight chenille stems will soon become crowns, epaulets, snakelike bracelets, and anklets.
Take full-body photographs of your grandchild, pets, friends, and family, and then enlarge them on a color copier so that they are paper doll size (about 4 inches). Help your grandchild glue the images to a stiff paper backing (like bristol board or cardboard) and cut them out. Glue the paper image onto a flat jumbo-sized “craft stick,” or, for bigger images, use a paint stick. These stick puppets are perfect for rainy day puppet shows, which can be based on a beloved book or spontaneous, imaginary puppetry.
Drape a small table with a cloth on three sides to use as a stage. Leave the back open so your child can gain ready access to puppets. Line up chairs for the audience, and settle in for the show.

When a child puts on a costume, he becomes someone else and inhibitions vanish.

Cuddle up together with one of your favorite children’s books (see here for some choices). Read the book aloud in a dramatic way—abandon your dignity and change your voice and facial expressions to suit the characters. Coax your grandchild (if old enough to read) to do the same. For toddlers, just read a passage dramatically and encourage participation.
Use one of your storybooks as a basis for a rainy day off-Broadway production. Open up your Dress-up Drawers (see here), and let your grandchild enter into a fantasy land—with capes, oversized shirts, hats, and ribbons—whatever you have on hand.
Clear a “stage” space in your living room for the play. Roll up the rugs, move back the furniture, and focus a bright light on the “stage.” Provide some appropriate music, and make some homemade theater signs with the title of the play and the name of the actors and actresses. Line up some chairs for the enthusiastic audience (YOU).
You’ll be surprised by how readily even the shiest grandchild will act when given a chance and the complete attention of devoted fans. I was shocked when my timid three-year-old grandchild acted out some of the pages of Maurice Sendak’s book Where the Wild Things Are. Another afternoon she followed through the pages of Good Night, Gorilla as though it was a script. My two oldest grandchildren donned clothes from the Dress-up Drawer, grabbed musical instruments from the Music Basket (see here), and performed improv from the top landing of the staircase. I was amazed by their skill, ability to act, sing, and play instruments, and the joy they got from the show—and the attention.

Capes, wings, tiaras, and, of course, wands—are necessities for young faerie princesses.

No child (or grown-up) can pass the chimes without ringing them.
My grandchildren love the different voices of the wind chimes and bells hanging around my home. Sometimes, when the wind gusts, the chimes sound angry. In gentle breezes, they sound like the tiny voices of faeries. Whenever we hear them, they remind us that though we may not be paying attention, the wind is always up to something.
If you garden, you may have extra terra-cotta pots you can use for this project or pick some up at a garden center.
A collection of clean, dry terra-cotta pots, large and small Twine
Acrylic paint (water-soluble and quick-drying)
Paintbrushes (sizes 00 to 6, or larger if you’re doing bigger designs)
Lay out your collection of terra-cotta pots—large pots will be the bells, and the small pots will be the clappers. Spend a rainy day together with your grandchild painting the pots (make sure they’re clean and dry first) with acrylic paints. Allow them to dry overnight before touching them.
Cut a 3-foot length of twine and pass it through the pot’s drainage hole and tie the twine in a fat double knot that will not slip back through the hole. Leave a tail of twine long enough to hang below the bottom of the pot. Slip a smaller terra-cotta pot onto the tail of twine, and tie another double knot inside the small pot to hold it in place, making sure that the little pot clapper will hit the side of the big “bell” pot.
Hang your bells from a tree branch, deck, or porch railing—where your child can ring them or where the wind will make its own music.


The same terra-cotta pots that make great wind chimes are also perfect homes for one of the most helpful critters found in a garden, the lowly, but ever so lovable toad.
Some children are frightened of toads. I don’t know if it’s the big bulging eyes, the bumpy body, or the enlarged parotid glands, but toads send a shiver down many small spines. Of course, when you read Kenneth Grahame’s Wind in the Willows to your grandchild, many of the unfounded fears will vanish. Who can resist Mr. Toad Esquire of Toad Hall?
I’ve learned that once a child does something kind for an animal, whether it is providing a birdbath, filling a feeder, or making a home for a spider, they feel invested in the critter, and they usually become more caring and less afraid. By helping your grandchild create a toad cottage, you’ll make life easier for the toad and open little eyes to one of the most helpful creatures in a garden.
A clean, dry terra-cotta pot (at least 6 inches wide)
Acrylic paint (water soluble)
Stiff brushes specifically for acrylic and oil (sizes 00 through 6)
Cover your worktable and turn the pot upside down. Use acrylic paint to decorate the cottage. (I like to add a “welcome” or a “do not disturb” sign.) Allow the cottage to dry thoroughly.
Ask your child to think like a toad and look for a cool, shady garden site for a cottage home. Once they’ve chosen a spot, set the cottage upside down in the shade and prop up one side with a rock or piece of wood so the toad can enter. You might not see Mr. Toad very often because he is very shy and retiring.
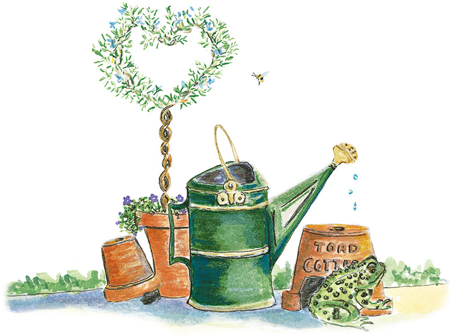
Mr. Toad Esquire abandoned Toad Hall for this snug little pot-cottage.
We stumbled on rainsticks, a primitive musical instrument, in a local craft gallery, and our grandkids couldn’t put them down. The lightweight cactus-branch instruments of differing lengths were studded with thorns, which pierced through the walls of the cactus and into the hollow interiors. The sticks were filled with a variety of objects, from pebbles, rocks, and sand to an array of oddly shaped seeds. When the rainsticks were shaken, or turned upside down, the objects hit the cactus thorns, which diffused their sounds. As the children shook and turned the sticks, we could hear falling rain, hailstones, and rushing waters.
The history of rainsticks is as cloudy as a stormy day. Some believe that the natives of Chile and Ecuador used the instruments to call down the rains, that the Incas used these as tubular rattles, or that they originated in Africa. Whatever their origins, they are a huge hit with kids who can make them themselves—with a little help from Gran!
Empty cardboard tubes from toilet-paper length to wrapping-paper length (Mailing tubes with end coverings are great.)
Colorful papers, stickers
Crayons, markers, or paint
Glue
Paper muffin cups
Rubber bands (thick)
Aluminum foil
Small pebbles, beans, lentils, rice, seeds, coarse sand
Beads, feathers, ribbons, buttons, or shells
Cover a table work space with newspaper and have your art supplies within easy reach.
Decorate the outside of cardboard tubes with bits of paper, paint, crayons, stickers, or markers. Let the tube dry. Then place a muffin cup over one end, secure it with a rubber band, and wrap it with tape to hold it in place.
Tear off a piece of aluminum foil twice as long as the tube. Roll the aluminum foil into a thin snake and kink and twist it until it is like a long, loosely coiled spring. Push the spring of foil inside the tube (it should reach from end to end) to act as an inside sound diffuser.
Fill the tube with a few tablespoons of beans, lentils, pebbles, sand, or rice. Each ingredient has its own sound: The rice is light as a spring rain, the pebbles and beans sound like a summer downpour, and the lentils almost sound like rustling leaves in the rain. Cap the open end with another paper muffin cup, secure with a rubber band, then wrap it with tape. Once your rainstick is filled and capped, you can add more decorations, such as long strips of ribbon or twine, feathers, shells, beads, buttons, and bells. You can also paint or paste colorful papers on both ends.
You’ll be amazed by how much joy and music these homemade rainsticks will provide.

The joy is in the process of making and decorating the rainsticks and the magical performances that will follow.

Maracas and tambourines are simple enough for any child to play.
Children have a natural urge to make music, whether it’s clacking two sticks together, blowing in a bottle, or drumming on a pan or tin can. Music flows from them like a mountain spring. Encourage your grandchild to experiment with a variety of instruments, and dance and play alongside him. (Don’t worry about dignity.)
You can find child-friendly musical instruments in toy stores, craft shops, import stores, and online catalogs. I first bought a xylophone, some flutes, and harmonicas from a fair trade store, then I added to the music basket with maracas, a tambourine, and drums made from empty tin cans ranging in size from soup cans, 28-ounce tomato sauce tins, and big restaurant-sized tins called #10, about 100 ounces. Last year I grew a big crop of gourds of all sizes and shapes. Once I dried them, my grandkids discovered that the seed-filled gourds make perfect rattles. The tin cans and gourds sound great together; each has a distinctive sound, from the sharp, loud hail on a tin roof to the muted gourd-seed rattles that conjure up images of rattlesnake tails and rustling corn.

This big basket of musical instruments is constantly in use both indoors and out.
The first time I saw Andy Goldsworthy’s ephemeral, nature-inspired art I shrieked with joy. Although his creations are thought-provoking, artistic, and sophisticated, they are also child-friendly and fun to copy. His works ignite a spontaneous spark of joy that infuses kids with their own natural creativity. Have you ever known a child who can pass up a pile of rocks or who isn’t tempted to sculpt sand, scuff smooth soil, or play with leaves or twigs?
Visit your local library and sit down with your grandchild with a few big Goldsworthy photo-picture books. Check out your favorite one, and then take time to page through it and talk about the rock sculptures, leaf art, and twig art pictured. Choose an art project you like and look for a good place in your yard to construct it.
A supply of rocks
Interesting twigs and branches
Flat stones
Seashells
Some flat sandy or smooth soil areas
Leaves
Flowers
Vines
Mosses
Lichen
Feathers
Collect various sizes of stumps and cut sections of branches to create natural pedestals for stacked rock sculptures and twig animals, bugs, and other whimsical works of art.

Dragonflies (maple seeds on a twig).

A tree stump pedestal for rock sculptures.
Modern art twigs with torn autumn leaves.

A rock “duck” from Peaks Island, Maine.
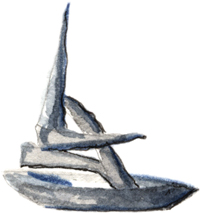
Pieces of stone stacked and leaned to create a sailboat.

The Green Man, framed in twigs. Vines, leaves, and acorn eyes make up his face.

A spiral of freshly picked dandelion flowers.

A “spider web” of branches and twigs.
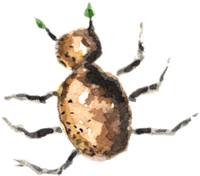
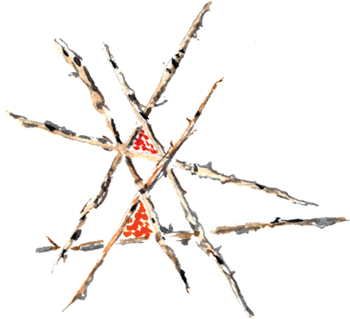
A bug made of rocks and twigs.
My grandchildren love working with clay. They sculpt people, beads, furniture, animals, and complete landscapes with trees, streams, and hills. One weekend evening, when they wanted to play with clay, our old supply was too hard for little hands to work. Since I didn’t want to trek to the store, I turned to my trusty “recipe box” of crafts in search of an easy bread “clay” I made almost 20 years ago. Fortunately I had some squishy white bread on hand, which was all we needed to whip up a batch and begin creating. (See sidebar for ingredients.)
Your grandchild will love pulling off the crusts, tearing the bread into tiny pieces, and tossing them into a big bowl. Then add water or lemon juice and detergent and moosh and knead the ingredients together. If the clay is too dry, simply add a few more drops of water.
Use a rolling pin to flatten the clay and cookie cutters to make ornaments and shapes. The clay can be sculpted, hand rolled into beads for homemade jewelry, or formed into ornaments or tags for gifts.

Ilyahna’s painted clay landscape.
Jewelry made from clay or handmade bread clay is so easy to make even a three-year-old can get involved in the process of rolling and forming shapes.
Lay a piece of kraft or wax paper onto a work surface, and create alongside your young artist. Roll beads of varying sizes, and make long, fat snakes, which will form tubular beads. Roll slender snakes and pinch the ends together to form a hoop.
Poke a piece of wire through the beads after rolling them and before they harden. Leave the beads strung onto the wire until they are thoroughly dry, and then decorate and paint them with water-soluble acrylics. Finally string them onto thread or cord. Store finished pieces on a wax paper-lined cookie sheet and allow them to dry.
Cover your beads and tubes with white glue and then quickly roll them across a small mound of glitter or sequins to give them a royal appearance. Allow them to dry thoroughly.


Okay, it’s a rainy day, and you and your grandchildren have been indoors all afternoon doing craft projects, but everyone is going a little stir-crazy. So don your rubber boots, take a bucket, and go outside when there is a pause in the rain. You will notice that right after a rain, the sidewalks and gutters are filled with worms. Scientists think that the worms surface to escape drowning. Sadly, once they’re in the sunlight they dry out and die.
You and your grandchild can become worm saviors. Fill your buckets with a bit of moist soil, grass, and leaves. Pick up stranded worms, gently drop them into the bucket, and transport them back to the garden or backyard. Bring a few worms indoors and put them into an old aquarium (this is your worm hotel) along with the moist soil, grass, and leaves.
Drape the hotel with dark fabric to keep the light out. In the morning, have your child sprinkle the soil in the aquarium with water. In the evening, lift the curtain and use your flashlight to see how the worms have built a network of tunnels visible along the sides of the aquarium. You may see what looks like a miniature worm city bustling below the soil. Tunnels and tiny mounds of castings (worm poop that looks like mini volcanoes) dot the worm landscape. Explain that this is what makes worms the best workforce in the garden; they aerate the soil with their tunnels and their castings make the soil and plants healthy.
You’ll see how the worms carry food and you might be able to see egg cases and even some baby worms. After a week of watching, release your worms into a shady, moist area of your yard.
Aquarium, terrarium, or big jar
Dark fabric piece (large enough to drape over entire aquarium)
Soil, grass clippings, shredded wet newspaper, crumbled leaves

If your child is squeamish about handling the worms, just use a spoon or trowel to gently lift them.

Grab a flashlight and quickly unveil the worm hotel to spy on their quiet goings-on.

Years ago, I attended a papermaking workshop taught by a well-known artist. The class was exciting, the process a bit long, but the possibilities were limitless. For months, I worked to streamline the procedure enough so that I could pass on the basics of creating beautiful papers to children and their grown-up helpers.
I dived into the challenge and began to teach everyone from four-year-olds to octogenarians how to make gorgeous papers. The process was so simple that I was able to successfully make paper with a group of children on a national television program. Everyone, no matter what age, loved doing the work as much as the finished products—lovely, lumpy, herbal, floral, colorful, whimsical, sometimes fragrant, always different papers for doing art, making books, jotting notes, and writing letters.
You’ll need to have your paper supplies, buckets, screens, and felts on hand and set up before doing this project. Having everything assembled will eliminate the “sit and wait quietly until I’m ready” that most kids can’t stand. Papermaking can be done on a balcony or a deck, in a garage, a basement, a kitchen, or wherever you aren’t afraid of a few drips or splashes.
Your grandchild will love the tactile pleasures of slopping through water loaded with paper and flowers, and will become surprisingly proficient at skimming and lifting out the one-of-a-kind works of art. If the paper doesn’t suit you when it comes off the screen, just throw it back into the washtub, stir it up, skim your screen through the slurry, and lift out another sheet.
Plastic bucket(s)
Large plastic cups
Blender
Pieces of pure rag paper (available at any craft supply or art store)
10-gallon tub (Rubbermaid works well), about 24 by 16 by 8¾ inches
Premade screens with aluminum frames, or homemade wooden ones, small enough to fit and be moved, back and forth, inside the tub, about 12 by 15 inches
Large sponge
Four pieces of felt (slightly larger than the screened frame)
Two pieces of waterproof (sometimes called marine) plywood slightly larger than the felt
We don’t measure when making paper. Like the traditional family soup pot, our buckets contain ingredients that change according to what is trimmed or harvested from the garden. Go exploring and carry a basket or bucket for gathering. Pick up wonderful leaves, fern fronds, herbs, flowers, mosses—whatever tickles your creative spirit. We love to use hollyhock, sunflower, cosmos, and rose petals. We once devoted ourselves to searching out perfect four-leaf clovers to press into our special papers.
Set aside any special specimens you want to preserve intact. Place your other plant material in a bucket, cover with water, and soak overnight so the fibers are broken down and mushy. Kids love the process of stirring the blend and sometimes whacking at fibers to speed the breakdown.
With the plastic cup, scoop the mushy pulp into the blender and fill halfway. Drop in a handful of small pieces of rag paper, which works as both a thickener and a binder. Cap the blender, turn it on low, and blend until the paper and flowers are mixed thoroughly. You may need to add more water to the mixture to help the blending process along. Your finished pulp should have the consistency of pancake batter—not too watery, not too thick.
Pour the blended pulp and water into your tub. Repeat the blending until you’ve processed enough pulp to fill the washtub two-thirds full. Now your child can sprinkle in some of the special reserved flower petals or little leaves to add texture to the blend. Stir thoroughly with little hands.
Submerge a screen horizontally into your tub, allowing the mixture to cover the screen. Slowly move the screen back and forth through the mixture as you lift it out of the water, keeping the screen horizontal. Try to cover the entire screen with a thin layer of pulp. Let it drain as you shake it gently from side to side, which will help strengthen the fibers in the paper. (The screen will be covered with a thin sheet of mushy pulp.) To embellish the surface of the paper, lay some vines, flowers, or leaves onto the surface and press them gently into the pulp with your sponge. Then press the paper with the sponge to remove the excess water, and keep wringing out the sponge and pressing it on the paper, to remove more water.
Place a piece of plywood on the ground. Dampen the sheets of felt, and stack two of them on the plywood. Gently turn your screen upside down over the felt and transfer your paper from the screen onto it. Cover with a couple of pieces of damp felt, and put another piece of plywood on top. It’s sort of like a triple-decker sandwich. Press firmly on the stack with your hands to squeeze out excess moisture.
Let the paper set for 2 hours before removing it from the felt. Lay your paper on a flat surface to dry. Voilà! It’s that simple and satisfying.
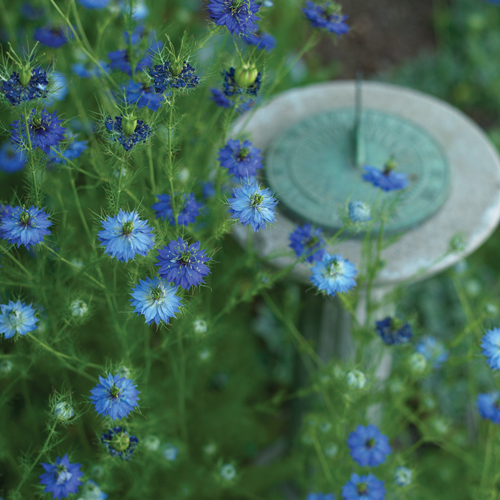
I grow these love-in-a-mist for papermaking and crafts projects. Start them from seed in spring, and they’ll return yearly.
In my old Heart’s Ease gardens, the children loved the elderberry tree spangled with paper wind wishes that danced in the slightest breeze. Sometimes, it was a heartbreaker to read the wishes they scribbled and hung. Use scraps of your beautiful handmade paper to write out a wish, a blessing, or a poem. Punch a hole in the top of the wish, and tie it loosely to a favorite tree or bush. If you want your child’s wish to last longer, simply cover it with clear contact paper, which will protect it from the rain.

When I was very young, my grandmother and I often made simple books from short stories I told her. She scribbled notes as I talked, asked questions about the stories, and then printed them on plain pages, which I embellished with my small drawings. I gave my tiny books to my family, and I thought they were the best gifts in the world, filled with my art and the story of life as I knew it. Now my own grandchildren are book creators, too. Sara just finished her first one, “The Little Red Hen.” Vaguely familiar, but definitely her own version of the story.
This project is one of the easiest and gives your child a chance to record life and history as seen through young eyes. If you can’t write fast enough to jot down your child’s story, use your recorder and then transcribe it onto the book pages. Older children can write out their own words, but the younger ones will need your help. You may want to prompt the story by asking questions about a favorite family pet, a trip to a park, or an experience at school. Whatever you ask, just make sure you focus on the story and the storyteller. Everyone loves an audience and your interest fans the flames of their creativity.
A collection of colorful papers, origami papers, watercolor papers
A bone folder (or a wooden craft stick) for crisp paper folds
Paper punch (for round holes)
Brass round-head fasteners or ribbon (thin enough to fit through holes)
Glue (for pasting pictures or drawings on pages. I use a pH neutral glue that is water soluble and acid free and will last for decades.)
Supply your young artist with crayons, pencils, paints, or photos to finish decorating the book pages. Work together on a flat, clean surface, and carefully fold and crease the pages. Do the same with a heavier piece of paper for the cover.
Our books are made of unusual papers, folded in half, with holes punched in two places on the edge of the fold and tied with beautiful pieces of ribbon or held together with brass fasteners. The beauty of these books is in the simplicity, the process, and the long-lasting results.

What could be a better gift than a child’s-eye view of life captured in a handmade book?
Gather hollyhock flowers and buds of different colors. Pull out the pistil in the center of the bloom. Stack different colored blooms for skirt. Use a bud for the head, a flower for a hat, and twigs for arms. Attach with a toothpick.

pistil


I saw one of these natural “stained glass windows” years ago, and it was hauntingly beautiful. The sunlight glimmered softly through the colorful flowers, leaves, and ferns, illuminating them so they glowed like sheets of fragile glass. I loved the window so much we had to make a few for our family. These are inexpensive and easy to create, and a window will last for years.
Take a walk together with your grandchild on a sunny, dry day, and bring your gathering basket. Search for the best and most colorful blooming flowers, dainty ferns, tassled grasses, and an array of leaves. Pick some of your favorites and gently stow them in your basket. When you return home, clean the flowers, ferns, and leaves with a soft, dry brush and press them between the pages in a heavy book.
Flowers, leaves, ferns, grasses
Two sheets of acrylic glass or Plexiglas (available in frame shops, craft stores, home centers)
Aluminum duct tape (available in hardware stores)
Allow your specimens to dry thoroughly for a few days. Help your grandchild make an arrangement with his flowers and leaves on one sheet of the glass.
Carefully, so as not to dislodge anything, place the second sheet of glass on top. Doing one side at a time, lay half of your aluminum tape along the edge of the top sheet of acrylic, and carefully press it down and fold the tape around the edge of the other sheet, making sure to smooth it as you press. The tape will seal the two acrylic sheets together and make a beautiful, simple frame.
Prop your grandchild’s creation against a window to highlight the shapes and colors of her natural stained glass work of art.

This window displays leaves from our walks together.
Oh, those unforgettable days of exploration and collecting for art projects. They are some of my favorite times with my grandchildren, who view each object they find as magical and exceptional. This is exactly how I want them to feel, rediscovering the mystery and miracle of nature every time they look closely at something.
Whenever you’re out on one of your nature walks, be on the lookout for interesting shapes, colors, and arrangements of plants and leaves. If you look, you will see the faces in pansies, skirts and dresses in hollyhock flowers and Canterbury bells, hats or fingers in tubular plants, animal shapes, and hearts—the array is endless, and all these shapes lend themselves to the art of collage. Gently snip or pick some leaves and flowers that you like and place them in your basket. When you return home, clean your collection with a soft, dry brush, and blot the plants dry if they’re moist.
On a piece of 8½-by-11-inch paper (try using colored construction paper), experiment with a variety of different flowers and leaves by arranging them into the shapes of animals, people, insects, landscapes, cars, and houses. Once you start moving and overlapping the shapes, you’ll be surprised at the multitude of things you can create from your natural supplies.
When your design is in place, just lift each piece slightly and use a cotton swab to smear a drop or two of white glue underneath the plants to secure them. Use a dampened swab to clean up any extra glue.
To reproduce your collage for cards, bookmarks, or special wrapping papers, simply place the paper on a flatbed color copier or scanner and make decorative copies.

Left: Lovely leaf lady with a bouquet. Right: Dancing leaf man in a beret.

My grandchildren love to spend Saturday nights around the farm table in our kitchen. We haul out our board games or play lively rounds of the Memory Game with cards that we created together. Move over, Parker Brothers! The game helps familiarize them with the looks and names of neighborhood trees and flowers. I always lose, but that’s okay. My grandchildren relish every minute of my humiliating defeats and they love to win. This is a game that kids love because with their young memories, they are inevitably better at it than adults are.
The best part of this memory game is that you and your child can make the cards yourselves. Homemade and free—what could be better? Just go outside, look, and gather leaves and flowers that interest you. Once you start looking, you may find that everything interests you.
24 different specimens of flowers, leaves, grasses, and ferns
White glue
24 3-by-5 inch index cards
12 8½-by-11-inch sheets glossy photo-quality paper (10 mil or higher) or card stock
Color copy machine or computer scanner and printer
Scissors or paper cutter
Gather two dozen specimens or parts of plants (petals, fronds, seeds, etc.) small and flat enough to fix on a 3-by-5 index card.
Lightly glue a single specimen in the center of each card until all 24 cards are done. Let dry.
Lay four cards at a time, facedown, on the copier or scanner bed.
Make two copies or prints of each set of cards on a full sheet of photo paper or card stock.
Cut each reproduced specimen to the 3-by-5-inch size. You will have 2 copies of each card and a deck of 48 cards.
(for two to four players, ages 4 and above)
Shuffle cards. Lay cards facedown in four rows.
The first player turns over two random cards. If they match, the player keeps them and takes another turn. (Every time a player matches two cards, he is allowed another turn.) When no match is made, the next player takes a turn.
The game is over when all pairs are matched, and the player with the most matches wins.

maple seeds

dill

lady’s mante

sweet william
A rainy afternoon is the perfect time to haul out the basket of natural objects you’ve collected, and turn them into some simple toys and games invented and played by Native Americans.
Find a short, forked twig and a short piece of twig that will fit inside the fork. Stretch a fat rubber band around the Y.
Twist the twig around and around inside the band. Then set on the ground and watch it hop. Nudge it if necessary.

Drill or poke 2 holes in a circle of wood or cardboard. Thread string through the holes and the loops, as shown. Then, pull and pause, pull and pause and watch it twirl.

You’ll need two forked branches to make two racquets.
Make a net of cord or twine and tie it onto the racquet.
Make a “ball” by filling a piece of cloth or cut-off sock with grass. Tie ball closed.
To play: Draw a large circle on the ground. Both players stand inside the circle and bat the ball to each other. If one player misses the ball, the other player gets a point.

You’ll need a long twig or branch for each player (about the size of a ball bat).
Use cut-off socks or fabric stuffed with grass, rice, or beans.
Tie tops of balls to a piece of twine.
To play: You and a partner try to toss the double-ball-on-a-string back and forth without letting the balls touch the ground or your hands.

Collect walnut shells. Open and fill each half cavity with mud, glue, clay, or wax.
To play: Sit on the ground. One player throws an odd number of shells, and the players yell “round” or “flat.” Whoever guesses the side of the largest number of shells facing up gets a point.


Flat = inside

Round = outside
Soak willow rods overnight. Bend them into a ring and tie them securely.
To play: One person rolls the willow ring along the ground while the other tries to spear the ring through the hole.

Find a long branch to use as a spear
Tie on a piece of string or twine. Tie the other end of the string to a ring.
Swing the ring back and forth and around until you can catch it on your spear.

Don’t you feel that whenever you’re with your grandchild it’s a special occasion? I love our quiet times and our adventures together and try to remember to record them in my journals or in a letter-from-the-heart, which I store in a special box.
I like it when my grandchildren let me know their take on our times together—whether we’ve gone to the zoo, a movie, museum, or on a nature hike. To preserve your grandchild’s memories and feelings, you might talk about the play you’ve just seen, write some notes about his favorite art at the museum, and ask him to do a small sketch of it. Write a funny poem about a book or place, take photographs of each other when you’re hiking, record some of your grandchild’s thoughts, and transcribe them into one of your letters.
Whenever you find something of interest on a walk, you and your grandchild might jot down a few words in your journals, even if you’re not quite sure what it is, tape a special flower onto the page, or do a quick sketch. (Please don’t try to suggest anything to improve your child’s work. All children’s art is beautiful, free, and evocative.)
Date your letter, sign it, fold it, and tuck it into an envelope, but don’t seal it. Store these letters in a child-crafted memory box (see following).

Your keepsake letters will preserve memories that might otherwise be lost.
I treasure my grandchildren’s drawings, notes, and poems, which are tucked into colorful envelopes, and store them and my letters-from-the-heart in a memory box.
Clean box (shoe boxes are the perfect size)
White glue
Acrylic paint
Bits of colorful paper, photos, stickers
Spend a rainy day with your grandchild decorating the memory box inside and out. You might glue on family photos, bits of tickets from events you’ve attended or places you’ve visited, or press wildflowers between clear contact paper and affix them to the box.
Even when we are separated by thousands of miles, I can slip an envelope out of the box and relive our adventures. These letters are a simple way to ensure that the history of our times together will be lifelong memories not only for them, but also for me.

