Understanding Operating System Utilities for Disk Maintenance
In this section, you examine different disk maintenance utilities that you can use to perform disk maintenance on your system. These utilities include Disk Management, defrag, and chkdsk. Each of these utilities serves a specific purpose for your operating system.
diskpart.exe and Disk Management
Before you can store any data on your disk, you need to prepare the disk for use. You can use the diskpart.exe utility to prepare your disk to hold data if you are using the Windows Recovery Console or in Windows, but you will likely want to use Disk Management (diskmgmt.msc) if you are in Windows.
Data is stored on a disk in a partition, and that partition is assigned a drive letter. There are two main partitioning standards, Master Boot Record (MBR), which has been around since the start of modern computing, and GUID Partition Table (GPT), which has been supported since 2010.
Decisions around MBR partitioning were made when early computer disks were created, you were allowed to create only four partitions on a disk, and a table was created in the disk’s BIOS to hold the partitioning information. The partition table has only four entries in it. The solution to the four-partition limit was to create a special partition, which is always stored in the last partition. This special partition is an extended partition, and it is designed to extend the number of drive letters you can associate with a drive. Remember that this is four, the same as the number of partitions. The extended partition does not have a drive letter associated with it, but rather allows you to create any number of logical drives within it, all of which do have drive letters. The data for the MBR is stored in the first sector of the disk. In addition to the limit on the number of partitions, there was one table being stored in a 512 byte sector, which in effect caps the maximum size of a partition at 2TB.
This process has been completely rebuilt with the GPT partitioning model. To not interfere with MBR data, the GPT is stored in the second sector of the disk, and uses a minimum 16,384 bytes to store its data. This data starts with a GPT header and is followed by an array to store data for at least 128 partitions. Since the specification defines the minimum size of the array, it is possible to have a larger array supporting more than 128 partitions. The specifications for GPT are a subset of the UEFI specifications. If you are using 32-bit Windows Vista or Windows 7, you are able access data on GPT partitions, but you are not able to boot from them; but all other current versions of Windows allow you also boot from the partitions if your hardware is using UEFI. The same can be said of FreeBSD 7.0 and up, Ubuntu 8.04 and up, Fedora 8 and up, and Mac OS X 10.4.0 and up.
Windows allows you to use either tool to manage your drives, either diskpart.exe or Disk Management, which is a snap-in, or a tool component for the Microsoft Management Console (MMC). Disk Management is fully covered in Book 2, Chapter 5.
Knowing your way around diskpart.exe is still important because you may have to resort to using diskpart.exe to prepare a drive to store data during a Recovery Console session or to perform certain tasks that Disk Management does not support, such as extending a primary partition on a drive. In order to boot, a hard drive requires that one of its primary partitions be made active. Each partition that you create can then be formatted with a file system. Each file system has a maximum partition size, and Windows may have some imposed limits on top of that.
 Starting with Windows Vista, you are able to use Disk Management to both extend and shrink partitions on a disk.
Each primary partition or logical drive that appears on your computer is still limited to the size specified by the file system that you use on it. FAT32 drives are limited to 2TB, but Windows limits the partitions to 32GB, and on MBR disks, even NTFS will be limited to 2TB; while on GPT disks you can use up to the theoretical limit of 16EB.
With MBR disks, you can boot only from an active partition, so if you don’t set up an active partition on a new drive, you will not be able to boot from that drive.
If you use Disk Management, you can create up to four primary partitions on each drive. If you want to create an extended partition, you can create only three primary partitions. You also have the option of updating your disk to a Dynamic Disk, which eliminates the traditional limits to partition table entries by maintaining its own partitioning information in a separate location on the disk. Do not confuse Dynamic Disks, which Microsoft implemented prior to GPT, with GPT disks; these are two methods to get around the MBR disk limits.
Dynamic Disks do not have as many recovery tools as traditional Basic Disks and are compatible only with all modern Microsoft operating systems (OSes). Because of this recoverability aspect, you should avoid using Dynamic Disks unless they are necessary for your disk configurations.
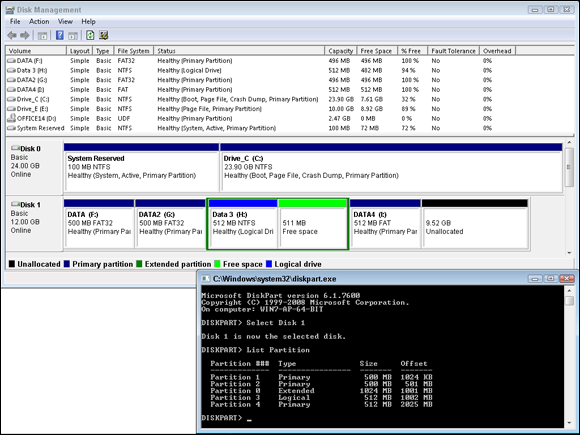
In the Disk Management utility (see Figure 4-1), the entire contents of the disk partitioning scheme are visible in the display, and you are given control over the drive letters that are assigned.
defrag.exe and dfrgui.exe
In this section, I discuss only the defragmentation options available to you in Windows because you will be tested only on the concepts of defragmentation or on the methods used to defragment disks within Windows.
As you write data to your hard drive, it is always written into the largest area of available free space. When you delete files, though, areas of free space become broken up and scattered around your drive. Sometimes the largest area of free space is not large enough to hold the data being written. When this happens, the file is broken up into pieces — fragmented — to the areas of free space.
To “repair” the disk fragmentation, you can use dfrgui.exe or defrag.exe:
- dfrgui.exe is the graphical defragmentation tool for Windows. In an effort to make names easier for end users, Windows 8.1 uses the display name of Optimize Drives when you launch this tool.
- defrag.exe is a command line front end for the same tool.
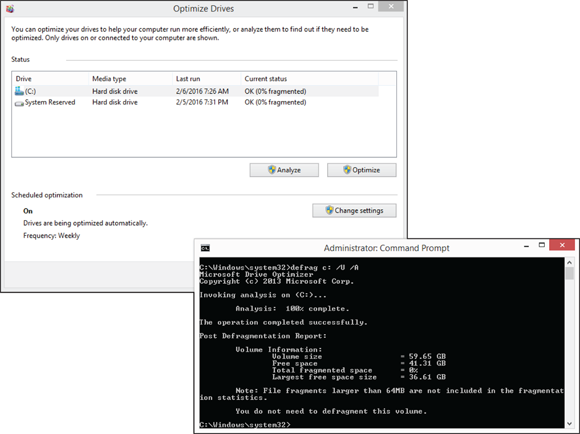
Both tools for Windows 7 are shown in Figure 4-2. While dfrgui.exe offers a simplified user interface, if you want to create a batch file or script to defragment your hard drive, you want to look at defrag.exe.
Defragmentation requires free space to do its job because it copies the files to new locations before removing them from the old locations. In addition to making all files contiguous, defragmentation attempts to consolidate most free space into a single unit, reducing how often new files are fragmented.
 While the defragmentation process takes place, all files on your drive are read, and the system is checked for errors, in the same manner as chkdsk.exe (discussed in the next section).
Because the disk fragmentation utility rearranges the data on your drive and can therefore improve performance, it should be run periodically to ensure maximum performance of your computer. How you define “periodically” depends upon your system and how you use it. If your hard drive is extremely full (containing perhaps only a few gigabytes of free space), you should run defrag.exe as often as every few days. Comparatively, if you have a large amount of free space on your drive, files will take longer to become fragmented on your disk, and you might need to defragment your drive only once every month or two.
 Defragmenting your data on a drive speeds access to files by eliminating the disk head seek time to move from one sector on the drive to another. When working with SSDs, there are no heads, and no seek time. You do get a benefit to moving blocks of data around, in fact, because the lifespan of an SSD is tied to an overall number of reads and writes, moving blocks of data will reduce the life of your drive. SSDs do benefit from index maintenance or garbage cleaning processes called TRIM. Starting with Windows 7, the Windows defragment tools perform a TRIM command when optimizing SSDs rather than a traditional data moving.
To open the graphical disk defragmenter, choose Start ⇒ All Programs ⇒ Accessories ⇒ System Tools ⇒ Disk Defragmenter. When you select a drive and then click the Analyze button, the defragmenter recommends whether you need to defragment your drive. If you have noticed a degradation in performance, though, go ahead and defragment your drive. (Select a drive and click the Defragment button.) The recommendation to defragment your drive is made based on a threshold, and you may still benefit from defragmentation if you get near but not over the threshold.
You can use Scheduled Tasks to regularly run disk defragmentation by placing defrag.exe commands in a batch file; Windows has scheduling built right into dfrgui.exe. I cover scheduling tasks in the “Miscellaneous Utilities” section of this chapter.
Free space and disk performance should be monitored to achieve an optimal level of performance.
chkdsk.exe (Check Disk)
The chkdsk.exe utility can identify potential problems with either your file system's allocation table or index, or the physical hard drive. chkdsk.exe can be run from the command line or from the Tools tab of your disk drives’ Properties. It has several options, of which the most important are
- /F: Fixes errors found on the disk, rather than just identifying them
- /R: Relocates bad sectors and recovers readable information
- /X: Forces a dismount of the volume, which closes all open files
If you suspect that you have a disk problem, you should run a scan of your disk. However, because fixing errors requires exclusive access to the disk, you want to run chkdsk.exe in scan-only mode, which is the default. If errors are detected, then you would want to specify /F and /X to correct any errors that are identified.
The system volume (C:) cannot be dismounted, so chkdsk.exe offers to schedule the scan during the next reboot of the system. On a system with a large C: drive, and depending on the number of errors, this scan can be very time consuming. The results of a scan can be seen Figure 4-3.
In addition to issues with directory index entries and Master File Table (MFT) problems, chkdsk.exe looks for cross-linked files and orphaned directory entries or lost file fragments. The File Allocation Table (FAT) contains a pointer to the starting cluster for each file. As the file is read, a pointer at the end of each cluster identifies where the next cluster of the file can be found, with the last cluster of the file not containing a further pointer. From time to time, the pointer at the end of a cluster becomes corrupted and starts pointing to the wrong location for the next bit of data. If the new location already contains file data (which contains a pointer to the next bit of data for a second file), you end up with two files using the same set of clusters.
When two files point to the same cluster (and clusters that follow), the situation is known as a cross-linked file. Depending on your outlook, you may choose to make copies of these files or to ignore them altogether. If you are a pessimist, you probably believe that both of these files are corrupt and probably garbage. If you are an optimist, you probably believe that one or both of these files are still readable and usable. There is no harm in having Check Disk create the files because your worst case scenario will be that the files are of no use.
File fragments or lost chains, on the other hand, tend to be the leftover portions of cross-linked files (the portions of a file that would have belonged to a file had its clusters not been corrupted or lost). You have the option of either deleting these file fragments or converting them to files. If you choose to convert them to files, each chain is saved to the root directory with a name following the format filennnn.chk with an incremental number in place of the nnnn.
Although you have the option to convert lost file fragments to files, I have yet to see useful data recovered from file fragments, so you might as well delete them and free the space.
chkdsk.exe serves an important purpose on your system by ensuring data integrity of the files on your disk, and it should be scheduled to run periodically on important volumes because some disk corruption can be prevented if identified early.
System Restore
The System Restore process has been around since before Windows Vista, and it has been enhanced through each newer version of Windows. The System Restore process is tied together with the System Protection settings. To access the System Protection settings, choose Start (or right-click Start) ⇒ Control Panel ⇒ System and Security ⇒ System, then click Advanced System Settings and click the System Protection tab. From the System Protection tab, you are able to:
- Configure the protection settings for your drives.
- Specify the amount of space to be used.
- Create System Restore Points.
- Access the System Restore tool to restore your system to a previous point in time.
The System Restore process does not manage, back up, or restore personal files, and it is not intended to be used for that purpose; rather, it was designed to deal with operating system and program files. To learn more about the System Restore process, review Book 7, Chapter 3.
Configuration Utilities
This section discusses many of the configuration utilities that ship with the Windows OS. These utilities provide easy ways to modify configuration files and the Registry.
System Configuration utility (msconfig.exe)
The System Configuration utility (see Figure 4-4) is a utility for maintaining settings on your Windows computer. To launch System Configuration, run msconfig.exe. This utility can change many aspects of your system startup. To use this utility, you need to be a member of the computer’s Administrators group.
The five tabs in this Windows utility allow you to launch the System Restore utility, expand files, perform selective boots, change the boot options in boot.ini or the BCD, and change the services and applications that are loaded at boot time. The five tabs are
- General: Allows you to perform a custom startup, loading all device drivers and services, minimal device drivers and services, or a selective startup, choosing to load services and/or startup items.
- Boot: Allows you to choose which installed OS you would like to boot, to boot Safe Mode with options, with or without a GUI, and create a boot log. This page also allows you to make all your boot changes permanent.
- Services: Allows you specify which services you would like to load on the next boot of Windows.
- Startup: Provides a link to the Startup section of Task Manager in Windows 8.1; while Windows Vista and Windows 7 provide a list processes set to run automatically with Windows, it allows you to select which ones you would like to load on the next boot of Windows.
- Tools: Provides a list of Windows tools which can be launched to resolve problems.
Use System Configuration to do the following:
- Create custom startup configurations (for troubleshooting).
- Perform a selective startup, which processes only some of the system files.
- Expand operating system files from the OS CD.
- Disable services or programs that have been added to the Run key of the Registry.
All the changes in the preceding bulleted list can be accomplished from within a simple Windows user interface, making System Configuration an easy configuration tool to work with.
If you suspect that a computer problem is related to one of the components loaded at startup, this is the tool you want to use. If you can boot into Safe Mode but not perform a normal boot, you can use this tool to select which components you want to load on reboot. By disabling components, you should be able to narrow down which component is causing the problem, by performing multiple boots with different combinations of the items selected.
regedit.exe
If you have ever talked to anybody about the system Registry, you have probably been given a stern warning that this is not a place for the timid. The reason for this warning is that the Registry stores system-wide configuration information for almost all services on your computer. If you experience major problems with the Registry, you will likely have major problems with your entire computer.
The Windows Registry has five major subtrees, as shown in Figure 4-5:
- HKEY_CLASSES_ROOT contains information about all the file associations and registered file types that exist in your computer. This information is actually a copy of the information stored in the HKEY_Local_Machine\software\classes key.
- HKEY_CURRENT_USER contains a subset of the information that is found in HKEY_USERS key, but contains only the information related to the current user. This key contains configuration information for the currently logged-on user. This information includes items such as Control Panel settings (including mouse acceleration and screensaver preferences) and user-related software settings for installed applications.
- HKEY_LOCAL_MACHINE contains information about your computer. This information includes configuration information for hardware components and system settings for all software on the computer.
- HKEY_USERS contains information for the currently logged-on user, as well as information for the default user and all other users who are logged onto the computer.
- HKEY_CURRENT_CONFIG contains settings that are dynamically rebuilt on every boot of the computer, which is mainly composed of Plug and Play information.
Of these subtrees, you really need to worry about only two: HKEY_CURRENT_USER and HKEY_LOCAL_MACHINE. The information in the other subtrees is either duplicated within these two subtrees or the data cannot be modified.
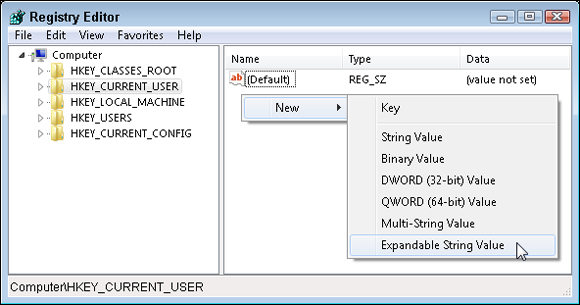
All Registry entries are stored in a hierarchical tree. This tree contains several subfolders: keys. If you want to create new keys within the Registry, use the Edit ⇒ New ⇒ Key command. Every key within the Registry can store values. The Registry Editor contains six different types of values (as shown in Figure 4-6):
- String
- Binary
- DWORD (32-bit)
- QWORD (64-bit)
- Multi-String
- Expandable String
Some hardware components or software components that you can install on your computer may create entries inside both HKEY_LOCAL_MACHINE and HKEY_CURRENT_USER. This makes sense if you think about applications like Microsoft Office. Microsoft Office creates entries in HKEY_LOCAL_MACHINE that relate to the location of Office components on the particular computer, such as the spell checker that can be found within C:\Program Files\Microsoft Office\Tools. At the same time, Microsoft Office installs entries in HKEY_CURRENT_USER that relate to the user configuration on the system. User-related settings are items such as the default Save As file type in Microsoft Word.
The Registry is an important part of your computer, and great care should be taken not to corrupt this database. Before you start doing any procedure that involves the Registry, make sure you have a clean backup of the Registry. You can create this backup in a variety of ways, such as by exporting the Registry, by creating a System State backup, or by physically copying the files that make up the Registry.
To copy the files that make up the Registry, you need to know where the files actually are. HKEY_CURRENT_USER, the user portion of the Registry, can be found in your user profile directory. It will be named NTuser.dat. HKEY_LOCAL_MACHINE is actually composed of several files that are found in the Windows directory. These files should be backed up and restored by using the Windows backup program. With Windows Vista, you can perform a System State backup or a Full backup.
Rather than backing up the entire Registry, though, you can be more selective and back up and restore individual keys within the Registry by using the Registry Editor.
To back up individual keys, follow these steps:
- Choose Start ⇒ Run (or Search or type on the Windows 8.1 Start Screen).
- Type regedit in the Run dialog box that appears.
-
Click the key that you want to back up.
This highlights the key.
-
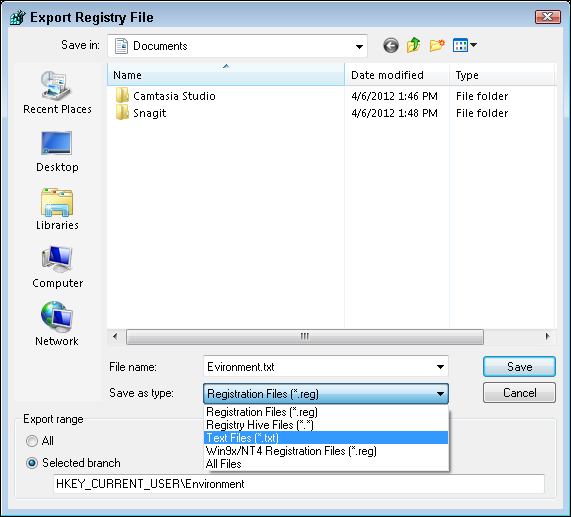
Choose File ⇒ Export.
The Export Registry File dialog box appears, as shown in Figure 4-7. This dialog box looks similar to a standard Save As dialog box, with the addition of the Export Range panel at the bottom. The Export Range panel contains your selected branch within the Registry by default.
- Type a name for the file and choose a location for regedit to save it.
-
Click Save.
The file is given the default .reg extension.
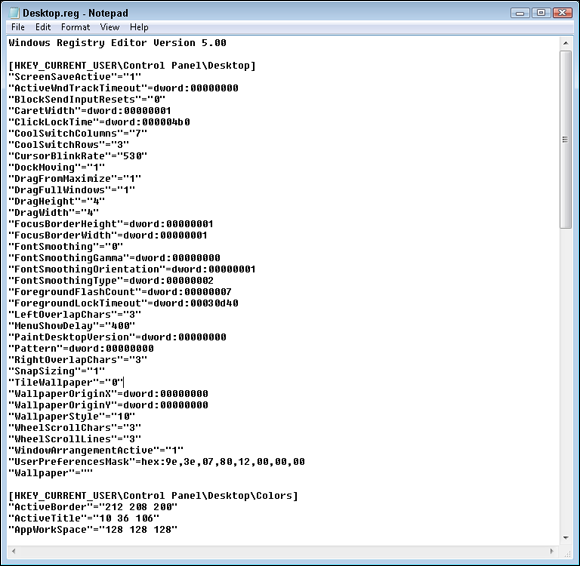
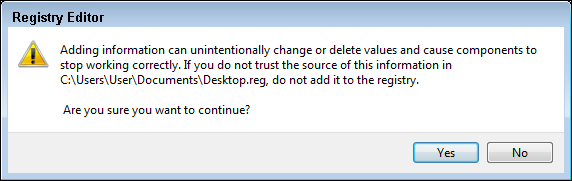
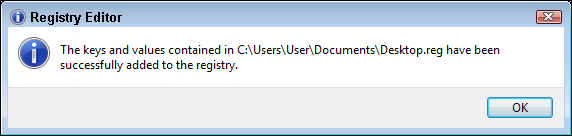
Files that end in the .reg extension are Registry export files that you can edit with a text editor (as shown in Figure 4-8). REG files share the same basic structure as an INI file, which are sections defined by names in square brackets, containing value names and value data on either side of an equal sign. To import a REG file into the Registry, just double-click the file. To help prevent accidental importing of Registry files, Windows has added a safety feature: Windows prompts you to confirm that you would like to import the settings into your Registry, as shown in Figure 4-9. After you import the settings, a dialog box confirms that a file has been successfully merged into your Registry.
On Windows computers, REG files are automatically imported into your Registry if you double-click them. Rather than using the .reg extension on your files, you may choose to use TXT files. Files with the .txt extension can also be imported into your Registry by using regedit.exe filename.txt at the command line.
Periodically, REG files become corrupted from being edited with certain text editors, such as WordPad. This corruption occurs because some text editors add extended (invisible) characters into the text file that are not compatible with regedit.exe. The only editor that does not exhibit this behavior is Notepad. If you have a corrupted file, you can fix it by opening the file through Notepad, resaving the file, and closing it. When saving the file, ensure there is a blank line at the end of the file. Even if the file is corrupt, you still receive a dialog box stating the information has been successfully entered into your Registry, as shown in Figure 4-10.
When you work with Windows computers, you can use regedit.exe to connect to a remote Registry, which allows you to change the Registry settings on a remote computer without having to leave your own computer. To connect to a remote Registry from across the network, choose File ⇒ Connect Network Registry.
Another advantage of the Registry Editor is that you can load Registry hives. This capability becomes useful when you want to modify the entries for the default ntuser.dat. The default ntuser.dat is used as a template to create new user profiles for users who do not yet have a profile. You can find the ntuser.dat file for this default template account in C:\Users\Default User\NTUSER.DAT, and you can load this subtree or hive into regedit.exe and edit the settings for this default template.
 Do not confuse this default user template with the default user in use prior to a user logging on to your computer. The Registry settings for the pre-logon default user are actually found in the Registry under HKEY_USERS\.DEFAULT.
Another thing that you do with the Registry Editor is manage the security on Registry keys. To view or modify the security settings on a Registry key, first select the key and then choose Edit ⇒ Permissions. You can work with permissions on Registry keys only — not on Registry values.
To allow for command line editing of the Registry, Microsoft introduced reg.exe as a standard component of Windows; this was introduced with Windows XP and has been present in Windows ever since. This allows for loading and unloading of Registry hives as well as editing Registry keys and values.
 Lab 4-1 will have you export your current desktop settings into a file and create a Registry file that is used to change wallpaper settings. Lab 4-1 can be downloaded from the companion website at
 www.dummies.com/go/aplusaio.
regsvr32
regsvr32 is short for register service and is a tool that is used to register and unregister Object Linking and Embedding (OLE) controls on your computer. These files can be contained in Dynamic Link Libraries (DLLs) or ActiveX Control (OCX) files.
When most applications run installation programs that include DLLs or other files that need to be registered, this is usually done as part of the installation process. However, when a problem occurs with the installation of a program, or if the developer has not created an installation package, you may find yourself registering and unregistering files by hand.
The easiest way to execute regsvr32.exe is to provide the name of the file that you want to register, such as regsvr32 sample.ocx. regsvr32 does support switches, of which the two most common are
- /u: Unregisters the service or server
- /s: Performs a silent installation and suppresses all message boxes
Device Manager
Device Manager (devmgmt.msc) is covered in more depth in Book 6, Chapter 1. The primary job of Device Manager is, appropriately enough, managing devices. You can access Device Manager by clicking the Device Manager button on the Hardware tab of the System Properties window. Use Device Manager to remove devices from your system, configure drivers, configure hardware resources, and manage hardware profile settings.
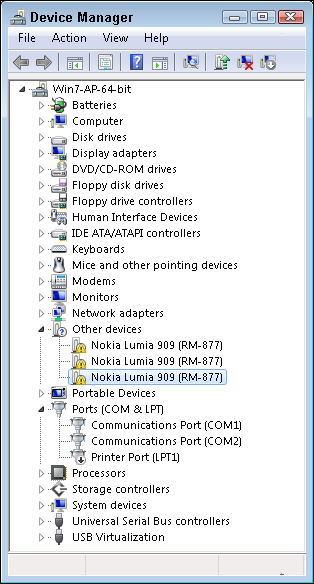
In Device Manager, you can easily pick out the devices with hardware problems because they sport a symbol, such as a small downward arrow on the icon in the device tree. A red arrow identifies devices that are in conflict or are disabled. A yellow exclamation mark identifies devices that are not properly configured (as shown in Figure 4-11). You can use Device Manager to identify problems with your hardware; configure the drivers for the devices; and configure hardware resources, such as IRQs and I/O addresses.
In addition to Device Manager, you can also find out information related to installed drivers on your computer or a remote computer by using the driverquery.exe command. This command generates a list of driver names, display names, the type of driver (kernel or file system), and the driver date, which will be similar to the output shown here:
Module Name  Display Name           Driver Type   Link Date
============ ====================== ============= ======================
1394ohci     1394 OHCI Compliant Ho Kernel        8/22/2013 7:38:14 AM
3ware        3ware                  Kernel        4/11/2013 6:49:23 PM
ACPI         Microsoft ACPI Driver  Kernel        10/6/2014 11:29:50 PM
acpiex       Microsoft ACPIEx Drive Kernel        8/22/2013 7:37:47 AM
acpipagr     ACPI Processor Aggrega Kernel        8/22/2013 7:38:48 AM
AcpiPmi      ACPI Power Meter Drive Kernel        8/22/2013 7:38:53 AM
acpitime     ACPI Wake Alarm Driver Kernel        8/22/2013 7:38:58 AM
ADP80XX      ADP80XX                Kernel        7/12/2013 5:47:36 PM
AFD          Ancillary Function Dri Kernel        10/13/2015 1:10:45 PM
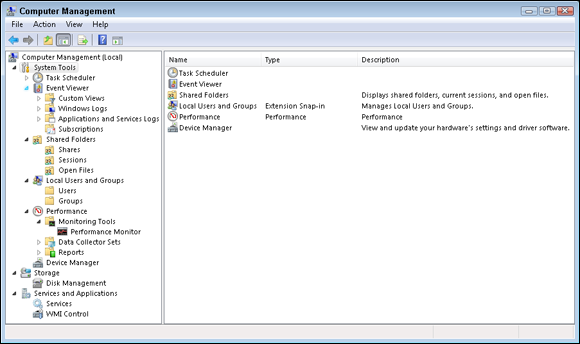
Computer Management
Windows includes the Computer Management utility, shown in Figure 4-12. Computer Management is actually more of a user interface to a number of other utilities than an actual utility. Computer Management is an MMC settings file that contains the following utilities or snap-ins:
- Event Viewer: Shows the contents of event log files
- Shared Folders: Shows the status of shared or published folders on the computer
- Local Users and Groups: Manages the local account database
- Performance or Reliability and Performance: Records system status and health based on measurable counters and generates alerts when the counters exceed threshold values
-
Device Manager: Displays hardware status and configuration information in a format that can be edited, unlike the System Information tool
See the upcoming section, “The System Information tool.”
- Disk Management: Manages disk partitions
- Task Scheduler: Manages and schedules tasks or applications to run automatically
- Services: Manages system services (such as the Server and Workstation services) on the local computer
- Other administration utilities: Other tools are included with this tool, including Telephony, WMI Control, Indexing Service, DNS, Internet Information Services, and Routing and Remote Access
Computer Management is an MMC snap-in that acts as a container for other MMC snap-ins. The only offering or benefit over the individual tools is that you have to add only one snap-in to the MMC, rather than a whole series.
By putting all these utilities together in one location, system management is made substantially easier for most users.
In addition to using Computer Management to view and manage your computer, you can manage a remote computer:
- Right-click Computer Management (Local) at the top of the tree in the left-hand pane.
-
Choose Connect to Another Computer.
This opens the Select Computer dialog box, from which you can type the name of another computer on the network.
-
Click OK.
After you are connected to that other computer, you can use all the management tools, with the exception of the Disk Defragmenter, which operates only on the local computer.
Lab 4-2 walks you through creating a custom Computer Management MMC. The labs can be downloaded from www.dummies.com/go/aplusaio.
Component Services
The first question you might ask about Component Services is what are they? Component Services are made up of Component Object Model (COM) components, COM+ applications, and the Distributed Transaction Coordinator (DTC) components. All these objects represent programming code that is registered on your computer. Programs on your computer use these components through system level calls to them.
The programming code used by these components is typically found in .dll files, and the components themselves are registered using regsvr32.exe. Once the .dll files containing these components are registered, you will find the object contained in Component Services MMC snap-in. The easiest way to access the Component Services management tool is to use dcomcnfg.exe. The main purpose of the Component Services tool is to adjust application launch and security settings for the small programs that make up COM, COM+, and DTC objects.
services.msc
The Services Administrative tool can be launched by running services.msc, where the .msc extension refers to a Microsoft Management Console (MMC)–saved console. The Services Administrative tool allows you to
- See the services installed on your computer
- Start, stop, and restart any service
- Change parameters and startup settings for any services
To find out more details about services.msc, go back and review Book 6, Chapter 3.
Getting a Handle on Diagnostic Utilities
To figure out what is wrong with a faulty computer, you need to first find out everything it is doing, both right and wrong. The tools in the following sections are designed to provide you with information on a variety of areas of your computer.
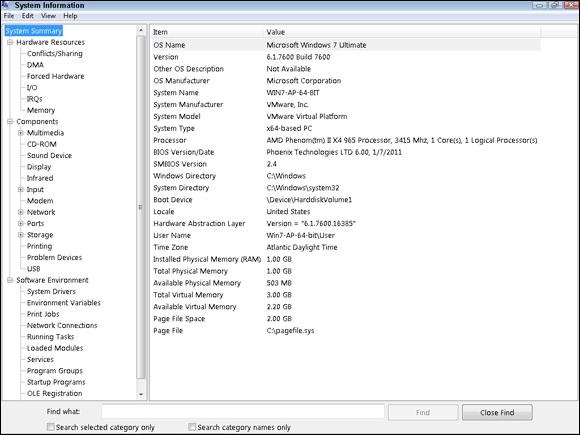
The System Information tool
The System Information tool (msinfo32.exe) is available in recent versions of Windows. This tool was designed to provide information about as many components in the OS as possible. Figure 4-13 should give you a good feel for the type of information that is available within this tool. If it’s part of the OS, the System Information tool can give you information about it.
To open the System Information tool, choose Start ⇒ All Programs ⇒ Accessories ⇒ System Tools ⇒ System Information Tools.
If you spend a few minutes investigating the data found in this tool, you will get a feel for the very detailed information it can provide. Very few areas of your system’s hardware are not covered by this tool. It is well worth your time to get to know this tool to see what information it can gather.
If you want to save the current system information for archiving or to use as a baseline, choose File ⇒ Save to save the information into an NFO file, which can later be opened and viewed with the System Information tool.
Event Viewer
On some computers, you can check log files to look for errors with the system, applications, or hardware. Microsoft created a central logging and reporting tool that many components in the OS and many applications use. Any application can log events to the event logs or even create its own event logs to be viewed with the Event Viewer (the tool you use to view all this logged information) as well as configure log settings or clear the logs.
To view information, choose Start ⇒ Control Panel ⇒ System and Security ⇒ Administrative Tools ⇒ Event Viewer or run eventvwr.msc. The interface has the log files on the left of the screen and the log data on the right. There are five different log entry types and three default logs: System, Application, and Security.
The Security log has two event types: either a lock or a key for Failures or Successes. The other two logs have three different entry types — Information, Warning, and Error — identifiable by symbol or color (blue, yellow, and red, respectively). To view log files on another computer, right-click Event Viewer (Local) in the left pane, and choose Connect to Another Computer from the shortcut menu. This opens the Select Computer dialog box, where you can type another computer name and then click OK.
Figure 4-14 shows a typical System log. The Security log has audit information about your system if you have enabled auditing of system events or file system access. The System log records major system events, such as service failures, system startup or shutdown, and Stop events. The Application log records events from applications although you might find that some applications record their events in the System log, and some items thought of as system events are recorded in the Application log.
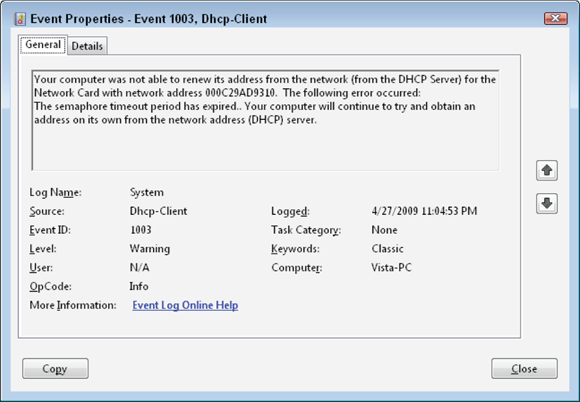
To see detailed information about the log entries, double-click any line item to bring up something that resembles Figure 4-15, listing date and time, source (system area or application), type of event, event ID (the error code returned by the application), user (if related to a user account), computer (if related to a computer account), a text-based description of the error, and data (which might show raw data related to the event as hexadecimal and ASCII data).
Read the Description section carefully because many developers put troubleshooting steps right into their error events.
To navigate to the next or previous events, use the arrows in the right side of the dialog box; to copy all event information to the Clipboard, use the button with the sheet of paper on it (or the Copy button if you are using Windows 7). You can then directly paste this information into a document or email when reporting this event to other support people.
If you can’t decipher the event message, you can find additional help at www.eventid.net, which allows you to plug in the EventID and the source. Then you are able to view recorded events and descriptions of both the errors and the fixes. This site also contains links to the Microsoft Knowledge Base for articles related to the errors. To follow the links, you need to register on the EventID site, but because the site provides the Q article numbers (Microsoft’s knowledge base has all articles number, with a Q as the initial character in the filename), you can go directly to http://support.microsoft.com and locate the articles yourself.
When you right-click a log file, you have the option to save the event log as different types of text files or an EVTX file, which can be loaded back into Event Viewer, or to clear or empty the event log. The View submenu has options to allow you to find specific entries or filter the log file to show certain events. You can filter the log by any of the field values.
To change how long the log files are kept, right-click a log file and choose Properties. The default log file size in Windows is 20MB, but it can be set all the way up to 16EB (exabytes), and settings are available on what to do when the log reaches its maximum size. When it reaches its maximum size, you can overwrite events as needed, overwrite events older than a number of days (the default is seven days), or not clear the events at all (in which case, you stop logging new events).
In most cases, you should use Overwrite Events Older Than X Days and choose a number of days for which normal activity will not fill the log file. This system means that you can ignore the logging activity, but you will be notified when the log file fills up, and you can start your investigation into the activity that filled it prematurely. I typically leave this setting between 7 and 14 days, and make the size of the log file larger if necessary.
System File Checker
The System File Checker (sfc.exe) is part of the Windows File Protection interface and must be run by an Administrator. With the proliferation of applications and with software developers replacing stock Microsoft DLL files with custom versions, there is a real need for Windows File Protection and the System File Checker.
DLL (Dynamic Link Library) files contain compiled application code that is the same type of code that makes up an application. By saving this code as a DLL, the developer makes the code available to many applications so that it can be reused, reducing application development time. One dialog box found in a system DLL is the common Save As dialog box.
Windows keeps the cached copies of these files for your use when corruption occurs in the original files. Windows now takes active steps to prevent the deletion of core files, but in the past we were able to easily illustrate this feature by deleting executables and DLLs and having them automatically replaced. The missing copy of the file will be replaced by the copy that was stored in the cache in %systemroot%\system32\dllcache or %systemroot%\WinSxS. If the file was not in the cache, Windows will prompt you for the OS CD.
When you run the System File Checker, you have a choice of switches that you can use (depending on your version of Windows):
- /SCANNOW: Immediately scans all files for incorrect versions, verifies the versions that are stored in the cache, and repairs any files it locates with problems
- /VERIFYONLY: Only scans files and does not attempt to repair any issues it finds
- /SCANFILE: Scans the integrity of a single file and repairs files it finds problems with
- /VERIFYFILE: Verifies the file specified but does not repair the file
- /OFFBOOTDIR: When performing offline repair (outside the current running copy of Windows), specifies the boot directory to use
- /OFFWINDIR: When performing offline repair (outside the current running copy of Windows), specifies the Windows directory to use
Windows Memory Diagnostics
The Windows Memory Diagnostics tool does just what its name claims; it is a tool that can be used to test the memory on your computer. This tool is preinstalled on Windows. Now, for it to test the memory, it is best if that memory is not being used for anything else. To allow almost all system memory to be free for the running of the diagnostic tests, Windows uses a special boot process to only load the test tool. So, to start the test tool, run %windir%\system32\MdSched.exe or choose Start ⇒ Search, type Memory Diagnostics, and select the tool when it is presented in the search results.
When you run Windows Memory Diagnostics, it will present you with a simple window asking you to either restart now or to run the tool on your next start of Windows. The choice is yours. When it reboots, it will automatically launch the test tool.
The tool will automatically start running the default tests on memory, as seen in Figure 4-16. If you would like to change the settings, follow the onscreen commands and press F1. This will bring you to the configuration screen, where you can change three settings. The first is the Test Mix, where you can choose from Basic, Standard (default), or Extended. The test mix determines the exact tests that will be executed against the memory on the computer. The second option you can adjust is whether the system cache memory will be used for tests. A default setting exists for cache use on each test, but you can force it to be on or off for all tests. The third setting is how many times you want to run the tests, which the test calls passes. Most major memory errors will appear on the first pass, while others are sporadic; in the latter case, it may take several passes to see the error. The pass count can be set up to 99 passes.
If Windows Memory Diagnostics reports any errors, it is likely that you have a hardware error related to memory on your computer, and you will need to replace the defective memory. See Book 2, Chapter 3 to review the process of replacing memory in a computer.
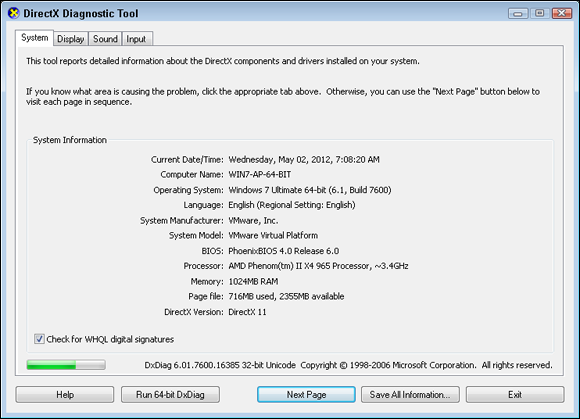
DirectX Diagnostic Tool
The last diagnostic tool that you see in this chapter is the DirectX Diagnostic Tool, or dxdiag.exe. This tool will evaluate the high-performance audio and video systems on your computer. Some applications, primarily games, make use of the DirectX drivers on your computer to assist in rendering high-speed graphics.
The main purpose of dxdiag.exe is to evaluate these systems through an easy-to-view screen, as shown in Figure 4-17. To launch dxdiag.exe, choose Start ⇒ Search, type dxdiag.exe, and select dxdiag.exe from the results list. When the tool launches, it will first ask you whether you would like to test the drivers to ensure that the drivers are all signed and tested by the Windows Hardware Qualifying Labs. Upon opening the main tool, it will automatically start testing the drivers on the system. You will see detailed information about the drivers in use on the system from the System, Display, Sound, and Input tabs.
Miscellaneous Utilities
A number of miscellaneous utilities are also available within Windows. The following sections take a look at some of them.
Task Scheduler
The system Task Scheduler service is responsible for running scheduled tasks. This service (like all services) runs in the background — and in this case, making sure that your tasks are performed at the times you planned.
Your interface to this service is found via Start ⇒ All Programs ⇒ Accessories ⇒ System Tools ⇒ Task Scheduler, which opens the Task Scheduler window.
To schedule a task, follow these steps:
- Click Create Basic Task.
- In the Create Basic Task Wizard that opens, type a name and description for the task, and then click Next to continue.
- Select the scheduled interval for the task, which includes
- Daily
- Weekly
- Monthly
- One Time Only
- When My Computer Starts
- When I Log On
- When a specific event is logged
-
Click Next.
Depending on your scheduled interval, you will be presented with different scheduling times.
- Specify the exact times you want the task to run and then click Next.
-
Select the action you want the task to perform and then click Next.
The main action is Start a Program while two deprecated options are Send an Email and Display a Message.
-
Browse to a program or script you want the task to run (you can provide arguments as a directory for it to start in) and then click Next.
You are now on the last screen of the wizard. You can choose the check box to Open the Properties Dialog When I Click Finish to view the properties for the task, which include the settings already discussed for this wizard, as well as these settings which will be on the Conditions and Settings tabs:
- Do not run the task if you have a laptop running on batteries.
- Maximum duration for the task to run.
- Run the task only if the computer is idle, and stop the job when the computer is no longer idle.
- If you do not want to view these settings, just click Finish; otherwise, select the Open the Properties Dialog When I Click Finish check box, and then click Finish.
When you exit the wizard, you will see the new task in the Task Scheduler’s Task Scheduler Library folder. To see the properties for any task, select the task and right-click Properties or view the properties at the bottom of the window. From the properties window of the task, you can adjust the general properties, triggers, actions, conditions, and settings. The history of the command execution will be shown on the History tab. If you do not want to wait for the schedule but rather have the task run immediately, select the task, right-click it, and choose Run from the shortcut menu. You will see the status of the job change to Running. The other information shown in the Scheduled Tasks folder includes
- When the task is scheduled to run next
- When the task last ran
- The status or what error code was returned the last time the task was run
0x0 is the standard code for a successful execution.
Data Sources
The ODBC Data Sources tool is found in the Administrative Tools folder is a configuration tool for data sources. Data sources provide you with the ability to store or retrieve information from a database using a common interface. Databases are often used by troubleshooting and logging tools to store data, but you may also need to troubleshoot database connections for other applications. The configuration information found in this section should help you in identifying data source configuration issues.
The main user interface for these database connections is the Data Sources (ODBC) Administrative Tool, which can be launched by choosing Start ⇒ Control Panel ⇒ System and Security ⇒ Administrative Tools ⇒ Data Sources (ODBC) or by running odbcad32.exe. When Data Sources opens, you will see the seven tabs shown in Figure 4-18. The main tabs that you will focus on are
- User DSN (Data Source Name): Used to manage user-based database connections. Connections created on this tab will only be available to the current user.
- System DSN: Used to manage system-based database connections. Connections created on this tab will be available to all users of the computer.
- File DSN: Used to manage file-based database connections. The files created by this process can be shared by any users who have the required database drivers installed on their computers.
The process to create a new DSN is fairly straightforward, and this process will show you how to create a new System DSN used to connect to a Microsoft SQL server:
-
Open the Data Sources (ODBC) Tool by choosing Start ⇒ Control Panel ⇒ System and Security ⇒ Administrative Tools ⇒ Data Sources (ODBC).
The ODBC Data Source Administrator should open.
- Select the System DSN tab.
-
Click the Add button to create a new data source.
The Create New Data Source window should open.
-
Select SQL Server and click the Finish button.
The Create New Data Source to SQL Server window should open.
- Type a descriptive name for the new data source and a description, and specify the server to which you want to connect. Then click the Next button.
-
Specify the type of authentication you would like to use; then choose Next.
You can use your current Windows logon credentials or credentials specific to the SQL server. You can override the default connection settings by clicking the Client Configuration button. Finally, you can make an initial connection to the SQL server to get server-specific information.
-
You can change to a different default database, which is otherwise assigned by the server, or manage other connection settings to the database.
The defaults are general settings, which work well for most applications, but you will want to check your application documentation to see if specific settings are required. Click Next to continue.
-
Select the needed logging and other advanced connection settings if necessary; then click Finish.
Again, the defaults are likely sufficient, unless application-specific documentation suggests otherwise.
This displays a summary page for the wizard. The summary page allows you to verify the settings that you are using, as well as allows you to test the connection to the data source.
- Click the Test Data Source button to make a test connection to the server. When you are happy with the connection, click OK to complete the wizard.
With the data source creation completed, you should see the new connection listed on the System DSN tab.
Microsoft Management Console
The Microsoft Management Console (MMC) is the main management interface for all Microsoft management tools. Prior to the implementation the MMC, you used to have a separate tool for each component you wanted to manage. With the MMC, you now have a common interface for all management tools. Each management tool is now a snap-in to the main interface.
To launch a blank console for the MMC, choose start and type mmc.exe. Once the blank console is launched, you can load snap-ins by using the following steps:
-
Open the MMC by choosing Start and then typing mmc.exe.
A blank MMC console opens.
- Choose File ⇒ Add/Remove Snap-in.
-
From the Add or Remove Snap-ins dialog box, select the snap-in you would like and click the Add button.
When you add some snap-ins, you will be prompted to add them to manage the local computer or a remote computer, as shown in Figure 4-19.
- Once you have installed or removed all the snap-ins you want to, click the OK button.
If you think that you will need to use the same combination of snap-ins in the future, choose File ⇒ Save or File ⇒ Save As to save a copy of the current console. MMC saved consoles have an extension of .msc.
Lab 4-2 walks you through the process of creating a custom Computer Management MMC. Lab 4-2 can be downloaded from the companion website at www.dummies.com/go/aplusaio.
Microsoft Terminal Services Client
The Microsoft Terminal Services Client (mstsc.exe) might not always be thought of as a troubleshooting tool, but when you are miles away from the computer for which you need to perform troubleshooting, this tool will be part of your arsenal. With the MSTSC, you will be able to remotely connect the computer and access most functions as if you were sitting in front of the computer. This tool is also called Remote Desktop Connection, which is covered in Book 5, Chapter 2.
Notepad
Another tool that is not often considered to be a diagnostic tool is notepad.exe. When working with configurations and logs on a Windows computer, it is not uncommon to encounter text files. In almost every situation when you encounter a text file, the best program to use is notepad.exe.
Explorer
Explorer is the Windows File Explorer and is used to locate files on your computer. As with mstsc.exe and notepad.exe, these tools are not truly diagnostic tools, but rather tools that you will use to work with files on your computer. File Explorer will be used to move files, recover files from the Volume Shadow-Copy Service (VSS), or back up files.
1. You have stopped by a user’s desk to find that he has been searching his hard drive for the program defrag.exe. To test his knowledge, you ask him, “defrag.exe does what for your computer?”
(A) Rearranges memory so that access to it is improved
(B) Removes dust and fragments from your computer
(C) Rearranges data on your disk drive so that access to it is improved
(D) Recovers files that have been corrupted
2. Based on issues you have described in conversation, your co-worker has suggested that you run the chkdsk.exe program on your problem computer. chkdsk.exe can do which of the following?
(A) Rearrange data on your drive so that disk access is faster.
(B) Consolidate free space on your hard drive.
(C) Correct problems with file storage on your hard drive.
(D) Change the partition table of the drive from FAT16 to FAT32.
3. You and a co-worker have a disagreement related to the proper name of the Registry modification tools in use on Windows computers. What programs can be used to edit the Registry on a Windows computer?
(A) registry.exe
(B) cfgedit.exe
(C) regedt32.exe
(D) regedit.exe
4. You need to send a copy of specific registry keys to a customer, who will import them into her computer. What command is used to export a section of your Registry while using regedit.exe?
(A) File ⇒ Export Registry File
(B) File ⇒ Extract to Recovery File
(C) Export ⇒ Set Restore Options
(D) File ⇒ Backup Key
5. After exporting a group of Registry settings to a .reg file, you need to make some changes to the settings. What tool should you use to change an exported Registry file?
(A) sysedit.exe
(B) regedit.exe
(C) notepad.exe
(D) Microsoft Word
6. You are concerned that some of you Registry files on your computer may be missing. Which files on your hard drive make up the Windows Registry?
(A) system.dat and registry.dat
(B) user.dat and system.dat
(C) user.dat and hardware.dat
(D) system, sam, security, and ntuser.dat
7. You have a script that needs to run every Monday at 9:00 a.m. What tool can you use to make this script run at that interval?
(A) Remote Desktop Connection
(B) Registry Editor
(C) Explorer
(D) Task Scheduler
8. You need to find out which memory addresses are being used by a driver. What tool will tell you what you need to know?
(A) memedit.exe
(B) System Resource Meter
(C) Device Manager
(D) System Driver Checker