Using F8 Options During Boot-up
In Vista and Windows 7, you can access the boot menu by pressing F8 immediately after the POST process. After you open the boot menu, you can choose Safe Mode or Safe Mode with Networking. These operating systems also have a Safe Mode with Command Prompt option that loads cmd.exe as your shell application.
When you access the F8 boot menu at system startup, you reveal several advanced boot options, depending on your OS:
- Safe Mode
- Safe Mode with Networking
- Save Mode with Command Prompt
- Enable Boot Logging
- Enable VGA Mode
- Enable low-resolution video (640x480)
- Last Known Good Configuration
- Directory Services Restore Mode
- Debugging Mode
- Disable Automatic Restart on System Failure
- Disable Driver Signature Enforcement
Booting into Safe Mode
If the computer hangs or crashes and reboots during the boot process, you might have a device-related error. If a Windows computer fails to boot properly, and you think that the problem is related to a service or driver that is loading, you might be able to boot the computer into Safe Mode.
Windows 8.1 has an option called Enable Low-Resolution Video, which loads all system drivers with the exception of the video driver. The idea of this option is that with the exception of having the video settings set wrong, the computer will boot and report that some drivers had failed to load — but, it will boot.
 When Vista or Windows 7 detects that it failed to boot properly, it may automatically attempt to boot into Safe Mode during the next boot.
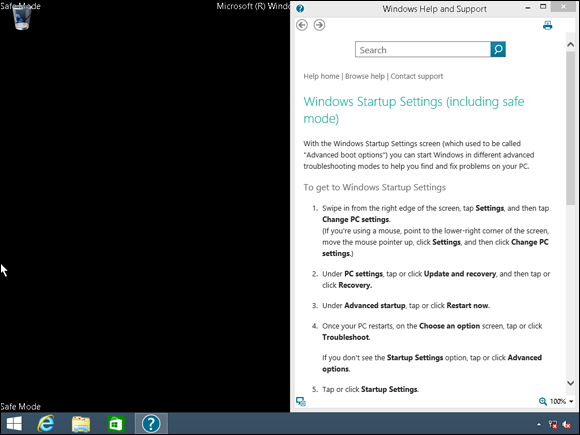
When booting into Safe Mode, the OS skips loading any drivers not considered crucial to the boot process. This means that you get a VGA driver providing video in a daring 640-x-480 resolution (16 colors), a keyboard, and a mouse; while Windows 7 defaults to 800 x 600, it also offers a 640-x-480 resolution from Safe Mode. Initially, you will be presented with a warning telling you that you are entering Safe Mode, after which, the words Safe Mode appear in each corner of your screen, as shown in Figure 3-1. Outside of these devices, you will have very few working devices: no sound cards, scanners, or DVD burners. With just the basics running, you should be able to identify the driver that did not load properly and then correct the problem.
Windows also supports an option for Safe Mode with Command Prompt. This mode boots the Windows GUI (graphical user interface) but opens cmd.exe as your shell, rather than explorer.exe. This allows you to perform many actions to correct your problem (by using utilities such as chkdsk.exe or the Registry Editor). When you are done, exiting the Command Prompt reboots your system.
Windows has a boot option for Safe Mode with Networking. This mode is useful when you need to download new drivers for a failed device or access files that might be stored on your server. With the exception of the loading of the networking drivers, this is a standard Safe Mode boot.
Tracking the boot with a bootlog
When choosing the Enable Boot Logging option from the Windows F8 menu, you create a log file called ntbtlog.txt, which is saved to the windows directory. This file is appended to when performing logged boots.
The ntbtlog.txt file is very useful for troubleshooting boot problems. It logs all drivers, services, and resources while they are loading. This file can then be referenced to locate problems with the boot, especially because the system does not give you much indication of what is happening during the boot.
The structure of a ntbtlog.txt file from Windows 7 is shown in Listing 3-1. This listing shows two boots of the system, which is noted by the OS identifier line Microsoft (R) Windows (R) Version 6.1 (Build 7600).
LISTING 3-1: A Windows 7 ntbtlog.txt File
Microsoft (R) Windows (R) Version 6.1 (Build 7600)
 5 15 2012 07:29:11.500
Loaded driver \SystemRoot\system32\ntoskrnl.exe
Loaded driver \SystemRoot\system32\hal.dll
Loaded driver \SystemRoot\system32\kdcom.dll
Loaded driver \SystemRoot\system32\mcupdate_AuthenticAMD.dll
<Lines Deleted>
Did not load driver @hal.inf,%acpi_amd64.devicedesc%;ACPI x64-based PC
Did not load driver @mdmgen.inf,%gen556%;Standard 56000 bps Modem
Did not load driver @netavpna.inf,%mp-agilevpn-dispname%;WAN Miniport (IKEv2)
Did not load driver @netrasa.inf,%mp-ip-dispname%;WAN Miniport (IP)
Did not load driver @netrasa.inf,%mp-ipv6-dispname%;WAN Miniport (IPv6)
Did not load driver @netrasa.inf,%mp-pppoe-dispname%;WAN Miniport (PPPOE)
<Lines Deleted>
Loaded driver \SystemRoot\system32\DRIVERS\udfs.sys
Did not load driver AFD.SYS
Did not load driver AFD.SYS
Microsoft (R) Windows (R) Version 6.1 (Build 7600)
 5 15 2012 07:35:01.500
Loaded driver \SystemRoot\system32\ntoskrnl.exe
Loaded driver \SystemRoot\system32\hal.dll
Loaded driver \SystemRoot\system32\kdcom.dll
Loaded driver \SystemRoot\system32\mcupdate_AuthenticAMD.dll
<Lines Deleted>
Loaded driver \SystemRoot\System32\DRIVERS\srv2.sys
Loaded driver \SystemRoot\System32\DRIVERS\srv.sys
Did not load driver \SystemRoot\System32\DRIVERS\srv.sys
Loaded driver \SystemRoot\system32\DRIVERS\asyncmac.sys
The ntbtlog.txt file in Listing 3-1 lists the devices that were loaded and the order in which they were loaded. Look through the listing to see what other drivers or devices you can identify. When checking the file, look for items that list LoadFailed or Did not load driver because those are failures related to current problems.
Using the Last Known Good Configuration
If you just updated a driver on your Windows 7-based computer and your computer will not boot, try booting into Safe Mode to troubleshoot the issue. If the driver update is causing problems with Safe Mode as well, you still have options. Later in this chapter, you can read about the System Image Emergency Repair Process, but in some cases, it is quicker to restore the Last Known Good Configuration.
The HKEY_LOCAL_MACHINE\SYSTEM\CurrentControlSet Registry key stores the load or startup settings for all devices and services on your computer, including the path to the driver that is to be used. By choosing to restore the Last Known Good Configuration from the F8 boot menu, you can quickly and automatically restore this section of the Registry with a copy that was used during your last successful boot. If your computer had been running for a long time with many potential changes to this Registry key, those other changes will be lost while you are repairing the boot problem. You will have to decide whether the loss of those other changes is worth the quick restoration of a bootable computer.
Microsoft disabled the Last Known Good Configuration in Windows 8.1, instead encouraging users to rely upon System Restore and System Image Backup. You learn about both features later in this chapter.
Other Windows boot options
There are a few other advanced boot options for Windows that you will rarely use, so they are briefly covered here:
- Directory Services Restore Mode (for Windows Server Domain Controllers): This boot option will never be used with Windows client computers (even though it is in the Options menu) because it is designed to restore the Active Directory database, which would be running on a Windows Server–based domain controller computer.
- Debugging Mode: This option is for use with external debuggers, which you might be asked to set up during troubleshooting sessions with Microsoft Professional Services after placing a support call.
- Disable Automatic Restart on System Failure: Some drivers may be configured to cause the system to reboot if they fail to load, but this option prevents the system from rebooting. This option is used to allow the system to complete its boot so that you could perform troubleshooting from within the OS.
Accessing startup settings in Windows 8.1
Windows 8.1 completely revamps how system troubleshooting and recovery take place. You now have the Windows Recovery Environment (Windows RE), a graphical shell that gives you access to the mouse, the network, and the local system drive, all from a RAM disk environment.
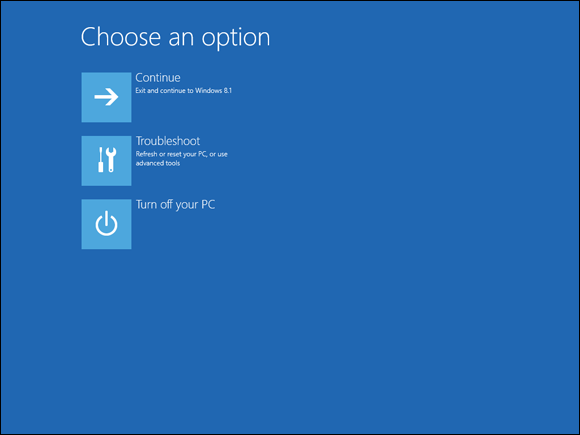
To reboot a Windows 8.1 system into Windows RE, navigate to the Start Screen, hold down the Shift key, open the Power menu, and select Restart. In a moment you’ll be asked to Continue normal boot, enter the Recovery Environment, or turn off the PC. I show you this screen in Figure 3-2.
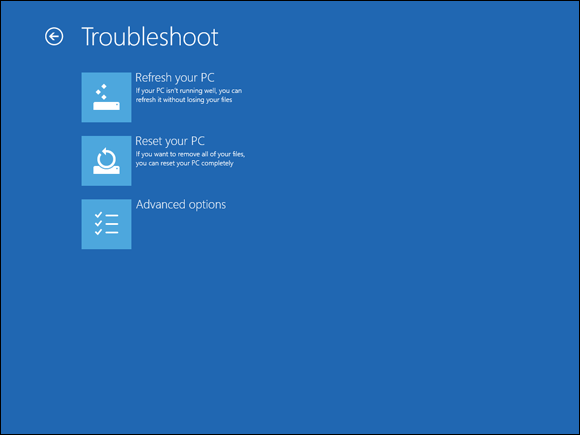
In the Choose an Option screen, click Troubleshoot to reach the Troubleshoot screen, shown in Figure 3-3.
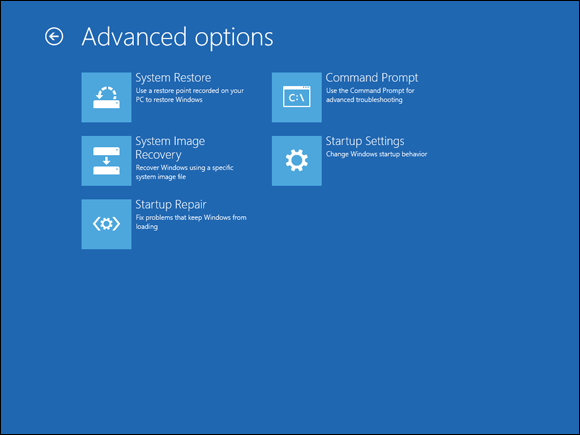
Click Advanced Options, and after another short pause you’ll reach the Advanced Options screen, shown in Figure 3-4.
I discuss the System Restore, System Image Recovery, and Startup Repair options later in this chapter. For now, click Startup Settings to see the aforementioned boot options. This is a much richer interface than users had in Windows 7 and earlier Windows versions, that’s for sure!
Improper shutdown and boot
There are times when your computer is not shut down properly. When using Windows Vista, Windows 7, or Windows 8.1, you will be told when the computer is rebooting that there was a problem. When this message appears, it will only remain for 30 seconds and then the default action will be to start Windows normally. The message for Windows 7 is shown in Listing 3-2.
LISTING 3-2: Windows Error Recovery for improper shutdown
                           Windows Error Recovery
Windows did not shut down successfully. If this was due to the system not responding, or if the system was shut down to protect data, you might be able to recover by choosing one of the Safe Mode configurations from the menu below:
(Use the arrow keys to highlight your choice.)

   Safe Mode
   Safe Mode with Networking
   Safe Mode with Command Prompt

   Start Windows Normally

Description: Start Windows with its regular settings.


Enter=Choose
In the default configuration, a failed shutdown will result in a 30-second delay on the next reboot, but if there is an actual problem, then successive failures will briefly present this message to the user of the computer. This message is displayed to give users an easy way to get into Safe Mode, where they would be able to perform some additional diagnostics to determine why the computer is not shutting down properly.
These messages are a little different from the messages that you will receive if the computer fails to boot up properly, which varies slightly from version to version in Windows Vista, Windows 7, or Windows 8.1. The Windows Vista message conveys the information found in Listing 3-3, which is that something has gone wrong and that you may need your OS installation DVD to repair the problem. Since boot problems are often the result of recent changes, you are also given the option of booting the Last Known Good Configuration from this menu. The default action for this menu is to boot Windows normally.
LISTING 3-3: Windows Vista failure to boot recovery message
                           Windows Error Recovery
Windows failed to start. A recent hardware or software change might be the cause. To fix the problem:

 1. Insert your Windows installation disc and restart your computer.
 2. Choose your language settings, and then click "Next."
 3. Click "Repair your computer."

Other options:
If power was interrupted during startup, choose Start Windows Normally.
(Use the arrow keys to highlight your choice.)

   Safe Mode
   Safe Mode with Networking
   Safe Mode with Command Prompt
   Last Known Good Configuration (advanced)
   Start Windows Normally

Description: Start Windows with its regular settings.


Enter=Choose
The similar message for Windows 7 is shown in Listing 3-4, which also states that the problem may have been caused by recent changes. Rather than showing the standard Safe Mode options, Windows 7 offers you the choice of using the Startup Repair tool to perform startup troubleshooting. The default action for this menu is to launch Startup Repair.
LISTING 3-4: Windows 7 failure to boot recovery message
                         Windows Error Recovery
Windows failed to start. A recent hardware or software change might be the cause.

If Windows files have been damaged or configured incorrectly, Startup Repair can help diagnose and fix the problem. If power was interrupted during startup, choose Start Windows Normally.
(Use the arrow keys to highlight your choice.)

   Launch Startup Repair (recommended)
   Start Windows Normally

Seconds until highlighted choice will be selected automatically: 30
Description: Fix problems that are preventing Windows from starting


Enter=Choose
Emergency Repair
When things go wrong with the boot of Windows, you can try booting into Safe Mode to repair the error, but sometimes the system will not boot at all. At these times, you can make a final attempt to resurrect the system or start the installation. If you choose to attempt the Emergency Repair Process, you should be familiar with what options are available. Here I focus on Windows 8.1 because Microsoft put so much effort into its emergency repair tools.
Factory Repair Partition
That’s right — I tell you to survey the Windows 8.1 repair tools, and then bring up an Original Equipment Manufacturer (OEM) repair partition! Ha.
Anyway, your computer manufacturer might very well have a hidden partition on the system drive that contains an operating system image and all drivers for hardware that shipped with the system. This is a potentially valuable resource for you!
Start the computer and press F12; on most systems, this keystroke presents a list of all bootable media detected by the UEFI/BIOS. If you have a factory recovery partition, you can choose to boot from it, and you’ll be prompted to reload your system.
Be advised that restoring your system drive via the factory recovery partition will in most cases reformat your system drive, which means you’ll lose all data that you haven’t already backed up.
Startup Repair
Windows 8.1 includes a Startup Repair routine that’s useful in cases where you suspect that some of Microsoft’s own operating system files have become corrupted, replaced by incompatible versions by third-party software or malware, or have been inadvertently deleted.
Perform the “Shift Restart” technique I show you earlier in this chapter. (Navigate to the Windows 8.1 Start Screen, hold down the Shift key, click the Power icon, and select Restart from the menu.) Next, from the Windows RE environment, select Troubleshoot ⇒ Advanced Options ⇒ Startup Repair. The computer automatically restarts, prompts you for a local administrator account password, and then performs the repair.
You may be prompted to insert your Windows 8.1 installation DVD if Startup Repair needs to replace one or more system files with “pristine” copies from the installation media.
System Image Recovery
System Image Recovery involves taking a snapshot of your entire system drive. This backup essentially clones your current Windows 8.1 operating environment; therefore, you should create a System Image Recovery snapshot only when the system is in a healthy state.
To make a System Image Backup of your Windows 8.1 computer, follow these steps:
-
Click the Start button to go to the Start Screen, then type File History and press Enter.
Unfortunately, the System Image Recovery tool is semi-hidden, and is part of the File History Control Panel.
- In the File History Control Panel, click System Image Backup in the lower-left corner.
-
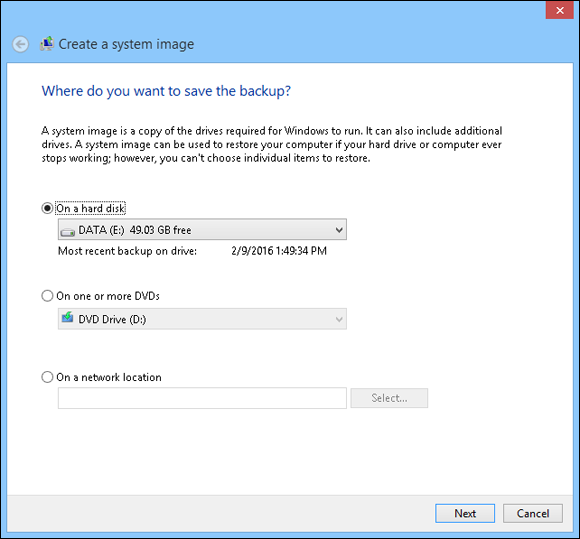
In the Create a System Image dialog box (shown in Figure 3-5), choose a disk partition with enough room to host the image.
You can’t create a system image on your C: drive, because that’s the partition that’s being backed up. The system image will likely run into several gigabytes, so you may need to plug in an external USB drive of appropriate size.
-
Click Next and select Start Backup to create your recovery image.
Depending on how big your system drive is, the backup may take several minutes to several hours to complete.
Restoring a previously created system recovery image is easy. Too easy, in fact.
 Restoring a system recovery image replaces every last bit of content on your computer’s system drive with the contents of the system image. Please make sure you’re regularly backing up your user data.
To restore a system recovery image on a Windows 8.1 computer, follow these steps:
- Reboot the computer into Windows RE.
-
In Windows RE, select Troubleshoot ⇒ Advanced Options ⇒ System Image Recovery.
The computer reboots again, taking you directly into the System Image Recovery environment.
-
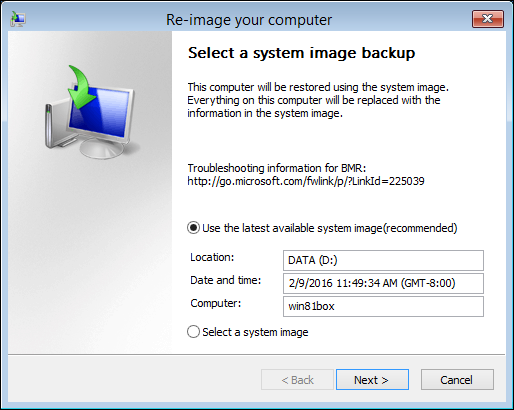
In the Re-image Your Computer dialog box (shown in Figure 3-6), select the appropriate system image.
By default, Windows shows you the most recent copy.
-
Click Next, Next again, and then Finish to start the restore process.
Think long and hard before clicking Finish, because the restore process will completely replace the contents of your system drive.
Although System Image Recovery can be a bit scary in its implications, I’ve used it to great effect in restoring customers’ computers, especially those that have become hopelessly crippled with malware.
To make user data recovery as easy as possible, I encourage my customers to use public cloud file storage services like Microsoft’s own OneDrive, or competitors like SugarSync or Dropbox.
Understanding Backup and Restore
Ensuring data recoverability involves performing a backup (normally to another type of medium) in addition to storing the file on the hard drive. This medium could be (for example) another internal hard drive, a DVD-R, or an external USB disk.
If you have lost a single file (or all the files) on your hard drive, you will want to perform a restore. You need to have your backup files or tapes available and use the Windows backup utility to restore your files.
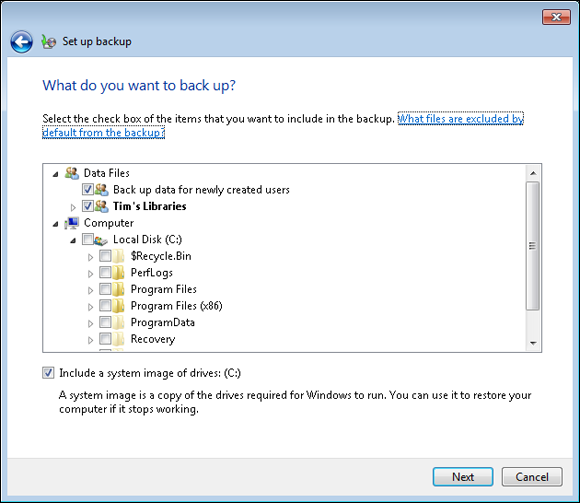
Windows 7 includes the traditional Windows Backup and Restore tool, which is available from the Start menu. Windows Backup uses a wizard interface, shown in Figure 3-7, that allows you to pick and choose which files, folders, and data you want to back up.
 Know that the Windows Vista and Windows 7 backup tools allow you to create on-demand as well as scheduled backups.
File History
You need to pay particular attention to the Windows 8.1 backup and restore tools in order to be successful on the 900-series A+ Exams. To that point, Windows 8.1 dramatically changes the backup and recovery landscape. You already learned about System Image Recovery; you also need to know about File History.
File History is very similar to the Time Machine feature in Apple OS X. Instead of the end user having to remember to create backups or schedule them, File History automatically backs up user data to an externally connected drive, another local hard drive, or to a network location.
To set up File History, open the File History Control Panel and click Turn On to start the service. This assumes that you have an appropriately sized data drive available to Windows. You can see in Figure 3-8, for instance, that File History on my Windows 8.1 computer wants to use my E: data disk.
Take a closer look at Figure 3-8. Do you see the Select Drive option? That’s where you go to choose which non-system disk you want to use for your File History backups.
Once you’ve enabled File History, Windows dutifully backs up your user data, including your document files, media files, Internet Explorer Favorites, and related irreplaceable assets. It’s great!
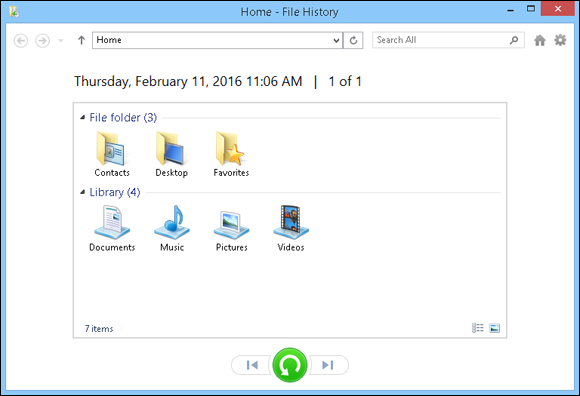
Restoring deleted user data with File History is easy as well. Again, look at Figure 3-8 and notice the Restore Personal Files link. That opens the recovery dialog box shown in Figure 3-9. From here you can drill through the File History libraries to locate your missing assets, select them, and click the big green Restore button to put ’em back. Awesome.
PC Refresh and Reset
Windows 8.1 also gives you two nifty technologies that can assist you in two very different, but yet mission critical, scenarios. Let’s say your Windows 8.1 system becomes super slow over time and otherwise “glitchy.” As one repair option among many that are available to you, you can restart the system into Windows RE and select Troubleshoot ⇒ Refresh your PC.
The PC Refresh process works similarly to the automatic system repair you look at earlier in this chapter, but with the exception that in a refresh, you’re effectively re-installing Windows. Don’t worry, though — all your user data remains intact.
By contrast, consider PC Reset (also accessible from the Windows RE Troubleshoot screen shown in Figure 3-10), which is useful when you’re selling or giving away your computer and you need assurance that the local system drive is wiped completely clean.
In a Reset operation, the system drive is formatted, and Windows performs a “clean” operating system re-installation. It goes (almost) without saying that in this case, all user data is destroyed.
System Restore
With Windows XP, Microsoft introduced a new system for backing out of driver changes — System Restore. When critical operations (say, updating drivers) are conducted on your system, Windows automatically creates a system restore point. This restore point can then be used to revert the system to a previous state in the event of an immediate failure. You can also manually create your own restore points.
If your computer encounters problems related to changes in its system files or settings, you can use a restore point (assuming that you have one saved) to quickly revert your computer to a previous state. It is like having an Undo button for your OS, rather than needing to go through a full restore from backup. The System Restore Wizard interface is shown in Figure 3-11.
Manually creating a restore point
You can manually create a restore point from within the System Restore Wizard by following these steps:
-
Choose Start ⇒ All Programs ⇒ Accessories ⇒ System Tools ⇒ System Restore.
In the System Restore dialog box that opens (refer to Figure 3-3), you can
- Restore My Computer to an Earlier Time
- Create a Restore Point
- Select Create a Restore Point and then click Next.
-
Provide a description and click Create.
A restore point description makes it easier to locate an appropriate restore point during the restore process.
- When the creation process is complete, click Close to exit System Restore.
For Windows Vista and Windows 7, you create a restore point by opening the System Protection tab of the System Control Panel and clicking the Create button, which will ask you for a description of the restore point.
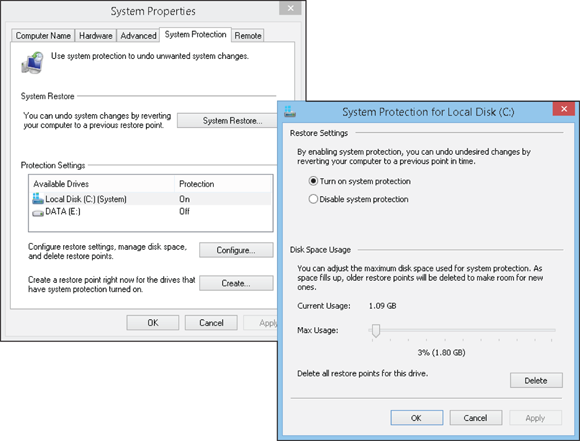
For the System Restore to work, Windows monitors all hard drives on your system. Windows Vista defaults to letting you use up to 12 percent of your drive space for System Restore data, while Windows 7 is a little more dynamic in assigning an initial percentage, maxing out at 100 percent. This system restore cache setting can be adjusted by choosing Start ⇒ Control Panel and double-clicking the System applet. Then click the System Restore tab. Figure 3-12 shows the dialog box and the settings for the C: drive, which I accessed by selecting the drive and clicking the Settings button. You can adjust the system restore cache by moving the slider and clicking OK.
Reducing the size of the cache reduces the disk space used by System Restore but also reduces the number of restore points that Windows will keep track of for you, which also reduces the age of your oldest restore.
If you have only one partition or drive on your computer, you can adjust the cache size without going into the settings for the disk.
Restoring your computer to a previous state
Minor and major disasters can require you to access a restore point to return your computer to working condition. The following instructions guide you through restoring your computer to a previous state by accessing a system restore point:
-
Choose Start ⇒ All Programs ⇒ Accessories ⇒ System Tools ⇒ System Restore.
The System Restore Wizard (refer to Figure 3-3) gives you the following option:
- Restore My Computer to an Earlier Time
-
Select Restore My Computer to an Earlier Time and then click Next.
The wizard presents you with a list of restore points.
-
Select the appropriate restore point and then click Next.
You see a warning you that you will lose recent changes on your system if you choose to restore.
-
Click Next or Finish.
Your system reverts to how it was configured at the restore point you chose, and your computer reboots.
 Labs 3-1 and 3-2 provide practice creating and invoking a system restore point in Windows 8.1. The labs can be downloaded from the companion website at
 www.dummies.com/go/aplusaio.
Recovery and Rescue Methods
So far in this chapter, you have seen many different tools that you can use to repair your computer when it is in a non-booting state. This section looks at manufacturer recovery tools, third-party tools, and special Windows installations.
Recovery CDs and recovery partitions
Many large computer companies, such as HP and IBM, provide a quick way to restore your computer to its default factory installation. In the past, this was done by using recovery CDs. When you unboxed your computer, you would get a set of bootable CDs that held some type of image of your computer. If your computer became unusable because of a virus, hard drive failure, or other issue, you could quickly boot from the CDs and restore your computer to its factory state. One problem with this scenario is that it usually meant that you also lost all of your data if it was not otherwise backed up.
Over the years, with vendors prepackaging applications with their computers, the size of that factory image has gotten larger and larger, so that now it would take multiple CDs, or even multiple DVDs, to store all that data. This change in the preparation of the computers has caused some vendors to use a recovery partition instead. This hidden partition contains the tools needed to restore the image to the rest of the hard drive. If you use partitioning tools and delete the partition, you lose your ability to restore the system to its factory default settings. The vendor will usually, however, give you the ability to back up this partition to CDs or DVDs. Usually, this partition is accessed by pressing one of the computer’s function keys during boot-up.
Recovery image
In addition to factory images that are available from some hardware vendors, you have the option of making your own recovery image. You can store this image on a partition on your hard drive, on a network server, or on some type of removable media. To create and restore this image, you can use some type of imaging software, such as O&O Software’s DiskImage. These tools allow you to create your own custom image to be used for recovery purposes.
Rescue CDs
A rescue CD is a bootable CD that includes tools used to rescue files from a failing hard drive, or to repair problems that occurred with a Windows installation that made it non-bootable. Many third-party rescue CDs are available to the CompTIA A+ Certified Professional. Some rescue CDs are commercially available, but a wide variety of them are available for free. A quick Internet search for Live CD will reveal a wide range of these CDs. It seems that there are as many types of custom Live CDs as there are problems that you need to solve. With a little searching and experimenting, you can find one that meets your most common problems to add to your arsenal of tools.
 Many of the key rescue CDs I have used for years are now actually DVDs. (With the extra space for tools, these DVDs are more useful than ever.) You can take the term “rescue CD” to mean “CD or DVD” in this section.
You’ll find discussion of any rescue optical media more in the Linux world, if my experience is any indication. Practically speaking, though, in the twenty-first century, computer repair technicians are far more likely to use USB thumb drives as repair platforms.
Many rescue CDs run a version of Linux, which has been prepackaged onto a bootable CD or CD image that includes a variety of tools. Knoppix (www.knopper.net/knoppix/), running a version of Debian Linux, is just one of these Live Linux CDs that many people use as a rescue CD, partly because it has a wide selection of tools and partly because it includes a GUI in the form of the X Window System and KDE or GNOME. With the variety of applications bundled on the Knoppix CD and the fact that the system runs entirely off of the CD, Knoppix is a great way to try Linux without having to install it. The following offers a brief overview of some of the rescue options that are available to you when using Knoppix, and most of the other Live CDs offer a similar mix of features. Try a few to find one that works for you.
Conveniently enough, Wiley also publishes Linux Bible, Ninth Edition, by Christopher Negus. It covers Knoppix as well as many of the tools you will need to know how to use to diagnose and resolve problems with your Windows installation. With this book, you will be able to do a Linux deep dive; the book will guide you through Linux management from start to finish, including a Linux installation on a flash drive, which can be used in place of a rescue CD.
The Knoppix boot process starts off with a confirmation of your intention to boot into Knoppix, as shown in Figure 3-13. There are advanced boot options that you can access or get information about by pressing F2 or F3, but in most cases, the system will boot without additional information.
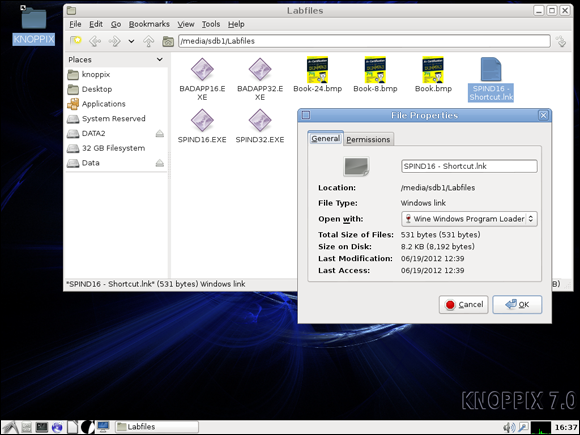
If you are not familiar with Linux, here’s a pointer: Linux identifies hard drives with letters and partitions with numbers, so in a typical IDE/ATA system, your four devices or drives are identified as hda, hdb, hdc, and hdd, with the C: drive usually being hda1 (the 1 means partition 1); while on SATA or SAS system your first four devices or drives are identified as sda, sdb, sdc, and sdd. In the case of Knoppix, all local disk partitions are automatically mounted for access and will appear on the desktop; some versions may only mount them as read-only. You can change the properties of the disk to allow writing to it; otherwise, you can browse and read files on your system. Figure 3-14 shows the properties of a Windows shortcut file that is found on sdb1 in a labfiles directory.
The overall desktop should not be alien to Windows users, with an applications menu in the bottom left of the screen, where the applications are stored in categories like Accessories, Education, Games, Graphics, Internet, Office, Sound & Video, and System Tools. Version 7 of Knoppix also includes WINE (a Windows environment for running Windows programs) which may be able to run some of the applications on your hard drive.
With the tools on this Live CD, you can verify many settings and even modify files that are found on your Windows installation.
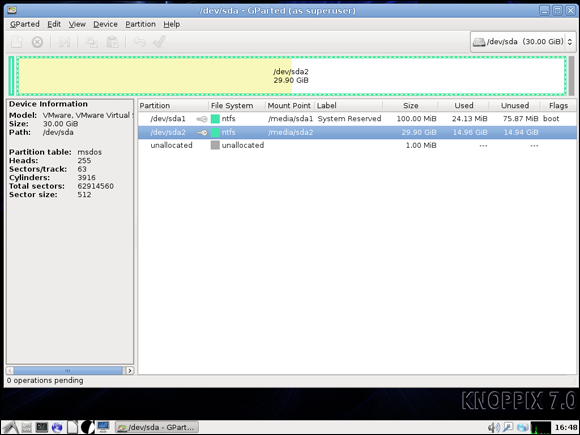
Knoppix has several tools that you will likely find useful, such as partimage (partition image; allows you to perform disk imaging tasks on your partitions) and parted (a command line, disk partition–editing tool). Figure 3-15 shows the interface of GParted (a GUI front end for parted). This interface is reminiscent of Partition Magic. You can use GParted to create, resize, delete, and move partitions around your drive.
To copy files to or from a Windows server on your network, you can use tools like Samba Network Neighborhood to access shared folders on your servers. You can use this tool to copy network drives to a computer that doesn’t have them or to rescue files from a hard drive that is very near failure and can no longer support booting. Figure 3-16 shows the shares that are available on the server 192.168.1.3 as well as in a folder on the local hard drive, making it easy to move data between locations.
Rescue partitions or rescue installations
Many of the quickest ways to repair a Windows installation are actually built into Windows. To repair a Windows installation from a Windows installation, you need only a small amount of planning. If you leave some free, unpartitioned space on your hard drive, you can create a rescue partition. A rescue partition, or rescue installation, of Windows is simply another copy of Windows that is installed onto your computer.
This second copy of Windows is not the default for booting, and is used only to repair problems to your normal installation of Windows. So if your default copy of Windows is installed on Drive C:, your rescue install could be installed on Drive D: or Drive E:. The partition should be used only for the Windows installation, and not used to store data for your normal installation. After installing Windows in the second location, it will be automatically set as the default boot. To change the default booting installation of Windows, follow these steps:
- Choose Start ⇒ Control Panel.
- If your Control Panel folder displays in Category view, choose Performance and Maintenance ⇒ System; if your Control Panel folder displays in Classic view, double-click System.
- In the System Properties dialog box that opens, click the Advanced tab and then on Settings in the Startup and Recovery section.
- In the Startup and Recovery dialog that opens, choose the copy of Windows that you would like to be the default booting installation from the Default Operating System drop-down menu.
- Click OK twice to close both open dialog boxes.
Scheduling Preventive Maintenance
This chapter walks you through the process of creating scheduled backups to keep your data safe. In addition to backups, many maintenance tasks can be scheduled to keep your computer running smoothly and safely. At a minimum, thought should be given to scheduling at least the following tasks:
- Disk defragmentation: This task will optimize the files on the drive to improve disk access speeds. To read more about this tool, review Book 2, Chapter 5.
- Check disk utility (chkdsk.exe): This task will examine the disk files and directory structures for errors. If errors are found, you can rerun the tool to fix errors. To find out more about this tool, look at Book 2, Chapter 5.
To schedule a task, choose Start ⇒ All Programs ⇒ Accessories ⇒ System Tools ⇒ Task Scheduler. Disk defragmentation should have a default system task, so navigate in the left pane to Task Scheduler Library ⇒ Microsoft ⇒ Windows ⇒ Defrag. Ensure that the task ScheduledDefrag has a status of Ready; otherwise, right-click the task and choose Enable.
chkdsk.exe does not have a default system task, so to review how to create a schedule for a task, look into Book 6, Chapter 4. When creating the task, set the command to execute to cmd /k %systemroot%\system32\chkdsk.exe C:. When this task runs, it will cause a command window to open, which will remain open until you close it.
Of course, the scheduled tasks I’ve given you thus far barely scratch the tip of the proverbial iceberg. Keep the following in mind as well:
- Windows Update: Microsoft releases Windows-related security fixes and performance improvements on the second Tuesday of every month (what many systems administrators call “Patch Tuesday”).
- Anti-malware definitions: Unless your system is equipped with the latest and greatest anti-malware signatures, it will be unable to defend against any “nasties” that make their way to your computer.
- Driver/firmware updates: What’s cool about Windows Update nowadays is that it can update third-party software in addition to native Windows code. This means that you largely don’t need to worry about keeping your hardware drivers current anymore.
Although I focus on Windows almost exclusively in this chapter, all the best practices I outline apply equally to OS X and Linux.
1. Which of the following keys should you press in the Windows 8.1 Start Screen in order to restart the system into Windows RE?
(A) Del
(B) Alt
(C) Ctrl
(D) Shift
2. Windows 8.1 includes the Windows Backup and Restore utility.
(A) True
(B) False
3. A user bought a new video card with 2GB of RAM. He needs it to play the new version of his favorite video game. After installing the video card, he boots up his Windows 7 computer and is overjoyed when he sees the Plug and Play Wizard detect the new hardware. When prompted, he provides the driver disk that came with his computer. After loading the driver for his new video card, his computer reboots. During the next boot, his computer halts and will not respond to any controls. What should he do next?
(A) Reboot his computer by using the power button. His computer will automatically boot to the Last Known Good Configuration.
(B) Reboot his computer by pressing Ctrl+Alt+Del and then pressing when he sees the message to Press F8. He will then be able to choose Disable Advanced Video Options from the boot menu.
(C) Reboot his computer by using the power button. His computer will automatically display the boot menu and attempt to boot to Last Known Good Configuration without user intervention.
(D) Reboot his computer by pressing Ctrl+Alt+Del and then hold down F9 to enable Safe Mode.
(E) Reboot his computer by using the power button. When he sees the message to Press F8, press it and select either the Last Known Good Configuration or Enable VGA Mode.
4. Which of the following actions should you perform when you prepare a Windows 8.1 computer for resale?
(A) You should run a PC Reset.
(B) You should run a PC Refresh.
(C) You should disable File History.
(D) You should boot into Safe Mode.
5. You can store a System Recovery Image on your Windows 8.1 computer's C: drive.
(A) True
(B) False
6. System Restore does not affect user data.
(A) True
(B) False