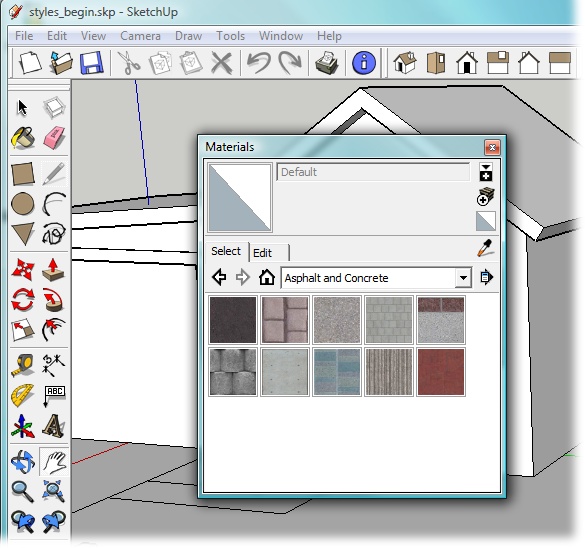
When you use the Face Style toolbar (Changing Face Styles) to change the look of your model, the changes you make apply to all the faces of the model. When you want to change the appearance of individual faces within your model, you change the color or materials of the face using the Paint Bucket (B) tool and the Materials window (Window → Materials), as shown in Figure 6-3.
Note
The tools for applying colors and materials are different on Macs and Windows. This section covers the Windows tools. If you're of the Mac persuasion, go to Applying Colors and Materials (Mac).
Click the Shaded face style button, or choose View → Face Style → Shaded.
Your model shows the base color for faces, but doesn't show textures. If you haven't applied color or textures to any faces, you won't see much of a change at this point. (To get the full picture for this exercise, make sure the X-ray button is toggled off.)
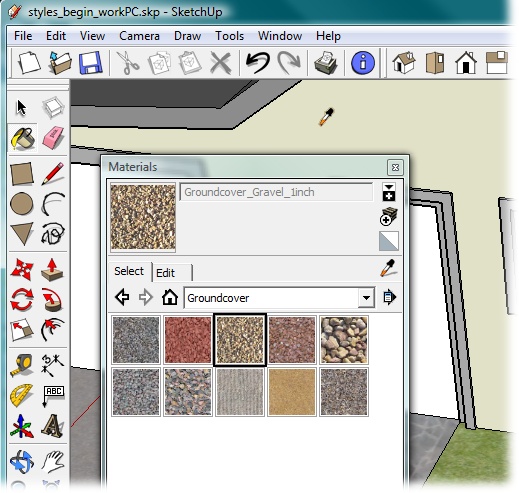
Choose Window → Materials.
The Materials window appears, as shown in Figure 6-3. You use this window to apply both solid colors and materials, which mix colors and images to create a textured appearance. At the top you see a preview of the selected material and its name. Below that is the Collections drop-down menu. The individual colors or materials in the collection appear below the menu.
From the drop-down menu, choose the Colors-Named collection.
The Colors-Named collection shows a variety of colors that are named with words and numbers.
Scroll to the bottom and select 0135_DarkGray.
When you click a color or material, its name appears at the top of the Materials window, and a preview appears in the upper-left corner.
Move your cursor over the house, and click the three faces that make up the roof.
When you click a face, SketchUp paints it with the selected color. The gray roof may show in slightly different shades depending on shadows and orientation, contributing to the 3-D effect.
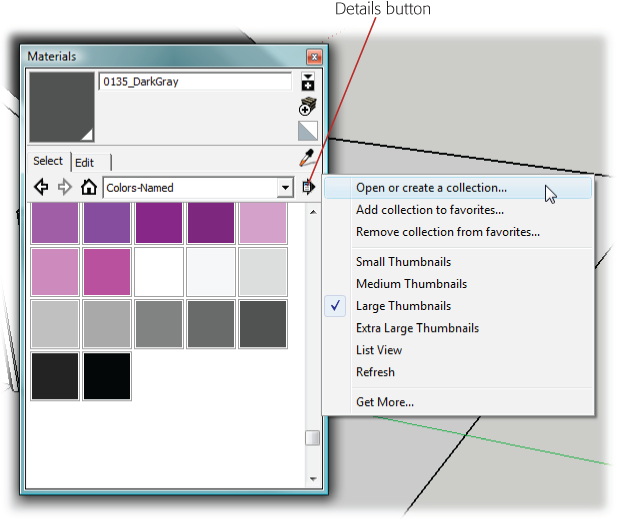
Click the Details button (Figure 6-4), and then choose "Open or create a collection".
The "Browse for Folder" window opens, where you can navigate through the folders on your computer.
Navigate to a location where you want to save your new collection.
Click the triangle button to open folders, and then click a folder to select it.
Click the Make New Folder button, and then type a name for your collection.
A new folder appears beneath your selected folder. As you type, the new name appears next to the folder icon. You can name it whatever you want, but House Materials works well for this exercise.
Click OK.
The "Browse for Folder" window closes. Your new collection is already selected in the Collections window. It's empty at this point, so it doesn't have much to show.
In the Materials window's upper-right corner, click the "Display the secondary selection pane" button.
At the bottom of the Materials window, the secondary selection pane opens, as shown in Figure 6-5. It has similar controls to the top pane, including an In Model button and a Collections drop-down menu.
Click the In Model button.
Several color chips appear in the In Model collection. These may be colors applied to the house, or they may be colors applied to Sang, who may or may not be visible in your model.
Find the color you applied to the roof, 0135_DarkGray, and drag the color chip up to your House Materials collection.
When you hold the cursor over a color or material, its name appears as a tooltip. Your House Materials collection now contains a copy of 0315_DarkGray. This collection is available whenever you use SketchUp for any model. By creating your own collections, you can save colors and materials that you know you want to reuse. The next time you need them, you won't have to search all over.
Use the Collections menu in the secondary selection pane to display Colors-Named, and then select 0133_Gray.
The lighter shade of gray appears in the preview at the top of the Materials window.
Drag the 0133_Gray color chip to the House Materials collection.
A copy of 0133_Gray is now included in the House Materials collection. You can drag colors and materials between any of the collections to create copies.
Apply 0133_Gray to the roof fascia.
The vertical trim at the edge of a roof is called fascia. On homes, it's usually made of wood. It can be painted to match the roof material or the other trim on the house.

Tip
If you preselect faces with the Select (space bar) tool, you can apply colors to several faces at once. Just click with the Paint Bucket on any of the selected faces.
Now that you've applied a couple shades of gray to your roof, why not go ahead and apply colors to the rest of your house model. It's just a matter of selecting the color in the Materials window and then clicking a face with your Paint Bucket (B). Paint the walls and the trim. For the window surface, open the Translucent collection and choose Translucent_Glass_Blue, as shown in Figure 6-6. Don't worry about the yard. In the next section, you'll apply some textured materials for the landscaping.
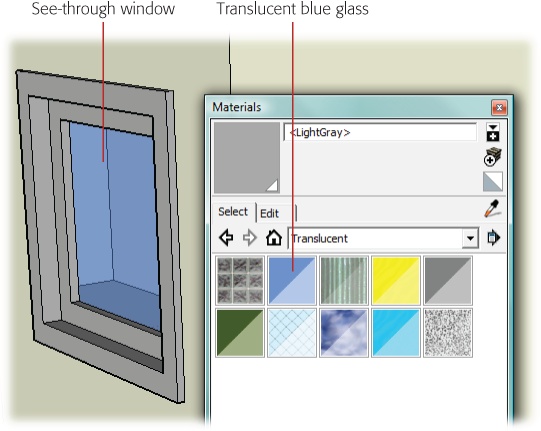
Figure 6-6. Create a see-through window by choosing Translucent_Glass_Blue from the Translucent materials collection. Translucent materials are indicated in the Materials window by a diagonal slash through the color chip.
In real life, objects seldom appear as a single color. For example, wood almost always has a mixture of colors and textures. Materials can look like just about anything, from wood siding to a lawn. You add materials to the faces of your model to give it a more realistic appearance, or at least to hint at the underlying material. Some materials, like those for fencing, may have transparent areas. For those times when you want a solid, nontextured color, you can choose from the Colors or Colors-Named collections.
When SketchUp applies a material to a face, it takes a small image and repeats it many times over the surface. This process is called tiling. You may have seen it used on web pages where an image is repeated.
In Windows, you apply materials the same way you apply solid colors. For example, here are the steps to apply materials to the yard in your house model:
In the Materials window (Window → Materials), use the Collections menu to choose Vegetation.
The Vegetation collection shows several natural textures, including a couple of grass options.
Click Vegetation_Grass1.
A sample of the grass texture appears in the preview at the top of the Materials window.
With the Paint Bucket, click the yard.
The yard surrounding the house fills in with the green grass texture. (You didn't even have to use fertilizer!)
In the "Asphalt and Concrete" collection, select Concrete_Aggregate_Smoke, and apply it to the driveway.
The "Asphalt and Concrete" collection has several options that might work for the driveway. The Concrete_Aggregate_Smoke is light gray. (Only in SketchUp is it as easy to pave a driveway as it is to plant a lawn.)
In the Stone collection, select Stone_Pavers_Flagstone_Gray, and apply the paving material to the walkway.
Your walkway has an attractive stone texture.
In the Groundcover collection, select Groundcover_gravel_1inch, and apply the gravel to the area between the front door and garage.
At this stage, your yard should look something like Figure 6-7.

Figure 6-7. Your house model gets dressed up with a variety of different materials. Browse the collections and try out different materials until you're happy with the results.
Materials go a long way toward dressing up your model. At this point, you may want to explore some of the material opportunities by adding materials to the house. Look under Roofing for different types of shingles and roofing materials. Look under "Brick and Cladding" for materials to apply to the sides of the house. You can choose one of the species in the Wood collection for the front and garage doors.
Right off the bat, SketchUp gives you quite a few colors and materials to work with, but sooner or later you'll want more variety. You can use several ways to mix up your own colors. If you've ever selected colors in Adobe Photoshop or Illustrator, you'll feel right at home.
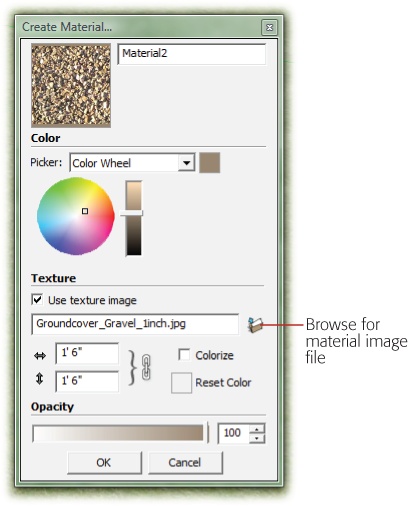
Make sure the Materials window is open (Window → Materials) and then click the Create Material button.
The Create Material button is on the right side of the window, directly below the "Display the secondary selection pane" button. When you click the button, the Create Material window appears, as shown in Figure 6-8.
Choose a color model from the Picker menu.
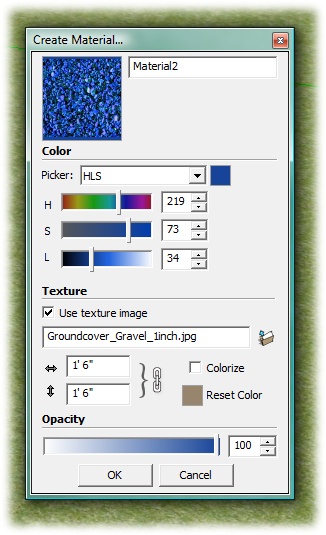
The Create Material window provides four different ways to mix and create colors: Color Wheel, HLS, HSB, and RGB.
Use the color model controls to mix a color.
If you're using the Color Wheel, click a color in the circle to select a hue, and then use the slider to the right to adjust the brightness.
The controls for HLS (Hue Luminance Saturation), HSB (Hue Saturation Brightness), and RGB (Red Green Blue) color models are very similar. They consist of three sliders that affect the different aspects of the color model (Figure 6-9). Drag the sliders to create a color. As an alternative, you can type a numeric value in the boxes at the right. For example, if you work with a team of artists, you may be given an RGB color value to use for parts of a project. If someone says that the walls of the house should be the RGB color 79, 255, 80, then all you need to do is type numbers into the boxes to create the specified color.
In the box at the top the Create Material window, type the name of your new color.
After you've created a color or a material, give it a unique name so you can find it and use it again.
If all you're doing is creating a new color, your work is done. You can click OK to close the Create Material window. If you're creating a textured material, complete the rest of the steps.
If you're creating a textured material, turn on the "Use texture image" box, and complete the rest of the steps.
The boxes and tools under Texture and Opacity are grayed out until you turn on the "Use texture image" box.
Click the "Browse for Material Image File" button shown in Figure 6-8.
The Choose Image window opens, where you can navigate through the folders and files on your computer.
Navigate to the material image file you want to use and then click Open.
The image is loaded in the Create Material window and a preview is displayed.
Adjust the width and height dimensions (Figure 6-9) if necessary.
You can edit materials by changing width and height that the textured image covers. Use smaller numbers for a smaller pattern that repeats more frequently.
Adjust the color if necessary.
After you've loaded a texture image, you may want to readjust the color. Turn on the Reset Color checkbox if you want to remove the current color. Use any of the color models to set a new color for the material.
Adjust the opacity if necessary.
Materials can be semitransparent. Use the Opacity slider to set the level. All the way to the right is 100 percent—completely opaque.
Tip
Shadows pass through materials that are less than 70 percent opaque. For more on shadows see Flicking the Light Switch.
Click OK.
SketchUp creates your new material and loads it into the Materials window, ready to go. To apply the material, just click one of your model's faces.
SketchUp comes with quite a few different materials when you first install it. You can find additional materials on the Google SketchUp site or from other artists. If you're looking for something specific, try a Google search. Type something like SketchUp materials bathroom tile or SketchUp materials redwood and see what pops up. Materials are stored in image files.
Sometimes when you're applying colors with the Paint Bucket (B), you want to load the bucket with a new color or texture. Sure, you can go back to the Colors window and hunt down the color you need. However, if the color is already applied to one of the faces in the model, you have a quick way to fill the Bucket with that color. Press Alt, and the bucket cursor changes to an eyedropper, as shown in Figure 6-10. Click the eyedropper on the face with the color or material you want to copy. Release the Alt key, and the bucket cursor reappears. You're all set to paint some new surfaces.
Sometimes you want to make changes to materials. Perhaps the brick pavers aren't exactly the color you want. It's best to apply the material to a face in your model and then to make changes to that material. That way you don't change the original material, and it will still be available for other projects.
Note
You can download edit_brick.skp from http://missingmanuals.com/cds for your material editing experiments.
In the edit_brick.skp document, choose Window → Materials.
The Materials window opens, showing the tab that was selected the last time you closed the window.
Click the Select tab, and then click the In Model button (a house).
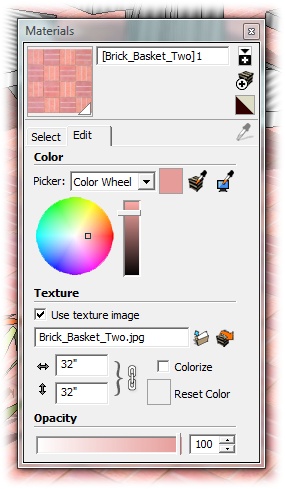
Click the red brick material.
The material's name, Brick_Basket_Two, appears at the top of the window.
Click the Edit tab.
The Edit tab shows the settings for the selected red brick materials. The settings are divided into two parts—Color and Texture—the two elements that give a material its character.
Color options. The Picker drop-down menu lets you choose between the different color systems discussed on Mixing Your Own Colors and Materials (Windows). Mixing your color is a matter of selecting a hue from a color wheel or making adjustments with sliders. You can use the eyedropper buttons to load colors into the material.
Texture options. Use the texture options to load a texture image and to make adjustments to the image. The "Use texture image" checkbox determines whether or not a material uses a texture image. The file name for the image is shown below. Use the Browse button to find and load a new image. Click "Edit texture image in external editor", and the JPEG image file opens in a separate image-editing or image-viewing program.
Click the "Match Color of object in model" button, and then click one of the gray colors in the water fountain.
As you make color changes, you see the effects immediately in your model. If you want to undo the color changes, click the color swatch to the left of the eyed ropper buttons.
Of the two eyed ropper buttons, you use the one on the left to load colors from objects in your model. Use the one on the right to select colors that are on your screen but not in the SketchUp model.
In the width box (it's labeled with a double-headed arrow), type 12.
The bricks in the texture image shrink. Changing the dimensions of a texture image is one of the easier ways to edit a texture. The tile size for the brick texture is 32".
Click the chain links next to the dimension boxes and then, in the height box, type 32.
The links icon changes to a broken link, and you can change the width-to-height proportion of the texture image.
Click the arrows to the left of the dimension boxes.
The arrows look more like labels than buttons, but clicking them resets the dimensions to the original values.