You use the Follow Me tool to extrude a two-dimensional shape along a path. As you see, with this project the path can take a few corners, and the extruded shape follows suit, creating corners and angles as needed. In the previous steps, you created a simple building-shaped box and the profile of a roof—or more accurately, the profile of half a roof. In the next steps, with the Follow Me tool, you extrude that path around the top edge of the building.
Click the Follow Me tool in the toolbar or choose Tools → Follow Me.
The cursor changes to the Follow Me tool. The hint in the status bar says "Select face to extrude." When you hold the cursor over different faces in your model, a highlight of blue dots appears on the faces.
Click the face that's the profile of the roof.
After you click the face, the shape is attached to the cursor. It's similar to using the Push/Pull tool. When you hover over an edge like the top edge of the building (Figure 8-8), the edge displays a highlight, and the extruded shape follows, perpendicular to the selected edge.
Move the cursor all the way down the edge on the right side of the building, and then turn the corner and follow the back edge of the building.
As you turn the corner at the back of the building, the extruded face turns to follow the new edge, forming perfect angles and sloped faces. It may take a little practice to move the cursor along the edge.
Turn the far corner and move the cursor back toward the front of the building.
Each time you move the cursor over a new edge, the roof shape follows, creating clean edges and a well-shaped roofline.
Turn the corner and then move the cursor across the front edge of the building, finishing up at the closest corner.
When the extruded shape passes the midpoint at the front edge of the building, some excess geometry appears. SketchUp isn't yet aware that you're near the end of the line with the Follow Me tool. When you click the building's front corner, SketchUp figures it all out and creates the proper edges and faces for a perfect roof, as shown in Figure 8-9.
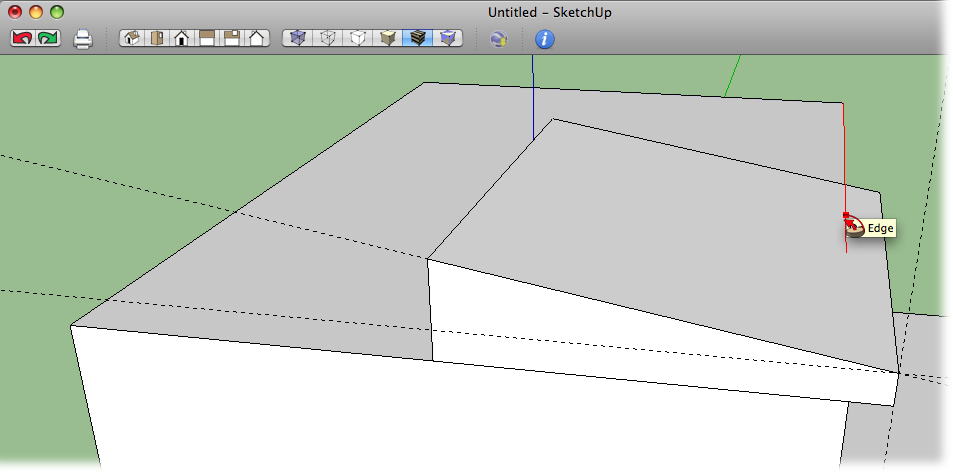
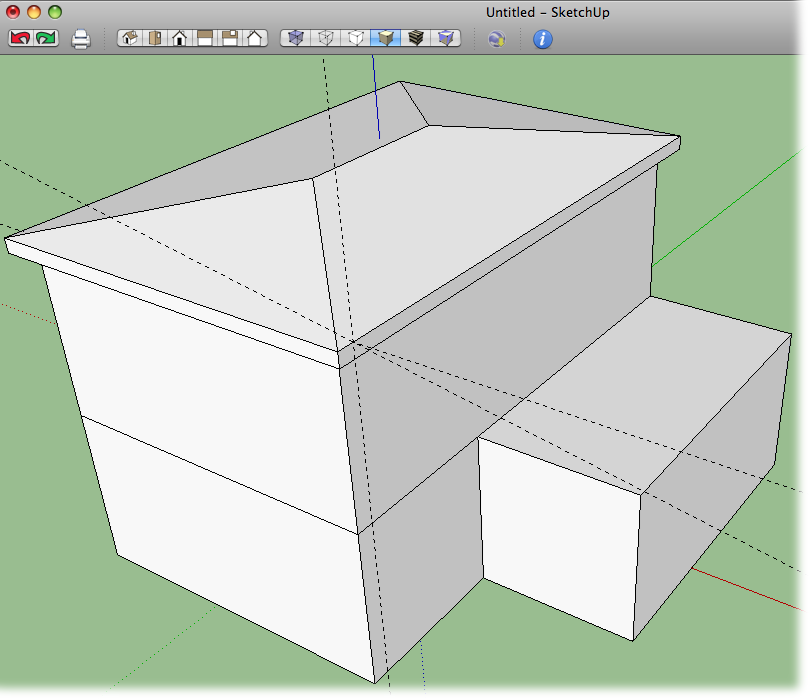
Figure 8-9. If all goes well in the roofing business, the finished result looks like this. If not, you can use Undo (Ctrl+Z for Windows, ⌘-Z for Mac) and try again. Or you may want to clean up by using the Eraser (E) and Line (L) tools.
Tip
If your extruded roof doesn't come out as expected, make sure no extra edges or faces are in your model that interfere with the Follow Me tool. Make sure the profile is touching the path—in this case, the top edge of the roof. At the end of the Follow Me action, you may want to zoom in to make sure you're clicking the corner of the roof and not one of the guides. If you continue to have problems, try the preselection technique described in the next section.
If your results don't look like Figure 8-9, then it's possible that the last point you clicked wasn't the corner of the building—perhaps it was the corner of the roof. If that's the case, it's likely you have some extra lines and extra geometry in your roof. You can undo the Follow Me operation by pressing Ctrl+Z (⌘-Z on a Mac). Then take another crack at it. When you get to that last point, try to make sure you're clicking the corner of the building and not the edge of the roof or one of the guides. You should see a tooltip that says "Endpoint".
An alternative solution is to clean up the excess architecture in your roof. Use the Eraser (E) to remove extra edges. Then if you have missing faces, use the Line (L) tool to trace over some of the edges until the faces appear. As you work in SketchUp, you'll find many other instances where your models need some cleanup, so a little practice at the art is never wasted.