In the previous section, you learned how to walk through walls by using the Walk tool. That's nothing compared with what you can do with the Section tool. Using section planes, you can slice into a model like it's a layer cake, displaying a cross-section of its innards. The effect is cool in a still image, but it's especially impressive in an animation.
Note
You don't have to be working with scenes to use section cuts and section planes. They're available anytime you're working in SketchUp.
Open a fresh copy of modern_house_scenes_begin.skp.
You can find a copy of this SketchUp document at http://missingmanuals.com/cds.
Choose Window → Outliner.
The Outliner shows that this document has three groups: house, landing, and steps.
Double-click the "steps" group.
The "steps" group opens for editing. You aren't really editing when you use section planes to create section cuts in your model. However, you can't apply a section plane to a closed group.
Click the Section Plane button (or choose Tools → Section Plane).
The cursor changes to a green square with a diamond in the center. As you move the cursor, the square snaps to align with faces and surfaces.
Click a vertical face of the stair stringer.
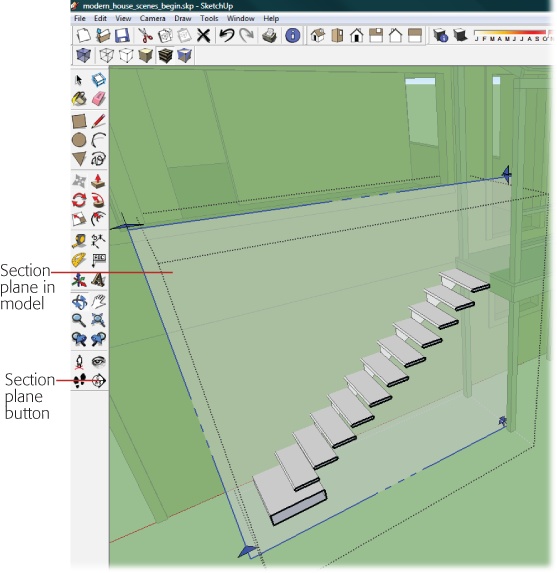
A section plane appears at the point where you clicked. After you add a section plane, usually the first thing you want to do is move the plane; however, you can't just click it with the Move tool. If you try, you end up moving parts of your model. Instead you need to explicitly select the section plane before you move it.
Using the Select (space bar) tool, click the section plane.
The section plane displays blue highlights, as shown in Figure 12-16.
Using the Move (M) tool, click the section plane. Then move the plane back toward the house and click again.
As the section plane moves back toward the house, it hides the front portion of the stairs, creating a cutaway view of the stairs.
Right-click the section plane, and choose Reverse from the shortcut menu. Again right-click the section plane, and choose Reverse from the shortcut menu.
The portion of the stairs that was visible is hidden, and vice versa. The command reverses what is visible and what is hidden by the section plane. After your double-reverse, the portion of the stairs closest to the house is visible.
Right-click away from the section plane and choose Close Group.
The "stairs" group closes and you see the entire house model in its full glory. The section plane and the section cut are still visible.
Go to View → Section Planes.
In the View menu the checkmark next to Section Planes disappears. In the modeling window the section plane disappears, too.
Go to View → Section Cuts.
In the View menu, Section Cuts is deselected. In the modeling window, all traces of the section plane and the section cut are gone. You can bring them back anytime using the same commands.
Section planes, like animations, are one of those SketchUp effects that are bound to get oohs and aahs from an audience. They're not only cool, but they're also a great way to provide extra information about your model, whether it's a building, a piece of furniture, or the latest hydrogen fuel cell-powered automobile.
When you first create them, section planes snap to the faces in your model. But you don't have to settle for that. You can use most of the tricks you use to orient and create rectangles, ovals, and polygons. That includes using the Shift key to lock the section plane to a particular orientation and then moving it elsewhere. Once you've created a section plane, you can use the Rotate (R) tool to change the angle. To give it a try in modern_house_scenes_begin.skp, double-click the "house" group. Then create a section plane that's aligned with the plane of the left side of the house. Select it and push it back partway into the model. When you're done, it should look like Figure 12-17.
Tip
If you need more details on how to create a section plane, see the exercise on View Cross-Sections with Section Planes.

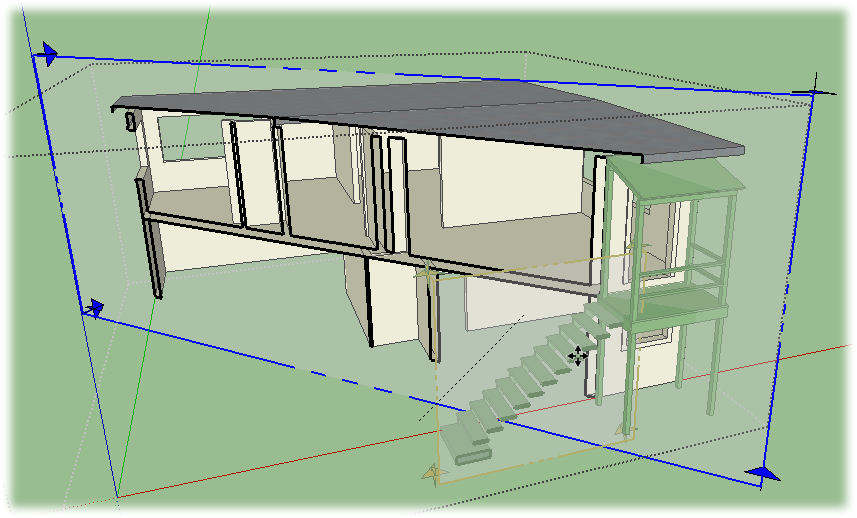
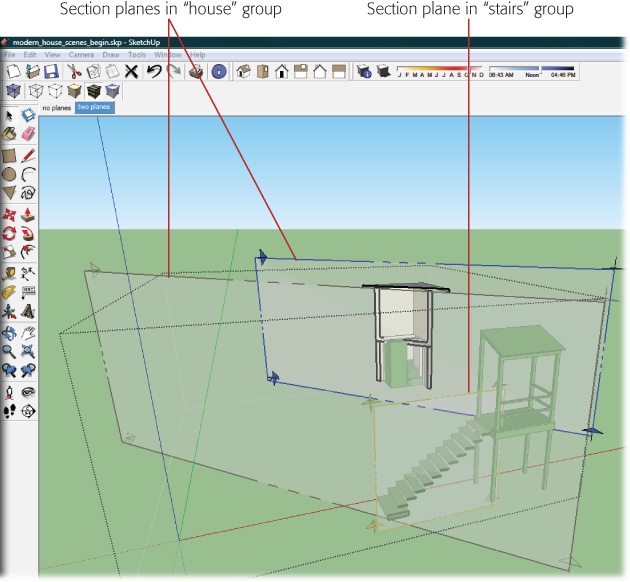
Figure 12-17. You can view two section cuts at the same time, as long as the cuts are inside of separate groups. Here the "stairs" group shows a section cut, and the "house" group shows a section cut.
To rotate the section plane in the house group, follow these steps:
Make sure that you're inside of the "house" group, and then click one of the section plane handles.
You want to be inside of the "house" group, but not inside of its subgroups. When you're at the right level, you should be able to select the section plane without any other entities being selected.
Click the Top view button, or choose Camera → Standard Views → Top.
You see the roof of the house, and the section plane is still selected.
With the Rotate (R) tool, hold the cursor over the ground, and then press and hold Shift.
The Rotate tool is locked to the ground plane.
Move the cursor to the top edge of the section plane and then click.
This click sets the first point for the rotate action. Release the Shift key.
Move the cursor down the top edge of the section plane and click again.
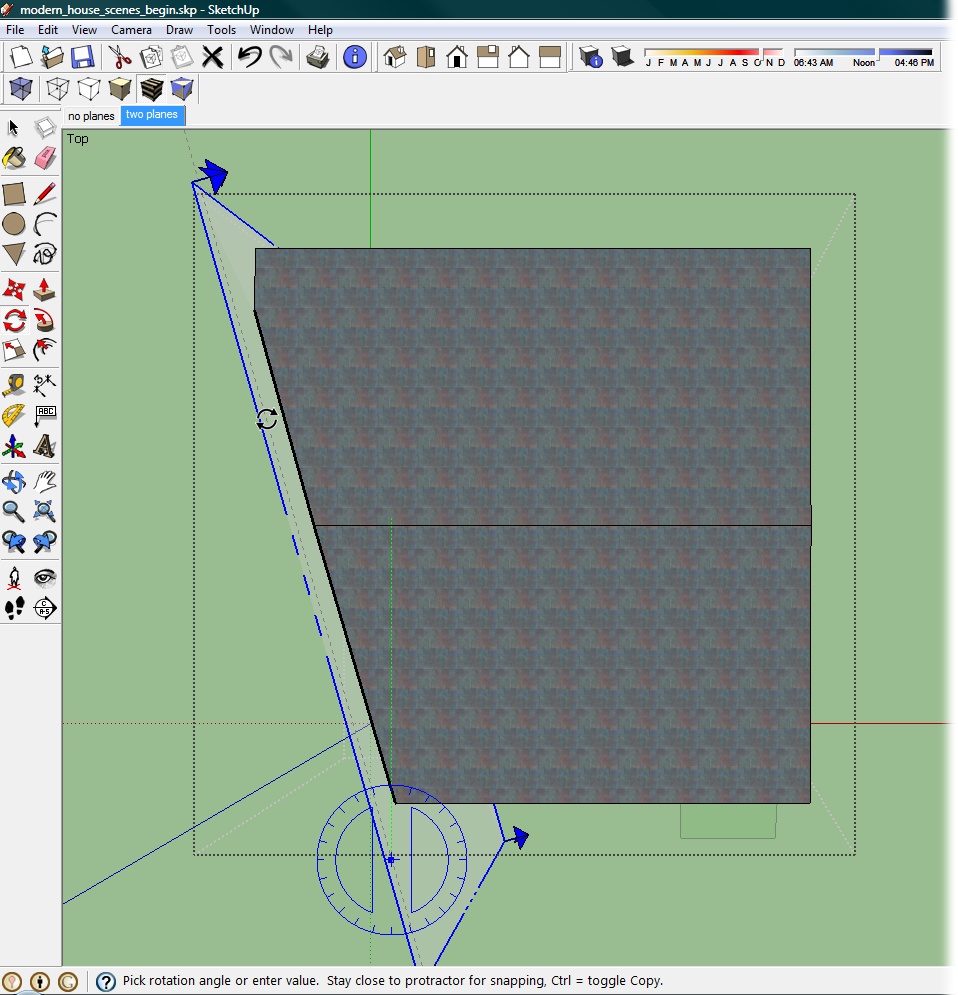
Now when you move the cursor, the section plane pivots around the first point you clicked, as shown in Figure 12-18.
Type 45 and press Enter (Return on a Mac).
The section plane is rotated to a 45-degree angle.
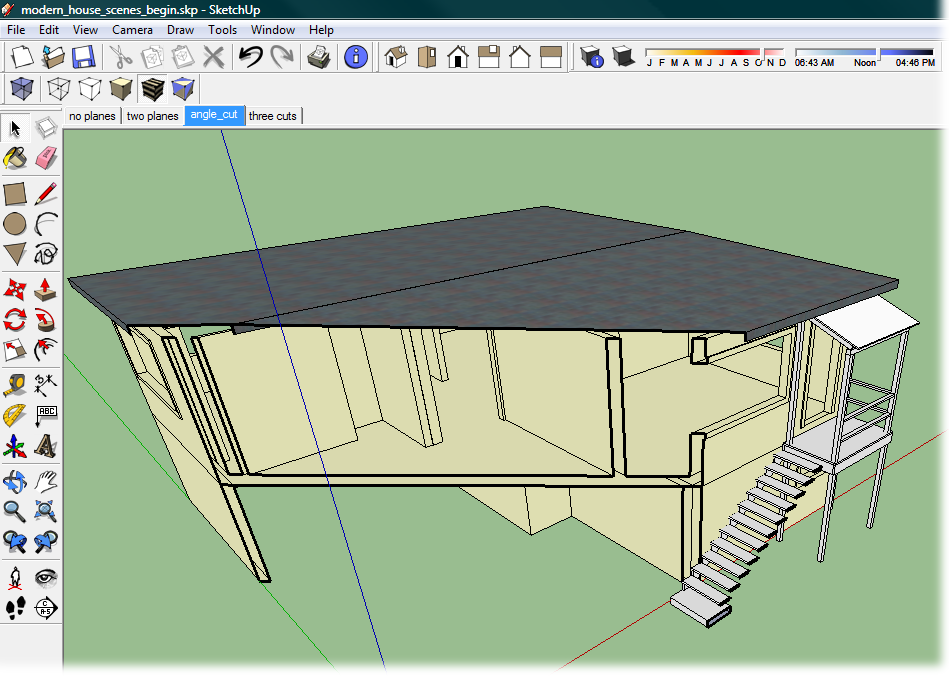
Use the Orbit tool to view the house from roughly the same angle as the section plane. Then use the Move tool to push the plane back and forth.
As you move the plane, the 45-degree, angled section cut moves back and forth across the model. As shown in Figure 12-19, this second section plane has no effect on the "stair" group.
Use the View menu to show or hide section planes and section cuts in your SketchUp modeling window. (See the note on Rotating a Section Plane for the definition of section planes and section cuts.) For example, if you want to show a section cut without the section plane apparatus, go to View → Section Plane to deselect the Section Plane option in the menu. The result looks like Figure 12-20. When you have the look you want, you can save the settings in a scene. Open the Scenes window (Window → Scenes), and make sure that under "Properties to save" the Active Section Planes option is turned on. Click the Add Scene button and you're done.
Keep in mind that you're saving the visibility or invisibility of the section plane and section cut in that scene. You're not saving the position of the plane. If you move a plane after you've saved a scene, your scene won't look like it did when you saved it.
The easiest way to create a second section plane inside of a group is to duplicate the first one. Select the section plane; then, using the Move (M) tool, press the Ctrl (Option) key. That puts the Move tool in copy mode. When you move the cursor, you see the small Section Plane icon. Click a new position, and SketchUp creates the second section plane, as shown in Figure 12-21.
Within a group, only one section plane can be active at a time, which also means only one section cut is visible. To make a section plane active, right-click the plane, or better yet the plane handles; then choose Active Cut from the shortcut menu.
So if only one section plane can be active at a time, why would you want to have two planes within a group? As far as scenes are concerned, section planes are static objects, like your model. When you save a scene with the Active Section Planes property turned on, SketchUp remembers which section plane is active. So if you want one scene to show the house with a section cut at a 45-degree angle and another scene to show a section cut that's perpendicular to the front wall, you need to have two section planes inside of the house group. Before saving the scene, make sure the correct section plane is active.