As with any page layout program, working inside of LayOut is a matter of adding and arranging words and graphics on pages. The main difference between LayOut and programs like InDesign or Publisher is the ease with which you can work with SketchUp models. After inserting your model, LayOut's text tools give you everything you need to create callouts, captions, and large blocks of text. You can create new 2-D graphics using the drawing tools on the LayOut toolbar. You fine-tune the entities on the pages using the tray settings. The next few sections describe how to work with LayOut's layers and pages and how to add graphics and text to your document. To begin, create a new LayOut document using the following steps:
Start LayOut. In the Getting Started window's New tab, click Titleblock.
A list of Titleblock templates appears under the Titleblock item, as shown in Figure 16-12. All the Titleblock templates are displayed in the Getting Started window.
Click Contemporary.
The Getting Started window displays only the contemporary-style Titleblock templates.
Use the scroll bars to find the Letter Landscape thumbnail, and then double-click it.
The Getting Started window closes, and a copy of the Letter Landscape template opens.
Tip
Below the template thumbnails is a checkbox called "Always Use Selected Template". Turn on this box if you want SketchUp to open the same template every time you start the program.
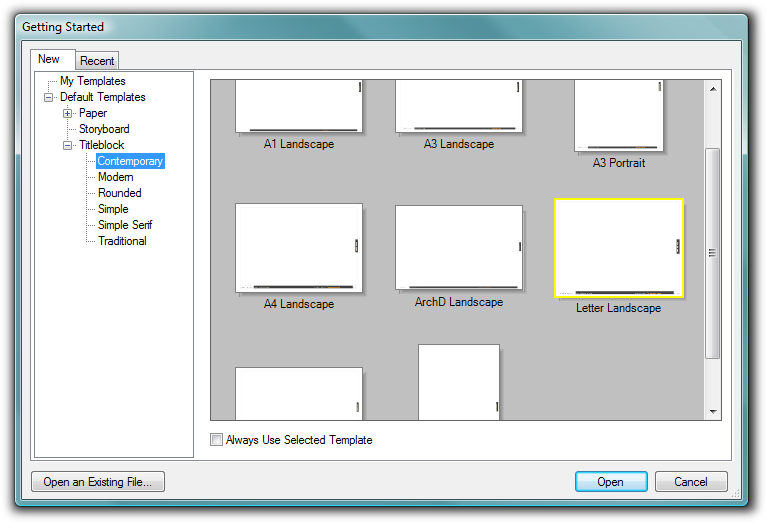
Figure 16-12. Templates are organized by style and type of project; click the names on the left to display template thumbnails in the window. Groups can contain groups, so click the plus and minus buttons to expand and collapse the group contents.
Several of the templates, including the Titleblock Contemporary template, start off with more than one type of page. Use the toolbar page buttons (Figure 16-13) to move back and forth through the pages in your document. You do other page management tasks using the Pages tray, as explained in the next section.
Just like a document in a word processor, LayOut puts words and images on pages. Usually the page size and orientation (portrait or landscape) is determined by the template you choose when you create a new document. Many templates start off with more than one type of page—like a cover page and an inside page. Layout only shows one page at time. You can move from one page to another in a few ways:
On the toolbar, click the Next page and Previous page buttons.
Choose Pages → Next and Pages → Previous.
In the Pages tray, click a page name.
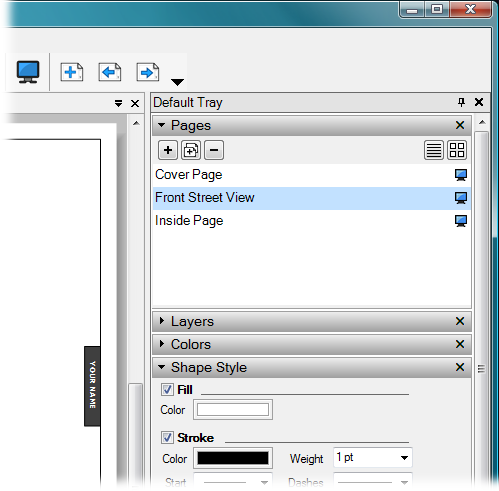
Figure 16-13. On the Pages tray's right side, use the buttons to show page names or page thumbnails. The video screen button to the right of each page name is a toggle that determines whether the page is included in LayOut's PowerPoint-style presentations.
With the document from Manipulating Your Model in LayOut open, follow these steps to display the Pages tray and use some of its settings:
Click the Window menu and make sure a checkmark is next to Pages.
When Pages is selected, the Pages tray is displayed.
If the tray is collapsed, click the bar that says Pages to expand the tray.
The Pages window lists the two pages currently in the document: Cover Page and Inside Page. See Figure 16-13.
Click the Add Page button.
A new page named "SketchUp vs. SketchUp Pro" is added to the list.
Double-click "SketchUp vs. SketchUp Pro" and then type Front Street View.
The page is renamed Front Street View.
Click each of the page names in the Pages tray, and leave the Cover Page selected.
When you click the page name, LayOut displays the page in the main window. The Cover Page has a different titleblock than Inside Page and Front Street View. The bottom of the Cover Page in the titleblock shows a logo and several text fields.
With the Select tool, double-click the YOUR NAME field and type your name, or if you prefer to remain anonymous, type PHIL BRUNELLESCHI. When you're finished, press Enter (Return).
The name appears in the titleblock. You can't click and move the words or graphics in the Cover Page. They're locked in place, using Layer settings as explained on Organizing Elements with Layers.
In the Pages tray, click Inside Page.
LayOut displays the Inside Page. On the right side is a field that says "YOUR NAME". Changing the text in the Cover Page didn't change the Inside Page.
Double-click YOUR NAME and type a name of your choice. Then in the Pages tray, click Front Street View.
The name appears on both the Inside Page and Front Street View pages, since these pages share content. This sharing is also a function of Layers, as explained on Organizing Elements with Layers.
Choose File → Save, give your file the name first_layout_project, and then click OK.
Your file is saved under the name first_layout_project.layout.
You can reorder your pages using the Pages tray. Just click the page name, and drag it to a new position in the list. If you want to make your document seem complete and official, fill in some of the text fields.
The previous section showed how some entities appear on multiple pages while others appear only on a single page. You also saw that text and graphics can be locked in place. All those LayOut tricks are controlled by the Layers settings. Here are some of the things that Layers can do:
Show and hide entities. Entire layers are displayed or hidden using the visibility toggle, which looks like an eyeball (Figure 16-14). Layers' visibility is unique to each page, so a layer that's hidden on The Missing Manual Series may be visible on What You Can Do with SketchUp. When the eye is grayed out, the layer is hidden.
Prevent content from changing. Lock or unlock the content for a layer using the lock layer toggle (padlock). Layer locking is unique to each page, so a layer that's locked on The Missing Manual Series may be unlocked on What You Can Do with SketchUp.
Display elements on multiple pages. Use the shared layer button to control whether a layer's content is shared across multiple pages.
Organize the stacking order of entities. Drag a layer up or down in the Layers list. The entities in higher layers cover the entities in lower layers. A single page icon indicates the content is limited to a single page.
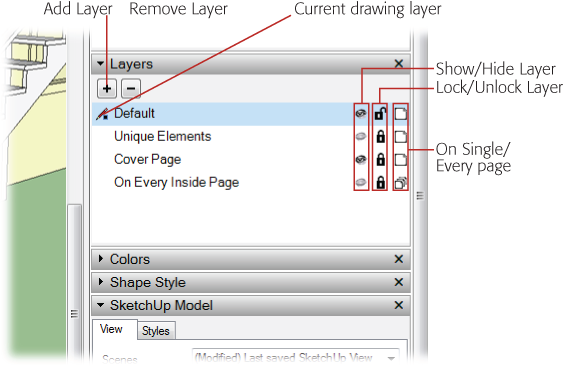
Figure 16-14. The pencil icon appears next to the current drawing layer. You can have only one current drawing layer at a time. When you add graphics and text to a LayOut document, it's important to know which layer is active and what properties are applied to the layer.
You can easily move entities to the current layer by right-clicking (⌘-clicking) the entity and choosing "Move to Current Layer" from the shortcut menu.
The LayOut document you started on Managing LayOut Pages has four layers. The layers' purposes are fairly clear from their names: On Every Inside Page, Cover Page, Unique Elements, and Default. When you first use a template to create a document, the layer selected as the current drawing layer is Default. It's also the only unlocked layer.
If you want to add text or a graphic that appears on every page except the cover page, click the padlock icon on the On Every Inside Page line to unlock the layer, and then click the layer. With the layer active and unlocked, you can add the text or graphics. When you're done, you can protect the shared content by clicking the padlock to lock the layer. You can show or hide the On Every Inside Page text or graphic on a page-by-page basis. This lets you show an entity on most pages without showing it on every page.
Tip
Text created with the Text and Label tools is locked in position when it's in locked layers, but you can edit the actual text by double-clicking it. In this way, you can create changeable text fields like the YOUR NAME field in the exercise on Organizing Elements with Layers.
If there's a single feature that distinguishes LayOut from every other page layout tool, it's the ability to insert 3-D SketchUp models and then manipulate the view from within the document. It's easier to do than you might think, though sometimes it makes the program crash. So before continuing, if you have something worth saving in your document, save it using the File → Save or File → Save As command. You're then ready to follow these steps:
With first_layout_project.layout open, in the Pages tray click Cover Page.
The relatively empty cover page is displayed.
Choose File → Insert.
A file browser window opens, where you can navigate the folders and files on your computer and network.
Find modern_house_layout.skp and then double-click the file name.
LayOut loads the model, creates a graphics box on the layout page, and then displays an image of the model in the box (Figure 16-15). The length of time before an image appears depends on your computer's speed and the model's size. Be patient—with complex models the process can take minutes, not seconds. The graphics box remains selected, and when you hold your cursor over the box, you see the Move cursor.
Drag the box with the model to position it on the page. Drag the blue triangle handles to resize the box.
The box changes position and dimensions. With 2-D graphics, when you change the proportions of an image, the image gets distorted—stretched or squished. That's not the case with SketchUp models in LayOut. Change the box any way you want, and your model still appears well-proportioned in whatever space you give it.
With the box selected, choose Arrange → Center → Vertically on Page, and then choose Arrange → Center → Horizontally on Page.
LayOut centers the model's box vertically and horizontally, which may not be exactly what you want for the cover page. Go ahead and make changes until you're pleased with the page layout.
Choose File → Save.
The changes you've made are saved to first_layout_project.layout.

Figure 16-15. Once a SketchUp model is imported into your LayOut document, you move and resize the image as you would any 2-D graphic. Drag the image handles to change the image's size. Drag the image to move it.
As shown in the exercise, working with the box that holds a graphic is similar to working with a rectangle shape in SketchUp. You drag to change the box's position and shape. You can also use the Measurements box for moves and dimension changes. Just start to move or change the box, and then type a value.
Once you've got a copy of your 3-D model pasted into a LayOut document, you don't need to use the File → Insert command to create additional images for your pages. You can copy and paste the model to create new graphics. Follow these steps to show a different view of the model on a different page:
With first_layout_project.layout open to Cover Page, right-click the model and choose Copy. In the Pages tray, click Inside Page.
The Inside Page appears in the window. It's empty except for the titleblock entities that appear on every page.
Right-click in the center of the page and choose Paste.
LayOut pastes a copy of the model on the Inside Page. Its size and view are identical to the graphic on the cover page.
Use the image handles to make the image fit on about a quarter of the page.
As the box gets smaller, the view of the model shrinks to fit.
Right-click the image and then choose Scenes → "rise and run" from the shortcut menu.
The image changes to a close-up detail of the stairs in parallel line mode. It looks more like a 2-D graphic than a 3-D model.
With the Select tool, move the cursor over the model graphic. Press Ctrl (Control), and then drag a new copy of the model to a new location on the page, as shown in Figure 16-16.
When the move is complete, you have two copies of the model on the Inside Page. As you move objects, you see inference guides to help you with alignment. The Move tool also snaps to horizontal and vertical axes on the page.
Double-click the second image and then drag it.
When you double-click a SketchUp model in LayOut, the Orbit cursor appears, making it easy to change the view. Suddenly the image looks like a 3-D model again, and you can change the view using several standard SketchUp view tools.
With the 3-D model still selected, right-click it and choose Camera Tools → Pan. Then drag to position a new view of the model in the box.
Right-clicking the model gives you access to many SketchUp commands. The Camera tools include the usual suspects: Orbit, Pan, Zoom, Zoom Window, Look Around, and Walk (Looking Around). Lower on the menu are the standard views: Front, Back, Left, and Right.
Right-click the model and choose Perspective. Then right-click again and choose Shadows.
Checkmarks appear in the menu next to the selected options. The Perspective view and Shadows give the model a better 3-D appearance.
Use the view tools to set up a good 3-D view of the stairs.
When you're done, the image may look like Figure 16-17.
Click outside of the model, on the empty white space.
Clicking outside of the model takes you out of 3-D mode and back to the page layout mode. Now if you right-click one of the model graphics, you see a different context menu with options like Cut, Copy, and Paste. You also see the blue handles around the image.
Choose File → Save.
The changes you've made are saved to first_layout_project.layout.
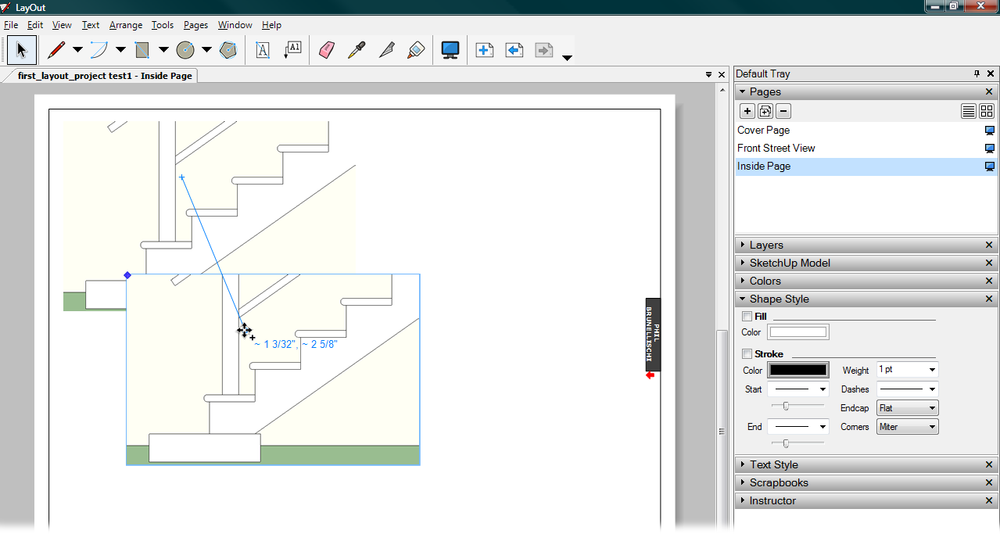
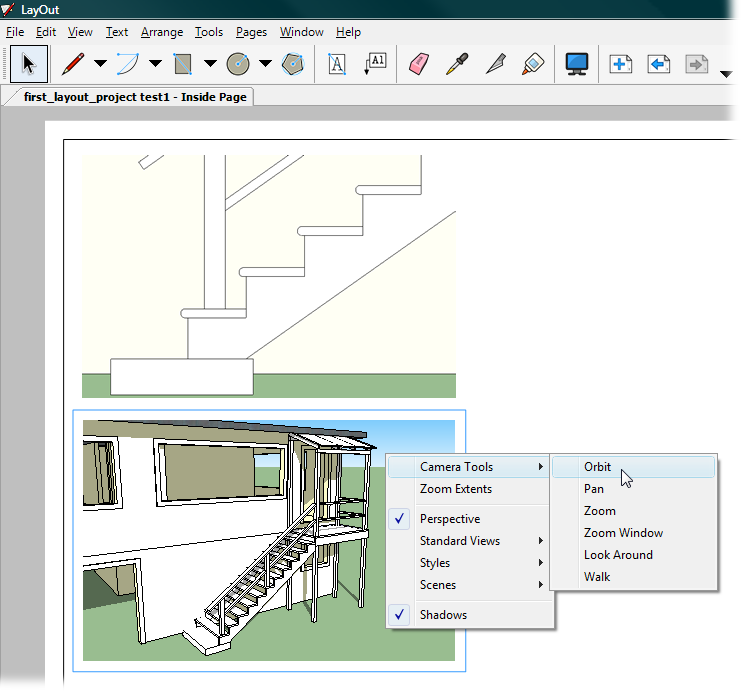
Figure 16-17. Double-click a model graphic to open it for 3-D changes. Then right-click the image to see a menu of 3-D SketchUp style commands, like Camera Tools, Styles, and Scenes.
With your 3-D model in LayOut, you can make changes to its appearance by right-clicking the model and then choosing from the Styles, Scenes, and Shadows menus. For some changes, like altering the angle of the shadow or its intensity, you must go back and edit your model in SketchUp. You can do that by choosing "Open with SketchUp" from the shortcut menu.
If you spend too much time waiting while LayOut renders each incremental change to the 3-D model, go to the SketchUp Model tray and turn off Rendered Auto. With auto mode turned off, you can make changes and when you're ready, click the Render button.
When LayOut inserts a SketchUp model into a page, it doesn't paste a fixed image. Instead, it creates a link from the LayOut document to the SketchUp file stored on your computer or network. That way, if you make changes to that SketchUp file, those changes are shown in the LayOut document, too. If you move or delete or rename the file, LayOut won't be able to link to it. In some cases LayOut may still be able to show an image, but it won't be able to update the model. If the graphics in LayOut become disconnected from the original file, you can use the Document Setup window to fix the problem (Figure 16-18). Go to File → Document Setup, and the Document Setup window opens. At left, click References, and the window displays the references to linked files. These files may be SketchUp models or 2-D graphics from other programs.
Examine the status field to see whether files are Embedded, Current, or Missing. Missing files are listed in red text. If a file is missing, click the Relink button at the bottom. A file browser window opens, where you can hunt down the missing file. Use the Update Reference button to force SketchUp to update the images in the LayOut pages to match the model. SketchUp usually updates images automatically, but sometimes it needs to be prompted. You can also update an image by right-clicking the image in a page and choosing Update from the shortcut menu. Use the Unlink button to break the connection between a SketchUp file and a LayOut image. At that point, the image still appears in LayOut, but it won't show any changes made to the original image outside of LayOut. Click Edit to open the file for editing. If it's a SketchUp model, SketchUp starts up with the file loaded. Use the Purge command to remove unneeded files from the list.
LayOut comes with a respectable set of drawing tools, most of which you can find on the toolbar. If you're familiar with SketchUp's basic drawing tools for lines and 2-D shapes, you'll be comfortable in LayOut. The tools for lines, arcs, and shapes work as they do in SketchUp. You'll even find inferences to help you find center points and align different objects on the page. The main differences between LayOut and SketchUp are that LayOut has no 3-D drawing tools, and the selection tools work differently. A single click selects objects—no need to double- and triple-click.
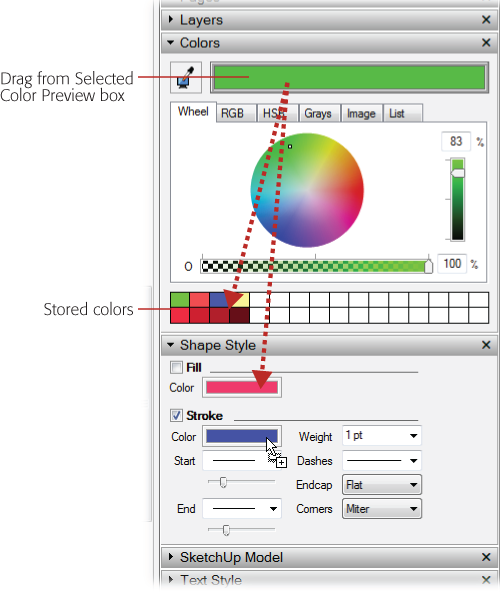
You use the Colors and Shape Style trays to specify colors and the thickness of lines (Figure 16-19). Special options are available to choose line styles and to create arrows, endcaps, and mitered corners.

Figure 16-18. If you need to manage or update the links from LayOut to other files such as SketchUp models or 2-D images, open the Document Setup window (File → Document Setup), and then at left click References. Here the status field shows that one of the files is missing.
In the previous exercise, you created a closeup view of the stairs on Inside Page. The wall color for the model is pale yellow, so the image gets a little lost on the page. In the next few steps, you use LayOut's drawing tools to create a border around the image and to add a drop shadow:
With first_layout_project.layout open to Cover Page, use the Select tool to click the closeup graphic of the stairs.
Blue triangular handles appear on the selected graphic.
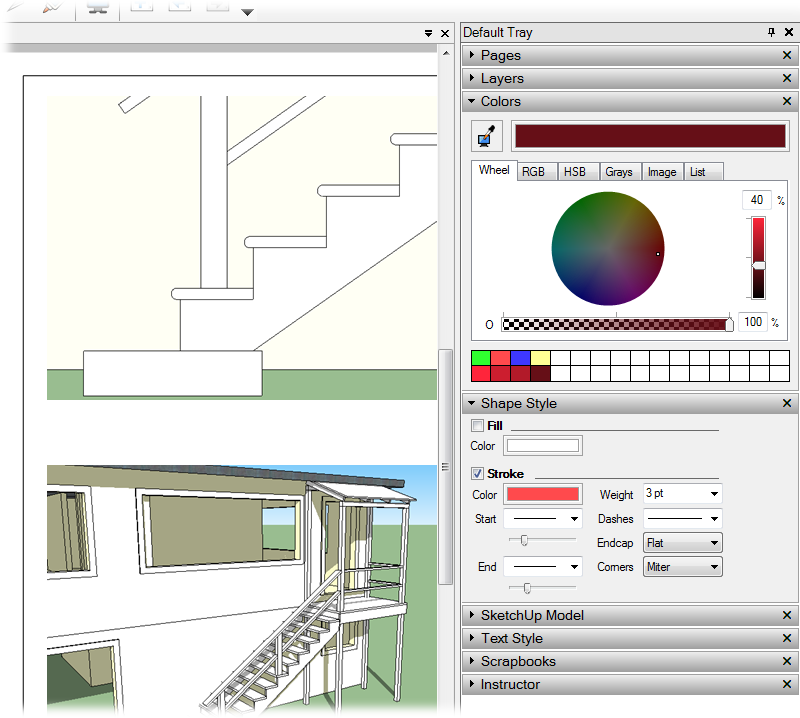
Click the Colors and Shape Style trays to show their contents.
The two trays look like Figure 16-19.
In the Shape Style tray, turn on the Stroke check box.
A stroke appears around the selected graphic. The color and weight of the stroke match the Color and Weight shown below the Stroke checkbox.
In the Colors tray, click the color wheel to select a new color. Then click the color in the Selected Color preview box. Press the mouse button as you drag the color onto the Color box under Stroke.
You can drag selected colors onto color boxes and faces in LayOut pages (Figure 16-20). Think of it as dragging a color chip onto an object to change its hue.
In the toolbar, click the Rectangle tool, and then draw a rectangle over the closeup graphic of the stairs.
LayOut draws the new rectangle over the graphic, hiding the image.
With the Select tool, click to select the rectangle.
Selection handles appear around the rectangle.
In the Shape Style tray, turn on the Fill box, and turn off the Stroke box.
The rectangle has a fill color and no stroke.
In the Colors tray, mix up a solid black, and then drag the transparency slider to 30 percent.
The rectangle becomes semitransparent. You can control the transparency of shapes within LayOut, but unfortunately you can't control the transparency of models and images after inserting them in LayOut.
With the Select tool, drag the rectangle down and to the right of the model image.
Put it in a good position for a drop shadow effect.
Right-click the rectangle and choose Arrange → Send to Back.
The rectangle is placed behind the model graphic. The dark semitransparent box shows on two edges of the image, as shown in Figure 16-21.
Tip
LayOut's Polygon tool is similar to SketchUp's. To set the number of sides for a polygon, select the Polygon tool and type the number of sides, followed by the letter "s". Then draw the polygon. Also, as in SketchUp, you can use the same technique to change the number of sides after a polygon is drawn.
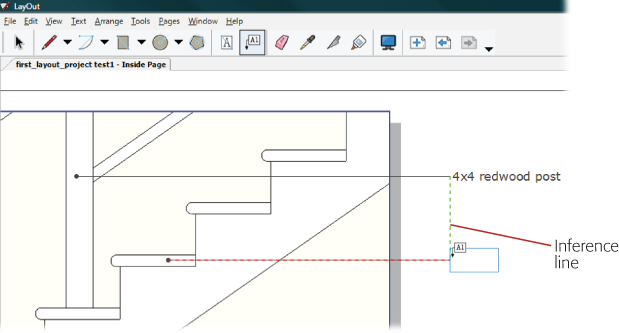
In a couple areas, pages created in LayOut are superior to images printed directly out of SketchUp. Callouts are one of those areas. A callout is a bit of text that draws attention to a particular part of an image, like the words "Inference line" in Figure 16-22. LayOut's Label tool is made specifically to create callouts. In the next few steps, you'll add a few callouts to the closeup image of the stairs:
On the toolbar, click the Label tool.
The Label tool looks like a box with "A1" inside; an arrow points down from the box.
In the Shape Style tray, set the Stroke color to black, the line weight to 0.5 pt, and in the Start drop-down menu, select either an arrow or a circle end point.
LayOut will apply the settings in the Shape Style tray to the graphic you created with the Label tool.
Click the stair post and then move the cursor to the right of the image.
You can use the same click-move-click method in LayOut that you use in SketchUp. Inference lines show up when you move the cursor along the vertical or horizontal axes.
Click in the page's white space, and then type 4 x 4 redwood post.
Your callout points to the stair post, and the text identifies it as a redwood 4 x 4.
With the Label tool, click one of the stair treads, and move the cursor to the right until you see an inference line extending from the first callout, as shown in Figure 16-22.
As you work in LayOut, keep looking for inferences that help you align text and graphics. They're tremendous timesavers.
When you see an inference line from the first callout, click; then type 1-inch bullnose tread.
The callout for the stair tread is perfectly aligned with the callout for the redwood post.

The Label tool works well for callouts. Use the Text tool to create blocks of text. Click the Text tool button, and your cursor changes to a pencil. Use the pencil to drag a box on the page. Press Enter (Return), and your cursor is placed in the box so you can type some text. You can move and modify the box containing text just as you would any rectangle.
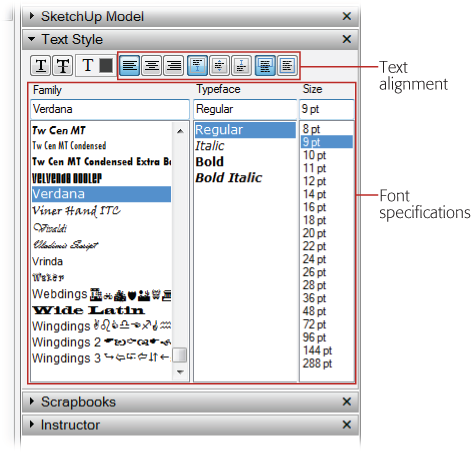
To format text created by either tool, double-click the text to open it for editing. Then drag to select the text you want to format. Open the Text Style tray, and you find tools to specify a typeface, font size, and alignment options (Figure 16-23).
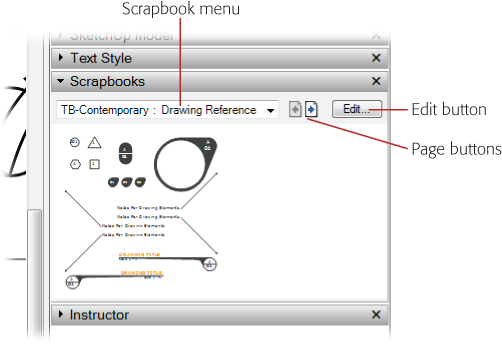
The Scrapbooks tray offers pages and pages full of artwork (Figure 16-24). The drop-down menu at the top lists pages devoted to arrows, cars, people, and architects' drawing reference symbols. Want to use any of the graphics in a scrapbook? Just click an image and then click a layout page. If you want to add multiple copies of an item, just keep clicking. The idea behind scrapbooks is to keep the images that you want to use over and over close at hand.
The scrapbooks have a pretty comprehensive set of graphics for architects, but it's easy for you to create your own scrapbook pages. Scrapbooks are really just .layout documents. To create your own scrapbook, just collect the images you want to save on one or more pages in a LayOut document, and then save it using the File → Save As Scrapbook command. A dialog box opens where you can name and save your scrapbook.