How to Bake your Wedding Cake
Preparation
Preparation is the key to remaining stress-free when you are baking your wedding cake. You don’t want to be whirling around the kitchen like a dervish only to find that you have forgotten to buy a vital ingredient. So make yourself a checklist of everything that you will need, both ingredients and equipment, and check it all off before you start baking.
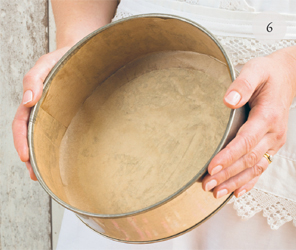
Before you start baking you also need to prepare the cake tins. Each tin will need to be greased and lined with baking paper, to make sure that the cake will come out cleanly.
Grease and line the cake tin

- Use a very small amount of butter to grease the base and sides of the tin (if you add too thick a layer it will cook into the cake and create a greasy film on the outside).

- Place the cake tin on top of a piece of baking paper and draw around the circumference (or sides, if it’s a square tin). Cut out this shape.

- The width of the strip of baking paper that you need will depend on the cake you are baking. If you are baking one layer of the cake at a time the strip will need to be 6 cm (2½ inches) wide; however, if you are baking each tier as one large cake then the strip should be 9 cm (3½ inches) wide. The length of the strip should be the circumference of the cake tin plus a 2 cm (¾ inch) overlap. Make a fold along the length of the strip 2 cm (¾ inch) up from the bottom of the strip.
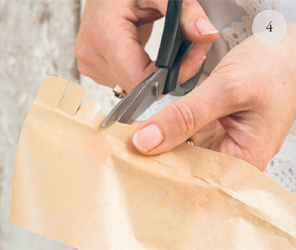
- Make a series of cuts from the bottom edge of the strip up to the fold approximately 1 cm (3/8 inch) apart.
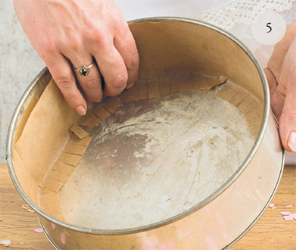
- Place the strip in the cake tin with the fold running around the edge of the tin and the fringing on the cake base. The butter should make it stick: if you find that the overlapping pieces aren’t sticking, smear a little butter on the back of the overlap so that it sits flush to the tin.
- Then place the baking paper circle (or square) into the base of the tin.
Prepare the ingredients
Before I start to bake I weigh out all my ingredients into smaller bowls, to save time and mess (just the ingredients for the actual cake, as you will make the icing or frosting at a later time).
Dried fruit: to make the most delicious fruit cake possible you should prepare dried fruits the day before you bake. Mix all the fruits required in a heatproof bowl and pour boiling water over them. Leave to soak for 10–15 minutes: this allows the fruit to really plump up so that it will absorb any added flavouring more easily. After the allotted time, pour the contents of the bowl into a large sieve or colander to drain as much water as possible. If you don’t have a suitable piece of equipment for doing this you can use a clean chopping board held flush to the top of the bowl and then move it slightly to make a small gap to allow the water to exit but none of the fruit. Put the fruit back into the bowl and add the alcohol (or fruit juice if you prefer). If you’ve forgotten to do this step the day before, don’t panic: just soak the fruit in boiling water as described above and drain thoroughly. You need to cool the fruit down or it will melt the batter. If you are cooking a large fruit cake (or three cakes) then this may take some time. You can speed up the process by spreading the fruit onto large baking trays and drizzle the alcohol or juice over it all. Add the fruit to the mixture when it is thoroughly cooled.
Butter: needs to be at room temperature. This is the conventional way to describe it, although obviously if you live in the tropics with no air conditioning then your room temperature is going to be very different to somebody baking in wintery Europe. What this well-worn phrase means is that the butter should be soft enough to beat easily. If you put the butter in a bowl and find that you are having to stab at it to break it into small pieces, it is too cold. Imagine a packet of cream cheese straight from the fridge: that is the consistency you want. If you have forgotten to take the butter out of the refrigerator then you can warm it through slightly in the microwave, but keep a beady eye on it and be very careful that it doesn’t melt. If the butter is melted instead of at room temperature it will affect the texture of the cake, which can become dense and doughy.

Flour: weigh the flour into a bowl, one that leaves enough space to give it a good whisk. Add any spices, salt or raising agents and then whisk it with a fork or a hand whisk to incorporate air and break up any lumps. If you have really lumpy flour then you may need to sift it (picture 1).
Cocoa: in my experience most cocoa powders can contain hard lumps, so sift it first.

Eggs: should also be at room temperature. If you keep your eggs in the refrigerator then take them out at least an hour before you need them. If you forget to do this, fill a bowl with warm water (not hot, as you don’t want boiled eggs) and leave the eggs in the water for about 5 minutes. I break all my eggs into a separate bowl first and whisk them together: this makes it easier to incorporate them into the cake mixture in a controlled manner (picture 2).
Every time you handle eggs you should wash your hands (think about where they came from) so by cracking them all at once you are saved from making multiple bathroom trips!
To separate eggs, I crack the egg in two then hold the egg yolk in one shell while the egg white pours out into the bowl; you may have to swap the yolk into the other side of the shell to separate all of the white. Some people pour the egg into the palm of their hand and let the white trickle through their fingers while they keep hold of the yolk. If you have a technique that works for you, stick with it.
Flavouring: if the cake mixture includes flavourings such as apple purée or caramel, make these in advance to give them time to cool down. If you add something warm to a batter it will melt the mixture and create a disappointing texture. The same principle applies to melted chocolate, although you will need to use this before it starts to set. If you are making your own flavourings such as elderflower syrup or lavender sugar then make them a month or so in advance to give time to allow the flavours to develop.
Let’s get baking
It’s time to bake. You may be baking together as a couple; perhaps one of you has taken on the mantle of ‘baker’; or maybe you are hosting a ‘bake my wedding cake’ party, in which case don’t drink too much champagne before it goes in the oven. Your mood can really affect your baking, so I always play lively music while I’m baking and switch to a more chilled style when I’m decorating and need to concentrate. A happy heart makes a happy cake.
Each recipe in this book includes a method, but do spend some time reading through these more general tips before you begin. As I mentioned previously, I married some time ago, and my fabulous husband Paul is something of a genius at writing. I frequently ask him to edit my recipes, blog posts, press releases—in fact, anything that the public will see—to make sure I haven’t embarrassed myself with poor choice of words. One of the first recipes he edited for me used the term ‘cream together the butter and sugar’. He is not a baker and was very puzzled as to what this actually meant. ‘It just means beat them until they look creamy, everybody knows that!’ I expounded. He patiently explained to me that as a complete novice baker he absolutely couldn’t make sense of it, and so I started to consider the baking terms that I unthinkingly throw around, that are not actually very explanatory. So I will attempt to make these terms more understandable.
Preheat the oven: this is pretty much self-explanatory. Before you start mixing the batter, set the oven to the correct temperature to ensure that by the time you put the cake in, it will have reached the precise temperature required. If you put a cake in a cold oven, it will not bake evenly all the way through and may sink in the middle.

Cream together the butter and sugar: weigh out the butter and sugar and put them in a bowl that is large enough to let you beat them properly (if using citrus fruit, add the zest at this stage as well). Then use an electric whisk to start beating them together. You need to move the whisk around the bowl, making sure that it reaches the bottom and the side of the bowl, so that every little bit is incorporated into the mixture. If you are using a hand whisk you will probably need to beat the mixture for about 10 minutes to ensure it reaches the desired consistency. If you are going old school and using a wooden spoon it may take even longer (picture 3). When you start beating, the mixture will be quite firm and—depending on the type of butter you use—probably tinged yellow. As you beat the mixture, it will become fluffier and paler until it is practically white (picture 4), then it has been creamed!

If you find that your bowl is slip-sliding away, get more purchase by putting a tablecloth underneath while you beat.

Add the eggs: as mentioned previously, you should crack all the eggs into a bowl and beat them together (a fork is sufficient for this). While you are still beating the creamed butter and sugar with one hand, use the other to gradually pour in the eggs in a steady (but fine) trickle. Of course it is much easier if you have a pal to pour while you beat and hold the bowl still (picture 5).
If the mixture separates or curdles: sometimes when you add the eggs into a cake mixture the different elements don’t come together quite in the manner you intend, and they can curdle. You will see the butter forming tiny clumps with the egg as a barrier around them. Don’t panic! It really isn’t the end of the world: your cake will still cook and be delicious. The best tip I can give you if this happens is to add a small amount of the flour (another reason why it’s good to have it already weighed out) as this will encourage all the ingredients to blend together.

Fold in the flour: when you get to this stage lay aside the whisk or wooden spoon and take up a large metal spoon (at least tablespoon size) or a plastic spatula. Add a small amount of the flour and slide the implement of choice about a third of the way down between the side of the bowl and the mixture then bring the spoon up and over, folding the mixture into itself; repeat this process until all the flour has been incorporated (picture 6). This helps retain the air incorporated into the flour when whisking it and creates a lighter cake. This technique can be used for anything that is folded in, such as dried fruit purée, caramel or egg whites. You can also use a figure-of-eight movement.

Ribbon stage: this is a term used usually when whisking egg yolks (or whole eggs) together with sugar. The mixture should triple in size and become very pale and fluffy. After 10 minutes it should have reached the ‘ribbon stage’: if you lift the beaters out of the bowl, a thick ribbon of the mixture should form which should take 3–4 seconds to disappear back into the batter (picture 7).

Stiff peaks: this a term used when beating egg whites and meringue. After greatly increasing in volume, the egg whites pass through the soft peak stage, where the peak flops over when you lift the beater, to stiff peaks (picture 8): the mixture should be glossy and white, and when you lift the beaters out of the bowl a peak should form that does not flop over. The traditional way to test if you have reached the correct stage is to hold the bowl of meringue upside-down over your head: if your head remains egg-free then it’s ready!
Caramelise the sugar: it is really important when you are making caramel, or any sugar syrup, not to stir the mixture in the pan. You can give it one or two stirs at the most, but I prefer to swirl the pan a little. Stirring creates sugar crystals and if you find that instead of a beautiful rich, luscious caramel you have a pan of white powder this is what has happened. There is no coming back from this, you just have to throw it away, wash the pan and start again.

Put the cake batter into the tins: if you are mixing three layers of a cake at the same time then you need to ensure the batter is evenly distributed among the tins. If one tin is fuller than another it will take longer to cook and the thinner cake may burn. If you are very precise, weigh the tins to make sure exactly the same amount goes into each. I am not a very precise person, so I tend to count out spoonfuls (picture 9). You will be trimming each layer before you stack them, so a little discrepancy isn’t a problem.
As soon as the tins are filled put the cakes into the oven. The raising agents start to work immediately after mixing: if you leave an uncooked cake sitting out for too long it will not rise when baked. This is why you preheat the oven.

Test to see if the cake is ready with a cake tester: a cake tester (or skewer) should be inserted into the very middle of the cake because this is the part of the cake which cooks last. When you pull it out, it should be totally clean (picture 10). Sometimes you may find small particles that will look like cake crumbs, because they are cake crumbs! This is okay and also means that the cake is baked. If the tester is covered in cake batter, quickly close the oven door and wait for another 5–10 minutes before trying again. When a cake is ready the top should be a lovely golden-brown colour, although with chocolate or ginger cakes, for example, it is hard to tell by colour if the cake is cooked. If you lightly press a couple of fingers on to the top of the cake it should feel firm but springy, if you feel any wobble the cake isn’t ready yet.
Leave the cake in the tin for 10 minutes: once the cake is cooked and out of the oven, leave it in the baking tin for 10 minutes. This gives the cake a little bit of time to settle so it won’t crumble when you turn it out.
Turn the cake out: the best way to do this is to put a wire cooling rack upside down on top of the tin and then, with the tin and rack held firmly together in both hands, flip it upside down. Wear oven gloves while you do this. If you find that the strip of baking paper is deeper than the cake you may have to quickly whip it off at this point, to prevent the cake breaking into pieces. Now carefully turn the cake over so that it cools the right way up. You can place a second wire rack (if you have one) on the bottom of the cake and flip the cake over: this will prevent it cracking as it cools. When completely cooled, remove any baking paper, wrap in plastic wrap and store in an airtight container.
General methods
Making modelling paste
Sprinkle gum tragacanth (CMC or Tylose) onto the work surface and knead it into ready-to-roll fondant. Knead well for 10 minutes, form the fondant into a ball, then cover it with a couple of layers of plastic wrap and set it aside overnight. (If using CMC or Tylose the paste will be ready to use immediately.) You can make the modelling paste in advance and keep it in a freezer until needed: just take it out a few hours before you need it to let it thaw.
Making royal icing
Mix the icing sugar and meri-white powder together, then slowly add the water and whisk vigorously. When the icing has become a thick paste, stop adding any more water. If you feel the icing is too thin you can add some more icing sugar.
Caramelising sugar
Put the sugar into a saucepan that has high sides and a thick base. Put the saucepan over low to medium heat until the sugar has dissolved. DO NOT STIR! If you stir it the syrup will crystallise and you’ll have to throw it away. The sugar will start to caramelise around the edge of the pan first. You can very gently pull the caramelised sugar into the centre of the pan or swirl the pan to make sure the sugar doesn’t burn. The sugar will turn a rich red–brown colour.
Making caramel

- Caramelise the sugar using the method above.

- When all the sugar has dissolved, take the pan off the heat and add the butter (if using it). You may find it bubbles up a bit so be careful. Then carefully add the cream.

- Stir the cream into the caramelised sugar. You may find that the caramel contains big lumps of toffee: if so, simply return the pan to the heat and stir until smooth.

- Add the salt (if using) and stir well, leaving the caramel to cool in a heatproof bowl. The caramel can be made up to two weeks in advance and kept in the refrigerator.
Making Swiss meringue buttercream
- Fill a saucepan one-third full of water and bring it to the boil, then turn the heat down so that the water is gently simmering. Place a heatproof bowl onto the saucepan so that it catches on the sides—it should be just bigger than the pan so that it sits snugly on top—and anything you add to it will be heated by the steam below. Make sure that the bottom of the bowl doesn’t touch the water.
- Put the egg whites and the sugar into the bowl. Stir the mix until all the sugar has dissolved: when this has occurred you should be able to rub a little of the egg white in between your thumb and fingers and not feel any grittiness from the sugar. Take the bowl off the saucepan and transfer the mixture to the bowl of a standing electric mixer (if using one). Using the fastest setting, beat the mixture for around 10 minutes, until it has reached the see stiff peak stage.
- Add the butter one piece at a time and beat it in well. Don’t worry if at some stage the mixture starts to look curdled; keep beating and the butter will incorporate into the meringue. Once all the butter has been added, beat for another few minutes.
Making ganache
- Put the chocolate in a large heatproof bowl. If you are not using buttons or drops then make sure to chop the chocolate into very, very small pieces.

- Put the cream into a saucepan and bring it to the boil. Pour it over the chocolate.
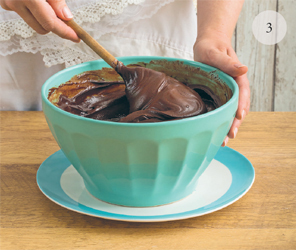
- Use a wooden spoon to beat the mixture together until the chocolate has melted and the two ingredients have combined together to create a beautiful glossy ganache.
Making sugar syrup
- Put the sugar and water in a saucepan over medium heat. Don’t stir, just give the pan a swirl.
- When all the sugar has dissolved, turn up the heat and bring the syrup to the boil.
- Once the syrup is boiling, take the saucepan off the heat and add any citrus zest (if using). You will need to use the syrup while it is still warm, but you can make it in advance and gently reheat it when layering the cakes.