Decorating the cakes
PREP: making modelling paste, 10 minutes plus 12 hours resting; making flowers, 10 hours; royal icing, 10 minutes; placing flowers, 1 hour
Equipment
rolling pin
cornflour (cornstarch)
2.5 cm (1 inch) and 1.7 cm (¾ inch) wide leaf cutters (preferably with veiners)
paintbrush or cocktail stick (toothpick)
800 g (1 lb 12 oz) modelling paste: use ready-made or see below for recipe
dusky pink and soft green food colouring
Modelling paste
800 g (1 lb 12 oz) fondant icing
3½ teaspoons gum tragacanth
Royal icing
PREP: 10 minutes
100 g (3½ oz) icing (confectioners’) sugar
3 g (1/8 oz) meri-white powder
10–15 ml (3/8–½ fl oz) water
- Make the modelling paste using the method described here.
- You will need 50 ml (1¾ oz) of edible glue (see here) or royal icing (see here).
- If you have a PVC tablecloth then this is ideal to work on. If you don’t have one, and find that the petals are sticking to the work surface or your fingers, then place a sheet of plastic wrap underneath and above the petals as you are forming the shapes.
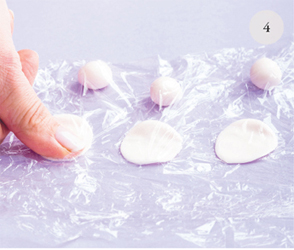
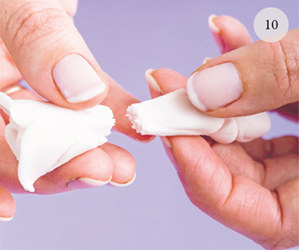
- Roll 6 hazelnut-size balls of modelling paste. Press down on one side of the ball with the pad of your thumb or finger (be careful not to mark the petal with your fingernail) to thin this out. You need to thin out around three quarters of the ball and the edge of the petal that you are pressing on should be as thin as you can make it.
- Repeat the thinning process with the other 5 balls.
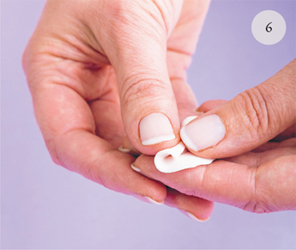
- Pick up one petal and hold it with the thin edge pointing upwards. With your thumb, curl one side of the petal in on itself, and then keep curling to create the centre of the rose.
- Take a second petal, again with the thin edge upwards. Wrap it around the first petal, with the midpoint of this new petal aligned with the lowest point in the centre piece. Pinch the top of the second petal between your thumb and forefinger and turn the edge of it outward slightly.
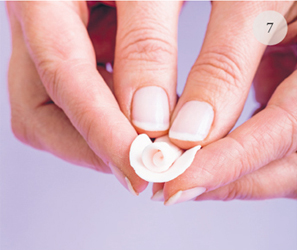
- Add the third petal on the opposite side of the centre to the second. Shape the petal edge in the same manner. Note that, from this point on, each petal that you add should sit a little higher than the petals it surrounds, so that you can curl each successive petal outward slightly more, so that the rose bloom grows outward rather than upward.
- Add the fourth petal with the centre at the join between the previous two petals. Add the fifth petal so that it slightly overlaps the back of the fourth. Repeat this process with the final petal, so that the sixth overlaps the fifth.
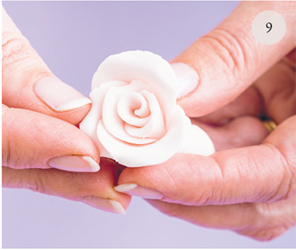
- Carefully pinch off the excess fondant at the base of the bloom.
- Leave the rose sitting upright to dry.
- Create different sized roses by using fewer or adding more petals. You can choose the number of flowers to add to each cupcake, depending on how long you wish to spend making the roses. I would add one large flower to each cupcake or two smaller roses; however, you may wish to leave some cakes empty or add two or three flowers to each.
To create a coloured rose
- Separate out 250 g (9 oz) of the modelling paste. Colour 50 g (1¾ oz) in a dark tone, 80 g (2¾ oz) in a medium tone and 120 g (4¼ oz) in a light tone of the colour you have chosen (I have used a dusky pink colour).
- Make the rose in the same manner as above using the darkest tone in the centre of the rose, the medium tone for the middle petals and the lightest tone for the outer petals.
To create the leaves
- Divide 100 g (3½ oz) of the modelling paste into thirds and colour each third a different tone of soft green.
- Roll the coloured paste out to 1 mm (1/32 inch) thick.
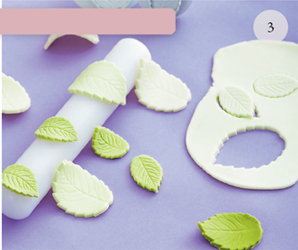
- Cut out the leaves using the leaf cutter and press with the veiner. Set the leaves aside to dry either with the tip propped up slightly or after curling them over a small rolling pin (or an alternative item with a similar shape). Curl some face up and some face down. You will need at least two but preferably three leaves for each rose (the total number will depend on how many roses you wish to make). Make about half of the leaves of each shade of green in the small size and half in the large size.
If you are not using the flowers and leaves immediately, store them in a cardboard box.
Decorate the cupcakes
Add the roses and leaves to the cakes once they have been frosted, but before the icing firms up. Attach the leaves to the roses with a small dab of royal icing (use a paintbrush or cocktail stick) or a little edible glue.
Transporting
You can buy boxes for transporting cupcakes from specialty sugarcraft shops. Or you can use the tins you baked them in, as this will prevent any from toppling over.
Setting up
You can purchase or hire special tiered cake stands for displaying cupcakes, or you can display them on conventional cake stands. Alternatively, you can create a beautiful display on a table top.
