Apple has continued to update their operating systems to work better in heterogeneous environments over the past decade. In this chapter, we are going to explore the various ways that a Mac or iOS device can integrate seamlessly into a corporate network that is based primarily on technologies from Microsoft Corp. Apple provides a number of built-in solutions that help with this multi-platform integration, but there are some third-party solutions available that go even further. In this chapter, we will discuss several of the built-in solutions and related strategies to support Apple products on a corporate network with minimal reconfiguration or cost.
Introduction to Apple-Microsoft Integration
Over the last several iterations of macOS and macOS Server, Apple has chosen to demote or completely remove first-party services in favor of industry standard solutions. For example, for decades AppleTalk was the standard networking protocol for the Mac. Apple File Protocol (AFP) was the file sharing standard in the Mac operating system. However, more recently Server Message Block (SMB) file sharing has taken over as the default file sharing protocol in macOS. AFP still exists, but it has been demoted to a solution that you can use if you need it, but the preference is to use the same file sharing solution as Linux and Windows clients do.
Server Message Block (SMB) is a protocol for sharing data over the network. Microsoft adopted this protocol in Windows 95. Linux and macOS clients use an SMB-compatible solution called Samba to access SMB-shared resources.
Beyond adopting SMB file sharing in macOS instead of Apple File Protocol, we can see the continued demotion of Open Directory in favor of Active Directory and the removal of a DHCP server, mail, messaging, and CalDAV server solutions in macOS Server. Many of these services have been replaced with cloud-hosted versions like iCloud, Office 365 (O365), and Google Docs. This actually works to our favor as Mac system administrators, because we can more easily integrate Apple devices into existing systems instead of having to stand up special Apple-only technologies or implementing complex and expensive middleware.
My Microsoft Environment
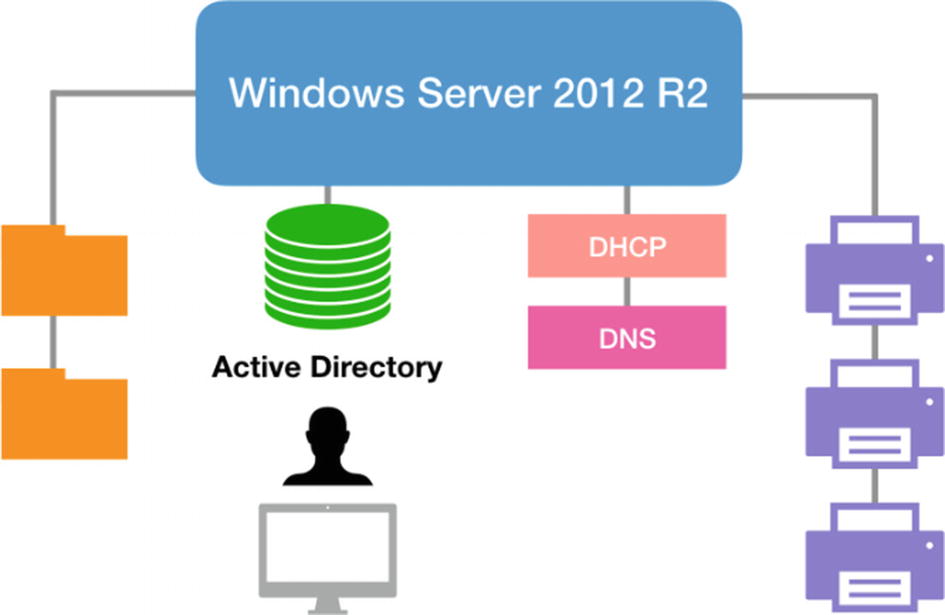
My Microsoft Network, services, printers, and shares
Microsoft Active Directory : On premises Windows domain named MyCompany.local. I have several organizational units (OUs) by location with a minimal Group Policy applied for the purposes of this demonstration.
User Accounts and Group Membership: I have several user accounts and a couple of groups to control access to various network file shares and printers. Each user authenticates to their PC with their domain account.
Group Policy: For the purpose of this demonstration, I have an OU with a basic Group Policy (GPO) applied that controls the default home page in my Internet Explorer (IE) browser.
DNS: I am running DNS server on my Windows server providing DNS to my network of PCs.
DHCP Server: I’m running Microsoft’s DHCP server and providing DNS to my network of PCs via this service.
File Sharing: I’m running file sharing services on my Windows server to share out a couple of network drives where PC users share files with each other.
Print Sharing: I’m running printer sharing services on my Windows server to share out workgroup printers to various users in the office.
In addition to the on premises solution, we also run Microsoft Office 365, and users have access to OneDrive and Microsoft Exchange in the cloud. Our email is delivered via Exchange on O365.
Now that we have our Microsoft environment defined, we need to plan our Apple platform integration and determine which services our Mac and iOS users will require.
Microsoft Services Required for Apple Users
The ability to sign in on his Mac both in the office and remotely
Access to shared files in the main corporate office server
The ability to print to the shared HP LaserJet printer in his office
Access to Exchange email
Access to Microsoft OneDrive
The Microsoft Office suite (including Microsoft Outlook) natively on his Mac
Default access to the company Intranet when he opens Safari
Migration of his existing Internet Explorer Favorites, Outlook Personal Folders, and data from his old Windows laptop
Access to Microsoft OneDrive
Access to his Exchange email
Contacts from his Exchange account available in the Phone app
Access to open and edit Word and Excel documents on the iPhone
Access to Microsoft Excel on the iPad
Access to shared files in the main corporate office server
Throughout this chapter, we will use these three scenarios to integrate an iPad running iPadOS, an iPhone, and a Mac into our existing corporate network.
Active Directory Integration for macOS
In this first section, we are going to focus on Active Directory authentication for macOS clients. Before getting started on this exercise, you should have a Mac with a clean OS install and a local Administrator account configured. Using the Sharing System Preference , go ahead and name this new Mac 101-2019MBP, which identifies it as a 2019 MacBook Pro in our main office 101. Open the Terminal and set the Local Hostname and hostname to match. For Active Directory integration to work properly, we need all three of the Mac’s names to be the same.
You probably have some kind of corporate naming convention at your organization. While Apple devices will attempt to name themselves after the first user account that is created on the machine, you will want to name your Macs in the same fashion that you name your Windows PCs.
Our Mac is now ready to be joined to the MyCompany domain. Let’s switch over to our Domain Controller and open Active Directory Users and Computers to get started.
As a best practice, I prefer to create records for my macOS clients in Active Directory prior to adding them to the domain. This serves a couple of purposes in that it guards against the Mac joining into the wrong OU and proactively avoids any odd errors where a Mac client is unable to write a new computer record in AD when it joins to the domain. In this exercise, we are going to prepare a place in Active Directory for our new MacBook Pro.
- 1.
Open Active Directory Users and Computers. As shown in Figure 11-2, I have an OU called Main Office Computers. Inside that OU, I have a Windows 10 PCs OU that houses the computer records for all of my Windows PCs in the main office. This is also where I apply specific Windows 10 GPOs for the main office computers. Create a new OU here for our Macs and name it macOS PCs.
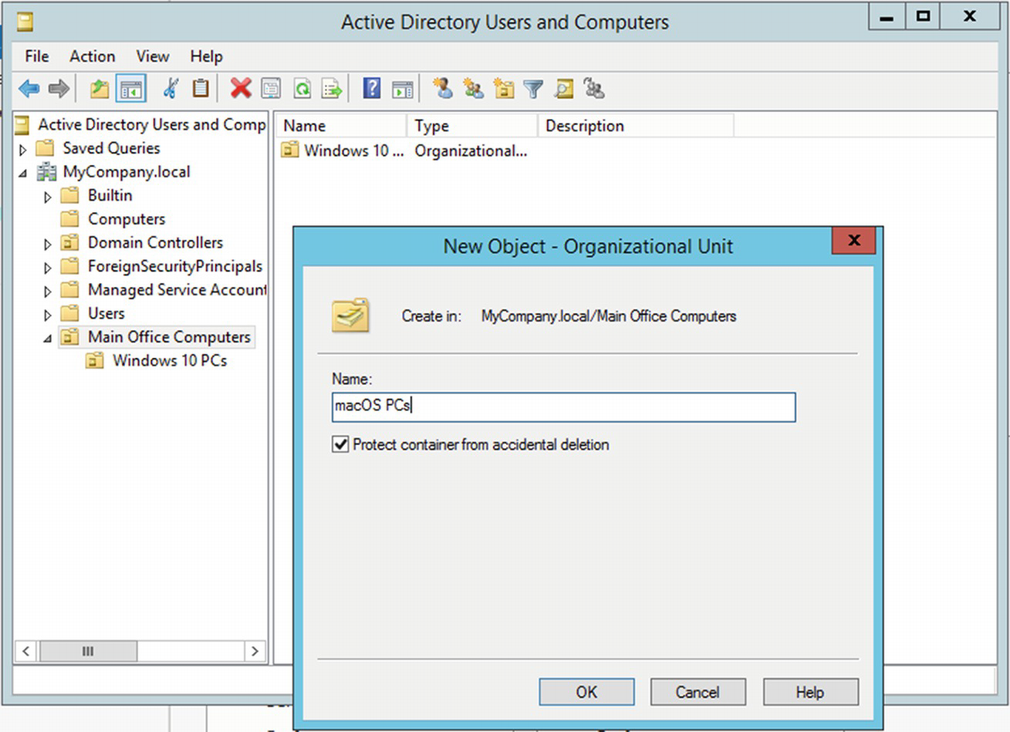
Creating the macOS PCs organizational unit
- 2.
Now that we have our OU created, we can populate it with computer records for our Macs. With the macOS PCs OU selected, right-click anywhere in the right-side panel and choose New ➤ Computer and name it 101-2019MBP as shown in Figure 11-3. Click OK to create the record.
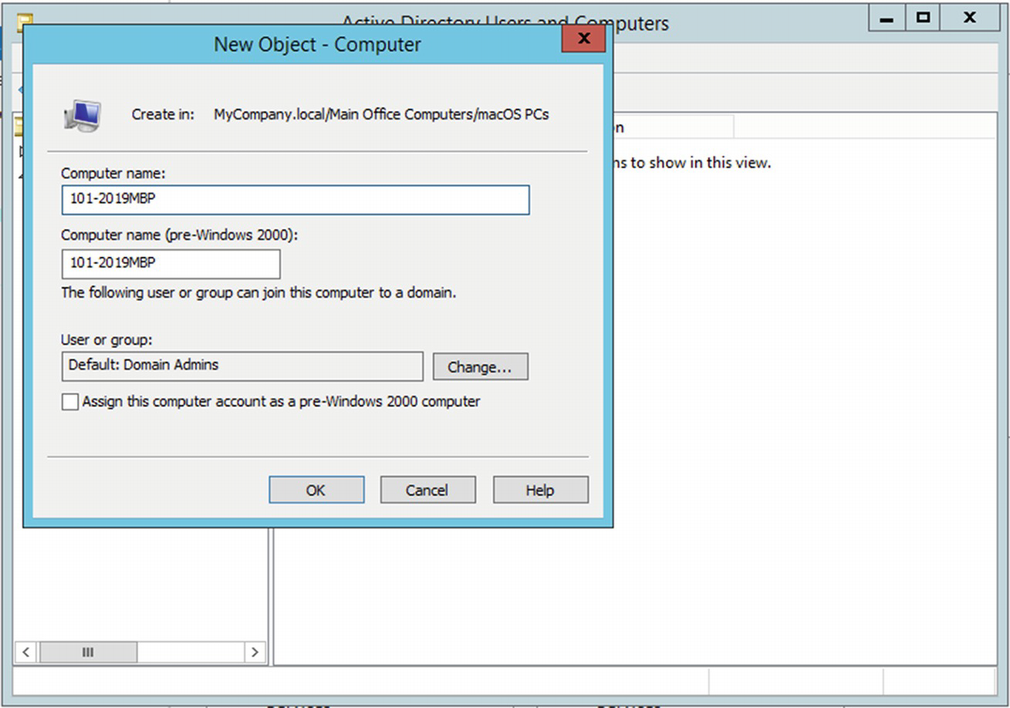
Add a new computer record in Active Directory
Now that we have created a record for our Mac client, we are ready to add it to the domain. Switch back to your MacBook Pro and open the Users & Groups System Preference to continue.
- 1.
From the Users & Groups System Preference, click the padlock to authenticate as the local Administrator account and then click the Login Options button. Your dialog box should look similar to Figure 11-4.
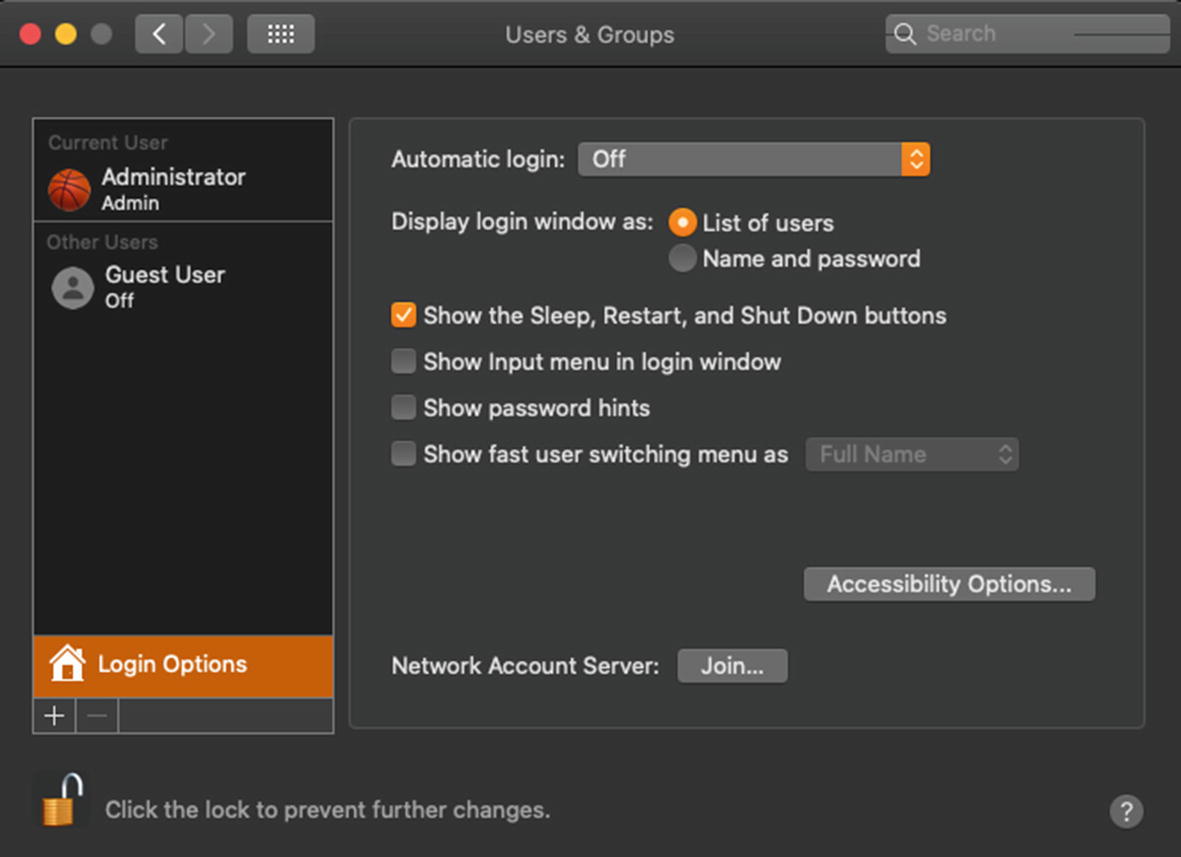
The Login Options pane in the Users & Groups System Preference
- 2.
Click the Join… button next to the Network Account Server prompt.
- 3.
Here we are going to enter the domain name of our AD domain. I will enter MyCompany.local as shown in Figure 11-5, and it will begin to search for the domain.
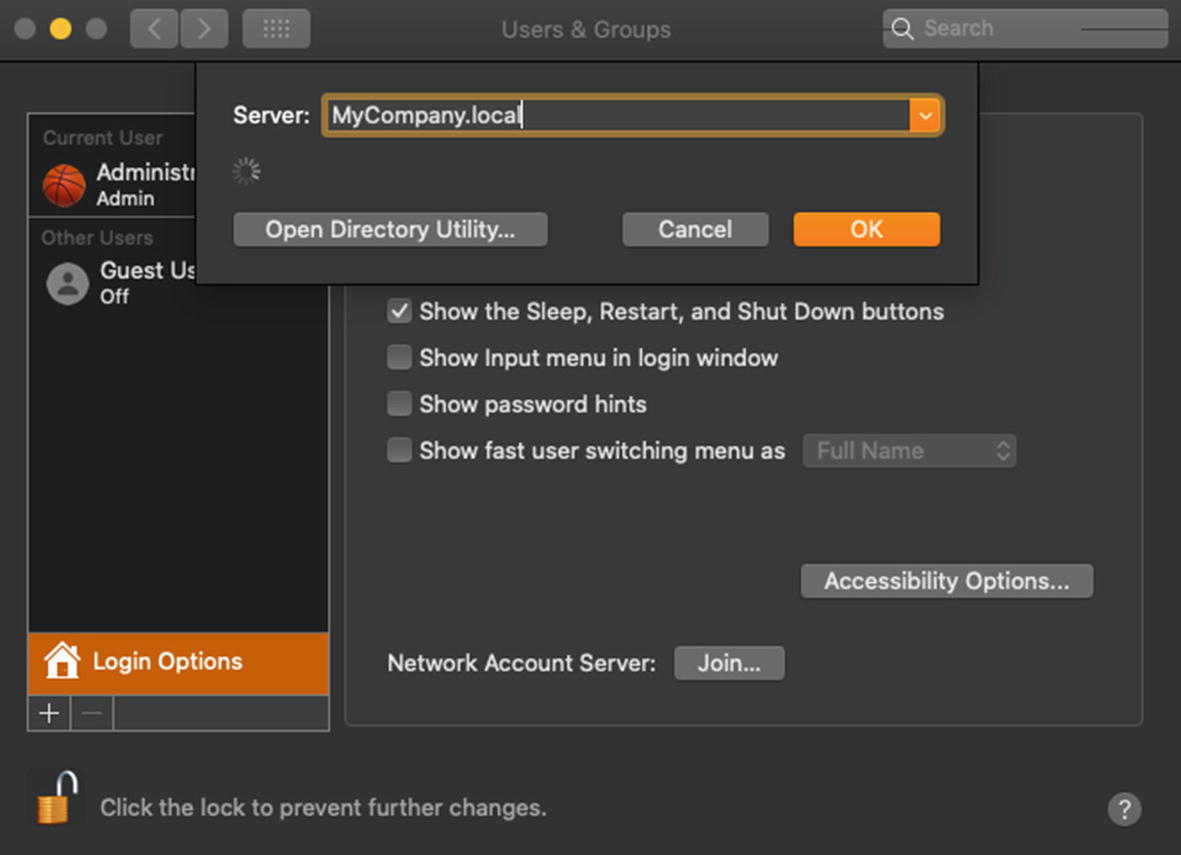
Enter the name of the domain in the Server field
- 4.
Once it finds the domain, it will prompt you to enter a Computer Name and credentials. If we set up our Local Hostname and hostname properly, it will auto-fill the Computer Name that we want to use as shown in Figure 11-6. Enter your Domain Admin username and password into the next field and click OK.
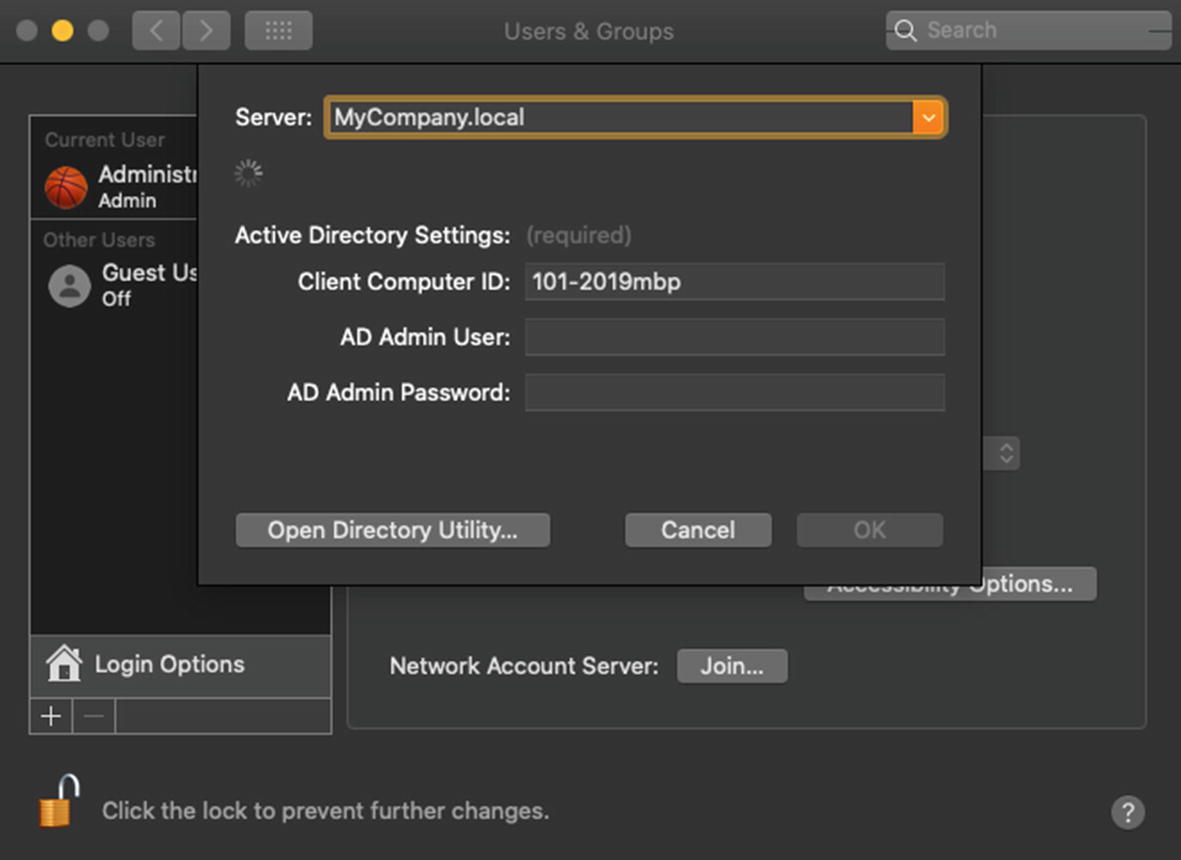
Confirm the Computer Name and authenticate with a Domain Admin account
- 5.
Next, it will prompt you to modify the directory configuration on your Mac and ask you to enter your local Mac Administrator account username and password. Enter that information and click the Modify Configuration button to continue.
- 6.
Your Mac will now begin configuring Active Directory, and after a minute or so, you will see a green dot next to the name of your Windows domain as shown in Figure 11-7. This indicates that your Mac is now successfully joined to the MyCompany domain.

The green dot next to the domain name confirms that our Mac has successfully joined
Pro Tip If you are getting errors when joining to your domain, one thing to check is the time zone, date, and time of both your Domain Controller and your Mac. Often times your client or server is a few minutes off, and that will cause the domain binding to fail with various cryptic error messages.
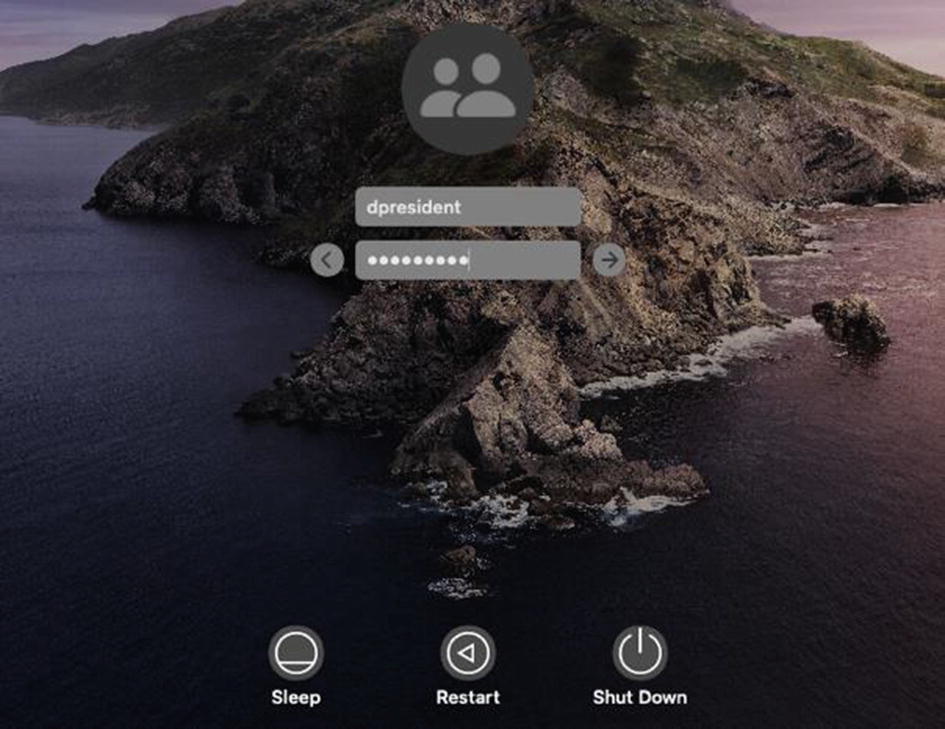
Signing in with a Network user account
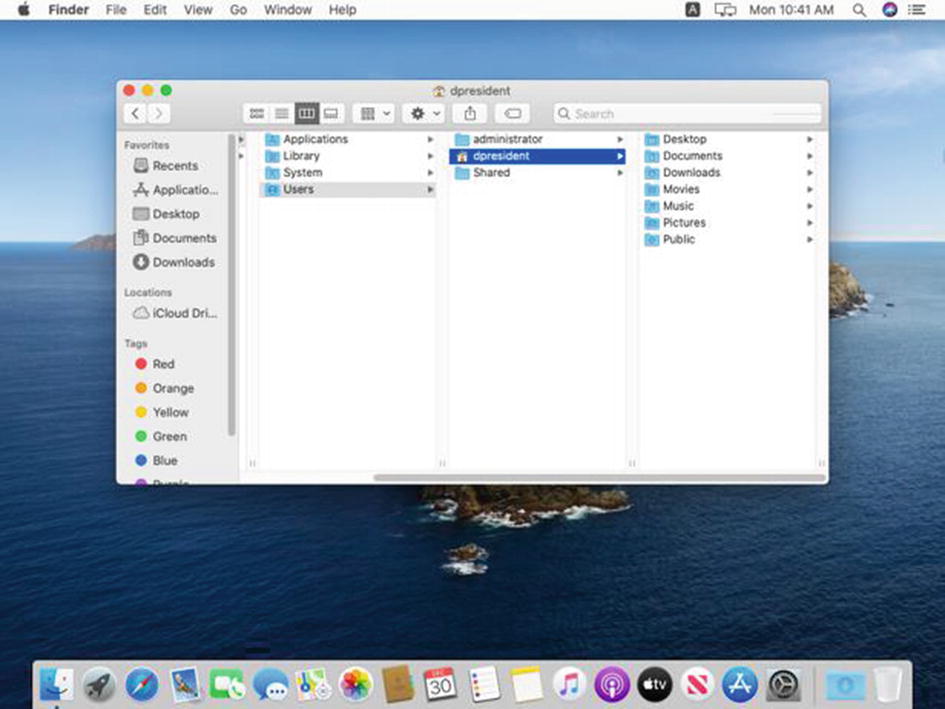
The default new user Desktop in macOS Catalina

The red dot indicates that the Windows domain is unreachable
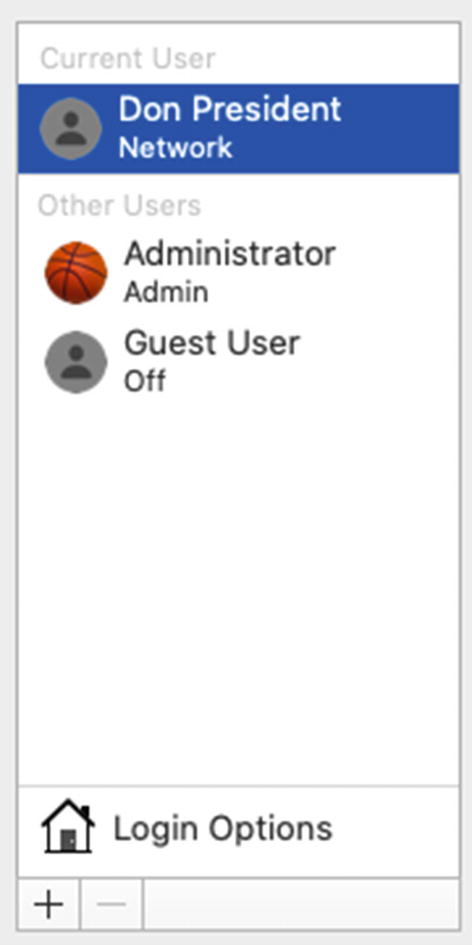
Notice the user account type designation for Don President
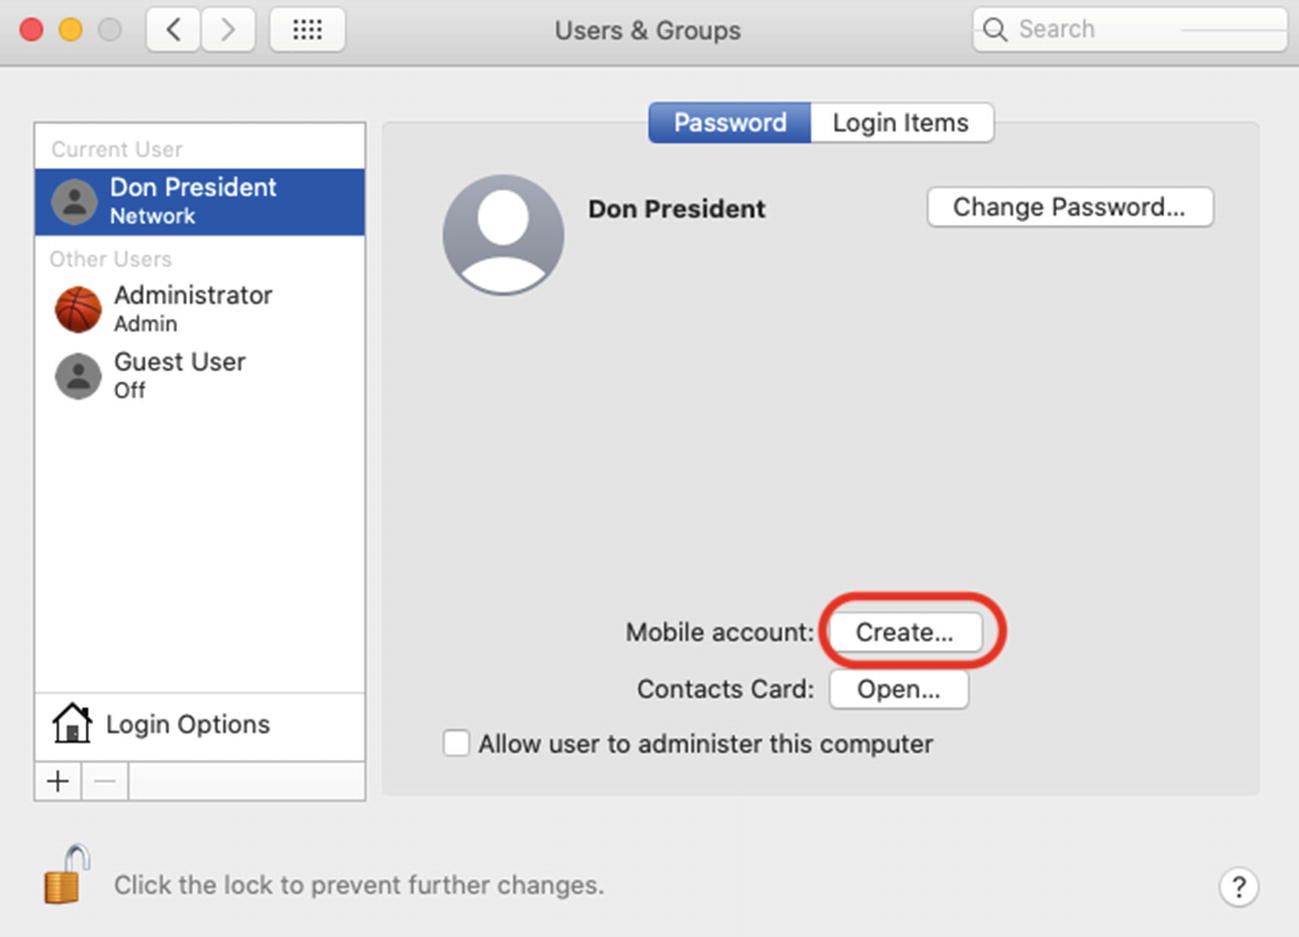
Converting the Don President Network account to a Mobile account

Follow the prompts to log out and create the Mobile account
Depending on the settings you have set for FileVault and others, it may ask you for the user’s Active Directory password and the local Administrator’s username and password during this process. Once it completes, you will be back to the login window.
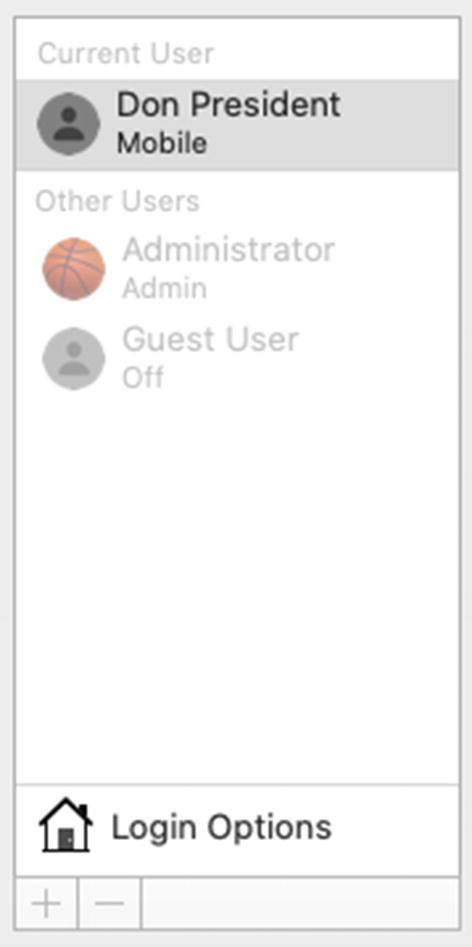
The user account is now listed as Mobile
Please note that if multiple Network users need to access this Mac while it is offline, you would need to convert each user account on this Mac from Network to Mobile. Right now, the only Active Directory user who can sign into this MacBook Pro when it’s disconnected from the network is Don President.
As we have demonstrated, adding a Mac to a Windows domain requires almost no additional configuration on the Windows server and no extensions to Active Directory to simply allow for authentication and support for cached credentials using the Mobile user account type in macOS. We have added the Mac to the domain interactively, but we can also automate this task by using a Configuration Profile or via a script.
Before you begin this exercise, you should start with a clean install macOS on a test Mac. You should name it and create a computer record in Active Directory to match. Then using the method you prefer, you should enroll it in MDM and promote it to User Approved so we have full access to all of the Configuration Profile options.
I have built a test Mac called 101-2019MPRO and named it accordingly (including the Local Hostname and hostname). I have added it to Profile Manager, and I have created a computer record in AD for it, but have not yet joined it to the domain.
- 1.
Open Profile Manager and browse to our 101-2019MPRO Mac in the Devices section. Click the Settings tab and then click the Edit button to apply a new Configuration Profile setting.
- 2.
Configure the General payload as we have in the past, ensuring that Automatic Push is enabled, and enter an optional profile description.
- 3.
Scroll down to the macOS section of the available payloads and choose the Directory payload and click the Configure button.
- 4.
Customize the payload as shown in Figure 11-15. Note that we are provided with a few new options including one to create Mobile accounts at login for all of our domain users the first time they sign into this Mac. Because we already have a computer record in AD, we will not specify the path to the specific OU.
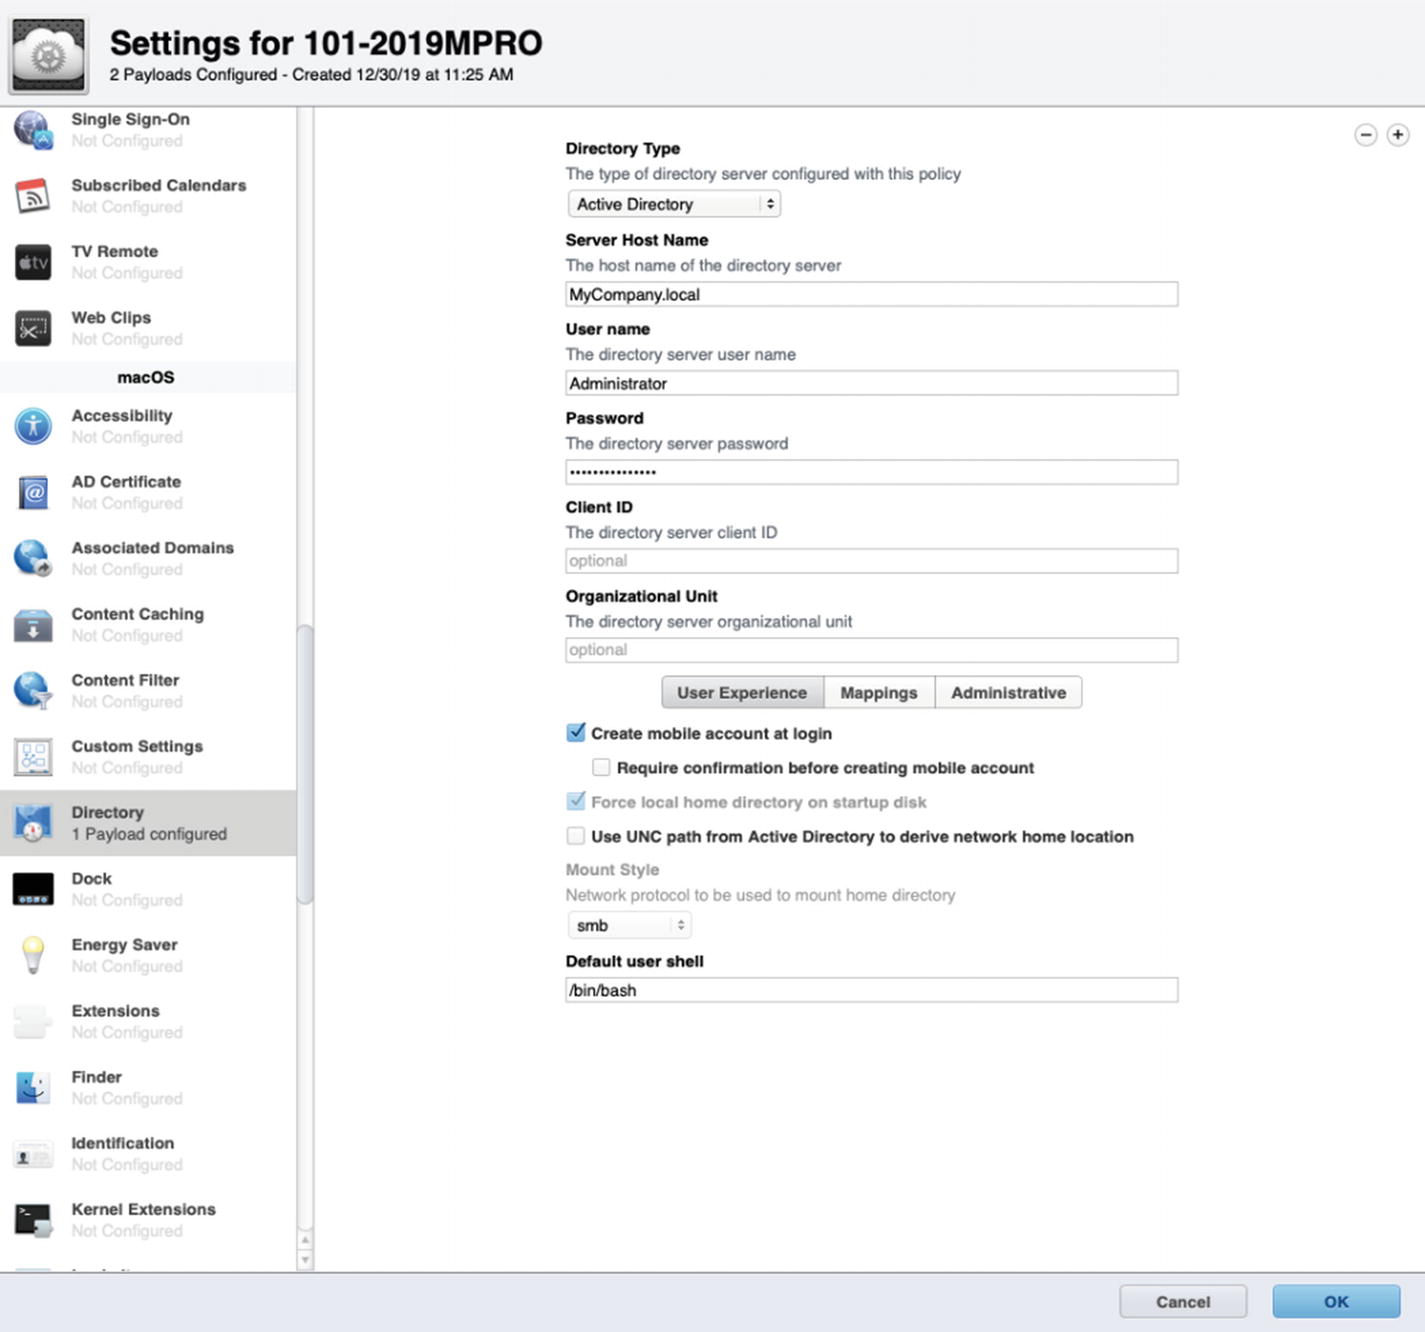
Configure the Directory payload for binding to our Active Directory domain
- 5.
Once you have customized the payload, click the OK button to save the configuration and close out of the Configuration Profile editor. Click the Save button in Profile Manager to apply the settings to the 101-2019MPRO client as shown in Figure 11-16.

Applying our domain payload to our test Mac using MDM
It should complete the Push Settings task successfully, and your Mac will now be configured to sign into the domain. Note that upon signing in for the first time, it is converting Don President to a Mobile account type on the machine automatically.
You may also want to configure payloads for things like Active Directory certificates or the login window to further customize the user experience or apply any required security certificates and include those along with your Directory payload.
Apple also provides a command line tool called dsconfigad for scripting the Active Directory configuration. Using this command within Apple Remote Desktop’s Send Unix task can be effective for joining multiple Macs to the domain at once and further automates the process. This is particularly useful if you are not using an MDM solution at your organization.
Before you begin this exercise, you should start with a clean install macOS on a test Mac. You should name it and create a computer record in Active Directory to match. I have built a test Mac called 101-2013MPRO and named it accordingly, but this time I have left the hostname as unset so I can share a shortcut with you during this exercise. I have created a computer record in AD for it, but have not yet joined it to the domain.
- 1.
We are going to interactively develop this script on our test Mac using the Terminal app, but once you have perfected it, you can create a template in Apple Remote Desktop and apply it to your entire Mac fleet. Open the Terminal on your 101-2013MPRO to get started.
- 2.We are going to write a quick little script that will capture the Mac’s Computer Name and save it as a variable, and then using the scutil --set command, it will set the hostname accordingly. So at the command prompt in the Terminal, typeHOSTNAME=$(network setup -getcomputername) scutil --set HostName $HOSTNAME
Press enter and then press enter again when prompted with the HostName [computer name] output and then enter the local Administrator password when prompted. Once it completes that change and you are at the command prompt again, enter scutil --get HostName, and it should now match the others as 101-2013MPRO. If you use this script in Apple Remote Desktop, it will always change the hostname on the Mac client to match the Computer Name. At this point, your Terminal window should look similar to Figure 11-17.
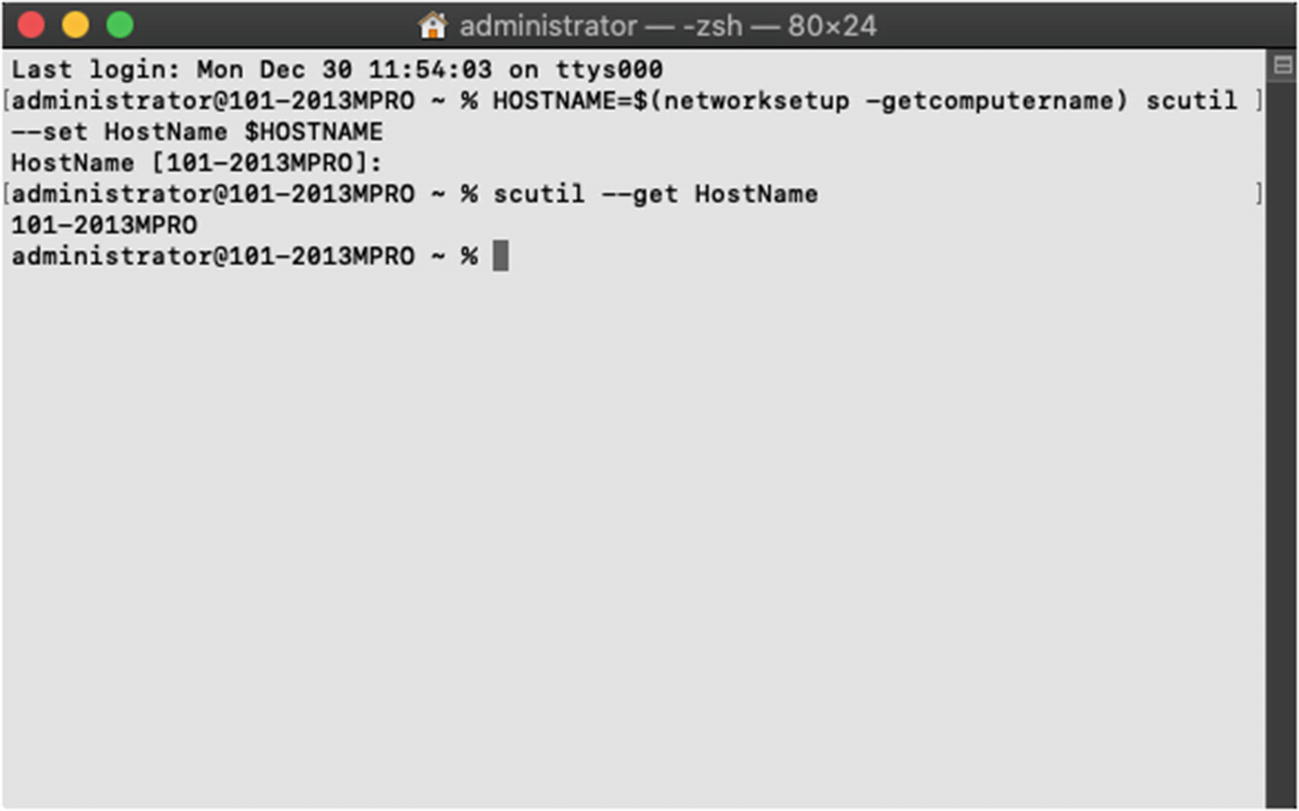
Using the script to copy the Computer Name to the hostname
- 3.Now that our Computer Name and hostname are consistent, we are ready to join the domain using the dsconfigad command. You can look at the manual for dsconfigad to read more about what this command does and additional options, but for this exercise we will stick to the basics. We need to define four arguments:
- a.
The Client ID (-c) represents the name we want to use to join the Mac to the domain.
- b.
The Administrator account (-u) represents the username of a Domain Admin account.
- c.
The Administrator password (-p) represents the password for that Domain Admin account.
- d.
The Domain (-domain) represents the domain we are adding our Mac to.
- a.
- 4.
Let’s start entering our dsconfigad command with the Client ID argument. Because we are going to use this same script on multiple computers, instead of specifying the exact name for this computer, we will use a token. We can use the "hostname -s" token so that it automatically applies the hostname of this Mac as the Client ID in the script. This will mimic the behavior of the GUI when we join a Mac to the domain using the Users & Groups System Preference.
- 5.
Next, we will specify the username and password for the Domain Admin account for our MyCompany.local domain. Finally, we will add the argument that specifies the domain name. Your finished script with all of the arguments should look something like Figure 11-18.
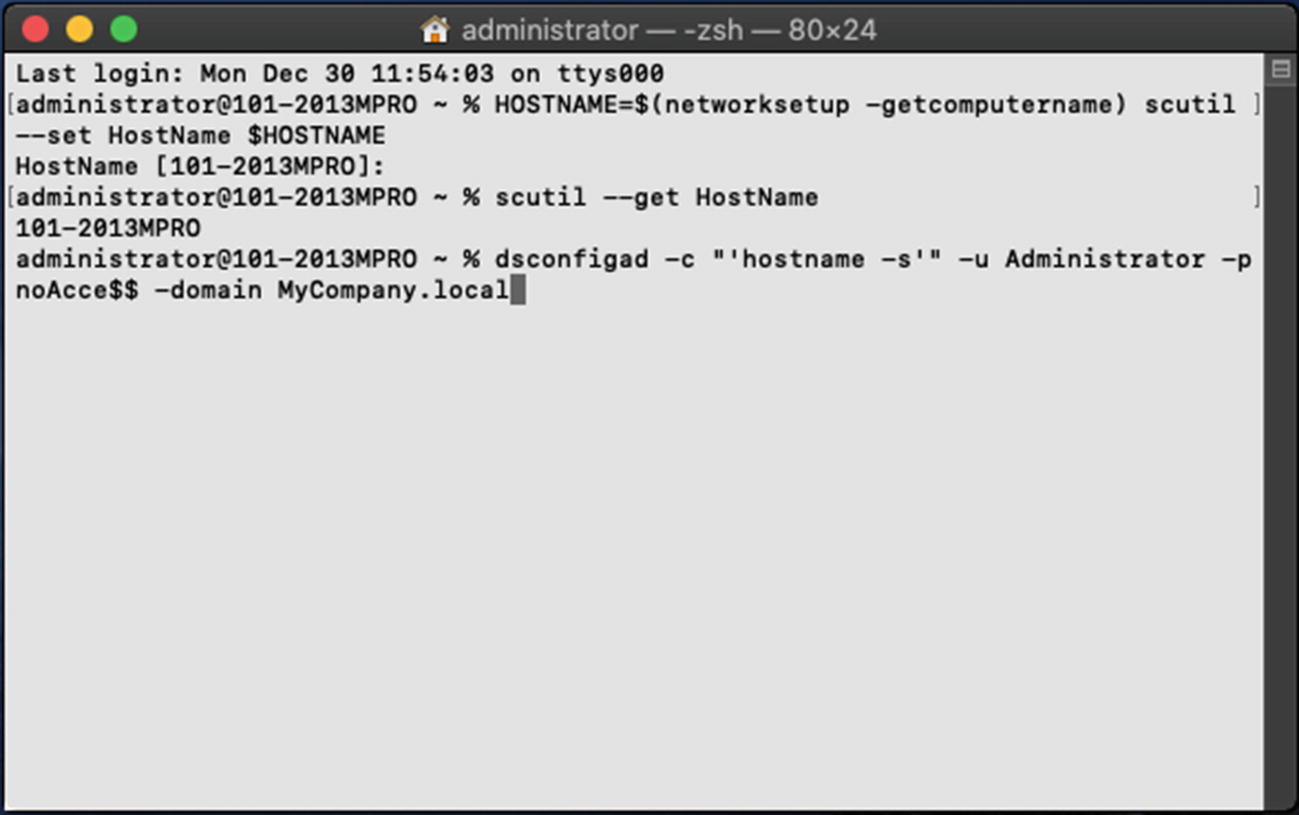
The full script that renames the computer and adds it to the domain
- 6.
It will prompt you to enter the password of the local Administrator account. After a minute or two, it will complete successfully. Open the Users & Groups System Preference and click the Login Options button to confirm that the Windows domain is now listed with a green indicator icon next to the Network Account Server as shown in Figure 11-19.
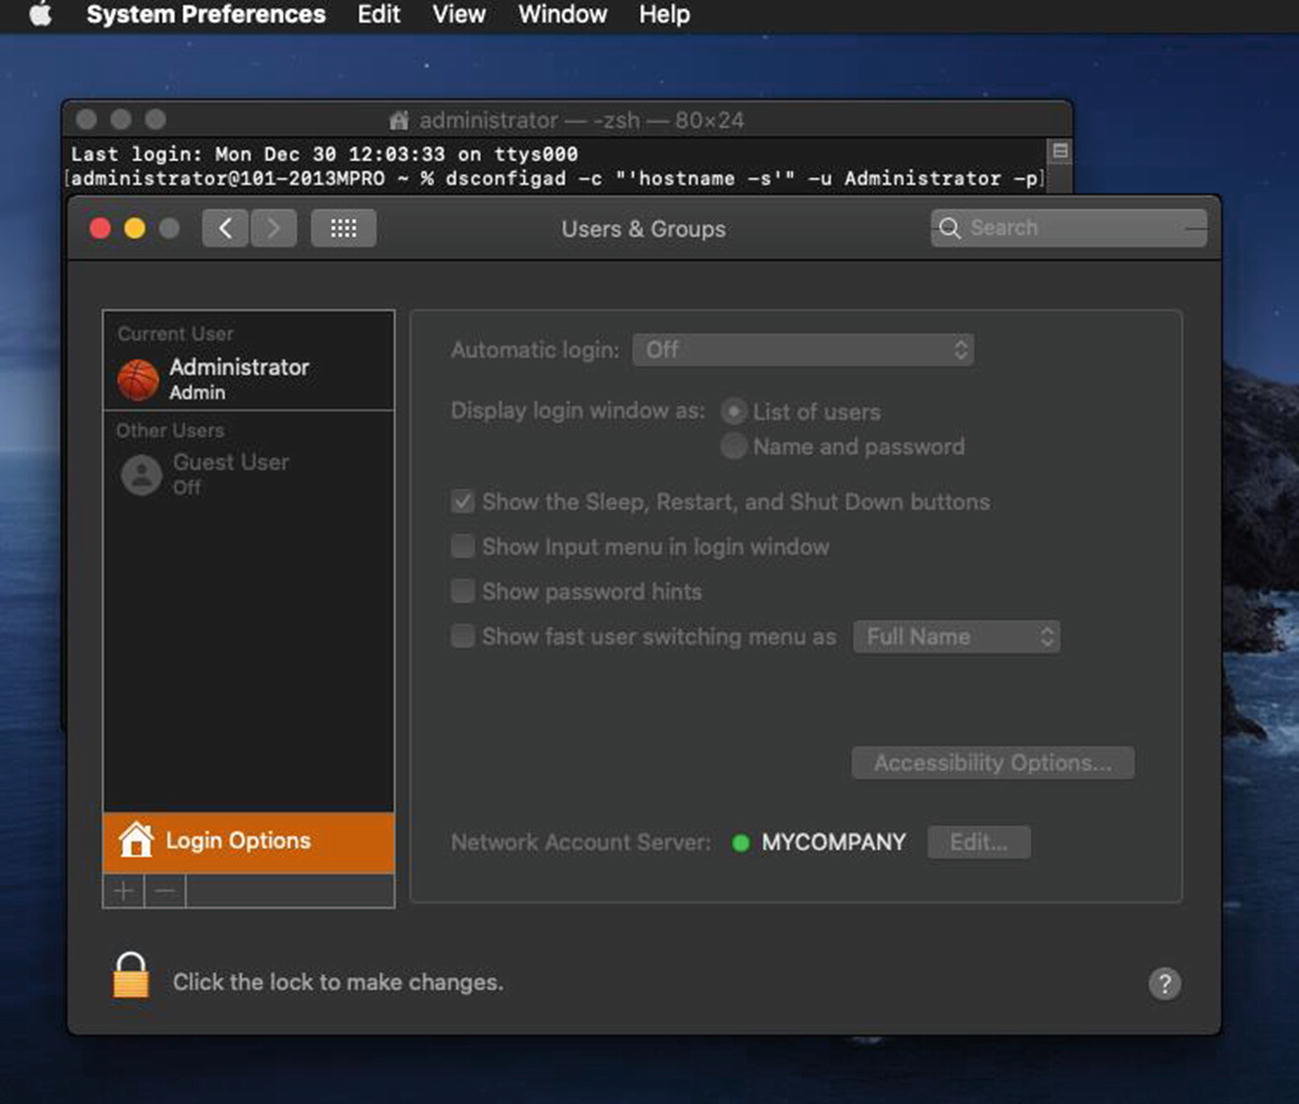
After the script runs, we can confirm that our Mac is on the domain in the Users & Groups System Preference
Pro Tip There are additional commands that you can use with dsconfigad to set additional settings like -mobile enable to support the Mobile account options and -passinterval to adjust the frequency that the domain computer password changes so that systems that are off of the network for prolonged periods of time do not fall off of the domain. If you have questions about this, consult with your Windows system administrator to determine if there is a need for this or other options.
We have successfully configured Active Directory and joined our Mac using three different methods. Now that we have our Mac on the domain, we can access other resources on our Windows server.
Using Profile Manager to Mimic Microsoft Group Policy
We are starting to check off these various integration tasks for Don President’s MacBook Pro. He can sign in with his Active Directory credentials, and he can log in while his machine is offline. However, we still need to configure his Mac to conform to our corporate standards. That could include a number of things defined in our Windows Group Policy including the default wallpaper, how long it takes for a screen saver to begin, if a screen saver requires a password, energy saver settings like when to put the computer or display to sleep, and the default home page just to name a few.
Fortunately, most of these options are available to us in Profile Manager, and we can use a Configuration Profile to provide these settings to Don’s Mac and mimic the settings we have built into our company’s GPO. For the purposes of this demonstration, we will simply set the energy saver and some custom Safari settings. To do this, open Profile Manager and browse to our 101-2019MBP computer in Devices. Click the Settings tab and then click Edit.
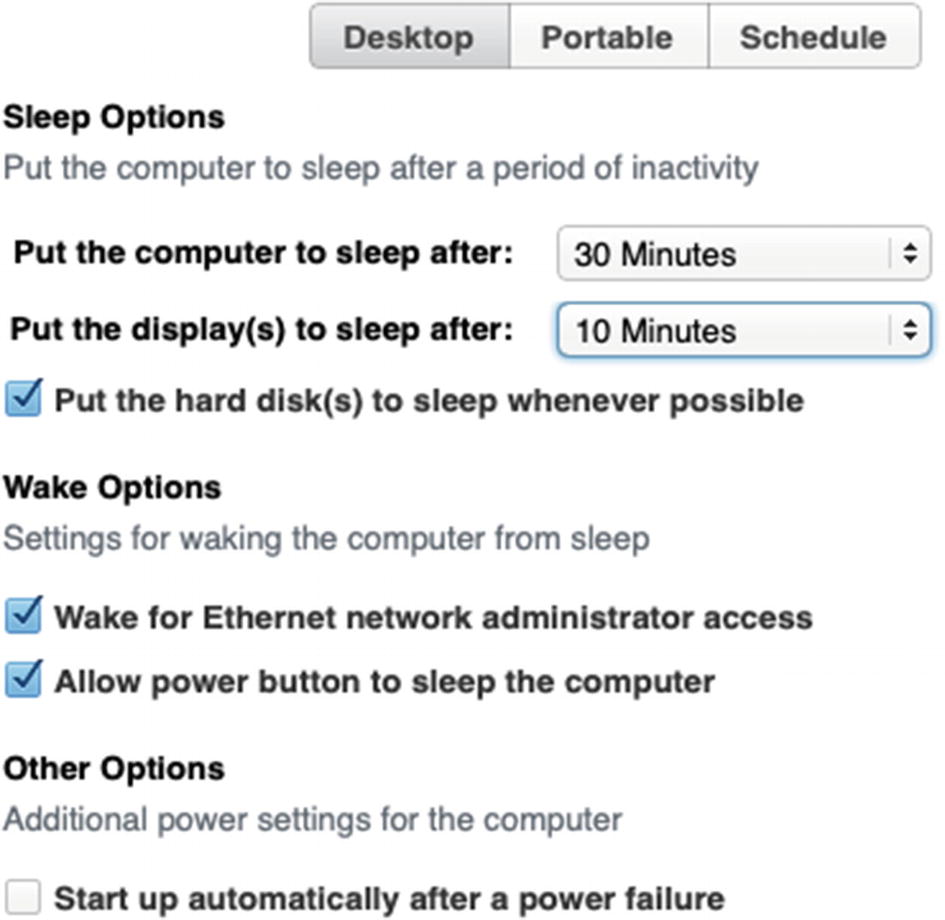
Configure the Energy Saver payload
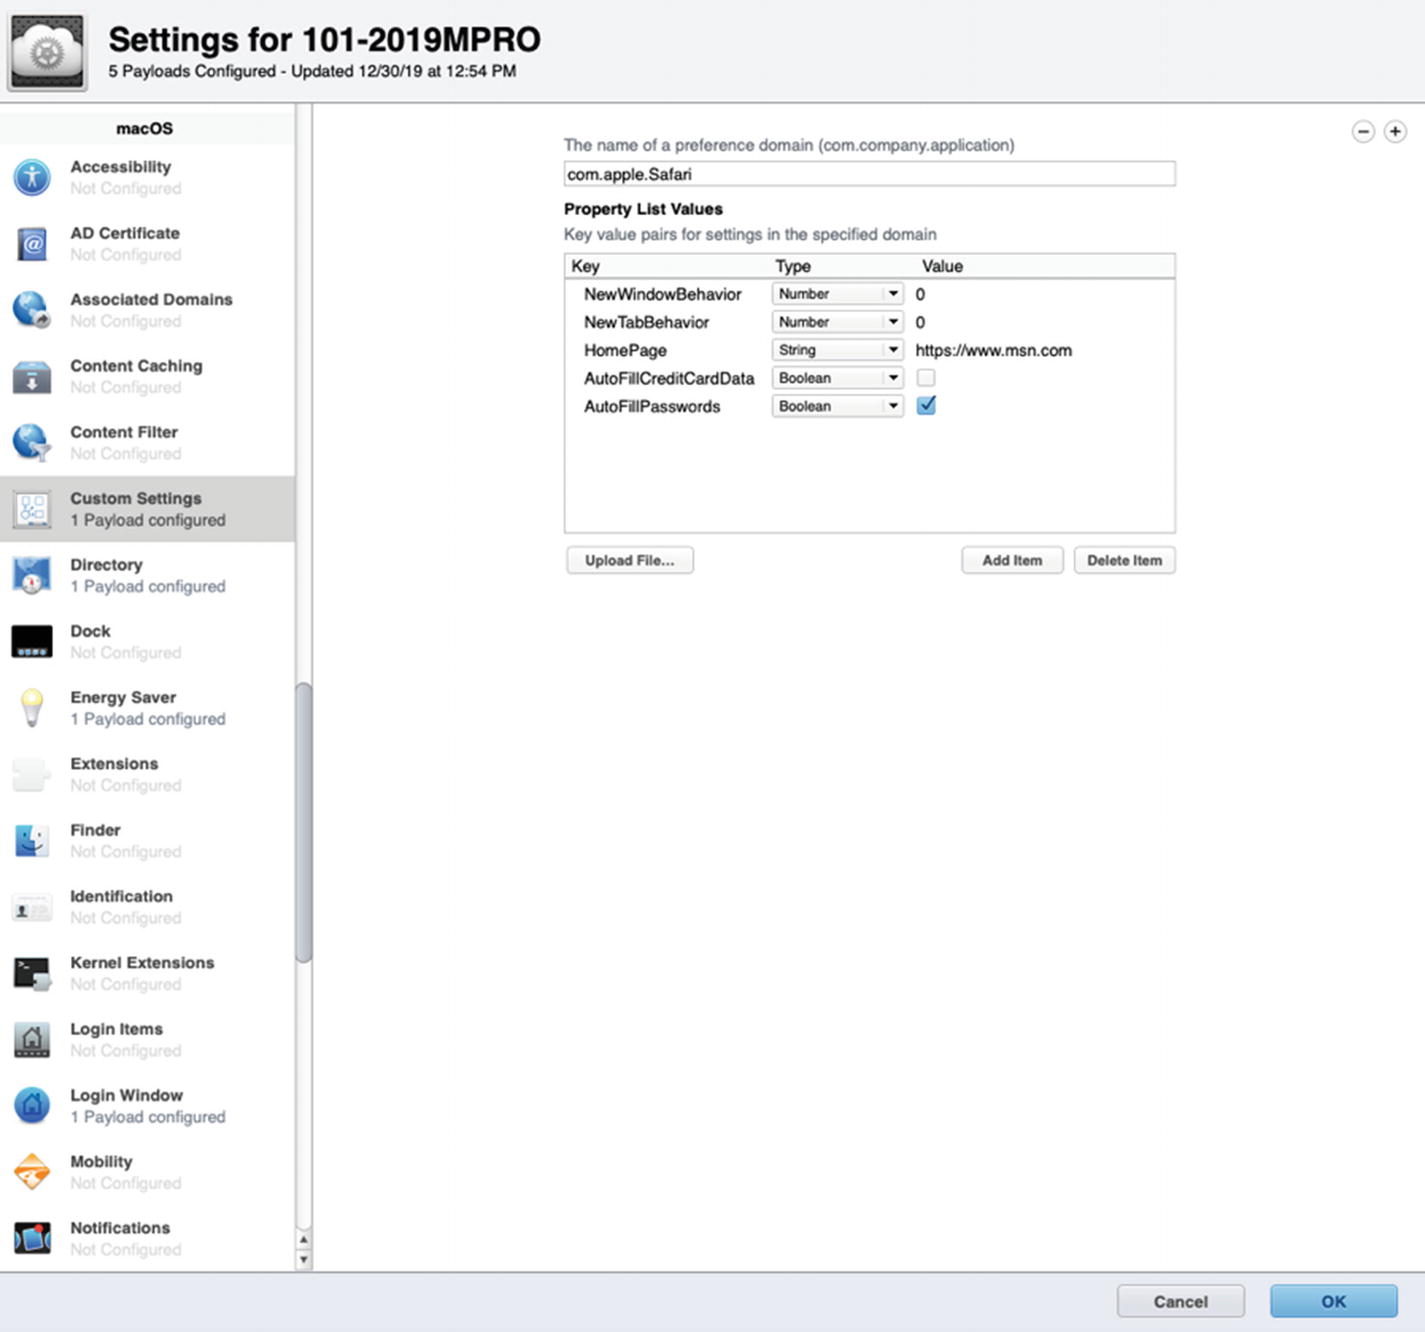
Creating custom keys and values for Safari to customize the user experience
You may wonder where I found these options that I am using to override the default behavior of Safari. This is going to vary by application, but typically I look for the corresponding ∗.plist file in the ~/Library/Preferences/ directory. The easiest applications to modify are those that save their settings there, and then I can simply upload the modified ∗.plist file into the Custom Settings payload in Profile Manager using the Upload File button. Unfortunately, some applications (like Safari) are a bit trickier.
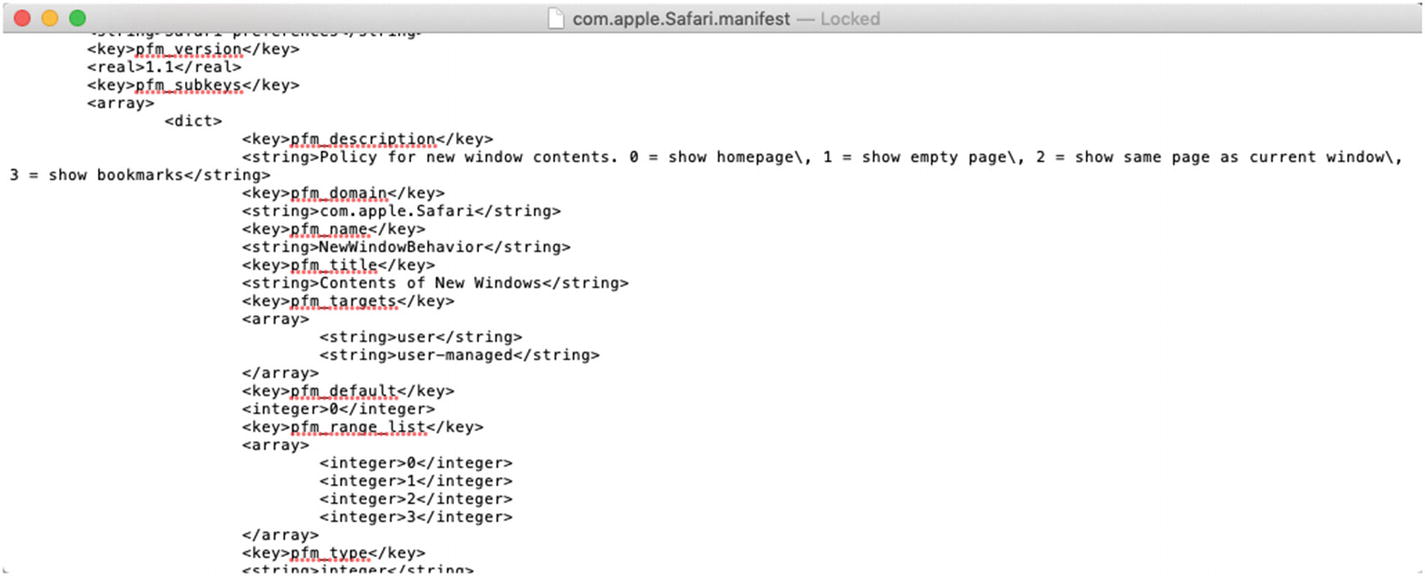
The key and value options for overriding the Safari preferences
I picked a few of these to add to my Custom Settings payload and manually added them by clicking the Add Item button and entering the values. As for the MyCompany home page, I used a string type to define the URL to www.msn.com. For the purposes of this demonstration, we will call that our company’s “Intranet home page.” You could put any URL in here and apply it as the new default home page in Safari.
When you choose to upload a *.plist preference file for a specific application, it will allow you to adjust the Property List Values in a way that is similar to using a Group Policy Administrative Template. Creating Custom Settings payloads for applications can take a lot of time, but it is worth the effort if you have hundreds or thousands of Macs to manage.
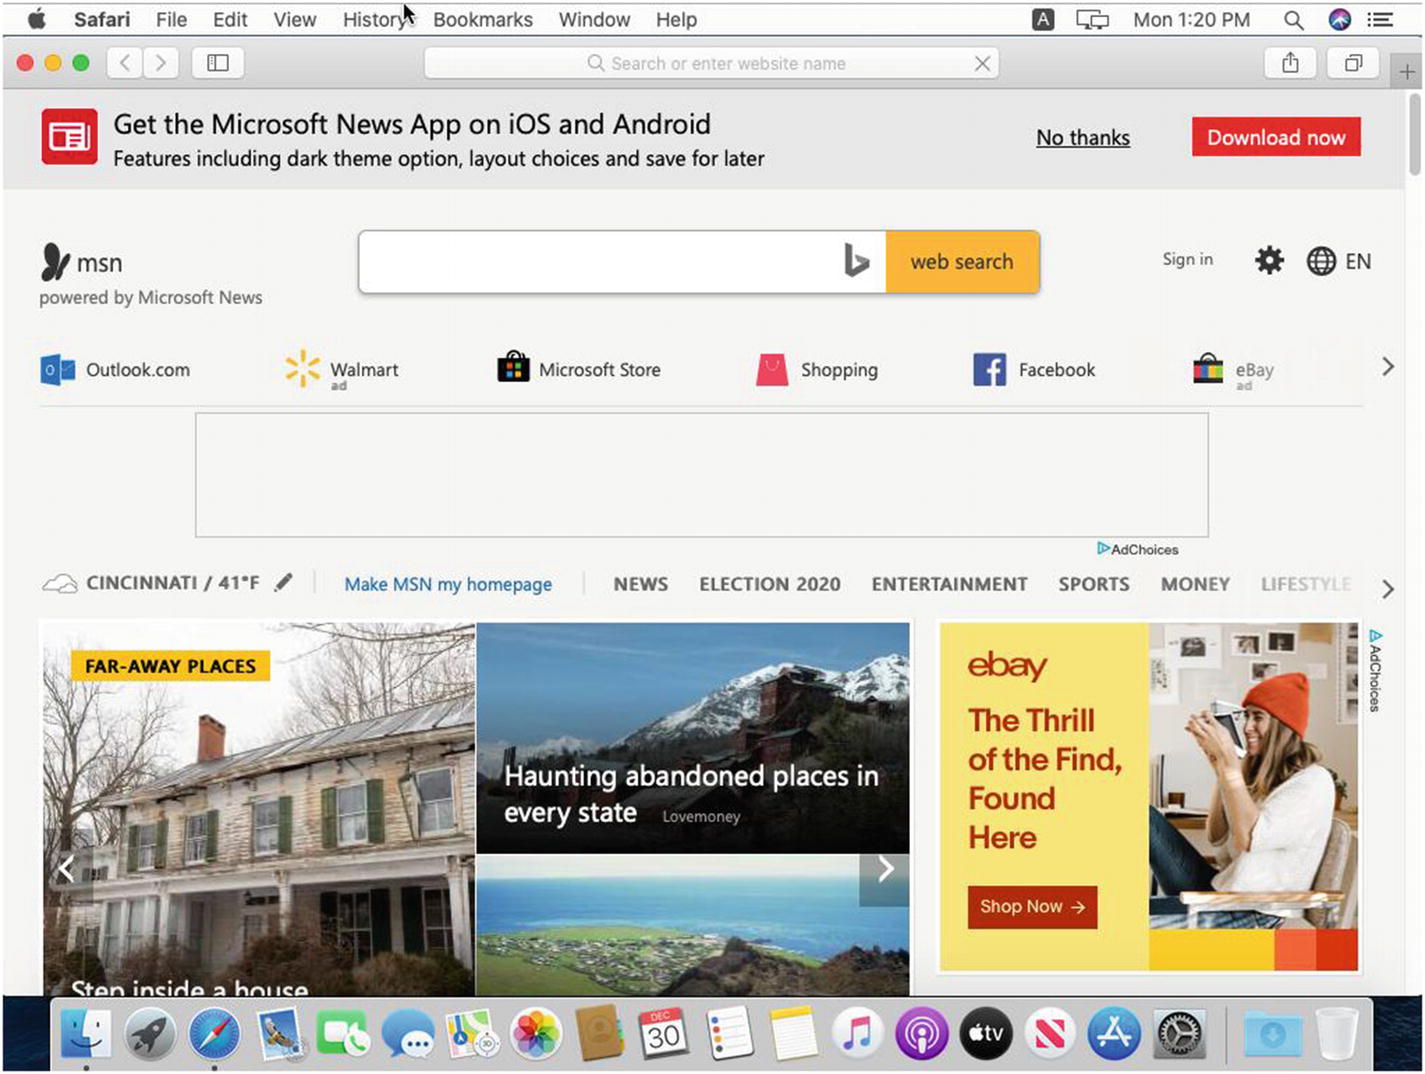
Our customized settings applied to Safari on our test Mac
Windows Printer Sharing Integration
The next item on our to-do list for Don is to map his network printer to his Mac. We have an HP LaserJet 9050 printer in the main office that is shared from our Windows server. Don has permission to print to the shared printer, and all we need to do is connect to it from his Mac. You can perform this task while signed in as Don.
- 1.
Open the Printers & Scanners System Preference and click the padlock and authenticate as the local Administrator account.
- 2.
Click the + button on the left-side pane as shown in Figure 11-24.
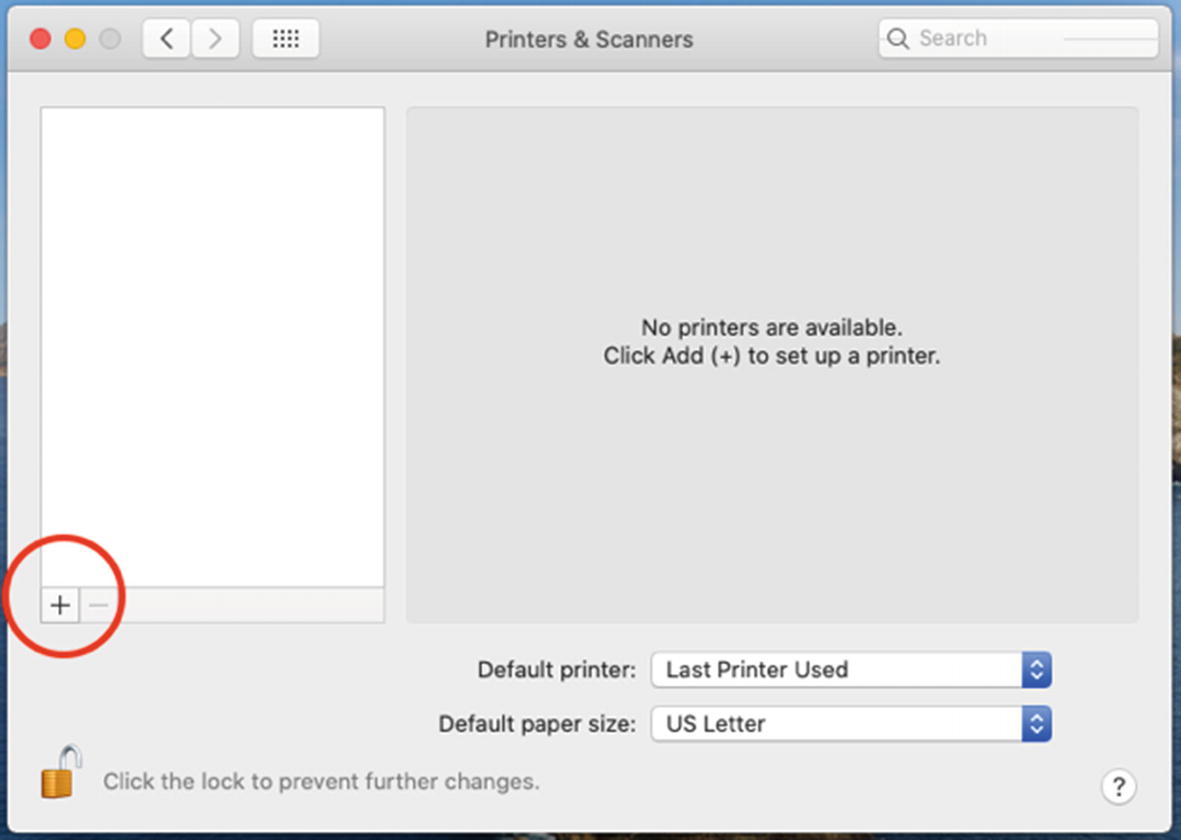
Add a new printer using the Printers & Scanners System Preference
- 3.
The Mac will search for available network printers in the directory domain and will list them. We will select our printer from the list, and the under the Use pop-up menu, we will choose Select Software and then browse for the HP LaserJet Series PCL driver. Once your window looks like Figure 11-25, click the Add button to finish the process. Print a test page to make sure it worked.
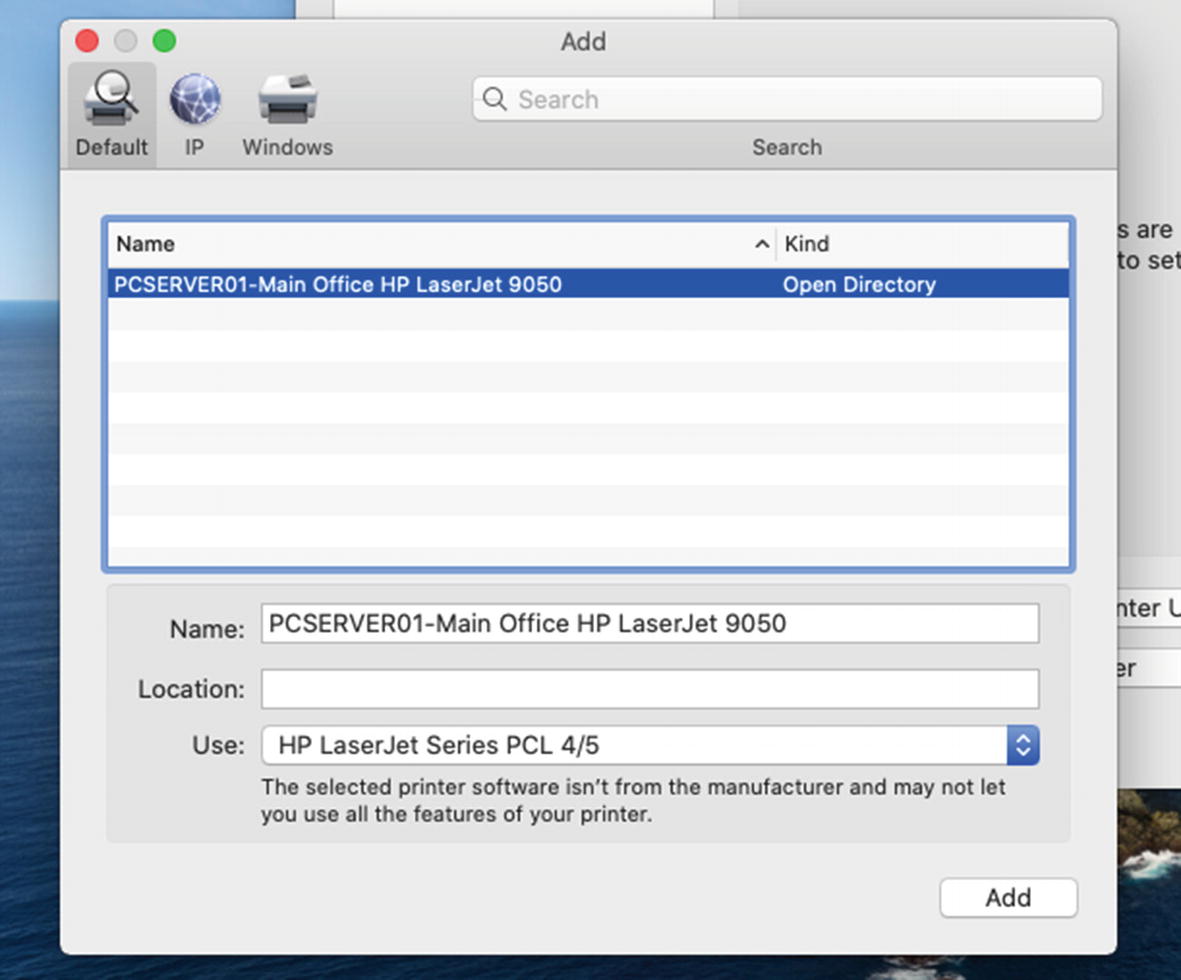
Find our network printer and select the proper driver
Windows File Sharing Integration
Next up, we have some Windows file sharing to configure. Don will need access to the Executive Shared drive on his Mac, and the sales manager will need to access the same network drive on her iPad so she can update the daily sales report that Don reviews. We will start with connecting to the network share on Don’s Mac.
macOS File Sharing
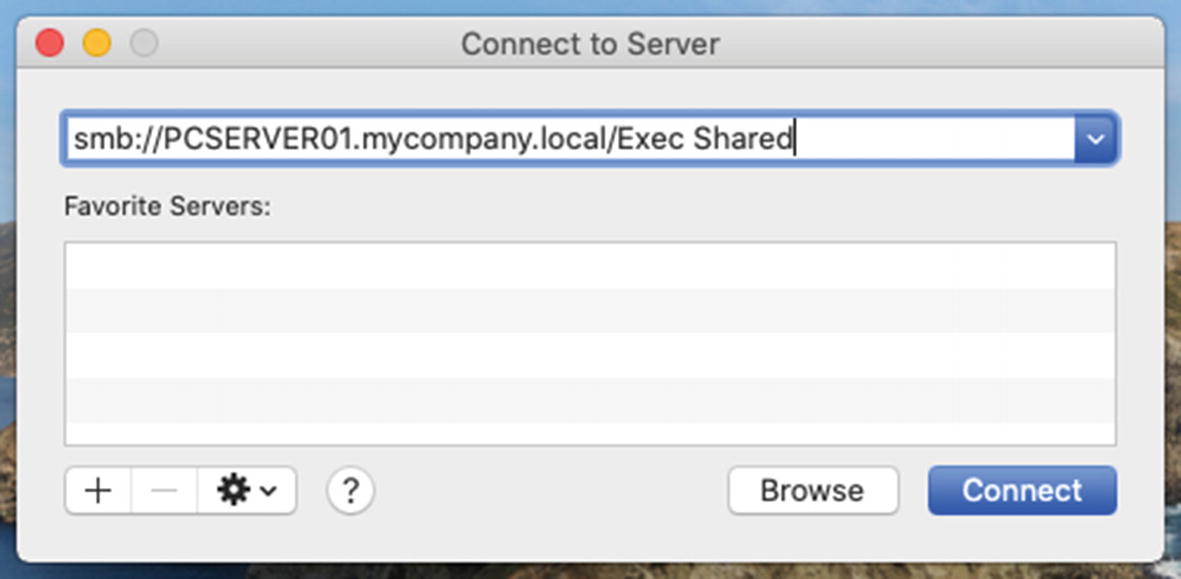
The Connect to Server dialog box
After entering the path to the network share, you can also click the + button to save it as a favorite server so Don won’t have to remember the path each time he needs to connect to it. Click the Connect button, and it should map the drive in a new window, and it should not require any additional authentication as we are already signed into the MacBook Pro with Don’s domain account.
Most likely you will want to automatically map Don’s network drives at login like we do on Windows. To do this, you can go to the Users & Groups System Preference ➤ Login Items tab; and using the + button, you can add the network volume to the list as shown in Figure 11-27. That way upon logging into the Mac, it will attempt to connect to these drives automatically.
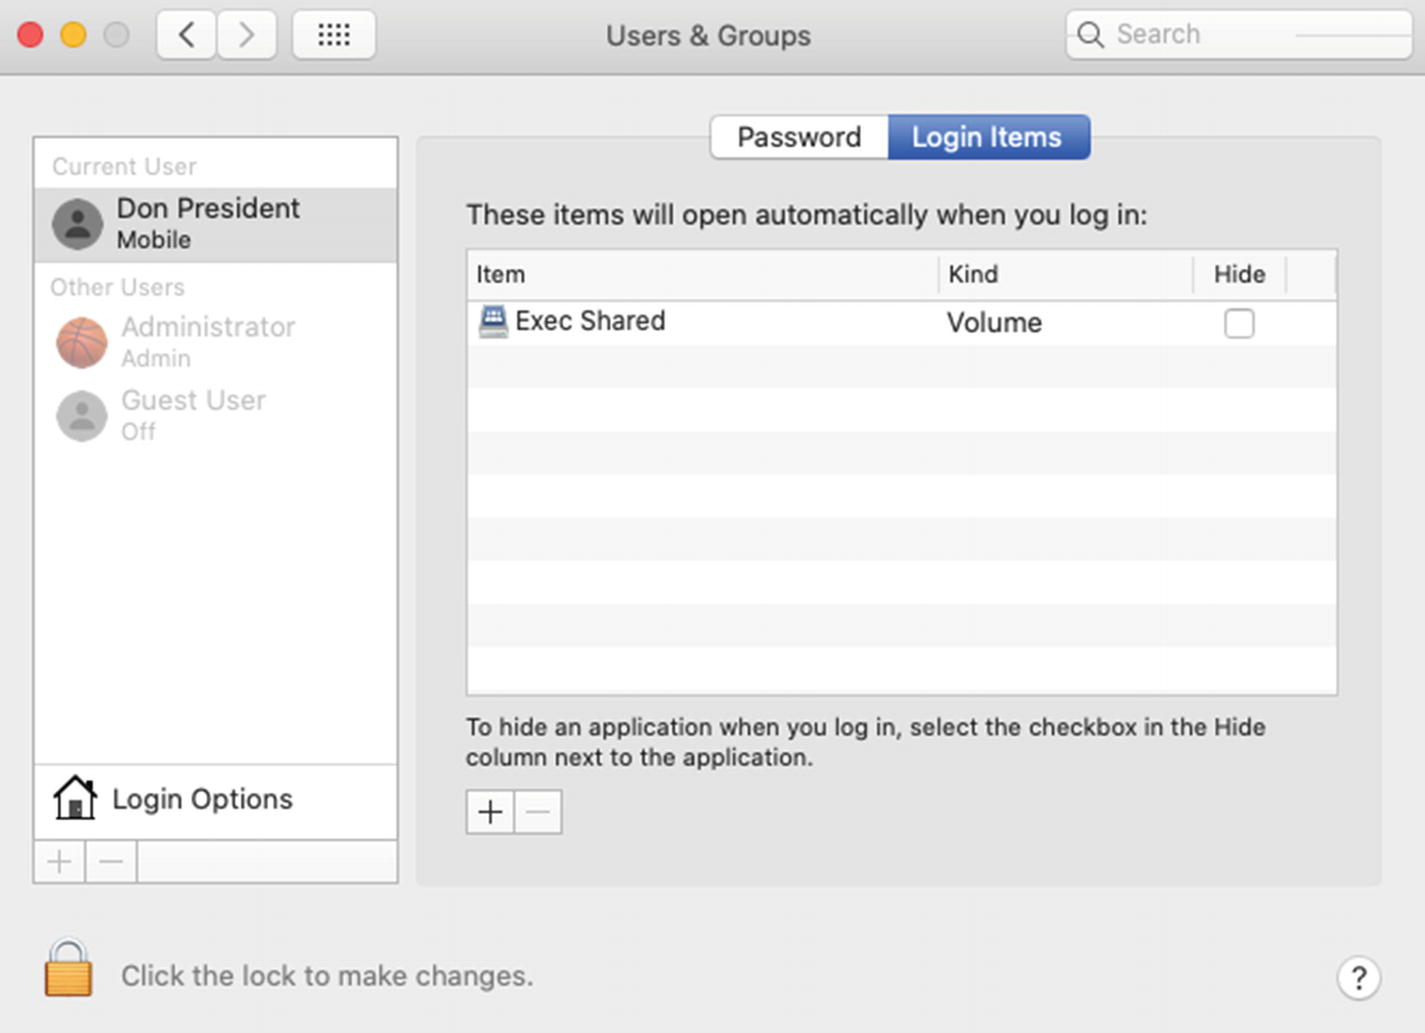
Adding the Exec Shared volume to the Login Items for Don President
You can also configure an MDM payload for mapping network drives automatically at login. As you can see in Figure 11-28, you can select to add an Authenticated Network Mount and then specify the file sharing protocol, the server name, and the name of the share.
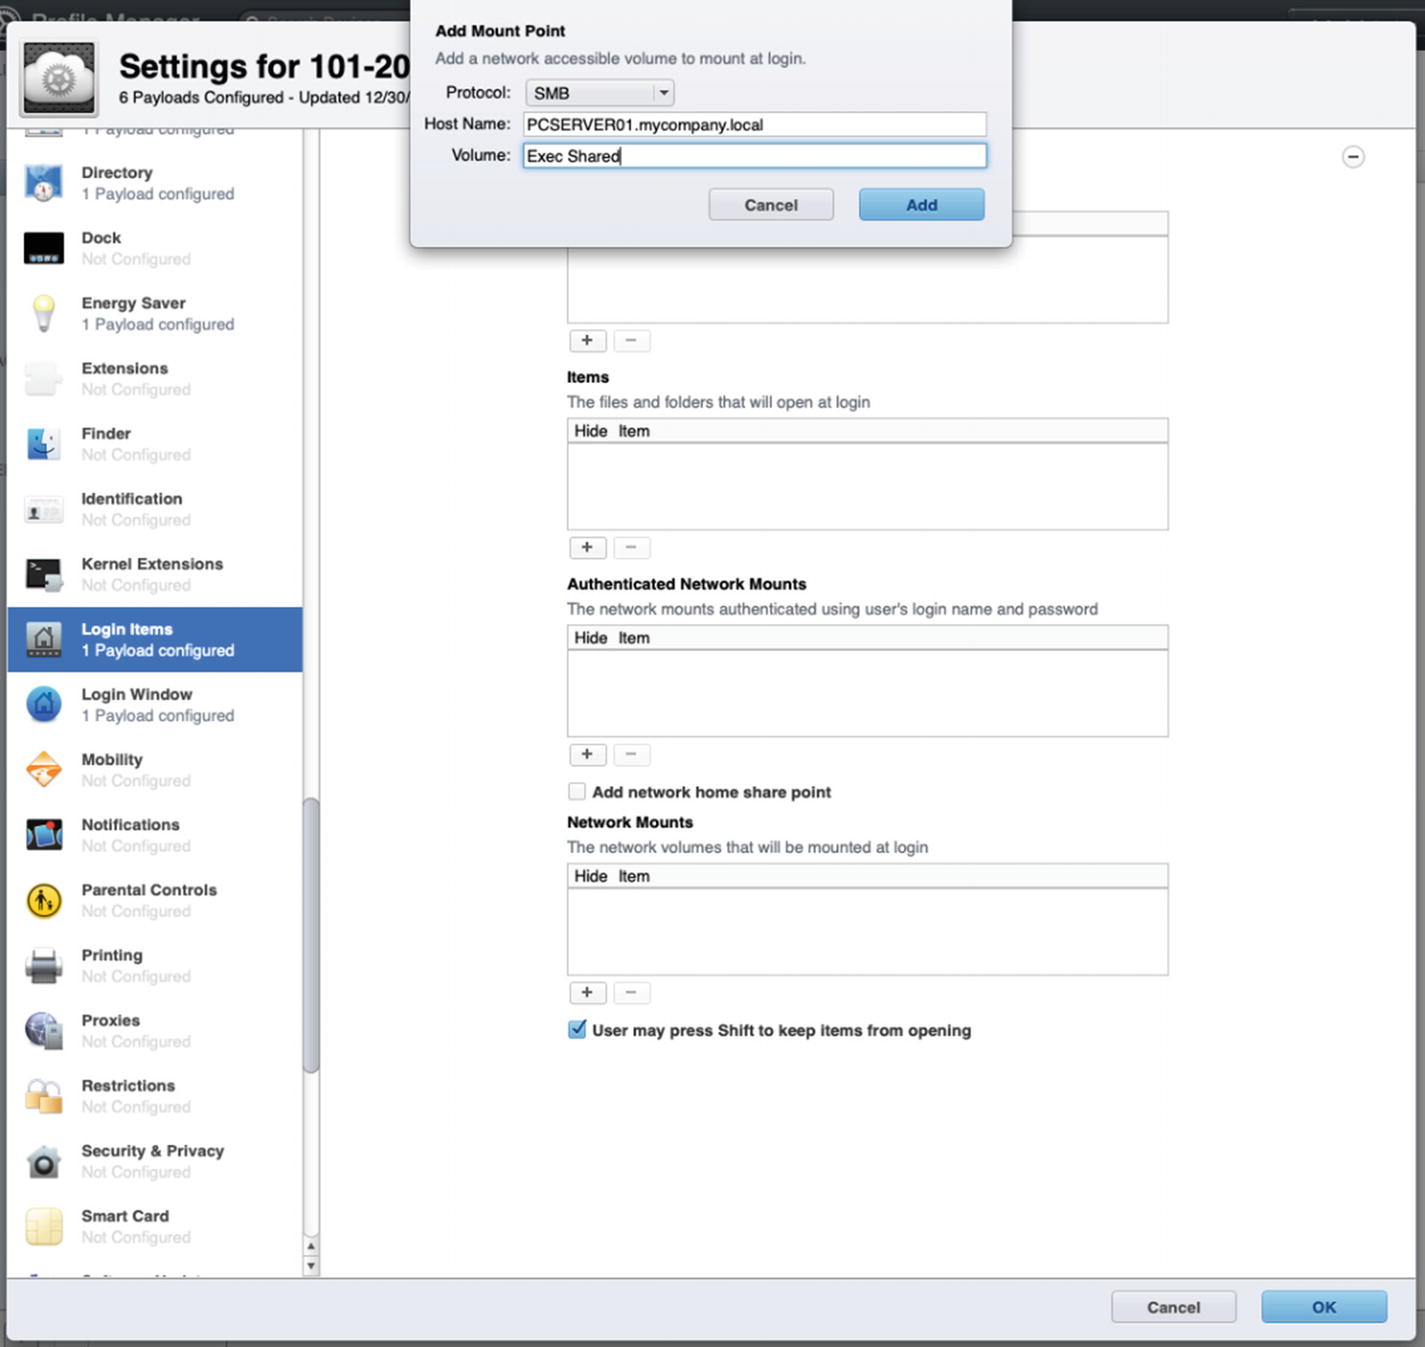
Adding a Mount Point in the Login Items payload via Profile Manager
iPadOS File Sharing
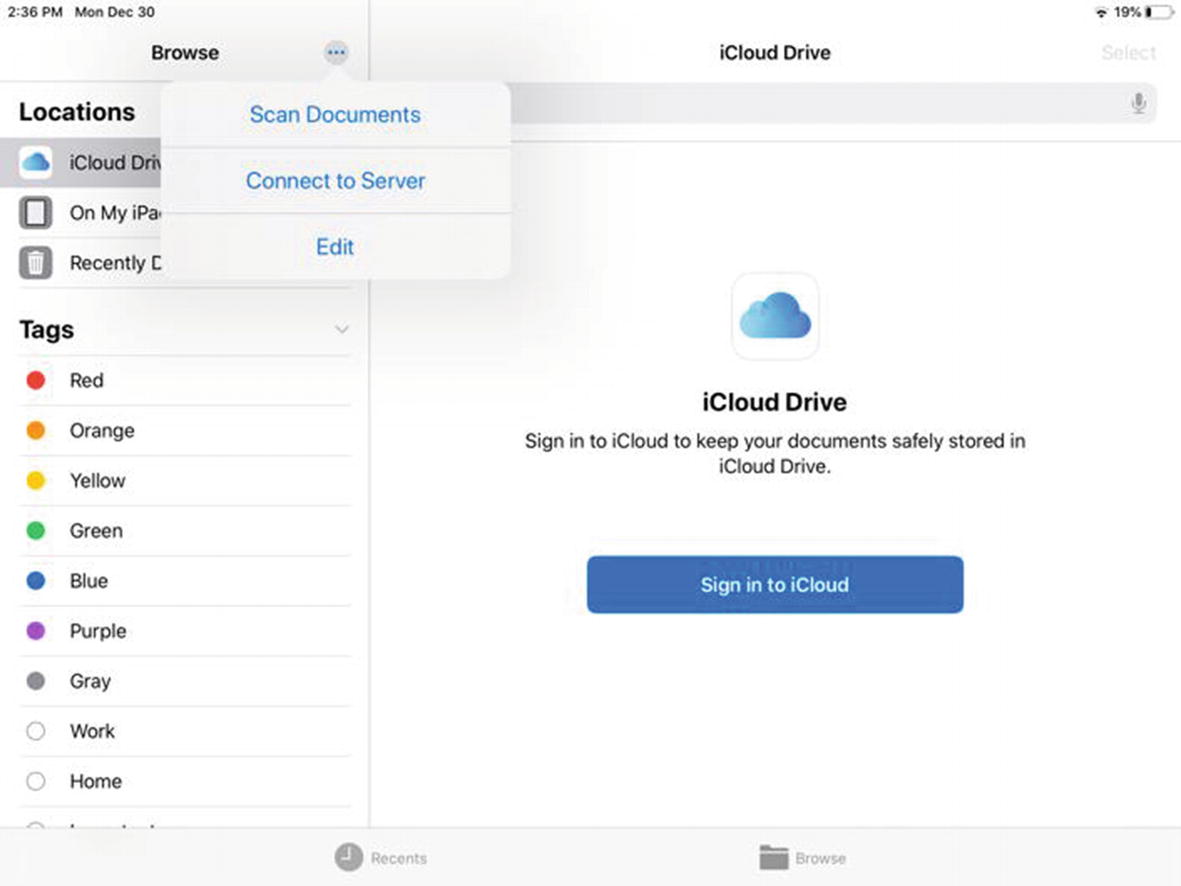
Accessing the Connect to Server option in the Files App
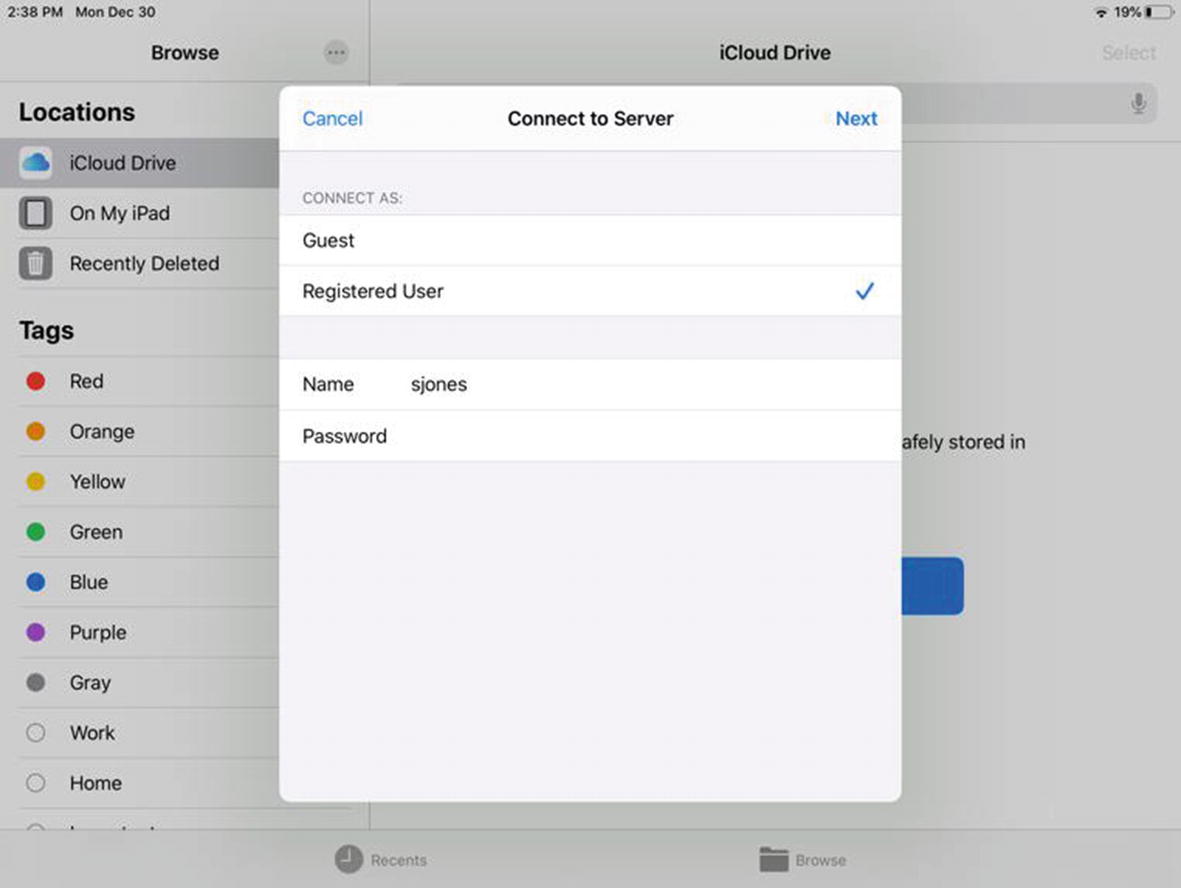
Enter a username and password to authenticate to the file server
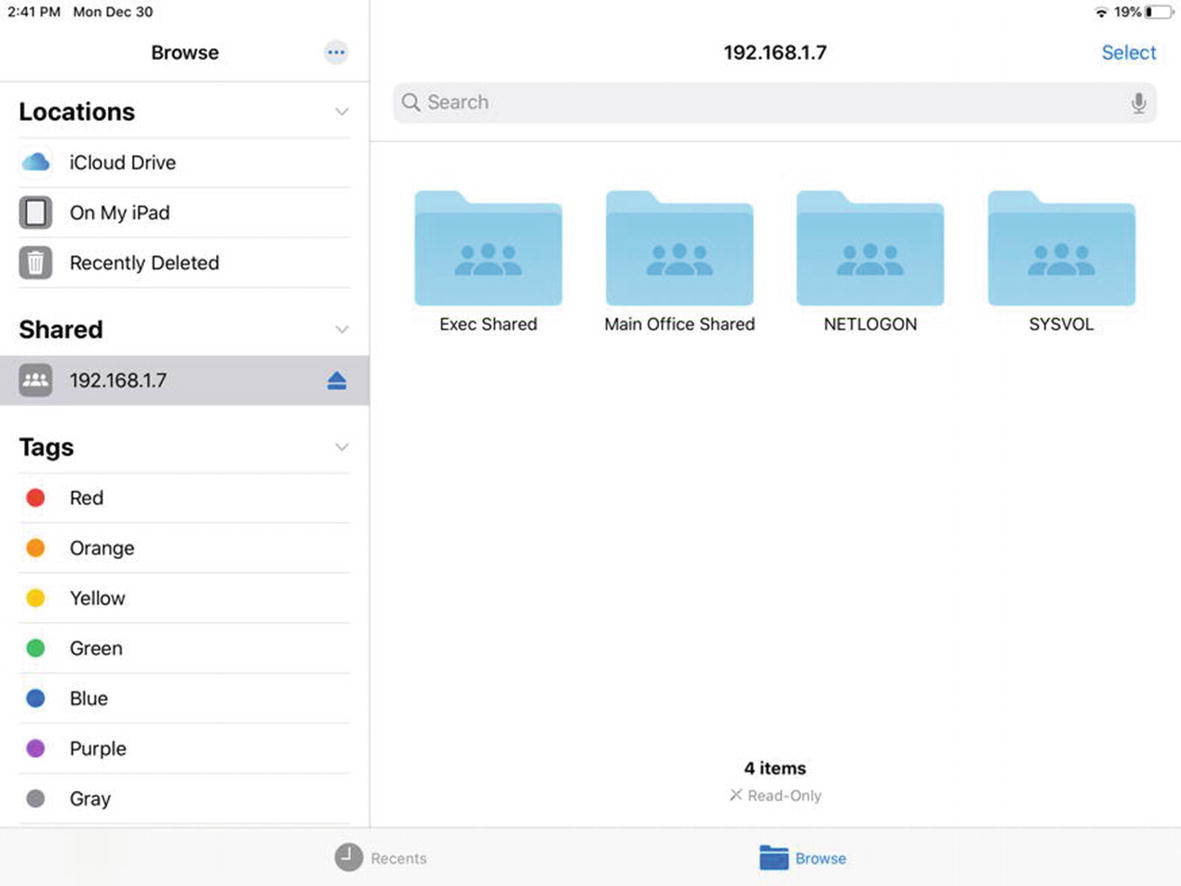
Browsing our network file share from the iPad
We have successfully configured local Windows file sharing on both macOS and iPadOS clients. Users of Apple devices can seamlessly share data with users on Windows PCs.
Microsoft Exchange Integration
Apple provides Microsoft Exchange integration at the operating system level on both macOS and iOS. You can use a Configuration Profile to configure the Exchange account settings for Mail, Contacts, Calendars, and Tasks. For Don’s new iPhone 11, we will simply configure the Exchange settings for his device remotely using Profile Manager. For his Mac, he wants to use Microsoft Outlook, so we will need to configure that manually after we download and activate the Office 365 applications in the next section.
Before we begin this exercise, be sure to create a new user in Profile Manager for Don President, using dpresident as the username. Enroll a test iOS device and name it Don’s iPhone so that you can modify and push new Configuration Profiles to the device. Now that we have an account created, we are going to create an Exchange payload that will use his username as a payload variable to configure the account on his device.
- 1.
Open Profile Manager, browse the Devices section, and find Don’s iPhone. Click it to select it and then click the Settings tab and Edit the Configuration Profile.
- 2.
In the Configuration Profile editor, scroll down to the iOS section and choose the Exchange payload. Click the Configure button to specify the settings.
- 3.
Enter the Exchange server information into the various fields as required by the Exchange payload as shown in Figure 11-32. For the username, we will use %short_name% instead of dpresident. What that will do is allow us to apply this payload to other users in our organization, and at the time that the Configuration Profile is applied, the %short_name% variable will resolve to the current user’s username, in this case dpresident.

Setting the Exchange settings by using a payload variable
- 4.
Scroll down to the Enabled Services section of the payload and ensure all of these are checked as shown in Figure 11-33. This will enable the entire iOS to access data from Microsoft Exchange, including the Phone app’s Address Book.
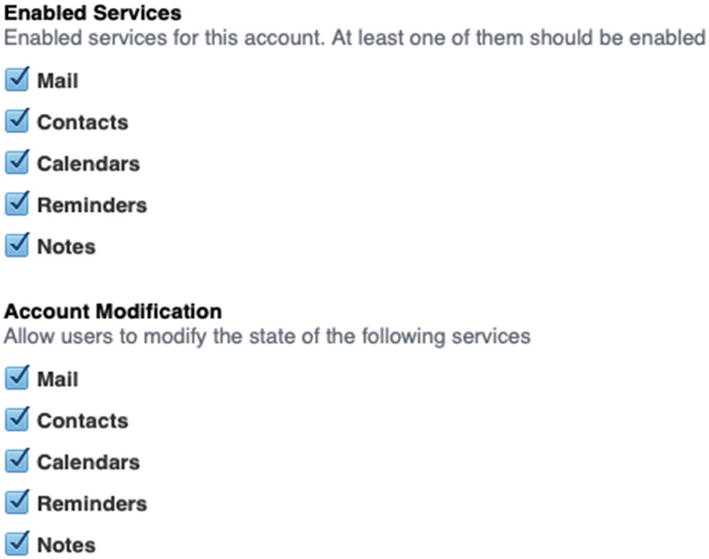
Configure which services are enabled
- 5.
Click the OK button to save the configuration payload and then click Save to apply. It will prompt the user for their password when the Profile applies, and then Exchange will be completely configured.
Pro Tip Note that if your company is using some of the MDM features included in ActiveSync, those will also apply to the device. For example, things like minimum passcode requirements will apply to the device, and whichever payload has the greater restriction will take precedence over the others. For example, if you require a minimum passcode length of four characters in Profile Manager but ActiveSync is set to require a minimum of six characters, the device will prompt the user to set a new six-digit passcode before Exchange data will begin to sync to the device.
Whether you are using BYOD or you are managing company-owned devices in Profile Manager, you can see how using a Configuration Profile to apply specific settings like Microsoft Exchange would be preferable to manually configuring every individual device.
Microsoft Office 365 Applications and OneDrive
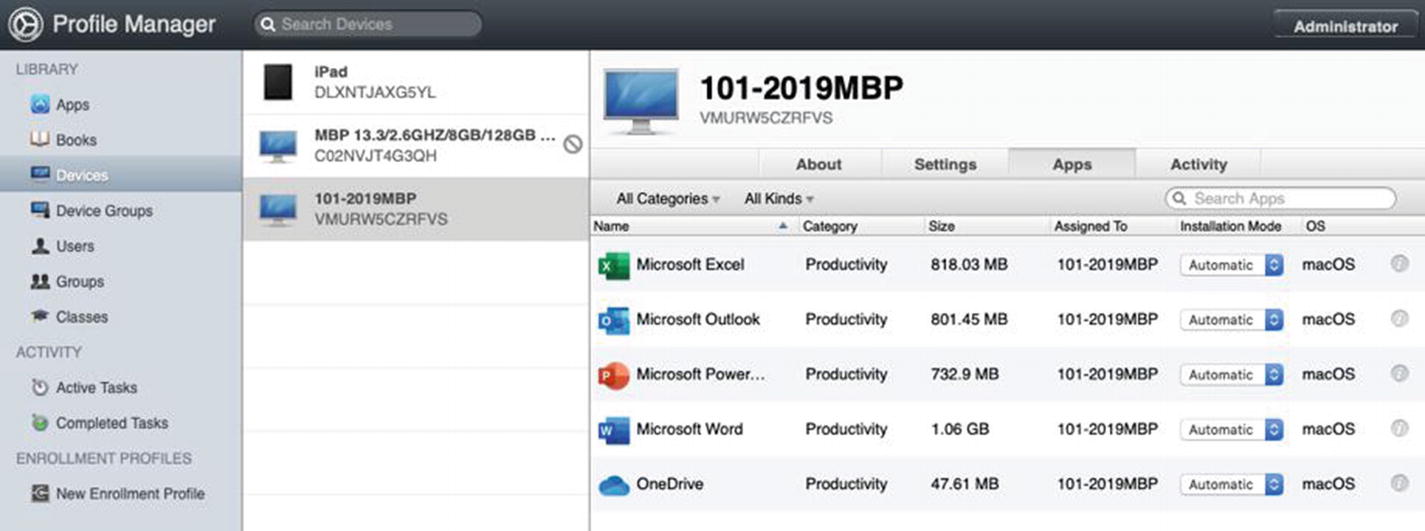
Installing the Microsoft Office 365 applications on Don’s MacBook Pro
This is pretty simple and straightforward because it’s the same process we followed in Chapter 9. Set the Installation Mode to Automatic and click the Save button to push the configuration and begin the application installation process. It will take a fair amount of time to install all of these applications, and you can use the Active Tasks window to monitor the progress until they have completed.
Activating the Office 365 Applications

Click the button to sign into an existing O365 account to activate
While we have Microsoft Outlook open, we can follow the prompts to configure the Exchange information and finish syncing with the mail server. We now have Don’s email fully configured and ready to go. We can let it sync his inbox in the background while we configure his OneDrive.
If your user still has Personal Folders (*.pst) files, once you have migrated those files to the Mac, you can import them into Outlook for Mac using the Import function under the Outlook menu.
Configuring OneDrive for Business
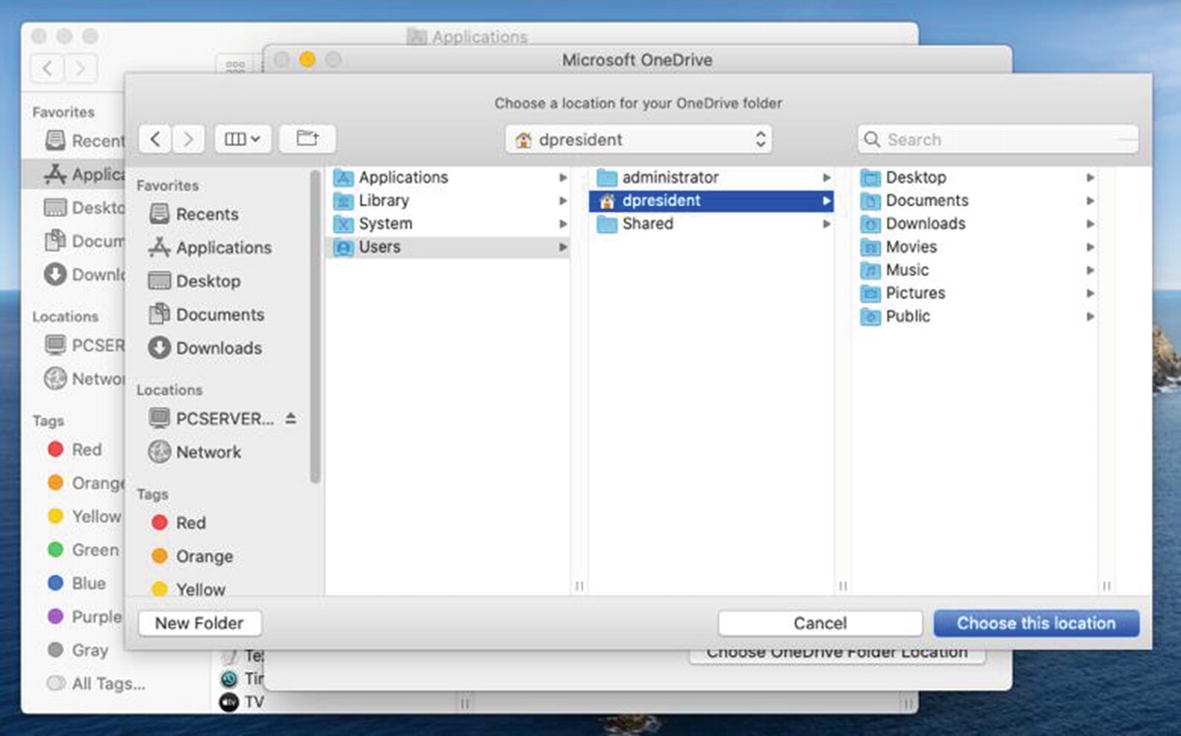
Select Don’s home directory as the location for his OneDrive folder
We have now finished configuring Office 365 and Microsoft OneDrive for Business on Don’s MacBook Pro.
Migrating Users from Windows to macOS
If he was using OneDrive to store all of his data and wasn’t using ∗.pst files on his Windows PC, there may not be much left to migrate. However, many users will still have data on their old PC that needs to be moved to their Mac. To check the last box on this PC to Mac migration for Don President, we need to migrate any remaining data over to his Mac.
Fortunately, Apple provides a pretty useful migration tool to assist in this process. To get started, make sure both his new Mac and his old PC are connected to the same network and then browse to the /Applications/Utilities/ folder on Don’s Mac and open the Migration Assistant utility.
Using the Migration Assistant
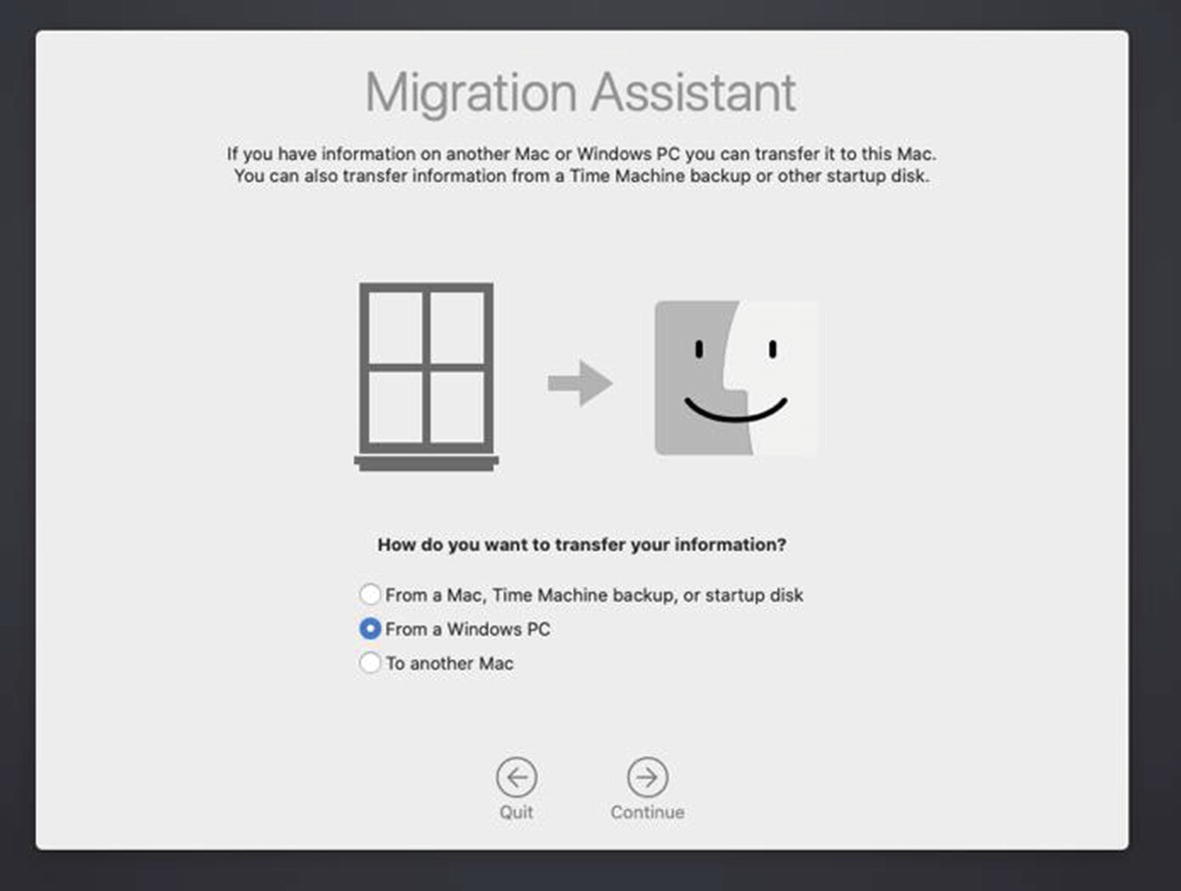
The Migration Assistant using the Windows PC option
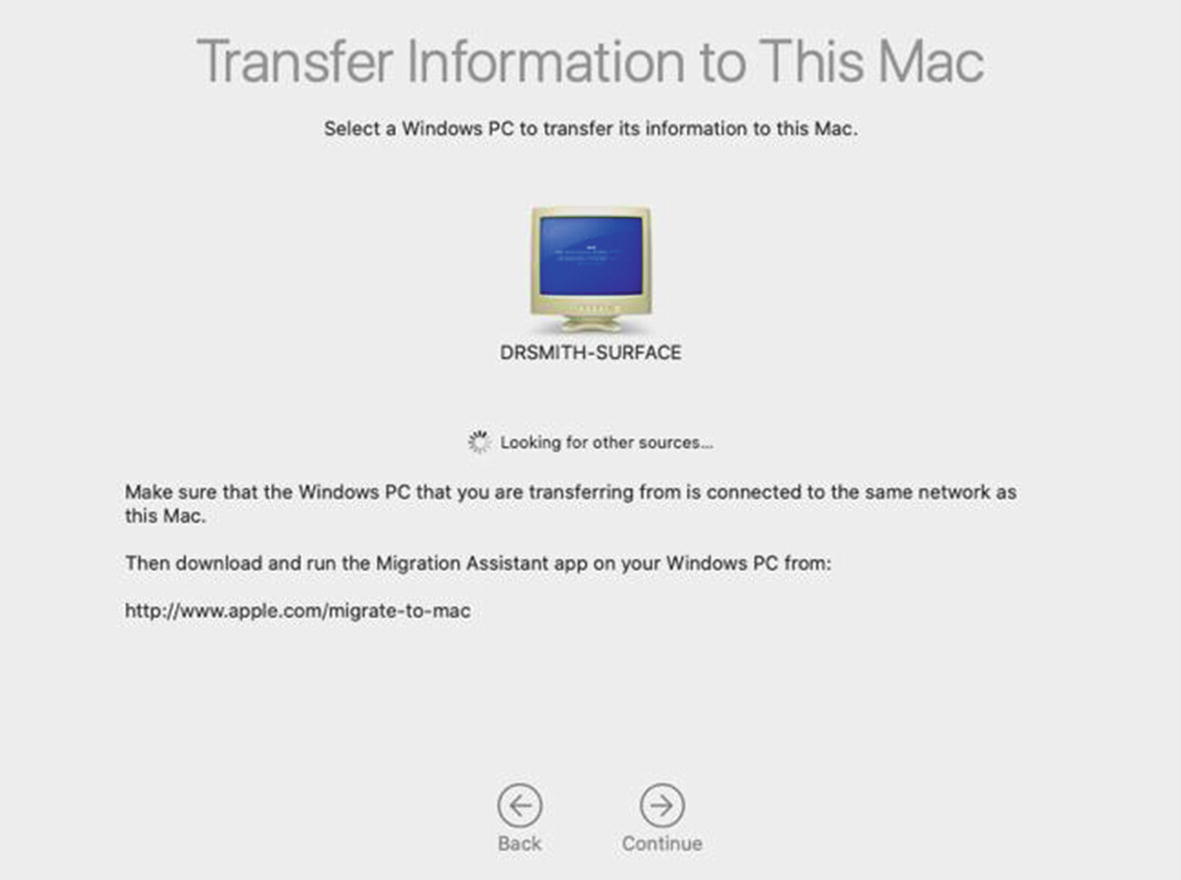
Selecting the PC to migrate from
When the computer you want to migrate from appears, select it and then click Continue. Switch back to the Windows PC and ensure that the security codes match between the Mac and Windows PC. Once you confirm that they do, click the Continue button on the Windows PC. It will begin gathering data and communicating with the new Mac. This may take several minutes.
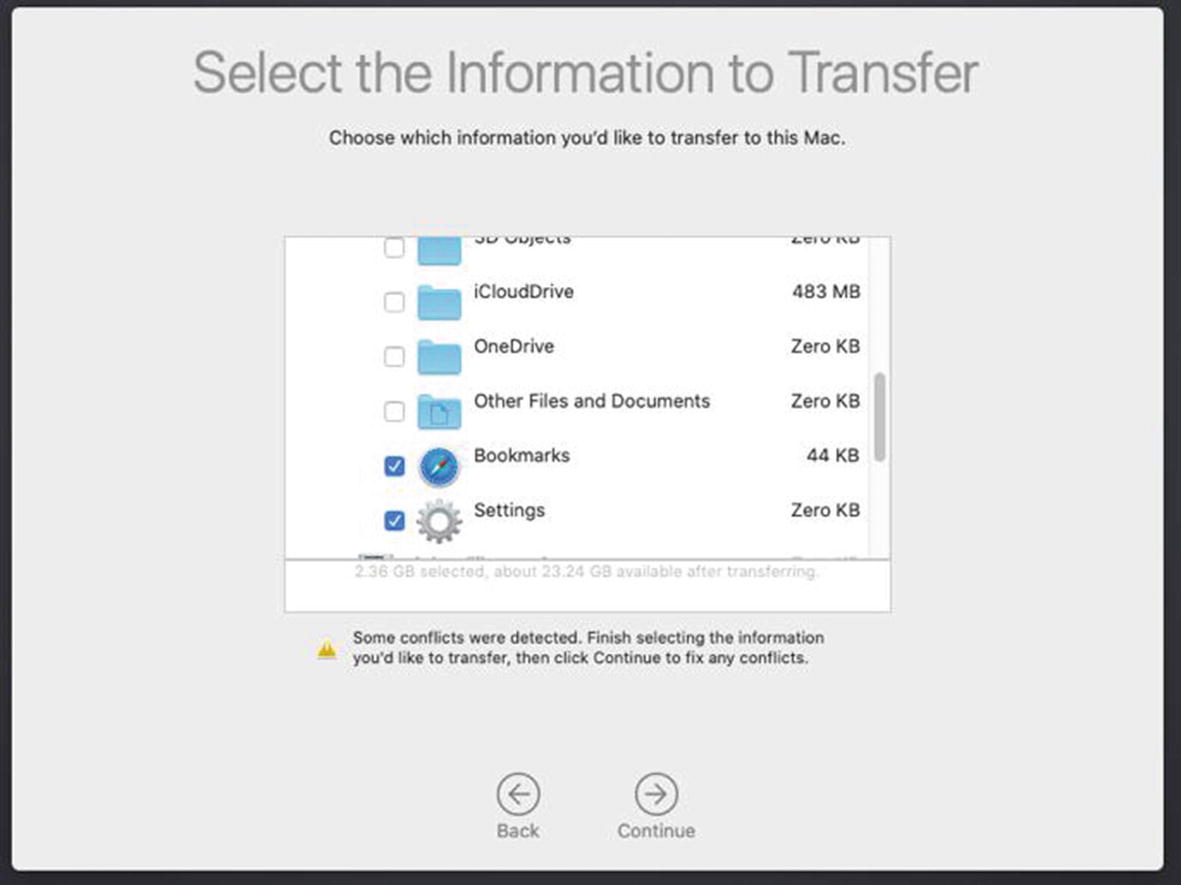
Select the files and settings you wish to migrate
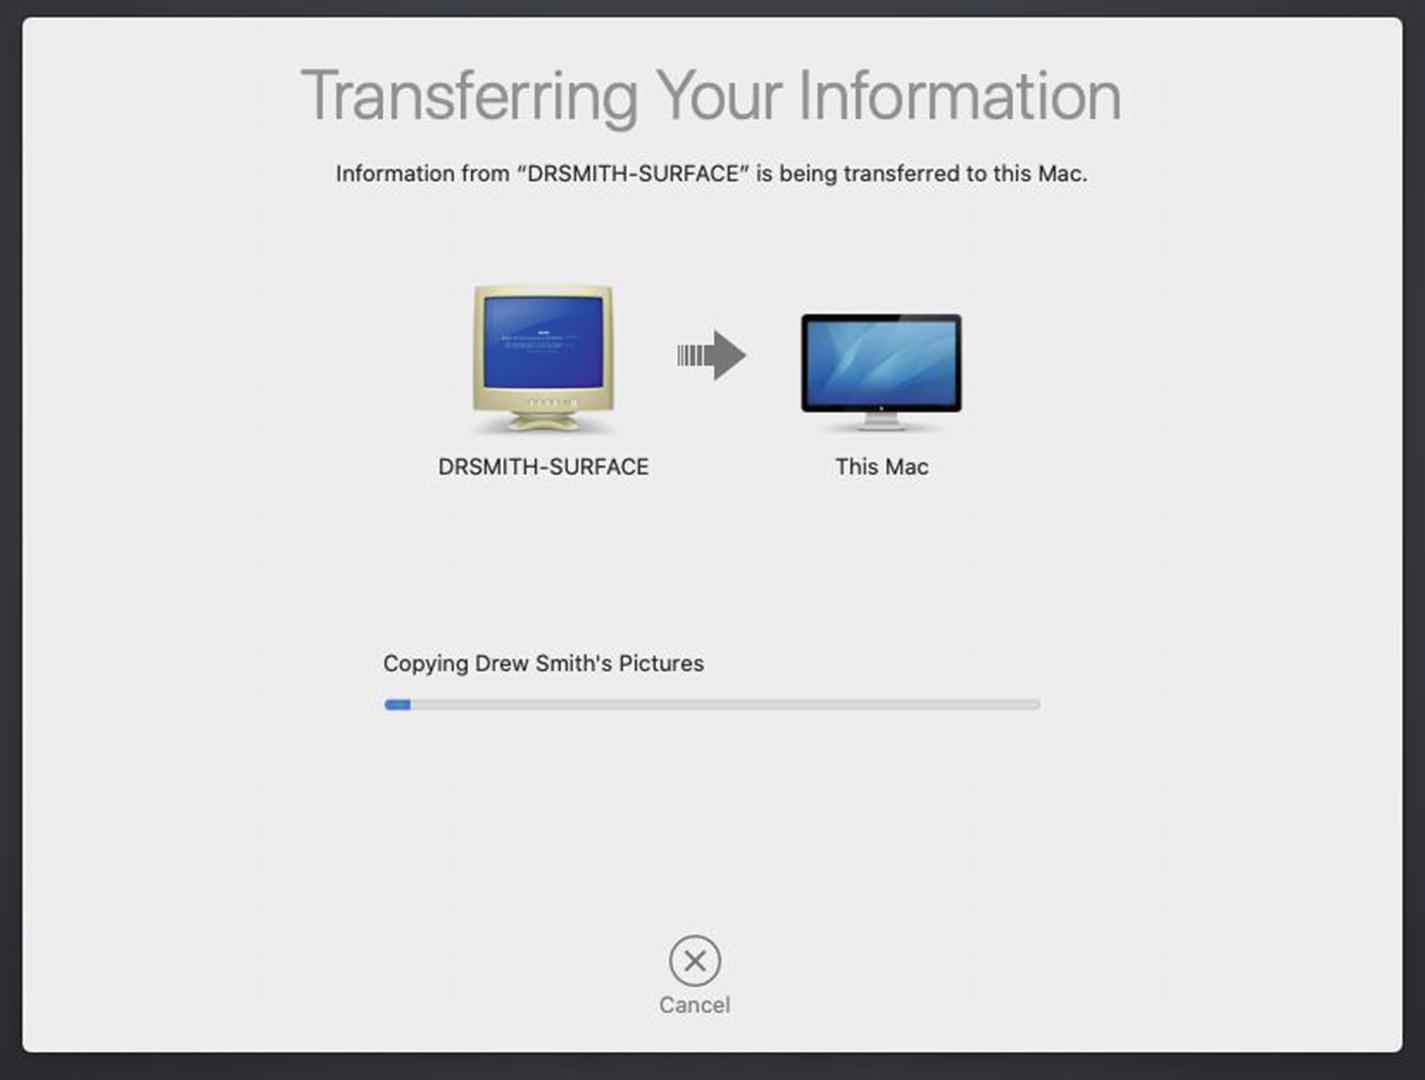
Transferring the data over the network
Moving the Migrated Data into Place
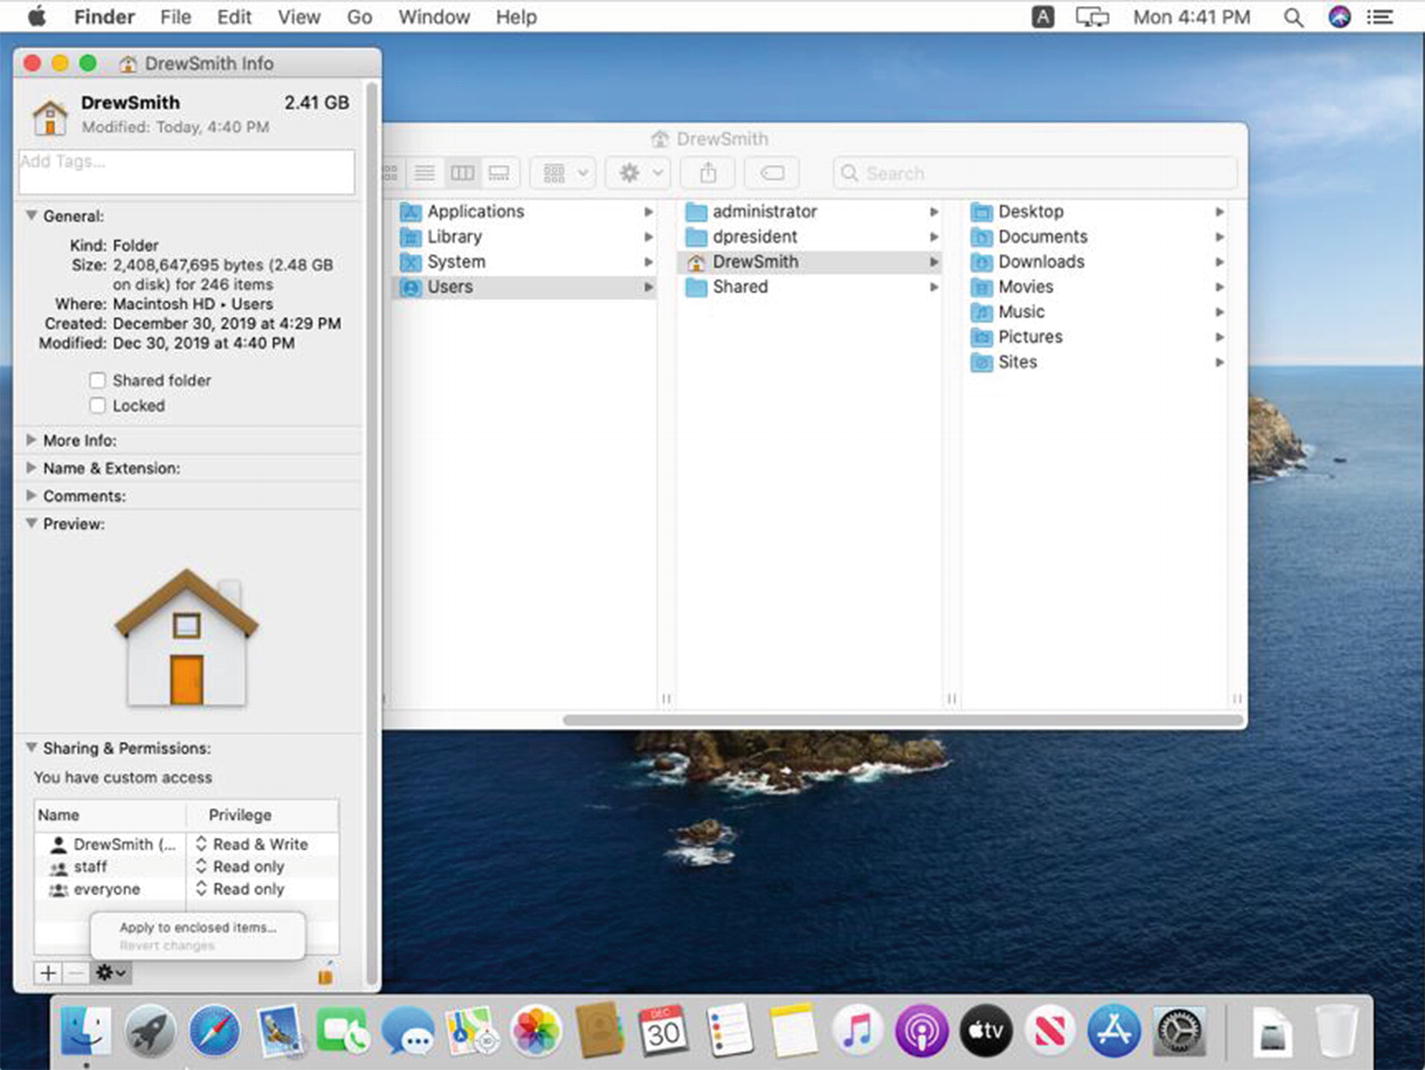
Using the Get Info ➤ Sharing & Permissions option to change permissions to the migrated folders
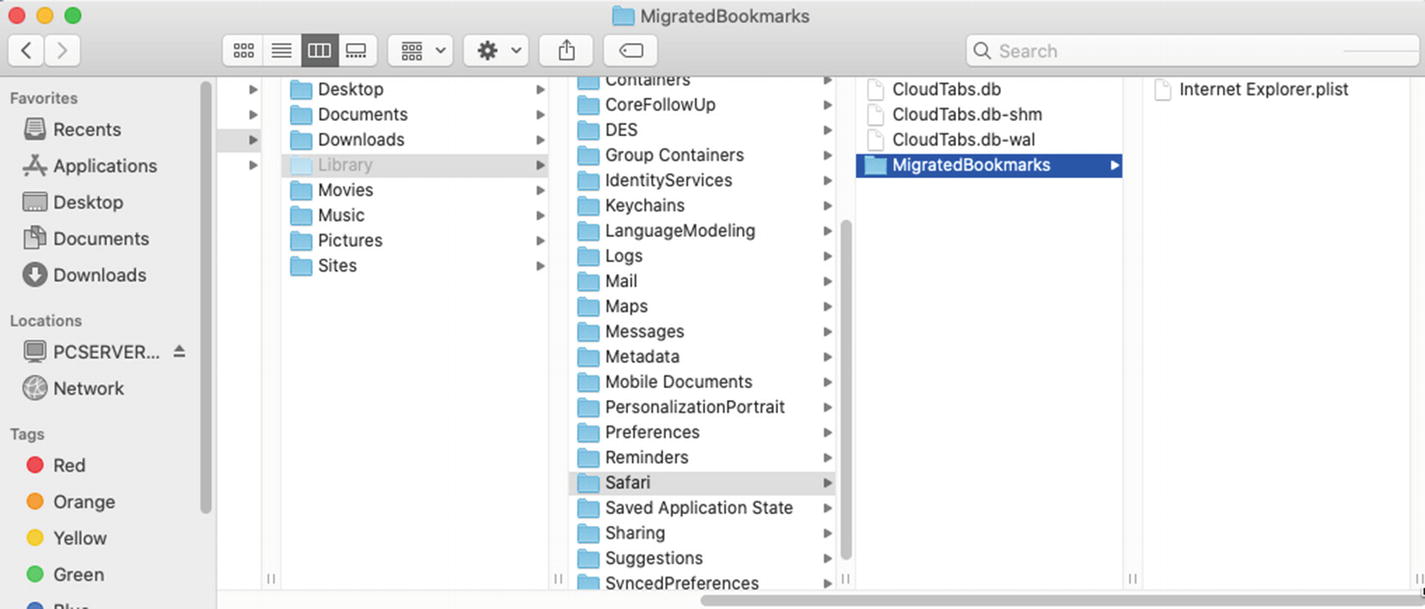
Moving Safari data from the migrated Library folder
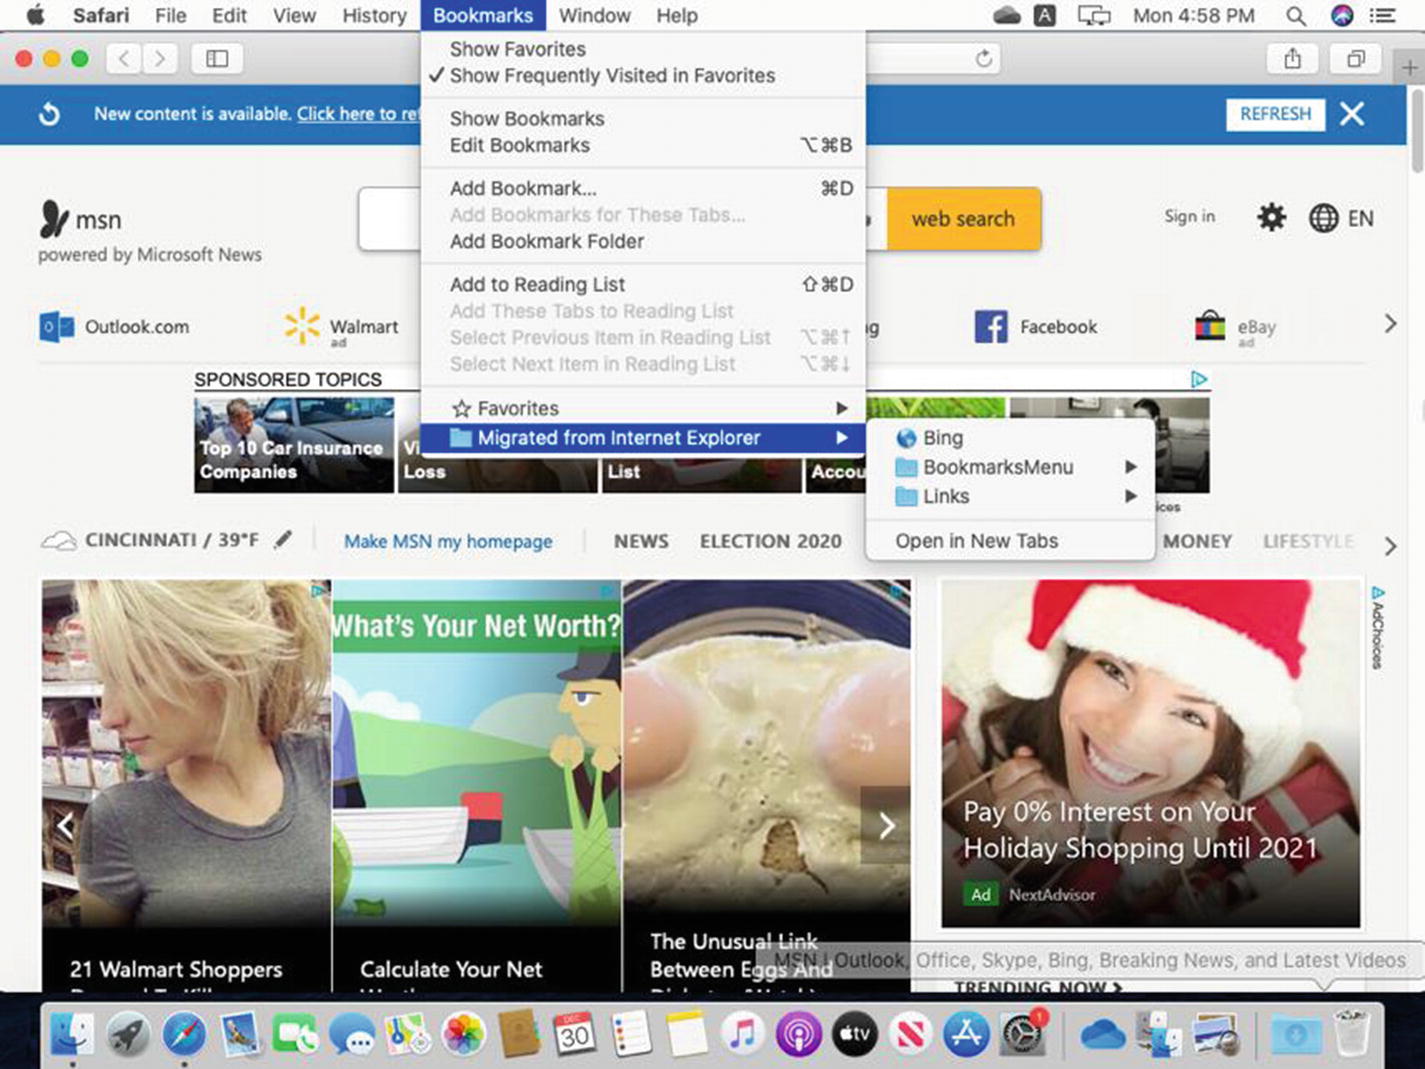
Confirming that the migrated IE Favorites are available in Don’s Safari Bookmarks menu
Unless I have a lot of data to migrate, I prefer to use OneDrive to move the user’s data off of the old PC and onto the new one. I will export the Internet Explorer Favorites using the File ➤ Export option in IE and then save them to a single directory. I can then import them into Safari on the new Mac. This method backs up the user’s data in Microsoft’s cloud and speeds up the restore process because I don’t have to copy data between two home directories and delete the user account that was created by the Migration Assistant.
Summary
In this chapter, we learned how to integrate Apple solutions into a corporate enterprise network comprised of Microsoft solutions. We migrated an executive user from a Windows PC to a MacBook Pro while allowing them to continue using the printers, file shares, and applications they were accustomed to without any loss of productivity. Using the same tools and strategies you learned in this chapter, you should be able to easily integrate a Mac, iPhone, or iPad into your existing Microsoft environment with minimal effort or extensive IT infrastructure changes.