Chapter 17. Laboratory: Photochemistry
Laboratory 17.1: Photochemical Reaction of Iodine and Oxalate
Ammonium oxalate reacts in solution with elemental iodine to form ammonium iodide and carbon dioxide, but the reaction rate is very low at room temperature. In this laboratory session, we investigate the effects on the reaction rate of elemental iodine with oxalate ions by exposing these reactants to various types and intensities of light for differing periods of time.
The balanced equation shows that one molecule of aqueous ammonium oxalate reacts with one molecule of iodine to form two molecules of ammonium iodide and two molecules of carbon dioxide.
(NH4)2C2O4(aq) + I2(aq) → 2 NH4I(aq) + 2 CO2(g)
Or, looking at the individual atom and ion species,
2 NH4+(aq) + C2O42–(aq) + 2 I0(aq) → 2 NH4+(aq) + 2 I–(aq) + 2 CO2(g)
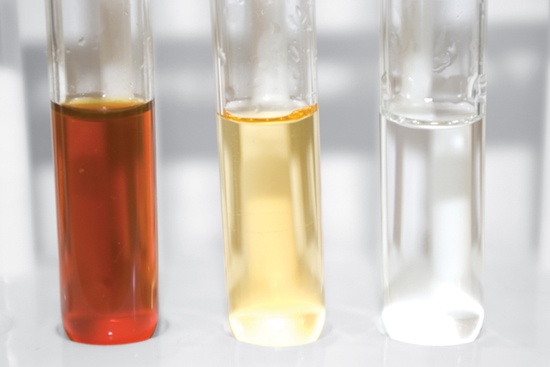
Oxalate ions are oxidized to carbon dioxide, and iodine is reduced to iodide ions. Iodine (oxidation state 0) is strongly colored in aqueous solution—an intense orange in the concentration we’re using—and iodide ions (oxidation state –1) are colorless. By observing the color change, if any, we can judge how far the reaction has proceeded to the right. If the solution remains orange, we know that it contains mostly reactants. If the solution turns colorless, we know that it contains mostly products. If the solution turns an intermediate color, we know that the solution contains a mixture of reactants and products proportionate to the degree of color change.
Procedure
This laboratory session has two parts. In Part I, we prepare standard reference solutions of iodine. In Part II, we test the effects of various types of light on the iodine/oxalate solutions and compare our results against the standard reference solutions we made in Part I. Setting up the experiment and completing the procedures in Parts I and II should take about 30 minutes of actual lab time.
Part I: Prepare Reference Samples
We expect that some or all of the types of light we use will cause the iodine/oxalate solution to react, partially or completely converting the orange iodine solution to colorless iodide solution. We can use the color of the resulting solutions to judge how far the reaction has proceeded. An intense orange color tells us that the reaction has proceeded little or not at all, and a colorless or pale yellow solution tells us that the reaction has proceeded to completion, or nearly so.
Just eyeballing each sample gives us imprecise results. We can judge that the reaction has proceeded to completion, mostly to completion, only a bit, or not at all. For quantitative results, we need a set of standard reference samples, with known concentrations of iodine. By comparing the test samples with these reference samples, we can judge the actual concentration of iodine in the test samples (and therefore how far the reaction has proceeded) with some degree of accuracy. (We’ll use the same visual colorimetry procedures we used in Laboratory 7.5: Determine Concentration of a Solution by Visual Colorimetry.)
Follow these steps to prepare a set of standard reference samples for comparison:
If you have not already done so, put on your splash goggles, gloves, and protective clothing.
Label six test tubes from 1 to 6.
Measure 8 mL of water into test tube #1 and add 20 drops (1 mL) of the iodine solution to yield 9 mL of dilute iodine solution. Stopper and shake test tube #1 to mix the contents thoroughly.
Caution
Oxalic acid is a strong organic acid that is very toxic and an irritant. Avoid breathing the dust or allowing it to contact your skin. Ammonia is an irritant. Tincture of iodine is an irritant and stains skin and clothing. (Stains can be removed with a dilute solution of sodium thiosulfate.) Wear splash goggles, gloves, and protective clothing.
Use a measuring pipette or Beral pipette and 10 mL graduated cylinder to transfer 4.5 mL (half the contents) from tube #1 to tube #2. Add 4.5 mL of water to tube #2 and mix thoroughly.
Transfer 4.5 mL (half the contents) from tube #2 to tube #3. Add 4.5 mL of water to tube #3 and mix thoroughly.
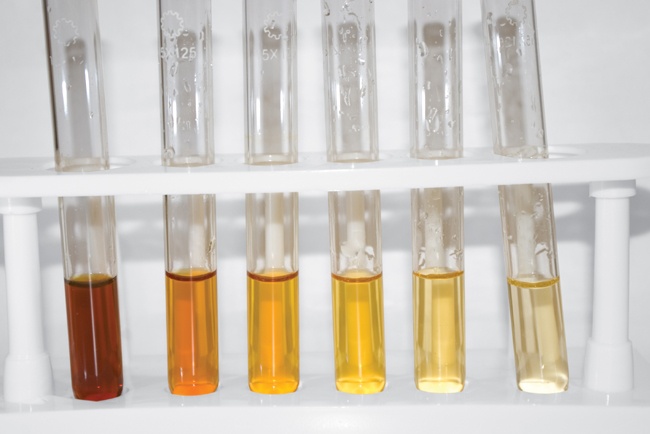
Repeat this procedure to create reference comparison samples in tubes #4, #5, and #6. When you finish, you have six test tubes, each of which has half the concentration of iodine that is in the preceding tube. Tube #1 should be an intense orange color, and tube #6 a pale yellow-orange.
Test tube #1 contains the same concentration of iodine that will be the starting point in the reactions in Part II. If we define the concentration of iodine in test tube #1 as 100%, test tubes #2 through #6 contain 50%, 25%, 12.5%, 6.25%, and 3.125%, respectively. Place these test tubes in one of the racks. You’ll use them later to estimate how far the reaction has proceeded in each of the test samples.
Part II: Determine the Effects of Different Light Sources on Iodine/Oxalate Solution Samples
If you have not already done so, put on your splash goggles, gloves, and protective clothing.
Place a weighing paper on the balance pan and tare the balance to read 0.00 g. Add oxalic acid crystals until the balance indicates about 2.5 g. (The exact amount is not critical.) If you do not have a balance, use 3/4 tsp. of oxalic acid crystals.
Transfer the oxalic acid crystals to the small beaker and add 25 mL of water, measured with your graduated cylinder. The solubility of pure oxalic acid in water is about 120 g/L at room temperature, so this solution is nearly saturated. You may need to stir the contents of the beaker to dissolve all of the crystals. If some crystals remain undissolved, you can decant the clear solution off to another container or warm the solution slightly to dissolve the few remaining crystals.
Once the oxalic acid crystals have dissolved, add 25 mL of clear household ammonia to the beaker and stir to mix the solutions. The oxalic acid and aqueous ammonia react to form a solution of ammonium oxalate.
Label six test tubes A through F, and transfer 4 mL of the ammonium oxalate solution to each of the six test tubes. (The exact amount is not critical, but keep the level in each of the test tubes the same.) Using 4 mL per test tube leaves you with about half of the ammonium oxalate solution unused, in case you need to repeat the experiment or collect additional data under different conditions.
Wrap test tube A in aluminum foil, leaving an open flap of foil at the top of the test tube, through which you will introduce the iodine solution. The goal is to prevent the solution in this test tube from being exposed to any light at all. The contents of this test tube will serve as the control.
Use the dropper or Beral pipette to transfer 10 drops of the iodine solution to test tube A, and immediately close the foil flap to prevent the contents of that test tube from being exposed to light. If necessary, put the test tube in a closed drawer or closet to protect it from exposure to light. (The reaction between ammonium oxalate and iodine produces carbon dioxide gas, so do not seal any of the test tubes with a cork or stopper.)
Working as quickly as possible, add 10 drops of the iodine solution to each of the remaining five test tubes. Expose these five test tubes to different light sources, as follows:
Expose test tube B to direct sunlight.
Expose test tube C to open shade (under an open sky, but not in direct sunlight).
Expose test tube D to the ambient light in your working area.
Expose test tube E as close as possible to a fluorescent light.
Expose test tube F close to a strong incandescent light. (but not close enough to be heated significantly by it).
As you expose each test tube to light, record the beginning time. Depending upon the intensity and type of light to which the test tube is exposed, the reaction may take from a few minutes to many hours to proceed to completion.
Examine each of the test tubes after 15 minutes, 30 minutes, one hour, two hours, and four hours of exposure. Compare the tint of the test tube to the comparison samples. Determine the nearest match, interpolating if necessary. Record your results in Table 17-1.
Disposal
Dilute all solutions with at least three or four times their volume of tap water and then flush them down the drain with plenty of water.
15 minutes | 30 minutes | One hour | Two hours | Four hours | |
Example | Halfway between #1 & #2 | Close match to #2 | Slightly paler than #6 | Colorless | N/A |
Test tube A (dark) | |||||
Test tube B (direct sun) | |||||
Test tube C (open shade) | |||||
Test tube D (ambient) | |||||
Test tube E (fluorescent) | |||||
Test tube F (incandescent) |
Review Questions
Q: | Q1: Which of the light sources caused the largest and smallest visible change in the iodine/oxalate solutions? Propose an explanation. __________________________________________________________________________________________ __________________________________________________________________________________________ __________________________________________________________________________________________ __________________________________________________________________________________________ __________________________________________________________________________________________ __________________________________________________________________________________________ __________________________________________________________________________________________ __________________________________________________________________________________________ __________________________________________________________________________________________ __________________________________________________________________________________________ __________________________________________________________________________________________ |
Q: | Q2: Examine the example data given in Table 17-1. What type of light source do you think was used? Do the data given for the 30-minutes and 1-hour times match what you would expect from the datum for the 15-minute exposure time? Why or why not? __________________________________________________________________________________________ __________________________________________________________________________________________ __________________________________________________________________________________________ __________________________________________________________________________________________ __________________________________________________________________________________________ __________________________________________________________________________________________ __________________________________________________________________________________________ __________________________________________________________________________________________ __________________________________________________________________________________________ __________________________________________________________________________________________ __________________________________________________________________________________________ __________________________________________________________________________________________ __________________________________________________________________________________________ |
Q: | Q3: If you performed this experiment under a type and intensity of light that caused a very rapid reaction, would you expect to see bubbles of carbon dioxide produced in the solution? If not, why not? (Hint: do the stoichiometry to determine the limiting reagent. How might the excess reagent react?) __________________________________________________________________________________________ __________________________________________________________________________________________ __________________________________________________________________________________________ __________________________________________________________________________________________ __________________________________________________________________________________________ __________________________________________________________________________________________ __________________________________________________________________________________________ __________________________________________________________________________________________ __________________________________________________________________________________________ __________________________________________________________________________________________ |
Q: | Q4: If you adjusted the amounts of reactants to near stoichiometric equivalence, would your answer to Q3 change? If not, why not? (Hint: look up the solubility of carbon dioxide and run the numbers.) __________________________________________________________________________________________ __________________________________________________________________________________________ __________________________________________________________________________________________ __________________________________________________________________________________________ __________________________________________________________________________________________ __________________________________________________________________________________________ __________________________________________________________________________________________ __________________________________________________________________________________________ __________________________________________________________________________________________ __________________________________________________________________________________________ __________________________________________________________________________________________ __________________________________________________________________________________________ __________________________________________________________________________________________ |


