First Things First: Creating a Solid Foundation
I had no idea that what I was doing before was wrong and most don’t. I thought it should work, but it just didn’t. And when it did, I didn’t know why. I had no idea what part of my marketing was working and what wasn’t, so I just did more of it, and more often, with that hope that it would work.
As I shared in this book’s introduction, I struggled for an extremely long time to make my business successful. I labored harder than I thought possible, at times doing a million “things,” hoping something would produce revenue.
When I did get a major sale, I usually had no idea why, other than what the prospect told me about where they came from. This tends to be the way most businesses track clients and sales, and it is riddled with assumptions and false data. When you start tracking your leads and sales sources, however, you will often find the prospect is wrong about where they think they came from. Accurate measurement requires more sophisticated ways of measuring ROI.
THE LAWS OF DIRECT-RESPONSE MARKETING
When I first read Dan Kennedy’s book, No B.S. Guide to Brand-Building by Direct Response: The Ultimate No Holds Barred Plan to Creating and Profiting from a Powerful Brand Without Buying It, I was blown away.
For the first time ever, I saw how marketing could equal results—how each action could be tracked. When I found something that worked, I could scale it. And quickly I would. When I found something that didn’t work, it would be eliminated quicker than an anchorman after a vulgar tweet.
Over the years, I have tweaked Dan Kennedy’s strategies and those of other mentors I have learned from, and added a few of my own as I find what works and what doesn’t, and what is my taste for doing things. Digital marketing gives us tracking options that go far and above what was ever possible before. It would be downright silly not to take advantage of these. And while Dan tends to be a gruff guy, as do many direct-response marketers, I tend to be a bit glam and have adjusted accordingly. (Hint, your marketing does not need to be ugly—more on that in a sec.)
Many direct-response marketers think social media is complete fluff, and for most companies, it is. That is because most marketers do not apply any direct marketing tactics to their strategic approach (if they are even strategic at all).
My firm places millions of dollars in ad spend in social media advertisements and is using direct-response marketing principles to achieve financially rewarding results for our clients—and frankly, for us, too (which makes us giddy).
For the sake of this book, I will share how to apply these principles to Instagram, but they work for all types of marketing. And they should be used accordingly.
It is my hope that you will find these principles as profitable as I have.
Direct-Response Marketing Rule 1: There Will Be TRACKING and MEASUREMENT
Ever hear that John Wannamaker quote, “I know 50 percent of my marketing is working. I just don’t know which 50 percent?” This philosophy is bogus. Everything in marketing is measurable. Everything.
And if it is not, you should find another strategy quickly or fire the person running your marketing. How will you ever know the ROI on your social media marketing unless you track it?
When it comes to Instagram marketing, do the following:
1. Use a unique URL and landing page in your bio. This way you know that every lead that comes in came from this source. Use tinyurl.com, bitly.com, or buy a new domain name to create this link.
2. Use a unique email address in your bio description. Create an email address just for Instagram so that when leads come in with this “To” line, you know where they came from.
Direct-Response Marketing Rule 2: There Will ALWAYS Be an OFFER or OFFERS
In Instagram, you never want to come across as a sales predator pouncing on his next kill, but you do need to ensure that you are giving your prospects a consistent opportunity to connect and do business with you. If you don’t, you will not realize a return of your marketing dollars and staff resources spent online.
Your marketing funnel will launch with the click of your bio link from your Instagram profile’s visitor. Make sure you draw attention to this link in your post description and bio so that visitors are given an opportunity to buy at some time. Remember, you are providing a solution to a need, and you are doing your prospects a service by giving them a chance to buy.
There are many types of offers you can run in an Instagram marketing and sales funnel.
Lead Generation
An incentive for your recipient to provide contact information. This is done through offering something of inherent value that is so good your recipient would pay for it, except they won’t because you will be giving it away for free. This can include any incentive such as:

![]() A report/white paper/guide
A report/white paper/guide

![]() Chapter of your book
Chapter of your book

![]() Ebook
Ebook

![]() Video
Video

![]() Gift certificate
Gift certificate

![]() Sample
Sample

![]() Webinar
Webinar

![]() Checklist
Checklist

![]() Script
Script

![]() Templates
Templates

![]() Swipe file
Swipe file

![]() Video training series
Video training series

![]() Ticket to a live event
Ticket to a live event

![]() Discount code/certificate
Discount code/certificate

![]() Sample
Sample
Sale
It is possible to sell directly to cold traffic on social media. We do it every day, but there are a few key things to remember. There should be something special about your offer, such as:

![]() It is being sold there first.
It is being sold there first.

![]() It is being sold for less money.
It is being sold for less money.

![]() It starts with a free trial.
It starts with a free trial.

![]() It comes with bonuses.
It comes with bonuses.

![]() It is time sensitive.
It is time sensitive.

![]() It is an outrageous offer—as in it is so good it is impossible to say no.
It is an outrageous offer—as in it is so good it is impossible to say no.
In contrast, if you sell the exact same thing on social media as you do everywhere else, for the exact same price, then you are most likely not going to realize great results. Social media is a cocktail party, not a shopping mall, and the only way to get people to pay attention to something being sold is to make sure it is a really good deal. Do that and everyone will pay attention and want in first.
At any one time, only a small percentage of people have intent to buy. According to Google, 18 percent of local searches leads to sales in contrast to only 7 percent of non-local searches (https://searchenginewatch.com/sew/study/2343577/google-local-searches-lead-50-of-mobile-users-to-visit-stores-study). For the rest of your target market, you need to create intent, so an incentive is needed.
Some examples of offers our clients are running effectively on social media:

![]() Women’s Institute for Gynecology & Minimally Invasive Surgery, LLC, runs a campaign starting with a guide on how hormones affect your body and mind and then encourages the prospect to schedule an appointment.
Women’s Institute for Gynecology & Minimally Invasive Surgery, LLC, runs a campaign starting with a guide on how hormones affect your body and mind and then encourages the prospect to schedule an appointment.

![]() The American Society for Tax Problem Solvers offers accountants five letter templates they can use with their clients to communicate with the IRS.
The American Society for Tax Problem Solvers offers accountants five letter templates they can use with their clients to communicate with the IRS.

![]() Financial planner John Smallwood offers a guide on ways to cut expenses so you can have more money for retirement.
Financial planner John Smallwood offers a guide on ways to cut expenses so you can have more money for retirement.

![]() Phelan Dental offers a free training for other dentists and sells a training course at the end—bringing in over six figures each month, on autopilot. (This does not suck.)
Phelan Dental offers a free training for other dentists and sells a training course at the end—bringing in over six figures each month, on autopilot. (This does not suck.)

![]() Modoma Health and Wellness offers an introductory massage for $39.
Modoma Health and Wellness offers an introductory massage for $39.
All very different offers for different types of businesses. But all are offering something of value as a first step in the collection of contact information.
Direct-Response Marketing Rule 3: There Will ALWAYS Be a REASON to RESPOND NOW
“I really could be busier. It’s just that I don’t have enough to do. If you could give me a few more things to fill my day, I would appreciate it,” said no one, ever.
Let’s face it. No one is walking around hoping you will give them more to do. Every prospect you encounter is busy and distracted, and unless you give them a reason to act now, they won’t. It is why so many gyms now offer boot camps. “Sign up now for the 21-Day Challenge: Abs from Flab to Fab!”
Adding in a reason to respond now gives that thing you can keep putting off “until next Monday” a deadline so you need to act now. Time-sensitive triggers include limited quantities, limited time, or are event, day, or time specific.
Direct-Response Marketing Rule 4: There Will ALWAYS Be CLEAR INSTRUCTIONS on How to RESPOND
Want your followers to comment on your post? Tell them. Want “hearts,” request the double tap. Simply telling your audience what you’d like them to do (call to action) can increase your engagement. A study by Search Engine Land (www.searchengineland.com) showed that simply giving clear instructions that lay out, step by step, exactly what you want your target market to do, will increase your conversions (actions taken by your target market) up to five times.
Direct-Response Marketing Rule 5: Brand Is Important but It Is Just the FIRST Step of a Marketing and Sales Funnel
In contrast to some old-school direct-response marketers, I believe your marketing need not and should not be ugly. If you make branding just the first step in a strategically executed marketing and sales funnel, brand can be leveraged to develop trust and authority positioning.
Bop Design (www.BopDesign.com) states, “80 percent of consumers are more likely to evaluate solutions from the brands they follow on social channels. Social media channels are a one-to-many solution for getting the word out about your products and services. By creating a strong brand presence on social media, you can reach a broader audience.”
After all, you are looking for lifetime customers here. Not one-time transactions. Branding is a strong way to start to build that trust. (See Chapter 3 for more on building your Instagram brand.)
Direct-Response Marketing Rule 6: RESULTS RULE. Period
There is an endless supply of conjecture by marketers, PR professionals, and “branding experts.” Be very cautious whenever you hear a universal truth about any type of marketing. My Elite Digital Group team places thousands of ads each week for clients across industries, geography, and products, and what we have found is that nothing can be deemed a universal truth, not even within the same industry. The only thing that should be used to determine your spend and marketing direction are the results of your own marketing. This is why everything needs to be tracked and checked every day.
Our reporting to clients tells them exactly what they spent on ads and our fee and how many qualified leads or customers they received that day. Keeping a hawk’s eye on spending and results allows us to quickly scale up or down a campaign without guessing if it is working.
As you develop your marketing and sales funnels, you will most likely find your own set of “laws.” I encourage you to start with the ones I outlined in this chapter and then tweak and add as you find a system that works for you. Above all else, let results, not conjecture, be your guiding force.
HOW TO SET UP YOUR ACCOUNT FOR MAXIMUM SUCCESS
Unfortunately for those of us (me included!) who prefer working on our desktops versus mobile apps, Instagram really is a mobile-only app. (For all of us over 40, let’s say a collective, “Dagnabit.” For all of those under, pretend that didn’t just happen. Please.)
While you can edit your profile and see your timeline on a desktop, pretty much everything else needs to be done on a mobile device. I have found a few workarounds, though, and we will get to those in a sec.
Finding Success with Instagram Begins with Setting Up Your Account Correctly
After you have downloaded the application from your app store you can get started. When you open the application, the registration screen will appear. Here you have the option of Signing In with your email or through Facebook (see Figure 2–1, page 23).
Signing Up with Your Email
Step 1. Select the option to sign up with your email address. You will need to have a valid email address to continue (see Figure 2–2, page 23).
Step 2. You will be taken to a page titled New Account. Put in your valid email address (there will be a verification email sent later on). Create a username. If the one you want is taken, you will be notified and given alternative username suggestions. Then you will create a password for your account. On this page you are given the option to add your phone number. This can make it easier for Instagram to verify your profile (see Figure 2–3 on page 23).
Step 3. Next you will be taken to the Edit Profile page. Here you will be asked to put in the name that you want to appear when someone views your profile, your username, website, and a brief bio. Definitely play around with your description in a Microsoft Word® document before pasting it into your profile.
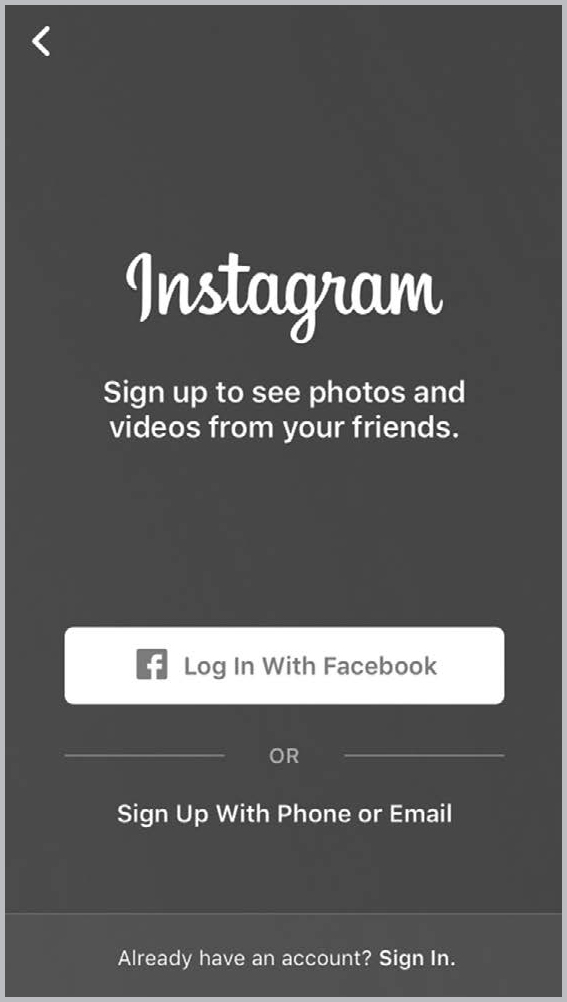
FIGURE 2–1. You Have the Option of Signing Up for Instagram Either Through Facebook or with Your Email.

FIGURE 2–2. Enter Your Email Address.
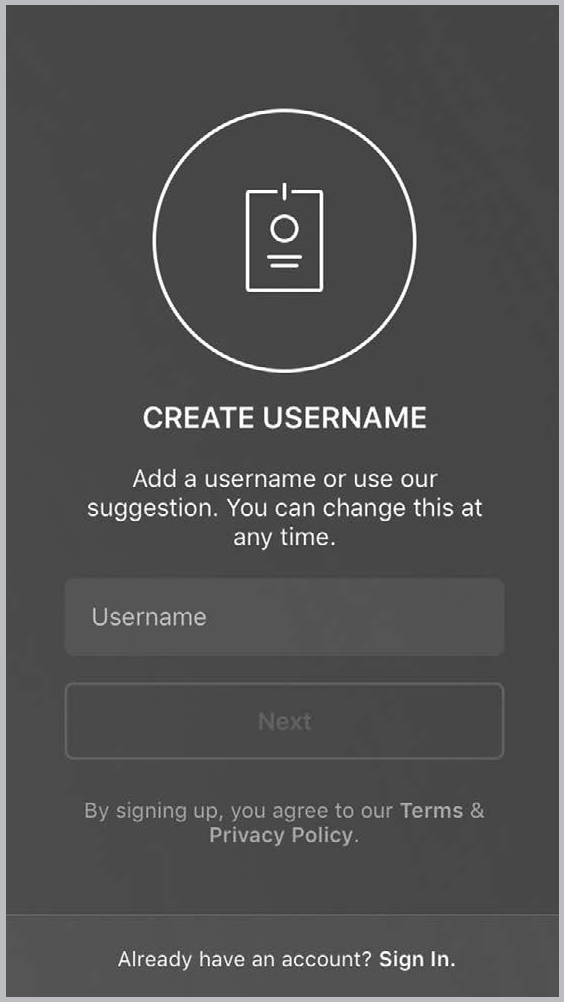
FIGURE 2–3. Pick a Username That You Want to Appear When Someone Views Your Profile.
Write your bio to really be about “them”—your target market.
Share with readers why they should connect with you by stating your unique selling proposition (USP). Tell viewers quickly why they would want to do business with you versus anyone else in the world and how it benefits them. Then follow it up with a link to a landing page offering value. If you have a lead magnet—like a free report, chapter download, or video—that is a great place to start. If not, then send them to your blog or other value-rich page on your site.
You can also add a profile picture on this page. You have the option of uploading an existing picture from your mobile device, taking a new picture right then, or choosing not to have a profile picture at all. Remember, this is your chance to let your followers get to know you a little bit, so make your personality show. (Don’t let too much “show,” if you know what I mean. And I am pretty sure you do.)
My recommendation here from a branding perspective is to only use a professional headshot, and no matter what, do not use a selfie. If you want to be treated like a market expert, show up that way.
Step 4. Check your email to verify your account. Once you complete that confirmation step, you are ready to search for friends, family, and celebrities to follow. You can also upload pictures because you are now an Instagram user.
Signing Up with Your Facebook Account
Since the big Facebook owns Instagram, they allow you to sign up for the platform using your Facebook account. Here’s how to do that:
Step 1. Select the option to “Log In with Facebook” and enter your username and password just like you would if you were signing into your Facebook account (see Figure 2–4, page 25).
Step 2. Verify that you would like to continue to create your Instagram account using your Facebook account (see Figure 2–5, page 25).
Step 3. The next screen will show your Facebook profile picture along with your profile name on Facebook. Here you can choose to change your profile picture or your display name (or you can keep both as they appear, see Figure 2–6, page 25).
Step 4. Next you will be asked to create a username. There will be a suggested username provided based on your Facebook profile name. You can choose to use the suggested username or you can create your own. Again, if the username you enter is already taken, you will be notified and alternatives will be provided (see Figure 2–7, page 27).
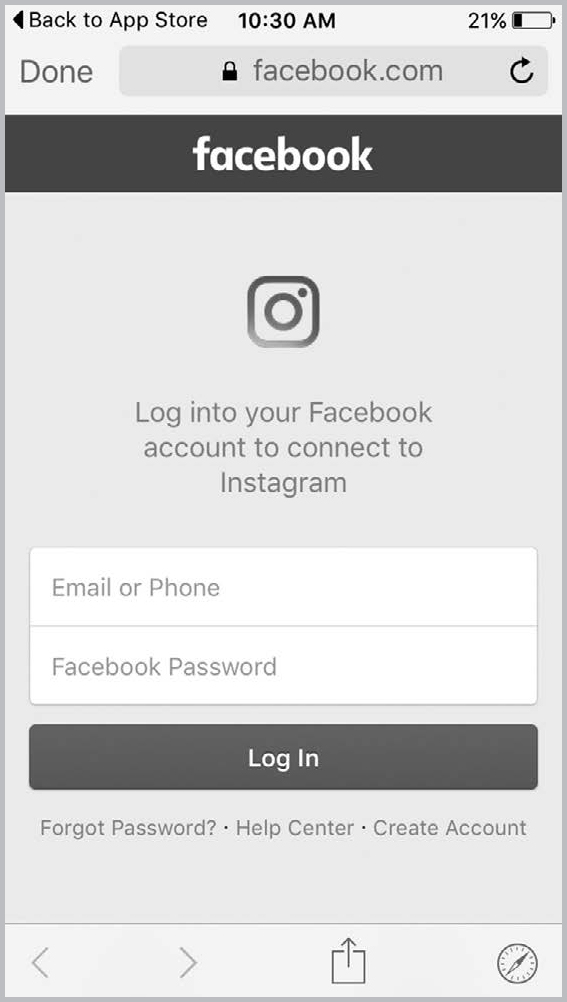
FIGURE 2–4. Log in to Facebook with Your Username and Password.
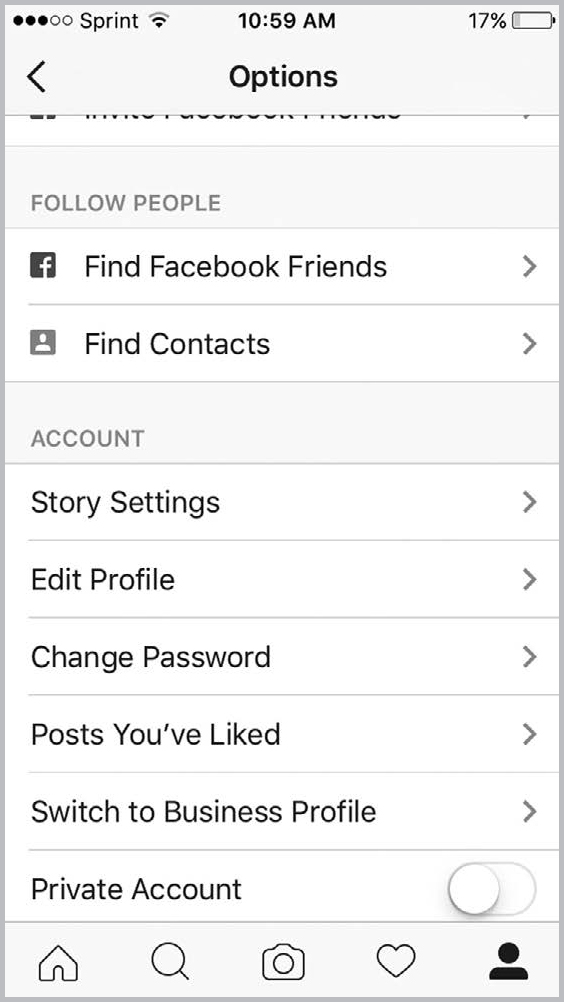
FIGURE 2–5. Verify that You Want to Create Your Instagram Account.

FIGURE 2–6. You Can Choose to Keep Your Profile Picture and Username from Your Facebook Account or You Can Create a New One.
Step 5. Then you can choose to follow your Facebook friends who also have an Instagram account linked to their Facebook account. Once you do this you can post pictures because you are now an Instagram user.
Creating Your Business Profile
Now that you’ve successfully created your Instagram profile you can build your business profile.
Step 1. Open your personal account and go to your profile. Click the settings wheel in the top-right corner. Scroll down and select “Switch to Business Profile” (see Figure 2–8, page 27).
Step 2. Now you can create your Business Profile through Facebook (see Figure 2–9, page 27). You can flip through the features and see that you can use your phone number, email, or location to connect to potential customers and see how well your posts are performing.
Step 3. Once you select to continue to use your Facebook profile, just enter your business account information. Profile details from your Facebook profile will automatically be displayed. You can choose to use this information or enter your own based on your personal preferences.
Step 4. After entering all your information you will be taken back to your Instagram page, which will now be a business profile!
At any time, you can view your profile from a visitor’s point of view so that you can see what your profile looks like to everyone else. (Don’t you wish you could do this in real life? I mean, how would the world see this black dress I am going to wear to Friday’s dinner?) By clicking the Contact button on your profile page you will see the engagement options that your followers and visitors will see when they view your business profile. Depending on your personal preferences, you can decide whether or not you want to edit the information your visitors will see.
Obviously the first thing a client will search for when trying to find your business is the name; however, the difference that will both set you apart from other users and gain landings is choosing a name and profile picture that make your brand linger in your viewers’ minds. Your assigned username should be the name of your business for people to easily find you online. The only problem with using your business name is that your establishment may have a name that already exists somewhere else in the world. In that event, it will be your profile picture and description that uniquely identifies your business in search results.
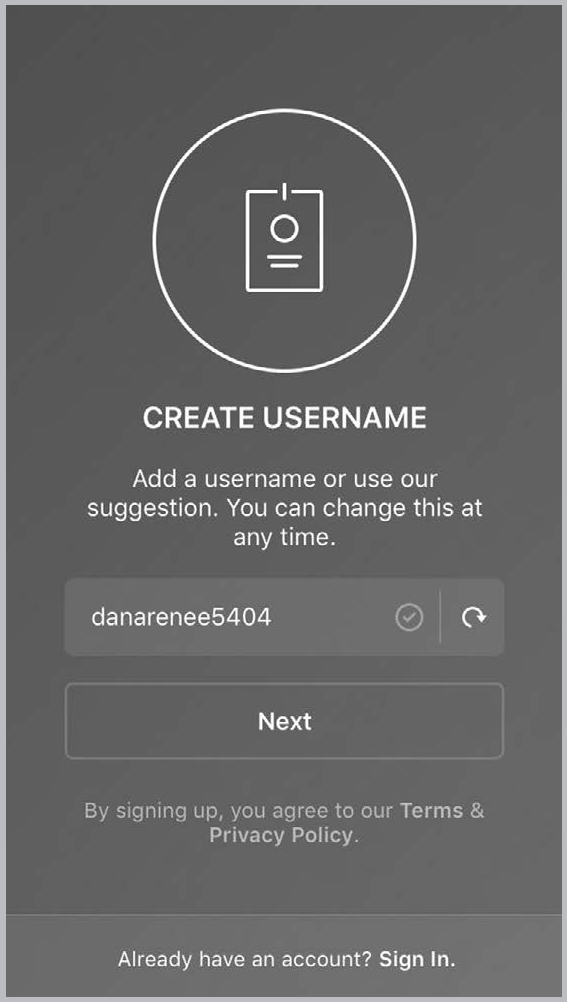
FIGURE 2–7. If You Want to Create a New Username and Add a New Profile Picture, This Is Where You Will Enter the Information.
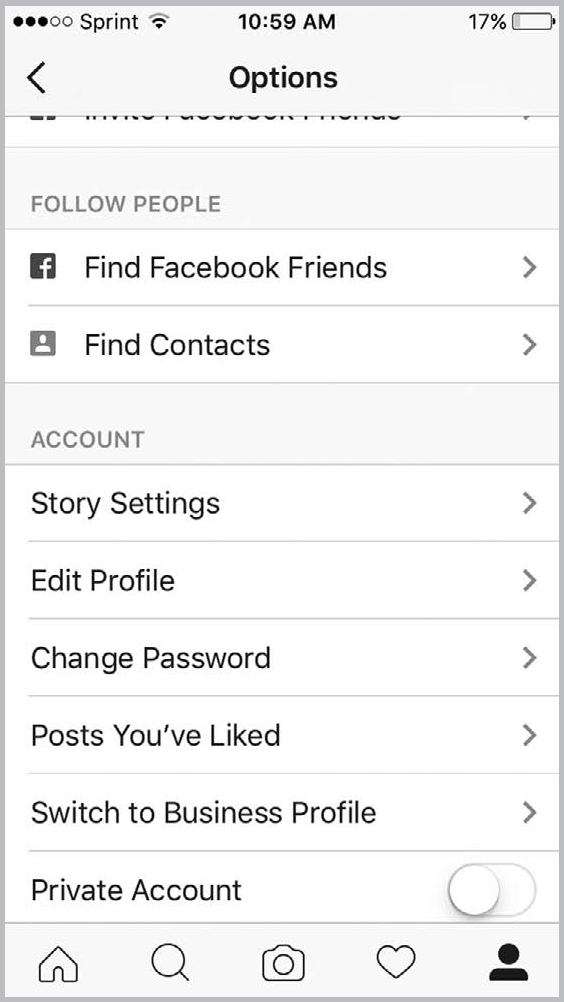
FIGURE 2–8. Click Switch to Business Profile to Create Your Business Profile.
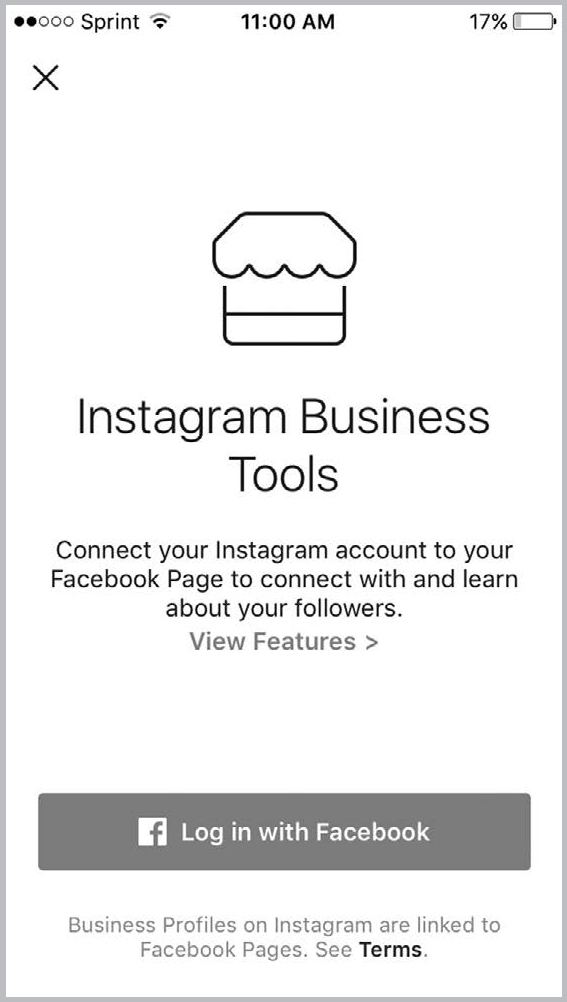
FIGURE 2–9. Connect Your Instagram Business Account with Your Facebook Business Profile.
If you are the face of your company, use your professional headshot as the account profile picture. If your company does not have a figurehead, use your company logo as your profile picture. (More on that later.)
If your business doesn’t have a logo, get one. Not only is it essential for a business to have a logo, this is the first thing users will see when typing your name into the search bar within Instagram. You can have a professional logo created quickly for just $5 on www.Fiverr.com. This logo should be the same image you use across all your social media platforms to make your personal branding consistent. Navigation between your various social media platforms will be more intuitive for your clients if all the pages have identical imagery.
You may be thinking, “Seriously, what kind of logo can I get for $5?!” I have ordered a bunch from Fiverr and have been really happy with them. And getting something done is way better than nothing at all—no excuses! (Hear me yelling that at you in the deepest Jillian Michaels voice possible, and while you are down there, gimme 20!)
The last step in setting up your profile is adding a description that gives a brief summary of what your business is all about. The Bio section can be a condensed version of your mission statement, a message for your fans, or anything you want to say that will convey the soul of your enterprise. Just like your personal branding, try to keep your info blurb similar across all your social media profiles. At the very end of your text input there should be a URL hyperlinked to your professional website. Directing online traffic to an actual website from your social media profile will add legitimacy to your establishment and ultimately result in conversions that will gain you business.
How to Use Instagram
Now that you’ve finished setting up your profile, it’s time to start using the app. Unlike that Steps app you downloaded last year, used for three days and then conveniently moved to the fourth page of your screen search, do not download and ignore. We are about to get our Instagram ROI on and this is going to be good!
Let’s start by adding some pictures to your profile. Click the camera icon at the bottom of the screen to either take a picture directly from your camera phone or import a photo from your library. Once you have a picture snapped or selected, it’s time to edit the photo using the filter presets within the app or tweaking the individual characteristics of the image. Click Next when you’ve finished editing the photo (see Figure 2–10, page 29).

FIGURE 2–10. First, Find an Image You Want to Upload to Instagram.
You are then presented with all of the tagging and linking options that make Instagram great for businesses. Let’s break down what each section does and how to best utilize it.
The first box allows you to write a caption for your photo (see Figure 2–11, page 30). In this space, you want to insert text that communicates the intent behind posting the picture, along with some categorized keywords (otherwise known as “hashtags”—see Figure 2–12, page 30). A hashtag, denoted by a “#” symbol preceding a single word or unbroken string of words, is how Instagram creates searchable content categorizes.
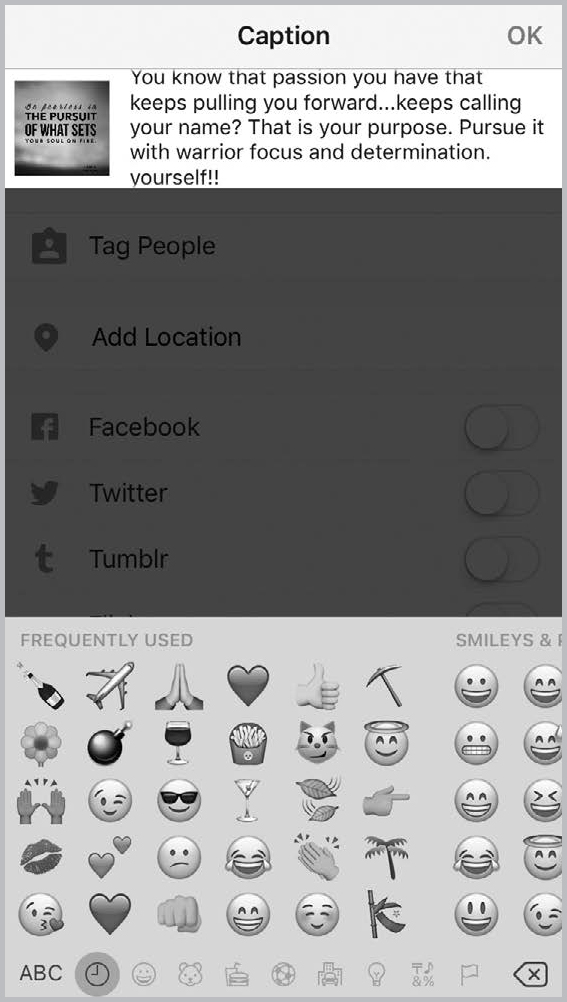
FIGURE 2–11. Then Add a Caption to Your Photo.
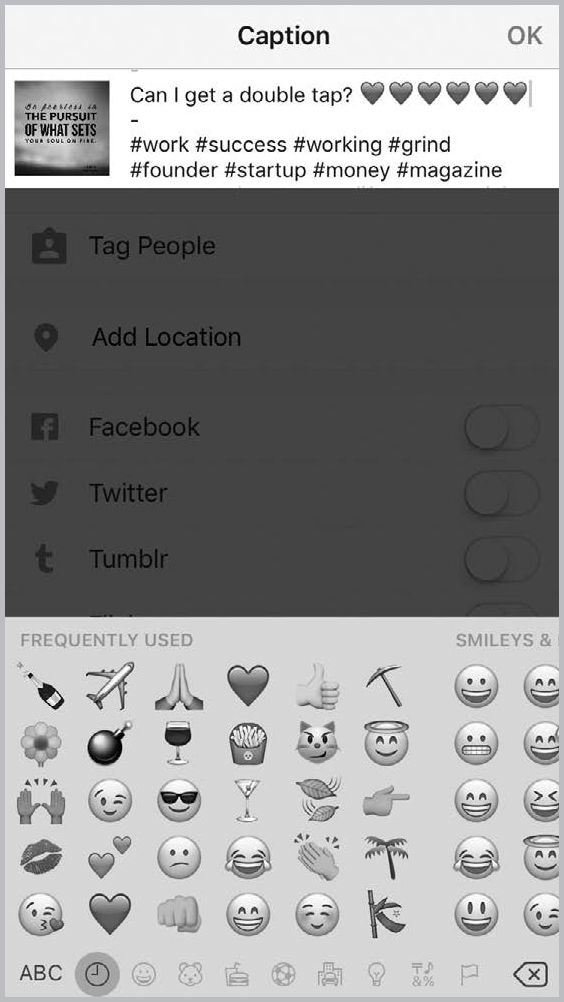
FIGURE 2–12. Be Sure to Include Hashtags That Will Get Your Prospects’ Attention.
Hashtags are used by businesses to gain followers by attracting the attention of public users. It is important that you include a large number of hashtags to cover a broad range of user traffic and keep them relevant to your industry to avoid spamming. For example, if I were the owner of a coffee shop I wouldn’t include #Roofing in my caption because that has nothing to do with coffee. (Duh, Ms. Obvious.) Instead I would include terms like #latteart, #barista, etc., that are directly relatable to your business and garner the attention of other people in your industry using the same hashtags. This is how you build relationships with followers as well as other businesses. (See Chapter 5 for more details.)
The next box marked “Tag People” is exactly what it says it’s for. OK, not exactly. It’s not like you are going to run around putting shiny gold gift tags on your peeps. This is all virtual and comes from the same terminology as Facebook and other social media profiles to indicate someone is included in your posts.
This is where you tag other users to link your media content with their profiles. As a business owner, the best use of this feature is to tag other independent businesses that you may be collaborating with or clients you might feature. This will provide a link for your followers to explore your business partners’ pages, and it shows that you conduct honest business.
![]()
HOW TO MAKE WRITING POST DESCRIPTIONS EASIER ON MOBILE
I hate typing descriptions on my phone. Hate, hate, hate. I get spelling errors, write only really short ones because I get lazy, and tend to flub up the whole thing when I am typing on mobile. I have found a workaround, though—I write all of my posts in the Notes app on my Mac (which syncs with my phone in the iCloud) and then snag it from the Notes app on my phone to paste in. Other options include Evernote, Google Notes, or any other list-making app that can work on both your computer and phone.
If you don’t want to include a tag within the actual photo itself, you also have the option of linking to another profile by typing a username within the caption section by putting the @ symbol before the name. This creates a hyperlink to the other user’s Instagram profile.
Adding tags also directs user traffic to your page by linking your profile with the people or businesses tagged in your photos. Followers are able to see photos those users were tagged in by clicking on the tab for tagged photos. Basically, if a user follows a partner business that you’ve tagged on Instagram, chances are they are going to find you by association. That’s a win-win for both you and the other enterprise you’ve teamed up with.
This is where some businesses will spam and spam some more by tagging other Instagrammers who have nothing to do with the post, just to get their attention. Once is fine if done with purpose. But do it all of the time, and you’ll become an annoying gnat that will be swatted away, as you will deserve. (Can you tell I hate being spam-tagged?!)
Next is the option to “Add Location” if you desire to have your followers know where you’re located. This is obviously not applicable if you run a business purely online or from your private residence. (Unless you want to be found, and that’s your thing. If so, this feature is all yours.)
If you have a brick-and-mortar establishment, it would be wise to include your location in your posts so your followers can find you for services and goods. Adding your location to your Instagram post creates a link under your username that users can click on to find a pinned map of your location as well as posts you have either made or been tagged in. This is yet another way to direct online traffic to your Instagram page for more landings and conversions on your website and social media platforms. Score!
You can also link your other social media profiles with Instagram so you can simultaneously have your post show up across all your profiles. Currently, Instagram has the option to connect with Facebook, Twitter, Tumblr, Flicker, and Swarm. To link these profiles with your Instagram feed, go into the Settings tab and scroll down to Linked Accounts. From there, you can log in to your other social media platforms to allow them access to your Instagram content.
The accounts you select will now show up as sliders at the bottom of the photo information screen. Just tap the sites you would like Instagram to post on before you tap Share, and voilà! Now your filtered photograph from Instagram and all of those content-rich hashtags have posted to all your other social media pages. Your contacts and followers from those other sites will see you have an Instagram feed that they can start following and interacting with.
I am not a huge fan of linking all accounts because I find that my reach is better on each platform when I post directly, but if you are short on time, it might be best. But then I will mock you when I see you do that, so if you don’t like being mocked, don’t link. (Just kidding, I won’t mock you. But you still shouldn’t link. Wink.)
Adding Effects and Filters
Filters are about the best thing and reason why Instagram is so popular. With the click of a button we can apply the same filters that the media does to make our photos pop, skin look more even, or the sunset pinker. I know, I know—this is a distorted reality. All I am saying is that if I could apply these filters to myself in real life, I would in a nanosecond. It really would have helped my appearance while I was utterly sleep-deprived in the months that followed giving birth to each of my two daughters.
How Do I Apply Filters to My Photo or Video?
Once you’ve taken a photo or video, or selected one from your phone or tablet, you can edit it by applying filters:
1. Tap Next, then tap the filter you’d like to apply.
2. Tap the filter again if you want to adjust the filter strength up or down using the slider. Tap Done to save your changes.
3. Tap Next to add a caption and location and to share your photo.
Are There Personalization Options?
For the super users, I have a red cape for you. You can always personalize your filters by adding, hiding, and rearranging the ones you see when posting a photo or video.
Start by uploading a photo or video and swiping all the way to the right on your filters, until you reach the end. Then tap Manage. From there, you can:

![]() Add a filter. Tap the filter you’d like to add. You’ll see
Add a filter. Tap the filter you’d like to add. You’ll see 
![]() next to the filters that currently appear when you post a photo or video.
next to the filters that currently appear when you post a photo or video.

![]() Hide a filter. Tap the filter you’d like to hide. You’ll see
Hide a filter. Tap the filter you’d like to hide. You’ll see 
![]() next to filters that are hidden.
next to filters that are hidden.

![]() Rearrange your filters. Tap and hold the filter you’d like to move. Then drag it to the position you’d like.
Rearrange your filters. Tap and hold the filter you’d like to move. Then drag it to the position you’d like.
When you’ve finished personalizing your filters, tap Done to return to your photo or video.
How Do I Apply Effects to My Photo?
You can edit photos you take or upload from your phone’s library. Once you’ve taken or uploaded a photo, tap Next, then tap Edit at the bottom of the screen. Learn more about the effects you can create:

![]() Tap
Tap 
![]() Adjust to change the photo’s vertical or horizontal perspective.
Adjust to change the photo’s vertical or horizontal perspective.

![]() Tap
Tap 
![]() Brightness to make your photo brighter or darker.
Brightness to make your photo brighter or darker.

![]() Tap
Tap 
![]() Contrast to make the bright areas of your photo brighter and the dark areas darker.
Contrast to make the bright areas of your photo brighter and the dark areas darker.

![]() Tap
Tap 
![]() Structure to bring out the detail and texture in your photo.
Structure to bring out the detail and texture in your photo.

![]() Tap
Tap 
![]() Warmth to shift the colors of your photo toward warmer orange tones or cooler blue tones.
Warmth to shift the colors of your photo toward warmer orange tones or cooler blue tones.

![]() Tap
Tap 
![]() Saturation to increase or decrease the color intensity of the image (ex: adjust up to make the red more red).
Saturation to increase or decrease the color intensity of the image (ex: adjust up to make the red more red).

![]() Tap
Tap 
![]() Color to add a color (yellow, orange, red, pink, purple, blue, cyan, or green) to either the shadows or highlights of your photo. Tap the color you want to use twice to adjust the strength of the color.
Color to add a color (yellow, orange, red, pink, purple, blue, cyan, or green) to either the shadows or highlights of your photo. Tap the color you want to use twice to adjust the strength of the color.
Tap 
![]() Fade to give your photo an aged look.
Fade to give your photo an aged look.
Tap 
![]() Highlights to adjust the focus on the bright areas of the image.
Highlights to adjust the focus on the bright areas of the image.
Tap 
![]() Shadows to adjust focus on the dark areas of the image.
Shadows to adjust focus on the dark areas of the image.
Tap 
![]() Vignette to darken the edges of the photo. Adding a vignette can direct the attention away from the edges toward the center of the photo.
Vignette to darken the edges of the photo. Adding a vignette can direct the attention away from the edges toward the center of the photo.
Tap 
![]() Sharpen to add crispness to your photo and make the photo appear clearer.
Sharpen to add crispness to your photo and make the photo appear clearer.
Frequently Asked Questions
I just applied an effect to my photo. How do I compare it to the original version?
Before posting a photo, you can tap on it anywhere to see what the original version looked like.
How can I tell which effects I’ve applied to my photo?
In preview mode, a gray dot will appear below each of the effects you’ve applied to your photo. For example, a gray dot below Brightness means you’ve adjusted the brightness of your photo.
How do I remove some of the effects I’ve applied to my photo?
You can remove any of the effects you’ve applied as long as your post is in preview mode and you haven’t shared it yet. A gray dot appears under each of the effects you’ve applied to the photo.
To undo or remove an effect:
1. Tap the tool you used.
2. Adjust the slider back to 0.
3. Tap to save your change.
How do I turn borders on or off?
You can add a border to any filtered photo:
1. Choose the filter you want to apply to your photo.
2. Tap the filter again and then tap on the right side to add a border. Tap it again to remove it.
3. Tap x to cancel, or tap the checkmark to save your change.
How do I crop my photo?
After you’ve uploaded or taken a new photo, you can crop it. To crop a photo:
1. Tap 
![]() Adjust.
Adjust.
2. Touch the screen and pinch to zoom in. Then move the photo and adjust how it fits within the frame. Use the grid to help you frame the photo.
3. Tap Cancel to cancel or tap Done to save your change.
How do I straighten a photo?
When you take a photo using the Instagram in-app camera or upload a photo from your phone’s library, you can straighten it with the Adjust tool. Once you upload a photo:
1. Take or upload a photo, then tap Edit at the bottom of the screen.
2. Tap 
![]() Adjust, then swipe the slider left or right to straighten the photo. Use the grid to help you frame the photo.
Adjust, then swipe the slider left or right to straighten the photo. Use the grid to help you frame the photo.
3. Tap Cancel to cancel or tap Done to save your change.
How do I rotate a photo?
You can rotate a photo after taking it or uploading it from your phone’s library. To rotate your photo:
1. Tap 
![]() Adjust.
Adjust.
2. Tap to rotate your photo.
3. Tap x to cancel, or tap the checkmark to save your change.
(Source: Instagram.com)
Now that you are all set up and know how to use the app, it’s time to start using it to get a high ROI. In the next chapter we’ll dive into creating your Instagram page’s look and feel.
#INSTAGRAMFORBUSINESS POSTABLES

![]() Marketing should equal results. #InstagramforBusiness
Marketing should equal results. #InstagramforBusiness

![]() Everything in marketing is measurable. Everything. #InstagramforBusiness
Everything in marketing is measurable. Everything. #InstagramforBusiness

![]() There should always be an offer. Or offers. #InstagramforBusiness
There should always be an offer. Or offers. #InstagramforBusiness

![]() It IS possible to sell directly to cold traffic on social media. #InstagramforBusiness
It IS possible to sell directly to cold traffic on social media. #InstagramforBusiness

![]() There should ALWAYS be a REASON to RESPOND NOW. #InstagramforBusiness
There should ALWAYS be a REASON to RESPOND NOW. #InstagramforBusiness

![]() Brand is important, but it is just the FIRST step of a marketing and sales funnel. #InstagramforBusiness
Brand is important, but it is just the FIRST step of a marketing and sales funnel. #InstagramforBusiness

![]() RESULTS RULE. Period. #InstagramforBusiness
RESULTS RULE. Period. #InstagramforBusiness
Resource spotlight: Visit www.UGIGbook.com to download over 20 postable images!