2.3 Data Structures
The SAP system typically contains various data, such as master data, user data, and transaction data. Each SAP system further consists of multiple clients. A client represents an organizational unit in an SAP system.
In SAP systems, the following terms must be differentiated with regard to the data structure:
-
Client-specific data
Data that exists within a specific client of the system -
Cross-client (client-independent) data
Data that exists across all the clients of the system.
In other words, when we store any data in an SAP system, the data can be specific to a client or it can be accessed centrally from any client.
In this section, we will discuss the concept of a client, the significance of using different clients, and how our decisions about clients influence the data stored in an SAP system.
2.3.1 Client Overview
Each SAP system can be divided into multiple clients, and each client is identified by a three-digit numeric value. Each client has its own master data, user data, and transactional data. The data in a client is known as client-specific data.
Each SAP system logon must include a client ID (see Figure 2.8), which indicates a logon to a specific client.
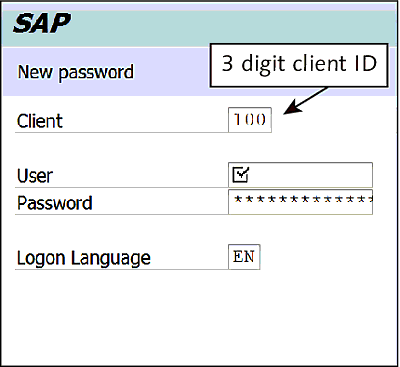
Figure 2.8 Client ID on Logon Screen
2.3.2 Client-Specific and Cross-Client Data
As mentioned previously, data in an SAP system is either client-specific or cross-client. Client-specific data is visible only in the client in which the data was created, whereas cross-client data is accessible from any client in the system.
Because the data in an SAP system is always stored in a database table, the data is restricted to a client by maintaining a client column (field) in the application table. These tables are called client-specific tables and the client columns (see Figure 2.9) are called MANDT.

Figure 2.9 Client Field in Table
The MANDT field stores the current client number in which the data is generated. While accessing the data from the client-specific tables, the system automatically matches the user’s current client with the MANDT field of the table, restricting the data to the current client.
For example, say a purchase order is created while logged on to client 100. The relevant purchase order application–related database tables update with the new purchase order data, and the MANDT fields of those tables will be updated with the client number (100 in this case) automatically. If you try to open the purchase order in another client—say, client 200—the system won’t show the purchase orders created in client 100, because it will try to match the MANDT field with 200.
For cross-client tables, the MANDT field isn’t part of the table key, so the data isn’t restricted to the client. The data can be accessed from any client of the system. To find out if the data in a table is client-dependent or cross-client, check if the table has MANDT as the first field and as part of the key, as shown in Figure 2.9.
For example, say that the material master table MARA has MANDT as the first field and part of the table key. This makes table MARA client-specific. If you create a new material in client 100, then the material data is visible only in client 100. You can’t access this data from other clients of the system. Similarly, if the material data is changed in a particular client, then the change won’t affect the data in other clients of the system. Application data is generally client-specific, and customizing data is generally cross-client.
The client concept entails splitting your SAP system into multiple clients and separating the data by either restricting it to a particular client or keeping it cross-client.
When you log on to an SAP system, you’re logging onto a particular client. Any activities carried out in the system are always carried out in one specific client. When planning the SAP system landscape, you can create various clients for various activities. For example, you can have one client for development, one client for testing (QA), and one client for production.
Some of the most important client roles are as follows:
-
Customizing and development client (CUST)
The SAP system software is standard business software and is adapted to company-specific business requirements when implemented. To customize the SAP software and carry out various development activities, each SAP system has a CUST client. -
Quality assurance client (QTST)
Once the developments are completed in CUST, they need to be tested thoroughly before the application can be used in production. The client in which these tests are carried out is called QTST. The QTST client is generally refreshed with production data at regular intervals so that applications can be tested with more realistic production data. -
Production client (PROD)
The production environment uses a different client, PROD. PROD is where actual business activities take place. There are no development or testing activities in this client in order to ensure smooth business operations.
These three clients (CUST, QTST, and PROD) are central clients that exist in every system landscape. In general, these three clients are maintained in separate systems and SAP instances, with some transportation mechanism in place to move objects between clients.
Each system will have precisely one client for each of these client roles. The development system will have a CUST client, the quality system will have a QTST client, and the production system will have a PROD client.
For example, ABAP programs are cross-client. When you create a program in one client, it is made automatically available in all the clients of that system. If you change the program in a CUST client, the changes automatically will be reflected in the QTST and PROD clients (if all the clients are set up in the same SAP instance). If all clients are set up in the same instance, you won’t have the opportunity to test your program changes. By keeping the clients in separate systems, you can make your changes in the development system, transport them to the quality system for testing, and once you’re satisfied, import them to the production system.
In order to maintain consistency across clients, we recommend that all the Customizing settings be carried out in a single Customizing client and transported (with the Change and Transport System [CTS]) to other clients. This helps prevent situations in which applications behave differently in different clients due to different customization settings.
We also recommend that no Customizing settings or workbench developments be carried out in the QTST or PROD clients. If you establish the appropriate client settings using Transaction SCC4 to prevent any development activities in the QTST and PROD clients, this ensures that development activities are always carried out in the CUST client and transported to other clients for testing and subsequent use by end users in the production environment.
2.3.3 Repository
The repository is a central store for all ABAP Workbench development objects, such as ABAP programs, screens, menus, function modules, and ABAP Data Dictionary objects.
As discussed in Section 2.2.3, all data, including the source code of ABAP programs and table definitions, is stored in database tables. These tables are not restricted by the client field (MANDT), making them cross-client. Therefore, if you create a table or a program in one client, it is automatically available in all clients. All repository objects are cross-client.
In other words, a table is cross-client, but the data in a table can be made client-specific or cross-client by including or ignoring the client field.
2.3.4 Packages
Repository objects are organized into packages. Packages contain related development objects, like programs or tables.
If you create multiple reports, a class, and a few tables for a project, keeping these semantically linked objects in one package helps to identify the related development objects for a project. This allows you to easily identify the dependent objects that need to be changed when the project requirement changes. Packages also transport all related objects together between clients.
Packages can be broadly classified as transportable or non-transportable:
-
Transportable package
A transportable package is a package in which transport attributes are defined. The objects in the transport package can be transported to the target system.
When developing a new application, you start in the development client and transport it to the testing client for testing. Finally, you transport the application to the production client for end users to use. In this process, you keep all the development objects and customization settings of the application in a transportable package to facilitate their transport to the target system using CTS. -
Non-transportable package
A package with no defined transport attributes is called a non-transportable package. The objects in a non-transportable package can’t be transported between clients and are called local objects. A local object—for example, a test program—is not intended to be transported or used in a production environment.
Figure 2.10 shows the development objects grouped into the standard SAP package named VF. All objects are grouped into different folders based on the type of object for easy identification. You easily can look up all related objects for a given application. For example, if you want to find all the related transactions, tables, enhancements, and so on for billing documents, you can open the VF package in the Object Navigator (Transaction SE80), as shown in Figure 2.10. You can check the package to which a transaction belongs by using Transaction SE93.

Figure 2.10 Checking the Package
2.3.5 Transport Organizer
Objects are transported between clients using CTS. The Transport Organizer is a tool within CTS for managing the objects that change during the development and customization phases. The Transport Organizer delivers the changed objects to the target client (QTST or PROD).
The CTS uses requests and tasks to manage objects. These objects are added to a task, and the tasks are grouped into requests. To transport an object, all the tasks in a request are released, and then the request itself is released. Once the request is released, the objects are transported to the target system automatically (or manually by the administrator). The target system to which the object is transported depends upon the transport routes of the package to which the object is assigned.
Figure 2.11 shows the requests and tasks in the Transport Organizer.

Figure 2.11 Requests and Tasks in Transport Organizer
Table 2.6 lists some of the important Transport Organizer transaction codes.
| Transaction | Description |
|---|---|
| SE01 | Transport Organizer (extended view) |
| SE09/SE10 | Search transport request by user |
| STMS | Transport Management system |
| SE03 | Transport Organizer tools |
Table 2.6 Important Transport Organizer Transactions
Certain naming conventions are followed when creating packages. Table 2.7 lists the naming conventions used for packages.
| Package Naming Convention | Explanation |
|---|---|
| Names beginning with a letter from A to S or from U to X. |
|
| Names beginning with Y or Z |
|
| Packages belonging to a prefix namespace |
|
| Names beginning with T (private test packages) |
|
|
Names beginning with T (private test packages) (Cont.) |
|
| Names beginning with $ (local packages) |
|
Table 2.7 Package Naming Conventions
Often, you’ll be using an existing package to save your development objects. The package used to save the repository object depends on the transport layer (the client to which the repository object will be transported) and the application area (the business function to which the repository object belongs).
Organizing and transporting development objects varies widely across organizations. Always check the internal process and coding standards followed by your organization.
Follow these steps to create a new package:
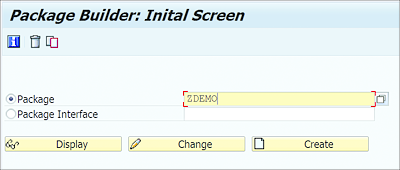
- Open Transaction SE21 or Transaction SPACKAGE to access the Package Builder tool.
-
On the Package Builder: Initial Screen, select the Package radio button and enter the name of the package. Make sure to follow the namespace conventions, as listed in Table 2.7. Once you enter the name of the package, click the Create button shown in Figure 2.12.
-
After clicking the Create button, a dialog box will appear. In the Create Package dialog box, maintain the attributes of the package, as shown in Figure 2.13, and click OK. Only the Short Description field is mandatory.
The following are the important attributes:- Package: Provide the name of the package.
- Short Description: Provide a short description for your package.
- Application Component: Use the (F4) help to select the appropriate application component based on the development objects that will be saved in this package.
- Software Component: This is selected as HOME for customer packages.
- Transport Layer: Select the transport layer based on the target system for the objects. You may have to consult your manager or SAP Basis administrator to select the correct transport layer.
- Superpackage: Packages can be nested, so you can embed one package into another in a package hierarchy. This allows for better modularization. Provide the name of the superpackage in this field if you want to nest the current package as a subpackage in an existing package.
-
Package Type: Select the package type that you wish to create. You can create the package as a Structure Package, Main Package, or Development Package:
- Structure Package: This forms the top level in the package hierarchy. You can add main packages to a structure package.
- Main Package: A main package acts as a container for development objects that are semantically linked. A main package contains subpackages (of either other main packages or standard development packages). Development objects are always added to the subpackage and never directly to the main package itself. You can group several main packages to form a structure package.
- Development Package: Development objects are always added to a development package.
-
Package encapsulated: Setting this flag encapsulates the package. When a package is encapsulated, only development elements exposed in package interfaces of the package are visible to the outside world. Package interfaces allow you to expose the development objects to other packages.
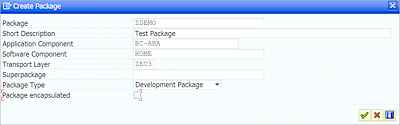
Figure 2.13 Package Attributes Window
- Once you’ve completed filling out the fields in Figure 2.13, select the green checkmark to continue.
-
In the dialog box that appears, assign a transport request to save the package. You can either assign an existing transport request by clicking the Own Requests button or create a new request, as shown in Figure 2.14. To create a new request, simply select the Create icon. This will open the Create Request dialog box, where you can fill out the fields for your new request.
Tip
If you’re creating something in the SAP system and the system prompts you to assign a package, it means you’re creating a repository object; keep this in mind if you need to identify if what you’re creating is a repository object or not. Remember that all repository objects (except for SAPscripts) are cross-client.

Figure 2.14 Creating a Request