12.3 Basic Screen Elements
Now that we have an understanding of the screen elements that can be created on a screen, let’s go ahead and create some of the basic elements.
As previously discussed, to create screen elements we call the layout editor by clicking the Layout button (see Figure 12.13) in Screen Painter. The graphical layout editor is part of the SAP GUI, and you can use it if you’re using a supported SAP GUI version on the Windows platform (SAP NetWeaver Application Server 6.10 with SAP GUI release 6.10 or later). If you aren’t using a supported platform, the system will open the alphanumeric editor. Both editors offer the same functionality but different interfaces. The graphical layout editor makes it easy to create screen elements using drag and drop.

Figure 12.18 Graphical Layout Editor
The graphical layout editor has three components, as shown in Figure 12.18:
-
Element palette
Allows you to create all the screen elements. -
Work area
The area in which you design the screen by adding various screen elements. -
Element bar
Shows the major attributes associated with a screen element when you double-click it.
In this section, we’ll walk through the steps for creating text fields, checkboxes, radio buttons, and push buttons via the graphical layout editor in Screen Painter.
12.3.1 Text Fields
As previously mentioned, text fields provide labels for other fields and are not editable. To create a text field, follow these steps:
-
Select the element from the element palette and drag it to the work area, as shown in Figure 12.19.
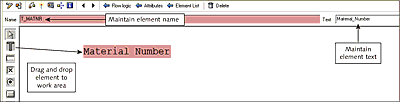
Figure 12.19 Creating a Text Field
- Adjust the length and height of the element if required.
- Maintain a name for the screen element.
- Maintain text for the screen element. This text will be displayed inside the element.
- Double-click the screen element to open the element bar in order to maintain further attributes. If the text element is displayed as a label for an I/O field, select As Label on Left/As Label on Right in the Display tab under Attributes.
12.3.2 Checkboxes and Radio Buttons
To create a checkbox or radio button, the corresponding program/dictionary field should be of type C and length 1. When the checkbox or radio button is selected, the corresponding program data object will be passed X. We can identify if the checkbox or radio button is selected by checking the corresponding program field for X or a space.
In the Screen Painter: Dict./Program Fields window, select the checkbox (ChkB) or radio button (RadB) option under the Copy As column (see Figure 12.20). These options will be enabled only if the field is of TYPE C and LENGTH 1.
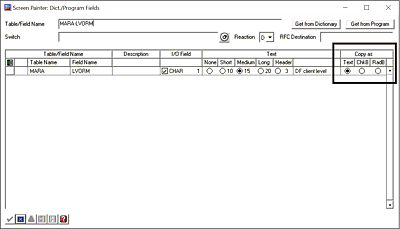
Figure 12.20 Copying Checkbox/Radio Button
The checkbox and radio button elements can also be created by selecting them from the element palette. The radio buttons should be grouped so that only one of the buttons in the group can be selected at a time. To group the radio buttons, select all the buttons that should be part of the group (by holding the (Ctrl) key and clicking each element), right-click, and select Radio Button Group • Define from the context menu, as shown in Figure 12.21.

Figure 12.21 Defining Radio Button Group
Optionally, the checkboxes and radio buttons can be assigned a function code in the element bar, which will then trigger a PAI event the moment the checkbox or radio button is selected. This is useful if you want enable/disable fields dynamically when a checkbox or radio button is selected, for example.
To assign the function code, double-click the screen element to open the element bar and enter the function code (up to twenty characters long) in the FctCode field (see Figure 12.22).

Figure 12.22 Assigning Function Code
12.3.3 Push Button
Before SAP ERP release 4.6, push buttons were the only UI elements that triggered PAI when the user clicked on them. However, checkboxes, radio buttons, and list boxes can now also trigger PAI. Each push button is assigned a function code that is passed to the program when PAI is triggered. You can maintain text for the push button statically in the attributes, or it can be set dynamically in the program.
To set the push button text dynamically, you need to define a data object in the program with the same name as the push button. The text that is filled in this data object will be displayed as the push button text. An icon can also be assigned to a push button in the element bar.
Double-click the screen element to open the element bar. Maintain the push button name in the Name field, the text in the Text field, select the icon in the Icon name field, and assign a function code in the FctCode field, as shown in Figure 12.23.
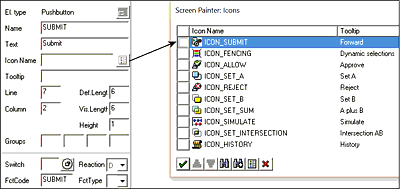
Figure 12.23 Assigning Icon
The function code can be accessed in the program using the sy-ucomm system field. It is also transferred to the ok_code field if the ok_code field is assigned in the screen element list. The screen element list consists of a field of type OK, as shown in Figure 12.24. Once the ok_code field is assigned in the element list, it should be declared in the program as type sy-ucomm.
Some user actions may trigger PAI but not pass any function code (e.g., if the user presses the (Enter) key on the keyboard). In such cases, the sy-ucomm field or the ok_code field retains the function code of the previous action. To ensure the previous actions of the user are not performed when the function code isn’t sent, it’s good practice to clear the ok_code field after performing the related task for the user action.
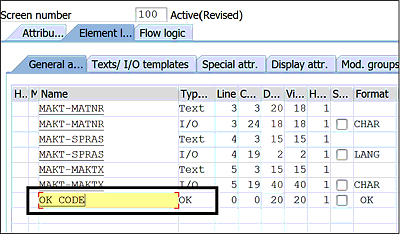
Figure 12.24 Assigning ok_code Field in Element List
This section discussed the steps for creating the most basic screen elements of a dialog program. In the next section, we’ll look at one of the more specialized elements: I/O fields.