19.3 EDI/ALE/IDocs
Intermediate Documents (IDocs) are a common data exchange format. IDoc interfaces allow you to exchange data with external systems. IDocs are commonly used with Electronic Data Interchange (EDI) and Application Link Enabling (ALE) technologies to exchange data with external systems.
Working with IDocs in EDI and ALE scenarios is a complex process and requires numerous configurations, such as RFC destinations, port definitions, partner profiles, and so on to be maintained in the system. This involves the help of system administrators and functional consultants to carry out different tasks. As an ABAP programmer, your role is limited to developing IDocs and posting programs.
19.3.1 Electronic Data Interchange
EDI is a popular way to exchange business documents between companies. For example, say that company ABC typically procures raw materials from different vendors. These vendors are known as business partners. When company ABC wants to procure different raw materials from its business partners, it needs to send a purchase order.
In a typical scenario, a purchase order is created in company ABC’s system and sent to the business partner via mail or fax. Someone at the business partner enters the purchase order details in the partner’s own internal system to generate an invoice. The business partner then sends the invoice to company ABC. The operator at company ABC enters the invoice details in the system for processing.
Figure 19.25 illustrates this manual process. Manually exchanging business documents is a time-consuming, expensive, and error-prone process. For example, what if the operator inputs the purchase order details incorrectly while generating the invoice due to an illegible fax?
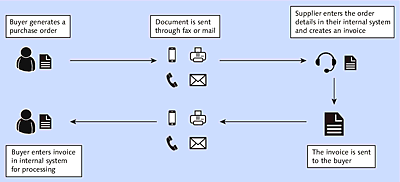
Figure 19.25 Manual Exchange of Business Documents
To make it easy for different organizations to exchange business documents, a more automated process was required. However, different organizations use different systems, and the same data can have different formats, one unique to each system. Company ABC may create a document in which the data is maintained in a specific format—for example, representing the date as YYYYMMDD.
When this document is sent to the business partner, the business partner’s system may use a different format for the same data. For the purposes of our example, say the business partner’s system uses an MMDDYY format for the date. When different systems use different formats to represent the same data, it becomes difficult to automate data exchange.
EDI addresses such challenges by defining a standard format for exchanging data. EDI is a computer-to-computer electronic exchange of business documents in a standard format. You may argue that sending a document via email is also an electronic way to exchange business documents—but when a business document is sent via email, you still need an operator to manually post the document in the system. EDI completely automates the process of exchanging business documents without any human intervention.
Because EDI doesn’t involve exchanging paper-based documents, it provides major benefits, such as reduced costs, almost real-time exchange of documents, reduced errors, and so on. EDI completely removes human interaction in the whole process of exchanging business documents.
Figure 19.26 further illustrates the EDI process.
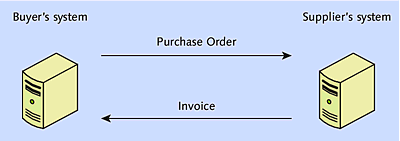
Figure 19.26 EDI Process
EDI is used to exchange many business documents, such as purchase orders, invoices, custom documents, shipping documents, and more. Because EDI improves the speed of processing documents, it provides a business advantage over competitors that still use a paper-based approach.
Now that you have a baseline understanding of the advantages of EDI, in the following subsections we’ll look at how IDocs are used with EDI and the processes used to exchange business documents.
Using IDocs with EDI
Because EDI involves the exchange of documents directly between computers without any human intervention, a common standard needs to be defined, describing what data is exchanged for a business document and in what format the data is presented. For this reason, there are several EDI standards in use today, such as ANSI, EDIFACT, TRADACOMS, and so on. Each standard also has multiple versions, such as ANSI5010, EDIFACT version D12, and so on. When two business agree to exchange documents using EDI, they agree to use a specific EDI standard and version.
Businesses typically use a translator program to convert the company’s internal format to an EDI-specific format before exchanging documents. For example, in an SAP system, when an application document such as a purchase order is created, the data is stored in the database in an SAP-specific format (e.g., the date is stored in YYYYMMDD format). If this application document needs to be sent to a business partner, it has to be converted first to the agreed-upon EDI standard.
Converting the document to EDI standard produces just another way of representing the same data. However, EDI standards keep evolving, and if SAP selects to take on the task of converting application documents to EDI standards, then SAP needs to keep updating its system each time an EDI standard changes. To avoid such a problem, SAP has outsourced the translation to third-party software vendors. The translator software is called the EDI subsystem. Using a third-party subsystem allows SAP not to worry about ever-changing EDI standards; it’s the job of the subsystem vendors to update their translation program to keep in sync with the changing standards.
However, there’s still one challenge. SAP needs the flexibility to change its own internal format and application documents. If the subsystem depends on the SAP application data directly, then each time SAP changes its application format, the subsystem needs to be updated to keep in sync with the changes.
To overcome such challenges, SAP uses the IDoc format. When the application document is created in the system, an IDoc is generated based on the application document. IDoc is another way of representing the same data. The subsystem uses the IDoc for conversion to the EDI document. SAP guarantees that no matter how an application changes internally, the subsystem always receives data in a fixed IDoc format. This allows SAP the flexibility to change its internal applications without worrying about the subsystems being affected.
The role of the subsystem is to convert the IDoc to an EDI document and transmit it to the business partner. Similarly, when the EDI transmission is received from a business partner, the EDI subsystem translates the EDI document into an IDoc. Exchange of business documents involves an outbound process, in which a document is sent from your system to a business partner’s system, and an inbound process, in which a document is received from a business partner and posted in your system.
We’ll discuss the inbound and outbound processes further in the following subsections.
Outbound and Inbound Processing
Figure 19.27 shows the steps involved in the outbound and inbound processes.
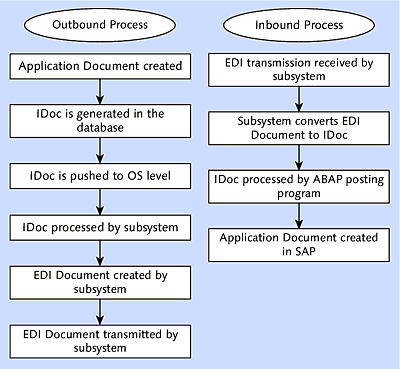
Figure 19.27 Outbound and Inbound Processes
In the outbound process, the application document is first created in the SAP system. If the document needs to be transmitted through EDI (e.g., via message control), then it triggers the EDI process.
In the EDI process, an ABAP program selects the application data from the database and generates an IDoc. This IDoc is then pushed to the OS level, to a specific directory from which the subsystem will pick up the IDoc for processing. The subsystem will first perform a syntax check to ensure the IDoc is in the correct format and all mandatory fields are filled.
The IDoc consists of a control record, multiple data records, and multiple status records:
-
Control record
The control record consists of the general information about the IDoc, such as the type of document (called the message type), the business partner details, and so on. You’ll learn more about the control record when we discuss IDoc development in the upcoming subsections. -
Data records
Data records consist of the actual data of the document. -
Status records
Status records are updated with the status of the IDoc at each processing step.
The subsystem converts the IDoc to EDI format. It uses the control record of the IDoc to identify the partner details and the message type being exchanged. Based on the message type, the required syntax checks are performed to ensure data consistency. The subsystem takes care of stripping the control record before transmitting the document to the business partner.
Once the IDoc is converted to an EDI document, the subsystem establishes a connection with the business partner’s system (either through direct connection to the partner’s network or through VAN) and transmits the document. Once the acknowledgement is received from the business partner that the document has been received successfully, the subsystem updates the IDoc with the status message. The IDoc is updated with the status message at each step of the process to help identify any issues.
In the inbound process, the EDI transmission is received by the subsystem and takes care of converting the EDI document to an IDoc. SAP provides program STARTRFC to start any RFC-enabled function module from the operating system level. The subsystem uses program STARTRFC to call the EDI_DATA_INCOMING function module to trigger the inbound processing. The control record of the IDoc is used to identify the partner profile, using which the ABAP posting program is executed. The posting program processes the IDoc and posts the application document in the SAP system.
The subsystem, even though not part of SAP, plays a crucial role. It takes care of processing IDocs, performs a syntax check on the document before transmission, establishes a connection with the business partner’s network to transmit the file, and acknowledges the successful transmission.
19.3.2 Application Link Enabling
ALE is a proprietary SAP technology used to create and run distributed applications. ALE allows you to integrate business processes between SAP systems and between SAP and non-SAP systems. When communicating with non-SAP systems, special SAP-certified third-party translator programs are used. ALE allows you to exchange data between application systems in a distributed environment in a controlled and consistent manner.
A distributed environment refers to a landscape in which various business functions of an organization are distributed across multiple systems. Due to increased globalization of markets, a distributed environment is required to decentralize such systems. For example, the accounts system is maintained in a central location, with manufacturing systems maintained locally at each plant.
Distributed environments also improve system performance, because different business functions run in different systems as opposed to all business functions running in the same system. ALE is middleware that allows you to integrated different components of a business process. It allows you to integrate processes from vendors and customers; business processes aren’t restricted to one organization only, but instead involve vendors and customers as business partners.
The applications of ALE integrated systems are loosely coupled, and the data is exchanged asynchronously using IDocs. Synchronous connections are used to read the data only. Asynchronous exchange of data ensures that the data arrives in the receiver system even if the system is offline when the data is sent.
ALE guarantees the distribution and synchronization of master data, customization data, and transaction data. There are many configurations that need to be set up for ALE integration. Transaction SALE is used to maintain all the required settings in the system.
- Application layer
- Distribution layer
- Communication layer
Figure 19.28 shows the different ALE layers.

Figure 19.28 ALE Services
The outbound ALE process involves the following steps:
-
Receiver determination
The receiver is determined either by the application or by using the distribution model. The distribution model defines which applications in the distributed system communicate with each other and what data is exchanged between them.
A master IDoc is created with all the data that should be exchanged with external systems, and for each receiver system identified from the distribution model, the data specified by the filter objects in the distribution model is selected from the master IDoc. -
Data selection
The data that needs to be distributed is selected by the application program. -
Segment filtering
Individual segments can be removed from the IDoc before it’s dispatched. For each receiving system, segment filtering is configured to set the filter objects. -
Field conversion
If the receiver system requires any field conversions, the conversion rules can be maintained in customizing. For example, a plant field can be converted to a four-character field from a two-character field when it’s being transferred from an SAP R/2 system to the latest SAP system. -
Version change
SAP guarantees that ALE will work to exchange the documents between different SAP releases. Changing the IDoc format allows you to convert message types from different releases. -
Dispatch control
Dispatch of IDocs can be controlled based on time and quantity. IDocs either can be sent immediately or can be scheduled to process in the background by scheduling a background job. The background job can be scheduled to run at periodic intervals. An IDoc also can be assigned a packet size so that it can be dispatched in packets. These settings are maintained in the partner’s profile.
Inbound processing involves the following steps:
-
Segment filtering
Similar to outbound processing, individual segments can be removed from the IDoc on the receiver’s system. -
Field conversion
This step is similar to the outbound processing step. -
Transfer control
Once the IDoc is written to the database, it can be posted by the application either immediately or in the background by scheduling a background job. A workflow can be used to notify the user if any error occurs while posting the document. -
Serialization
Serialization is used to post documents in the correct sequence.
Now that you have a better understanding of EDI and ALE technology, we’ll dive into the use of IDocs in the next subsection.
19.3.3 Intermediate Documents
IDocs are used to exchange data via EDI or ALE. An IDoc is just a data container that holds data in a specific data format. For example, a date field may be stored in an IDoc with an MMDDYY format.
As previously mentioned, an IDoc consists of one control record, multiple data records, and multiple status records, as shown in Figure 19.29. The control record holds control information such as direction (inbound or outbound), sender and receiver information, message type, IDoc status, and so on. In Figure 19.29, you’ll see the control record information displayed under the Short Technical Information section.
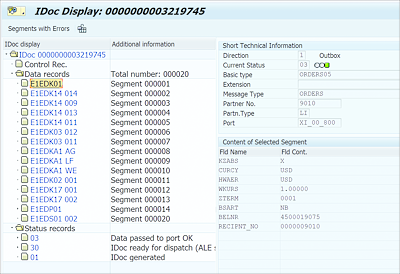
Figure 19.29 IDoc Example
The data records hold the application data. When developing an IDoc, we define segments (structures) that hold the application data. When the IDoc is generated, the segments translate to data records. The fields of the IDoc segment and the data they contain can be seen under the Content of Selected Segment section in Figure 19.29. Each IDoc contains multiple data records.
Status records contain the IDoc status. A status record is added to the IDoc at each milestone. For example, the status code 01 is added when the IDoc is generated, status code 03 is added when it’s transferred to the port, and so on. The status records show the status of the IDoc processing at any given stage.
In Figure 19.29, you’ll see status records 03, 30, and 01 attached to the IDoc under the Status Records folder and displayed in a tree structure. Transaction WE47 contains all the available status codes and their descriptions, as shown in Figure 19.30. These status codes should be used when updating the status record of the IDoc.
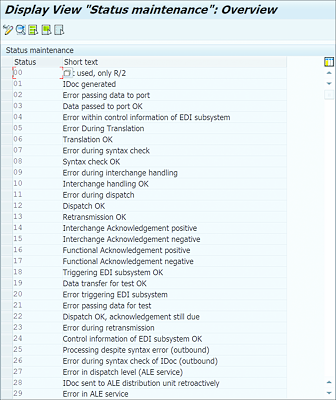
Figure 19.30 IDoc Statuses
IDoc Structure
IDocs are stored internally in the database in the following database tables:
-
EDIDC
The control record is stored in database table EDIDC with a unique IDoc number (see Figure 19.31). Each IDoc has one record in this table and is uniquely identified by the IDoc number. Other details about the IDoc, such as IDoc status, direction, receiver port, partner details, and so on, also are stored in this table.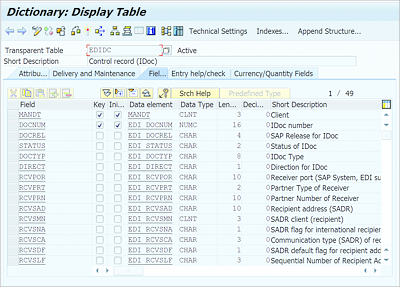
Figure 19.31 Table EDIDC
-
EDID4
The data records of the IDoc are stored in this table, linking the control record with the document number. There can be one to many records for each IDoc. This table stores the segment information and the application data for the IDoc. The SDATA field in table EDID4 contains the application data. This field is parsed in the program at runtime to a structure of the type of the IDoc segment.
When developing an IDoc, a segment is defined that contains the fields to store the application data. Segments are stored in ABAP Data Dictionary as structure types.
For example, say you want to generate an IDoc for a billing document with data such as document number, payer, and net value. To store this data about the billing document in an IDoc, define a segment with fields such as VBELN, KUNRG, and NETWR to store the document number, payer, and net value, respectively. This segment translates to a data record when the IDoc is generated and stored in table EDID4 with the segment name and corresponding data of the segment fields. The segment name is stored in the SEGNAM field, and the data of the segment fields is stored in the SDATA field of table EDID4.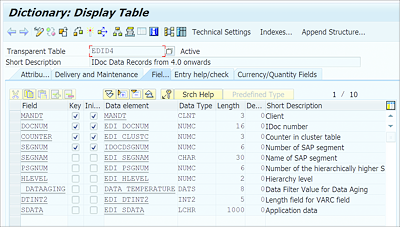
Figure 19.32 Table EDID4
-
EDIDS
The status records of the IDoc are stored in this table and linked to the control and data records using the IDoc number. Table EDIDS contains different information about the status record, such as the IDoc status, status code, time and date of status record, and so on, as shown in Figure 19.33.
Figure 19.33 Table EDIDS
IDoc Development and Tools
An IDoc is an instance of the IDoc basic type. The IDoc is the data container, and the IDoc basic type defines the IDoc structure. The basic type consists of one or more segments, which exist as structures in ABAP Data Dictionary. The IDoc segments provide the structure to parse the application data from the SDATA field of the data record.
When creating an IDoc basic type, we perform two basic steps: First, define the segments containing various fields for the application data that should be saved in an IDoc, and then add these segments to the IDoc basic type. IDoc basic types are created using Transaction WE30, whereas segments are defined using Segment Editor (Transaction WE31).
After creating the basic type with the required segments, the basic type should be linked to a logical message type, which describes the business process, and each basic type should be linked to a business process via the logical message type. For example, the ORDERS logical message type usually is used for purchase orders in outbound processing, and if you’re creating a basic type to pass purchase order data to the external system, then the basic type should be linked to the ORDERS logical message type.
You can link the basic type to an existing logical message type or create a new logical message type if none of the existing message types describe your business process adequately. One basic type can be assigned to several logical message types and vice versa, so you should create a new message type only if none of the existing message types adequately describe your business process.
The logical message types are defined using Transaction WE81, whereas the basic type is linked to the message type using Transaction WE82.
Now that you have a better idea of the structure, types, and tools of IDocs, in the following subsections we’ll walk you through IDoc development and the required configuration steps.
Creating a Segment
Use Transaction WE31 to create a segment. The segment is added to the basic type to define the structure of the IDoc.
Proceed as follows to create a segment:
-
On the initial screen of Transaction WE31 (see Figure 19.34), provide the name of the segment and click the Create button in the application toolbar. SAP segment names start with E1, and customer segment names should start with Z1.
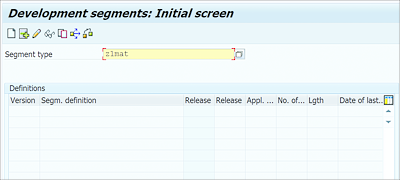
Figure 19.34 Create Development Segment Initial Screen
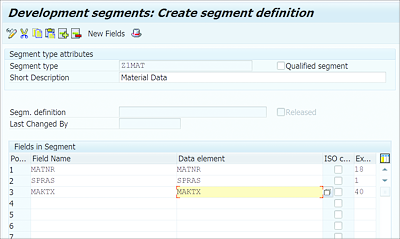
- On the Create Segment Definition screen, as shown in Figure 19.35, maintain the fields for the segment just like you would maintain the components of a structure. For example, enter the field name in the Field Name column and the data element name in the Data Element column. Once the fields of the segment are maintained, click the Save icon in the standard toolbar to save the segment. The fields of the segment translate to data records in the IDoc.
-
If the segment has a different meaning in different scenarios, then you can select the Qualified Segment checkbox (see Figure 19.35). When this checkbox is set, the meaning of the segment is derived from the first field of the segment.
-
Once the segment is saved, release the segment by following the menu path Edit • Set Release from the initial screen, as shown in Figure 19.36.
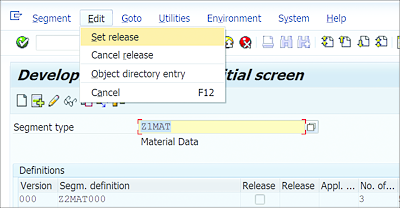
Figure 19.36 Releasing Segment
Similarly, you can create additional segments as per your requirements.
Creating a Basic Type
Once the segment is defined using Segment Editor, we can define the basic type using Transaction WE30.
Proceed with the following steps to create the basic type:
-
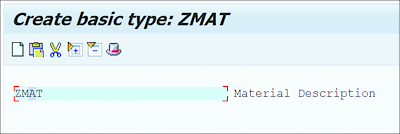
On the initial screen of Transaction WE30 (see Figure 19.37), you can create a new basic type or create an extension for the existing basic type. To create a new basic type, select the Basic Type radio button. If you want to create an extension type, enter the name of the basic type for which you want to create an extension and select the Extension radio button. For this example, create a new basic type.
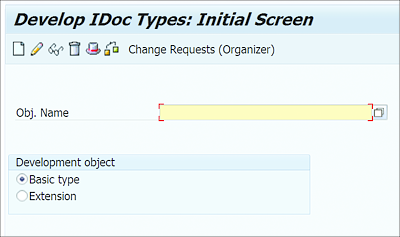
Figure 19.37 Develop IDoc Types: Initial Screen
- Once you provide the name of the basic type and click the Create button, you’ll see a dialog box in which you can create a basic type from scratch, copy from an existing basic type, or create a successor to an existing basic type, as shown in Figure 19.38. Select the Create New radio button to create a new basic type.
-
Now, you’ll see a screen in which you can add segments to the basic type. Click the Create button, as shown in Figure 19.39.
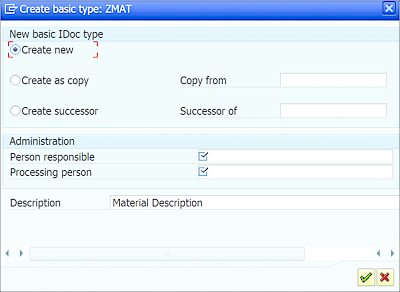
Figure 19.38 Create Basic Type
-
In the Maintain Attributes dialog box that appears (see Figure 19.40), enter the name of the segment type that you created previously. You can also set the segment as mandatory. If the Mandatory Seg. checkbox is selected, then the IDoc will be checked at runtime to validate if all the mandatory segments are filled.
The Maximum Number and Minimum Number fields allow you to set how many times the segment can be repeated in the IDoc. For example, if the segment contains header fields, then you can set it to repeat only once. Similarly, if the segment contains item records, you can set it to repeat multiple times.
The Segment Editor button takes you to the segment editor, in which you can check the segment definition.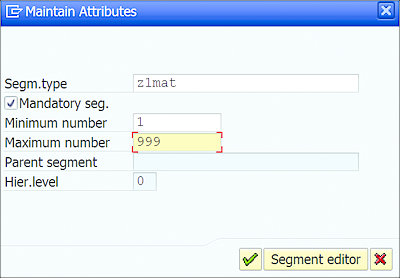
Figure 19.40 Maintain Attributes
-
Click OK to add the segment to the basic type. Similarly, you can add additional segments to the basic type. You can add new segments as child segments by keeping the cursor on the existing segment and clicking the Create icon. Doing so will open a dialog box asking you whether you want to add the new segment type at the same level or as a child segment, as shown in Figure 19.41.
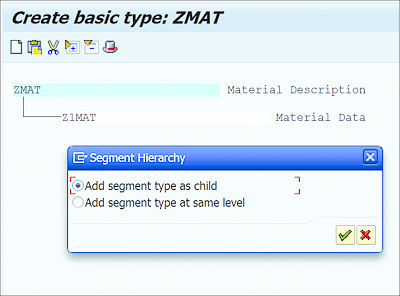
Figure 19.41 Adding Additional Segments
- Once all the required segments are added to the basic type, save it. The basic type should be released to freeze any further changes. To release the basic type, follow the menu path Edit • Set Release from the initial screen of Transaction WE30.
-
You can check the consistency of the basic type by following the menu path Development object • Check from the initial screen. At this point, when the basic type is checked for consistency, the system will show a warning message indicating that the basic type isn’t linked to any logical type, as shown in Figure 19.42.

Figure 19.42 Consistency Check
The logical message type identifies the type of document being exchanged. Each basic type is linked to a logical message type. For example, the ORDERS message type is used for purchase orders, ORDRSP is for order confirmation, and so on. You can create a new logical type and link your basic type to it. If we want to extend an existing logical type, create a new extension type and add the extension type to the existing logical type. In the next subsection, we’ll explain the steps for creating a logical type.
Creating a Logical Type
You can create a new logical type using Transaction WE81. Proceed with the following steps to create a logical type:
- On the initial screen of Transaction WE81, enter change mode and click the New Entries button to maintain the new logical type and its description, as shown in Figure 19.43.
-
Once the message type and the short description is maintained, click the Save button in the toolbar to save the new logical message type. The basic type can now be linked to the new logical message type. The logical message type plays a central role in linking different objects of IDoc processing, such as partner profiles and inbound and outbound process codes.
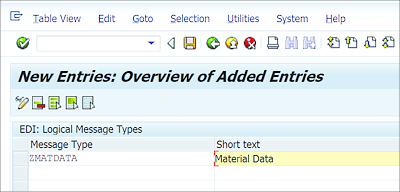
Figure 19.43 Maintain Message Type
Assigning Basic Types
After the logical message type is maintained, the basic type is linked to the message type using Transaction WE82.
The following steps walk you through how to assign and link the basic type you’ve created:
-
On the initial screen of Transaction WE82, enter change mode and click the New Entries button. Maintain the message type and basic type details, as shown in Figure 19.44.
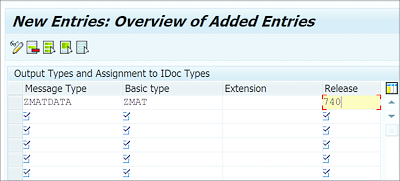
Figure 19.44 Assigning Basic Type to Message Type
- The Release column should be filled with the SAP release version to which this message type and basic type are linked. This helps the system use the correct basic type based on the system release. One message type can have multiple basic types (a one to many [1:n] relation).
-
Use the menu path System • Status to find the release version of your system under the SAP System Data section, as shown in Figure 19.45.

Figure 19.45 SAP Product Version
Before IDocs can be generated, there are many configurations that need to be maintained in the system. Most of these configurations are maintained by system administrators. In the following subsection, we’ll walk through the different system configurations.
19.3.4 System Configurations
There are configurations that need to be maintained to work with IDocs. There are certain configurations that are specific to EDI and certain configurations that are specific to ALE. The following sections describe some common configurations.
The different configuration steps involved are as follows:
- Define an RFC destination using Transaction SM59.
- Define a port definition using Transaction WE21.
- Define a partner profile using Transaction WE20.
- Define an outbound process code using Transaction WE41.
- Define an inbound process code using Transaction WE42.
- Define IDoc attributes using Transaction BD51.
On the SAP Easy Access screen, type “WEDI” in the command field to open the IDoc and EDI Basis menu, as shown in Figure 19.46; from this menu, all the tools discussed in the following sections can be accessed.

Figure 19.46 IDoc and EDI Basis Menu
RFC Destination (Transaction SM59)
The RFC destination is maintained by the system administrator using Transaction SM59, from which different types of connections can be maintained, as shown in Figure 19.47.
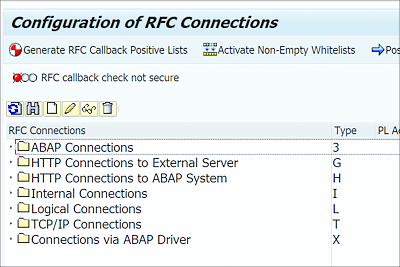
Figure 19.47 RFC Destinations
For ALE, an ABAP connection (Type 3) is defined, whereas for EDI, a TCP/IP connection (Type T) is defined. Within the RFC destination (see Figure 19.48), the remote server details and the logon credentials for the remote server are maintained. The system uses this information to connect to the remote server.
The remote server details are maintained under the Technical Settings, tab and the logon credentials for the remote system are maintained under the Logon & Security tab.
The Unicode tab allows you to maintain details about the communication type, such as Unicode or non-Unicode. Under the Special Options tab, you can maintain the settings to activate an RFC trace and the time-out duration if the remote system doesn’t respond. All these settings are maintained by the SAP Basis administrator; a discussion of these individual settings is beyond the scope of this book.
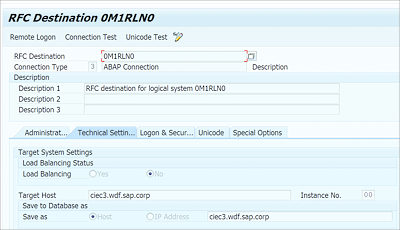
Figure 19.48 RFC Destination for ABAP Connection
In addition to maintaining RFC destinations statically via Transaction SM59, with the release of SAP NetWeaver 7.5, SAP added support for dynamic RFC destinations. A new CL_DYNAMIC_DESTINATION class is available to manage dynamic RFC destinations. The CREATE_RFC_DESTINATION method of the CL_DYNAMIC_DESTINATION class makes it possible to create a dynamic destination, which can be used in current sessions for RFCs.
Port Definition (Transaction WE21)
The port definition is maintained using Transaction WE21. The port definition is an important configuration that tells the system the physical/logical directory in which the IDoc file will be stored when using EDI or the RFC destination for a transactional RFC (tRFC) when using ALE.
When using a tRFC, the called function module is executed exactly once in the called system. This ensures that the function module isn’t restarted automatically if an error occurs.
For EDI, we maintain a file port, and for ALE, we maintain a tRFC port, as shown in Figure 19.49. If the IDoc is transmitted as an XML file, then an XML file port is maintained.
Defining ports is the responsibility of the SAP Basis administrator; our concern as ABAP developers is limited to knowing the port definition that should be used while generating the IDoc.
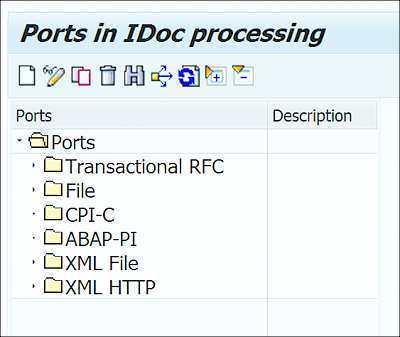
Figure 19.49 Port Definition
Partner Profile (Transaction WE20)
A partner profile is one of the important configurations that needs to be maintained in the system before any data can be exchanged with a business partner.
The partner type is a key field for maintaining the partner profile. Figure 19.50 shows different types of partners under which business partner profile is maintained. In a distributed environment, the receiving system details are maintained under Partner Type-Logical System (LS).
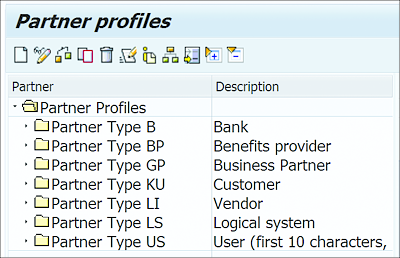
Figure 19.50 Partner Profile
For each business partner, the outbound and inbound parameters are maintained. The outbound parameters contain information such as the message type, basic type, port definition, outbound process code, and so on. The inbound parameters contain information such as the inbound process code, which identifies the inbound posting program that should be triggered when an inbound transmission is received from the partner.
You can also maintain agent details for who can be informed in case of any errors in processing. The system will trigger a workflow in which the agent can take actions to correct the errors.
Figure 19.51 shows the outbound and inbound parameters maintained for a partner profile.
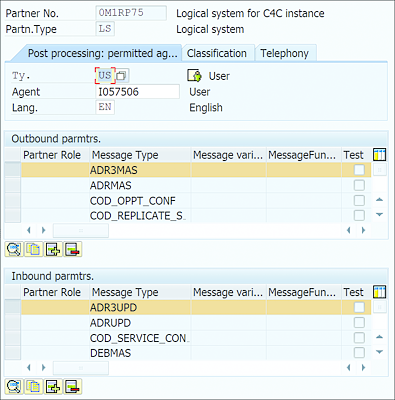
Figure 19.51 Outbound and Inbound Parameters for Partner Profile
Outbound Process Code (Transaction WE41)
The outbound process code links the extraction program that reads the application data and generates the IDoc with the message type. The extraction and posting programs are maintained as function modules.
In the outbound process code, we define a process code to which the function module that extracts the application data and generates the IDoc is linked (see Figure 19.52). This process code is then assigned to the outbound parameter of the partner profile under the Message Control settings, as shown in Figure 19.53. Message control is a mechanism to automate the output or follow up with processing of partner-dependent messages.
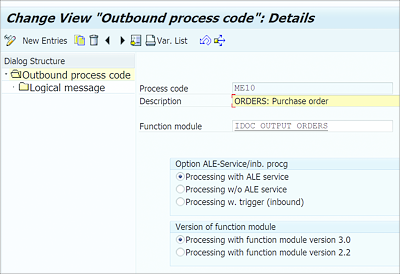
Figure 19.52 Outbound Process Code
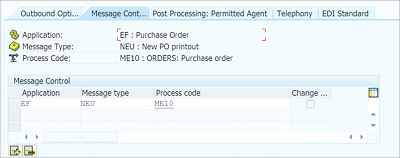
Figure 19.53 Process Code in Partner Profile
When message control is used to initiate EDI/ALE process, the partner profile is read to identify the outbound process code from which the extraction program is triggered.
Inbound Process Code (Transaction WE42)
Similar to the outbound process code, the inbound process code links the message type with the posting program. The inbound process code is maintained in the partner profile. When an inbound IDoc is received, the process code is read from the partner profile to identify the posting program. The posting program then processes the IDoc to post the application document.
Figure 19.54 shows the inbound process code linking to the function module. Figure 19.55 shows the process code maintained in the inbound parameters of the partner profile.
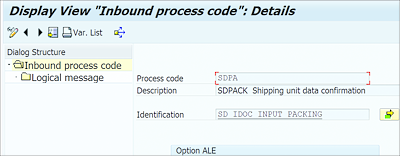
Figure 19.54 Inbound Process Code
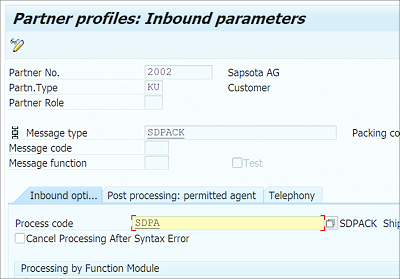
Figure 19.55 Process Code Maintained in Partner Profile
Define IDoc Attributes (Transaction BD51)
IDoc attributes define how the inbound IDoc functions are processed. In this transaction, you maintain the inbound function module name and the processing attribute with one of the following options (see Figure 19.56):
-
0
Mass processing for functions that use direct input to the database to post the application document (direct input method). -
1
Individual input for functions that use the CALL TRANSACTION method to post the application document. -
2
Individual input for functions that use the CALL TRANSACTION method and lock the IDoc. -
Dialog Allowed
Flag that allows screen display when IDocs are processed in the foreground and the function uses the CALL TRANSACTION method.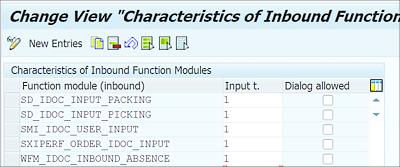
Figure 19.56 IDoc Characteristics
19.3.5 Inbound/Outbound Programs
Once the basic type is developed and all the required configurations are maintained, we need ABAP programs to extract the application data and create an IDoc in the database for outbound IDocs and to post the application data from an inbound IDoc. We’ll look at inbound and outbound programs in the following subsections.
Inbound Program
In an inbound program, the function module should use the standard interface using the EDIDC and EDIDD structures. The IDoc control record will be filled in the EDIDC structure, which can be used to validate if the inbound program is called for the correct message type. The EDIDD structure is an internal table that contains the data records. The SDATA field of the EDIDD structure contains the unformatted row, which can be parsed to a structure of the correct segment type. This row is then updated in the database.
The easy way to define an interface is to copy the interface from an existing inbound function module. Listing 19.2 shows the inbound function code in its bare minimum form. This inbound function module is configured in Transaction WE42.
FUNCTION ZDEMO_IDOC_INPUT.
*"--------------------------------------------------------------
*"*"Local Interface:
*"  TABLES
*"      IDOC_CONTRL STRUCTURE  EDIDC
*"      IDOC_DATA STRUCTURE  EDIDD
*"      IDOC_STATUS STRUCTURE  BDIDOCSTAT
*"--------------------------------------------------------------
  DATA : wa_makt TYPE zmakt,
         st_seg TYPE zseg1,
         it_makt TYPE STANDARD TABLE OF zmakt.

  LOOP AT IDOC_DATA WHERE DOCNUM EQ IDOC_CONTRL-DOCNUM.
    st_seg = IDOC_DATA-SDATA.
    MOVE-CORRESPONDING st_seg TO wa_makt.
    APPEND wa_makt to it_makt.
  ENDLOOP.
  MODIFY zmakt FROM TABLE it_makt.
  IF sy-subrc IS INITIAL.
  IDOC_STATUS-DOCNUM = IDOC_CONTRL-DOCNUM.
  IDOC_STATUS-STATUS = '53'.
  IDOC_STATUS-MSGTY = 'I'.
  IDOC_STATUS-MSGID = 'YM'.
  IDOC_STATUS-MSGNO = '004'.
  APPEND IDOC_STATUS.
ELSE.
  IDOC_STATUS-DOCNUM = IDOC_CONTRL-DOCNUM.
  IDOC_STATUS-STATUS = '51'.
  IDOC_STATUS-MSGTY = 'E'.
  IDOC_STATUS-MSGID = 'YM'.
  IDOC_STATUS-MSGNO = '004'.
  APPEND IDOC_STATUS.
  ENDIF.
ENDFUNCTION.
In Listing 19.2, we defined a function module with three tables parameters. The IDOC_CONTRL parameter is of type EDIDC, the IDOC_DATA parameter is of type EDIDD, and the IDOC_STATUS parameter is of type BDIDOCSTAT. When the function module is called, the IDoc control record is transferred to the IDOC_CONTRL parameter and the data records are transferred to the IDOC_DATA parameter. We also defined a local structure, st_seg, which is of the segment type used in the basic type. The IDoc’s data records are based on this segment type.
We first move the data in the SDATA field into the st_seg structure. This data is then moved to the internal table from which the corresponding database table is updated. Note that we kept the code very basic in this example to highlight how the data is processed from the IDoc and updated in the application table.
We updated the status in the IDOC_STATUS parameter, which is updated in the IDoc as a status record. The status codes are maintained in the system, and only these codes should be used to update the IDoc. You can find all the status codes via Transaction WE47, as shown in Figure 19.57.
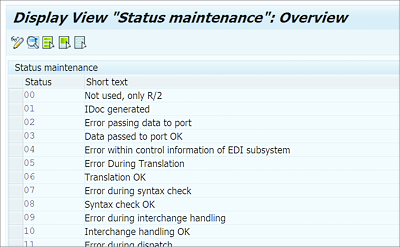
Figure 19.57 IDoc Status Codes
Outbound Program
In an outbound program, we extract the application data from the database and fill the EDIDD structure. The MASTER_IDOC_DISTRIBUTE function module is used to generate the IDoc. This outbound function module is configured in Transaction WE41.
Listing 19.3 shows sample code for an outbound function module. Again, we have kept the code to the bare minimum to make it easy for you to follow the logic.
FUNCTION ZDEMO_IDOC_OUTPUT.
*"--------------------------------------------------------------
*"*"Local Interface:
*"  IMPORTING
*"      VALUE(OBJECT) LIKE  NAST STRUCTURE  NAST
*"      VALUE(CONTROL_RECORD_IN) LIKE  EDIDC STRUCTURE  EDIDC
*"  EXPORTING
*"      VALUE(CONTROL_RECORD_OUT) LIKE  EDIDC STRUCTURE  EDIDC
*"  TABLES
*"      IDOC_DATA STRUCTURE  EDIDD
*"      IDOC_STATUS STRUCTURE  BDIDOCSTAT
*"--------------------------------------------------------------
"Segment Type
DATA : S_ZMAKTID LIKE zseg1.
"Application table
DATA : T_makt TYPE STANDARD TABLE OF zmakt.
DATA : w_makt TYPE zmakt.
DATA : v_matnr TYPE matnr.
"Generated Communication IDOc
DATA : T_COMM_IDOC TYPE STANDARD TABLE OF EDIDC.
CONSTANTS :
C_ZMAKTID LIKE EDIDD-SEGNAM VALUE 'ZSEG1', "Segment name
C_IDOCTP LIKE EDIDC-IDOCTP VALUE 'ZDMIDOC'. "Basic Type

*Fill control record
MOVE control_record_in TO control_record_out.
control_record_out-direct = '1'.
control_record_out-serial = sy-datum.
control_record_out-serial+8 = sy-uzeit.

*Fetch application data
v_matnr = object-objky.
SELECT matnr spras maktx FROM makt INTO TABLE t_makt WHERE matnr EQ v_matnr.

*Fill data records
LOOP AT t_makt INTO w_makt.
    S_ZMAKTID-matnr = w_makt-matnr.
    S_ZMAKTID-spras = w_makt-spras.
    S_ZMAKTID-maktx = w_makt-maktx.
    IDOC_DATA -SEGNAM = C_ZMAKTID.
    IDOC_DATA -SDATA = S_ZMAKTID.
    APPEND IDOC_DATA.
    CLEAR IDOC_DATA.
  ENDLOOP.

*Send IDoc
CALL FUNCTION 'MASTER_IDOC_DISTRIBUTE'
  EXPORTING
    MASTER_IDOC_CONTROL            = control_record_out
  TABLES
    COMMUNICATION_IDOC_CONTROL     = T_COMM_IDOC
    MASTER_IDOC_DATA               = IDOC_DATA
  EXCEPTIONS
    ERROR_IN_IDOC_CONTROL          = 1
    ERROR_WRITING_IDOC_STATUS      = 2
    ERROR_IN_IDOC_DATA             = 3
    SENDING_LOGICAL_SYSTEM_UNKNOWN = 4
    OTHERS                         = 5.
  IF SY-SUBRC <> 0.
  *Update IDoc status
  ENDIF.
In Listing 19.3, we selected the data from the application table and filled the IDoc data structure. This data is then sent to the MASTER_IDOC_DISTRIBUTE function module along with the control record to generate the IDoc.
In this section, we discussed the steps for creating and generating IDocs to be used with EDI and ALE technologies. In the next section, we’ll look at a tool used to migrate data from legacy systems.