19.5 Web Services
A web service is a service offered by one system to another system over the Internet. With a web service, web technology such as HTTP is utilized for communication between systems. Using web services, data is exchanged in machine-readable file formats, such as XML and JSON. Web services provide object-oriented web interfaces for SAP systems; for example, a mobile application can access SAP data using a web service. A web service uses Internet standards such as the following:
-
Web Services Description Language (WSDL)
Used to specify the interface of a web service. WSDL describes the interface of the actual web service using this XML-based language, consisting of the names of operations and the input and output messages. Figure 19.79 shows a sample web service definition that defines the web service interface in an XML-based format. In Figure 19.79, note that the interface definition consists of the fields of table SPFLI.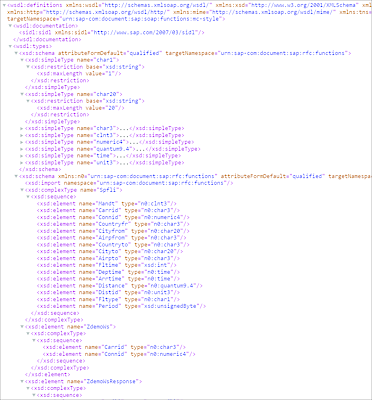
Figure 19.79 Sample Web Service Definition
-
Simple Object Access Protocol (SOAP)
Used to transmit remote procedural calls. SOAP specifies a general format for XML messages that are application-independent. These messages can be exchanged between partners over different transport protocols. -
Universal Description, Discovery, and Integration (UDDI)
UDDI is used to locate web services. UDDI publicly enables web services, which allows them to be discoverable.
Using a web service, we can expose any remote-enabled function module, BAPI, IDoc, or XI Message interface. We can also consume web services in an ABAP program. We’ll discuss how to create a web service in Section 19.5.1 and look at consuming web services in an ABAP program in Section 19.5.2.
Any business function that exists independently can be exposed as a web service using the web service framework. For example, if an external application developer wants to access the material data from an SAP system, he can consume a BAPI that has been exposed as a web service. Web services allow you to expose business functions to external applications using open standards.
SOAP requests are processed through the Internet Communication Framework (ICF). The ICF was introduced with the SAP Web Application Server in release 6.10, which allows ABAP programs direct access to the Internet. ICF is implemented in AS ABAP as an object-oriented layer that enables handling of HTTP requests within the ABAP environment. ICF enables you to work with the Internet Communication Manager (ICM) of the application server and is the technological foundation for all SAP technologies that use HTTP(s) for communication, such as Web Dynpro ABAP, web services, and SAPUI5. In web services, the HTTP protocol of the ICF is used for communication between web service requesters and providers. For web services to work, the SOAP runtime should be activated in Transaction SICF.
On the initial screen of Transaction SICF (see Figure 19.80), enter “service” in the Hierarchy Type field and click Execute to see the complete list of services. Navigate to the /sap/bc/srt node, and activate the node and all its subnodes, as shown in Figure 19.81. You also need to activate the /sap/bc/webdynpro/sap/appl_soap_management node.
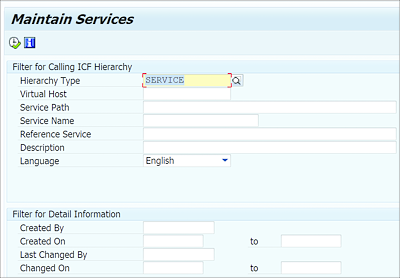
Figure 19.80 Transaction SICF Initial Screen

Figure 19.81 Activating SOAP Runtime
19.5.1 Creating a Web Service
The web service framework provides a wizard that makes it easy to create a web service without writing any code. Any remote-enabled function module or BAPI can be easily exposed as a web service.
For our example, let’s expose an RFC that provides the flight schedule data from table SPFLI as a web service. This function module has CARRID and CONNID as import parameters and the SPFLI structure as the export parameter.
Proceed with the following steps:
- From the Function Builder menu, select Utilities • More Utilities • Create Web Service • From the function module. You can also open the function module in Object Navigator and select Create • Enterprise Service from the context menu. This will start the Create Web Service wizard.
-
On the wizard screen, provide the web service name (Service Definition) and Description, then click the Cont. button, as shown in Figure 19.82.

Figure 19.82 Web Service Wizard
-
In the next step, enter the name of the function module that should be offered as a web service. Because you initiated the wizard from the function module, the function module name should be prefilled. Select the Map Name checkbox (see Figure 19.83) to remove underscores in the function name and capitalize the first letter in each word (i.e., set it in camel case).
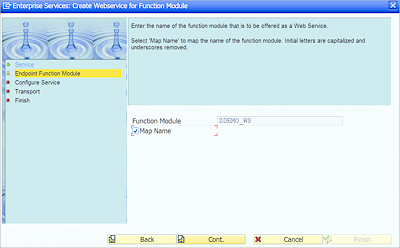
Figure 19.83 Endpoint Function Module
- In the next step, select the security profile for the web service. This specifies how the authentication should be performed for the web service.
- In the next step, select the package for the web service.
- In the final step, click Complete to create the web service. The system will take you to the web service definition, as shown in Figure 19.84. Activate the web service.
- The web service doesn’t have a runtime release at this point, so it can’t be used. We can create the runtime release via Transaction SOAMANAGER.
-
Open Transaction SOAMANAGER to launch the SOA Management application in your web browser. Under the Service Administration tab, click the Simplified Web Service Configuration link, as shown in Figure 19.85.
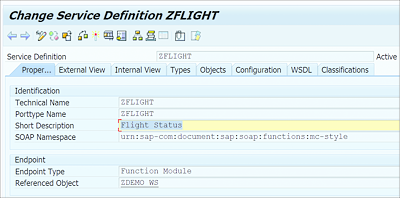
Figure 19.84 Web Service Definition
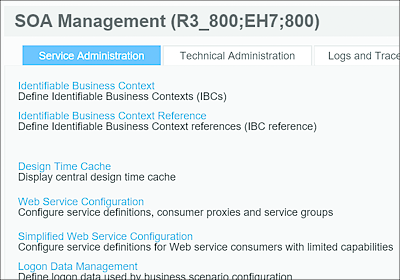
Figure 19.85 SOA Management
- Search for the web service, select the User Name/Password (Basic) checkbox, and click Save, as shown in Figure 19.86.
-
Select the web service as shown in Figure 19.86, and click the Show Details button. This will display the WSDL URLs (Figure 19.87). Click on the URL to see the web service definition. Copy this URL; you’ll use it to consume the web service in the next section. The URL listed after With WS Policy contains the web service policy (such as security policy) advertised for the consumer.
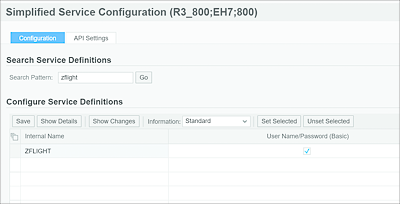
Figure 19.86 Simplified Service Configuration

Figure 19.87 WSDL URLs
-
You can execute the web service definition in Object Navigator to test the web service (see Figure 19.88).
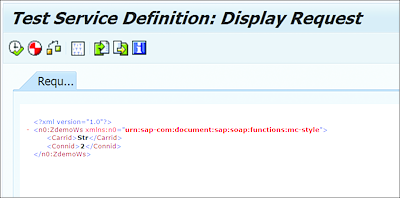
Figure 19.88 Test Web Service Definition
19.5.2 Consuming Web Services
A web service is consumed using the web service client proxy. The client proxy takes care of creating valid SOAP messages and evaluates received responses. It also acts as a transfer program and takes care of connecting to the server of the required web service.
In the following subsections, we’ll walk through the process of consuming a web service.
Creating a Web Service Consumer
The following steps walk you through creating a web service consumer:
- In Object Navigator, select Create • Enterprise Service from the context menu of the package.
- This will open the Enterprise Services wizard. Select the Service Consumer radio button, as shown in Figure 19.89, and click Cont.
- Select External WSDL/Schema, as shown in Figure 19.90.
-
Select URL as the WSDL/Schema Source, as shown in Figure 19.91. This allows you to use the URL of the web service as the source.
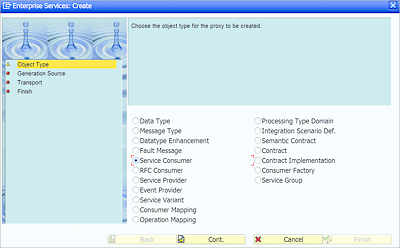
Figure 19.89 Create Consumer
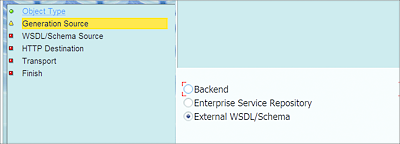
Figure 19.90 Select Generation Source
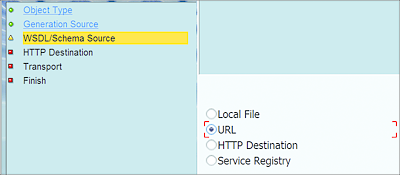
Figure 19.91 Schema Source
- Provide the URL for the web service. For this example, use the URL that was generated for the service definition in the previous steps.
- The system will prompt you to enter a User Name and Password to connect to the URL.
-
Enter the Package details (see Figure 19.92).
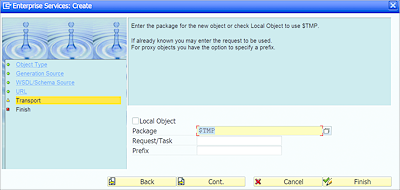
Figure 19.92 Maintain Package
- In the final step, verify the details and click Complete to complete the wizard. Activate the service proxy by clicking the Activate icon.
Maintaining Port Information
Once the web service proxy is created, we need to maintain port information in Transaction SOAMANAGER. Proceed with the following steps:
- In Transaction SOAMANAGER, click on the Web Service Configuration link (see Figure 19.85) and search for the consumer proxy you just created (see Figure 19.93). If you provided a prefix to be used while creating the proxy, the same will be used as a prefix.
-
Select the consumer proxy you created and click the Create • Manual Configuration (see Figure 19.94) option to create a logical port name (see Figure 19.95). A logical port is used for configuration of the runtime services of the client proxy.
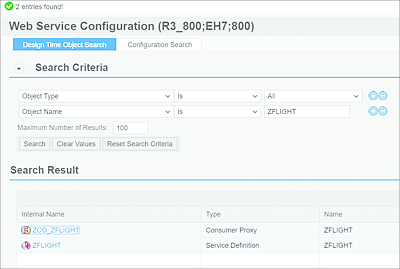
Figure 19.93 Search Consumer Proxies
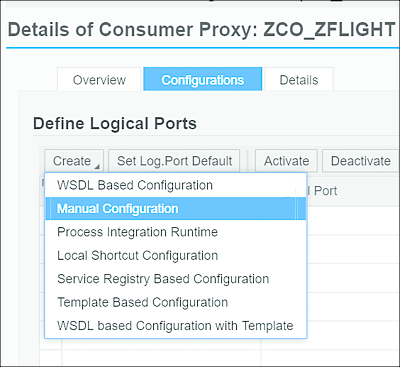
Figure 19.94 Create Manual Configuration
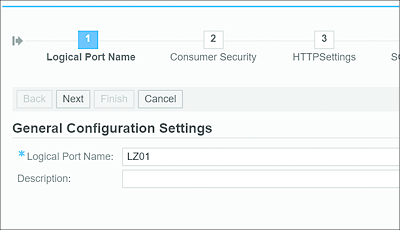
Figure 19.95 Maintain Logical Port
-
Provide the authentication details that should be used by the consumer (see Figure 19.96).
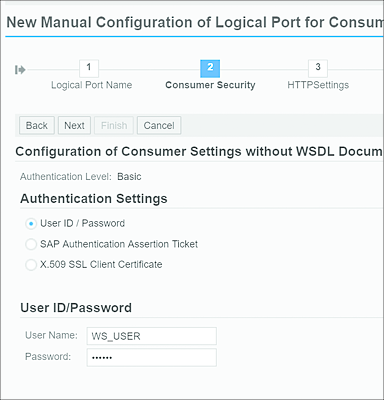
Figure 19.96 Consumer Security
- In the next step, maintain HTTP settings: Provide the web service producer URL in the URL Access Path field (see Figure 19.97). Leave the other fields set to their default values and click Finish.
-
Once completed, you can execute the service consumer in Object Navigator for testing.
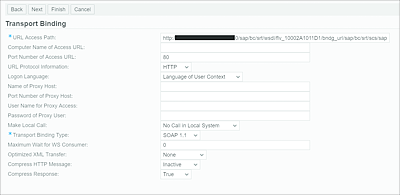
Figure 19.97 HTTP Settings
Creating an ABAP Program to Consume a Web Service
Finally, we need to create an ABAP program to consume the web service. In Object Navigator, you can drag and drop the web service consumer (see Figure 19.98) into ABAP Editor to generate the code template.
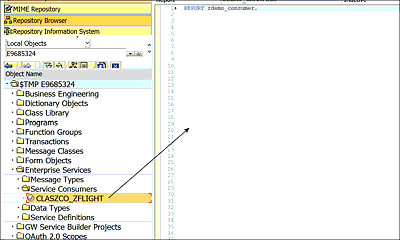
Figure 19.98 Generate Sample Code
Listing 19.4 shows sample code to consume a web service in an ABAP program.
REPORT ZDEMO_WS.
DATA: r_ws TYPE REF TO zwsco_zflight,
      output TYPE ZWSZDEMO_WS_RESPONSE,
      input TYPE ZWSZDEMO_WS.
input-carrid = 'AA'.
input-connid = '0017'.

TRY.
  CREATE OBJECT r_ws
  EXPORTING
    logical_port_name = 'LZ01'.

  CALL METHOD r_ws->zdemo_ws
  EXPORTING
    input = input
  IMPORTING
    output = output.

CATCH cx_ai_system_fault .
ENDTRY.
Listing 19.4 Consuming Web Service
In Listing 19.4, a R_WS reference object is defined, referring to the service consumer. The function module is added as a method with two parameter, input and output. The input parameter holds the importing fields of the function module exposed as a web service. The output parameter holds the exporting parameters of the function module. The web service proxy object is instantiated using the logical port name.
Figure 19.99 shows the data in the output structure after the method call.
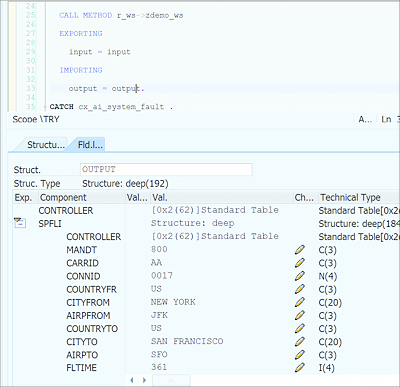
Figure 19.99 Data in Output Structure