
Turn an essential duck-hunting accessory
A true American folk object, the game call gained enormous popularity in the late 19th century, when it became part and parcel of hunting. Poke around a bit and you’ll find game calls for geese, turkeys, doves, crows, squirrels and even coyotes. But in all its many forms, the classic game call is the duck call.
Whether you hunt with a gun or a camera, a game call is a wonderful turning project. The parts that make the sound (called the “guts”) are available in kit form or as separate parts (see Sources, page 71), so once you’re set up for drilling and turning, it’s easy to produce a number of calls in a short time. Play with different shapes or explore your own theories about dimensions and sound—I guarantee you’ll have fun. But before you commit to a valuable piece of wood for that heirloom call, it’s a good idea to work out the basic drilling, chucking, shaping and fitting, using blanks of common wood such as poplar.
In addition to the guts, you’ll need two blanks of wood (Photo 1; see Sources). You can use contrasting woods or cut both blanks from one long piece. Any good, dry wood will do. Walnut is a popular choice (historically and with contemporary makers), and it’s usually readily available. The recent development of resin-injected woods commonly used in pen-making has created a material not so prone to dimensional changes due to exposure to moisture—an unavoidable occurrence with mouth-blown calls.
You’ll also need a 2" x 2" x 4" blank of poplar or other soft wood to create two jam chucks, and basic spindle-turning tools, including a spindle roughing gouge, a skew chisel, 1⁄4" and 3⁄8" detail/spindle gouges and standard and thin-kerf parting tools. Next on the list are a four-jaw scroll chuck and a drill chuck (a keyed chuck that mounts in the lathe’s tailstock), 5⁄8" and 7⁄8" Forstner-style drill bits and E-6000 adhesive (see Sources). A lanyard and a ferrule are optional, but you’ll definitely need O-rings if they don’t come with the guts parts that you order (see Sources).

Cut blanks for the call’s wooden parts. You’ll also need three O-rings and the “guts”—the parts that create the sound. A ferrule and lanyard are optional.
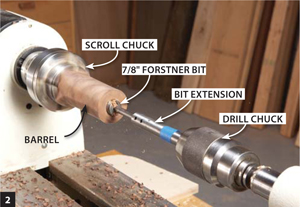
Drill a hole through the blank that will be the call’s barrel. This requires a scroll chuck to hold the blank and a drill chuck to hold the Forstner bit and its extension.

Reduce the diameter at the end of the barrel and add details after installing a tapered plug in the hole and engaging the tailstock. This end will be the mouthpiece.

Flip the blank end-for-end and mount it on a jam chuck so you can work the other end. The hole in the barrel snugly fits a tenon turned on the jam chuck.
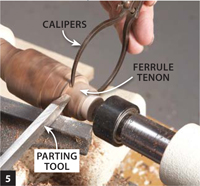
Turn a tenon for the ferrule, a metal band used to reinforce the joint between the call’s two wooden parts. Ferrules commonly appear on older calls, but including one is optional.
The guts play an important role in determining a call’s diameter, because they mount in a hole drilled through one part (the stopper). As the guts come in different styles and sizes, this hole must be sized to fit. A larger hole drilled through the other part (the barrel) houses a tenon turned on the stopper. The call has to be long enough to house the guts; beyond that, its length can vary.
The call shown here is sized to house Arkansas-style single-reed guts, which require a 5⁄8" bore. I used a pair of 13⁄4" x 13⁄4" blanks to make this call: one 2" long with a 5⁄8" bore (for the stopper) and one 4" long with a 7⁄8" bore (for the barrel).
The first step is to drill a centered 7⁄8" dia. hole all the way through the barrel blank, using the lathe or a drill press. To drill the hole on the lathe, mount the blank in a scroll chuck (Photo 2). The blank can be mounted square (as shown) or on a shouldered tenon. (This tenon has to be turned first, of course, after mounting the blank between centers.)
Drill the hole with a Forstner bit and a drill chuck. To keep from building up excessive heat, it’s best to use a high-speed steel (HSS) or carbide-edged bit. Most of these bits are short, so you’ll probably need a bit extension. Drill slowly and frequently back the bit out of the cut to clear the chips.
Next, shape the barrel’s mouthpiece (Photo 3). Reduce the diameter to about 11⁄4". Flatten the end to facilitate mounting it for the next step and sand everything smooth—don’t leave any sharp edges where your mouth will contact the call.
Remove the barrel and mount a 2" long poplar waste block in the scroll chuck, with its grain running parallel to the lathe bed. Turn a tenon on the waste block that’s slightly larger than the hole drilled through the barrel and about 1" long. Then carefully reduce its diameter to obtain a jam fit with the barrel (Photo 4). The fit should be tight enough to hold the barrel for turning but loose enough to allow it to be easily removed after it’s been turned.
To support the barrel’s free end, turn a short, tapered plug to fit inside its drilled hole and bring up the tailstock. (Another option is to install a live center with a cone-type point in the tailstock.)
The portion where the barrel fits onto the stopper requires special attention, because it may split if the parts swell or if the barrel takes too much force to install. The solutions are to leave this portion extra-thick or to install a metal ferrule to reinforce the joint (Photo 5). Size a tenon to fit the ferrule using outside calipers. Aim for a push-on fit and plan to glue on the ferrule using E-6000, a rubber-based adhesive that bonds permanently but stays flexible.
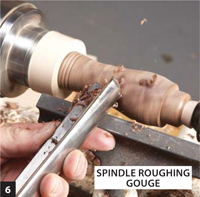
The barrel’s final shape is up to you, but a curved form makes the call easy to hold (Photo 6). Although not essential, a lanyard reduces the chance of losing the call and frees up both hands for those moments of truth (Photo 7). Complete the barrel by finish-sanding it to #220-grit (or #320-grit if the #220-grit scratches remain visible).
Complete the barrel by connecting the two ends. If you decide not to add a ferrule, leave extra thickness at the joint to keep the wood from splitting.

Cut a cove to house the lanyard. First, cut a shallow groove with a thin-kerf parting tool. Then use a small detail/spindle gouge to form the cove.
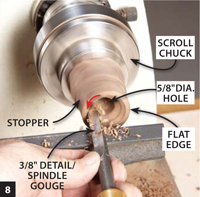
Flare the end of the call’s stopper after mounting it and drilling through it, as for the barrel. Leave the edge flat for mounting on the jam chuck. This end sounds the call.
Drill a centered hole through the 2" blank as before, but use a 5⁄8" Forstner bit to match the hole to the Arkansas-style guts we’ve chosen. The tailstock end of this blank will be the exit for sound, so it’s often flared like a horn for greater volume—in theory, anyway (Photo 8). Turn this end of the stopper about one-quarter of the way up the outside.
Remount the jam chuck you used for the barrel and resize its tenon to fit the smaller hole in the stopper. If the end of the stopper has been flared, you may have to lengthen the tenon to create a secure fit.
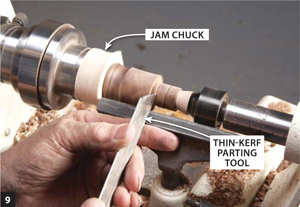
Install the stopper on the jam chuck and bring up the tailstock for additional support. Then turn a tenon to fit inside the barrel, with shallow grooves for two O-rings (Photo 9). Make the tenon about 1" long and size its diameter for a very slightly loose fit into the barrel. Space the grooves about 1⁄2" apart.
The O-rings may be slightly wider than the parting tool; if so, make a second cut to widen each groove. The depth of the grooves is also critical, as the O-rings must protrude slightly above the tenon to achieve an airtight fit with the barrel—but not so tight that the pieces have to be forced hard together (Photo 10).
Shape the tenon’s shoulder to fit nicely against the barrel. Then finish-turn the outside of the stopper (Photo 11). Complete the job by finish-sanding the stopper to the same grit as the barrel.
As moisture is a real enemy, whether from blowing the call or from the environment (cold and wet is often the norm for duck hunting), it’s imperative to apply a moisture-resistant finish on both the inside and the outside of the call. Some makers soak their calls in linseed oil. I prefer to use a film-forming finish. Any high-quality varnish that’s thin enough for wiping will work. I apply four coats of Waterlox Marine Finish, using a small brush to get inside the barrel. Allow the parts to dry for several days before assembling the call.
Assemble the guts (the third O-ring fits in a groove on the tone board) and install them in the stopper (Photo 12). Use a bit of E-6000 adhesive, if necessary. Install the barrel and give the call a couple blasts. Does it sound like a duck? You can alter the sound by adjusting the reed and wedge on the tone board, but my advice is to ask someone familiar with duck calling to assist you with the call’s initial “tuning” and to teach you some basic calls. That’s much more fun than purchasing an instructional duck call CD.
Cut shallow grooves for the O-rings after flipping the stopper, mounting it on a jam chuck and turning a tenon that’s slightly smaller than the hole in the barrel.

Install the O-rings to create an airtight fit with the barrel that’s neither too tight nor too loose. This is a critical step! Adjust the fit by carefully increasing the depth of the O-ring grooves.

Shape the middle section to complete the stopper. The end of this stopper flares like a horn on the outside to match the flared shape cut on the inside.

Insert the assembled guts after applying finish to the stopper and barrel and allowing it to thoroughly dry. Then install the barrel, add the lanyard and start quacking!
SOURCES Web Foot Custom Calls, webfootcustomcalls.com, Duck Call Guts, #DS01, $4.10 ea. Hut Products, hutproducts.com, 800-547-5461, Deluxe Single Lanyard, #3002, $0.89 each, Dymondwood Duck Call Kit #3135 $12.99 ea.; O-rings, 10-pack, #3003, $0.99. Tho Game Calls, thogamecallsstore.com, 603-867-1018, Stippled Brass Band (Ferrule), 1-1⁄4" OD x 1⁄2" wide, $5.99 each. Woodcraft Supply, woodcraft.com, 800-225-1153, E-6000 Adhesive, 3.7 oz. tube, #147109A, $6.50; Waterlox Marine Finish, 1 quart, #85W54, $42.50. Craft Supplies, woodturnerscatalog.com, 800 551 8876, HSS Forstner bits, 5⁄8" #979-310 $28.50, 7⁄8" bit #979-310 $30.90, bit extension in 3.5" #979-311 $26.75, No. 2MT adapter for these bits (replaces a Jacobs style chuck) #979-312 $43.25, or a Keyless drill chuck #104-578 $45.50, Oneway Talon Scroll Chuck #103-647 $234.95.