
Household utensils a cut above the rest
Metal has long since replaced wood as the preferred material for household utensils. But that doesn’t change the fact that opening letters and spreading butter can be accomplished effectively with wooden tools. So, here’s a chance to make a pair of useful utensils that will stand out beautifully from the tarnished crowd, especially in the eyes of a woodworker. Why two separate projects in one article? Because the techniques used to create each one are similar.
Choose closed-grain hardwood for both projects. The letter opener requires durable, sharp edges and the butter knife will be much easier to keep clean if the wood doesn’t contain large open pores. Hard maple is an excellent choice—so are cherry, pear, apple, Osage orange and a host of exotics, including goncalo alves, olive, ebony, and purpleheart. Even laminated bamboo flooring material will work for the letter opener, although you may have to glue several pieces together to reach the necessary thickness.
Both projects are evenly divided between turning operations and contour sanding. Basic spindle turning tools are all you’ll need for the turnings: a spindle roughing gouge, a spindle/detail gouge, a parting tool and a skew chisel. If you are adept with the skew chisel, you can complete both projects with it alone.
To shape the blades, you’ll need a Jacobs-type chuck that fits your lathe’s headstock and a 5" firmed-backed sanding disc holder (see Sources, page 96). If you want to add curves to the blade of the butter knife, as I have, you’ll need a 1" or 2" sanding drum that fits into the Jacobs chuck You’ll also need #80-, #120-, #150- and #220-grit paper for the sanding disc and a #100-grit sleeve for the sanding drum.
The how-to steps for both projects are basically the same, with a few minor variations. So, I’ll show how to turn and shape the letter opener first. Then I’ll explain the variations used to turn and shape the butter knife.
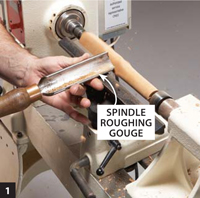
Many steps in making a letter opener and a butter knife are the same. Start both projects by turning the square stock into a cylinder.

Separate the handle from the blade area by rolling a bead. Cut in with a parting tool or skew chisel. Then roll the bead with a spindle/detail gouge.
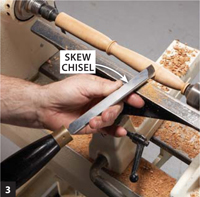
To make a letter opener, shape the blade portion to look like an asymmetrical ellipse, using the skew chisel or spindle/detail gouge.

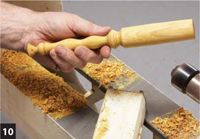
Shape the handle to a form that fits nicely in your hand—this is a great opportunity to try different shapes.

Detail the handle. One option is to lay out a series of small beads with the long point of the skew. To roll the beads, use either the skew or the spindle/detail gouge.

Turn both ends to a small diameter with the long point of the skew. Then carefully part off the turning at the headstock end. This leaves only a bit of waste to cut through at the tailstock end.
Start with 11⁄4" squares of wood that are approximately 10" long. Mount a blank and turn it to a cylinder (Photo 1).
Determine where the handle will transition to the blade. Make the blade portion longer, rather than dividing the parts evenly, and mark the transition by creating a bead (Photo 2).
Traditional metal letter opener blades often swell from the tip, so turn the blade portion to look like an ellipse—an asymmetrical “ellipse” looks the best (Photo 3).
When shaping the handle, the top priority is always a comfortable grip. Here, the handle echoes the blade’s elliptical look (Photo 4). A gradual taper from the end to the bead also forms a comfortable grip.
The handle’s surface can be detailed or left smooth. A series of small beads can make the handle easier to grip. Vary the beads’ sizes for interest, wider in the middle and gradually narrowing towards the ends (Photo 5).
Finish-sand everything but the blade area to #220-grit.
Remove the letter opener from the lathe and cut the waste material from both ends, using a coping saw or Japanese-style saw. Alternately, you can save some sanding by using the skew chisel to part off the letter opener at the headstock end (Photo 6).
Shape the blade by sanding. One way to reduce the amount of sanding dust raised during this step is to cut away most of the waste wood with a small saw earlier, while the letter opener is still on the lathe. The alternative is to plan to capture a lot of dust. Position a dust collection hose near the headstock and be sure to wear an effective dust mask (rated at NIOSH 95).
Mount the Jacobs-type chuck in the headstock and install the 5" sanding disc holder with #80-grit paper attached.
Work the blade slowly into the basic shape. Then start tapering from the middle to the edges to create the double-sided wedge shape (Photo 7). For the opener to work effectively, the edges of the blade must be fairly sharp. If the #80-grit paper cuts too aggressively, switch to #100-grit. Switch to #120-grit when you near the final shape; switch to #220-grit to complete the disc sanding.
Finish-sand the blade by hand, following the grain (Photo 8).
Test the opener on several sealed envelopes. You’ll discover that (1) a certain level of edge sharpness is required to cut the paper, and (2) properly shaped wedges aid the cutting process by easing the envelope open. You may need to do some re-shaping to achieve optimal results.

Install a sanding disc holder to finish shaping the letter opener’s blade. On both sides, create tapers from the center to the edges and from the handle to the tip.

Complete the letter opener by sanding with the grain to remove cross-sanding marks from the blade.
Although a butter knife's handle may be differently shaped, the main differences from the letter opener are that the knife’s blade is shorter and turned to a cylinder.
Whenever you turn a handle, it’s a good idea to stop during the process and check the way it feels in your hand.

The butter knife’s blade tapers from the handle to the tip, and from the top to the bottom. Only the bottom edge tapers to a point.

Shape the butter knife’s blade on a sanding drum, to add interest. A concave curve on the top edge complements the curve on the front at the bottom.
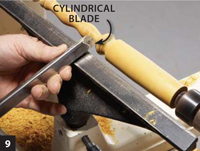
Turn the blade area to a cylinder, instead of an ellipse, and experiment with a variety of shapes for the handle (Photos 9 and 10).
When shaping the blade with the 5" disc, taper from the topside down, to create an edge at the bottom (Photo 11). This edge doesn’t have to be as sharp as the edges on a letter opener. Generally speaking, butter knife blades are a bit thinner, usually about 1⁄8" thick along the top edge of the blade, and more consistently thick from end to end.
Use a sanding drum to make the blade look more interesting (Photo 12). After shaping these curves, you may have to return to the disc to refine the edge.
Almost any finish will work for the letter opener. Wipe-on poly or gel varnish would be good choices if you prefer a film-forming finish. For an oil finish, choose an oil-varnish blend or a drying oil such as linseed oil or tung oil.
The butter knife is a little different, as it will be washed and used with food. The first option is no finish—just let the knife take on the natural look it acquires through use. For a more finished look and a little protection against staining, try an oil finish such as pure mineral oil, walnut oil or tung oil. (Make sure the product you use contains no toxic additives.) For still more protection, apply coats of wipe-on or gel-type varnish. These finishes will be food safe once they’ve fully cured, which may take several weeks.
SOURCES Craft Supplies, woodturnerscatalog.com, 800 551 8876, Keyless Drill Chuck #104-578 $45.50 The Sanding Glove, www.thesandingglove.com, (800) 995-9328, 5" Firm Disc Holder #SM-5F, $15.95. Rockler Woodworking and Hardware, www.rockler.com, (800) 279-4441, 15 Piece Sanding Drum Kit #42937, $18.99.