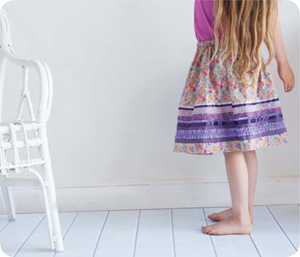
This is my modern take on the kind of heavily embellished, traditional skirt worn with pride on special occasions by girls and women from different cultures across the world.
If, like me, you have a closely guarded stash of ribbons, this is a great way to dip into your collection. Take time to enjoy putting different combinations together, to create your very own heirloom masterpiece. It’s surprising how easy it is to create such a show-stopper skirt.
Cotton lawn or lightweight fabric, 46 x 137cm (18 x 54in)
Ruffle fabrics: two strips of 2.5 x 137cm (1 x 54in) co-ordinating fabric (see Tip)
8–10 different ribbons in a variety of widths and textures: satin, sheer, organza, glitter, ric rac, lace etc, which when laid out next to each other give a total width of 15cm (6in).
Buttonhole elastic or regular elastic, 65cm (26in) of 2cm (3⁄4in) wide
Button, size suitable for your elastic (only needed if using buttonhole elastic)
Fabric: measure from the child’s waist to the desired hem length of the skirt (above or below knee, you choose!) then add 7.5cm (3in) to this measurement. This is the length of 137cm (54in) wide fabric you will need.
Elastic: measure the child’s waist and add 7.5cm (3in).
To make the thin ruffle strips, take 137cm (54in) wide fabric and make a snip in the fabric and rip or tear it to give a straight edge (don’t cut with scissors); snip and rip again at 2.5cm (1in) so you have lightly frayed edges.
Pick out one colour from your fabric and choose ribbons in varying shades of this colour. Or you could mix it up and choose different colours picked out from your fabric. For my ribbon choice I used 5.5cm (21⁄4in) wide crinkled taffeta, ric rac, 1.25cm (1⁄2in) wide satin, 1cm (3⁄8in) glitter ribbon, 2.5cm (1in) wide organza, 2.5cm (1in) wide cotton lace, and two different shades of 1.25cm (1⁄2in) wide satin ribbons, all in varying shades of purple.
Use the measurements given in the You will need list to make a skirt that will fit an average height 6–7 year old just below the knee, or mid calf for the average 5–6 year old and ankle length for the average 3–4 year old.
1 Take the ruffle fabric strips and, with right sides together, stitch the two short ends to make one long strip.
2 Sew two rows of long tacking (basting) stitches 1cm (3⁄8in) apart. Leave long threads at both ends. Take hold of a set of long thread ends (one each from the same end, same side of both rows of stitches) and pull to create a gather. Ease the fabric along the stitches to even out the gather.

To tack (baste) using your sewing machine, adjust the stitch length on the machine to about 4.5.
3 Adjust the gather until the length of the ruffle is reduced to 137cm (54in).
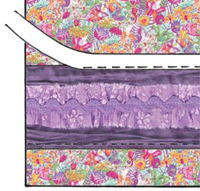
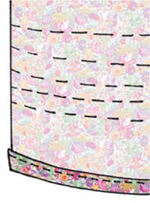
4 Lay the skirt fabric out on a table and experiment with the arrangement of the ribbons. To follow my design, place the widest ribbon at the bottom with the ruffle in the centre, then the ric rac. When you are happy with your design, take a picture or make notes of the order of the ribbons.
5 Stitch the ribbons on (instructions now follow for my ribbon arrangement). Starting with your bottom (widest) ribbon lay it on your skirt fabric 4cm (11⁄2in) from the bottom edge, pin in place. Stitch it to the skirt using co-ordinating thread, close to the edge of the ribbon. Lay the ruffle centred on top. Stitch in place along the centre of the ruffle, between the tacking (basting) stitches. Remove the tacking (basting) stitches. Next lay the ric rac on top of the centre of the ruffle and stitch in place.
6 Then lay the next ribbon above the wide ribbon, overlapping the wide ribbon edge. Stitch close to the edge through this ribbon and wide ribbon. Repeat with subsequent ribbons, always overlapping the top ribbon over the previous one, sewing through both.

7 With right sides together, form the skirt loop and stitch the edges together with a 1cm (3⁄8in) seam. Finish the seam (see Techniques section) and press to one side. This is the back seam of the skirt.
8 Hem the bottom edge of the skirt by folding up 1.25cm (1⁄2in), and pressing. Fold another 2cm (1in) over, and press again. Stitch all around the hem, 2mm (1⁄8in) from the top fold.
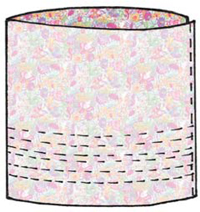
9 Fold over 1.25cm (1⁄2in) at the top of the skirt and press.
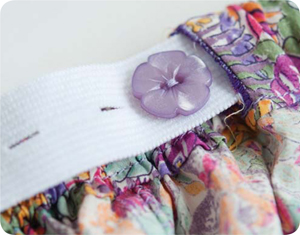
10 If not using buttonhole elastic, go straight to step 11. Make a 2cm (3⁄4in) buttonhole (see Techniques section) 5mm (1⁄4in) from the top folded edge of the skirt, stitching through the folded edge.

11 Fold over another 3cm (11⁄4in) at the top of the skirt. Stitch in place close to the fold, all around the skirt. Note: if you are not using buttonhole elastic, leave a 4cm (11⁄2in) gap.
12 Machine zigzag stitch over the ends of the elastic to prevent fraying; alternatively, you can blanket stitch by hand (see Hand sewing stitches in the Techniques section). Attach a safety pin to one end and insert the elastic into the waistband through the buttonhole (or through the gap if not using buttonhole elastic). Push the elastic around through the waistband with your thumbs and forefingers. Note: secure the other end of the elastic with another safety pin once it is nearly at the buttonhole/gap so that it does not disappear into waistband. Make sure the elastic lies flat within the waistband.
13 If you are not using buttonhole elastic, omit this step and go to step 15. Pull the safety pin out of the buttonhole, pulling the elastic about 7.5cm (3in) out of the buttonhole. Adjust the other end of the elastic so that it sits just inside the buttonhole, and pin it in place (take care not to let go and lose it!). Secure the elastic in place, stitching through all the layers close to the buttonhole using machine zigzag stitch or blanket stitch by hand.

14 Stitch the button in place, close to the buttonhole. Adjust the elastic to the desired length and push a buttonhole over the button. The fitting of your skirt made using buttonhole elastic is now complete.

If the party is this afternoon and the pressure is too much, or even if you just prefer a simpler look, you can make a plain version of this skirt without the embellishments – it’s still very pretty if you pick the right fabric!
15 To complete the fitting of the skirt if you are using plain elastic, pull both ends of elastic about 7.5cm (3in) out of the gap and tie in a knot at the required waist measurement (about 59cm (23in) for 5–7 year olds). Slip stitch the gap closed (see Hand sewing stitches in the Techniques section). As your child grows these stitches can be undone and the elastic length adjusted to a different size or replaced.