
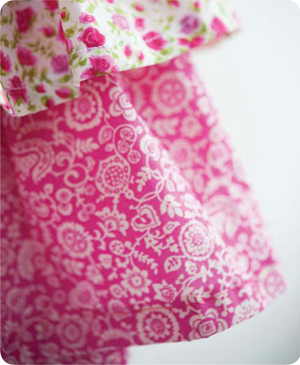
Who doesn’t love a ra-ra skirt? I know I did, and still maintain a fondness for its flouncy delights. I was definitely a child of the 80s, and don’t want my daughter to miss out on this particular cultural icon. This easy-to-make version is great for twirling at parties, or just in your living room.
You could mix it up with rainbow shades, graduate the tones or use your little one’s favourite colours. Floral prints in popping colours are the perfect match for energetic tiny people.
Top ruffle and waistband, 20 x 137cm (8 x 54in) cotton lawn or lightweight fabric
Middle ruffle, 24 x 137cm (91⁄2 x 54in) cotton lawn or lightweight fabric
Bottom ruffle, 35 x 137cm (133⁄4 x 54in) cotton lawn or lightweight fabric
55cm (26in) of 2cm (3⁄4in) wide elastic, either buttonhole elastic or regular
Button, size suitable for your elastic (only needed if using buttonhole elastic)
Fabric: measure from child’s waist to the desired hem length of the longest ruffle of the skirt (above or below knee, you choose!) then add 7.5cm (3in) to this measurement. This is the length of 137cm (54in) wide fabric you will need for the bottom ruffle
Elastic: measure the child’s waist and add 7.5cm (3in)
Using regular 122cm (44in) wide fabric works just as well, but results in a slightly less ruffled skirt.
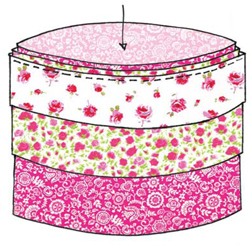
For this skirt I chose three fabrics on the same colour theme (pink with roses or floral). I tried to keep the same hue of pink and varied the shade using the density of pattern of the print, shading from light to darker/stronger colour from the top to the bottom of the skirt. On the top ruffle the roses are widely spaced on a white background, on the middle ruffle the roses are closer together and on the bottom ruffle the pink is the predominant colour of the fabric.

1 Start by making the top ruffle. Form a loop, with right sides together, and stitch the edges together with a 1cm (3⁄8in) seam. Finish the seam and press to one side. Repeat with the 9cm (31⁄2in) strip to make the waistband, and with the other two fabrics for the middle and bottom ruffles.

2 To hem the top ruffle, fold up 5mm (1⁄4in) on one edge and then press. Fold another 1.25cm (1⁄2in) over and press again. Stitch all around the hem 2mm (1⁄16in) from the fold. Repeat with the other two ruffle pieces.

3 Make a gather on the middle ruffle all around the circumference at a distance of 12.5cm (5in) from the bottom hemmed edge. To do this, sew two rows of long tacking (basting) stitches 1cm (3⁄8in) apart. You can do this on your sewing machine by setting the stitch length to about 4.5, or sew by hand. Leave long threads at both ends. Take hold of a set of long thread ends (one each from the same end, same side of both rows of stitches) and pull to create a gather. Ease the fabric along the stitches to even out the gathering, until the circumference is reduced to about 90cm (36in) long (or 45cm/18in when skirt is folded flat).
4 Sew regular length zigzag stitches around the circumference between the tacking (basting) rows. Remove the tacking (basting) stitches. Repeat with the bottom ruffle, 15cm (6in) from the bottom edge.

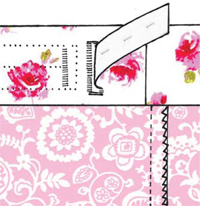
5 Insert the middle and then the bottom ruffle inside the top ruffle loop. Align the top edges, pin in place and stitch together 1cm (3⁄8in) from the top edge.
6 On one long edge of the waistband strip (see Cutting), fold up 1.25cm (1⁄2in) to the wrong side and press.
7 If not using buttonhole elastic, omit this step and go to step 8. Make a 2cm (3⁄4in) buttonhole (see Techniques) 5mm (1⁄4in) from the top folded edge of the waistband, stitching through the folded edge.

8 Turn the skirt from step 5 inside out and insert into the waistband loop, aligning the top edges (the non folded edge of the waistband). Pin and stitch together with a 1.25cm (1⁄2in) seam. Trim to 5mm (1⁄4in) and finish the seam.

9 Turn the skirt right side out. Fold the waistband over the top edge of the skirt, ensuring that the folded waistband edge covers your stitching from step 7. Stitch 2mm (1⁄16in) from the folded edge all around the top of the skirt. Leave a 4cm (11⁄2in) gap if you are not using buttonhole elastic.

10 Machine zigzag stitch over the ends of the elastic to prevent fraying; alternatively, blanket stitch by hand (see Hand sewing stitches in the Techniques section). Attach a safety pin to one end and insert the elastic into the waistband through the buttonhole (or through the gap if not using buttonhole elastic). Push the elastic around through the waistband with your thumbs and forefingers. Note: secure the other end of the elastic with another safety pin once it is nearly at the buttonhole/gap so that it does not disappear into the waistband. Make sure the elastic lies flat within the waistband.
11 If you are not using buttonhole elastic, omit this step and go to step 13. Pull the safety pin out of the buttonhole, pulling the elastic about 7.5cm (3in) out of the buttonhole. Adjust the other end of the elastic so that it sits just inside the buttonhole, and pin it in place (take care not to let go and lose it!). Secure the elastic in place, stitching through all the layers close to the buttonhole using machine zigzag stitch or blanket stitch by hand (see Hand sewing stitches in the Techniques section).
12 Stitch the button in place, close to the buttonhole. Adjust the elastic to the desired length and push a buttonhole over the button. The fitting of your skirt made using buttonhole elastic is now complete.
13 To complete the fitting of the skirt if you are using plain elastic, pull both ends of elastic about 7.5cm (3in) out of the gap and tie in a knot at the required waist measurement (about 59cm (23in) for 5–7 year olds). Slip stitch the gap closed (see Hand sewing stitches in the Techniques section).
If you are using plain elastic, leave some spare in the waistband so that in the future you can open the stitched gap, undo the knot and adjust the elastic length, or even replace it, if a different size is required.
