There is something so sweetly nostalgic about fresh baked breakfast breads, snack cakes, and muffins. I can’t recall many times in my life when there wasn’t a loaf of banana bread on a platter with a knife resting beside it should anyone want a quick little bite. In a time of mixes and store-bought baked goods, a basket of homemade muffins or a fresh loaf of sweet bread holds a charm that captures the heart and brings us back to simpler times.
The original recipe for this bread is legendary. It was wildly popular when I was a child and Mama kept the starter carefully nursed in her fridge, dutifully baking loaves of bread each week and passing on the extra starter to a friend so that she, too, could make the delicious, moist, cinnamon-flavored concoction known as Amish friendship bread. I never met a single person who didn’t fall in love at first bite.
But goodness, that bread is high maintenance! My version doesn’t require a starter or any forethought beyond, “Hey, I think I’ll go make some Shortcut Amish Friendship Bread!” but it still has that wonderfully moist flavor that is perfect for an after-school snack or coffee-time treat. It’s so simple, you can just make a loaf for a friend rather than saddling them with a starter that they’ll have to remember each day. Low-maintenance deliciousness is just another reason to love this version. Makes two 5 x 9-inch loaves
Nonstick cooking spray, for coating the pans
3 cups self-rising flour (see recipe)
2 cups granulated sugar
1 box (5.1 ounces) vanilla instant pudding mix
1 tablespoon ground cinnamon
1½ cups buttermilk (see recipe) or whole milk
½ cup vegetable oil
½ cup (1 stick) butter, melted and cooled slightly
2 large eggs, lightly beaten
1 teaspoon vanilla extract
1 Preheat the oven to 325˚F. Lightly coat two 5 x 9-inch loaf pans with cooking spray and set aside.
2 Place the flour, sugar, pudding mix, and cinnamon in a large mixing bowl. Stir together with a wooden spoon until well blended. Add the buttermilk, vegetable oil, butter, eggs, and vanilla, and beat with an electric mixer at medium speed, scraping down the side of the bowl as needed, until smooth and fully blended, about 2 minutes.
3 Divide the batter among the prepared pans. Bake until a toothpick inserted in the center comes out clean, about 1 hour. Allow to cool for 10 minutes in the pan, then turn out onto a wire rack to cool completely.
Shortcut Amish Friendship Bread will keep, in an airtight container or bread bag at room temperature, for up to 4 days.
from Mary Alice Dobbert
“This recipe is from my mom, Mary Anne Christiano. Mom always made this around Easter time when I was a young girl. Mom and Dad had four children and we all really enjoyed Mom’s baking, especially her banana bread. Mom is still a wonderful cook. I remember that I would sit in the kitchen and watch my mom cook and bake during my childhood. I think this is where I get my love for baking. I still love to sit and chat and watch her cook.
“Even though I know this recipe by heart, I always take out her recipe card because I love to look at Mom’s handwriting. It’s just so beautiful to have these old memories from your past on a little recipe card.” Makes one 5 x 10-inch loaf or two 4 x 8-inch loaves
Nonstick cooking spray, for coating the pan
¾ cup (1½ sticks) butter, at room temperature
½ cup brown sugar
½ cup granulated sugar
4 bananas, mashed
3 large eggs
⅓ cup milk
1 teaspoon vanilla extract
2½ cups all-purpose flour
½ teaspoon salt
1 teaspoon baking powder
½ cup chopped walnuts (optional)
1 Preheat the oven to 350˚F. Lightly coat a 10 x 5-inch loaf pan (or two 8 x 4-inch loaf pans) with cooking spray and set aside.
2 Cream together the butter and sugars in a large mixing bowl with an electric mixer at medium speed until combined, 1 to 2 minutes. Add the bananas, eggs, milk, and vanilla and blend until smooth. Add the flour, salt, and baking powder to the banana mixture and mix until just incorporated. Stir in the walnuts, if using.
3 Pour the batter into the prepared pan. Bake until the edges are dark brown and there is a nice crack down the center of the bread, or until a toothpick inserted in the center comes out clean, 50 to 60 minutes.
4 Allow to cool on a wire rack for 15 minutes, then remove the loaf from the pan. Return the banana bread to the wire rack and cool completely before slicing.
Mom’s Banana Bread will keep, in an airtight container or bread bag at room temperature, for up to 4 days, or wrapped in aluminum foil in the freezer for 3 months.
Christy’s Note: Every baker must have a recipe for banana bread in her lineup. This one is a sure keeper. It is delicious served warm slathered with butter and also freezes well. I love to keep some on hand for when company drops over for coffee.
This loaf is decadently moist with sweet juicy bits of pineapple and a crispy crust that makes your mouth sing! This is a very dense and heavy bread with a tender crumb. If you are going to give it as a gift, I suggest making four smaller loaves, since they will travel a bit easier. Makes one 5 x 9-inch loaf or four 3 x 5-inch loaves
Nonstick cooking spray, for coating the pan
1 can (20 ounces) pineapple tidbits, drained
½ cup vegetable oil
¼ cup milk
2 large eggs
1 teaspoon vanilla extract
2 cups granulated sugar
2 cups self-rising flour (see recipe)
2 teaspoons ground cinnamon
1 Preheat the oven to 350˚F. Lightly coat a 5 x 9-inch loaf pan with cooking spray and set aside.
2 Place the pineapple, vegetable oil, milk, eggs, vanilla, and sugar in a large mixing bowl and stir with a large spoon until well blended. Add the flour and cinnamon and stir again until well combined.
3 Spoon the batter into the prepared pan. Bake until a toothpick inserted in the center comes out clean, 1 hour. Allow to cool in the pan for 5 minutes, then turn out onto a wire rack. For best results, allow to cool before cutting.
Amazing Pineapple Bread will keep, in an airtight container or bread bag at room temperature, for up to 3 days.
Sweet breads generally freeze very well. Sweet loaf breads may be frozen whole or sliced and then frozen—that way you can remove one or two slices at a time rather than defrosting the entire loaf. Just be sure to wrap them well before freezing. To freeze muffins, simply place them in a zip-top bag and lay the bag flat in your freezer.
This makes the most gorgeous loaf of banana bread you’ve ever seen, with a lightly golden top that mounds up beautifully with a lovely split right down the center. It looks like it deserves an honored place in a bakery store window. The addition of oats helps make an already moist bread even more so, and their faintly nutty flavor works well with the bananas. For added flavor, I soak my oats overnight before making this bread. Just place them in a mason jar, add water to cover, and place the lid on it. Leave them out on the counter until you’re ready to make the bread the next day. This develops a richer flavor in the oats and adds just a hint of yeastiness. I often leave oats out like this for a full twenty-four hours to allow them to start to ferment and then place them in my fridge. Breakfast is ready in a flash since soaked (and fermented) oats don’t require as much cooking time as raw oats. When I have them waiting in my fridge and want to make this bread, I just strain out a cup of oats and add them to my recipe! Makes one 5 x 9-inch loaf
Nonstick cooking spray, for coating the pan
1 cup light brown sugar
3 medium-size ripe bananas (the ones with brown spots on them are sweetest)
½ cup (1 stick) unsalted butter, at room temperature
2 large eggs
½ cup buttermilk (see recipe)
1 teaspoon vanilla extract
2¼ cups self-rising flour (see recipe)
1 cup soaked oats (old-fashioned or quick-cooking oats), drained (see headnote)
1 Preheat the oven to 350˚F. Lightly coat a 5 x 9-inch loaf pan with cooking spray and set aside.
2 Place the brown sugar and bananas in a large mixing bowl and beat with an electric mixer at medium speed until the bananas are liquefied, about 1 minute. Add the butter, eggs, buttermilk, and vanilla and mix again until well blended. Add the flour and oats and mix, scraping down the side of the bowl as needed, until smooth and well blended, about 2 minutes.
3 Pour the batter into the prepared pan. Bake until a toothpick inserted in the center comes out clean, 60 to 65 minutes. Allow to cool in the pan for 10 minutes, then turn out onto a wire rack or towel to cool completely.
Oatmeal Banana Bread will keep, in an airtight container or bread bag at room temperature, for up to 5 days.
The only thing I enjoy more than baking for my family is baking for a small regiment. Here are some things to keep in mind:
Choose the recipe wisely. If you are going to be baking for fifty or even five hundred, layer cakes aren’t the way to go. They don’t travel well and they require a great deal of fuss when cooking on that scale. Instead, think bar cookies, cupcakes, congealed salads, and desserts that can be prepared in single servings. These will be easier to transport, won’t require a dedicated person to serve them, and in many cases won’t even require silverware.
Some of my favorite baked goods to take for large crowds are:
Muffins: These can be made days in advance and stored, carefully wrapped, in the freezer until needed.
Bar Cookies: No fussing with scooping out dough onto endless pans!
Sheet Cakes: Stick with ones that don’t require refrigeration so you can set them out ahead of time.
If you are going to be serving these types of desserts on a buffet, it’s easy to simply place them on a tray, but you can also make them more of a grab-and-go treat by wrapping each serving individually in plastic wrap. Sheet cake slices can be placed on small disposable plates.
When serving a crowd, keep serving sizes slightly smaller than usual, as most people prefer smaller portions of dessert; they can always come back for another bite. This will also help your dish serve more people.
I love fruit in just about any shape and form. I actually don’t know of any fruit offhand that I don’t love, but I do know that strawberries definitely make my top-ten list. This bread is a great way to use strawberries that might be getting a wee bit past their prime, but it is definitely worthy of freshly picked berries as well. It is great just sliced and served, but if you really want to gussy it up a bit, butter each slice and toast it in the oven for a few minutes. Don’t forget to call dibs on the first slice! Makes one 5 x 9-inch loaf
Vegetable shortening and flour, for preparing the pan
1 cup fresh strawberries, hulled, washed, and sliced
1 cup plus 2 tablespoons granulated sugar
1½ cups self-rising flour (see recipe)
½ cup vegetable oil
2 large eggs, beaten
2 teaspoons ground cinnamon
1 cup chopped pecans
1 Preheat the oven to 350˚F. Lightly grease and flour a 5 x 9-inch loaf pan and set aside.
2 Place the strawberries in a small bowl and pour the 2 tablespoons of sugar over them. Stir and set aside.
3 Place the flour, the remaining 1 cup of sugar, the vegetable oil, eggs, and cinnamon in a large mixing bowl and mix with a spoon until well combined. Add the pecans and strawberries and mix again until well combined.
4 Pour the batter into the prepared pan. Bake until a toothpick inserted in the center comes out clean, 45 to 50 minutes. Allow to cool in the pan for 10 minutes before removing from the pan to cool completely.
Strawberry Pecan Bread will keep, covered at room temperature, for up to 3 days.
If your quick breads and cakes are consistently sunken in the center, try leaving them in the oven just a bit longer. The center of a loaf is the last part to finish baking, so taking it out before the center is fully done will cause it to sink. This can vary by oven but at my house, when a loaf looks done, I usually let it cook another 3 to 4 minutes just to give the center time to set. You can test it by pressing lightly on the center with your finger. If it springs back, the center is done. Or use the trusty toothpick test: The bread or cake is done when a toothpick inserted in the center comes out clean.
from Amanda Dobbs
“Molcie Dobbs is a phenomenal woman. As a twenty-two-year-old (mind you, the age I am now), my grandmother moved out of her family home and took a man’s job driving a forklift at the Tennessee Coal, Iron, and Railroad Company. She had put in an application every afternoon until she got the job, about which she knew nothing.
“There, she met my grandfather, fell in love, and started our wonderful family. Her Hawaiian Banana Nut Bread is just like her: On the outside it looks like your average old-fashioned favorite, but once you slice it open and experience it, you notice that there is something distinctly different and special about it. Grandmama has been making this bread for about as long as I can remember. She uses this recipe to show her talent and appreciation for numerous people around the community, including the garbage man who would pause his work just to take her garbage can back up to her house for her.
“She is known for her bread among our family and acquaintances; however, I know her for much more than that. Grandmama has taught me more about hard work, true love, and the importance of independence than I could have ever asked for. Every time I see banana nut bread, I think of Grandmama and how her special twist makes a very ordinary recipe extraordinary—just like Grandmama makes my very ordinary life that much more extraordinary, simply by being in it.” Makes two 5 x 9-inch loaves
Vegetable shortening and flour, for preparing the pans
3 cups all-purpose flour
2 cups granulated sugar
1 teaspoon baking soda
1 teaspoon salt
1 heaping teaspoon ground cinnamon
1 cup chopped pecans
1 cup sweetened shredded coconut
3 large eggs, beaten
2 cups mashed bananas (5 to 6 bananas)
1½ cups vegetable or canola oil
2 teaspoons vanilla extract
1 to 2 teaspoons coconut extract, to taste
1 can (8 ounces) crushed pineapple, drained
1 Preheat the oven to 350°F. Lightly grease and flour two 5 x 9-inch loaf pans and set aside.
2 Whisk together the flour, sugar, baking soda, salt, cinnamon, pecans, and the coconut in a large bowl. In a separate large bowl, whisk together the eggs, bananas, oil, vanilla, coconut extract, and crushed pineapple.
3 Add the wet mixture to the dry mixture and stir with a rubber spatula until just moistened.
4 Pour the batter evenly into the prepared pans. Bake until a toothpick inserted in the center comes out clean, 1 hour and 15 minutes. Cool the pans on a wire rack for 10 minutes. Remove the breads from the pans and allow to cool completely.
Hawaiian Banana Nut Bread will keep, in an airtight container or bread bag at room temperature, for up to 4 days, or in an airtight container in the freezer for up to 3 months.
Christy’s Note: I love pineapple, coconut, and bananas. Add some pecans and you take the combo over the top. I’m sure this recipe could easily win a blue ribbon. When my mother made some and gave it to a neighbor, she called immediately and wanted the recipe. You will definitely not be disappointed with this delicious bread.
I often turn quick bread recipes into muffins in order to have more shareable servings! Simply prepare your favorite quick bread recipe as the directions state, but instead of pouring the batter into a loaf pan, pour it in greased or paper-lined muffin cups. Cooking time will be reduced by about half, but you’ll still need to check on them after 20 minutes to see if they are done. The recipe for one 5 x 9-inch loaf of quick bread usually yields about 12 muffins. Don’t forget, muffins become cupcakes when you ice them! Try some of my favorite frostings in chapter 3. Banana Bread Muffins with Cream Cheese Frosting? Yes, please!
My family has always loved quick breads. They make a delicious snack, simple dessert, or great quick bite for breakfast as you head out the door. This bread greets your family with a heavenly aroma. It bakes up moist and tender, studded with juicy bits of apple, with a decadent soft-crisp crust on top. It’s great on its own or spread with a smear of butter or apple butter.
Feel free to use any kind of apple you want, even apples that are going a little soft. In the interest of being neighborly, I like to double this so I have one loaf to keep and one to give away as a nice surprise to someone who would enjoy a little pick-me-up. Makes one 5 x 9-inch loaf
Nonstick cooking spray, for coating the pan
3 to 4 medium-size apples, peeled and diced (about 2 cups)
¼ cup milk
2 large eggs, lightly beaten
½ cup vegetable oil
1 teaspoon vanilla extract
2 cups granulated sugar
2 cups self-rising flour (see recipe)
2 teaspoons ground cinnamon
½ teaspoon ground allspice
1 Preheat the oven to 350˚F. Lightly coat a 5 x 9-inch loaf pan with cooking spray and set aside.
2 Place the apples in a large mixing bowl. Add the milk, eggs, oil, vanilla, and sugar and stir with a large spoon until well blended. Add the flour, cinnamon, and allspice and stir again until well combined.
3 Spoon the batter into the prepared pan. Bake until a toothpick inserted in the center comes out clean, about 1 hour. Allow to cool in the pan for 5 minutes, then turn out onto a wire rack. For best results, allow to cool completely before cutting.
Amazing Apple Bread will keep, in an airtight container or bread bag at room temperature, for up to 3 days.
King cake is a classic Mardi Gras favorite that is fun to make at home. This ring-shaped treat is a cross between a bread and a cream cheese–filled cinnamon roll, without too much sweetness to it. Instead of reserving this for Mardi Gras season, I make it whenever the mood strikes and just switch up the sprinkles. Serves 8 to 10
Nonstick cooking spray, for coating the baking sheet
1 loaf (1 pound) frozen bread dough, thawed
All-purpose flour, for rolling out the dough
1 package (8 ounces) cream cheese, at room temperature
2½ cups confectioners’ sugar
1 teaspoon lemon extract
3 tablespoons milk, plus extra as needed
1 teaspoon butter flavoring or vanilla extract
Colored sprinkles, for garnish (optional, see Note)
1 Lightly coat a baking sheet with cooking spray and set aside.
2 Place the bread dough on a floured surface and roll it out to a 10 x 18-inch rectangle with a rolling pin. To make this easier, partially roll out the dough, allow it to rest for 5 minutes, then roll it out the rest of the way.
3 Combine the cream cheese, 1 cup of the confectioners’ sugar, and the lemon extract in a medium-size mixing bowl and beat with an electric mixer at medium speed until creamy and well blended, 1 to 2 minutes.
4 Spread the cream cheese mixture over the dough, leaving a 1-inch border around the edges. Starting with a long edge, roll the dough up into a log about 17 inches long and ½ inch thick. Brush the open edge with water and press it into the log, then gently squeeze the log together with your hands to seal it.
5 Form the log into a ring, pressing the short ends into each other and brushing with water, if needed, to seal together. Place the dough on the prepared baking sheet and spray the top of the dough lightly with cooking spray. Cover with plastic wrap and set in a warm, draft-free place to rise for 45 minutes to 1 hour. (I have found that the top of my dryer is a great place to let the dough rise, especially if I have a load of laundry drying.)
6 Preheat the oven to 350˚F.
7 Remove the plastic wrap and bake the ring until golden brown, 30 to 35 minutes. Allow to cool.
8 Stir together the remaining 1½ cups confectioners’ sugar, the milk, and the butter flavoring in a small bowl until smooth. Drizzle over the top of the cake with a spoon. Immediately sprinkle with colored sprinkles, if desired. Allow to sit until the glaze hardens.
Super Easy King Cake will keep, covered at room temperature, for up to 3 days.
Note: Traditional king cake sprinkles are purple, yellow, and green. I rarely come across purple sprinkles, so I use whatever colors my kids want and we enjoy our cake just the same!
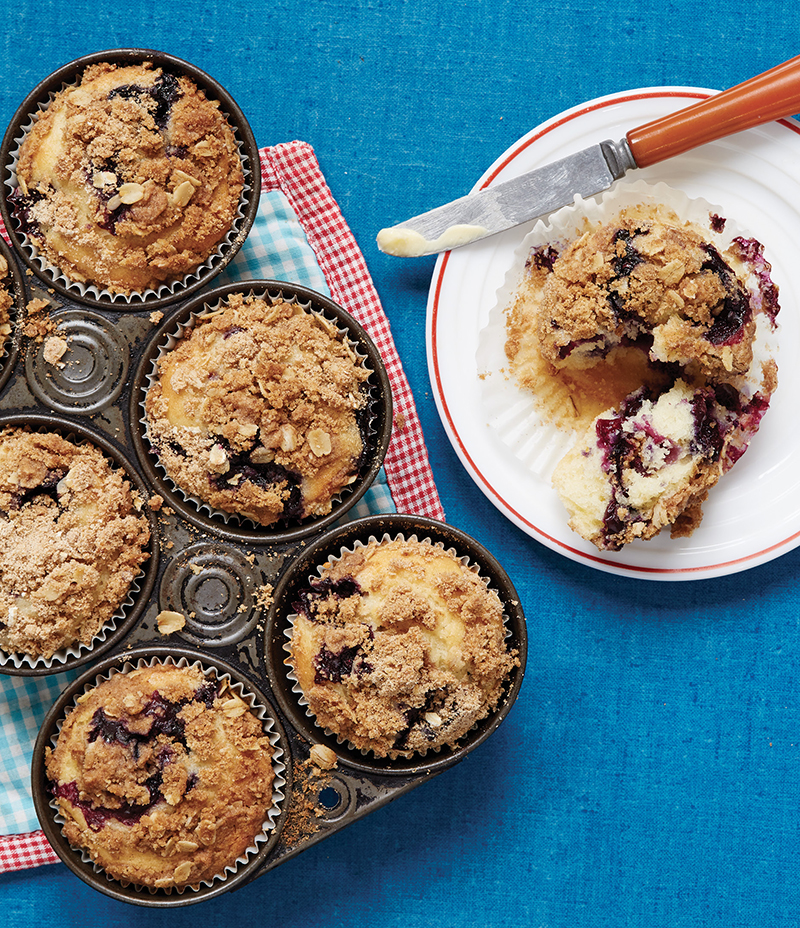
This recipe yields beautiful, light, and fluffy muffins with a wonderful crunchy topping. Feel free to substitute other berries for the blueberries. These are excellent for the office or teacher treats because they taste as good as they look! Makes 15 muffins
Nonstick cooking spray, for coating the muffin tins (optional)
2 cups self-rising flour (see recipe)
1 cup granulated sugar
¾ cup buttermilk (see recipe)
½ cup vegetable oil
1 large egg, lightly beaten
1 cup blueberries
½ cup all-purpose flour
¼ cup light brown sugar
¼ cup old-fashioned or quick-cooking oats
¼ cup (½ stick) cold butter
1 teaspoon ground cinnamon
1 Preheat the oven to 350˚F. Lightly coat 15 muffin cups (you’ll have to use 2 tins) with cooking spray or line them with muffin papers and set aside.
2 Place the self-rising flour, granulated sugar, buttermilk, vegetable oil, and egg in a large mixing bowl and stir together with a wooden spoon until well blended. Fold in the blueberries. Divide the batter evenly among the muffin cups.
3 Place the all-purpose flour, brown sugar, oats, butter, and cinnamon in a medium-size bowl. Cut together with a long-tined fork or pastry cutter until well mixed and crumbly. Sprinkle a little of the topping over each muffin.
4 Bake until lightly browned, 25 to 30 minutes. Allow to cool slightly, then remove from the muffin tins.
Bake Shop Blueberry Muffins will keep, in an airtight container at room temperature, for up to 3 days.
Another keeper from my sister-in-law, Tina. What could be better on a cold winter morning than a muffin made with apples and oats? I especially like them when prepared with buttermilk as I find it gives them just a little more of a rich tang. These muffins make a delicious hearty breakfast and are perfect with a cold glass of milk. Makes 12 muffins
Nonstick cooking spray, for coating the muffin tin (optional)
1¼ cups self-rising flour (see recipe)
¾ cup quick-cooking oats
½ cup packed light brown sugar
1 teaspoon ground cinnamon
1 large egg
½ cup whole milk or buttermilk (see recipe)
¼ cup vegetable oil
2 tablespoons lemon juice
1 cup finely chopped, peeled apple
½ cup chopped nuts (optional)
2 tablespoons butter, melted
1 tablespoon lemon juice
½ cup confectioners’ sugar
1 Preheat the oven to 400˚F. Lightly coat a 12-cup muffin tin with cooking spray or line the cups with muffin papers and set aside.
2 For the muffins: Stir together the flour, oats, brown sugar, and cinnamon in a large bowl with a spoon. Set aside.
3 Beat the egg, milk, vegetable oil, and lemon juice in a medium-size bowl with a wooden spoon. Stir in the apples and nuts, if using. Dump the apple mixture into the flour mixture and stir until just moistened and no dry spots remain.
4 Spoon the batter into the muffin cups and bake until golden and a toothpick inserted in the center comes out clean, 20 minutes. Remove to a wire rack to cool.
5 If you wish to make the glaze: Stir together the butter, lemon juice, and confectioners’ sugar in a small bowl with a spoon until smooth. Once the muffins are cool, drizzle a bit of the glaze on top of each muffin and spread with the back of a spoon.
Apple Oat Muffins will keep, in an airtight container at room temperature, for up to 3 days.
Often, I wake up to the sound of birds chirping in the dark. I love that they sound just as happy in darkness as they do in the sunshine. When we realize that joy and happiness come from a spring inside us that’s not dependent on outward circumstance, droughts and darkness from this world of ours can’t dry it up.
So those birds just start singing when they want to—and eventually the sun will rise to the song. I think I’ll join them.
With golden nuggets of deliciousness in every bite, these muffins are great to have on the weekends when you just want to sit and relax before starting the day or for brunch with an omelet or fruit salad. I have made them the day before and reheated them in the microwave and they are just like fresh from the oven. Don’t be surprised if the dough doesn’t look like normal muffin batter—it is much thicker but turns out wonderful results. These muffins would be equally good with dried peaches. If you are a muffin lover like me, please give them a try. You won’t be disappointed. Makes 12 muffins
Nonstick baking spray, for coating the muffin tin (optional)
1 cup boiling water
1 cup chopped dried apricots
1 cup granulated sugar
½ cup (1 stick) butter or margarine
1 cup sour cream
2 cups all-purpose flour
1 teaspoon baking soda
½ teaspoon salt
1 Preheat the oven to 400˚F. Lightly coat a 12-cup muffin tin with cooking spray or line the cups with muffin papers and set aside.
2 Place the boiling water in a small heatproof bowl and add the dried apricots. Allow them to soak for 5 minutes.
3 Cream together the sugar and butter in a large mixing bowl with an electric mixer at medium speed until fluffy, 1 to 2 minutes. Add the sour cream and mix well.
4 Stir together the flour, baking soda, and salt in a small bowl. Add the flour mixture to the butter mixture and beat again with an electric mixer at medium speed, scraping down the side of the bowl as needed, until fully combined, about 1 minute.
5 Drain the apricots, pat them dry with a paper towel, and stir them into the batter with a wooden spoon.
6 Divide the batter evenly among the muffin cups. Bake until a toothpick inserted in the center comes out clean, 15 to 20 minutes. Remove to a wire rack to cool.
Dried Apricot Muffins will keep, in an airtight container at room temperature, for up to 5 days.
These intense chocolate muffins are speckled with marshmallows and look just like a muffin version of hot cocoa. The taste is enough to win over any chocolate lover with the first bite. Makes 12 muffins
Nonstick cooking spray, for coating the muffin tin (optional)
1½ cups self-rising flour (see recipe)
½ cup dark brown sugar
½ cup unsweetened cocoa powder
½ cup (1 stick) butter, melted and cooled
1 cup milk
2 large eggs, lightly beaten
1 cup mini marshmallows
1 Preheat the oven to 350˚F. Lightly coat a 12-cup muffin tin with cooking spray or line the cups with muffin papers and set aside.
2 Stir together the flour, brown sugar, and cocoa powder in a medium-size mixing bowl. Add the butter, milk, and eggs and stir until just blended, being careful not to overstir (the batter will be lumpy and that is okay). Fold in the marshmallows.
3 Divide the batter evenly among the muffin cups, stirring as you do, since the marshmallows tend to float to the top. Bake until a toothpick inserted in the center comes out clean, 20 to 25 minutes. Serve warm.
Hot Cocoa Muffins are best served the day they are made.
If you’ve been flipping through this book, have looked at my website, or have read any of my other books, you’ve probably picked up on the fact that my daughter is a chocolate lover. The darker the better. In fact, when she wasn’t even old enough to walk yet she would crawl over to me, pull herself up to standing by grabbing hold of my leg, look up at me, and say, “I need chocwat.” That was her first full sentence! So of course you know why I developed these deep chocolate muffins. Katy gives them her resounding stamp of approval! Makes about 12 muffins
Nonstick cooking spray, for coating the muffin tin
2 cups self-rising flour (see recipe)
1 cup granulated sugar
¾ cup unsweetened cocoa powder
½ cup (1 stick) butter, melted and cooled
1 large egg
1 cup milk
1 teaspoon vanilla extract
1½ cups chocolate chips (I use semisweet)
1 Preheat the oven to 400˚F. Lightly coat a 12-cup muffin tin with cooking spray or line the cups with muffin papers and set aside.
2 Combine the flour, sugar, and cocoa powder in a large bowl and stir together with a spoon until well blended. In a separate small bowl, beat together the butter, egg, milk, and vanilla with an electric mixer at medium speed until well mixed, about 1 minute.
3 Pour the butter mixture into the flour mixture and stir with a wooden spoon to mix well. Stir in the chocolate chips.
4 Divide the batter evenly among the muffin cups. Bake until a toothpick inserted in the center comes out clean, 20 minutes. Remove to a wire rack to cool.
Double Chocolate Chip Muffins are best served the day they are made.
This is one of the most versatile muffin recipes I make, with countless flavor variations. I mix up a batch of batter and keep it in the refrigerator for up to 1 month, then make however many muffins I need, be it one or five dozen. Even better is that it calls for ingredients you most likely already have on hand and is a pretty healthy muffin overall. No matter what you add, the muffin is moist, tender, and delicious. And the freshly baked muffins freeze well, too! Makes about 60 muffins
6 cups old-fashioned oats
2 cups very hot tap water
5 cups all-purpose flour
5 teaspoons baking soda
2 teaspoons ground cinnamon
2 teaspoons salt
2 cups granulated sugar
4 large eggs
4 cups buttermilk (see recipe)
1 cup vegetable shortening, melted (or melted butter)
Nonstick cooking spray, for coating the muffin tins
Optional mix-ins: fresh blueberries; chocolate chips; sliced almonds; chopped walnuts; chopped pecans; diced apples; dried cranberries, cherries, or other dried fruit; chopped banana
1 Place 2 cups of the oats and the hot water in a medium-size bowl. Stir and set aside.
2 Place the remaining 4 cups of the oats, the flour, baking soda, cinnamon, salt, and sugar in a large bowl and stir to combine. Form a well in the center and crack the eggs into it; beat them lightly with a spoon. Add the buttermilk and stir the batter with a large spoon until well combined.
3 Pour the melted shortening into the hot oats mixture and stir to incorporate. Pour the hot oats mixture into the batter and stir again until well combined. Cover and refrigerate at least overnight or up to one month.
4 When you’re ready to bake the muffins, preheat the oven to 400°F. Lightly coat the cups of a muffin tin with cooking spray—coat as many cups as muffins you plan to make.
5 Remove the batter from the refrigerator and stir gently, then measure the amount you need into a large bowl (¼ cup batter will make 1 muffin; 1 cup of batter will make 4). Add any mix-ins, if desired: about 2 tablespoons mix-ins for ¼ cup batter, or ½ cup mix-ins for every 1 cup. Stir until just incorporated, and transfer the batter to the prepared muffin cups.
6 Bake until lightly browned and a toothpick inserted in the center comes out clean, about 20 minutes. Remove to a wire rack to cool.
Anytime, Any Kind Oatmeal Muffin batter will keep, in an airtight container in the refrigerator, for up to 1 month. Baked muffins will keep, in a zip-top bag in the freezer, for up to 3 months.
Ever look at folks who seem to always be smiling and think, “Well, they must have an easier life than I do”? That’s just not the case. I don’t know a single human being who has made it to adulthood without their share of hard times, so don’t discount happy or optimistic people as folks who just have it easy. Each of us has a choice to make when we wake up every morning. If you see someone smiling and making the best of their life, you know what choice they made! What is yours gonna be today? P.S. The “morning” part was given to us free of charge. It’s up to us to put the “good” in it!
This is my incredibly versatile bran muffin recipe. These muffins can be made plain, or with your favorite mix-ins. They can be made only slightly sweet for a dinner bread or muffin-sweet for breakfast.
This is just a good basic bran muffin recipe, so feel free to make them exactly as I do or take them in your own direction! Makes 12 muffins
Nonstick cooking spray, for coating the muffin tin
1½ cups wheat bran (see Notes)
1 cup buttermilk (see recipe)
1 large egg
½ cup vegetable oil or ½ cup (1 stick) butter, melted and cooled
¾ cup brown sugar (dark or light) (see Notes)
1 teaspoon vanilla extract
1 cup self-rising flour (see recipe)
½ cup dried cranberries, dried blueberries, or other dried fruit
1 cup chopped almonds, pecans, walnuts, or other nuts (optional)
1 Preheat the oven to 375˚F. Lightly coat a 12-cup muffin tin with cooking spray or line the cups with muffin papers and set aside.
2 Stir together the wheat bran and buttermilk in a large mixing bowl with a spoon. Add the egg, vegetable oil, brown sugar, and vanilla. Stir well to combine.
3 Add the flour, cranberries, and nuts, if using, and stir well until completely moist.
4 Divide the batter among the muffin cups. Bake until golden and a toothpick inserted in the center comes out clean, about 20 minutes.
Delectably Moist Bran Muffins will keep, in an airtight container at room temperature, for up to 5 days, or in the freezer for up to 3 months.
Notes: Wheat bran is usually available in the health foods section at grocery stores.
If you prefer sweeter muffins, use 1 cup brown sugar.
If you love peach crisp and old-fashioned baked rice pudding, this is a blend of those flavors. Technically it is a breakfast, but it is so very good and just lightly sweet enough that it could also be a dessert at the end of a soothing meal. It has a custardy texture and taste, with warm peaches and a hint of brown sugar to keep you coming back for just one more bite. Serves 6 to 8
Nonstick cooking spray, for coating the baking dish
2 cups old-fashioned oats
2 teaspoons baking powder
¼ teaspoon baking soda
1 teaspoon ground cinnamon
½ teaspoon salt
½ cup brown sugar (dark or light)
1½ cups milk
½ cup (1 stick) butter or margarine, melted
1 teaspoon vanilla extract
2 large eggs
1 can (29 ounces) sliced peaches, drained
Heavy (whipping) cream or ice cream, for serving (optional)
1 Preheat the oven to 350˚F. Lightly coat an 8 x 8-inch baking dish with cooking spray and set aside.
2 Stir together the oats, baking powder, baking soda, cinnamon, salt, and brown sugar in a large mixing bowl. In a separate medium-size bowl, whisk together the milk, melted butter, vanilla, and eggs. Pour the milk mixture into the oats mixture and stir until well mixed. Stir in the peaches.
3 Pour the batter into the prepared dish and bake until set and lightly browned on top, 45 to 50 minutes.
4 Serve warm by itself or with a drizzle of fresh cream or a scoop of ice cream. It is delicious on its own, though. You could make this for breakfast and then heat up the leftovers and serve with ice cream at suppertime!
Baked Peach Oatmeal Pudding is best served warm but will keep, covered in the refrigerator, for up to 2 days.

This is great for company or for those mornings when you just want to make your family feel extra special! It mixes up easily the night before and just has to be popped in the oven to cook the next morning. A simple strawberry syrup is the perfect complement. Serves 6
Nonstick cooking spray, for coating the baking dish
1 package (8 ounces) cream cheese, at room temperature
1 jar (10 ounces) strawberry preserves (regular or sugar-free)
1 deli loaf French bread
4 large eggs
1 cup milk
1 teaspoon vanilla extract
1 Lightly coat a 9 x 13-inch baking dish with cooking spray and set aside.
2 Place the cream cheese and 3 tablespoons of the strawberry preserves in a medium-size mixing bowl and beat with an electric mixer at medium speed until well combined and creamy, 1 to 2 minutes. Set aside.
3 Cut the French bread into six 1½-to 2-inch-thick slices. Reserve the end pieces for another use. Cut a pocket into the side of each slice with a bread knife, being careful not to go all the way to the bottom. Stuff each pocket with the cream cheese mixture. Arrange the slices flat in the prepared dish.
4 Beat together the eggs, milk, and vanilla in a medium-size bowl with a whisk until well blended. Pour over the bread slices in the baking dish. Cover and refrigerate for several hours or overnight.
5 Preheat the oven to 350°F. Uncover and bake until golden brown, 30 to 40 minutes.
6 Meanwhile, place 1 cup of the strawberry preserves in a microwave-safe bowl. Microwave at 30-second intervals, stirring between each, until melted and of a pourable consistency. Drizzle over the French toast and serve.
Overnight Stuffed French Toast will keep, covered in the refrigerator, for up to 1 day. (It reheats nicely in the microwave.)
I’ve been to some great Mexican restaurants in my time, and one of my favorite things to order are warm sopaipillas drizzled with honey. Our dear friends the Maestas family are from New Mexico, and this recipe came from their mother. So simple, yet so delicious! Makes 12 sopaipillas
2½ cups all-purpose flour, plus extra for rolling out the dough
1 teaspoon salt
1 teaspoon baking powder
1 cup granulated sugar
2 tablespoons ground cinnamon
3 tablespoons vegetable oil, plus extra for frying
¾ cup warm water
Honey, for serving
1 Stir together the flour, salt, and baking powder in a large bowl until just blended. In a separate small bowl, stir together the sugar and cinnamon and set aside.
2 Add the vegetable oil and warm water to the flour mixture and stir until a sticky dough forms.
3 Lightly flour a work surface and your hands. Place the dough on the work surface and roll it into a ball, kneading just enough to help it stay together.
4 Pinch off golf ball–size portions of the dough and roll them into balls. Return the balls to the mixing bowl and cover with a towel. Allow to rest for 5 minutes.
5 While the dough balls are resting, fill a medium-size skillet with vegetable oil to a depth of 1 inch. Place over medium-high heat to preheat while you prepare the dough. Line a plate with paper towels and place it next to the stove.
6 Take each ball, one at a time, and roll it out on a floured surface with a rolling pin into an oval about 2 inches wide and 4 inches long. Repeat until all of the dough balls are flattened.
7 Sprinkle a little flour into the hot oil. If it sizzles, the oil is ready. Once the flour sizzles, reduce the heat to medium. Carefully place 2 to 3 sopaipillas at a time into the oil and cook until browned on one side, about 2 minutes. Turn with tongs and brown the other side, about 2 minutes more. Remove the sopaipillas from the oil and place them on the lined plate to drain.
8 While still hot, dip both sides of each sopaipilla into the cinnamon sugar mixture. Repeat the cooking and dipping processes until all of the sopaipillas are done.
9 Serve with a drizzle of honey or with honey on the side for dipping.
Sopaipillas are best served the day they are made.
If you’ve ever had a funnel cake at a festival or fair, you know the simple crispy deliciousness that is this iconic fried bread. The surprise comes when you realize how easy they are to make at home! They are actually less of a mess to make at home because you don’t have the coating of confectioners’ sugar on your clothes that you get when eating them in the outdoor breeze. My kids think it’s so cool that their mama can make these—and I’ll take cool points wherever I can get them. Makes 4 or 5 funnel cakes
Corn oil, for frying (see Note)
2 large eggs
2 tablespoons granulated sugar
1 cup milk
2 cups all-purpose flour
1 teaspoon baking powder
½ teaspoon salt
1 cup confectioners’ sugar, for garnish
1 Pour the corn oil in a large, heavy-bottomed skillet to a depth of at least 1 inch. Place over medium-high heat to preheat.
2 Meanwhile, place the eggs, granulated sugar, milk, flour, baking powder, and salt in a large mixing bowl and beat with an electric mixer at medium speed, scraping down the side of the bowl as needed, until well blended and smooth, 1 to 2 minutes.
3 Test the oil by dropping a tiny sprinkling of flour into it. If the flour sizzles, the oil is hot enough. Once it’s hot enough, turn the temperature down to medium. Line a plate with paper towels and place it next to the stove.
4 Hold your finger over the opening in the bottom of a funnel and add ½ cup of the batter. Hold the funnel over the hot oil and remove your finger, moving the funnel in a swirling pattern and crisscrossing the batter multiple times in order to connect the cake. Continue until the funnel is empty.
5 Cook until lightly browned on the bottom, about 2 minutes. Use tongs to carefully flip the cake over and cook the other side, 2 minutes more. Remove the cake from the oil and place it on the lined plate. Repeat the process until all of the batter is used.
6 Sprinkle the top of the cakes with the confectioners’ sugar and enjoy immediately.
Note: Vegetable oil can be used to fry these, but I find they have better flavor if fried in corn oil.
Fruit fritters are one of those fun little treats that you can serve as an appetizer, a breakfast, a side, or just an anytime treat. These golden brown beauties are pretty on their own, or you can dust them with a light coating of confectioners’ sugar if you like. For an extra-special touch, serve alongside pineapple preserves or honey, for dipping. Makes about 24 small fritters
Vegetable oil, for frying
2 cups self-rising flour (see recipe)
½ cup brown sugar (light or dark)
1 teaspoon ground cinnamon
1 cup milk
3 tablespoons melted butter
2 large eggs, lightly beaten
1 can (16 ounces) pineapple tidbits, drained
Confectioners’ sugar, for garnish (optional)
Melted butter, honey, or warmed pineapple preserves, for serving
1 Pour the vegetable oil in a medium-size skillet to a depth of 1 inch. Place over medium-high heat to preheat the oil to 350°F while you prepare the batter.
2 Stir together the flour, brown sugar, and cinnamon in a large mixing bowl with a fork. Add the milk, butter, and eggs and stir together with a spoon until well combined. Stir in the pineapple tidbits.
3 Line a plate with paper towels and place it next to the stove. Reduce the heat to medium. Working in batches to avoid crowding the skillet, drop the batter by ⅛ cupfuls into the hot oil and brown on one side, about 2 minutes. Turn with tongs and brown the other side, about 2 minutes more. As the fritters cook, remove them to the lined plate to drain.
4 Dust the fritters with confectioners’ sugar, if desired. Serve with melted butter, honey, or warmed pineapple preserves.
Pineapple Fritters are best served soon after they are made.

This recipe comes to you courtesy of my sweet little Katy. Chocolate biscuits are one of her favorite treats.
As far back as I can remember and as far back as our family stories go, biscuits have been a staple on our tables. There are as many ways to make them as there are cotton plants in a field, and all of them are wonderful. The great thing is that these recipes have been handed down from one generation to the next, and at some point we’ve each taken our turn standing in the kitchen while the craft was explained and demonstrated before we stepped in and began making them on our own.
This recipe sprang up out of Katy’s love for chocolate, so it isn’t a generations-old recipe, but it will become one as soon as Katy Rose starts making them herself. Right now she’s beside me, helping with each step along the way. Sometimes I just stand over her shoulder and talk her through it. Soon enough, I’ll be off doing something else while Miss Katy works kitchen magic all on her own. And that is what it is all about: cooking up memories together while teaching our kids to cook on their own. Next time you head into the kitchen, take the hand of someone dear to you and invite them along. Makes about 12 biscuits
Nonstick cooking spray, for coating the baking sheet
2¼ cups self-rising flour (see recipe), plus extra for rolling out the dough
½ cup (1 stick) cold butter, cut into slices
½ cup granulated sugar
1 cup semisweet chocolate chips
1 cup plus 1 tablespoon whole milk, plus extra as needed
1 cup confectioners’ sugar
1 teaspoon vanilla extract or butter flavoring
1 Preheat the oven to 450˚F. Lightly coat a baking sheet with cooking spray and set aside.
2 Place the flour and cold butter in a large bowl. Cut the butter into the flour with a fork or pastry cutter until fully incorporated and the mixture resembles lumpy flour. Place the bowl in the refrigerator for 10 minutes.
3 Stir the granulated sugar and chocolate chips into the flour mixture until well blended. Add the 1 cup of milk and stir until just moistened (add up to ¼ cup more milk if needed).
4 Turn the dough out onto a lightly floured surface. Dip the palms of your hands in flour and pat the dough into a ½-inch-thick rectangle. Gently fold the right side over onto the middle of the rectangle. Fold the left side over on top of the folded right side, like you are folding a piece of paper to put into an envelope.
5 Pat this out again into a rectangle and repeat the folding process once more, being careful not to roll the dough too thin. It needs to be at least ½-inch thick. This procedure will result in the biscuits being light and layered. Dip the rim of a roughly 2-inch glass or biscuit cutter into flour and use it to cut out the biscuits. Place the biscuits on the prepared baking sheet with their sides touching.
6 Bake until lightly golden on top, 14 to 16 minutes.
7 Meanwhile, prepare the glaze: Stir together the confectioners’ sugar, vanilla, and the remaining 1 tablespoon milk in a small bowl until smooth. Brush the glaze over the tops of the warm biscuits while they’re still on the baking sheet. Allow to cool for a few minutes before serving.
Feather-Light Chocolate Biscuits are best served the day they are made.
from Vicki Perfetti
“This recipe comes from my maternal grandmother, Velma Blackwell. She was the youngest of nine, and her mother died very young. Her father ran a boarding house, and since she was the youngest, most of her siblings had already left home. So, at the age of eleven, she became the boarding-house cook.
“This is one of my favorite dishes of hers, and I still consider it a real treat when my mom makes these rolls for special occasions. I was only twelve when my grandmother passed away in 1976. She was such a special person to me and is still the best cook I’ve ever known.” Serves 12
Nonstick cooking spray, for coating the baking dish
2½ cups granulated sugar
1½ cups plus 1 tablespoon all-purpose flour, plus extra for rolling out the dough
2 cans (14½ ounces each) tart red cherries, drained and juice reserved
2 tablespoons butter
2¼ teaspoons baking powder
½ teaspoon salt
2 tablespoons vegetable shortening
¾ cup milk
1 Preheat the oven to 350˚F. Lightly coat a 9 x 13-inch baking dish with cooking spray.
2 Stir together 1 cup of the sugar and the 1 tablespoon of flour in a medium-size saucepan. Add 2 cups of the cherry juice (supplement with water if you don’t have quite 2 cups) and bring to a boil over medium-high heat. Once it reaches a boil, boil for 1 minute and remove from the heat. Stir in the butter and set aside.
3 Sift the remaining 1½ cups flour with the baking powder and salt in a medium-size bowl. Add the shortening and cut together with a long-tined fork or pastry cutter. Stir in the milk and mix with a spoon until a dough forms.
4 Turn out the dough onto a floured board and knead lightly for a few seconds. Roll the dough into a ¼-inch-thick rectangle with a rolling pin. Spread the cherries on top. Sprinkle with ½ cup of the remaining sugar. Starting with a long edge, roll up the dough like a jelly roll and press the edges together to seal.
5 Cut into 1½-inch slices and place cut side down in the prepared baking dish. Pour the cherry juice mixture on top. Sprinkle with the remaining 1 cup sugar.
6 Bake until lightly golden, 25 to 30 minutes. Serve warm.
Cherry Rolls are best served the day they are made.
Christy’s Note: I halved this recipe and used an 8 x 8-inch pan and it came out wonderful. I heated up and ate the rolls for several days all on my own—in the name of research, of course! This is a recipe my family will enjoy for years to come. In fact, my mother has made these once a week since we got this recipe!
This recipe makes a small and dainty orange roll. My home state of Alabama has a few places that are known for their orange rolls. Surprisingly, I’ve never been to any of those restaurants! Given the chance to go out to eat or stay home, I generally choose to stay in whenever possible. It’s not that I’m a homebody, it’s just that I realize how blessed I am to have my home and everyone in it, and I need a few lifetimes in order to enjoy it fully.
Here is my simple take on orange rolls, and I hope you get to try them soon because they are surprisingly low-fuss and supremely divine! Makes 24 rolls
Nonstick cooking spray, for coating the muffin tins
1 loaf (1 pound) frozen bread dough, completely thawed
All-purpose flour, for rolling out the dough
½ cup (1 stick) butter, at room temperature
1 tablespoon grated orange zest
3 tablespoons orange juice concentrate (1 tablespoon thawed and 2 tablespoons frozen)
2 to 3 tablespoons granulated sugar
½ cup confectioners’ sugar
1 Lightly coat 2 mini muffin tins with cooking spray and set aside.
2 Place the bread dough on a floured surface and roll it out to about a 17 x 6-inch rectangle. It’s easier to roll the dough out part way, let it rest for 5 minutes, then finish rolling it out.
3 Place the butter, orange zest, and 1 tablespoon thawed orange juice concentrate in a medium-size mixing bowl and mix with an electric mixer at low speed until well blended, 1 minute.
4 Spread the orange butter mixture over the dough, leaving about a ½-inch border around the edges. Sprinkle with the sugar. Starting with a long edge, roll the dough into a log about 6 inches long and 1½ inches thick. Press the seam and ends together to seal.
5 Cut the log into 24 even slices. Place the slices in the cups of the prepared muffin tins. Lightly spray the tops with cooking spray and cover loosely with plastic wrap. Allow to rise in a warm place until the dough has doubled in size, 30 minutes to 1 hour.
6 Preheat the oven to 350˚F. Remove the plastic wrap from the rolls and bake until lightly browned, 20 minutes.
7 Place the confectioners’ sugar and 2 tablespoons of the frozen orange juice concentrate in a small bowl and stir until smooth and creamy. Brush the mixture over the tops of the rolls while still hot in the muffin tins. Allow the rolls to cool before removing.
Almost Famous Orange Rolls will keep, in an airtight container at room temperature, for 2 to 3 days.
I’m good at a few things—but housekeeping isn’t one of them. I believe we all have different God-given talents. Combined with those are certain obstacles and challenges that we must overcome at the same time. Keeps life interesting.
For me, one of those obstacles is housework. Sure, I’m busy. I use that as an excuse most times. Truth is, with all of the thoughts whizzing around in my head like a box of mismatched fireworks, my brain doesn’t see the mess and clutter in my house. But regardless of the multiple reasons, it still comes down to the fact that although my home has been in magazines, it requires two weeks of deep cleaning to be even remotely presentable.
But I still try, and I’m always working on it. Recently, we spent a great deal of time organizing, finding homes for objects that have never had a home beyond being close at hand, and donating things my kids have outgrown. We made huge headway and that felt good.
But something happened last week that really put all of that in perspective for me. My daughter had a friend she wanted to spend some time with, so I picked her up and took them to Katy’s favorite restaurant.
When we have these “dates” with her friends, I’m kinda the gray man. I am there, but I’m not. They talk and play and go about their visit as if I’m invisible. Kinda like the chauffeur. The parents reading this know what I’m talking about. I enjoy this because I pretend to be lost in my thoughts while I’m really just listening in and enjoying their excited conversation. Although sometimes I do find my thoughts drifting, only to be called back by something particularly funny or heartwarming.
And so, as I was sitting there looking out the window, Katy’s voice called me back. “You have GOT to come to my house soon. You are going to LOVE IT. My house is a complete paradise!”
I did a double blink and looked at her in surprise. Her face was animated and lit up with glee as she smiled with excitement. I was completely taken aback.
Paradise? But the sink is full of dirty dishes. There is Mount Laundry in our living room, and I can’t remember the last time someone actually put the toilet paper on the holder. Paradise? I looked down in confusion as I recalled that new pink chair Katy picked out for a reading corner in her room. How excited she was to have a birthday party in our house to show off the diner furniture we’d bought, and that big pot of chicken and dumplings she’d fawned over the night before.
I thought of her cuddling up against her dad on the couch as they read books and that big basket she uses to tote her sweet cat around . . . the third- (or fourth-) hand piano I bought her off Craigslist for a hundred dollars that she decorated with a collection of My Little Ponies and pounds away on throughout the week. I thought of that big old pile of shoes in the den that seems to grow daily as everyone comes in and gets comfy—bare feet on their own turf.
Come to think of it, I can’t begin to count the hugs, kisses, “I love you”s, and laughter that have taken place in the five years we have lived here. The walls must be nigh on bursting with it at this point. But Paradise? You bet. Mount Laundry and all.

This is a deluxe version of your classic cinnamon roll, taken over the top with the addition of dried cranberries, toasted pecans, and a little bit of orange zest. You still have all the goodness of the cinnamon roll and more. I like to get up early from time to time and make these in the wee hours of the morning for my kids to take to school for the staff. This simple recipe uses frozen bread dough as a significant shortcut. Most of the work is just waiting around for them to rise!
One of the great things about this recipe is that it can be made in advance and then frozen to enjoy later. Simply prepare the rolls through step 7, and once cooled, store them in the freezer. To reheat, leave them on the counter in the baking pan to thaw for 1 hour, then place the pan on a rimmed baking sheet, cover it loosely with aluminum foil, and bake in a preheated 200˚F oven until heated through, 15 to 20 minutes. Remove from the oven and continue with step 8. They’re nearly as good as fresh-baked! Makes 12 rolls
Nonstick cooking spray, for coating the baking pan
½ cup dried cranberries (or raisins or dried cherries)
1 loaf (1 pound) frozen white bread dough (such as Rhodes brand), thawed
All-purpose flour, for rolling out the dough
½ cup (1 stick) butter or margarine, at room temperature
1 cup packed brown sugar
3 tablespoons ground cinnamon (or less to taste)
½ cup toasted chopped pecans
1 tablespoon grated orange zest (or more to taste)
3 ounces cream cheese, at room temperature
1½ cups confectioners’ sugar
½ teaspoon vanilla extract (optional; I usually just leave it out)
1 to 2 tablespoons milk (optional)
1 Lightly coat a 9 x 13-inch baking pan with cooking spray and set aside.
2 Place the cranberries in a small bowl and cover with 1 cup hot water. Let them sit for 5 minutes to plump, then drain well.
3 Roll out the bread dough into a 9 x 16-inch rectangle on a floured surface. Spread ¼ cup of the butter over the dough.
4 Mix together the brown sugar and cinnamon in a small bowl with a spoon until well blended. Sprinkle over the top of the dough, leaving about a ½-inch border around the edges so it will seal. Sprinkle the pecans, cranberries, and orange zest over the brown sugar mixture.
5 Starting with a long edge, carefully roll the dough into a log, squeezing lightly as you do to seal it. Cut crosswise into 1-inch slices with a serrated knife.
6 Place the slices in the prepared pan and cover with plastic wrap or a clean towel. Place in a warm, draft-free area and allow to rise until the dough doubles in size, 2 to 3 hours.
7 Preheat the oven to 400˚F. Remove the plastic wrap and bake until lightly golden on top, about 15 minutes. Allow to cool slightly while you prepare the icing.
8 Mix together the cream cheese, the remaining ¼ cup butter, the confectioners’ sugar, and the vanilla extract, if using, in a large mixing bowl with an electric mixer at medium speed, scraping down the side of the bowl as needed, until smooth and creamy, 1 to 2 minutes. If the icing becomes too thick, add 1 or 2 tablespoons of the milk. Spread the icing over the cinnamon rolls.
Harvest Stuffed Cinnamon Rolls will keep, covered at room temperature, for up to 3 days, or individually wrapped in aluminum foil, stored in a zip-top bag, and frozen for up to 2 months.