
Some of the most popular exercises in weight training are those that work the chest muscles, or pectorals (pectoralis major and pectoralis minor). When developed properly, these muscles contribute a great deal to an attractive upper body and to success in many recreational and athletic activities.
The bench press, machine pec deck, machine chest press, and the *dumbbell chest fly (an additional exercise) described in this step provide an added benefit because they also train the muscles of the front shoulder (anterior deltoid). In addition, the bench press and machine chest press train the back of the upper arms (triceps).
If you have access to free weights, you are encouraged to select the bench press or the *dumbbell chest fly to develop your chest. If you prefer working with machines, select the machine pec deck or the machine chest press for your chest exercise.

The free-weight bench press involves the use of a barbell and a bench with uprights, called a Begin by sitting on the end of the bench with your back facing the upright supports. Now lie back and position yourself so that your buttocks, shoulders, and head are firmly and squarely positioned on the bench, as shown in figure 4.1a on page 44 Your legs should straddle the bench and both feet should be flat on the floor, about shoulder-width apart. This five-point contact (with the bench and the floor) position is important—especially the straddled feet—because it provides stability when you are handling the bar over your chest and face.
From this position, slide toward the upright supports until your eyes are directly below the front edge of the shelf of the uprights. This position helps prevent the bar from hitting the uprights during the upward movement phase but keeps it close enough to be easily placed back on the shelf (racked) after the last repetition is completed. Improper body positioning on the bench is a common error. Make sure your eyes are below the edge of the shelf and check that there are five points of contact.

MISSTEP
Your body does not have five points of contact with the bench and floor.
CORRECTION
Check to be sure that your head, shoulders, and buttocks are squarely on the bench and both feet are flat on the floor.
While the bar is supported on the uprights, grasp it with an evenly spaced overhand grip, hands about shoulder-width apart or wider. An appropriate grip width on the bar positions the forearms perpendicular to the floor as the bar touches the chest. Keep in mind that a wide grip is preferred because it emphasizes a larger area of the chest musculature than a narrow one does.

MISSTEP
Your grip is not evenly spaced.
CORRECTION
Evenly space your hands using the markings on the bar or have your spotter help you locate a balanced position.
From this position, signal “OK” to the spotter and push the bar off the uprights to a straight-elbow position with your wrists directly over your elbows. Pause with the bar in the extended-arm position and then lower it slowly to your chest as shown in figure 4.1b The bar should contact your chest approximately 1 inch (1 or 2 cm) above or below the nipples. A common error is touching the bar too high on the chest. Concentrate on having the bar touch or nearly touch at your nipple area. Inhale as you lower the bar to your chest. After the bar touches the chest (do not bounce it off your chest), slowly push it straight upward to an extended-elbow position (figure 4.1c). If your elbows extend unevenly, visually focus and concentrate on the arm that is lagging behind. Exhale through the sticking point that occurs when the bar is about halfway up. Do not allow your wrists to hyperextend (roll back); concentrate on keeping them straight.
MISSTEP
The bar bounces off your chest.
CORRECTION
Control the bar’s downward momentum and pause briefly at the chest.
Throughout the exercise keep your head, shoulders, and buttocks in contact with the bench and both feet flat on the floor. Signal the completion of the last repetition by saying “OK” to your spotter. Rack the bar and be sure to support the bar until it is racked (figure 4.1d).

MISSTEP
Your buttocks lift off the bench, which causes the bar to move backward and over the face.
CORRECTION
Lighten the load and concentrate on keeping your buttocks in contact with the bench.

MISSTEP
When racking, you push the bar into the uprights.
CORRECTION
Visually focus on and maintain control of the bar until it is safely in the rack.
As the spotter, stand 2 to 6 inches (5-15 cm) from the head of the bench and centered between the uprights (figure 4.1a). To assist your partner in moving the bar off the supports (called a handoff), grasp the bar using the alternated grip. Space your hands evenly between your partner’s hands. At the “OK” command, carefully lift the bar from the supports and guide it to a straight-elbow position over your partner’s chest. Before releasing the bar, be sure that your partner’s elbows are completely straight. Practice making your handoff as smooth as possible. If your handoff is too high, too low, too far forward, or too close to the shelf, it will disturb your partner’s stable position on the bench, which may contribute to a poor performance or injury.
Once the downward phase begins, your open hands and eyes should follow the bar’s downward path to the chest (figure 4.1b) and back up to the starting position (figure 4.1c). As your partner’s elbows straighten for the last repetition and after you hear the “OK” signal, assist by grasping the bar and moving it back to the supports (figure 4.1d). Be sure that the bar is resting on the shelf before releasing it.
Most errors associated with this exercise are a result of lowering and raising the bar too quickly. Any technique error is made worse as the speed of the movement increases; thus, the first step in correcting errors is to make sure that the bar is moving slowly. Then attempt to make the corrective changes for the errors that apply to you.

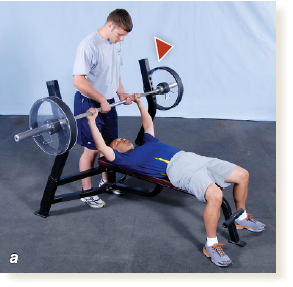
Preparation
Spotter
1. Place feet hip-width apart, 2 to 6 inches (5-15 cm) from head of bench
2. Slightly flex knees
3. Keep back flat
4. Use alternated grip, inside partner’s hands
5. React to “OK” command from partner
6. Assist in lifting bar off supports
7. Guide bar to straight-elbow position
8. Release bar smoothly
Lifter
1. Use an overhand grip at least shoulder-width apart
2. Create five points of contact: head, shoulders, buttocks on bench; both feet on floor
3. Straddle bench
4. Focus eyes below edge of shelf
5. Signal “OK” to spotter
6. Move bar off supports
7. Push to straight-elbow position over chest
8. Keep wrists directly above elbows throughout exercise

Downward Movement
Spotter
1. Closely follow bar movement
2. Assist only when necessary
Lifter
1. Inhale while lowering the bar
2. Keep wrists straight
3. Use slow, controlled movement
4. Touch bar to chest near nipples
5. Pause as bar touches chest
Upward Movement
Spotter
1. Closely follow bar movement
2. Watch for uneven arm extension
3. Watch for bar stopping or moving toward partner’s face
4. Assist only when necessary
Lifter
1. Push upward with elbows extending evenly
2. Exhale during upward movement
3. Pause at straight-elbow position
4. Continue downward and upward movements until set is complete
5. Signal “OK” on last repetition
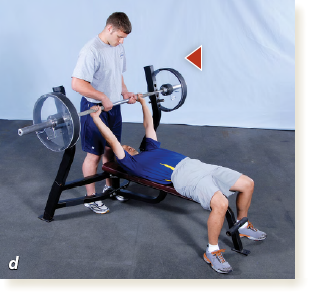
Racking the Bar
Spotter
1. Grasp bar with alternated grip
2. Keep bar level
3. Guide bar to supports
4. Say “OK” when bar is racked
Lifter
1. Keep elbows straight
2. Move bar to supports
3. Support bar until racked
Get into a sitting position in a pec deck chest machine with your back firmly against the back pad. Adjust the seat until your upper arms are parallel to the floor when you are holding the handles. Sit erect, look straight ahead, and place your forearms on the arm pads with the elbows level with the shoulders. Grip each handle with a closed grip (figure 4.2a).
While in this position, squeeze your forearms together until the pads touch in front of your chest (figure 4.2b). Exhale as your elbows come together. Pause in this position and then slowly return to the starting position while inhaling (figure 4.2a).

MISSTEP
Head and torso lean forward.
CORRECTION
Keep your head and shoulders against the back pad. Lighten the load if necessary.

MISSTEP
You pull with your hands.
CORRECTION
Think: Press elbows together.
The machine pec deck is different from the free-weight bench press and the machine chest press in terms of the number of muscle groups exercised. The triceps are involved in the bench press and chest press but not in the pec deck. The free-weight equivalent to the machine pec deck is the *dumbbell chest fly (see page 49).


Preparation
1. Place head, shoulders, and back in contact with back pad
2. Grasp each handle with a closed grip
3. Place forearms on arm pads
4. Check seat height; upper arms should be parallel to floor
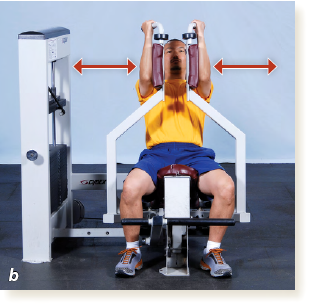
Movement
1. Squeeze forearms together; do not pull with hands
2. Keep head and torso on back pad
3. Bring arm pads to front of chest
4. Exhale as elbows come together
5. Pause
6. Return to starting position while inhaling
7. Continue forward and backward movements until set is complete
Position your head, shoulders, and buttocks in contact with the bench on a multi- or single-unit machine. Put both feet flat on the floor about shoulder-width apart to complete the five points of contact. Grip the bar handles with your hands slightly more than shoulder-width apart, aligned with your nipples (figure 4.3a).
CAUTION: If you are performing this exercise in a supine position, be sure your head is at least 2 inches (5 cm) from the weight stack. If you are too close, the selector key may strike your forehead.
From this position, push to a full elbow extension in a slow, controlled manner (figure 4.3b). Exhale through the sticking point. Pause at full extension, then return to the starting position while inhaling (figure 4.3a).

Figure 4.3 MACHINE CHEST PRESS (MULTI- OR SINGLE-UNIT MACHINE)

Preparation
1. Head, shoulders, buttocks stay on bench
2. Feet flat on floor
3. Grip slightly wider than shoulders
4. Align grip with nipples
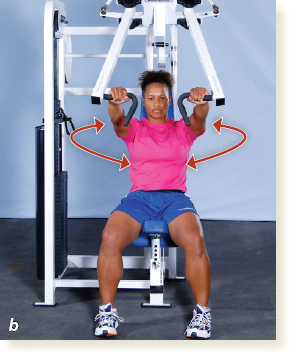
Movement
1. Push to full elbow extension
2. Exhale through the sticking point
3. Pause
4. Return to starting position while inhaling
5. Continue forward and backward movements until set is complete
MISSTEP
During the backward movement phase, the weights stop above the rest of the weight stack.
CORRECTION
Lower the weight stack until it lightly touches the rest of the stack.
 DUMBBELL CHEST FLY
If you are an experienced lifter who is ready for a more challenging program, consider adding the *dumbbell chest fly exercise. Often this exercise supplements the bench press, machine pec deck, or machine chest press exercise. Being able to move the dumbbells in unison and in an arcing fashion over the chest requires more coordination than the other chest exercises in the basic program. The *dumbbell chest fly involves the same major muscle area as the other chest exercises—the pectoralis major—and it is a pulling exercise.
Pick up the dumbbells in a neutral grip with the palms turned inward. Lie on the bench with head, shoulders, and buttocks in contact with the bench. Place both feet flat on the floor with legs flexed 90 degrees and straddling the bench (figure 4.4a). Flex your arms slightly at the elbows as you hold the dumbbells over your chest.
Inhale as you slowly lower the dumbbells (figure 4.4b). Keep your arms perpendicular to your torso with your elbows slightly flexed. The dumbbells should move in an arc, not straight up and down like the bench press exercise. Lower the dumbbells to chest height, taking care not to twist or arch your body. Keep your head, shoulders, and buttocks in contact with the bench.
Exhale as you return the dumbbells to the starting position (figure 4.4c). Your feet stay flat on the floor, and your torso remains in contact with the bench at all times.

MISSTEP
You flex your elbows too much.
CORRECTION
Flex the elbows only slightly. Dumbbells should move in an arc.
Like the free-weight bench press, this exercise also requires a spotter. Stand 2 to 6 inches (5-15 cm) from the head of the bench (figure 4.4a). Kneel on both knees or position one knee on the floor with the foot of your other leg forward and flat on the floor. To help move the dumbbells to the correct starting position, grasp your partner’s wrists or forearms near the dumbbells. At the “OK” command, help move the dumbbells to a straight-elbow position over your partner’s chest. Release the dumbbells smoothly after making sure your partner’s elbows are completely straight. When the exercise is performed, your hands should follow close to (without touching) your partner’s wrists as the dumbbells are lowered (figure 4.4b) and returned to the starting position (figure 4.4a).

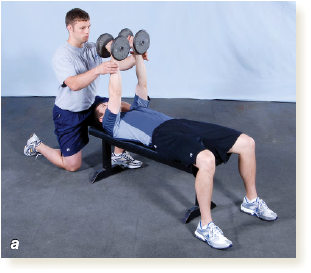
Preparation
Spotter
1. Be positioned 2 to 6 inches (5-15 cm) from head of bench
2. Keep back flat
3. React to “OK” command from partner
4. Grasp partner’s wrists or forearms near dumbbells
5. Help lifter move dumbbells into position
6. Guide dumbbells up until partner’s elbows are fully extended
7. Release wrists smoothly
Lifter
1. Hold dumbbells with neutral grip, palms facing inward
2. Create five points of contact: head, shoulders, buttocks on bench; both feet on floor
3. Signal “OK” to spotter
4. Move dumbbells to straight-elbow position over chest
5. Slightly flex elbows
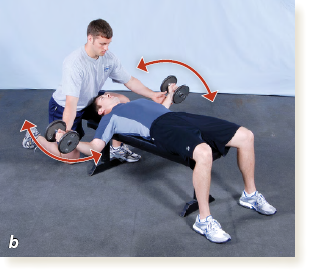
Movement
Spotter
1. Follow close to (without touching) partner’s wrists
2. Assist only when necessary
Lifter
1. Slowly lower dumbbells, keeping arms perpendicular to torso
2. Lower dumbbells to chest height
3. Keep elbows slightly flexed
4. Do not twist or arch body
5. Inhale while lowering dumbbells
6. Pause in lowest position
7. Return to starting position while exhaling
8. Keep feet flat on floor
9. Keep head, shoulders, and buttocks on bench
10. Continue downward and upward movements until set is complete
Chest Drill 1. Choose One Exercise
After reading about the characteristics and techniques involved in the exercises and the type of equipment required for each, you are ready to put to use what you have learned. Consider the availability of equipment and access to spotters in your situation; then select one of the following exercises to use in your program:
Free-weight bench press
Machine pec deck (seated fly)
Machine chest press (multi- or single-unit machine)
Write in “Chest” in the “Muscle group” column on the workout chart and fill in the name of the exercise you selected in the “Exercise” column (see figure 11.1 on page 146). If you intend to include the *dumbbell chest fly exercise, record it on the workout chart immediately after the chest exercise selected above.
Success Check
Consider availability of equipment.
Consider need for a spotter and the availability of a qualified professional.
Consider time available.
Choose a chest exercise and write it on the workout chart.
Chest Drill 2.
Warm-Up and Trial Loads for Basic Exercises
This practice procedure answers the question “How much weight or load should I use?” Using the coefficient associated with the chest exercise you selected and the formula shown in figure 4.5, determine the trial load. (See step 3, pages 33-34 for more information on using this formula.) Round your results down to the nearest 5-pound (2.3 kg) increment or to the closest weight-stack plate. Be sure to use the coefficient assigned to the exercise you selected. Use one-half of the amount determined for the trial load for your warm-up load in the exercise. These loads will be used in drills 4 and 5.
Success Check
Determine your trial load by multiplying your body weight by the correct coefficient.
Determine your warm-up load by dividing your trial load by two.
Round down your trial and warm-up loads to the nearest weight stack or bar weight.
Write down your warm-up and trial loads.
Chest Drill 3.
Determine Trial Load for *Dumbbell Chest Fly
If you are an experienced lifter who decided to add the *dumbbell chest fly, follow the directions to determine your trial load. (See step 3, pages 34-35 for more information.)
Based on your previous experience and knowledge of the weight you can lift, select a weight that will allow you to perform 12 to 15 repetitions. Calculate the warm-up load by multiplying the trial load by 0.6 and round down to the nearest 5-pound (2.3 kg) increment (figure 4.6). These loads will be used in drill 4.
Success Check
Select a weight that will allow 12 to 15 repetitions.
Determine the warm-up load by multiplying the trial load by 0.6.
Round down the warm-up load to the nearest 5-pound (2.3 kg) increment.
Chest Drill 4. Practice Proper Technique
In this procedure, you are to perform 15 repetitions with the warm-up load determined in drill 2 (free-weight bench press, machine pec deck, or machine chest press) or drill 3 (*dumbbell chest fly). If you are an experienced lifter who decided to add the *dumbbell chest fly, practice it last.
Review the photos and instructions for the exercise, focusing on proper grip and body positioning. Visualize the movement pattern through the full range of motion. Perform the movement with a slow, controlled velocity, remembering to exhale through the sticking point. Ask a qualified professional to observe and assess your technique.
If you selected the free-weight bench press or the *dumbbell chest fly, you need a spotter. You also need to practice spotting these exercises. Identify a partner with whom you will take turns completing the drill.
Instead of performing 15 repetitions in a continuous manner, rack the bar (free-weight bench press) or return the dumbbells to the floor (*dumbbell chest fly) after each repetition to practice the bench press handoff or the *dumbbell chest fly wrist grasp at the beginning of each repetition. Alternate responsibilities so that you and your partner both have a chance to develop the techniques that are required to correctly perform the spotting techniques. Ask a qualified professional to observe and assess your performance in the basic techniques.
Success Check
For the free-weight bench press, all handoffs and rackings are performed correctly.
For the *dumbbell chest fly, all wrist grasps are performed correctly.
For all exercises, movement pattern, velocity, and breathing are correct.
Chest Drill 5. Determine Training Load
This practice procedure will help you determine an appropriate training load designed to produce 12 to 15 repetitions. For basic exercises, perform as many repetitions as possible with the calculated trial load from drill 2. Make sure that the repetitions are performed correctly.
If you performed 12 to 15 repetitions with the trial load, then your trial load is your training load. Record this weight as your training load for this exercise on the workout chart (see page 146). If you did not perform 12 to 15 repetitions, go to drill 6 to make adjustments to the load.
Success Check
Check that you are using the correct load.
Maintain proper and safe technique during each repetition.
Chest Drill 6. Make Needed Load Adjustments
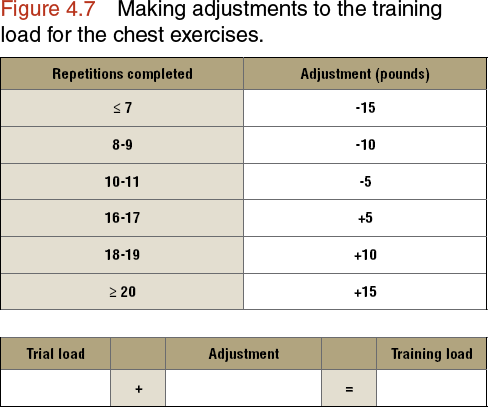
If you performed fewer than 12 repetitions with your trial load, the load is too heavy, and you need to lighten it. On the other hand, if you performed more than 15 repetitions, the trial load is too light, and you need to increase it. Use figure 4.7 to determine the adjustment you need to make and the formula for making load adjustments.
Success Check
Check correct use of the load adjustment chart (figure 4.7).
Write in your training load on the workout chart (see page 146).
This step involved selecting one chest exercise for which you have the needed equipment and perhaps one more if you have already been training. Using a proper grip, the correct body position, movement, and breathing patterns, and accurate warm-up and training loads will maximize your success.
After you have determined your training load and recorded it on your workout chart, you are ready to move on to step 5. In this step you will select exercises that develop the back muscles. It includes four exercises, each with specific instructions on how they should be performed, from the grip to the lifting movements involved.
Before Taking the Next Step
Honestly answer each of the following questions. If you answer yes to all of the questions relevant to your level and exercise selection, you are ready to move on to step 5.
1. Have you selected a basic chest exercise? If you are an experienced lifter, do you want to add the *dumbbell chest fly?
2. Have you recorded your exercise selection (or selections) on the workout chart?
3. Have you determined a warm-up and training load for the exercise(s) you selected?
4. Have you recorded the training load(s) on the workout chart?
5. Have you learned the proper technique for performing the exercise(s) you selected?
6. If the exercise requires a spotter, have you identified a qualified professional? Have you learned the proper spotting techniques?