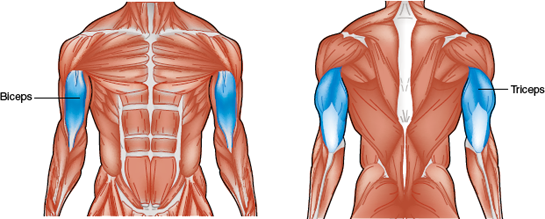
Exercises that develop the two muscle groups of the upper arm are very popular, especially with people who are just beginning a weight training program. These muscles respond quickly when properly trained, and changes in this muscle area are noticed sooner and more often than changes in other body parts. The anterior (front) and posterior (back) portions of the upper arm are known as the biceps (the traditional “show me your muscle” muscle) and the triceps, respectively.
The free-weight biceps curl or *alternating dumbbell biceps curl, the preacher curl using the cam-type machine, and the low-pulley biceps curl using a single- or multi-unit weight machine are ideal exercises to develop the front of the upper arm. They also develop the muscles in the front of the forearm.

The free-weight seated triceps extension or *supine triceps extension, the triceps extension using the cam machine, and the triceps pushdown on a multi- or single-unit weight machine are excellent exercises for developing the back of the upper arms.
When properly developed, the biceps and triceps muscles contribute to elbow-joint stabilization. Development of these muscles contributes to activities that require pulling (biceps) or pushing and throwing motions (triceps).
If you have access to free weights, you are encouraged to select the biceps curl or the *alternating dumbbell biceps curl to develop the front of your upper arms. If you have access to either a cam or multi- or single-unit machine, choose either the preacher curl or the low-pulley biceps curl exercise.
To get in the preparatory position, grasp the bar in an underhand grip with your hands about shoulder-width apart and evenly spaced (figure 7.1a). Press your upper arms against the sides of your torso, upper arms perpendicular to the floor with elbows fully extended. The bar should touch the front of your thighs in this position. Your back should be straight, your eyes should be looking straight ahead, and your knees should be slightly flexed to reduce stress on the low back.

MISSTEP
Your elbows are slightly flexed in the preparatory position.
CORRECTION
Stand erect with your shoulders back and your elbows fully extended.
Begin the upward movement phase by curling the bar upward toward your shoulders, keeping your elbows and upper arms perpendicular to the floor and close to the sides of your torso (figure 7.1b). Avoid allowing your elbows and upper arms to move back or out to the sides. Your body must remain straight and erect throughout the exercise—no rocking, swinging, or jerking should occur. Begin to exhale as the bar nears the sticking point and continue curling until the elbows are flexed, and the bar is near the front of the shoulders.

MISSTEP
Your upper arms move back as you lift the bar.
CORRECTION
Squeeze the insides of your upper arms against the sides of your torso.
MISSTEP
You use momentum to complete the repetition.
CORRECTION
Keep your upper body erect. If this problem continues, stand with your back against the wall.

MISSTEP
Your wrists hyperextend (roll back) as you complete the upward movement phase.
CORRECTION
Concentrate on keeping your wrists straight and rigid.
After reaching the top position, inhale as you slowly lower the bar back down to the starting position (figure 7.1a). Your elbows should be fully extended, and you should pause momentarily before curling the bar upward for the next repetition.

Figure 7.1 BICEPS CURL (FREE WEIGHT)
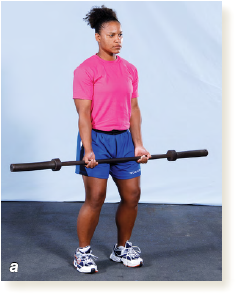
Preparation
1. Use an underhand grip, hands shoulder-width apart
2. Hold torso erect
3. Hold head up, facing forward
4. Keep upper arms against sides of torso, elbows extended
5. Allow bar to rest on front of thighs
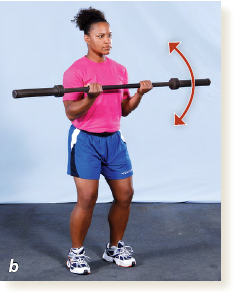
Movement
1. Keep upper arms stationary
2. Keep elbows close to body
3. Do not rock, jerk, or swing body
4. Begin to exhale as bar nears shoulders
5. Curl bar to shoulders
6. Return to starting position while inhaling
7. Continue upward and downward movements until set is complete
Sit on the seat of the cam machine with your chest against the pad (figure 7.2a). Place your elbows on the pad in line with the axis of the cam, repositioning your arms if necessary. Adjust the seat so that your elbows are slightly lower than your shoulders with your feet flat on the floor.

MISSTEP
Your elbows are flexed at the start of the exercise.
CORRECTION
Start the exercise with your elbows fully extended; lower the seat if needed.
Grasp the handles in an underhand grip and begin the exercise at full elbow extension. Perform the exercise by curling the handles upward as far as possible, pausing briefly at the top position (figure 7.2b). Exhale as the handles pass through the sticking point.

MISSTEP
You use upper-torso movement to complete the curl.
CORRECTION
Keep the chest against the pad and the body stationary.

MISSTEP
You do not go through the full range of motion.
CORRECTION
Curl upward until your hands almost touch your shoulders.
Inhale as you slowly lower the handles to the starting position, being careful not to allow the elbows to hyperextend (figure 7.2a).

MISSTEP
The weight drops too quickly.
CORRECTION
Slowly lower the weight, being careful not to hyperextend your elbows.


Preparation
1. Sit with chest against pad
2. Place elbows on pad in line with axis of cam
3. Adjust seat so that elbows are slightly lower than shoulders
4. Grasp handles with underhand grip
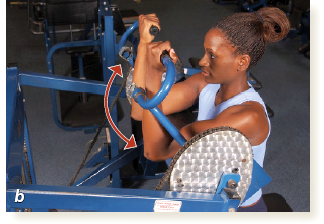
Movement
1. Curl upward as far as possible
2. Exhale through sticking point
3. Pause
4. Return to starting position while inhaling
5. Continue upward and downward movements until set is complete
Stand and face the weight machine with your feet approximately 18 inches (46 cm) from the lowest pulley. Keep your torso erect with your shoulders pulled back and your chest out with your knees slightly flexed. If you begin with your knees locked, you will pull yourself forward as you pull the bar upward. Grasp the bar in an underhand grip and begin the exercise with your elbows fully extended (figure 7.3a).

MISSTEP
Your elbows are flexed at the start.
CORRECTION
Fully extend your elbows before starting and between each repetition.
Curl the bar until it almost touches your shoulders (figure 7.3b). Avoid allowing your upper arms to move backward or out to the sides. Exhale as you pass through the sticking point and inhale while lowering the bar (figure 7.3a).
MISSTEP
You allow the weight plates to drop quickly to the weight stack.
CORRECTION
Slowly lower the weight and allow the plates to lightly touch, not bang against, the rest of the weight stack.

MISSTEP
You do not go through the full range of motion.
CORRECTION
Raise the bar until it almost touches your shoulders and lower it to a fully extended elbow position.

Figure 7.3 LOW-PULLEY BICEPS CURL (MULTI- OR SINGLE-UNIT MACHINE)
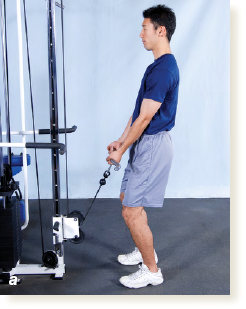
Preparation
1. Hold torso erect, shoulders back, chest out
2. Slightly flex knees
3. Use underhand grip
4. Extend elbows fully

Movement
1. Curl bar to shoulder level
2. Keep upper arms stationary
3. Exhale as bar nears shoulders
4. Pause
5. Return to starting position while inhaling
6. Continue upward and downward movements until set is complete
A common additional exercise for the biceps is the *alternating dumbbell biceps curl. This exercise is similar to the free-weight biceps curl except that it is performed with one arm at a time, using a dumbbell instead of a long bar. The major muscle area involved is the same (biceps brachii).
Grasp one dumbbell in each hand and stand with your feet shoulder-width part and your knees slightly flexed. Allow the dumbbells to hang at the sides of your body with your palms facing your legs (this places the dumbbell handles parallel to each other). Your elbows should be fully extended (figure 7.4a).
Beginning with your right arm, slowly curl the dumbbell up toward your right shoulder (figure 7.4b). As the dumbbell moves forward from the side of your right leg, rotate the handle so your palm faces up while keeping your elbow and upper arm perpendicular to the floor and close to the side of your torso. Do not lean back as you curl the dumbbell and exhale as the dumbbell nears your right shoulder. Pause at the top of the curl.

MISSTEP
Your elbow moves away from the side of your body as you curl the dumbbell upward.
CORRECTION
Press your upper arm and elbow against the side of your torso to keep it in position as the dumbbell is raised.
After reaching the top position, inhale as you slowly lower the dumbbell back down to the starting position, rotating it again as it passes by your thigh, until your elbow is fully extended (figure 7.4a). Repeat with the other arm.

MISSTEP
You allow the dumbbell to drop quickly back to the starting position.
CORRECTION
Slowly, with control, lower the dumbbell until the elbow is fully extended.

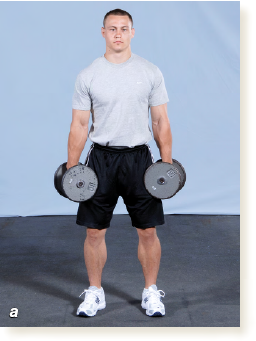
Preparation
1. Stand erect with feet shoulder-width apart and flat on floor
2. Grasp dumbbells with arms next to sides of body
3. Elbows begin fully extended
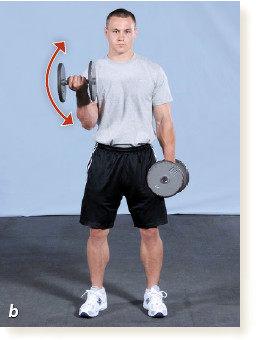
Movement
1. Starting with right arm, slowly curl dumbbell toward right shoulder
2. Rotate handle as dumbbell moves in front of right leg
3. Continue curling dumbbell and rotating handle until palm faces up
4. Keep upper arms and body stationary
5. Exhale as dumbbell nears shoulder
6. Return to starting position while inhaling
7. Repeat with other arm
8. Continue upward and downward movements until set is complete
If you have access to free weights, you may select the seated triceps extension or *supine triceps extension to develop the back of your upper arms. If you have access to either a cam or multi- or single-unit machine, select either the triceps extension or the triceps pushdown.
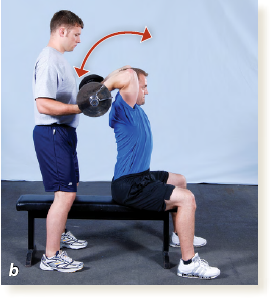
Sit erect on the end of a bench with your buttocks in contact with the bench and both feet flat on the floor at or wider than shoulder-width apart. From this position, signal “OK” to the spotter to hand you the bar. Grasp the bar with a narrow overhand grip 6 to 8 inches (15-20 cm) apart. Move the bar to a position over your head and pause with the bar in a straight-elbow position with your wrists directly over your elbows (figure 7.5a).
CAUTION: Do not use a long barbell for the seated triceps extension exercise. A safer choice is a cambered bar because it is shorter and easier to keep balanced during the exercise.
With your upper arms stationary and perpendicular to the floor, flex your elbows to slowly lower the bar behind your head (figure 7.5b). Inhale as you lower the bar. Keep your upper arms parallel to each other; do not allow them to bow out.
Pause at the lowest bar position and then return to the starting position by extending your elbows to push the bar back up (figure 7.5a). Keep your upper arms stationary; do not let your elbows bow out. Exhale as the bar nears the top position. Signal the completion of the last repetition by saying “OK” to your spotter and smoothly hand off the bar.

MISSTEP
Your hands are too far apart.
CORRECTION
Space your hands no more than 8 inches (20 cm) apart on the bar.

MISSTEP
You lower the bar only to the top of your head.
CORRECTION
Perform the exercise in front of a mirror. Make sure you lower the bar to a position behind the head.

MISSTEP
Your elbows flare out as you push the bar overhead.
CORRECTION
Keep your upper arms next to your ears and point your elbows forward.
As the spotter, grasp the bar using a wide grip, lift the bar off the floor, straddle the bench to stand behind your partner, and allow your partner to grasp the bar between your hands. When you hear the “OK” command, guide the bar to a straight-elbow position over your partner’s head. Before releasing the bar, be sure that your partner’s elbows are completely straight. Practice to make the handoff as smooth as possible.
Follow the downward and upward motions (figure 7.5b) of the bar. As your partner’s elbows straighten during the last repetition and after you hear the “OK” signal, assist by grasping the bar, using a wide grip, and return it to the floor.

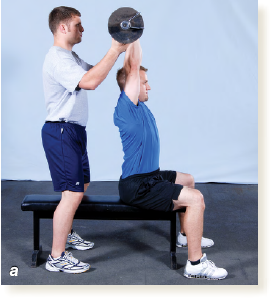
Preparation
Spotter
1. Grasp bar using a wide grip
2. Stand directly behind partner, straddling bench
3. React to “OK” command from lifter
4. Hand bar to partner
5. Guide bar to straight-elbow position
6. Release bar smoothly
Lifter
1. Sit erect on bench with feet flat
2. Signal “OK” to spotter
3. Take bar from spotter
4. Grasp the bar with a narrow overhand grip, evenly spaced, 6 to 8 inches (15-20 cm) apart
5. Move to straight-elbow position over head
Movement
Spotter
1. Keep hands under bar to protect partner’s head
2. Closely follow bar movement
3. Assist only when necessary
4. Grasp bar with wide grip after last repetition
5. Return bar to floor
Lifter
1. Lower bar to behind head
2. Keep elbows pointed forward
3. Inhale as bar is lowered
4. Pause in lowest position
5. Push bar to full extension
6. Keep elbows close to ears, pointing forward
7. Exhale as bar passes through sticking point
8. Continue downward and upward movements until set is complete
9. Signal “OK” on last repetition
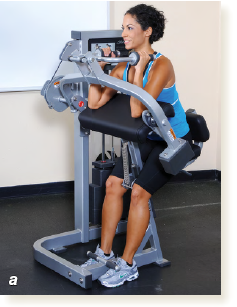
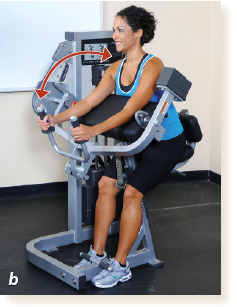
Sit in the cam machine with your back firmly pressed against the low back pad and your chest against the chest pad. Adjust the seat so that your elbows are lower than your shoulders with your feet flat on the floor. Your elbows should be in line with the axis of the cam. Adjust the position of your upper arms so they are parallel to each other on the arm pad. Grasp the handles in a closed, neutral grip (figure 7.6a).
From this position, push with your hands until your elbows are extended (figure 7.6b). Do not allow your upper arms to lift off the pads. Pause in the extended position; then slowly return to the starting position (figure 7.6a). Exhale while pushing through the sticking point and inhale during the return.

MISSTEP
Your upper arms and elbows lift off the pads.
CORRECTION
Keep pressing your upper arms and elbows against the pads. Lighten the load, if necessary.

Figure 7.6 TRICEPS EXTENSION (CAM MACHINE)
Preparation
1. Place back firmly against low back pad and chest against chest pad
2. Adjust seat so that elbows are lower than shoulders
3. Place upper arms parallel to each other on arm pad
4. Grasp the handles in a closed, neutral grip
Movement
1. Extend elbows
2. Keep upper arms on arm pad, elbows pointing forward
3. Exhale through sticking point
4. Pause in extended elbow position
5. Return to starting position while inhaling
6. Continue forward and backward movements until set is complete
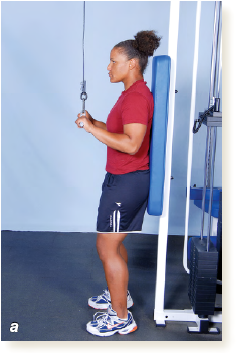
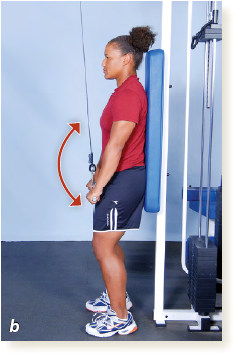
Stand erect with your feet approximately shoulder-width apart. Grasp the bar in an overhand grip with your hands 6 to 8 inches (15-20 cm) apart (figure 7.7a). Pull the bar down, flex your elbows, and press your upper arms firmly against the sides of your torso. Begin the exercise with the bar at chest height.
From this position, extend your elbows until they are straight, and the bar touches your body (figure 7.7b). Be sure to extend your elbows completely. Pause and then slowly return the bar to chest height without moving your upper arms and torso (figure 7.7a). Exhale as you press the bar down through the sticking point and inhale during the return.

MISSTEP
Your upper arms move away from your body.
CORRECTION
Squeeze your upper arms against the sides of your torso. Pause at both the fully extended and flexed elbow positions.

MISSTEP
You allow the bar to move above the shoulders.
CORRECTION
The bar should begin at chest height and be prevented from moving higher than shoulder level. Think: Knuckles stay below the shoulders.

MISSTEP
Your torso flexes forward as you push the bar down.
CORRECTION
Maintain a stable, upright position with your head, shoulders, hips, and feet in a straight vertical line. Lighten the load if necessary.
As you return the bar to chest height, take care not to allow it to move too quickly because this causes errors in technique and puts too much stress on the elbows. Slowly return the bar to the starting position in a controlled manner.

Preparation
1. Stand erect
2. Place feet shoulder-width apart
3. Use overhand grip 6 to 8 inches (15 to 20 cm) apart
4. Squeeze upper arms against ribs
5. Begin with bar at chest height
Movement
1. Extend elbows until bar touches body
2. Do not move upper arms or torso
3. Exhale when passing through sticking point
4. Pause at fully-extended elbow position
5. Return to starting position while inhaling
6. Continue downward and upward movements until set is complete
If you are an experienced lifter who is ready for a second triceps exercise, consider adding the *supine triceps extension. Like the seated triceps extension, this exercise requires a spotter. It is a pushing exercise that is performed lying on your back, usually on a flat bench.
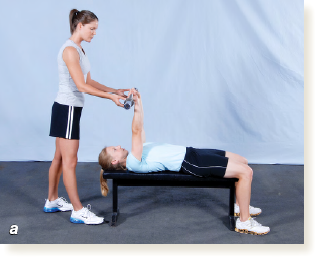
Lie on a bench and position your head, shoulders, and buttocks in contact with the bench and both feet flat on the floor about shoulder-width apart to complete the five points of contact. From this position, signal “OK” to the spotter to hand you the bar. Grasp the bar with an overhand grip evenly spaced about 8 inches (20 cm) apart. Move the bar to a position over your chest and pause with the bar in a straight-elbow position with your wrists directly over your elbows (figure 7.8a, page 95).
CAUTION: Do not use a long barbell for the *supine triceps extension exercise. A safer choice is a cambered bar because it is shorter and easier to keep balanced during the exercise.
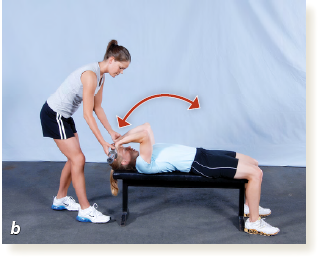
Keeping your upper arms stationary and perpendicular to the floor, flex your elbows to slowly lower the bar toward your head (figure 7.8b). Inhale as you lower the bar. Keep your elbows pointing straight up; do not allow them to bow out. Continue lowering the bar until it approaches the top of your head (the actual location depends on the length of your forearms).
Pause at the lowest bar position and then reverse the motion by extending the elbows to push the bar back up to the starting position (figure 7.8a). Keep your upper arms stationary; do not let your elbows bow out. Exhale as the bar nears the top position. Signal the completion of the last repetition by saying “OK” to your spotter and smoothly hand off the bar.

MISSTEP
Your elbows move out and forward.
CORRECTION
Concentrate on keeping your upper arms stationary during the exercise.

MISSTEP
Your upper arms are not perpendicular to the floor during the exercise.
CORRECTION
Concentrate on keeping your elbows pointing up during the movement phases.
As the spotter, stand 2 to 6 inches (5-15 cm) from the head of the bench (figure 7.8a). Using the technique described in step 2 (see page 18), grasp the bar using a wide grip, lift the bar off the floor, stand at your partner’s head, and allow your partner to grasp the bar between your hands. When you hear the “OK” command, guide the bar to a straight-elbow position over your partner’s chest. Before releasing the bar, be sure that your partner’s elbows are completely straight. Practice making the handoff as smooth as possible. If your handoff is too far forward or back, it will disturb your partner’s stable position on the bench, which may contribute to a poor performance or injury.
Follow the downward motion of the bar with your open hands and eyes (figure 7.8b). Follow the bar back up to the starting position (figure 7.8a). As your partner’s elbows straighten during the last repetition and after you hear the “OK” signal, assist by grasping the bar, using a wide grip, and then return it to the floor.

Preparation
Spotter
1. Grasp bar using a wide grip
2. Stand 2 to 6 inches (5-15 cm) from head of bench
3. React to “OK” command from lifter
4. Hand bar to partner
5. Guide bar to straight-elbow position
6. Release bar smoothly
Lifter
1. Create five points of contact: head, shoulders, buttocks on bench; both feet on floor
2. Signal “OK” to spotter
3. Take bar from spotter with an overhand grip, evenly spaced, 8 inches (20 cm) apart
4. Move to straight-elbow position over chest
Movement
Spotter
1. Keep hands under bar to protect partner’s head
2. Closely follow bar movement
3. Assist only when necessary
4. Grasp bar with wide grip after last repetition
5. Return bar to floor
Lifter
1. Keep upper arms stationary
2. Keep elbows straight up, not flared out
3. Slowly lower bar while inhaling
4. Pause at lowest bar position
5. Push upward to extend elbows
6. Exhale during upward movement
7. Pause at straight-elbow position
8. Continue downward and upward movements until set is complete
9. Signal “OK” on last repetition
Arm Drill 1. Choose Two Exercises
After reading about the characteristics and techniques involved in the exercises and the type of equipment required for each, you are ready to put to use what you have learned. Consider the availability of equipment and your situation; then select one biceps exercise and one triceps exercise to use in your program.
Biceps
Biceps curl (free weight)
Preacher curl (cam machine)
Low-pulley biceps curl (multi- or single-unit machine)
Triceps
Seated triceps extension (free weight)
Triceps extension (cam machine)
Triceps pushdown (multi- or single-unit machine)
Write in “Biceps” then “Triceps” in the “Muscle group” column on the workout chart and fill in the name of the exercises you selected in the “Exercise” column (see figure 11.1 on page 146). If you intend to include the free-weight *alternating dumbbell biceps curl (biceps) or free-weight *supine triceps extension (triceps), record it on the workout chart immediately after the arm exercises already selected.
Success Check
Consider availability of equipment.
Consider need for a spotter and the availability of a qualified professional.
Consider time available.
Choose two arm exercises and write them on the workout chart.
Arm Drill 2.
Warm-Up and Trial Loads for Basic Exercises
This practice procedure answers the question “How much weight or load should I use?” Using the coefficients associated with the arm exercises you selected and the formulas shown in figure 7.9, determine the trial load. (See step 3, pages 33-34), for more information on using this formula.) Round your results down to the nearest 5-pound (2.3 kg) increment or to the closest weight-stack plate. Be sure to use the coefficient assigned to the exercise you selected. Use one-half of the amount determined for the trial load for your warm-up load in the exercise. These loads will be used in drills 4 and 5.
Success Check
Determine your trial load by multiplying your body weight by the correct coefficient.
Determine your warm-up load by dividing the trial load by two.
Round down your trial and warm-up loads to the nearest 5-pound (2.3 kg) increment or to the closest weight-stack plate.
Arm Drill 3.
Determine Trial Loads for *Alternating Dumbbell Biceps Curl and *Supine Triceps Extension
If you are an experienced lifter who decides to add the *alternating dumbbell biceps curl or the *supine triceps extension, follow the directions to determine your trial load. (See step 3, pages 34-35, for more information.)
Based on your previous experience and knowledge of the weight that you can lift, select a weight that will allow you to perform 12 to 15 repetitions. Calculate the warm-up load by multiplying the trial load by 0.6 and round down to the nearest 5-pound (2.3 kg) increment (figure 7.10). These loads will be used in drill 4.
Success Check
Select a weight that will allow 12 to 15 repetitions.
Determine the warm-up load by multiplying the trial load by 0.6.
Round down the warm-up load to the nearest 5-pound (2.3 kg) increment.

Arm Drill 4. Practice Proper Technique
In this procedure you are to perform 15 repetitions with the warm-up load determined in drill 2 (biceps curl, preacher curl, or low-pulley biceps curl for the biceps; seated triceps extension, triceps extension, or triceps pushdown for the triceps) or drill 3 (*alternating dumbbell biceps curl for the biceps or *supine triceps extension for the triceps). If you are an experienced lifter who decided to add the *alternating dumbbell biceps curl or the *supine triceps extension, practice it last.
Review the photos and instructions for the exercise, focusing on proper grip and body positioning. Visualize the movement pattern through the full range of motion. Perform the movement with a slow, controlled velocity, remembering to exhale through the sticking point. Check your technique either by watching yourself in a mirror or by asking a qualified professional to observe and assess your technique.
If you selected the free-weight seated triceps extension or the *supine triceps extension, you need a spotter. You also need to practice the skills of spotting these exercises. Identify a spotter with whom you will take turns completing the drill.
Instead of performing 15 repetitions in a continuous manner, return the bar to the floor after each repetition to practice getting in the right spotting position and properly handling the bar. Alternate responsibilities so that you and your partner both have a chance to develop the techniques that are required in performing and spotting these exercises. Ask a qualified professional to observe and assess your performance in the basic techniques.
For the free-weight seated triceps extension and the *supine triceps extension, all bar handoffs and bar returns are performed correctly.
For all exercises, movement pattern, velocity, and breathing are correct.
Arm Drill 5. Determine Training Load
This practice procedure will help you determine an appropriate training load designed to produce 12 to 15 repetitions. For basic exercises, perform as many repetitions as possible with the calculated trial load from drill 2. Make sure that the repetitions are performed correctly.
If you performed 12 to 15 repetitions with your trial load, then your trial load is your training load. Record this number as your training load for this exercise in the workout chart (see page 146). If you did not perform 12 to 15 repetitions, go to drill 6 to make adjustments to the load.
Success Check
Check that you are using the correct load.
Maintain proper and safe technique during each repetition.
Arm Drill 6. Make Needed Load Adjustments
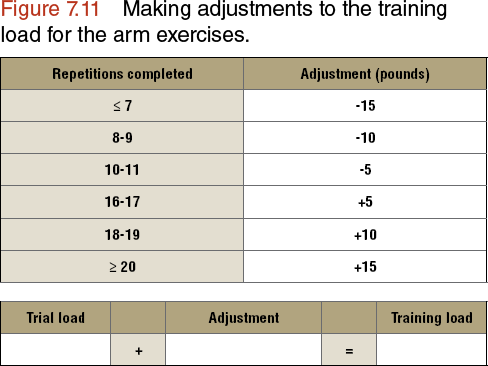
If you performed fewer than 12 repetitions with your trial load, the load is too heavy, and you need to lighten it. On the other hand, if you performed more than 15 repetitions, it is too light, and you need to increase it. Use figure 7.11 to determine the adjustment you need to make and the formula for making load adjustments.
Success Check
Check correct use of load adjustment chart (figure 7.11).
Write in your training load on the workout chart (see page 146).
This step involved selecting one arm exercise for the biceps and another for the triceps for which you have the needed equipment and perhaps one more for each if you have already been training. Using a proper grip, the correct body position, movement, and breathing patterns, and accurate warm-up and training loads, will maximize your success.
After you have determined your training load and recorded it on your workout chart, you are ready to move on to step 8. In this step, you will select exercises (classified as either multijoint or single-joint) that are designed for developing the legs.
Before Taking the Next Step
Honestly answer each of the following questions. If you answer yes to all of the questions relevant to your level and exercise selection, you are ready to move on to step 8.
1. Have you selected basic biceps and triceps exercises? If you are an advanced lifter, do you want to add the *alternating dumbbell biceps curl (biceps) or *supine triceps extension (triceps)?
2. Have you recorded your exercise selections on the workout chart?
3. Have you determined warm-up and training loads for the exercises you selected?
4. Have you recorded the training loads on the workout chart?
5. Have you learned the proper technique for performing the exercises you selected?
6. If an exercise you selected requires a spotter, have you identified a qualified professional? Have you learned the proper spotting techniques?