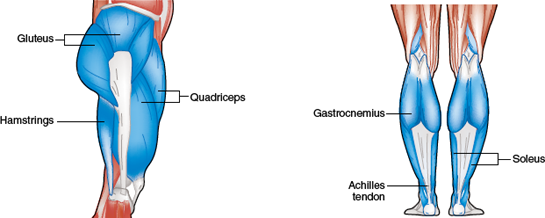
Exercises that develop the upper legs and hips are considered very physically demanding due to the large muscles involved. The area of the body trained by these exercises is sometimes referred to as the power zone. These muscles—the largest ones of the whole body—include the quadriceps (front of the thigh), hamstrings (back of the thigh), and gluteal muscles (the buttocks). They are responsible for our ability to run, jump, and make quick starts and fast stops, as well as lateral, backward, pushing, pulling, rotating, and kicking movements. They also stabilize the upper body during most of its movements. The importance of developing these muscles is obvious, and they should not be neglected in favor of the more visible muscles of the upper body.
The exercises in this step can be classified as either multijoint or single-joint. A multijoint exercise involves two or more joints of the body changing angles as the exercise is performed. This step includes the free-weight lunge, machine leg press, and *back squat (free weight) multijoint exercises. They are excellent for developing all of the large muscles of the upper legs and hips.

Some *additional exercises involve only one joint (a single-joint exercise); these focus on one muscle or body part area. The machine *knee extension trains the quadriceps, the machine *knee curl trains the hamstrings, and the free-weight *standing heel raise trains the back of the lower legs (the calves).
If you have access to free weights, you are encouraged to select the lunge or the *back squat to develop your legs. To isolate your calves, consider adding the *standing heel raise. If you have access to either a cam machine or a multi- or single-unit machine, choose the machine leg press exercise.
Multijoint leg exercises require you to simultaneously extend the knee and hip joints. The quadriceps extend the knees, the hamstrings flex the knees and, with the help of the gluteal muscles, extend the hips.
The multijoint exercises featured in this step contribute to knee and hip-joint stabilization, muscular padding for protection of the hip, and lower-body sculpting. The leg and hip strength gained by training with these exercises is especially beneficial to those involved in athletic activities.
Begin with your feet shoulder-width apart, eyes straight ahead, head up, shoulders back, chest out, and back straight (figure 8.1a). Do not lean your upper torso forward. This erect posture should be maintained throughout the exercise.
The forward movement phase begins with a controlled step forward with your preferred leg (figure 8.1b). Be careful not to under or overstride. Once in the stepped-out position, lower your hips (down, not forward) so the top of your forward thigh is parallel to the floor, and your forward knee is directly over your forward ankle (figure 8.1c). Your forward foot should be pointed straight ahead, with your back knee somewhat flexed and not quite touching the floor.
After pausing to gain balance, push off your forward foot and smoothly return to the starting position (figure 8.1a). Do not use the upper body to create momentum to move backward. Pause and then step forward with the other foot in the same manner. Continue alternating your legs until the set is completed. At first, you might have to slide or stutter step your forward foot to be able to return to the starting position. As you gain strength and develop better balance, this movement will not be necessary.
CAUTION: The lunge is a relatively difficult exercise to perform because of the balance required. First try lunges without weights to develop the needed balance. When you feel comfortable with the forward and backward movements and with your balance, begin using dumbbells (one in each hand) and eventually progress to using a barbell (as seen in figure 8.1).
MISSTEP
Your forward step is too short or too far out.
CORRECTION
Place your forward foot on the floor so that when you lower your hips, the forward knee is directly over your forward ankle. You may need to begin with small steps forward and gradually increase each stride until the thigh of the forward leg is parallel to the floor, and the lower leg is perpendicular to the floor.

MISSTEP
Your torso leans forward when you step forward, lower your hips, or both.
CORRECTION
Focus on keeping your torso erect and head facing forward. If your hips are not flexible enough to keep this erect position during the exercise, don’t lower your hips as far down when you are in the stepped-out position. Also, be sure to perform the lower body stretching exercises described in step 2.

Figure 8.1 LUNGE (FREE WEIGHT)
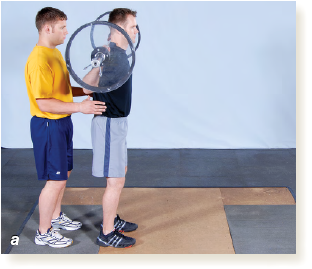
Preparation
1. Stand erect with eyes straight ahead
2. Position head up, shoulders back, chest out, and back straight
3. Feet should be shoulder-width apart
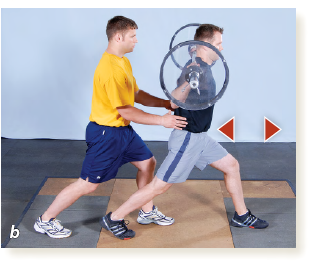
Forward Movement
1. Inhale and take a controlled step straight ahead
2. Keep torso erect
3. Do not under or overstride
4. Pause in stepped-out position
Downward Movement and Return
1. Lower hips down until top of forward thigh is parallel to floor
2. Keep forward knee over forward ankle
3. Moderately flex back knee, but do not let it touch floor
4. Pause in lowest position
5. Push off with forward foot while exhaling to return to starting position
6. Maintain an erect torso
7. Pause before stepping forward with other leg
8. Continue alternating legs until set is complete
This exercise typically involves the use of a multi- or single-unit machine, although some equipment companies make a cam-type leg press machine. Begin by sitting in the machine and adjusting the seat so that your knees are flexed to 90 degrees. If you have trouble, use a mirror or ask someone to help you create a 90-degree angle. Sit erect with your low back pressed against the back of the seat, toes pointed slightly outward, and feet flat against the pedal surface slightly wider than shoulder-width apart (figure 8.2a). Grasp the handrails to stabilize your body.
Begin the forward movement phase by pushing your legs to an extended-knee position while maintaining an upright torso position (figure 8.2b). Do not let your knees move in toward each other as they are extended; keep a consistent space between them throughout the movement. Avoid twisting your body as you extend your legs and do not forcefully lock out your knees at the end of the movement. Exhale while pressing forward.
For the backward movement phase, allow your legs to move back toward your body without lifting your buttocks off the seat or allowing the plates to bang against the rest of the weight stack (figure 8.2a). Inhale as you return to the starting position. This movement should be performed in a slow, controlled manner.

MISSTEP
Your feet are not flat on the pedal surface.
CORRECTION
Think about pushing with the middle or back half of your foot.
MISSTEP
Your torso leans forward.
CORRECTION
Sit with your back and hips pushed against the seat.

MISSTEP
Your knees move in toward each other as you press the weight forward.
CORRECTION
Keep your knees over your feet during the movement; the distance between your knees should remain the same as you press the weight forward.
Most leg press errors involve the speed of movement. Many lifters have a tendency to press out too quickly, causing the knees to lock out. The danger is that you might hyperextend your knees and cause injury. Control your forward speed and concentrate on stopping your forward movement at a point just before your knees lock out. Another common error is letting the foot pedals free-fall back to the starting position. Just as you controlled your forward movement speed, also use a slow, controlled movement to return to the starting position.

Figure 8.2 LEG PRESS (MULTI- OR SINGLE-UNIT MACHINE)
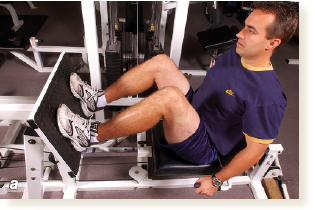
Preparation
1. Sit erect with back pressed against back of seat
2. Adjust seat or chair to flex legs to 90 degrees
3. Place feet flat on pedal surface with toes pointed slightly outward
4. Feet should be slightly wider than shoulder-width apart
5. Grasp handrails
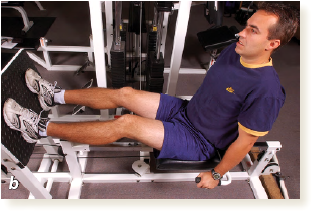
Movement
1. Push the pedals away by extending hips and knees
2. Maintain body position
3. Do not let knees move in toward each other
4. Avoid twisting body
5. Exhale during push
6. Pause at full extension without locking out knees
7. Return to starting position while inhaling
8. Continue forward and backward movements until set is complete
The final multijoint exercise is the *back squat. This exercise targets all the major muscles of the lower body—quadriceps, hamstrings, and gluteals. In addition, many upper-body muscles are recruited to achieve an upright, flat-back (not rounded or hunched over) position, to keep the bar in place on the shoulder, and to provide protective support for the low back.
The *back squat is a more advanced exercise because of the upright, flat-back position (required to minimize stress on the low back), the placement of the barbell across the shoulders and upper back, and the balance needed throughout the whole exercise. A spotter is required. A common strategy when learning how to perform this exercise is to first try it with a long broomstick to develop the needed body position, bar placement, and overall balance. After you master the correct technique, progress to an empty bar, then to a bar with weight plates. Be sure to use locks.
Stand in the rack with feet flat on the floor, slightly wider than shoulder width (figure 8.3a, page 108). Grasp the bar in an overhand grip with your hands slightly more than shoulder-width apart. Duck under the bar and, with the help of the spotter, position the bar across your shoulders at the base of your neck. Keep your hips directly under the bar with your chest out, shoulders back, and head up.
From this position, signal “OK” to the spotter and slowly stand up, pause, and then take one or two steps backward to clear the supports. Reposition your feel to be slightly wider than shoulder-width apart with your toes pointed slightly outward. Again, position your hips directly under the bar with your chest out, shoulders back, and head up. Pause before beginning the downward movement phase.
For the downward movement phase, slowly squat (figure 8.3b, page 109). Do not lean forward; maintain an upright, flat-back position. Keep your feet flat on the floor and your knees aligned over your feet. Inhale as you descend and continue until your thighs are parallel to the floor.

MISSTEP
The bar is positioned too high on your neck.
CORRECTION
Place the bar on your shoulders at the base of your neck. You should be able to keep your head up even with the bar across your shoulders.

MISSTEP
You tip your head forward to look at the floor.
CORRECTION
Slightly tilt your head backward and focus your eyes slightly up with your chest out and shoulders back. However, do not look up at the ceiling.
MISSTEP
You allow your knees to move in front of your feet or toward each other.
CORRECTION
Keep your heels in full contact with the floor. Use a shallower squatting depth if needed.
Begin the upward movement by pushing with your legs. Keep your head up and chest out. Exhale through the sticking point as you extend your hips and knees and return to the starting position. Signal the completion of the last repetition by saying “OK” to your spotter. Pause and then walk forward until the bar comes into contact with the rack (figure 8.3c, page 109). Pause and then slowly squat down to place the bar on the supports. Be sure your hips remain directly under the bar with your chest out, shoulders back, and head up. Do not let the bar go until it is fully resting on the supports.
As the spotter, you should stand as close as you can to your partner without making contact. Alternatively, you can use two spotters; one at each end of the bar (as seen in figure 8.3). To assist your partner in removing the bar from the rack, grasp it with a closed grip. At your partner’s “OK” command, carefully help lift the bar off the supports and take one or two steps backward as your partner also takes one or two steps backward to clear the supports (figure 8.3a, page 108). Before releasing the bar, be sure that your partner has the bar under control. Practice this procedure so that you can provide assistance without bumping your partner or the bar—either error could cause a loss of balance or a dropped bar.
Once the downward phase begins, squat with your partner and follow the bar’s path with your open hands (figure 8.3b, page 109). Be sure to maintain the flat-back body position. During the upward phase, ascend with your open hands still under the bar.
As you ascend with your partner for the last repetition, prepare to help rack the bar. After your partner gives the “OK” signal, assist by grasping the bar with a closed grip and walking forward to help rack it (figure 8.3c, page 109). Be sure that the bar is fully resting on the supports before releasing it.

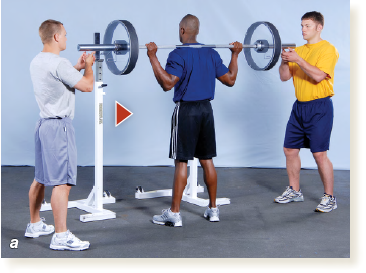
Preparation
Spotter
1. Stand close to partner (or ends of bar)
2. Use closed grip
3. React to “OK” command from partner
4. Assist in lifting bar off supports
5. Release bar smoothly
6. Take 1 or 2 steps backward with partner
7. Once partner is stationary, stand directly behind and close to partner (or ends of bar)
Lifter
1. Use an overhand grip, hands slightly wider than shoulder width
2. Position bar on shoulders at base of neck
3. Align hips directly under bar, with chest out, shoulders back, head up
4. Position feet flat on floor slightly wider than shoulder width
5. Signal “OK” to spotter
6. Slowly stand to move bar off supports
7. Take 1 or 2 steps backward
8. Reposition hips directly under bar, with chest out, shoulders back, head up
9. Reposition feet flat on floor slightly wider than shoulder width
Movement
Spotter
1. Squat with partner
2. Follow bar with open hands
3. Assist only when necessary
Lifter
1. Squat slowly
2. Maintain an upright, flat-back position
3. Keep feet flat on floor, knees in line with feet
4. Continue squatting until thighs are parallel to floor
5. Inhale during downward movement
6. Pause in lowest body position
7. Push up with legs to return to starting position
8. Keep head up and chest out
9. Exhale through sticking point
10. Continue downward and upward movements until set is complete
11. Signal “OK” on last repetition
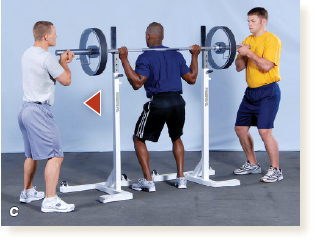
Racking the Bar
Spotter
1. Grasp bar with closed grip
2. Walk 1 or 2 steps forward with partner
3. Guide bar to supports
4. Say “OK” when bar is racked
Lifter
1. Walk 1 or 2 steps forward until bar contacts rack
2. Align hips directly under bar, with chest out, shoulders back, head up
3. Squat down until bar is on supports
If you are an experienced lifter who is ready for a more challenging leg program, consider one or more *additional leg exercises. At first, choose one of the single-joint exercises to complement the multijoint exercise you are already performing. A common approach is to add the machine *knee extension exercise (for the quadriceps muscle) and the machine *knee curl exercise (for the hamstring muscle) to a program that already includes either the free-weight lunge or the machine leg press. Later, as you become even more trained, consider replacing the lunge or leg press with the free-weight *back squat exercise. The *standing heel raise exercise can be added at any time.
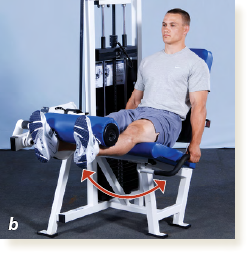
Sit erect on the seat of the cam machine (figure 8.4a) with your back pressed against the back pad. Look straight ahead and keep your head up. Tuck your ankles behind the foot pads and position the instep of both feet against the pads. Grasp the edge of the seat or the handles of the machine.
Slowly extend your knees (figure 8.4b). Be sure to go through the complete range of motion. Exhale as you extend your knees and pause briefly at the top position.
Slowly lower the weight and return to the starting position (figure 8.4a). Keep a firm grip on the seat or handles to keep the buttocks in contact with the seat. Inhale as you lower the weight. Do not allow the weights to bang together at the bottom of the movement. Pause before beginning the next repetition.

MISSTEP
The backs of your knees hang off the front edge of the seat.
CORRECTION
Check that your knees are aligned with the axis of the machine and adjust the position of the back pad, if possible, so the backs of your knees are in contact with the front edge of the seat.

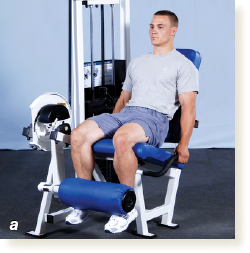
Preparation
1. Sit on seat
2. Place ankles behind pads
3. Position instep of feet against ankle pads
4. Sit erect with back against back pad
5. Hold head up, facing forward
6. Grip edge of seat or machine handles
Movement
1. Slowly extend knees through complete range of motion
2. Exhale while extending
3. Pause briefly in extended position
4. Return to starting position while inhaling
5. Keep buttocks in contact with seat
6. Continue upward and downward movements until set is complete
Lie face-down on the cam machine (figure 8.5a, page 112) with your thighs, hips, stomach, and chest in full contact with the bench. Your knees should hang off the edge of the thigh pad or bench. Tuck your ankles under the foot pads and position your Achilles tendons in contact with pads. Grasp the edge of the bench or the handles of the machine.
Slowly flex your knees to bring your heels as close to your buttocks as you can (figure 8.5b, page 112). Exhale as you flex your knees and pause briefly at the top position.
Slowly lower the weight and return to the starting position (figure 8.5a, page 112). Keep your hips and chest in contact with the bench by firmly gripping the handles or sides of the bench. Inhale as you lower the weight. Do not allow the weights to bang together at the bottom of the movement. Pause before beginning the next repetition.

MISSTEP
Your hips lift off the bench as you flex your knees.
CORRECTION
Check that your knees are aligned with the axis of the machine and keep your hips and chest in contact with the bench.

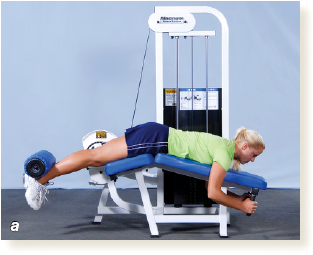
Preparation
1. Lie face-down on bench
2. Position thighs, hips, stomach, and chest flat on bench
3. Hang knees off edge of bench
4. Place ankles under pads
5. Position Achilles tendons in contact with pads
6. Grip edge of seat or machine handles
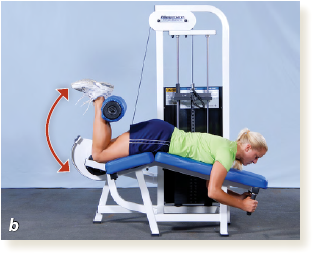
Movement
1. Slowly flex knees through complete range of motion
2. Keep hips on bench
3. Exhale while flexing
4. Pause briefly in flexed position
5. Return to starting position while inhaling
6. Keep chest on bench
7. Continue upward and downward movements until set is complete
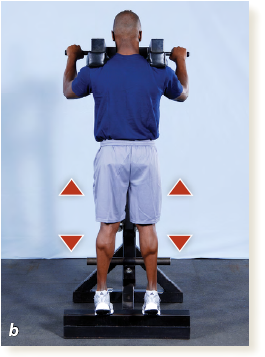
This pushing exercise uses plantar flexion at the ankle joint to train the calf muscles, the soleus and gastrocnemius. The *standing heel raise can be performed with a barbell across the shoulders, with one or two dumbbells, with your body weight only, or in a standing machine (as shown in figure 8.6).
Dip your shoulders under the shoulder pads and place your feet hip-width apart with the balls of both feet near the front edge of the step (figure 8.6a). Keep your torso erect with your knees straight, but not forcefully locked out. Your eyes should focus straight ahead to help you maintain balance. Allow your heels to lower below the level of the step; you should feel no pain in your calves, only a stretch. This is the starting position.
Slowly point your toes to lift your heels as high as you can (figure 8.6b). Exhale as you ascend and pause briefly at the top of the movement.
Slowly allow your heels to lower back to the starting position (figure 8.6a). Again, allow your heels to lower below the level of the step in a gentle, stretched position. Maintain an upright position with your knees straight. Inhale as you lower your heels.
MISSTEP
Your knees flex and extend during the movement.
CORRECTION
Keep your knees straight—but not locked—throughout the exercise.

MISSTEP
Your ankles turn to the outside or your knees bow outward during the upward movement phase.
CORRECTION
Push up from the balls of the feet with attention focused on pushing up from the ball of the big toe of both feet.

Figure 8.6  STANDING HEEL RAISE
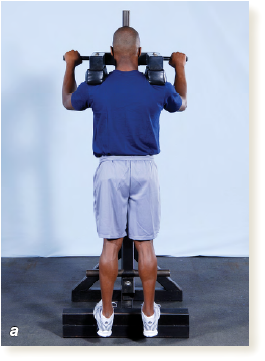
Preparation
1. Dip shoulders under shoulder pads
2. Place balls of both feet hip-width apart near front edge of step
3. Stand erect with knees straight
4. Allow heels to lower below level of step in a gentle stretch
Movement
1. Push up from the balls of the feet to raise heels as high as possible
2. Exhale during upward movement
3. Keep knees straight
4. Pause at top of movement
5. Return to starting position while inhaling
6. Do not move torso or flex knees
7. Continue upward and downward movements until set is complete
Leg Drill 1. Choose One Exercise
After reading about the characteristics and techniques of the exercises and the type of equipment required for each, you are ready to put to use what you have learned. Consider the availability of equipment and access to spotters in your situation; then select one of the following exercises to use in your program:
Lunge (free weight)
Leg press (multi- or single-unit weight machine)
Write in “Legs” in the “Muscle group” column on the workout chart and fill in the name of the exercise you selected in the “Exercise” column (see figure 11.1 on page 146). If you intend to include the machine *knee extension or *knee curl or the free-weight *back squat or *standing heel raise, record it on the workout chart immediately after the selected leg exercise.
Success Check
Consider availability of equipment.
Consider need for a spotter and the availability of a qualified professional.
Consider time available.
Choose a leg exercise and write it on the workout chart.
Leg Drill 2.
Warm-Up and Trial Loads for Basic Exercises
This practice procedure answers the question “How much weight or load should I use?” Using the coefficient associated with the leg exercise you selected and the formula shown in figure 8.7, determine the trial load. (See step 3, pages 33-34), for more information on using this formula.) Round off your results down to the closest 5-pound (2.3 kg) increment or to the closest weight-stack plate. For the lunge exercise (and the *standing heel raise if you choose to use two dumbbells), divide the loads you calculated by two to equal the weight of each individual dumbbell. Use half of the amount determined for the trial load for your warm-up load in the exercise. These loads will be used in drills 4 and 5.
Success Check
Determine your trial load by multiplying your body weight by the correct coefficient.
Determine your warm-up load by dividing your trial load by two.
Round down your trial and warm-up loads to the nearest 5-pound (2.3 kg) increment or to the closest weight-stack plate.
Leg Drill 3.
Determine Trial Loads for *Back Squat, *Knee Extension, *Knee Curl, and *Standing Heel Raise
If you are an experienced lifter who decided to add the *back squat, *knee extension, *knee curl, or *standing heel raise, follow the directions to determine your trial load. (See step 3, pages 34-35), for more information.)
Based on your previous experience and knowledge of the weight that you can lift, select a weight that will allow you to perform 12 to 15 repetitions. Calculate the warm-up load by multiplying the trial load by 0.6, and round down to the nearest 5-pound (2.3 kg) increment (figure 8.8). For the *standing heel raise, divide the loads you calculated by two to determine the weight of each dumbbell. These loads will be used in drill 4.
Success Check
Select a weight that will allow 12 to 15 repetitions.
Determine the warm-up load by multiplying the trial load by 0.6.
Round down the warm-up load to the nearest 5-pound (2.3 kg) increment or to the closest weight-stack plate.
Leg Drill 4. Practice Proper Technique
In this procedure, you are to perform 15 repetitions with the warm-up load determined in drill 2 (lunge or leg press) or drill 3 (*back squat, *knee extension, *knee curl, or *standing heel raise). If you are an experienced lifter who decided to add the *back squat, practice it first. If you decided to add the *knee extension, *knee curl, or *standing heel raise exercise, practice it last.
Review the photos and instructions for the exercise, focusing on proper grip and body positioning. Visualize the movement pattern through the full range of motion. Perform the movement with a slow, controlled velocity, remembering to exhale through the sticking point. Ask a qualified professional to observe and assess your technique.
If you selected the free-weight *back squat, you need a spotter. You also need to practice the skills of spotting this exercise. Identify a spotter with whom you will take turns completing the drill. Instead of performing 15 repetitions in a continuous manner, practice racking the bar after each repetition. Alternate responsibilities so that you and your partner both have a chance to develop the techniques that are required in performing and spotting this exercise. Ask a qualified professional to observe and assess your performance in the basic techniques.
Success Check
For the *back squat, all rackings are performed correctly.
For all exercises, movement pattern, velocity, and breathing are correct.
Leg Drill 5. Determine Training Load
This practice procedure will help you determine an appropriate training load designed to produce 12 to 15 repetitions. If you selected the leg press, perform as many repetitions as possible with the calculated trial load from drill 2. Make sure that you perform the repetitions correctly.
If you performed 12 to 15 repetitions with the trial load, then your trial load is your training load. Record this number as your training load for this exercise on the workout chart (see page 146). If you did not perform 12 to 15 repetitions, go to drill 6 to make adjustments to the load.
CAUTION: If you selected the lunge or the *standing heel raise exercise, do not use the calculated load to perform a maximal number of repetitions because you will have extraordinarily sore muscles for the next several days. Instead, over the course of multiple weeks of consistent training, gradually increase the weight until the calculated training load is reached.
Success Check
Check that you are using the correct load.
Maintain proper and safe technique during each repetition.
Leg Drill 6. Make Needed Load Adjustments
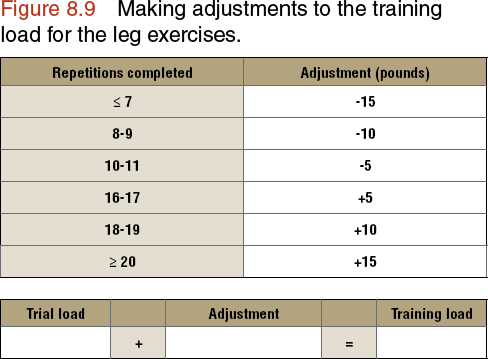
If you performed fewer than 12 repetitions with your trial load, the load is too heavy, and you need to lighten it. On the other hand, if you performed more than 15 repetitions, the load is too light, and you need to increase it. Use figure 8.9 for the formula for making load adjustments to determine the adjustment you need to make.
Success Check
Check correct use of load adjustment chart (figure 8.9).
Write in your training load on the workout chart (see page 146).
This step involved selecting one leg exercise for which you have the needed equipment and perhaps one or two more if you have already been training. Using a proper grip, the correct body position, movement, and breathing patterns, and accurate warm-up and training loads will maximize your success.
After you have determined your training load and recorded it in your workout chart, you are ready to move on to step 9. In this step, you will select body weight or machine exercises that will develop the lower back, torso, and abdominal muscles (often called the core of the body).
Before Taking the Next Step
Honestly answer each of the following questions. If you answer yes to all of the questions relevant to your level and exercise selection, you are ready to move on to step 9.
1. Have you selected a basic leg exercise? If you are an advanced lifter, do you want to add the *back squat, *knee extension, *knee curl, or *standing heel raise?
2. Have you recorded your exercise selection(s) on the workout chart?
3. Have you determined warm-up and training loads for the exercise(s) you selected?
4. Have you recorded the training load(s) on the workout chart?
5. Have you learned the proper technique for performing the exercise(s) you selected?
6. If an exercise you selected requires a spotter, have you identified a qualified professional? Have you learned the proper spotting techniques?