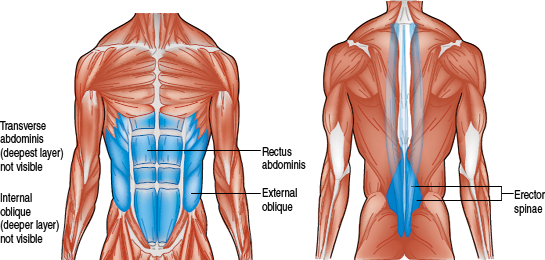
Previous editions of this text used the term “core exercises” to identify multijoint, large muscle exercises such as the bench press, shoulder press, and back squat. To reflect the recent attention given to improving the strength, endurance, and flexibility of the low back, torso, and abdominal muscles—the central section or core of the body—this edition now labels exercises that train those muscles as core exercises.
The core muscles are divided into three general areas—the front of the torso, the sides of the torso, and the low back—and include the rectus abdominis, transverse abdominis, external and internal obliques, and the erector spinae. The rectus abdominis and the transverse abdominis are the major supporting muscles of the front of the torso. They support and protect the internal abdominal organs and work with the low back muscles to align and support the spine. The external and internal obliques are on the sides of your torso side and wrap toward your waist. The internal obliques are under the external obliques, and their fibers run in the opposite direction. The erector spinae muscles are actually a collection of muscles of varying length and thickness that run along your spine from right below the base of your neck to the base of your low back. Some sources also include in the core muscles of the upper torso, such as the latissimus dorsi and trapezius, and muscles that surround the hips, including the buttocks (gluteals) and hip flexors. Because these muscles are trained in other steps, exercises for them are not included in this step.

The core muscles are responsible for causing movement in three different general directions. If you are standing or sitting, your rectus abdominis and transverse abdominis flex your torso forward (such as when you bow to someone); your external and internal obliques rotate your torso from side-to-side, help you reach across your body toward the other side, and allow you to bend to the side; and your erector spinae arches your torso backward.
If you are lying down, your rectus abdominis and transverse abdominis lift your upper or lower body off the floor when you are lying face-up, your external and internal obliques twist your upper or lower body from side-to-side and lift your hips up when you are lying on your side, and your erector spinae lift your upper or lower body off the floor when you are lying face-down.
As mentioned in step 1, there is a variety of equipment that may be used when performing core exercises. Arguably the most common is the stability ball; an air-filled ball made of elastic soft vinyl and nylon with a diameter of about 55 to 75 centimeters (21.5-29.5 in.). It is called by many different names including balance ball, body ball, fitness ball, physioball, or Swiss ball. Several exercises in this step use a stability ball. If you choose one of those exercises, be sure that the ball is fully inflated (it should feel very firm when you push down on it). To choose the right ball size, sit on it (after it is fully inflated) with your feet flat on the floor. In this position, your thighs should be parallel to the ground.
The exercises in this step are the extended abdominal crunch, side plank, twisting trunk curl, back extension, and the *abdominal crunch. The extended abdominal crunch and the back extension involve a stability ball; be sure to choose one that is the proper size for you. The side plank and twisting trunk curl are no-weight exercises. All you need for these exercises is your own body. If you have access to a cam machine, you may select the *abdominal crunch to develop your rectus abdominis and transverse abdominis muscles. These machines come in various designs, so be sure to follow the signs or ask for assistance if the directions in this step do not match the machine in your facility.
CAUTION: A higher number of repetitions (up to 25-30) is encouraged to promote tone and muscular endurance. However, you should not sacrifice quality for quantity.
Prepare for this exercise by lying face-up on a stability ball with the low-to-middle part of your back on the very top of the stability ball (figure 9.1a). In this position, your feet should be flat on the floor about hip-width apart with your thighs, hips, and lower abdomen approximately parallel to the floor. Fold your arms across your chest or place your hands behind your head (but don’t pull on your neck).
Begin the upward movement phase by curling your torso to lift your shoulder blades off the ball (figure 9.1b). Be sure to exhale. This movement should be slow and controlled; do not use momentum created by lurching forward with the head, arms, or shoulders. Pause briefly at the most crunched position. Keep your feet on the floor and your thighs and hips motionless.
The downward movement phase follows the pause at the top. Inhale as you lower yourself back to the starting position (figure 9.1a). Your low back should remain in contact with the ball throughout the exercise with your feet flat on the floor.

Figure 9.1 EXTENDED ABDOMINAL CRUNCH
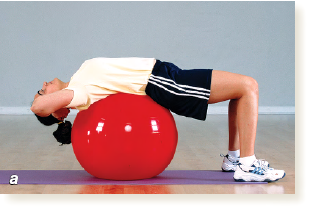
Preparation
1. Lie face-up on ball with low-to-middle back on very top of ball
2. Place feet flat on floor
3. Position thighs, hips, and lower abdomen approximately parallel to floor
4. Fold arms across chest or place hands behind head, but don’t pull on neck
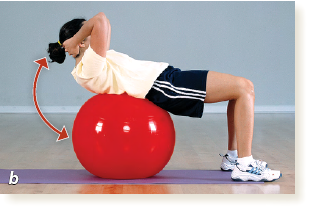
Movement
1. Curl chin to chest first
2. Continue curling torso to lift shoulder blades off ball
3. Do not jerk head, arms, or shoulders to help curl torso
4. Exhale during upward phase
5. Pause at highest position
6. Slowly return to starting position while inhaling
7. Pause at lowest position
8. Continue upward and downward movements until set is complete

MISSTEP
The stability ball rolls side-to-side or you slide off the side of the ball as you perform the exercise.
CORRECTION
Move your feet farther apart to create a wider base of support.
Most errors associated with the extended abdominal crunch exercise involve maintaining a stable body position on the ball. If you are not able to perform the exercise safely and correctly, your core muscles may not be strong enough. If so, then perform the exercise lying on a floor mat instead. This modified exercise is called the bent-knee sit-up; your feet should be flat on the floor with your knees flexed at 90 to 110 degrees. The rest of the exercise technique is the same as the extended abdominal crunch.
There is a variety of plank exercises but to give specific attention to the external and internal obliques, perform the side plank exercise.
Prepare for this exercise by lying on your right side with only your right forearm and the right side of your hips and legs in contact with the floor. Place your left hand on your left hip or behind your head. Position your left leg across the top of your right leg so the inside edge of your left shoe contacts the floor ahead of your right foot (figure 9.2a).
Using the outside edge of your right shoe and the inside edge of your left shoe as fixed pivot points, perform the upward movement phase by contracting your core muscles to lift your hips straight up until your whole body is in an angled straight line (figure 9.2b). Exhale as you lift upwards with your body weight supported over your right forearm. Do not allow your head, shoulders, hips, or knees to tip forward or backward. If you want to increase the difficulty of the exercise, place your left leg and foot on top of your right leg and foot to create only one fixed pivot point (the outside edge of your right shoe).
The downward movement phase follows a pause at the top. Allow your core muscles to relax to lower the hips and torso back down to the starting position (figure 9.2a). Inhale before beginning the next repetition. For the next set, lie on your left side with only your left forearm and the left side of your hips and legs in contact with the floor. Continue to alternate sides with each set.

Figure 9.2 SIDE PLANK
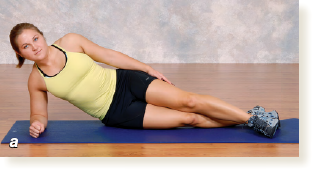
Preparation
1. Lie on right side with right forearm and right side of hips and legs in contact with floor
2. Position left leg across the top of right leg with inside edge of left shoe in contact with the floor ahead of right foot
3. Place left hand on left hip or behind head
Movement
1. Contract core muscles to lift hips straight up
2. Keep outside edge of right shoe and inside edge of left shoe in fixed position on floor
3. Continue until whole body is in an angled straight line
4. Exhale during upward phase
5. Pause at highest position
6. Relax core muscles to lower hips and torso back to starting position
7. Inhale during downward phase
8. Pause at lowest position
9. Continue upward and downward movements until set is complete
10. Switch to the left side for the next set

MISSTEP
Your hips sag toward the floor when you are in the highest body position.
CORRECTION
Contract your core muscles to keep your body stiff and straight from your head down to your feet.
If you find that this exercise is too easy over time, increase the difficulty by staying in the highest body position for 10 seconds or more.
This exercise has a similar movement pattern to the traditional sit-up exercise except you alternately curl your shoulders toward the opposite leg (the twisting motion) during the upward phase.
Prepare for this exercise by lying on your back with your feet flat on the floor (figure 9.3a). Your knees should be flexed at 90 to 110 degrees with your arms folded across your chest or behind your head (but don’t pull on your neck).
Begin the upward movement phase by curling your chin to your chest and then contracting your abdominal muscles to lift your shoulders off the floor. While exhaling, immediately twist your torso so that your right shoulder (or elbow) goes toward your left knee (figure 9.3b). Pause at the top of the movement. Keep your low back on the floor and your legs and feet motionless.
Slowly untwist and uncurl your torso back down to the starting position (figure 9.3a). Keep your chin to your chest until your shoulders touch the floor. Inhale as you lower to the floor. On the next repetition, twist your torso so that your left shoulder (or elbow) goes toward your right knee. Continue alternating the direction that you twist with each repetition.

Figure 9.3 TWISTING TRUNK CURL
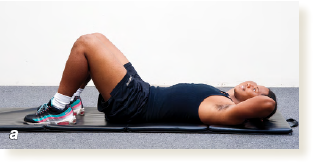
Preparation
1. Lie face-up on floor
2. Place feet flat on floor
3. Place knees at 90 to 110 degrees
4. Fold arms across chest or behind the head but not pulling on the neck
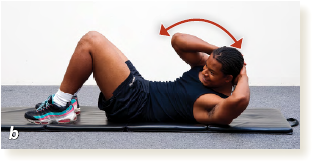
Movement
1. Curl chin to chest first
2. Immediately twist torso to move right shoulder or elbow toward left knee
3. Continue twist while curling torso to lift shoulder blades off floor
4. Exhale during upward phase
5. Pause at highest position
6. Slowly untwist and uncurl torso back down to starting position
7. Inhale during downward phase
8. Pause at lowest position
9. Continue alternating the twist direction with each repetition until set is complete

MISSTEP
Your buttocks lift off the floor just prior to the upward movement.
CORRECTION
Start each repetition with your head, shoulders, upper back, and low back in contact with the floor. As you twist and curl your torso, keep the rest of your body stationary.
Most errors associated with the twisting trunk curl involve speed. You will have a tendency to lurch forward and then quickly fall back to the starting position. Instead, keep the movements slow and controlled in both the upward and downward phases.
Prepare for this exercise by lying face-down on a stability ball with your navel on the very top of the stability ball (figure 9.4a). In this position, your feet should be at least 18 inches (46 cm) apart with your knees straight and balls of your feet flat on the floor. Clasp your hands behind your head.
Before you begin the upward movement phase, be sure the balls of your feet are firmly planted on the floor; that is a position that you need to maintain throughout the exercise. While exhaling, slowly lift your torso off the stability ball until your back is fully extended, and your chest is off the ball (figure 9.4b). At the highest body position, your head, shoulders, hips, knees, and feet should at least form a straight line. Better yet, you should lift your torso until your back is arched.
The downward movement phase follows a pause at the top. Inhale as you lower back to the starting position (figure 9.4a). Your lower stomach should remain in contact with the ball throughout the exercise with the balls of your feet in solid contact with the floor.

Figure 9.4 BACK EXTENSION
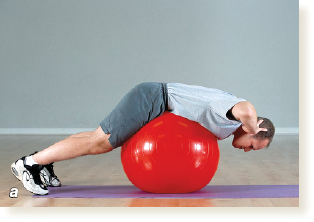
Preparation
1. Lie face-down on ball with navel on very top of ball
2. Place feet 18 inches (46 cm) apart
3. Position knees straight with balls of feet on floor
4. Clasp hands behind head
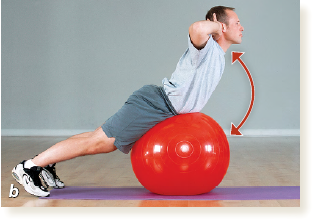
Movement
1. Lift torso off ball
2. Continue lifting torso until back is extended with chest off ball
3. Do not lift feet off floor
4. Exhale during upward phase
5. Pause at highest position
6. Return to starting position while inhaling
7. Pause at lowest position
8. Continue upward and downward movements until set is complete
MISSTEP
As you raise your torso, your knees bend or one or both of your feet lift up off the floor.
CORRECTION
Move your feet farther apart, slightly roll down off the top of the ball, or do a combination of both.
The primary challenge of the back extension exercise is the same as the one for the extended abdominal crunch exercise (as well as any exercise performed on a stability ball): keeping a stable body position. As explained for the extended abdominal crunch, if you are not able to keep your body in the right place on the ball, then you are at risk of falling off the ball and getting hurt. An alternative exercise is to perform the back extension while lying face-down on a floor mat and arching your back to lift up your head, torso, arms, legs, or any combination of these to train the erector spinae muscles.
 ABDOMINAL CRUNCH
If you are an experienced lifter who is ready for a second core exercise, consider adding the *abdominal crunch. This is a core exercise for your abdominal muscles that is performed in a cam machine. Most fitness facilities have an abdominal crunch station, but the machine may not look or function like figure 9.5. Be sure to follow the signs or ask for assistance if the directions in this step do not match the machine in your facility.
Prepare for this exercise by sitting erect on the seat of the cam machine with your shoulders and upper arms firmly against the chest or shoulder pads. Adjust the height of the seat so that the machine’s axis of rotation is level with the middle of your torso. Place your ankles behind the roller pad and your hands crossed in front of you or holding on the handles (figure 9.5a).
While exhaling, lean forward and then down solely by contracting your abdominal muscles (figure 9.5b). Be sure you do not use your legs or arms to pull on the chest or shoulder pads. Pause in the fully contracted position and then inhale while you slowly return to the starting position (figure 9.5a).

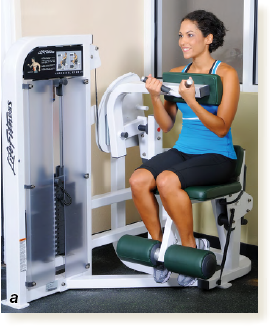
Preparation
1. Sit erect with shoulders and upper arms firmly against pads
2. Adjust seat so axis of rotation is mid-torso level
3. Place ankles behind roller pads
4. Cross arms or hold handles
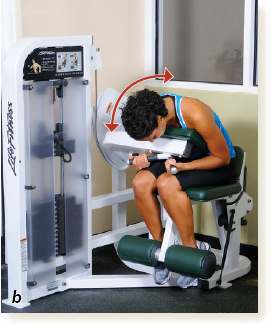
Movement
1. Lean forward and down by contracting abdominal muscles
2. Keep legs and arms relaxed
3. Exhale during downward movement
4. Pause in fully crunched position
5. Return to starting position while inhaling
6. Continue downward and upward movements until set is complete

MISSTEP
You pull on the chest or shoulder pads with your hands.
CORRECTION
Concentrate on contracting only your abdominal muscles without using any other muscles to help you flex your torso forward and down.
CAUTION: Be sure to not use so much weight that you involve muscles other than your abdominals to perform the exercise. The heavier load may place a higher stress on your low back.
Core Drill 1. Choose Two Exercises
After reading about the characteristics and techniques of the exercises and the type of equipment required for each, you are ready to put to use what you have learned. Consider what equipment is available to you and then select two of the following exercises to use in your program:
Extended abdominal crunch
Side plank
Twisting trunk curl
Back extension
Write in “Core” in the “Muscle group” column on the workout chart and fill in the name of the exercises you selected in the “Exercise” column (see figure 11.1 on page 146). If you intend to include the *abdominal crunch, record it on the workout chart immediately after the core exercises previously selected.
Success Check
Consider availability of equipment.
Consider time available.
Choose two core exercises and record them on the workout chart.
Core Drill 2.
Warm-Up and Trial Loads for the *Abdominal Crunch
This practice procedure will answer the question “How much weight or load should I use?” If you chose the extended abdominal crunch, side plank, twisting trunk curl, or back extension, you will not need to determine the warm-up, trial, and training loads. Continue to drill 3 and ignore comments concerning warm-up and training loads. If you chose the *abdominal crunch, continue with the following procedures.
For the *abdominal crunch exercise, use the formula shown in figure 9.6 to determine the trial load. (See step 3, pages 34-35, for more information on using this formula.) Round off your results down to the closest 5-pound (2.3 kg) increment or to the closest weight-stack plate. Use half of the amount determined for the trial load for your warm-up load in the exercise. These loads will be used in drills 3 and 4.
Success Check
Determine your trial load for the *abdominal crunch by multiplying your body weight by the coefficient.
Determine your warm-up load by dividing your trial load by two.
Round down your trial and warm-up loads to the nearest 5-pound (2.3 kg) increment or to the closest weight-stack plate.
Core Drill 3. Practice Proper Technique
In this procedure, you are to perform 12 to 15 repetitions of the exercises you have chosen. If you chose the *abdominal crunch, use the warm-up load determined in drill 2.
Review the photos and instructions for proper body positioning. Visualize the movement pattern through the full range of motion. Perform the movement with a slow, controlled velocity, remembering to exhale through the sticking point. Ask a qualified professional to observe and assess your technique.
Success Check
Check movement pattern.
Check velocity of movements.
Check breathing.
Core Drill 4.
Determine Training Load for the *Abdominal Crunch
If you chose the extended abdominal crunch, side plank, twisting trunk curl, or back extension, you do not need to determine warm-up, trial, or training loads. Skip drills 4 and 5 and proceed to the success summary.
This practice procedure will help you determine an appropriate training load designed to produce 12 to 15 repetitions for the *abdominal crunch. Use the calculated trial load from drill 2 and perform as many repetitions as possible with this load, up to a maximum of 25. Make sure that you perform the repetitions correctly.
If you performed 12 to 15 repetitions with the trial load, then your trial load is your training load. Record this number as your training load for this exercise on the workout chart (see page 146). If you did not perform 12 to 15 repetitions, go to drill 5 to make adjustments to the load.
Success Check
Check for correct load.
Maintain proper and safe technique during each repetition.
Core Drill 5.
Make Needed Load Adjustments for the *Abdominal Crunch
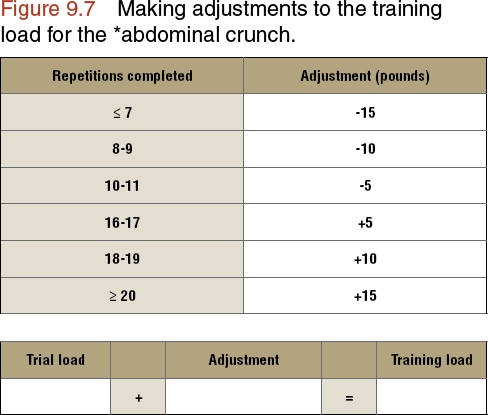
If you performed fewer than 12 repetitions with your trial load, the load is too heavy, and you need to lighten it. On the other hand, if you performed more than 15 repetitions, the load is too light, and you need to increase it. Use figure 9.7 to determine the adjustment you need to make and the formula for making load adjustments.
Success Check
Check correct use of load-adjustment chart (figure 9.7).
Observe the “CAUTION” on page 127.
Record your training load on the workout chart (see page 146).
In this step, you learned how to perform five exercises that can be used to strengthen the core muscles. Regardless of which exercises you selected, be sure to perform them in a slow, controlled manner and complete 12 to 25 repetitions of each during a workout, depending on the core exercise selected.
After you have determined your exercises and training loads (if applicable) and recorded that information in your workout chart, you are ready to move on to step 10. In this step, you will select total-body exercises for your program. You may select from two exercises: the hang clean and the push press. Both of these involve the use of a barbell, and each requires a higher level of muscular coordination than any of the exercises included in steps 4 through 9. If you are new to weight training, you will want to wait a couple of months before adding these exercises to your workouts. If you are experienced, adding one or both of them to your workout will provide you with a more well-rounded and challenging program.
Before Taking the Next Step
Honestly answer each of the following questions. If you answer yes to all of the questions relevant to your level and exercise selection, you are ready to move on to step 10.
1. Have you selected two core exercises?
2. Have you recorded your exercise selections on the workout chart?
3. If you chose the *abdominal crunch, have you determined warm-up and training loads?
4. Did you record your training load on the workout chart?
5. Have you learned the proper technique for performing the exercises you selected?