Chapter 13
Heading Off Honey-Bee Pests
IN THIS CHAPTER
 Getting to know some common pests
Recognizing and preventing potential problems
Treating your colony when the going gets tough
Using some natural alternatives to modern medicine
Keeping out some furry non-friends
As a beekeeper, you should always be taking steps to ensure your bees’ nutritional health, but even healthy bee colonies can run into trouble every now and then. Critters (two-, four-, and multi-legged) can create problems for your hives. Anticipating such trouble can head off disaster. And if any of these pests get the better of your colony, you’ll need to know what steps to take to prevent things from getting worse.
In this chapter, I introduce you to a few of the most common pests of the honey bee and what you must do to prevent catastrophe.
Parasitic Problems
This list starts with two little mites that have gotten a lot of publicity in recent years about big problems they’ve created for honey bees: the varroa mite and the tracheal mite. These two parasites in particular have become unwelcome facts of life for beekeepers, changing the way we care for our bees. You need to be aware of these pests and find out how to control them. Doing nothing to protect your bees from mites is like playing a game of Russian roulette. Of the two, the varroa mite is the biggest threat to your bees’ well being.
 Even those beekeepers practicing a natural approach to honey-bee management need to be attentive to the welfare of their colonies. Sometimes, the judicial use of certain additives is the only surefire way to eliminate problems that are harming the health of your bees.
 Following package directions precisely is very important with any of the products listed in this chapter. The use of protective gloves is also recommended.
Varroa mites
You will need to watch out for this one, and take decisive action if needed. Somehow this little pest (Varroa destructor), shown in Figure 13-1, has made its way from Asia to all parts of the world. Varroa has been a problem since the late 1980s (maybe longer) and has created quite a problem for beekeepers. Resembling a small tick, this mite is about the size of a pinhead and is visible to the naked eye. Like a tick, the adult female mite attaches herself to a bee and feeds on its blood (hemolymph fluid) and “fat body.”

Courtesy of USDA-ARS, Scott Bauer
FIGURE 13-1: Varroa mites can seriously weaken a hive by attaching to bees and feeding on their hemolymph (blood).
Hemolymph fluid is the “blood” of arthropods. It is the fluid that circulates in the body cavity of an insect. Fat body is like a liver to bees, located just beneath the bee exoskeleton. Varroa mites access it by burrowing between the bee’s abdominal body segments.
Mites attached to foraging worker bees enable the infestation to spread from one colony to another. The varroa mite is strongly attracted to the scent of drone larvae, but it also invades worker brood cells just before they’re capped over by the bees. Within the cells, varroa mites feed on the developing pupae. They reproduce at a fantastic rate and cause a great deal of stress to the colony. The health of the colony can weaken to a point that bees become highly susceptible to viruses. Within a couple of seasons, the entire colony can be wiped out.
Recognizing varroa mite symptoms
The chances are quite certain that your colony will have varroa living among them. But how do you know if your colony has a minor or serious infestation of varroa mites? Following is a list of some varroa mite symptoms. If you suspect a varroa infestation, confirm your diagnosis using one of the surefire detection techniques I describe in the next section. These are techniques that should become routine for you — a routine that you practice before you see one of the following symptoms:
- Do you see brown or reddish spots on the white larvae? You may be seeing mites.
- Are any of the newly emerged adult bees badly deformed? You may notice some bees with stunted abdomens and deformed wings.
Do you actually see varroa on adult bees? They’re usually found behind the head or nestled between the bee’s abdominal segments.
Finding mites on adult bees indicates a heavy infestation. The mites head for bee larvae first (before the larvae are capped and develop into pupae). They then feed on capped pupae. It doesn’t take much to figure out that by the time the mites are prevalent on adult bees, the mite population is quite high.- Did your colony suddenly die in late autumn? Oops! You’re way too late to solve the problem this year. You’ll have to start fresh with a new colony next spring.
Using detection techniques for varroa
These days it’s important to perform routine varroa inspections before you see evidence of any of the symptoms. Alas, these days, varroa detection needs to be a routine part of your inspection schedule. I suggest using one or more of these methods monthly, starting in early summer and continuing until the onset of cold weather in the autumn.
POWDERED-SUGAR-SHAKE METHOD
 I like the powdered-sugar-shake technique for detecting varroa as it is effective, natural, and nondestructive (no bees are killed in the process). You can use this process in the early spring or later fall (when no honey supers are on the hives) as well as in summer (when supers are in place). Follow these steps:
Obtain a 1-pint, wide-mouthed glass jar (the kind mayonnaise comes in) and modify the lid so it has a coarse screen insert. Just cut out the center of the lid and tape or glue a wire screen over the opening (see Figure 13-2).
Size #8 hardware cloth (eight wires to the inch) works well. Now you have something resembling a jumbo saltshaker.
 If you don’t feel like trying to make one of these modified jars, many beekeeping supply houses sell a ready-to-use product designed just for this purpose.
- Scoop up about half a cup of live bees (about 200 to 300) from the brood nest and place them in the jar. Be careful that you don’t scoop up the queen!
- Put 3 to 4 tablespoons of powdered sugar (confectioners’ sugar) into the jar and then screw on the perforated lid. (Alternatively you can use granulated sugar.)
Cover the screened lid with one hand (to keep the sugar from spilling out) and shake the jar vigorously for 30 to 60 seconds (like a bartender making a martini shaken, not stirred).
Shake your sugar-bee cocktail authoritatively. Doing so dislodges any mites that are on the bees.This action doesn’t really harm the bees, but it sure wakes them up!
- Place the jar in a sunny spot for about a minute to allow mites to drop off the bees; then give the jar another shake like before.
- Pour/shake all the sugar through the screened top and onto a white sheet of paper or any white surface.
- Open the top and deposit the bees onto the entry area of the colony (they are likely too covered with sugar to fly home). You may want to stand to the side because they will be rather unhappy (to put it mildly). Shake any remaining sugar onto the paper.
Count the mites, which can easily be spotted as they contrast with the white surface and white powdered sugar.
If you count ten or more mites, you should proceed with the recommended treatment (see the section “Knowing how to control varroa mite problems” later in this chapter). Seeing many dozens of mites means the infestation has become significant. Take remedial action fast! Less than six mites is good but continue sampling.

Courtesy of Howland Blackiston
FIGURE 13-2: This jar’s lid has been modified for a powdered-sugar-shake mite inspection.
Bees can be returned unharmed to the hive using this technique. Although they may be coated with sugar, their sisters nevertheless have a grand time licking them clean. Just wait 10 to 15 minutes to let them calm down before releasing them. All that jostling can make them understandably irritable — and revengeful.
DRONE-BROOD-INSPECTION METHOD
Regrettably, the drone-brood-inspection method kills some of the drone brood. Simply follow these steps:
Find a frame with a large patch of capped drone brood.
They are the larger capped brood with distinctly dome-shaped cappings. Shake all the bees off the frame and move to an area away from the hive where you can work undisturbed.
- Using an uncapping fork (see Chapter 16 for an image of an uncapping fork), slide the prongs along the cappings, spearing the top third of the cappings and impaling the drone pupae as you shovel across the frame.
Pull the drone pupae straight out of their cells.
Any mites are clearly visible against the white pupae. Repeat the process to take a larger sampling. See Figure 13-3.

Courtesy of USDA-ARS, Scott Bauer
FIGURE 13-3: Varroa mites first attach themselves to drone pupae, so that’s a good place to look for evidence of an infestation. Can you see the mites on these pupae?
Two or more mites on a single pupa indicate a serious, heavy infestation. Two or three mites per 50 pupae indicate a low to moderate infestation. But remember, whenever you see any mites at all, it’s time to take action! (See “Knowing how to control varroa mite problems” coming up.)
SCREENED-BOTTOM-BOARD METHOD
The screened-bottom-board method is not as reliable an evaluation method as the previous two, but it’s worth considering, particularly if you combine this method with one or both of the other two techniques. About 10 to 15 percent of varroa mites routinely fall off the bees and drop to the bottom board. But if you use a screened bottom board (sometimes called a “sticky” board), the mites fall through the screen and onto a removable tacky white board.
When this white board is in place, mites fall through the screen and become stuck to the sheet (you apply a thin film of petroleum jelly or cooking spray to the sheet to help the mites stick).
Just insert the sheet for 24 hours and then remove it to count the mites. If the number of mites is more than 24 in a 24-hour period, then appropriate control measures should be taken. The board can be wiped clean and readied for its next use.
A screened bottom board is also an excellent way to improve ventilation in the hive.
Knowing how to control varroa mite problems
Several techniques and products are available that help reduce or even eliminate varroa mite populations. Some involve chemicals, and some favor an all-natural approach. Here are the ones that I suggest you consider and a few that I think you should avoid as a new beekeeper.
GO AU NATUREL
You don’t always have to use chemicals to deal with varroa mites. Integrated pest management (IPM) is the practice of controlling honey-bee pests with the minimal use of chemicals. (See Chapter 11 for more on IPM.) As it relates to controlling varroa mites, here are a couple of nonchemical techniques to consider. Both are fairly labor intensive — but hey, no harsh chemicals are used!
- Use drone comb to capture varroa mites. Bee suppliers sell a special drone foundation that has larger hexagons imprinted in the sheet. The bees will build drone comb only on these sheets. That’s useful because varroa mites prefer drone brood over worker brood. By placing a frame of drone comb in each of your hives, you can capture and remove many mites. After the drone cells are capped, remove the frame and place it overnight in your freezer. This kills the drone brood and the mites that have invaded the cells. Use a serrated knife to uncap the cells and then snap the frame downward sharply to dislodge the majority of the dead mites and drone pupae. Place the frame back in the hive. The bees will clean it out, removing any remaining drone brood and mites. The cells will get filled again, and you repeat the process.
Powdered-sugar dusting to control varroa mites. This involves dusting all of the bees with powdered sugar. (Note it’s best to find a powdered sugar without added cornstarch, although some claim this is not so critical. Play it safe and ask your bee suppliers for a “pure” powdered sugar.) The idea behind this technique is that the powdered sugar knocks many of the mites off the bees, and the mites fall down through the screened bottom board and perish in the grass below the hive (this assumes you are using an elevated hive stand and a screened bottom board with the insert removed). Use this method continually during the season to help keep the mite populations below harmful levels.
Here’s the process:
Sift a pound of powdered sugar using a baking flour sifter.
Do this twice to ensure no lumps. This should be done on a day with low humidity.
- Put the sifted sugar into an empty (and cleaned) baby-powder container. (Alternatively, you can improvise your own container.)
Smoke and open the hive. Then place a frame on the rest and do your dusting thing.
Remove frames one by one, and dust the bees with the sugar. A frame rest comes in handy here (see Chapter 5 for an image of a frame rest).
The key operating word is dusting the bees not coating them with loads of powdered sugar. You want to master a technique that makes light clouds of sugar dust — don’t shake the sugar directly on the bees.
Avoid dusting any open cells.
You just want to dust the backs of the adult bees.
- Put the dusted frame back into the hive and repeat this process with each frame with bees on it.
- When done, put a little extra dusting along all the top bars and to sift down between frames.
This powdered-sugar dusting should be repeated once a week for two to three weeks.
SYNTHETIC CHEMICAL OPTIONS
There are a few effective and approved synthetic miticide chemicals (chemicals that kill mites). One is fluvalinate, which is sold under the brand name Apistan and is available from your beekeeping supplier. Another is amitraz, sold under the brand name Apivar, and yet another is coumaphos (marketed as CheckMite+). Formic acid is also used as a treatment for tracheal mites (sold in plastic strips under the brand name Mite Away Quick Strips or Formic Pro). In addition there are “soft” (safer) chemicals such as thymol (marketed as Apiguard). Also consider oxalic acid (which sounds scary but it’s actually derived from plants). It’s a bit tricky to use and should only be used when there is little or no brood in the hive. When any of the detection techniques mentioned earlier in this chapter indicate a worrisome population of varroa mites, consider using one of these treatments by carefully following the directions on the package.
Apistan (fluvalinate): Apistan is packaged as chemical-impregnated strips that look kind of like bookmarks. Hang two of the plastic strips in the brood chamber between the second and third frames and the seventh and eighth frames. You’re positioning the strips close to the brood so the bees naturally come into contact with the pesticide they contain. The bees will brush up against each other and transfer the fluvalinate throughout the hive.
The U.S. mite population has developed resistance to this product, and treatment is not considered reliable.- Apivar (amitraz): Apivar is packaged as chemical-impregnated strips that are hung in the hive. The principle behind its use is similar to that of Apistan. The chemical (pesticide) used is the main difference between the two products. The mites have not yet developed resistance to this chemical treatment, but you should keep abreast of developments as resistance may occur in coming years.
- CheckMite+: CheckMite+ is a product manufactured by the Bayer Corporation (of aspirin fame). Like Apistan, it also consists of strips impregnated with a chemical pesticide. But in the case of CheckMite+, the chemical is coumaphos — an ingredient used in deadly nerve gas. It’s tricky to use. And mite resistance to this chemical is widespread. However, this is the best chemical currently on the market for small hive beetle control.
- Mite Away Quick Strips and Formic Pro Strips (formic acid): These two products contain formic acid, which is considered a natural-source chemical. Formic acid is highly effective in penetrating the brood cappings to kill mites within cells. The Mite Away Quick Strips (MAQS) and Formic Pro formulations consist of strips that are laid across the top bars of the brood area. As with any of these treatments, follow the manufacturer’s instructions precisely.
- Apiguard (thymol): Apiguard is a natural product specifically designed for use in beehives. It is a slow-release gel matrix, ensuring correct dosage of the active ingredient thymol. Thymol is a naturally occurring substance derived from the plant thyme, and for this reason it can be considered a more natural product for use with your colonies. It is effective against the varroa mite and is also active against both the tracheal mite and chalkbrood. It is easy to use and much safer than formic acid or coumaphos. Note that it is temperature sensitive and not effective at hot summer temperatures.
Because varroa mites can develop a resistance to individual medications, it is prudent to alternate between two or more of them from one season to the next.
Check the product label to see if the treatment you are using is safe to use when there is honey on the hive for human consumption (some are okay to use, some are not). To play it safe, don’t treat your bees with medication when you have honey supers on the hive. If you do, your honey might become contaminated and cannot be used for human consumption. Note: Honey exposed to any of these medications can be safely fed to your bees, however.
Tracheal mites
Another mite that can create serious trouble for your bees is the tracheal mite (Acarapis woodi), shown in Figure 13-4. These little pests are much smaller than the period at the end of this sentence and can’t be seen with the naked eye. Dissecting an adult bee and examining its trachea under magnification is the only way to identify a tracheal mite infestation.

Courtesy of USDA-ARS, William E. Styer
FIGURE 13-4: An adult tracheal mite (Acarapis woodi).
As its name implies, this mite lives most of its life within the bee’s trachea (breathing tubes), as shown in Figure 13-5. Mated female mites pass from one bee to another when the bees come in close contact with each other. Once the mite finds a newly emerged bee, she attaches to the young host and enters its tracheal tubes through one of the bee’s spiracles — external opening holes that are part of the respiratory system. Within the trachea the mite lays eggs and raises a new generation. The tracheal mite causes what once was referred to as acarine disease of the honey-bee (a rather old-fashioned term not used much these days).
Early detection of bad infestations is difficult. As a result, tracheal mites can lead to the total loss of a colony before you’re even aware that your bees are infested. Infestations are at their worst during winter months when bees are less active. Her majesty isn’t laying eggs, so no new bees are emerging to make up for attrition. Winter also is when beekeepers don’t routinely inspect the colony. Thus, seemingly healthy colonies with plenty of food sometimes suddenly die during late winter or early spring.

Courtesy of USDA-ARS, Lila de Guzman
FIGURE 13-5: Tracheal mites (seen in this magnified photo of an infected bee’s tracheal tubes) pose a serious threat to the health of bee colonies.
Symptoms that may indicate tracheal mites
The only surefire way to detect tracheal mites involves dissecting a bee under a microscope — a little tricky for the novice, and not everyone has a dissection microscope in the hall closet. Whenever you suspect tracheal mites, call your state apiary inspector (if one is available) or check with local bee clubs about who is doing this diagnosis.
A few clues may indicate the presence of tracheal mites. But the symptoms, listed as follows, are unreliable because they also may indicate other problems:
- You see many weak bees stumbling around on the ground in front of the hive. (This condition could also be an indication of Nosema disease; see Chapter 12.)
- You spot some bees climbing up a stalk of grass to fly, but instead they just fall to the ground. This happens because mites clog the trachea and deprive the bee of oxygen to its wing muscles.
- You notice bees with K-wings (wings extended at odd K-shaped angles and partly opened — not folded in the normal closed position). This also can be an indication of Nosema disease.
- Bees abandon the hive (abscond) in early spring despite ample honey supplies. This can happen even late in the fall when it’s too late to remedy the situation.
How to control tracheal mite problems
Tracheal mite infestations are a problem, not a hopeless fate. You can take steps by using several techniques that I list in the following sections to prevent things from getting out of control. It isn’t a case of just one technique working well. Play it safe by using a combination of some or all of these methods.
Natural source options
Several remedies for tracheal mites involve a more natural approach than using synthetic chemicals.
SUGAR-AND-GREASE PATTIES
Less popular in recent years than it was in years past, placing patties of sugar and grease in the hive is a natural treatment for tracheal mites that some beekeepers use year-round (even during the honey harvest season — unless you are adding the wintergreen oil option). As the bees feed on the sugar, they become coated with grease. The grease impairs the mite’s ability to reproduce or latch onto the bees’ hairs. Whatever the scientific reason, the treatment seems to work pretty well and is a natural defense against tracheal mites.
Place one patty on the top bars of the brood chamber, flattening out the patty as needed to provide clearance for the inner cover and replacing it as the bees consume it. One patty should last a month or more.
Here’s a recipe I’ve used for sugar-and-grease patties:
- 1½ pounds of solid vegetable shortening (such as Crisco)
4 pounds of granulated sugar
½ pound honey
- Optional: Add a cup of mineral salt (the orange/brown salt available at farm supply stores — it’s used to feed livestock). Pulverize the salt in a blender, breaking it into a fine consistency. The bees seem to like it, and this in turn encourages better interaction with the sugar and grease patties.
- Mix all these ingredients together until smooth. Form into about a dozen hamburger-size patties. Unused patties can be stored in a resealable plastic food bag and kept frozen until ready to use.
Note: As an option, you may add 45 milliliters (1.5 ounces) of natural food-grade wintergreen oil to the mixture, provided that you’re not using this treatment while honey for human consumption is on the hive. Some beekeepers have indicated enhanced results when adding essential oils.
Treating with sugar-and-grease patties can sometimes be an attractive lure for the small hive beetle, so be on the lookout for these unwelcome critters. There is more about the hive beetle later in this chapter.
MENTHOL CRYSTALS
Menthol crystals are the same ingredient found in candies and cough drops. Menthol is derived from a plant, making it a natural alternative to chemical pesticides. Prepackaged bags containing 1.8 ounces of menthol crystals are available from your beekeeping supplier.
Not all menthol products are approved for use with honey bees. Be sure to purchase menthol packets (such a Mite-a-Thol) from reputable beekeeping supply vendors.
Place a single packet on the top bars of the brood chamber toward the rear of the hive (see Figure 13-6). Setting the packet on a small piece of aluminum foil prevents the bees from chewing holes in the bag and carrying away the menthol. Bees are tidy and try their best to remove anything they don’t think belongs in the hive. Leave the menthol in the hive for 28 consecutive days when the outdoor temperature is between 60 and 80 degrees Fahrenheit (16 and 27 degrees Celsius). The menthol vapors are effective only at these temperatures. That means the product is temperature dependent — you can only use it when the weather is warm. Treat for tracheal mites in both the late spring and early autumn.

Courtesy of Mann Lake Ltd.
FIGURE 13-6: In warm weather a packet of menthol, such as Mite-a-Thol, placed on the top bars of the brood chamber helps control tracheal mites.
Honey for human consumption must be taken off the hive whenever any medications are used (natural or otherwise). You can safely add honey supers three to four weeks after menthol is removed from the hive.
Synthetic chemical options
When using any of these products, be certain to follow the instructions very carefully.
- Apiguard (Thymol): Apiguard is mentioned earlier in this chapter. In addition to being effective against the varroa mite, it is also active against both tracheal mites and chalkbrood. It is easy to use, but as always, follow directions precisely.
- Api-Life VAR (Thymol): Api-Life VAR is 95 percent effective while leaving the least residue of any product available to beekeepers. It contains thymol plus three essential oils. Each colony is treated by breaking a wafer into four pieces and placing the pieces around the brood nest. This product is not approved for use in all areas, so be sure to check its availability with your beekeeping supplier.
- Apivar: Apivar, mentioned earlier for varroa mite control, is also effective in controlling tracheal mites.
- Mite Away Quick Strips and FormicPro (formic acid): Mentioned earlier in this chapter as a treatment option for varroa mites, these formic acid products are also effective for controlling tracheal mites.
Zombie (Phonid) flies
In 2012 this critter became a problem for honey bees in some parts of the United States (as if there were not enough problems already). And it became a bonanza for morbid journalists seeking sensational headlines. Here’s why.
The fly (Apocephalus borealis, to be precise) deposits eggs into the body of an adult bee, where the larva feeds and develops, eventually emerging from the bee body behind the head to pupate, decapitating the bee in the process. Horrors. While infected, the bees begin to act more and more disoriented, flying aimlessly from the hive at night (bees never fly at night), stumbling and crawling about the ground, and eventually dying. The term zombees was the resulting headline. Given the public’s craze for all things zombie related, it’s no wonder the media has had a field day with this story.
So while it’s not yet as much of a threat as the other parasitic problems listed in this chapter, it’s worth a mention. The best defense is maintaining a strong and robust colony.
Other Unwelcome Pests
As if the mites and flies already mentioned weren’t enough, there are other types of pests that can make life miserable for you and your bees.
Wax moths
Wax moths can do large-scale damage in a weak hive (see the color-photo section of this book). They destroy the wax comb, which ruins the colony’s ability to raise brood and store food. But they don’t usually become a problem in a strong and healthy hive because bees continually patrol the hive and remove any wax moth larvae they find. Therefore, if you see wax moths, you probably have a weak colony. Keeping your bees healthy and reducing hive boxes and frames to correspond to colony size are the best defenses against wax moths. Once an infestation overtakes a weak colony of bees, there is nothing you can do to get rid of it. It’s too late.
The story is different when comb is stored for the winter. With no bees to protect these combs, the wax is highly susceptible to invasion by wax moths. But in this case, steps can be taken to keep the moths from destroying the combs over the winter. The use of PDB crystals (para dichlorobenzene, or Para Moth, as shown in Figure 13-7) on stored supers and hive bodies can kill the moths and larvae that would otherwise destroy the wax.

Courtesy of Mann Lake Ltd.
FIGURE 13-7: Para-Moth is approved for use in the control of wax moths. It contains para dichlorobenzene.
This product is not for use on supers that have contained or will contain honey for human consumption. Follow product instructions carefully.
Here’s a chemical-free approach that I urge you to use. You can destroy wax moth larvae by placing the frames in the deep-freezer for 24 hours. If you don’t have a big freezer, you can freeze two or three frames at a time. After they’ve had the freeze treatment, put the frames back in the supers and store them in tightly sealed plastic garbage bags. The colder the storage area, the better.
Small hive beetle
More bad news for bees came in 1998 when the small hive beetle was discovered in Florida. Most common beetles that wander in and out of a hive are not a problem, so don’t panic if you see some bugs. But the small hive beetle, originally from Africa, is an exception. The larvae of this beetle eat wax, pollen, honey, bee brood, and eggs. In other words, they gobble up nearly everything in sight. The beetles also — yuck! — defecate in the bees’ honey, causing it to ferment and ooze out of the comb (see the image in the color-photo section). Things can get so slimy and nasty that the entire colony may pack up and leave. Who can blame them?
Determining whether you have a small hive beetle problem
Be on the lookout for little black or dark brown beetles (see Figure 13-8) scurrying across combs or along the inner cover and large numbers of adult beetles on the bottom board. You may even notice their creamy larvae on the combs and bottom board. If you see some suspects, don’t panic; get them identified. There are many lookalikes.

Courtesy of Alex Wild
FIGURE 13-8: The small hive beetle has become a significant problem for beekeepers in some states (mostly in the Southeast).
How to control the small hive beetle
First of all, keeping your colonies strong and healthy is your best natural defense. In addition, you need to destroy any small beetles you see during routine inspections. If infestation levels appear heavy, medicating your hive may be necessary. Presently, two approved treatments for the small hive beetle are sold under the brand names of CheckMite+ to kill the adult beetles inside the hive and GardStar for soil application in the apiary to halt their reproduction.
If you suspect that you have the small hive beetle, contact your state apiary inspector (if you have one) or consult with members of your regional bee club. It’s important that you do your part to keep this new pest at bay. The inspector or fellow club members will let you know what kinds of treatments are effective in your area. They might even help you with the treatment!
Ants, ants, and more ants
Ants can be a nuisance to bees. A few ants here and there are normal. A healthy colony keeps the ant population under control. But every now and then things can get out of hand, particularly when the colony is too young or too weak to control the ant population. Sometimes there are more ants than the colony can handle. When ants overrun a colony, the bees may abscond (leave the hive). But you can take steps to control the ant population before it becomes a crisis. Two natural approaches you can use if you notice more than a few dozen ants in the hive are the following:
- Send cinnamon to the rescue: Purchase a large container of ground cinnamon from a restaurant supply company. Sprinkle the cinnamon liberally on the ground around the hive. Sprinkle some on the inner cover. Your hive will smell like a giant breakfast doughnut. Yummy! The bees don’t mind, but the ants don’t like it and stay away. Remember to reapply the spice after the rain washes it away.
- Create a moat of oil: This technique is a useful defense against ants. You’ll need a hive stand with legs. (This is a good idea even if you don’t have an ant problem, because raising the hive off the ground is a back-saver for you!) Place each of the stand’s four legs in a tin can — old tuna cans or coffee cans are fine. Fill the cans with oil (such as canola, vegetable, mineral, and so on). You can use water, but it will evaporate quickly whereas the oil will not. The ants won’t be able to cross the “moat” and thus are unable to crawl up into the hive (see Figure 13-9).

Courtesy of Howland Blackiston
FIGURE 13-9: Placing the legs of your elevated hive stand in cans of oil prevents ants from marching into your hive.
Bear alert!
Do bears like honey? Indeed they do! And they simply crave the sweet honey-bee brood. (I’ve never tried it myself, but I suspect it’s sweet.) If bears are active in your area (they’re in many states within the continental United States), taking steps to protect your hive from these lumbering marauders is a necessity. If they catch a whiff of your hive, they can do spectacular and heartbreaking damage, smashing apart the hive and scattering frames and supers far and wide (see Figure 13-10). What a tragedy to lose your bees in such a violent way. Worse yet, you can be certain that once they’ve discovered your bees, they’ll be back, hoping for a second helping.
The only effective defense against these huge beasts is installing an electric fence around your apiary. Anything short of this just won’t do the trick.
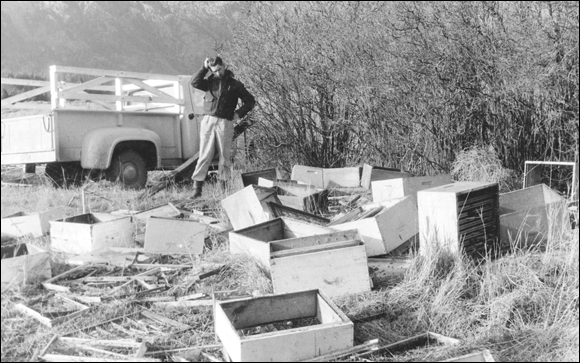
Courtesy of Bee Culture Magazine
FIGURE 13-10: These beehives were shattered to smithereens by a hungry bear.
If you’re ever unlucky enough to lose your bees to bears, be sure to contact your state or local conservation department. You may qualify for remuneration for the loss of your bees. And the department may provide financial assistance for the installation of an electric fence. It may even offer a service for trapping and relocating the offender. However, with decreasing state budgets, these perks may be increasingly difficult to come by.
Raccoons and skunks
Raccoons are clever animals. They easily figure out how to remove the hive’s top to get at the tasty treats inside. Placing a heavy rock on the hive’s outer cover is a simple solution to a pesky raccoon problem.
Skunks are insect eaters by nature. When they find insects that have a sweet drop of honey in the center, it’s a bonanza! Skunks and their families visit the hive at night and scratch at the entrance until bees come out to investigate. When they do, they’re snatched up by the skunk and gulp! Skunks can put away quite a few bees during an evening’s banquet. In time, they can decimate your colony. These raids also make your bees decidedly more irritable and difficult to work with. You need to put a quick end to skunk invasions.
Putting your hive on an elevated stand is an effective solution for skunk invasions. The skunk then must stand on his hind legs to reach the hive’s entrance. That exposes his tender underbelly to the bees — and have no doubts, the bees know what to do next!
You may wonder how the bees feel about skunk scent and whether it bothers them. I can’t really give you a good answer to this: My bees have never told me how they feel about the smell, nor do I think I’ve ever known a skunk to spray a hive. But my dog has some stories to tell!
Another solution is hammering a bunch of nails through a plank of plywood (about 2-feet square) and placing it on the ground in front of the hive with the nail points sticking up like a bed of nails. Or you can use carpet tack strips available at home-improvement stores. No more skunks. Just be sure you remember the plank is there when you, your family, or your four-legged pets go stomping around the hive!
Keeping out Mrs. Mouse
When the nighttime weather starts turning colder in early autumn, mice start looking for appropriate winter nesting sites. A toasty warm hive is a desirable option. The mouse may briefly visit the hive on a cool night when bees are in a loose cluster. During these exploratory visits, the mouse marks the hive with urine so she can find it later. When winter draws nearer, the mouse returns to the marked hive and builds her nest for the winter.
I can assure you that you don’t want this to happen. Mice do extensive damage in a hive during the winter. They don’t directly harm the bees, but they destroy comb and foundation and generally make a big mess. They usually leave the hive in early spring, long before the bees break winter cluster and chase them out or sting them to death. Nesting mice isn’t the surprise you want to discover during your early spring inspection. Anticipate mouse problems and take these simple steps to prevent mice from taking up winter residence in your hive:
As part of winterizing your hive, use a long stick or a wire coat hanger to “sweep” the floor of the bottom board, making sure no mouse already has taken up residence.
Shoo them out if they have.
When you’re sure your furry friends are not at home, secure a metal mouse guard along the entrance of the hive (see Figure 13-11).
This metal device enables bees to come and go and provides ample winter ventilation, but the mouse guard’s openings are too small for Mrs. Mouse to slip through.

Courtesy of Howland Blackiston
FIGURE 13-11: Installing a metal mouse guard prevents mice from nesting in your hive during winter.
The early use of mouse guards pays dividends. Mama mouse makes early visits to the hive (when the weather is still mild), looking for a suitable home for the winter. She will “scent” the inside of the hive at night when the bees are inactive and then will return in the cooler weather to take up winter residence. So don’t delay getting those guards on before she makes her rounds.
Using a wooden entrance reducer as a mouse guard doesn’t always work. The mouse nibbles away at the wood and makes the opening just big enough to slip through.
Some birds have a taste for bees
If you think you notice birds swooping at your bees and eating them, you may be right. Some birds have a taste for bees and gobble them up as bees fly in and out of the hive. But don’t be alarmed. The number of bees that you’ll lose to birds probably is modest compared to the hive’s total population. No action need be taken. You’re just witnessing nature’s balancing act.
Pest Control at a Glance
Table 13-1 provides treatment options for the various pests mentioned in this chapter.
TABLE 13-1 Solutions to Common Pest Problems
Pest Problem |
Solution(s) |
Comments |
Varroa mites |
Use drone comb Apistan (fluvalinate) Apivar CheckMite+ Mite Away Quick Strips (formic acid) FormicPro (formic acid) Apiguard (thymol) |
The drone-comb method use a natural solution, but it does kill some developing drones. Alternate your medication treatments to prevent the mites from building a resistance to the pesticide. Apiguard uses natural (nonharsh) ingredients. |
Tracheal mites |
Menthol crystals Sugar-and-grease patties Apiguard (thymol) Mite Away Strips (formic acid) Api-Life VAR Apivar |
All of these options use natural (nonharsh) ingredients. |
Zombie flies |
Maintain strong, healthy hives |
Also called zombees. |
Wax moths |
PDB crystals (para dichlorobenzene) Freezing frames |
Applied only to empty supers and hive bodies. where there is comb that was used to raise brood. Freezing is a natural, nonchemical solution. |
Small hive beetles |
Check-Mite+ (coumaphos) GardStar Hive traps |
Harsh chemical. GardStar is applied to the ground surrounding the hive. The hive traps are natural, nonchemical solutions. |
Ants |
Cinnamon Oil or water moat |
Both the cinnamon and oil-moat methods are natural, nonchemical solutions. |
Bears |
Electric fence around your hives |
Some states may offer financial compensation for an electric bear-fence installation. |
Raccoons and skunks |
Elevated hive stand Bed of nails |
Elevating a hive is also easy on your back! Watch where you step! |
Mice |
Metal mouse guard placed at hive entrance |
Install guards well before the cold weather approaches. |