Chapter 5
Basic Equipment for Beekeepers
IN THIS CHAPTER
 Deciding what equipment and tools to get
Assembling woodenware
Picking up some tricks of the trade
Considering really helpful accessories
Beekeepers use all kinds of fantastic tools, gadgets, and equipment. Quite frankly, part of the fun of beekeeping is putting your hive together and using the paraphernalia that goes with it. The makings for a beehive come in a kit form and are precut to make assembly a breeze. The work is neither difficult nor does it require too much skill. Some suppliers will even assemble the hive for you.
 The more adventuresome among you may want to try making your own hives from scratch. After you get the hang of beekeeping, you can try your hand at making your own hives. Many different mail-order establishments offer beekeeping supplies, and several excellent ones are now on the Internet. Check out a listing of some of the quality suppliers in Appendix A. And be sure to get a copy of my book Building Beehives For Dummies (Wiley) for detailed plans for building your own hives and accessories.
 If you’re planning to place a hive on the roof of an urban building, make sure that all the parts of the hive style you choose will fit through the window/trap door/hatch that allows you access to your roof.
Starting Out with the Langstroth Hive
Many different kinds and sizes of beehives are available. Check Chapter 4 for the stats on several of the most popular hives for the backyard beekeeper. But worldwide, the most common is the eight- or ten-frame Langstroth hive. This so-called moveable-frame hive was the 1851 invention of Rev. Lorenzo L. Langstroth of Pennsylvania. Its design hasn’t changed much in the last 150 years, which is a testament to its practicality. Therefore, this is the style of hive that most of this book recommends. However, because of the increasing popularity of the Kenyan Top Bar hive, this edition includes supplemental information regarding it as well.
Here are some of the benefits of the Langstroth hive:
- Langstroth hive parts are completely interchangeable and readily available from any beekeeping supply vendor.
- All interior parts of the hive are spaced exactly 3⁄8 inch (9.525 mm) apart, thus enabling honey bees to build straight and parallel even combs. Because it provides the right “bee space,” the bees don’t “glue” parts together with propolis or attempt to fill too-large spaces with burr comb.
- Langstroth’s design enables beekeepers to freely inspect and manipulate frames of comb. Before this discovery, beekeepers were unable to inspect hives for disease, and the only way to harvest wax and honey was to kill the bees or drive them from the hive.
- The traditional Langstroth hive body holds ten frames, but an eight-frame version is readily available. The advantage is that eight-frame hives are a bit less cumbersome and less heavy than the ten-frame original.
 Decide upfront whether you will use the eight- or ten-frame variety of the Langstroth hive. Standardize on one or the other, because the hive bodies are not interchangeable with each other. Pick the ten-frame version for maximum honey production. Pick the eight-frame version for lighter and easier-to-carry hive bodies and honey supers. More and more hobbyists are settling on the lighter eight-frame option. Those ten-frame supers get super heavy!
Knowing the Basic Woodenware Parts of the Langstroth Hive
Woodenware refers to the various components that collectively make up the beehive. Traditionally these components are made of wood — thus the term — but some manufacturers offer synthetic versions of these same components (plastic, polystyrene, and so on). My personal preference: real wood. The bees accept it far more readily than synthetic versions. And the smell and feel of wood is ever so much more pleasurable to work with.
Be aware that the hive parts you order (see “Ordering Hive Parts” later in this chapter) will arrive in precut pieces. You will need to spend some time assembling them. See “Setting up shop” later in this chapter for a list of tools and hardware that you will need for assembly. Note: Some vendors will preassemble hives for you, usually for a slight extra charge.
This section discusses, bottom to top, the various components of a modern ten-frame Langstroth beehive. As you read this section, refer to Figure 5-1 to see what the various parts look like and where they are located within the structure of the hive.
Hive stand
The entire hive sits on a hive stand. The best ones are made of cypress or cedar — woods that are highly resistant to rot. The stand is an important component of the hive because it elevates the hive off the ground, improving circulation and minimizing dampness. In addition, grass growing in front of the hive’s entrance can slow the bees’ ability to get in and out. The stand helps alleviate that problem by raising the hive above the grass. It also puts your hive at a more convenient height to inspect.
A commercial hive stand consists of three rails and a slanted landing board, upon which the bees land when they return home from foraging trips. Nailing on the landing board just right is the only tricky part of hive stand assembly. Carefully follow the instructions that come with your hive stand. Note: Putting the stand together on a flat surface helps prevent the stand from wobbling.
When placing a beehive on a roof, the surface will often be unsteady. It’s a good idea to bring a few shims (slats of wood) to steady the hive. Also, don’t neglect a hive stand just because there is no grass on the roof. Here’s another hint: Save your back the trouble and place the hive on an elevated hive stand that raises the entire hive setup 12 inches or more off of the roof’s surface. There’s more about elevated hive stands later in this chapter.
Bottom board
The bottom board is the thick bottom floor of the beehive. Like the hive stand, the best bottom boards are made of cypress or cedar wood. This part’s easy and intuitive to put together.

Courtesy of Howland Blackiston
FIGURE 5-1: The basic components of a modern Langstroth hive.
Some beekeepers use what’s called a screened bottom board in place of the standard bottom board. This improves ventilation in warm weather and is helpful when monitoring the colony’s population of varroa mites (see Chapter 13 for more information on varroa mites). When the weather turns cold, the screened board should be removed and replaced with a conventional bottom board.
Entrance reducer
When you order a bottom board, it should come with a notched wooden cleat. One way or the other, be sure to get an entrance reducer. Commercial versions come with notched wooden cleat. The cleat serves as your entrance reducer (see Figure 5-2), which limits bee access to the hive and controls ventilation and temperature during cooler months. The entrance reducer isn’t nailed into place, but rather is a friction-fit at the hive’s entrance. The small notch reduces the entrance of the hive to the width of a finger. The larger notch (if available on the model you purchase) opens the entrance to about four finger widths. And removing the entrance reducer completely opens the entrance fully.

Courtesy of Howland Blackiston
FIGURE 5-2: This entrance reducer is being installed with its smallest opening providing limited access (for newly established hives and/or cold weather conditions).
Beekeepers use the entrance reducer only for newly established hives or during cold weather (see Chapter 6 for when and how to use an entrance reducer). This is the reason the entrance reducer isn’t shown in Figure 5-1. For established hives in warm weather, the entrance reducer isn’t used at all. The only exception may be when you’re dealing with a robbing situation — see Chapter 10.
If you can’t find your entrance reducer, use a handful of grass to reduce the hive opening. Or fashion something out of a scrap of wood.
Deep-hive body
The deep-hive body typically contains eight or ten frames of honeycomb (depending on the type/size of Langstroth hive you are using). The best quality frames have crisply cut dovetail joints for added strength. You’ll need two deep-hive bodies to stack one on top of the other, like a two-story condo. The bees use the lower deep as the nursery, or brood chamber, to raise thousands of baby bees. The bees use the upper deep as the pantry or food chamber, where they store most of the honey and pollen for their use.
If you live in an area where cold winters just don’t happen, you don’t need more than one deep-hive body for your colony.
The hive body assembles easily. It consists of four precut planks of wood that come together to form a simple box. Simply match up the four planks and hammer a single nail in the center of each of the four joints to keep the box square. Use a carpenter’s square to even things up before hammering in the remaining nails.
Place the hive body on the bottom board. If it rocks or wobbles a little, use some coarse sandpaper or a plane to remove any high spots. The hive body and bottom board need to fit solidly on the hive stand.
Use a little waterproof wood glue on the joints of all your woodenware before nailing them together. That gives you a super-strong bond.
Queen excluder
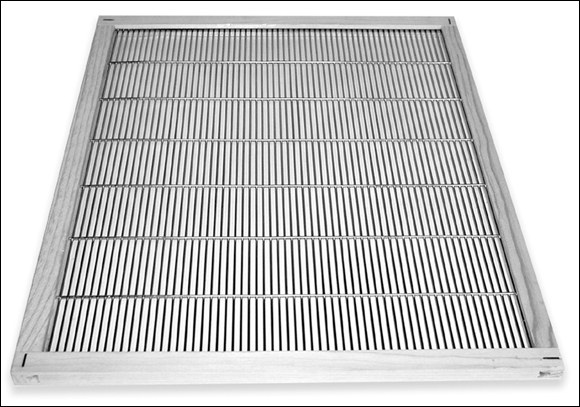
No matter what style of honey harvest you choose, a queen excluder is a basic piece of equipment that many backyard beekeepers use. It’s placed between the deep food chamber and the shallow (or medium) honey supers, that will added at the tops of the hive for bees to store their surplus honey. The queen excluder comes already assembled and consists of a wooden frame holding a grid of metal wire or a perforated sheet of plastic (see Figure 5-3). Plastic/metal varieties lack the wooden border. As the name implies, this gizmo prevents or excludes the queen from entering the honey super to lay her eggs. Why is the important? When a queen lays eggs in the super it encourages bees to bring pollen into the super, potentially spoiling the clarity of the honey you plan to harvest. The spacing of the grid is such that smaller worker bees can pass through to the honey supers and fill them only with honey.
Courtesy of Howland Blackiston
FIGURE 5-3: A queen excluder.
 You use a queen excluder only when you place honey supers on the hive and the bees are bringing in nectar and converting it into honey. It is a thus a piece of woodenware that is unique to honey production. When you are not collecting honey, it should not be used. It should also never be used during the overwintering period because it can exclude the winter bee cluster from accessing critical honey stores.
Many experienced beekeepers (myself included) will not use a queen excluder because doing so can slow down the bees’ progress in producing honey. Some say it may even contribute to swarming (see Chapter 10 for more on swarming). However, it takes a season or two of experience to judge when it’s okay to bypass using a queen excluder (you can choose not to use the excluder if you are certain that there is a very strong nectar flow and the bees are rapidly filling many cells with nectar). My recommendation: Play it safe during your first two seasons and use the queen excluder. After that you can try not using it when you put the honey supers on, timed to coincide with a major nectar flow. By that time you’ll know what to look for.
Shallow or medium honey super
Beekeepers use honey supers to collect surplus honey. That’s your honey — the honey that you can harvest from your bees. You need to leave the honey in the deep-hive body for the bees. Supers are identical in design to the deep-hive bodies — and assemble in a similar manner — but the depth of the supers is shallower.
They come in two popular sizes: shallow and medium. The shallow supers are 5 by 5 inches deep, and the medium supers are 6
 inches deep.
Honey supers are put on the hive about eight weeks after you first install your bees. For the second-year beekeeper, honey supers are placed on the hive when several different spring flowers start to bloom.
The reduced depth of the supers makes them easy to handle during the honey harvest. A shallow super with ten frames full of honey will weigh a hefty (but manageable) 35 to 40 pounds. A medium super with ten frames full of honey weighs about 50 to 55 pounds; however, a deep-hive body full of honey weighs a backbreaking 80 pounds or more. That’s more weight than you’d want to deal with!
You can use medium-size equipment for your entire hive. Three medium-depth hive bodies are equivalent to two deep-hive bodies. Standardizing on one size means that all of your frames and boxes are 100 percent interchangeable. The lighter weight of each medium-hive body makes lifting much, much easier. In addition, the eight-frame version of the Langstroth hive (versus the ten-frame) is considerably more manageable because of the lighter weight.
As the bees collect more honey, you can add more honey supers to the hive, stacking them one on top of another like so many stories to a skyscraper. For your first season, order one or two honey supers (either shallow or medium).
Frames
Frames are “action-central” in the beehive. Bees build their beeswax comb within frames. Frames are made of wood or plastic, with wooden frames being the most widely available variety, so here I will focus on the wooden type. A wooden- frame holds a single sheet of beeswax foundation (described in the next section). The frame is kind of like a picture frame. It firmly holds the wax comb that the bees build from the foundation template and enables you to remove these panels of honeycomb for inspection or honey extraction. Beeswax comb is too delicate to handle, but you can manage the frame holding the comb rather easily. Ten deep frames are used in each deep-hive body (unless you have decided on using an eight-frame version of the Langstroth hive). Frames are the trickiest pieces of equipment you’ll have to assemble. Beekeeping suppliers usually sell frames in packages of ten, with hardware included. All-in-one plastic molded frames with foundation require no assembly.
Although plastic frames and foundation are available from some beekeeping suppliers, I don’t like the plastic foundation. I much prefer the all-natural wax foundation, and I feel the bees share my preference. There is no doubt that plastic foundation is far more durable than delicate wax foundation, but a sometimes serious downside with plastic foundation is that the bees are very slow to work plastic foundation into honeycomb. You need a strong nectar flow to entice them. Not so with beeswax foundation. Want to be convinced? Use plastic foundation in one hive and pure beeswax foundation in a second hive. See for yourself which one is the winner.
Wooden frames come in three basic sizes: deep, shallow, and medium — corresponding to deep-hive bodies and shallow or medium honey supers. The method for assembling deep, shallow, or medium frames is identical regardless of its size. Each frame has four basic components: one top bar with a wedge (the wedge holds the foundation in place), one bottom bar assembly (consisting of either two rails or a single bar with a slot running its length), and two sidebars (see Figure 5-4). Frames typically are supplied with the necessary and correct size nails.
Some suppliers offer a frame design that allows you to simply slide a sheet of foundation into a slotted top bar, avoiding all the fuss associated with the more typical, standard frame design.

Courtesy of Howland Blackiston
FIGURE 5-4: The parts of a standard frame design.
Assuming you are using the traditional design that is so readily available, assemble your frames by following these directions:
Take the top bar and snap out the wedge strip.
You can use your hive tool to pry the wedge strip from its place. Clean up any filigree (rough edges) by scraping the wood with your hive tool. Save the wedge for use when you’re installing the wax foundation (see the “Foundation” section next).
- Place the top bar on your tabletop work surface with the flat side facing down on the table.
- Take the two side pieces and snap the wider end into the slots at either end of the top bar.
Now snap your bottom bar assembly into the slots at the narrow end of the side pieces.
Depending on the manufacturer, this assembly will either consist of two rails or a single bar with a slot running its length.
Now nail all four pieces together.
Use a total of six nails per frame (two for each end of the top bar and one at each end of the bottom bar). In addition to nailing, I suggest you also glue the parts together using an all-weather wood glue. Doing so adds strength.
Repeat these steps until all your frames are assembled.
Time for a break while the glue dries.
Don’t be tempted to use any shortcuts. Frames undergo all kinds of abuse and stress, so their structural integrity is vital. Use glue for extra strength and don’t skimp on the nails or settle for a bent nail that’s partially driven home. If any nail comes through the wood to the outside, remove and replace it. Exposed nails will tear up gloves or puncture fingers. There’s no cheating when it comes to assembling frames!
If you’re a visual person, check out my video on how to assemble wooden frames at www.dummies.com/go/beekeepingfd5e.
Foundation
Foundation consists of thin, rectangular sheets that are used to urge your bees to draw even and uniform honeycombs. It comes in two forms: plastic and beeswax. Using plastic foundation has some advantages because it’s stronger than wax and resists wax moth infestations. But the bees are slow to accept plastic, and I don’t recommend it for the new beekeeper. Instead, purchase foundation made from pure beeswax. The bees will accept it much more quickly than plastic, and you will have a much more productive and enjoyable first season with your bees. In subsequent seasons you can experiment with plastic — but I’ll bet you come back to the wax!
Beeswax foundation is imprinted with a hexagonal cell pattern on the wax that guides the bees as they draw out uniform, even combs. Some foundation comes with wire embedded into the foundation (my preference). Some you must wire manually after installing the foundation in the frames. That’s a lot of extra work and takes a bit of skill. I suggest using the prewired foundation.
Your bees find the sweet smell of beeswax foundation irresistible and quickly draw out each sheet into thousands of beautiful, uniform cells on each side where they can store their food, raise brood, and collect honey for you! Once they have finished this task, the comb is now referred to as drawn comb.
To see a video of how to install beeswax foundation, go to www.dummies.com/go/beekeepingfd5e. The steps are the same as the ones outlined here.
Like frames, foundation comes in deep, shallow, and medium sizes — deep for the deep-hive bodies, shallow for the shallow supers, and medium for the medium supers. You insert the foundation into the frames the same way for all of them.
Here’s how to insert foundation into your frames:
- With one hand, hold the frame upright on the table. Look closely at a sheet of foundation. If it’s the prewired variety (my recommendation), you will note that vertical wires protrude from one side and are bent at right angles. However, wires at the other side are trimmed flush with the foundation. Drop this flush end into the long groove or slit of the bottom bar assembly and then coax the other end of the foundation into the space provided by your removal of the wedge bar (see Figure 5-5).

Courtesy of Howland Blackiston
FIGURE 5-5: Inserting the prewired foundation sheet into the grooved or slotted bottom assembly.
- Turn the frame and foundation upside down (with the top bar now resting flat on the table). Adjust the foundation laterally so equal space is on the left and right. Remember the wedge strip you removed when assembling the frames? Now’s the time to use it! Return the wedge strip to its place, sandwiching the foundation’s bent wires between the wedge strip and the top bar (see Figure 5-6). Use a brad driver to nail the wedge strip to the top bar (see Figure 5-7). Start with one 18-gauge brad in the center and then one brad at each end of the wedge strip. Add two more brads for good luck (five total).

Courtesy of Howland Blackiston
FIGURE 5-6: Turn the frame upside down to sandwich the foundation’s bent wires between the wedge strip and the top bar.

Courtesy of Howland Blackiston
FIGURE 5-7: With the frame still upside down, use a brad driver to nail the wedge strip back in place.
- Finally, use support pins — they look like little metal clothespins — to hold the foundation securely in place (see Figure 5-8). The pins go through predrilled holes in the side bars and pinch the foundation to hold it in place. Although each side bar typically has three to four predrilled holes, use only two pins on each sidebar (four per frame). The extra holes are for those who want to manually wire their foundation — that’s not me!

Courtesy of Howland Blackiston
FIGURE 5-8: Insert support pins in predrilled holes of the side bars to hold the wax foundation in place.
Finally, turn the frame as it will hang vertically in the hive box and shake it. If the foundation stays in place, you’ve got it right! You’ve completed building one frame. Now repeat — you have a bunch more to go!
Inner cover
The inner cover provides the correct “bee space” at the top of the hive while providing helpful ventilation. Wooden inner covers of good quality are made entirely of cypress or cedar wood. Budget models made from pressboard or Masonite also are available, but they don’t seem to last as long. Alternatively, there are durable plastic ones available that will never rot. See Figure 5-9. The basic design consists of a framed flat plank with a precut hole in the center of the plank. The inner cover resembles a shallow tray (with a hole in the center). In some models, a notch is cut out of one of the lengths of frame. This is a ventilation notch. I prefer this design for the extra ventilation it provides. The inner cover is placed on the hive with the “tray” side facing up. See Figure 5-10. If your model has a half-moon ventilation notch (as seen in the figure) place the notch toward the front of the hive.

Courtesy of Howland Blackiston
FIGURE 5-9: A wooden and a plastic inner cover.
Outer cover
Look for cypress or cedar wood when buying an outer cover. These woods resist rot and last the longest. Outer covers assemble in a manner similar to the inner cover: a frame containing flat planks of wood. But the outer cover typically has a galvanized steel tray that fits on the top, protecting it from the elements. Alternatively, there are some plastic models on the market that will never rot. Not quite as pretty as wood, but perhaps more practical.

Courtesy of Howland Blackiston
FIGURE 5-10: The correct placement of an inner cover. Note tray side faces up.
Urban hives are often on rooftops with much higher winds to contend with. For the safety and comfort of your bees and those on the sidewalks below, use strong crank straps (ratchet tie-down straps) to secure all the hive parts together. One sudden gust of wind can send an outer cover flying off the rooftop and onto the street.
Knowing the Basic Parts of a Top Bar Hive
A Top Bar hive is basically a long box with sides that slope at approximately a 30-degree angle. Viewed from the end, the box appears as a trapezoid, wide at the top and narrow on the bottom (see Figure 5-11). This is where a Top Bar hive departs from the dimensional standards of a Langstroth box.

Courtesy of William Hesbach
FIGURE 5-11: The basic Top Bar hive box. Note the end is trapezoidal.
Top Bar hives are not standard and different manufacturers make different sizes. The lengths of Top Bar hives vary but are generally between 36 and 48 inches long. The depth of the box can also vary, but most Top Bar hives measure about 10 inches in depth. The Top Bar hive lends itself to home construction and with that comes your personal choice of size. See my book Building Beehives For Dummies (Wiley) for plans so that you can build your own.
It’s best to choose one size and stick with it for all your Top Bar hives. Just like when making the choice between eight- and ten-frame Langstroth equipment, you don’t want to be stuck with bars and comb that are not interchangeable between your Top Bar hive colonies.
The top bar
As name implies, the key component of a top bar hive is the top bar. The top bar is a simple piece of 3/4-inch wood that spans the width of the hive, resting on the hive sides and is roughly 1⅜ inches wide. The lower surface of the top bar is used by the bees to attach their comb. The top bar is usually equipped with a center guide down the length of the bar that helps keep the comb straight as the bees build it. The center guides come in different designs based on the manufacturer, or you can choose your own style if you build your own top bars. The guides can be as simple as a piece of protruding wood (using popsicle sticks work well), or the bar may have a groove that runs the length of the bar. A strip of foundation can be securely waxed into the groove. See Figure 5-12.

Courtesy of William Hesbach
FIGURE 5-12: The different types of center guides that help the bees get started building comb on the top bars.
The guide on the top bar is the only part that supports the comb (which can get heavy when filled with honey). In time, the bees will use propolis to reinforce the base of the comb, which adds good stability. Pick a bar style that will allow the most surface area for the bees to attach the comb.
Everything else
Top Bar hives also use outer covers, entrance reducers, and hive stands, all designed for this type of hive; their functions are similar to the same items for a Langstroth hive. Find out more about these components in the earlier “Knowing the Basic Woodenware Parts of the Langstroth Hive” section.
Ordering Hive Parts
Hive manufacturers traditionally make their woodenware out of pine, cypress, or cedar. Hardwoods are fine, but too expensive (and too heavy) for most hobbyists. Many suppliers offer various grades of components from a commercial budget-grade to a select best quality-grade. Go for the highest quality that your budget allows. Although the bees don’t care, some woodenware may be a little more expensive up front, but the higher quality parts assemble with greater ease and are more likely to outlast the budget versions.
Any of this stuff is available from beekeeping supply stores. Most of these vendors are now on the web. For a listing of some of my favorites, see Appendix A. And be sure to take advantage of the special discount coupons that are included at the end of this book.
Don’t wait until the last minute to order and assemble your first startup kit. In the United States, springtime is the beginning of the beekeeping season. If you wait until spring to order your kit, you will likely have to wait to get it (the suppliers become swamped with orders at that time). Ideally it’s best to get all the stuff you need and assemble your hives and frames a few months before you plan to install bees in your hive. (Items to put on your holiday wish list perhaps?)
Startup hive kits
Many suppliers offer a basic startup kit that takes the guesswork out of what you need to get. These kits often are priced to save a few bucks. Make certain your kit contains these basic items, discussed in this section:
- Woodenware for the hive body/bodies
- Honey super(s) if you are using a Langstroth hive
- Frames and foundation if you are using a Langstroth hive, or top bars if you are using a Top Bar hive
- Hardware to assemble stuff (various size nails and so on)
- Veil and gloves
- Smoker
- Hive tool
- Feeder (appropriate style for either Langstroth or Top Bar hive)
Setting up shop
Before your bees arrive, you need to order and assemble the components that will become their new home. You don’t need much space for putting the equipment together. A corner of the garage, basement, or even the kitchen will do just fine. A worktable is mighty handy, unless you like crawling around on the floor.
Get all your hive parts (woodenware) together and the instruction sheets that come with them. The only tool you must have is a hammer. But having the following also is mighty useful:
- A pair of pliers to remove nails that bend when you try (unsuccessfully) to hammer them.
- A brad driver with some ¾-inch, 18-gauge brads. Having this tool makes the installation of wax foundation go much faster.
- A bottle of good-quality, all-weather wood glue. Gluing and then nailing woodenware greatly improves its strength and longevity.
- A carpenter’s square to ensure parts won’t wobble when assembled.
- Some coarse sandpaper or a plane to tidy up any uneven spots.
- A hive tool (I hope one came with your startup kit). It’s pretty handy for pulling nails and prying off the frame’s wedge strip.
Start assembling your equipment from the ground up. That means starting with the hive stand and moving on to all points north of that. That way you can begin to build the hive and ensure everything sits level and snug.
If you are using a Langstroth hive, the various stacked components of the hive (bottom board, hive boxes, cover) are not nailed together. They simply are placed one on top of the other (like a stack of pancakes). This enables you to open up and manipulate the hive and lift off boxes during inspections.
Adding on Feeders
Feeders are used to supply sugar syrup to your bees when the nectar flow is minimal or nonexistent. They also provide a convenient way to administer nutritional food supplements for your bees. See Chapter 12 for more information on keeping your bees healthy.
New colonies need to be fed after installation. For established colonies, it’s good management practice to feed your bees in the early spring and once again in autumn (see Chapter 9). Each of the many different kinds of feeders has its pluses and minuses. I’ve included a brief description of the more popular varieties.
 Feeding your colony can make a difference in its general well-being. In the spring, feeding sugar syrup stimulates the queen to lay more eggs, pushing colony expansion. Feeding in the fall encourages bees to store food and helps a colony remain strong and survive the winter season. By adding one of the many all-natural food supplements now available, you can help ensure the optimum nutrition for your bees, and keep them as strong and healthy as possible.
Hive-top feeder
The hive-top feeder (sometimes called a Miller feeder after its inventor, C. C. Miller) is the model I urge you to use for your Langstroth hive (see Figure 5-13). There are various models and variations on the original design, but the principle is similar from one to the next. As a new beekeeper, you will love how easy and safe it is to use. The hive-top feeder sits directly on top of the upper deep brood box and under the outer cover (no inner cover is used when a hive-top feeder is in place). It has a reservoir that can hold one to three gallons of syrup. Bees enter the feeder from below by means of a screened access.

Courtesy of www.kelleybees.com
FIGURE 5-13: A hive-top feeder.
The hive-top feeder has several distinct advantages over other types of feeders:
- Its large capacity means you don’t have to fill the feeder more than once every week or two.
- The screened bee access means you can fill the feeder without risk of being stung (the bees are on the opposite side of the screen).
- Because you don’t have to completely open the hive to refill it, you don’t disturb the colony (every time you smoke and open a hive, you might set the bees’ progress back a a day or two).
- Because the syrup is not exposed to the sun, if you choose to medicate your bees, there is no light to diminish its effectiveness.
But with all of these good features, there are some negatives:
- Sometimes in the frenzy of feeding, bees will lose their grip on the screen, and some will drown in the syrup.
- The hive needs to be level or nearly level for this feeder to be effective.
- When it is full, the feeder is awkward and heavy to remove for routine inspections.
The urban beekeeper is best off using a feeder that contains the most syrup because access to the hives is usually more difficult and therefore less frequent. Don’t let your bees be without feed because their caretaker cannot scale the fire escape for a few days. Give them a feeder that allows for ample supplies of syrup and your rewards will be their loyalty and, ultimately, healthier and better honey producers. A large-volume hive-top feeder is a good choice for urban beekeepers.
Entrance feeder
The entrance feeder (sometimes called a Boardman feeder) is a popular device suggested in many traditional beekeeping books for Langstroth hives. It consists of a small inverted jar of syrup that sits in a contraption at the entrance to the hive (see Figure 5-14). Entrance feeders are inexpensive and simple to use, and they come with many hive kits for that reason. But I don’t recommend that you use an entrance feeder.

Courtesy of Howland Blackiston
FIGURE 5-14: An entrance feeder.
They have few advantages (other than being cheap) and have many worrisome disadvantages:
- The feeder’s proximity to the entrance can encourage bees from other hives to rob syrup and honey from your hive.
- You’re unable to medicate the syrup because it sits directly in the sun.
- The feeder’s exposure to the hot sun tends to spoil the syrup quickly.
- Refilling the small jar frequently is necessary (often daily).
- Using an entrance feeder in the spring isn’t effective. The entrance feeder is at the bottom of the hive, but in the spring the bees cluster at the top of the hive.
- Being at the entrance, you risk being stung by guard bees when you refill the feeder.
Pail feeder
The pail feeder consists of a one-gallon plastic pail with a friction top closure. Several tiny holes are drilled in its top. The pail is filled with syrup, and the friction top is snapped into place. The pail then is inverted and placed over the center hole in the inner cover of a Langstroth hive (Figure 5-15). These work on the same principle as a water cooler where the liquid is held in by a vacuum. The syrup remains in the pail yet is available to the bees that feed by sticking their tongue through the small holes.

Courtesy of Howland Blackiston
FIGURE 5-15: Here’s a pail feeder placed over the oval hole of the inner cover. By covering the feeder with an empty deep-hive body and the hive cover/roof, you can keep raccoons out of the feeder.
Although inexpensive and relatively easy to use, it also has a few disadvantages:
- This feeder is placed within an empty deep-hive body, with the outer cover on top.
- You essentially must open the hive to refill the feeder, leaving you vulnerable to stings (see the following Tip to avoid this problem).
- Refilling this feeder typically requires smoking your bees and disrupting the colony.
- Its one-gallon capacity requires refilling once or twice a week.
- Limited access to syrup means that only a few bees at a time can feed.
Cover the hole on the inner cover with a small piece of #8 wire hardware cloth; it will keep the bees from flying out at you when you remove the bucket for refilling. The hardware cloth should be affixed to the top side of the inner cover.
Baggie feeder
Here’s yet another cost-effective solution (see Figure 5-16). Pour 3 quarts of prepared syrup into a one-gallon-size sealable plastic baggie. Zip it up. Lay the baggie of syrup flat and directly on the top bars. Note the air bubble that forms along the top of the bag. Use a razor blade to make a couple of 2-inch slits into the air bubble. Squeeze the bag slightly to allow some of the syrup to come through the slits (this helps the bees “discover” the syrup). Now you need to place an empty super and outer cover on the hive (to cover the feeder). This type of feeder works best on a Langstroth hive.

Courtesy of Howland Blackiston
FIGURE 5-16: A baggie feeder is a cost-effective feeding option.
The advantages of using a baggie feeder are as follows:
- Very cost effective
- Reduces the likelihood of robbing
- Puts the feed directly on top of the bees for easy access
- No drowned bees
There are some disadvantages:
- You have to open the hive and disrupt the bees to put new bags on.
- The old bags are not reusable after you cut them with a razor.
- The bags have to be replaced fairly frequently.
Frame feeder
This plastic feeder (often called a Boardman feeder) is a narrow vessel resembling a standard frame that is placed within the upper Langstroth hive body, replacing one of the frames next to the outside wall (see Figure 5-17). Filled with a pint or two of syrup, bees have direct access to it. But it isn’t very practical for the following reasons:
- Its capacity is small so it must be refilled frequently, sometimes daily.
- You lose the use of one frame while the feeder is in place.
- Opening the hive to refill the feeder is disruptive to the colony and exposes you to stings.
- Bees can drown in the feeder.

Courtesy of Howland Blackiston
FIGURE 5-17: Frame feeders are placed within the hive, replacing a frame of comb.
Top Bar hive feeders
If you decide on a Top Bar hive, it will most likely come with plans to make a feeder or come with one you can just fill and use. Otherwise, Top Bar hive feeders fall into the category of in-hive feeders such as the baggie feeder, which is placed on the bottom of the box, not on the top bars as in the Langstroth hive, or the frame feeder mentioned previously. Other options include jars that fit inside trapezoidal-shaped containers, or simple plastic containers placed inside the hive and filled with syrup. See Figure 5-18.

Courtesy of William Hesbach
FIGURE 5-18: Feeders for Top Bar hives come in different shapes and sizes.
Because there isn’t a booming commercial market for Top Bar hives, most Top Bar feeders wind up being homemade. You can find simple instructions on the Internet.
Fundamental Tools
Two tools — the smoker and the hive tool — are musts for the beekeeper. They’re used every time you visit any kind of hive and are indispensable.
Smoker
The smoker will become your best friend. Smoke changes the bees’ behavior and enables you to safely inspect your hive. Quite simply, the smoker is a fire chamber with bellows designed to produce lots of cool smoke. Figure out how to light it so it stays lit, and never overdo the smoking process. A little smoke goes a long way. (See Chapter 7 for more about how to use your smoker.)
Be sure to go online and watch my videos on how to light and properly use a smoker. Just go to www.dummies.com/go/beekeepingfd5e.
Smokers come in all shapes, sizes, and price ranges, as shown in Figure 5-19. The style that you choose doesn’t really matter. The key to a good smoker is the quality of the bellows. Consider one fabricated from stainless steel to avoid rusting.

Courtesy of Howland Blackiston
FIGURE 5-19: Various smokers.
Hive tool and frame lifter
The versatility of the simple hive tool is impressive. Don’t visit your hives without one! Use it to scrape wax and propolis off woodenware. Use it to loosen hive parts, open the hive, and manipulate frames. In addition, a frame lifter is used by many beekeepers to firmly grip a frame and remove the frame from the hive. Bee suppliers offer a wide range of styles and designs of hive tools to choose from. The ones pictured in Figure 5-20 are among the most commonly used.

Courtesy of Howland Blackiston
FIGURE 5-20: A frame lifter (top) and a hive tool (bottom).
Bee-Proof Clothing
At minimum, new beekeepers should wear a long-sleeved shirt when visiting the hive. Light colors are best — bees don’t like dark colors (black, navy, and so on). Wear long pants and slip-on boots. Tuck your pant legs into the boots. Alternatively, use Velcro or elastic strips (even rubber bands) to secure your pant legs closed. You don’t want a curious bee exploring up your leg! Better yet, order a bee suit (coveralls) or a bee jacket from your beekeeping supplier.
You should also invest in veils and gloves, which are discussed in this section.
Veils
Don’t ever visit your hive without wearing a veil. Although your new colony of bees is likely to be super gentle (especially during the first few weeks of the season), it defies common sense to put yourself at risk. As the colony grows and matures, you will be working with and among upwards of 60,000 bees.
It’s not that the bees are aggressive (they’re not), but they are super curious. They love to explore dark holes (like your ear canal and nostrils). Don’t tempt fate — wear a veil.
Veils come in many different models (see Figure 5-21) and price ranges. Some are simple veils that slip over your head; others are integral to a pullover jacket or even a full coverall. Pick the style that appeals most to you. If your colony tends to be more aggressive, more protection is advised. But remember, the more that you wear, the hotter you’ll be during summer inspections.

Courtesy of Howland Blackiston
FIGURE 5-21: Protective clothing comes in various styles, from minimal to full coverage. This beekeeper uses a veil-and-jacket combination, leather gloves, and high boots to keep them bee-tight.
Urban beekeepers may have more to lose by not wearing a veil. Whereas the suburban beekeeper might suffer a sting and run away from the hostility, the city-dwelling beekeeper risks a much more devastating fate if a bee enters her nose or ear — one loses all sense of space and equilibrium when a bee stings these areas, and if the hives are located on a roof, the sting is the least of the beekeeper’s problems! You certainly don’t want to flee and wind up falling off the roof! Rooftop beekeepers should always use a veil.
Keep an extra veil or two on hand for visitors who want to watch while you inspect your bees.
If a bee ever gets inside your veil, don’t try to remove it while you are near the hive. There are many more bees outside your veil than the one inside. Leave the area before extracting the offending visitor.
Gloves
New beekeepers understandably like the idea of using gloves (see Figure 5-22), but I urge you not to use them for installing your bees or for routine inspections. You don’t really need them at those times, especially with a new colony or early in the season. Gloves only make you clumsier, especially for persons unaccustomed to using them. Importantly for bee care, gloves inhibit your sense of touch, which can result in your inadvertently injuring bees. Stings tell a story. Masking them is counterproductive and only makes bees more defensive when they see you coming.

Courtesy of Howland Blackiston
FIGURE 5-22: Although not needed for routine inspections, it’s a good idea to have a pair of protective gloves — and maybe even an extra pair for visitors.
The only times that you really need to use gloves are
- Late in the season (when your colony is at its strongest)
- During honey harvest season (when your bees are protective of their honey)
- When moving hive bodies (when you have a great deal of heavy work to do in a short period of time)
Other times leave the gloves at home. If you must, you can use heavy gardening gloves, or special beekeeping gloves with long sleeves (available from beekeeping supply vendors).
Really Helpful Accessories
All kinds of gadgets, gizmos, and doodads are available to the beekeeper. Some are more useful than others. I describe a few of my favorites in this section.
Elevated hive stand
I have all my hives on elevated stands. Elevated hive stands are something you’re more likely to build than purchase. I’ve included detailed plans for making an elevated hive stand in Chapter 18. Alternatively, you can fashion an elevated stand from a few cinderblocks (see Figure 5-23). You can also use posts of various sorts (see Figure 5-24), or purchase a commercial-grade stand that’s waterproof and comes with a built-in frame rest (see Figure 5-25). In any case, having the hive off the ground means less bending over during inspections and makes the hive far easier to work with.

Courtesy of Howland Blackiston
FIGURE 5-23: You can elevate your hive on cinderblocks.

Courtesy of Howland Blackiston
FIGURE 5-24: You can use a level stump to get your hive up off the ground.

Courtesy of Beesmart.com
FIGURE 5-25: This commercially available hive stand is completely weatherproof and includes a built-in frame rest.
In the case of Top Bar hives, an elevated stand can be attached directly to the body to position your hive at a comfortable working height (see Figure 5-26) or fabricated to cradle the body of the hive and be more portable. Any stand that elevates the Top Bar hive to about 36 inches (typical countertop height) will work just fine.

Courtesy of William Hesbach
FIGURE 5-26: This hive stand made from cinder blocks elevates a Top Bar hive to a comfortable working height and make inspections and harvesting less physically stressful for you.
To help prevent ants from nesting under your top cover, the legs of the stand can rest in a container of liquid large enough to act as a moat and prevent ants from crawling up the legs. Raising the entrance using an elevated hive stand also is a natural way to deter skunks from snacking on your bees. (See Chapter 13 for more information on heading off ants, skunks, and other honey-bee pests.)
Frame rest
For users of a Langstroth hive, a frame rest is a super-helpful device that I love. This gadget hangs on the side of the hive, providing a convenient and secure place to rest frames during routine inspections (see Figure 5-27). It holds up to three frames, giving you plenty of room in the hive to manipulate other frames without crushing bees.
Bee brush
The long, super-soft and washable bristles of a bee brush enable you to remove bees from frames and clothing without hurting them (see Figure 5-28). Some beekeepers use a goose feather for this purpose. Keep that in mind in the event you have an extra goose around the house.

Courtesy of Howland Blackiston
FIGURE 5-27: A frame rest is a handy device for holding frames during inspections.

Courtesy of Howland Blackiston
FIGURE 5-28: Use a soft and washable bee brush to gently remove bees from frames and clothing.
Slatted rack
You may want to sandwich a slatted rack between the Langstroth hive’s bottom board and lower deep-hive body (see Figure 5-29). It does an excellent job of helping air circulation throughout the hive. Also, no cold drafts reach the front of the hive, which in turn encourages the queen to lay eggs right to the front of the combs. More eggs mean more bees, stronger hives, and more honey for you! I use a slatted rack on all my hives.
Screened bottom board
The screened bottom board replaces the standard bottom board. Its bottom is completely open, with #8 hardware cloth screening replacing the wooden floor. Some commercial units include slots that hold a removable “sticky board” below the screen that you can use to monitor the colony’s varroa mite population. These products have become a standard part of integrated pest management (IPM) and are also available for Top Bar hives (see Figure 5-30).

Courtesy of Howland Blackiston
FIGURE 5-29: Slatted racks help improve ventilation and can improve brood pattern.

Courtesy of William Hesbach
FIGURE 5-30: Screen bottom boards are available for Top Bar hives.
With varroa mites a problem for many beekeepers, screened bottom boards are gaining popularity. (See Chapter 13 for more information on varroa mites.) A moderate percentage of mites naturally fall off the bees each day and land on the bottom board of the hive. Ordinarily they just wait to reattach themselves to the bees. But when you use a screened bottom board in place of a regular bottom board, mites fall to the ground, or they are trapped on a “sticky board” placed under the screening. Either way, they are unable to crawl back up into the hive. When using a sticky board, the beekeeper can actually count the number of mites that have fallen off the bees and thus monitor the mite population.
There is another great advantage of using a screened bottom board — improved ventilation during the warmer months. Poor ventilation is one of the leading causes of stress on the colony. Using a screened bottom board (sans sticky board) provides the ultimate in ventilation.
I am often asked if you use a slatted rack with a screened bottom board. The answer is no. Use one or the other. Either one will improve ventilation, but only the screened bottom board will help you monitor the mite population.
Beekeeper’s toolbox
It seems that whenever I get out in the yard and start an inspection, there’s something I need that I don’t have with me. I’ve pretty much solved that annoying situation by bringing along a toolbox with everything I might possibly need during an inspection. Here’s a list of some of the goodies in my beekeeping toolbox (see Figure 5-31):
- Basic beekeeping tools: A hive tool and frame lifter are absolute necessities to help you get into the hive.
- Matches: You’ll need these to relight your smoker. Keep some strike-anywhere matches in a waterproof container.
- A spray bottle of alcohol: Fill a small plastic spray bottle with plain rubbing alcohol. Use this during inspections to clean any sticky honey or pollen off your hands. Never spray the bees with this!
- Baby powder: Dust your hands with baby powder before inspections. The bees seem to like the smell, and it helps keep your hands clean.
- Disposable latex gloves: Available at any pharmacy, I use these during inspections late in the season when propolis is plentiful. The gloves don’t impede my dexterity, and they keep my hands clean when working among the authoritatively sticky propolis. Note: They are not sting-proof.
- Notebook and pencil: You can take notes on your inspections as well as note what tasks you have completed and what may need attention on a subsequent visit. Alternatively, use one of nifty new beekeeping apps.
- Hammer and nails: A hammer and an assortment of frame and hive nails are helpful for any quick onsite repairs that need attention.
- Multipurpose jackknife: You never know when you might need those little pliers, screw drivers, or blades.
- Reading glasses/magnifier and flashlight: Tiny eggs can be hard to see without a little help.
- A long kitchen knife: This is handy for Top Bar hive beekeepers to cut bridge comb that tends to “glue” top bars together.

Courtesy of Howland Blackiston
FIGURE 5-31: This simple toolbox (formerly a fishing tackle box) is a convenient way to tote basic supplies to the bee yard.
When doing inspections on an urban rooftop hive, bring along a heavy sheet, a light blanket, or a large piece of cardboard. The rooftops can get much hotter than the air, and when bees are knocked from frames during inspections, it is better to have them land on a relatively cool blanket than to have them scorch their six little feet on the hot tar. In the heat of the summer, this is the difference between them surviving or not surviving a routine inspection.